Indesit FZ 1031 P.1 IX AUS/G Användarguide
- Kategori
- Mikrovågor
- Typ
- Användarguide

Contents
Installation, 2-3
Positioning
Electrical connection
Data plate
Description of the appliance, 4
Overall view
Control panel
Start-up and use, 5
Control panel lock
DEMO mode
Setting the clock
Setting the timer
Starting the oven
Cooking modes, 6-9
Manual cooking modes
Automatic cooking modes
Programming cooking
Practical cooking advice
Cooking advice table
Precautions and tips, 10
General safety
Disposal
Respecting and conserving the environment
Care and maintenance, 11-12
Switching the appliance off
Cleaning the appliance
Cleaning the oven door
Replacing the light bulb
Automatic cleaning with the FAST CLEAN function
Assistance, 13
Operating Instructions
OVEN
GB
FZ 1031 P.1 AUS/G
FZ 1031 P.1 IX AUS/G
Svenska, 53
SE
English,1 Dansk, 27
DK
GB
Deutsch, 14
DE
Norsk, 40
NO

2
GB
Before operating your new appliance please read
this instruction booklet carefully. It contains important
information concerning the safe operation, installation
and maintenance of the appliance.
Please keep these operating instructions for future
reference. Make sure that the instructions are kept with
the appliance if it is sold, given away or moved.
Positioning
Keep all packaging materials out of the reach of
children. It may present a choking or suffocation
hazard (see Precautions and tips).
The appliance must be installed by a qualified
person in compliance with the instructions provided.
Incorrect installation may cause harm to people and
animals or may damage property.
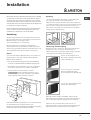
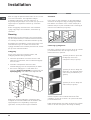
Built-in appliance
Use the appropriate cabinet to ensure that the
appliance functions properly.
The panels adjacent to the oven must be made of
heat-resistant material.
Cabinets with a veneer exterior must be assembled
with glues which can withstand temperatures of up
to 100°C.
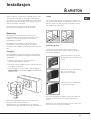
To install the oven under a counter (see diagram)
or in a kitchen unit, the cabinet must have the
following dimensions:
The appliance must not come into contact with
electrical parts once it has been installed.
The indications for consumption given on the data plate
have been calculated for this type of installation.
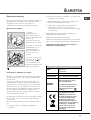
Ventilation
To ensure adequate ventilation is provided, the back
panel of the cabinet must be removed. It is advisable
to install the oven so that it rests on two strips of
wood, or on a completely flat surface with an opening
of at least 45 x 560 mm (see diagrams).
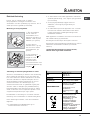
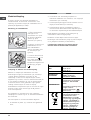
Centring and fixing
Position the 4 tabs on the side of the oven so that they
are lined up with the 4 holes on the outer frame.
Adjust the tabs according to the thickness of the
cabinet side panel, as shown below:
20 mm thick: take off the
removable part of the tab (see
diagram).
18 mm thick: use the first
groove, which has already
been set in the factory (see
diagram).
16 mm thick: use the second
groove (see diagram).
Secure the appliance to the cabinet by opening the
oven door and inserting 4 screws into the 4 holes on
the outer frame.
All parts which ensure the safe operation of the
appliance must not be removable without the aid of a
tool.
560 m
m
.
45 mm.
595 mm.
595 mm.
24 m
m
.
545 mm.
5 mm.
567 mm.
23 mm.
593 mm.
45 m
m
.
558 mm.
5
4
7
m
m
. m
in
.
Installation

GB
3
Electrical connection
Ovens equipped with a three-pole power supply
cable are designed to operate with alternating
current at the voltage and frequency indicated on
the appliance data plate (see below).
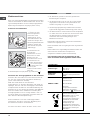
Fitting the po wer supply cable
1. Open the terminal
board by inserting a
screwdriver into the
side tabs of the cover.
Use the screwdriver as
a lever by pushing it
down to open the cover
(see diagram).
2. Loosen the cable
clamp screw and
remove it, using a
screwdriver as a lever
(see figure).
3. Remove the wire
contact screws L-N-
, then fasten the wires
under the screw heads,
respecting the colour
code: Blue (N), Brown
(L) and Yellow-Green
(
).
Connecting the supply cable to the mains
Install a standardised plug corresponding to the
load indicated on the data plate (see table).
The appliance must be directly connected to the
mains using an omnipolar circuit-breaker with a
minimum contact opening of 3 mm installed between
the appliance and the mains. The circuit-breaker
must be suitable for the charge indicated and must
comply with current electrical regulations (the
earthing wire must not be interrupted by the circuit-
breaker). The supply cable must be positioned so
that it does not come into contact with temperatures
higher than 50°C at any point.
The installer must ensure that the correct electrical
connection has been made and that it is fully
compliant with safety regulations.
Before connecting the appliance to the power
supply, make sure that:
The appliance is earthed and the plug is compliant
with the law.
The socket can withstand the maximum power of
the appliance, which is indicated on the data plate
(see below).
The voltage is in the range between the values
indicated on the data plate (see below).
The socket is compatible with the plug of the
appliance. If the socket is incompatible with the
plug, ask an authorised technician to replace it. Do
not use extension cords or multiple sockets.
Once the appliance has been installed, the power
supply cable and the electrical socket must be easily
accessible.
The cable must not be bent or compressed.
The cable must be checked regularly and replaced
by authorised technicians only (see Assistance).
The manufacturer declines any liability should
these safety measures not be observed.
TABLE OF CHARACTERISTICS
Dimensions
width 43.5 cm
height 32 cm
depth 40 cm
Volume 56 l
Electrical
connections
voltage: 220-240V ~ 50/60Hz
maximum power absorbed
2800 W
ENERGY LABEL
Directive 2002/40/EC on the
label of electric ovens.
Regulation EN 50304
Declared energy
consumption for Forced
convection Class
heating mode: Gratin
This appliance conforms to
the following European
Economic Community
directives: 2006/95/EEC
dated 12/12/06 (Low
Voltage) and subsequent
amendments - 89/336/EEC
dated 03/05/89
(Electromagnetic
Compatibility) and
subsequent amendments -
93/68/EEC dated 22/07/93
and subsequent
amendments.
2002/96/EEC

4
GB
Description
of the appliance
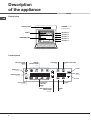
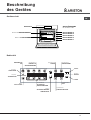
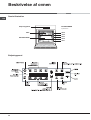
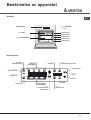
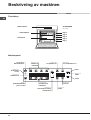
Overall view
Control panel
Control panel
GRILL
DRIPPING PAN
GUIDES for the
sliding racks
position 5
position 4
position 3
position 2
position 1
DURATION
icon
DOOR LOCK
indicator
CLOCK
icon
TIMER
icon
TEMPERATURE
display
CONTROL PANEL
POWER
button
FAST CLEAN
selector
TIME/TEMPERATURE
ADJUSTMENT
buttons
MANUAL
COOKING MODE
icons
COOKING END TIME
icon
AUTOMATIC
COOKING
MODE
icons
TIME
display
START
STOP

GB
5
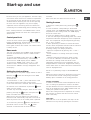
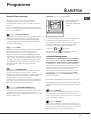
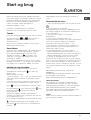
The first time you use your appliance, heat the empty
oven with its door closed at its maximum temperature
for at least half an hour. Ensure that the room is well
ventilated before switching the oven off and opening
the oven door. The appliance may emit a slightly
unpleasant odour caused by protective substances
used during the manufacturing process burning away.
The Control panel lock and DEMO mode can be
activated/deactivated even when the control panel is
switched off.
Control panel lock
To lock the oven controls, press the and
buttons simultaneously. A buzzer will sound and the
TEMPERATURE display shows "Loc".
Press again to unlock the controls. The "STOP" button
is always active.
Demo mode
The oven can operate in the DEMO mode: all heating
elements are deactivated, and the controls remain
operative.
To activate the DEMO mode, press the "+",
, and
"START" buttons simultaneously. A buzzer will
sound and the TIME display shows "DEMO".
To activate the DEMO mode, press the "+" and
"START" buttons simultaneously. A buzzer will
sound and the "DEMO" message disappears from
the display.
Setting the clock and timer
After connection to the power supply network or after a
blackout, the
button and the digits on the TIME
display will flash.
To set the time:
1. Press buttons "+" and "-"; press and hold to scroll
the numbers quicker and make setting easier.
2. Once the exact time is reached, wait 10 seconds for
the selection to be memorized, or press the
button
again to fix the setting.
To make any necessary changes, switch off the control
panel by pressing the
; button, then press the
button and follow the steps indicated.
When the set time has elapsed, the timer emits a
buzzer that will automatically stop after 6 seconds or
when any active icon on the control panel is pressed.
To set the timer, press the
button and follow the
procedure used to set the clock. The
button
switched on indicates that the timer has been
activated.
The timer does not switch the oven on or off.
Starting the oven
1. Switch the control panel on by pressing the
button.
2. Press the button corresponding to the desired
cooking mode. The TEMPERATURE display shows the
temperature of the cooking mode; the TIME display
shows the current time.
3. Press the "START" button to begin cooking.
4. The oven will begin its preheating phase, the current
temperature indicators will light up as the temperature
rises. The temperature may be adjusted by pressing
the "+" and "-" buttons.
5. When preheating is finished, a buzzer will sound
and all current temperature indicators will be turned on:
the food can then be placed in the oven.
6. During cooking it is always possible to:
- adjust the temperature by pressing the "+" and "-"
buttons;
- set the duration of a cooking mode (see Cooking
Modes);
- interrupt cooking by pressing the "STOP" button.
7. In case of a blackout, an automatic system will
reactivate the cooking mode from where it was
interrupted, provided the oven temperature has not
dropped below a certain level. Programmed cooking
modes which have not started will not be restored and
must be reprogrammed.
There is no preheating stage for the BARBECUE
mode.
Never put objects directly on the bottom of the oven;
this will avoid the enamel coating being damaged.
Always place cookware on the rack(s) provided.
Cooling ventilation
In order to cool down the external temperature of the
oven, a cooling fan generates a stream of air which
escapes between the oven control panel and the oven
door. At the beginning of the FAST CLEAN mode, the
cooling fan operates at low speed.
Once the cooking has been completed, the cooling
fan continues to operate until the oven has cooled
down sufficiently.
Oven light
When the oven is not in operation, the lamp can be
switched on at any time by opening the oven door.
Start-up and use

6
GB
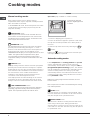
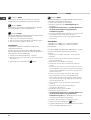
Manual cooking modes
All cooking modes have a default cooking
temperature which may be adjusted manually between
40°C and 250°C as desired.
In the BARBECUE mode, the default power level value
is indicated as a percentage (%) and may also be
adjusted manually.
MULTILEVEL mode
All heating elements and the fan are activated. Since the
heat remains constant throughout the oven, the air cooks
and browns food in a uniform manner. A maximum of two
racks may be used at the same time.
BARBECUE mode
The top heating element and the rotisserie spit (where
present) are activated. By pressing the + and -
buttons on the left hand side of the control panel, the
power levels that may be set will appear on the
TEMPERATURE display; these range between 5% and
100%. The high and direct temperature of the grill is
recommended for food which requires a high surface
temperature. Always cook in this mode with the oven door
closed.
GRATIN mode
The top heating element and the rotisserie spit (where
present) are activated and the fan begins to operate.
During part of the cycle the circular heating element is
also activated. This combination of features increases
the effectiveness of the unidirectional thermal
radiation of the heating elements through forced
circulation of the air throughout the oven.
This helps prevent food from burning on the surface
and allows the heat to penetrate right into the food.
Always cook in this mode with the oven door closed.
LOW TEMPERATURE modes
This type of cooking can be used for proving, defrosting,
preparing yoghurt and heating dishes at the required
speed. The temperature options are: 40, 65, 90 °C.
Spit roast (only available in certain models)
To operate the rotisserie
spit (see diagram) proceed
as follows:
1. Place the dripping pan in position 1.
2. Place the rotisserie support in position 3 and insert
the spit into the hole provided on the back panel of
the oven.
3. Start the spit roast function by selecting the
or
modes.
When the
mode is activated, the rotisserie spit
will stop if the door is opened.
Automatic cooking modes
The temperature and cooking duration are pre-set
values, guaranteeing a perfect result every time -
automatically. These values are set using the C.O.P.
®
(Programmed Optimal Cooking) system. The duration
may be modified by ±5/10 minutes, depending on the
selected cooking mode. The cooking cycle stops
automatically and the oven indicates when the dish is
cooked. You may start cooking whether the oven has
been preheated or not.
When the cooking stage has been reached, the oven
buzzer sounds.
Do not open the oven door to avoid offsetting the cooking
time and temperature.
ROAST mode
Use this function to cook beef, pork and lamb. Place
the meat inside the oven while it is still cold. The dish
may also be placed in a preheated oven.
BAKED CAKES mode
This function is ideal for cooking desserts which are
made using natural yeast, baking powder and
desserts which contain no yeast. Place the dish in the
oven while it is still cold. The dish may also be placed
in a preheated oven.
Cooking modes

GB
7
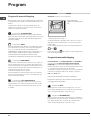
PIZZA mode
Use this function to make pizza. Please see the following
chapter for the recipe and further details.
BREAD mode
Use this function to make bread. Please see the following
chapter for the recipe and further details.
PIZZA mode
To obtain the best results, we recommend that you carefully
observe the instructions below:
Follow the recipe.
The weight of the dough should be between 500 g
and 700 g.
Lightly grease the dripping pan.
Recipe for PIZZA:
1 dripping pan on a low shelf level, hot or cold oven
Recipe for 3 pizzas weighing approximately 550 g: 1000 g
flour, 500 ml water, 20 g salt, 20 g sugar, 100 ml olive oil, 20
g fresh yeast (or 2 sachets of powder yeast)
Leavening at room temperature: 1 hour.
Place inside hot or cold oven.
Start the
PIZZA cooking mode.
BREAD mode
To obtain the best results, we recommend that you carefully
observe the instructions below:
Follow the recipe.
Do not exceed the maximum weight of the
dripping pan.
Remember to pour 100 ml of cold water into the
baking tray in position 5.
The dough must be left to rise at room temperature for
1 1 ½ hours (depending on the room temperature)
or until the dough has doubled in size.
Recipe for BREAD:
1 Dripping pan holding 1000 g Max, lower level
2 Dripping pans each holding 1000 g Max, medium and
lower levels
Recipe for 1000 g of dough: 600 g flour, 360 g water, 11g
salt, 25 g fresh yeast (or 2 sachets of powder yeast)
Method:
Mix flour and salt in a large bowl.
Dilute yeast in lukewarm water (approximately 35
degrees).
Make a small well in the mound of flour.
Pour in water and yeast mixture.
Knead dough by stretching and folding it over itself
with the palm of your hand for 10 minutes until it
has a uniform consistency and is not too sticky.
Ball and cover the dough with plastic wrap and
leave it to leaven at room temperature for 1 1 ½
hours (until it has doubled in size).
Cut the dough into equal sized loaves.
Place them in the dripping pan on oven paper.
Cover the loaves with flour.
Make incisions on the loaves.
Remember to pour 100 ml of cold water into the
baking tray in position 5. For cleaning purposes,
we recommend the use of water and vinegar.
Place the loaves inside the oven while it is still cold.
Start the
BREAD cooking mode.
Once baked, leave the loaves on one of the grill racks
until they have cooled completely.

8
GB
Programming cooking
A cooking mode must be selected before
programming can take place.
Programming the duration
1. Press the
; button; the button and the
numbers on the TIME display will flash.
2. To set the duration, press buttons "+" and "-";
press and hold to scroll the numbers quicker and
make setting easier.
3. Once the desired duration setting is reached, wait
10 seconds for the selection to be memorized, or
press button
again to fix the setting.
4. When the set time has elapsed, END appears on
the TEMPERATURE display and a buzzer sounds.
For example: it is 9:00 a.m. and a time of 1 hour
and 15 minutes is programmed. The programme
will stop automatically at 10:15 a.m.
Programming delayed cooking
1. Press the
button and repeat steps 1 to 3 as
described for the duration setting.
2. Then press the
button and set the end of
cooking time by pressing buttons "+" and "-"; press
and hold to scroll the numbers quicker and make
setting easier.
3. Once the end of cooking time is reached, wait 10
seconds for the selection to be memorized, or press
the
button again to fix the setting.
4. Press the START button to confirm the
programming process.
5. When the selected time has elapsed, END appears
on the TEMPERATURE display and a buzzer sounds.
For example: it is 9:00 a.m. and a time of 1 hour
and 15 minutes is programmed and the end time
is set to 12:30. The programme will start
automatically at 11:15 a.m.
The
and buttons will flash signalling that the
programmed mode has been set. After
programming, in the time before cooking starts, the
TIME display indicates the duration and end of
cooking time alternately.
To cancel a programming procedure press the
"STOP" button.
When selecting a cooking mode, the
button is
activated whereas the
button is not. When setting
the cooking time, the
button is illuminated and
delayed cooking can be programmed.
Practical cooking advice
Do not place racks in position 1 and 5 during fan-
assisted cooking. This is because excessive direct
heat can burn temperature sensitive foods.
In the BARBECUE and GRATIN cooking modes,
particularly when using the rotisserie spit, place the
dripping pan in position 1 to collect cooking
residues (fat and/or grease).
MULTILEVEL
Use positions 2 and 4, placing the food which
requires more heat on 2.
Place the dripping pan on the bottom and the rack
on top.
BARBECUE
Place the grill rack in position 3 or 4 and place
the food in the centre of the rack.
We recommend that the power level is set to
maximum. The top heating element is regulated
by a thermostat and may not always operate
constantly.
PIZZA
Use a light aluminium pizza pan. Place it on the
rack provided.
For a crispy crust, do not use the dripping pan as
it prevents the crust from forming by extending
the total cooking time.
If the pizza has a lot of toppings, we recommend
adding the mozzarella cheese on top of the pizza
halfway through the cooking process.

GB
9
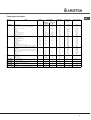
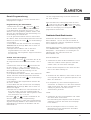
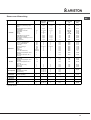
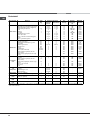
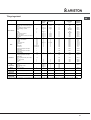
Cooking advice table
Cooking
modes
Foods Weight
(in kg)
Rack position Preheating Recommended
temperature
(°C)
Cooking duration
(minutes)
standa rd
g
uide ra ils
sliding guide
rails
Multilevel* Pizza on 2 racks
Pies on two racks/cakes on 2 racks
Sponge cake on 2 racks (on the dripping pan)
Roast chicken + potatoes
Lamb
Mackerel
Lasagne
Cream puffs on 2 racks
Biscuits on 2 racks
Cheese puffs on 2 racks
Savoury pies
1+1
1
1
1
2 and 4
2 and 4
2 and 4
1 and 2/3
2
1 or 2
2
2 and 4
2 and 4
2 and 4
1 and 3
1 and 3
1 and 3
1 and 3
1 and 3
1
1
1
1 and 3
1 and 3
1 and 3
1 and 3
Yes
Yes
Yes
Yes
Yes
Yes
Yes
Yes
Yes
Yes
Yes
220-230
180
170
200-210
190-200
180
190-200
190
190
210
200
20-25
30-35
20-25
65-75
45-50
30-35
35-40
20-25
10-20
20-25
20-30
Barbecu e* Mackerel
Sole and cuttlefish
Squid and prawn kebabs
Cod fillet
Grilled vegetables
Veal steak
Sausages
Hamburgers
Toasted sandwiches (or toast)
Spit-roast chicken using rotisserie spit (where present)
Spit-roast lamb using rotisserie spit (where present)
1
0.7
0.7
0.7
0.5
0.8
0.7
4 or 5
4 or 6
1
1
4
4
4
4
3 or 4
4
4
4
4
-
-
3
3
3
3
2 or 3
3
3
3
3
-
-
No
No
No
No
No
No
No
No
No
No
No
100%
100%
100%
100%
100%
100%
100%
100%
100%
100%
100%
15-20
10-15
8-10
10-15
15-20
15-20
15-20
10-12
3-5
70-80
70-80
Gratin* Grilled chicken
Cuttlefish
Spit-roast chicken using rotisserie spit (where present)
Spit-roast duck using rotisserie spit (where present)
Roast veal or beef
Roast pork
Lamb
1.5
1
1.5
1.5
1
1
1
2
2
-
-
2
2
2
2
2
-
-
2
2
2
No
No
No
No
No
No
No
210
200
210
210
210
210
210
55-60
30-35
70-80
60-70
60-75
70-80
40-45
Low
temperature
Defrosting
Proving
Dish heating
Pasteurisation
2 or 3
2 or 3
2 or 3
2 or 3
2
2
2
2
No
No
No
No
-
-
-
-
-
60-90
-
-
Automatic
pizza
Pizza (see recipe)
Focaccia (bread dough)
1
1
2
2
2
2
No
No
-
-
23-33
23-33
Automatic
bread
Bread (see recipe) 1 2 2 No - 55
Automatic
baked ca kes
Cakes made using leavened dough 1 2 or 3 2 No - 35-55
Automatic
roa st
Roasts 1 2 or 3 2 No - 60-80
* The cooking times listed above are intended as guidelines only and may be modified according to personal tastes. Oven preheating times are set as standard and may not be
modified manually.

10
GB
Precautions and tips
This appliance has been designed and manufactured in
compliance with international safety standards. The following
warnings are provided for safety reasons and must be read
carefully.
General safety
The appliance was designed for domestic use inside the
home and is not intended for commercial or industrial use.
The appliance must not be installed outdoors, even in
covered areas. It is extremely dangerous to leave the
appliance exposed to rain and storms.
When moving or positioning the appliance, always use the
handles provided on the sides of the oven.
Do not touch the appliance with bare feet or with wet or
damp hands and feet.
The appliance must be used by adults only for the
preparation of food, in accordance with the instructions
provided in this booklet.
Do not touch the heating elements and parts
of the oven door when the appliance is in
use; these parts become
extremely hot. Keep
children well away from the appliance.
Ensure that the power supply cables of other electrical
appliances do not come into contact with the hot parts of
the oven.
The openings used for the ventilation and dispersion of
heat must never be covered.
Always grip the oven door handle in the centre: the ends
may be hot.
Always use oven gloves when placing cookware in the
oven or when removing it.
Do not use aluminium foil to line the bottom of the oven.
Do not place flammable materials in the oven: If the
appliance is switched on accidentally, it could catch fire.
When unplugging the appliance, always pull the plug from the
mains socket; do not pull on the cable.
Never perform any cleaning or maintenance work without
having disconnected the appliance from the electricity
mains.
If the appliance breaks down, under no circumstances
should you attempt to perform the repairs yourself. Repairs
carried out by inexperienced persons may cause injury or
further malfunctioning of the appliance. Contact a Service
Centre (see Assistance).
Do not rest heavy objects on the open oven door.
The appliance should not be operated by people (including
children) with reduced physical, sensory or mental
capacities, by inexperienced individuals or by anyone who
is not familiar with the product. These individuals should, at
the very least, be supervised by someone who assumes
responsibility for their safety or receive preliminary
instructions relating to the operation of the appliance.
Do not let children play with the appliance.
Disposal
When disposing of packaging material: observe local
legislation so that the packaging may be reused.
The European Directive 2002/96/EC relating to Waste
Electrical and Electronic Equipment (WEEE) states that
household appliances should not be disposed of using the
normal solid urban waste cycle. Exhausted appliances
should be collected separately in order to optimise the cost
of re-using and recycling the materials inside the machine,
while preventing potential damage to the atmosphere and
to public health. The crossed-out dustbin is marked on all
products to remind the owner of their obligations regarding
separated waste collection.
For further information relating to the correct disposal of
exhausted household appliances, owners may contact the
public service provided or their local dealer.
Respecting and conserving the
environment
You can help to reduce the peak load of the electricity
supply network companies by using the oven in the hours
between late afternoon and the early hours of the morning.
The cooking mode programming options, the delayed
cooking mode (see Cooking modes) and delayed
automatic cleaning mode (see Care and Maintenance) in
particular, enable the user to organise their time efficiently.
Always keep the oven door closed when using the
BARBECUE and GRATIN modes: This will achieve improved
results while saving energy (approximately 10%).
Check the door seals regularly and wipe them clean to
ensure they are free of debris so that they adhere properly
to the door, thus avoiding heat dispersion.

GB
11
Switching the appliance off
Disconnect your appliance from the electricity supply
before carrying out any work on it.
Cleaning the appliance
The stainless-steel or enamel-coated external parts
and the rubber seals may be cleaned using a
sponge that has been soaked in lukewarm water
and neutral soap. Use specialised products for the
removal of stubborn stains. After cleaning, rinse and
dry thoroughly. Do not use abrasive powders or
corrosive substances.
The inside of the oven should ideally be cleaned
after each use, while it is still lukewarm. Use hot
water and detergent, then rinse well and dry with a
soft cloth. Do not use abrasive products.
All accessories - with the exception of the sliding
racks - can be washed like everyday crockery, and
are even dishwasher safe.
We recommend that detergents are not sprayed
directly onto the control panel, but that a sponge
is used instead.
Never use steam cleaners or pressure cleaners on
the appliance.
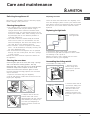
Cleaning the oven door
Clean the glass part of the oven door using a sponge
and a non-abrasive cleaning product, then dry
thoroughly with a soft cloth. Do not use rough abrasive
material or sharp metal scrapers as these could
scratch the surface and cause the glass to crack.
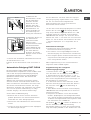
For more thorough cleaning purposes, the oven door
may be removed:
1. Open the oven door fully (see diagram).
2. Lift up and turn the small levers located on the two
hinges (see diagram).
3. Grip the door on the two
external sides and close it
approximately half way. Pull the
door towards you, lifting it out
of its slot (see diagram). To
replace the door, reverse this
sequence.
Glass door
Seal
Lamp
Oven
compartment
Inspecting the seals
Check the door seals around the oven regularly. If the
seals are damaged, please contact your nearest After-
sales Service Centre (see Assistance). We recommend
that the oven is not used until the seals have been
replaced.
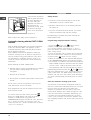
Replacing the light bulb
To replace the
oven light bulb:
1. Remove the glass cover using a screwdriver.
2. Remove the light bulb and replace it with a similar
one: Wattage 15 W, cap E 14.
Replace the glass cover, making sure the seal is
positioned correctly (see diagram).
Assembling the sliding rack kit
To assemble the sliding racks:
1. Remove the two
frames, lifting them
away from the spacers
A (see figure).
2. Choose which shelf to
use with the sliding rack.
Paying attention to the
direction in which the
sliding rack is to be
extracted, position joint
B and then joint C on the
frame.
Care and maintenance
A
B
C
Left
guide rail
Right guide
rail
Direction
of extraction

12
GB
3. Secure the two frames
with the guide rails using
the holes provided on
the oven walls (see
diagram). The holes for
the left frame are
situated at the top, while
the holes for the right
frame are at the bottom.
4. Finally, fit the frames on the spacers A.
Do not place the sliding racks in position 5.
Automatic cleaning with the FAST CLEAN
function
With the FAST CLEAN mode, the internal temperature
of the oven reaches 500°C. The pyrolytic cycle is
activated and burns away food and grime residues.
Dirt is literally incinerated.
Keep children away from the appliance during the
automatic cleaning cycle as surfaces may become
very hot. Particles may ignite inside the oven due to
the spontaneous combustion process. There is no
cause for concern: this process is both normal and
hazard-free.
Before initiating the FAST CLEAN mode:
Remove large or coarse food residues from inside of
the oven using a damp sponge. Do not use
detergents.
Remove all accessories.
Do not place tea towels or pot holders over the oven
handle.
If the oven is too hot, the pyrolytic cycle may not
start. Wait for the oven to cool down.
The programme may only be started once the oven
door has been closed.
To activate the Fast Clean mode, press the
button; the TIME display will show the default
duration of 1h30 (normal cycle) while the
TEMPERATURE display will indicate "nor"; pressing
the "+" button activates the intensive cycle "int",
which lasts 2h; the "-" button activates the economy
cycle "eco", lasting 1h.
Safety devices
The door is locked automatically as soon as the
temperature exceeds a certain value.
Should a malfunction occur, the heating elements
will switch off.
Once the oven door has been locked, you cannot
change the duration and end time settings.
Programming is possible only after selecting the
FAST CLEAN mode.
Programming delayed automatic cleaning
1. Press the
button; the button and the
numbers on the TIME display will flash.
2. To set the duration, press buttons "+" and "-";
press and hold to scroll the numbers quicker and
make setting easier.
3. Once the desired end of cooking time is reached,
wait 10 seconds for the selection to be memorized,
or press button
again to fix the setting.
4. When the selected time has elapsed, END appears
on the TEMPERATURE display and a buzzer sounds.
For example: it is 9:00 a.m. and the Economy (ECO)
FAST CLEAN mode level has been selected: default
set time 1 hour. 12:30 is selected as the end time.
The programme will start automatically at 11:30 a.m.
Programming has been set when the
and buttons
flash. After programming, in the time before the Fast
Clean mode starts, the TIME display indicates the
duration and end of the Fast Clean mode alternately.
To cancel a programming procedure press the STOP
button.
Once the automatic cleaning cycle is over
You will have to wait until the temperature inside the
oven has cooled down sufficiently before you can open
the oven door. You will notice some white dust
deposits on the bottom and the sides of your oven;
remove these deposits with a damp sponge once the
oven has cooled down completely. Alternatively, you
can make use of the already heated oven, in which
case it is not necessary to remove the deposits, they
are completely harmless and will not affect your food in
any way.
D

GB
13
Warning:
The appliance is fitted with an automatic diagnostic system which detects any malfunctions. Malfunctions are
displayed by messages of the following type: ER followed by numbers.
Call for technical assistance if a malfunction occurs.
Before calling for Assistance:
Check whether you can fix the problem yourself.
Restart the programme to check whether the malfunction has disappeared.
If it has not, contact the Authorised Technical Assistance Service.
Never use the services of an unauthorised technician.
Please have the following information to hand:
The message shown on the TEMPERATURE display.
The appliance model (Mod.).
The serial number (S/N).
The latter two pieces of information can be found on the data plate located on the appliance.
Assistance

Inhaltsverzeichnis
Installation, 15-16
Aufstellung
Elektroanschluss
Typenschild
Beschreibung des Gerätes, 17
Geräteansicht
Bedienfeld
Inbetriebsetzung und Gebrauch, 18
Sperre der Schaltelemente
DEMO-Modus
Einstellung der Uhr
Einstellung des Kurzzeitweckers
Inbetriebsetzung des Backofens
Programme, 19-22
Manuelle Garprogramme
Automatik-Garprogramme
Garzeit-Programmierung
Praktische Back-/Brathinweise
Back-/Brattabelle
Vorsichtsmaßregeln und Hinweise, 23
Allgemeine Sicherheit
Entsorgung
Energie sparen und Umwelt schonen
Reinigung und Pflege, 24-26
Abschalten Ihres Gerätes vom Stromnetz
Reinigung Ihres Gerätes
Reinigung der Backofentür
Lampenaustausch
Automatische Reinigung FAST CLEAN
Kundendienst
Bedienungsanleitung
BACKOFEN
DE
Deutsch, 14
DE
FZ 1031 P.1 AUS/G
FZ 1031 P.1 IX AUS/G
Svenska, 53
SE
English,1 Dansk, 27
DK
GB
Norsk, 40
NO

DE
15
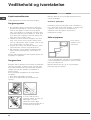
Bewahren Sie diese Bedienungsanleitung bitte sorgfältig
auf, damit Sie sie jederzeit zu Rate ziehen können. Sorgen
Sie dafür, dass sie im Falle eines Verkaufs, eines Umzugs
oder einer Übergabe an einen anderen Benutzer das Gerät
stets begleitet, damit auch der Nachbesitzer die Möglichkeit
hat, darin nachschlagen zu können.
Lesen Sie bitte die nachfolgenden Hinweise aufmerksam
durch. sie liefern wichtige Informationen hinsichtlich der
Installation, des Gebrauchs und der Sicherheit.
Aufstellung
Verpackungsmaterial ist kein Spielzeug für Kinder.
Es ist entsprechend den Vorschriften zur getrennten
Müllsammlung zu entsorgen (siehe
Vorsichtsmaßregeln und Hinweise).
Die Installation ist gemäß den vorliegenden
Anweisungen und von Fachpersonal durchzuführen.
Jede unsachgemäße Installation kann Menschen und
Tiere gefährden oder Sachschaden verursachen.
Einbau
Um eine einwandfreie Betriebsweise des Gerätes zu
gewährleisten, muss der Umbauschrank folgende
Eigenschaften aufweisen:
Die an den Backofen angrenzenden Schrankwände
müssen aus hitzebeständigem Material gefertigt sein.
Bei Möbeln aus Furnierholz muss der verwendete
Leim einer Temperatur von 100°C standhalten.
Für den Einbau des Backofens in einen
Unterschrank (siehe Abbildung) oder in einen
Hochschrank, muss das entsprechende Möbel
über folgende Abmessungen verfügen:
Nach dem Einbau des Gerätes muss eine Berührung
mit den Elektroteilen ausgeschlossen sein.
Die auf dem Typenschild enthaltenen Verbrauchsangaben
wurden bei dieser Art der Installation ermittelt.
Belüftung
Um eine einwandfreie Belüftung zu gewährleisten,
muss die Rückwand des Schrankumbaus
abgenommen werden. Der Backofen sollte möglichst
so installiert werden, dass er auf zwei Holzleisten oder
aber auf einer durchgehenden Fläche aufliegt, die
über einen Ausschnitt von mindestens 45 x 560 mm
verfügt (siehe Abbildungen).
Zentrierung und Befestigung
Bringen Sie die 4 seitlich am Backofen befindlichen
Klampen mit den 4 Löchern des Rahmens in
Übereinstimmung. Achten Sie dabei darauf, dass bei
einer Stärke der Umbauschrankwand von:
20 mm: der bewegliche Teil
der Klampe abgenommen wird
(siehe Abbildung);
18 mm: die erste, werkseitig
bereits angebrachte Rille
genutzt wird (siehe Abbildung);
16 mm: die zweite Rille genutzt
wird (siehe Abbildung).
Befestigung des Gerätes am Möbel: Öffnen Sie die
Backofentür und schrauben Sie die 4 Holzschrauben in
die 4 im Backofenrahmen vorgesehenen Löcher ein.
Alle zum Schutz dienenden Teile müssen so
befestigt werden, dass ein Entfernen derselben ohne
Zuhilfenahme eines Werkzeugs nicht möglich ist.
560 m
m
.
45 m
m
.
595 mm.
595 mm.
24 m
m
.
545 m
m
.
5 mm.
567 mm.
23 mm.
593 mm.
45 mm.
558 mm.
547 m
m
. m
in
.
Installation

16
DE
Elektroanschluss
Die mit einem Dreileiterkabel ausgerüsteten Backöfen
sind für den Betrieb mit Wechselstrom bei der auf dem
Typenschild (befindlich auf dem Gerät) angegebenen
Spannung und Frequenz ausgelegt (siehe unten).
Anschluss des Netzkabels
1. Öffnen Sie das
Klemmengehäuse,
indem Sie unter
Zuhilfenahme eines
Schraubenziehers die
seitlichen Zungen des
Klemmengehäusedeckels
anheben. Ziehen Sie
den Deckel ab (siehe
Abbildung).
2. Schrauben Sie die
Schraube der
Kabelklemme aus und
drücken Sie sie durch
Einwirken auf den
Schraubenzieher heraus.
3. Schrauben Sie die
Schrauben der Kontakte L-
N-
aus und befestigen
Sie die Drähte dann unter
Beachtung der
entsprechenden Farben
unter den
Schraubenköpfen: Blau (N), Braun (L), Gelb/Grün (
).
Anschluss des Versorgungskabels an das Stromnetz
Versehen Sie das Kabel mit einem Normstecker für
die auf dem Typenschild angegebene Belastung
(siehe nebenstehende Tabelle).
Wird das Gerät direkt an das Stromnetz
angeschlossen, ist zwischen Stromnetz und Gerät ein
allpoliger, der Last und den einschlägigen Vorschriften
entsprechender Schalter mit einer Mindestöffnung der
Kontakte von 3 mm zwischenzuschalten. (Der Erdleiter
darf vom Schalter nicht unterbrochen werden.) Das
Versorgungskabel muss so verlegt werden, dass es
an keiner Stelle einer Temperatur ausgesetzt wird, die
50°C über der Raumtemperatur liegt.
Der Installateur ist für den ordnungsgemäßen
elektrischen Anschluss sowie die Einhaltung der
Sicherheitsvorschriften verantwortlich.
Vor dem Anschluss stellen Sie bitte sicher, dass:
die Steckdose geerdet ist und den gesetzlichen
Bestimmungen entspricht;
die Netzsteckdose für die auf dem Typenschild
angegebene maximale Leistungsaufnahme des
Gerätes ausgelegt ist (siehe unten);
die Versorgungsspannung im Bereich der auf dem
Typenschild angegebenen Werte liegt (siehe unten);
die Netzsteckdose mit dem Netzstecker kompatibel
ist. Sollte dies nicht der Fall sein, wechseln Sie bitte
die Netzsteckdose oder den Netzstecker aus;
verwenden Sie keine Verlängerungen und
Mehrfachsteckdosen.
Netzkabel und Steckdose müssen bei installiertem
Gerät leicht zugänglich sein.
Das Netzkabel darf nicht gebogen oder eingeklemmt
werden.
Das Kabel muss regelmäßig kontrolliert werden und
darf nur durch autorisiertes Fachpersonal
ausgetauscht werden (siehe Kundendienst).
Der Hersteller lehnt jede Verantwortung ab, falls
diese Vorsc
hriften nicht eingehalten werden sollten.
TY PENSCHILD
Abmessungen
Breite 43,5 cm
Höhe 32 cm
Tiefe 40 cm
Nutzvolumen
Liter 56
Elektrischer
Anschluss
Spannung 220-240V ~ 50/60Hz
maximale Leistungsaufnahme
2800W
ENERGY LABEL
Richtlinie 2002/40/EG über die
Etikettierung von
Elektrobacköfen.
Norm EN 50304
Deklarierte
Energieverbrauchsklasse
Erzwungene Konvektion -
Heizfunktion: Überbacken.
Dieses Gerät entspricht den
folgenden EG-Richtlinien:
2006/95/EWG vom 12.12.06
(Niederspannung) und
nachfolgenden Änderungen -
89/336/EWG vom 03.05.89
(elektromagnetische
Verträglichkeit) und
nachfolgenden Änderungen -
93/68/EWG vom 22.07.93 und
nachfolgenden Änderungen.
2002/96/EG

DE
17
Beschreibung
des Gerätes
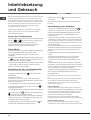
Geräteansicht
Bedienfeld
Bedienfeld
Einschub BACKOFENROST
Einschub FETTPFANNE
GLEITFÜHRUNGEN
für die Einschübe
Einschubhöhe 5
Einschubhöhe 4
Einschubhöhe 3
Einschubhöhe 2
Einschubhöhe 1
Symboltaste
DAUER
Anzeige
TÜRSPERRE
Symboltaste
UHR
Symboltaste
KURZZEITWECKER
Display
TEMPERATUR
BEDIENFELD
ON
Tasten
ZEITREGULIERUNG/
TEMPERATUR
Wahl
FAST CLEAN
Symboltaste
MANUELLE
GARPROGRAMME
Symboltaste
GARZEITENDE
Symboltaste
AUTOMATIK-
GARPROGRAMME
Display
ZEITEN
START
STOPP

18
DE
Bei erstmaliger Inbetriebnahme sollte der leere Backofen für
etwa eine Stunde bei Höchsttemperatur und geschlossener
Backofentür in Betrieb genommen werden. Schalten Sie das
Gerät dann aus, öffnen Sie die Backofentür und lüften Sie die
Küche. Der bei diesem Vorgang entstehende Geruch wird
durch das Verdunsten der zum Schutz des Backofens
aufgetragenen Stoffe verursacht.
Die Funktionen Sperre der Schaltelemente und DEMO-
Modus können auch bei ausgeschaltetem Bedienfeld
aktiviert/deaktiviert werden.
Sperre der Schaltelemente
Zur Sperre der Backofen-Schaltelemente drücken Sie die gleichzeitig
die Tasten
und . Es ertönt ein akustisches Signal und auf
dem Display TEMPERATUR erscheint die Anzeige "Loc".
Durch erneutes Drücken werden die Schaltelemente wieder
freigegeben. Die Taste "STOPP" bleibt immer aktiviert.
Demo-Modus
Der Backofen kann auch im Vorführmodus (DEMO) in Betrieb gesetzt
werden: Während dieser Betriebsweise werden sämtliche
Heizelemente deaktiviert, die Schaltelemente bleiben jedoch
einsatzfähig.
Zur Aktivierung des DEMO-Modus drücken Sie gleichzeitig die Tasten
"+",
, und "START". Es ertönt ein akustisches Signal und auf dem
Display ZEITEN erscheint die Anzeige "dEMO".
Zur Aktivierung des DEMO-Modus drücken Sie gleichzeitig die Tasten
"+" und "START". Es ertönt ein akustisches Signal und auf dem
Display verschwindet die Anzeige "dEMO".
Einstellung von Uhr und Kurzzeitwecker
Nach dem Anschluss an das Stromnetz oder nach
einem Stromausfall blinken die Taste
und die Ziffern auf dem
Display ZEITEN.
Zur Einstellung der Uhrzeit:
1. Die Tasten "+" und "-" drücken; wenn sie gedrückt gehalten
werden, wird der Lauf der eingeblendeten Zeit beschleunigt, um die
Einstellung zu vereinfachen.
2. Ist die richtige Zeit erreicht, dann warten Sie 10 Sek. damit die
Auswahl gespeichert wird oder drücken Sie erneut die Taste
um
die Einstellung zu bestätigen.
Um eventuelle Änderungen anzubringen schalten Sie das Bedienfeld
durch Drücken der Taste
aus. Drücken Sie daraufhin die Taste
und verfahren Sie gemäß obiger Anleitung.
Nach Ablauf der für den Kurzzeitwecker eingestellten Zeit ertönt ein
akustisches Signal, das nach einer Minute oder durch Drücken auf
ein beliebiges aktiviertes Symbol verstummt.
Zur Einstellung des Kurzzeitweckers drücken Sie die Taste
und
befolgen Sie die zur Einstellung der Uhr beschriebene
Vorgehensweise. Die Taste
zeigt an, dass der Kurzzeitwecker
aktiviert wurde.
Der Kurzzeitwecker steuert nicht das Ein- und Ausschalten des
Backofens.
Inbetriebsetzung des Backofens
1. Schalten Sie das Bedienfeld durch Druck auf die Taste ein.
2. Drücken Sie auf die Taste der von Ihnen gewünschten
Garfunktion. Das Display TEMPERATUR zeigt die dem Programm
entsprechende Temperatur an; das Display ZEITEN zeigt die
laufende Uhrzeit an.
3. Drücken Sie die Taste "START", um den Garvorgang einzuleiten.
4. Der Backofen schaltet auf Vorheizen; die Anzeigen der aktuellen
Garraumtemperatur schalten sich nach und nach an, je weiter die
Temperatur steigt. Die Temperatur kann durch Drücken der "+" und "-"
Tasten geändert werden.
5. Ein akustisches Signal und das Aufleuchten sämtlicher Anzeigen
der aktuellen Garraumtemperatur zeigen an, dass die Vorheizphase
abgeschlossen ist. Geben Sie die zu garenden Speisen in den
Backofen.
6. Während des Garvorgangs sind folgende Einstellungen jederzeit
möglich:
- Die Temperatur durch Drücken der "+" und "-" Tasten ändern.
- die Programmierung einer Garzeitdauer (siehe Programme);
- ein Unterbrechen des Garvorgangs durch Betätigen der Taste
"STOPP".
7. Für den Fall eines Stromausfalls ist das Gerät mit einem System
ausgestattet, welches das Programm wieder an dem Punkt aufnimmt,
an dem es unterbrochen wurde (wenn die Temperatur im Backofen
nicht zu stark abgesunken ist). Noch auszuführende,
vorprogrammierte Vorgänge hingegen werden bei Rückkehr der
Stromversorgung nicht wiederhergestellt und müssen neu
programmiert werden.
Das Programm GRILL sieht kein Vorheizen des Backofens
vor.
Stellen Sie niemals Kochgeschirr auf dem Backofenboden
ab, da dadurch das Email beschädigt werden könnte.
Stellen Sie Ihr Kochgeschirr stets auf den mit dem Gerät
gelieferten Backofenrost.
Kühlluftgebläse
Um die Temperaturen an den äußeren Teilen des Backofens
abzusenken, wird mit Hilfe eines Kühlluftgebläses ein Luftstrahl
erzeugt, der zwischen dem Bedienfeld und der Backofentür
austritt. Zu Beginn des Programms FAST CLEAN verfügt das
Gebläse über eine niedrige Geschwindigkeit.
Nach Abschluss eines Garvorgangs bleibt das Gebläse
solange in Betrieb, bis der Backofen ausreichend abgekühlt ist.
Backofenbeleuchtung
Bei ausgeschaltetem Backofen kann das Backofenlicht
jederzeit durch Öffnen der Backofentür eingeschaltet werden.
Inbetriebsetzung
und Gebrauch

DE
19
Manuelle Garprogramme
Für alle Programme ist eine Gartemperatur
voreingestellt. Diese kann von Hand auf einen
beliebigen Wert zwischen 40°C und 250°C verändert
werden.
Bei dem Programm GRILL ist der voreingestellte Wert
eine in % angegebene Leistungsstufe. Auch diese lässt
sich manuell verändern.
Programm ECHTE HEISSLUFT
Alle Heizelemente schalten sich ein und das Gebläse wird in
Betrieb genommen. Da die Hitze im gesamten Backofen
konstant ist, werden die Speisen sehr gleichmäßig gegart
und gebräunt. Es kann auf maximal zwei Einschubhöhen
gleichzeitig gegart werden.
Programm GRILL
Das obere Heizelement schaltet sich ein, und der Bratspieß
(falls vorhanden) wird in Betrieb gesetzt. Durch
Betätigen der Tasten + und - (linke Seite des
Displays) werden auf dem Display TEMPERATUR die
einstellbaren Leistungswerte angezeigt, die von 5% bis
100% reichen. Die sehr hohe Temperatur und die direkt auf
das Grillgut gerichtete Hitze empfiehlt sich für Lebensmittel,
die zur optimalen Garung einer hohen Temperatur auf der
Oberseite bedürfen. Garen Sie bei geschlossener
Backofentür.
Programm ÜBERBACKEN
Das obere Heizelement und für eine gewisse Zeit auch
das runde Heizelement schalten sich ein, und das
Gebläse sowie der Drehspieß (falls vorhanden) werden in
Betrieb gesetzt. Außer der einseitigen Strahlungshitze
zirkuliert Heißluft im Innern des Backofens.
Hierdurch wird ein Verbrennen der Speisenoberflächen
verhindert, und die Hitze dringt tiefer in die Speisen ein.
Garen Sie bei geschlossener Backofentür.
Programme NIEDRIGE TEMPERATUR
Diese Programme eignen sich zum Gären von
Hefeteigen, zum Auftauen von Gefriergut, zur Bereitung
von Yoghurt, zum mehr oder weniger schnellen
Aufwärmen. Folgende Temperaturen können eingestellt
werden: 40, 65, 90°C.
Drehspieß (nur bei einigen Modellen)
Zur Inbetriebnahme des
Drehspießes (siehe
Abbildung) verfahren Sie
wie folgt:
1. Schieben Sie die Fettpfanne auf Einschubhöhe 1 ein;
2. Schieben Sie die Drehspießhalterung auf
Einschubhöhe 3 ein und stecken Sie den Spieß in die
entsprechende Öffnung der Backofenrückwand;
3. Setzen Sie den Drehspieß durch Wahl der
Programme
oder in Betrieb.
Ist das Programm
eingeschaltet, stoppt der
Drehspieß, wenn die Tür geöffnet wird.
Automatik-Garprogramme
Temperatur und Garzeitdauer sind vorbestimmt
und durch das System C.O.P.
®
(Cottura Ottimale
Programmata Programmierte optimale Garzeit)
unveränderlich. Somit wird ein perfektes Ergebnis
garantiert. Nur die Garzeitdauer kann, je nach dem
gewählten Programm, um ±5/10 Minuten geändert
werden. Der Backvorgang wird automatisch
unterbrochen; der Backofen signalisiert, wenn das
Backgut gar ist. Das Backgut kann in den nicht
vorgeheizten oder in den vorgeheizten Backofen
geschoben werden.
Bei Erreichen der Garphase ertönt ein akustisches Signal.
Öffnen Sie die Backofentür nicht. So wird verhindert, dass
die Dauer und die Temperatur des Garvorgangs verfälscht
werden.
Programm BRATEN
Verwenden Sie diese Funktion für Kalbs-, Schweine-
und Lammbraten. Schieben Sie das Gargut in den
kalten Ofen. Es kann jedoch auch in den vorgeheizten
Backofen gegeben werden.
Programm KUCHEN
Diese Funktion ist ideal zum Backen von Kuchen mit
Natur- oder chem. Hefe, oder ohne Hefe. Schieben Sie
das Gargut in den kalten Ofen. Es kann jedoch auch in
den vorgeheizten Backofen gegeben werden.
Programme

20
DE
Programm PIZZA
Benutzen Sie diese Funktion zum Backen von Pizzen.
Befolgen Sie das angeführte Rezept sowie die Details.
Programm BROT
Benutzen Sie diese Funktion zur Brotherstellung. Befolgen
Sie das angeführte Rezept sowie die Details.
Programm PIZZA
Für optimale Ergebnisse befolgen Sie bitte aufmerksam die
nachfolgend aufgeführten Anweisungen:
Halten Sie sich bitte an das Rezept.
Der Teig muss zwischen 500 g und 700 g wiegen.
Fetten Sie das Backblech leicht ein.
PIZZAREZEPT:
1 Backblech, untere Einschubhöhe, bei kaltem oder
vorgeheiztem Backofen
Rezept für 3 Pizzen mit etwa 550 g: 1000 g Mehl, 500 g
Wasser, 20 g Salz, 20 g Zucker, 10 cl Olivenöl, 20 g frische
Hefe (oder zwei Tütchen Instanthefe)
Aufgehen bei Raumtemperatur: 1 Stunde.
Schieben Sie Pizza in den kalten oder vorgeheizten
Backofen ein.
Starten Sie das Garprogramm
PIZZA.
Programm BROT
Für optimale Ergebnisse befolgen Sie bitte aufmerksam die
nachfolgend aufgeführten Anweisungen:
Halten Sie sich bitte an das Rezept.
Berücksichtigen Sie das Maximalgewicht pro
Backblech.
Vergessen Sie bitte nicht, 1 dl kaltes Wasser auf
die auf Einschubhöhe 5 eingeschobene
Fettpfanne zu geben.
Der Teig sollte bei Raumtemperatur eine Stunde bis
eineinhalb Stunden lang gehen (je nach
Zimmertemperatur), bis er seine doppelte Größe
erreicht hat.
BROTREZEPT:
1 Backblech mit 1.000g max., untere Einschubhöhe
2 Backbleche mit 1000 g max., untere und mittlere
Einschubhöhe
Rezept für 1000g Teig: 600 g Mehl, 360g Wasser, 11g Salz,
25 g frische Hefe (oder zwei Tütchen Instanthefe)
Vorgang:
Vermischen Sie Mehl und Salz in einem großen
Behälter.
Lösen Sie die Hefe in leicht lauwarmem Wasser
(circa 35 Grad) auf.
Drücken Sie eine Mulde in das Mehl.
Geben Sie das Gemisch aus Wasser und Hefe
hinein.
Kneten Sie das Ganze, bis ein homogener und nur
leicht klebriger Teig entsteht. Plätten Sie hierfür den
Teig mit dem Handballen und kneten Sie ihn dann
wieder zusammen.
Formen Sie eine Kugel und lassen Sie sie bei
Raumtemperatur eine bis eineinhalb Stunden
gehen (bis der Teig seine doppelte Größe erreicht
hat); decken Sie den Teig während des Vorgangs
mit Frischhaltefolie ab.
Teilen Sie den Teig, so dass Sie mehrere Brote
erhalten.
Geben Sie diese auf ein mit Backpapier
ausgelegtes Backblech.
Bestäuben Sie die Brote mit Mehl.
Schneiden Sie die Brote ein.
Vergessen Sie bitte nicht, 1 dl kaltes Wasser auf
die auf Einschubhöhe 5 eingeschobene
Fettpfanne zu geben. Zur Reinigung raten wir die
Verwendung von Wasser und Essig.
Schieben Sie das Gargut in den kalten Ofen.
Starten Sie das Garprogramm
BROT.
Legen Sie die Brote nach dem Garvorgang auf ein Gitter,
damit sie komplett abkühlen können.
Sidan laddas...
Sidan laddas...
Sidan laddas...
Sidan laddas...
Sidan laddas...
Sidan laddas...
Sidan laddas...
Sidan laddas...
Sidan laddas...
Sidan laddas...
Sidan laddas...
Sidan laddas...
Sidan laddas...
Sidan laddas...
Sidan laddas...
Sidan laddas...
Sidan laddas...
Sidan laddas...
Sidan laddas...
Sidan laddas...
Sidan laddas...
Sidan laddas...
Sidan laddas...
Sidan laddas...
Sidan laddas...
Sidan laddas...
Sidan laddas...
Sidan laddas...
Sidan laddas...
Sidan laddas...
Sidan laddas...
Sidan laddas...
Sidan laddas...
Sidan laddas...
Sidan laddas...
Sidan laddas...
Sidan laddas...
Sidan laddas...
Sidan laddas...
Sidan laddas...
Sidan laddas...
Sidan laddas...
Sidan laddas...
Sidan laddas...
-
 1
1
-
 2
2
-
 3
3
-
 4
4
-
 5
5
-
 6
6
-
 7
7
-
 8
8
-
 9
9
-
 10
10
-
 11
11
-
 12
12
-
 13
13
-
 14
14
-
 15
15
-
 16
16
-
 17
17
-
 18
18
-
 19
19
-
 20
20
-
 21
21
-
 22
22
-
 23
23
-
 24
24
-
 25
25
-
 26
26
-
 27
27
-
 28
28
-
 29
29
-
 30
30
-
 31
31
-
 32
32
-
 33
33
-
 34
34
-
 35
35
-
 36
36
-
 37
37
-
 38
38
-
 39
39
-
 40
40
-
 41
41
-
 42
42
-
 43
43
-
 44
44
-
 45
45
-
 46
46
-
 47
47
-
 48
48
-
 49
49
-
 50
50
-
 51
51
-
 52
52
-
 53
53
-
 54
54
-
 55
55
-
 56
56
-
 57
57
-
 58
58
-
 59
59
-
 60
60
-
 61
61
-
 62
62
-
 63
63
-
 64
64


Indesit FZ 1031 P.1 IX AUS/G Användarguide
- Kategori
- Mikrovågor
- Typ
- Användarguide
på andra språk
Relaterade papper
-
Indesit FZ 1031 P.1 IX AUS/G Användarguide
-
-
-
-
-
-
-
-
-
Andra dokument
-
Whirlpool SK1036EL.20 X/HA Användarguide
-
-
-
-
Groupe Brandt FAC74X1N Bruksanvisning
-
Tefal GC705D.NEU Användarmanual
-
-
BRAVILOR BONAMAT Aurora Single Low Bruksanvisningar