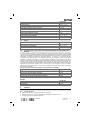
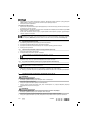
Hilti SC 70W-A22 Cordless Circular Saw Användarmanual
- Typ
- Användarmanual


1

2
3
4
5

6
7
8
9

10
11
12

SC 70WA22
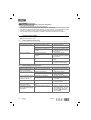
en Originaloperatinginstructions....................................... 1
es Manualdeinstruccionesoriginal .................................... 16
pt Manualdeinstruçõesoriginal ...................................... 32
da Originalbrugsanvisning .......................................... 48
sv Originalbruksanvisning........................................... 63
no Originalbruksanvisning .......................................... 77
fi Alkuperäisetohjeet ............................................. 91
hu Eredetihasználatiutasítás ........................................ 106
cs Originálnínávodkobsluze ........................................ 122
sk Originálnynávodnaobsluhu ....................................... 136
tr Orijinalkullanımkılavuzu ......................................... 151
ar ﺩﻟﻴﻞﺍﻻﺳﺘﻌﻤﺎﻝﺍﻷﺻﻠﻲ .......................................... 166
lv Oriģinālā lietošanas instrukcija . . . . . . . . . . . . . . . . . . . . . . . . . . . . . . . . . . . . . 182
lt Originalinaudojimoinstrukcija...................................... 197
et Originaalkasutusjuhend .......................................... 212
kk Түпнұсқа пайдалану бойынша нұсқаулық . . . . . . . . . . . . . . . . . . . . . . . . . . . . . 227
ja オリジナル取扱説明書 ............................................ 243
ko 오리지널사용설명서............................................. 258
zh 原始操作說明.................................................. 272
cn 原版操作说明.................................................. 285

*2092403* 2092403 English 1
1 Information about the documentation
1.1 About this documentation
• Read this documentation before initial operation or use. This is a prerequisite for safe, trouble-free
handling and use of the product.
• Observe the safety instructions and warnings in this documentation and on the product.
• Always keep the operating instructions with the product and make sure that the operating instructions
are with the product when it is given to other persons.
1.2 Explanation of symbols used
1.2.1 Warnings
Warnings alert persons to hazards that occur when handling or using the product. The following signal words
are used:
DANGER
DANGER !
▶Draws attention to imminent danger that will lead to serious personal injury or fatality.
WARNING
WARNING !
▶Draws attention to a potential threat of danger that can lead to serious injury or fatality.
CAUTION
CAUTION !
▶Draws attention to a potentially dangerous situation that could lead to slight personal injury or damage
to the equipment or other property.
1.2.2 Symbols in the documentation
The following symbols are used in this document:
Read the operating instructions before use.
Instructions for use and other useful information
Dealing with recyclable materials
Do not dispose of electric equipment and batteries as household waste
1.2.3 Symbols in the illustrations
The following symbols are used in illustrations:
These numbers refer to the corresponding illustrations found at the beginning of these operating
instructions
The numbering reflects the sequence of operations shown in the illustrations and may deviate
from the steps described in the text
Item reference numbers are used in the overview illustrations and refer to the numbers used in
the product overview section
This symbol is intended to draw special attention to certain points when handling the product.
1.3 Product-dependent symbols
1.3.1 Symbols
The following symbols can be used on the product:

2 English 2092403 *2092403*
Rated speed under no load
Direct current (DC)
Revolutions per minute
Diameter
Saw blade
Wireless data transfer
Li-ion battery
Hilti Li-ion battery type series used. Observe the information given in the section headed In-
tended use.
1.4 Product information
products are designed for professional users and only trained, authorized personnel are
permitted to operate, service and maintain the products. This personnel must be specifically informed about
the possible hazards. The product and its ancillary equipment can present hazards if used incorrectly by
untrained personnel or if used not in accordance with the intended use.
The type designation and serial number are printed on the rating plate.
▶Write down the serial number in the table below. You will be required to state the product details when
contacting Hilti Service or your local Hilti organization to inquire about the product.
Product information
Circular saw SC 70WA22
Generation 01
Serial no.
1.5 Declaration of conformity
We declare, on our sole responsibility, that the product described here complies with the applicable directives
and standards. A copy of the declaration of conformity can be found at the end of this documentation.
The technical documentation is filed here:
Hilti Entwicklungsgesellschaft mbH | Tool Certification | Hiltistrasse 6 | 86916 Kaufering, Germany
2 Safety
2.1 General power tool safety warnings
WARNING Read all safety warnings, instructions, illustrations and specifications provided with this
power tool. Failure to follow all instructions listed below may result in electric shock, fire and/or serious injury.
Save all warnings and instructions for future reference.
The term "power tool" in the warnings refers to your mains-operated (corded) power tool or battery-operated
(cordless) power tool.
Work area safety
▶Keep work area clean and well lit. Cluttered or dark areas invite accidents.
▶Do not operate power tools in explosive atmospheres, such as in the presence of flammable
liquids, gases or dust. Power tools create sparks which may ignite the dust or fumes.
▶Keep children and bystanders away while operating a power tool. Distractions can cause you to lose
control.
Electrical safety
▶Power tool plugs must match the outlet. Never modify the plug in any way. Do not use any adapter
plugs with earthed (grounded) power tools. Unmodified plugs and matching outlets will reduce risk of
electric shock.

*2092403* 2092403 English 3
▶Avoid body contact with earthed or grounded surfaces, such as pipes, radiators, ranges and
refrigerators. There is an increased risk of electric shock if your body is earthed or grounded.
▶Do not expose power tools to rain or wet conditions. Water entering a power tool will increase the
risk of electric shock.
▶Do not abuse the cord. Never use the cord for carrying, pulling or unplugging the power tool. Keep
cord away from heat, oil, sharp edges or moving parts. Damaged or entangled cords increase the
risk of electric shock.
▶When operating a power tool outdoors, use an extension cord suitable for outdoor use. Use of a
cord suitable for outdoor use reduces the risk of electric shock.
▶If operating a power tool in a damp location is unavoidable, use a residual current device (RCD)
protected supply. Use of an RCD reduces the risk of electric shock.
Personal safety
▶Stay alert, watch what you are doing and use common sense when operating a power tool. Do
not use a power tool while you are tired or under the influence of drugs, alcohol or medication. A
moment of inattention while operating power tools may result in serious personal injury.
▶Use personal protective equipment. Always wear eye protection. Protective equipment such as a
dust mask, non-skid safety shoes, hard hat or hearing protection used for appropriate conditions will
reduce personal injuries.
▶Prevent unintentional starting. Ensure the switch is in the off-position before connecting to power
source and/or battery pack, picking up or carrying the tool. Carrying power tools with your finger on
the switch or energising power tools that have the switch on invites accidents.
▶Remove any adjusting key or wrench before turning the power tool on. A wrench or a key left
attached to a rotating part of the power tool may result in personal injury.
▶Do not overreach. Keep proper footing and balance at all times. This enables better control of the
power tool in unexpected situations.
▶Dress properly. Do not wear loose clothing or jewellery. Keep your hair and clothing away from
moving parts. Loose clothes, jewellery or long hair can be caught in moving parts.
▶If devices are provided for the connection of dust extraction and collection facilities, ensure these
are connected and properly used. Use of dust collection can reduce dust-related hazards.
▶Do not let familiarity gained from frequent use of tools allow you to become complacent and ignore
tool safety principles. A careless action can cause severe injury within a fraction of a second.
Power tool use and care
▶Do not force the power tool. Use the correct power tool for your application. The correct power tool
will do the job better and safer at the rate for which it was designed.
▶Do not use the power tool if the switch does not turn it on and off. Any power tool that cannot be
controlled with the switch is dangerous and must be repaired.
▶Disconnect the plug from the power source and/or remove the battery pack, if detachable, from
the power tool before making any adjustments, changing accessories, or storing power tools.
Such preventive safety measures reduce the risk of starting the power tool accidentally.
▶Store idle power tools out of the reach of children and do not allow persons unfamiliar with the
power tool or these instructions to operate the power tool. Power tools are dangerous in the hands
of untrained users.
▶Maintain power tools and accessories. Check for misalignment or binding of moving parts,
breakage of parts and any other condition that may affect the power tool’s operation. If damaged,
have the power tool repaired before use. Many accidents are caused by poorly maintained power
tools.
▶Keep cutting tools sharp and clean. Properly maintained cutting tools with sharp cutting edges are
less likely to bind and are easier to control.
▶Use the power tool, accessories and tool bits etc. in accordance with these instructions, taking
into account the working conditions and the work to be performed. Use of the power tool for
operations different from those intended could result in a hazardous situation.
▶Keep handles and grasping surfaces dry, clean and free from oil and grease. Slippery handles and
grasping surfaces do not allow for safe handling and control of the tool in unexpected situations.
Battery tool use and care
▶Recharge only with the charger specified by the manufacturer. A charger that is suitable for one type
of battery pack may create a risk of fire when used with another battery pack.
▶Use power tools only with specifically designated battery packs. Use of any other battery packs may
create a risk of injury and fire.

4 English 2092403 *2092403*
▶When battery pack is not in use, keep it away from other metal objects, like paper clips, coins,
keys, nails, screws or other small metal objects, that can make a connection from one terminal to
another. Shorting the battery terminals together may cause burns or a fire.
▶Under abusive conditions, liquid may be ejected from the battery; avoid contact. If contact
accidentally occurs, flush with water. If liquid contacts eyes, additionally seek medical help. Liquid
ejected from the battery may cause irritation or burns.
▶Do not use a battery pack or tool that is damaged or modified. Damaged or modified batteries may
exhibit unpredictable behaviour resulting in fire, explosion or risk of injury.
▶Do not expose a battery pack or tool to fire or excessive temperature. Exposure to fire or temperature
above 130° C (265 °F) may cause explosion.
▶Follow all charging instructions and do not charge the battery pack or tool outside the temperature
range specified in the instructions. Charging improperly or at temperatures outside the specified range
may damage the battery and increase the risk of fire.
Service
▶Have your power tool serviced by a qualified repair person using only identical replacement parts.
This will ensure that the safety of the power tool is maintained.
▶Never service damaged battery packs. Service of battery packs should only be performed by the
manufacturer or authorized service providers.
2.2 Safety instructions for all saws
Cutting procedures
▶DANGER: Keep hands away from cutting area and the blade. Keep your second hand on
auxiliary handle or motor housing. If both hands are holding the saw, they cannot be cut by the blade.
▶Do not reach underneath the workpiece. The guard cannot protect you from the blade below the
workpiece.
▶Adjust the cutting depth to the thickness of the workpiece. Less than a full tooth of the blade teeth
should be visible below the workpiece.
▶Never hold the workpiece in your hands or across your leg while cutting. Secure the workpiece
to a stable platform. It is important to support the work properly to minimise body exposure, blade
binding, or loss of control.
▶Hold the power tool by insulated gripping surfaces, when performing an operation where the
cutting tool may contact hidden wiring. Contact with a "live" wire will also make exposed metal parts
of the power tool "live" and could give the operator an electric shock.
▶When ripping, always use a rip fence or straight edge guide. This improves the accuracy of cut and
reduces the chance of blade binding.
▶Always use blades with correct size and shape (diamond versus round) of arbour holes. Blades
that do not match the mounting hardware of the saw will run off-centre, causing loss of control.
▶Never use damaged or incorrect blade washers or bolt. The blade washers and bolt were specially
designed for your saw, for optimum performance and safety of operation.
Kickback causes and related warnings
• kickback is a sudden reaction to a pinched, jammed or misaligned saw blade, causing an uncontrolled
saw to lift up and out of the workpiece toward the operator;
• when the blade is pinched or jammed tightly by the kerf closing down, the blade stalls and the motor
reaction drives the unit rapidly back toward the operator;
• if the blade becomes twisted or misaligned in the cut, the teeth at the back edge of the blade can dig
into the top surface of the wood causing the blade to climb out of the kerf and jump back toward the
operator.
Kickback is the result of saw misuse and/or incorrect operating procedures or conditions and can be avoided
by taking proper precautions as given below.
▶Maintain a firm grip with both hands on the saw and position your arms to resist kickback forces.
Position your body to either side of the blade, but not in line with the blade. Kickback could cause
the saw to jump backwards, but kickback forces can be controlled by the operator, if proper precautions
are taken.
▶When blade is binding, or when interrupting a cut for any reason, release the trigger and hold the
saw motionless in the material until the blade comes to a complete stop. Never attempt to remove
the saw from the work or pull the saw backward while the blade is in motion or kickback may
occur. Investigate and take corrective actions to eliminate the cause of blade binding.

*2092403* 2092403 English 5
▶When restarting a saw in the workpiece, centre the saw blade in the kerf so that the saw teeth are
not engaged into the material. If a saw blade binds, it may walk up or kickback from the workpiece as
the saw is restarted.
▶Support large panels to minimise the risk of blade pinching and kickback. Large panels tend to sag
under their own weight. Supports must be placed under the panel on both sides, near the line of cut and
near the edge of the panel.
▶Do not use dull or damaged blades. Unsharpened or improperly set blades produce narrow kerf
causing excessive friction, blade binding and kickback.
▶Blade depth and bevel adjusting locking levers must be tight and secure before making the cut. If
blade adjustment shifts while cutting, it may cause binding and kickback.
▶Use extra caution when sawing into existing walls or other blind areas. The protruding blade may
cut objects that can cause kickback.
Lower guard function
▶Check the lower guard for proper closing before each use. Do not operate the saw if the lower
guard does not move freely and close instantly. Never clamp or tie the lower guard into the open
position. If the saw is accidentally dropped, the lower guard may be bent. Raise the lower guard with
the retracting handle and make sure it moves freely and does not touch the blade or any other part, in all
angles and depths of cut.
▶Check the operation of the guard return spring. If the guard and the spring are not operating
properly, they must be serviced before use. Lower guard may operate sluggishly due to damaged
parts, gummy deposits, or a build-up of debris.
▶The lower guard may be retracted manually only for special cuts such as "plunge cuts" and
"compound cuts". Raise the lower guard by the retracting handle and as soon as the blade enters
the material, the lower guard must be released. For all other sawing, the lower guard should operate
automatically.
▶Always observe that the lower guard is covering the blade before placing the saw down on bench
or floor. An unprotected, coasting blade will cause the saw to walk backwards, cutting whatever is in its
path. Be aware of the time it takes for the blade to stop after switch is released.
2.3 Additional safety instructions
Personal safety
▶Modification of the power tool is not permitted.
▶Always hold the machine with both hands on the grips provided. Keep the grips dry, clean and free
from oil and grease.
▶Wear ear protectors. Exposure to noise can cause hearing loss.
▶Respiratory protection must be worn if the power tool is used without a dust removal system for
work that creates dust.
▶Operate the tool only together with the safety devices that belong to it.
▶Improve the blood circulation in your fingers by relaxing your hands and exercising your fingers
during breaks between working.
▶The power tool is not intended for use by inexperienced persons who have received no special
training.
▶Keep the power tool out of reach of children.
▶Do not switch the product on before it is at the workplace.
▶Remove the battery before storing or transporting the power tool.
▶Do not work overhead with the product.
▶Do not attempt to brake the product by applying lateral pressure to the saw blade.
▶The kerf must be free of obstructions. Do not saw into screws and nails etc.
▶Do not touch the clamping flange or the clamping screw while the power tool is running.
▶Never press the drive spindle lock button while the saw blade is rotating.
▶Never direct the power tool toward persons.
▶Adjust the pressure applied to the saw blade and the material being cut so that the blade does not
stall, possibly causing kickback.
▶Avoid overheating the tips of the saw blade teeth.
▶When cutting plastic, melting of the plastic should be avoided.
▶Dust from materials, such as paint containing lead, some wood species, concrete / masonry / stone
containing silica, and minerals as well as metal, may be harmful. Contact with or inhalation of the dust
may cause allergic reactions and/or respiratory or other diseases to the operator or bystanders. Certain
kinds of dust are classified as carcinogenic such as oak and beech dust, especially in conjunction with

6 English 2092403 *2092403*
additives for wood conditioning (chromate, wood preservative). Material containing asbestos may be
handled only by specialists. Use a dust removal system whenever possible. To achieve a high level
of dust collection, use a suitable vacuum cleaner. When indicated, wear a respirator appropriate
for the type of dust generated. Ensure that the workplace is well ventilated. Follow national
requirements for the materials you want to work with.
▶Before beginning the work, check the hazard classification of the dust that will be produced. Use
an industrial vacuum cleaner with an officially approved protection classification in compliance
with locally applicable dust protection regulations.
▶Observe the national health and safety requirements.
Electrical safety
▶Before beginning work, check the working area (e.g. using a metal detector) to ensure that no
concealed electric cables or gas and water pipes are present. External metal parts of the power tool
may become live, for example, when an electric cable is damaged accidentally. This presents a serious
risk of electric shock.
Careful handling and use of batteries
▶Observe the special guidelines applicable to the transport, storage and use of lithium-ion batteries.
▶Do not expose batteries to high temperatures and keep them away from fire. There is a risk of
explosion.
▶Do not disassemble, crush or incinerate batteries and do not subject them to temperatures over
80°C (176°F). This presents a risk of fire, explosion or injury through contact with caustic substances.
▶Never continue to use or attempt to charge damaged batteries, e.g. batteries with cracks, broken
parts, bent or pushed-in / pulled-out contacts).
▶Do not use the battery as a power source for other unspecified power tools or appliances.
▶If the battery is too hot to touch it may be defective. In this case, place the power tool in a non-
flammable location, well away from flammable materials, where the battery can be kept under
observation and allowed to cool down. Contact Hilti Service after the battery has cooled down.
2.4 Additional safety instructions for circular saws
▶Bring the saw blade into contact with the workpiece only when the circular saw is switched on.
➥ The path of the saw must be free of obstructions above and below the workpiece. Do not saw into
screws, nails or similar objects.
▶Never work overhead with a circular saw.
▶Never attempt to brake the saw blade by applying lateral pressure.
▶Avoid overheating the tips of the saw blade teeth.
▶Always use a saw blade that is suitable for the material you are going to saw.
▶Use only saw blades recommended by Hilti that comply with the EN 847-1 standard.
2.5 Battery use and care
▶Observe the special regulations and instructions applicable to the transport, storage and use of Li-ion
batteries.
▶Do not expose batteries to high temperatures, direct sunlight or fire.
▶Do not disassemble, crush or incinerate batteries and do not subject them to temperatures over 80 °C.
▶Do not use or charge batteries that have suffered mechanical impact, have been dropped from a height
or show signs of damage. In this case, always contact your Hilti Service.
▶If the battery is too hot to touch it may be defective. In this case, place the product in a non-flammable
location, well away from flammable materials, where it can be kept under observation and allowed to
cool down. In this case, always contact your Hilti Service.

*2092403* 2092403 English 7
3 Description
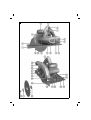
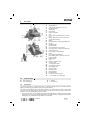
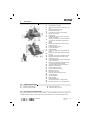
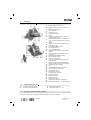
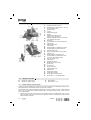
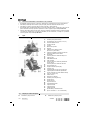
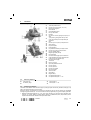
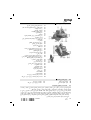
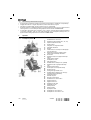
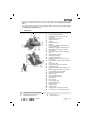
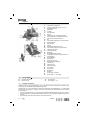
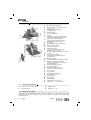
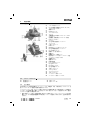
3.1 Product overview 1
@Single-arm fence
;Cutting angle presets (22.5°, 45°, 50°)
=Spindle lock button
%Auxiliary grip
&On/off switch
(Switch-on interlock
)Grip
+Charge-status and fault indicator (Li-ion bat-
tery)
§Release buttons (also used to activate the
charge status indicator)
/Battery
:Clamping lever for cutting depth adjustment
∙Hex key
$Small base plate
£LED illumination
|Front clamping lever for the fence
¡Clamping lever for cutting angle adjustment
QCutting depth scale
WHose connector (chip deflector)
EGuard
RPivoting guard operating lever
TRear clamping lever for the fence (only with
large base plate)
ZPivoting guard
UArbor
IDirection-of-rotation arrow
OTwin-arm fence
P0° cutting line indicator
Ü45° cutting line indicator
[Cutting angle scale
]Large base plate
ÆClamping screw
ºClamping flange
~Mounting flange
A0° indicator on the base plate
S1°- 50° indicator on the base plate
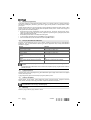
3.2 Guide rail adapter 2
DRear retaining lug
FFront retaining lug
G0° indicator
H1°- 50° indicator
3.3 Intended use
The product described is a cordless circular saw. It is designed for sawing wood or wood-like materials,
plastics, drywall panel, gypsum fiber board and composite materials.
The circular saw is equipped with a removable connector for an optional vacuum cleaner / dust removal
hose. This connector is designed to fit standard suction hoses. In order to connect the vacuum cleaner hose
to the saw, use of a suitable adapter may be necessary.
▶The use of saw blades not in compliance with the stated specifications (e.g. diameter, speed of rotation,
thickness) or the use of cut-off and grinding wheels or saw blades made from highly alloyed high speed
steel (HSS) is not permissible. Sawing metals is not permissible.

8 English 2092403 *2092403*
▶Do not use the product to cut tree branches or trunks.
▶Use only Hilti Liion batteries of the B 22 series with this product.
▶Use only Hilti battery chargers of the C4/36 series for charging these batteries.
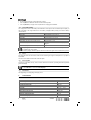
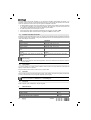
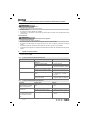
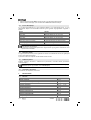
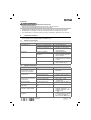
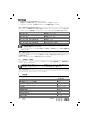
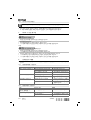
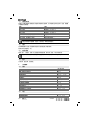
3.4 Liion battery display
The charge status of the Li-ion battery and malfunctions of the power tool are indicated by the display on
the Liion battery. The charge status of the Liion battery is displayed after pressing one of the two battery
release buttons.
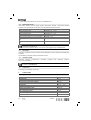
Status Meaning
4 LEDs light. Charge status: 75 % to 100 %
3 LEDs light. Charge status: 50 % to 75 %
2 LEDs light. Charge status: 25 % to 50 %
1 LED lights. Charge status: 10 % to 25 %
1 LED blinks, the power tool is ready for use. Charge status: < 10 %
1 LED blinks, the power tool is not ready for use. The battery has overheated or is completely dis-
charged.
4 LEDs blink, the power tool is not ready for use. The power tool is overloaded or has overheated.
Battery charge status cannot be displayed while the control switch is pressed and for up to 5 seconds
after releasing the control switch.
If the battery display LEDs blink, please observe the instructions given in the Troubleshooting section.
3.5 Fence
The single-arm fence can be used to make accurate cuts along the edge of a workpiece or to rip strips of
equal width.
The fence can be fitted on either side of the base plate.
3.6 Items supplied
Circular saw, saw blade, hex key, fence, vacuum cleaner hose connector, operating instructions (optional:
guide rail adapter)
Spare parts, consumables and accessories approved by Hilti for use with the product can be found at
your local Hilti Store or online at: www.hilti.group.
3.7 Accessories
Clamping flange, mounting flange, clamping screw.
4 Technical data
4.1 Circular saw
SC 70WA22
Rated voltage 21.6 V
Weight in accordance with EPTA procedure 01 4.8 kg
Specified blade diameter 190 mm
Saw blade disc thickness 0.7 mm … 1.5 mm
Kerf width 1.5 mm … 2 mm
Saw blade arbor size 30 mm
Rated speed under no load 3,500 /min
Maximum cutting depth at 0° 70 mm
Maximum cutting depth at 45° 51 mm
Maximum cutting depth at 50° 45 mm

*2092403* 2092403 English 9
SC 70WA22
Bevel cutting angle 0° … 50°
Operating temperature −10 ℃ … 50 ℃
Storage temperature range (without battery) −30 ℃ … 70 ℃
4.2 Battery
Battery operating voltage 21.6 V
Ambient temperature for operation −17 ℃ … 60 ℃
Storage temperature −20 ℃ … 40 ℃
Battery charging starting temperature −10 ℃ … 45 ℃
4.3 Noise information and vibration values determined in accordance with EN 62841
The sound pressure and vibration values given in these instructions have been measured in accordance
with a standardized test and may be used to compare one power tool with another. They may be used
for a preliminary assessment of exposure. The data given represents the main applications of the power
tool. However, if the power tool is used for different applications, with different accessory tools, or is poorly
maintained, the data may vary. This may significantly increase exposure over the total working period. An
accurate estimation of exposure should also take into account the times when the power tool is switched
off, or when it is running but not actually being used for a job. This may significantly reduce exposure over
the total working period. Identify additional safety measures to protect the operator from the effects of noise
and/or vibration, for example: maintain the tool and the accessories, keep the hands warm, organization of
work patterns.
Noise emission values determined in accordance with EN 62841
SC 70WA22
Sound power level (LWA)103 dB(A)
Uncertainty for the sound power level (KWA)3 dB(A)
Sound pressure level (LpA)92 dB(A)
Uncertainty for the sound pressure level (KpA)3 dB(A)
Total vibration (vector sum of three directions), determined in accordance with EN 62841
SC 70WA22
Vibration emission value for sawing in wood (Ah, W)0.93 m/s²
Uncertainty (K) 1.5 m/s²
5 Operation
5.1 Preparations at the workplace
5.1.1 Charging the battery
1. Before charging the battery, read the operating instructions for the charger.
2. Make sure that the contacts on the battery and the contacts on the charger are clean and dry.
3. Use an approved charger to charge the battery.
5.1.2 Inserting the battery
CAUTION
Risk of injury by short circuit or falling battery!
▶Before inserting the battery, make sure that the contacts on the battery and the contacts on the product
are free of foreign matter.
▶Make sure that the battery always engages correctly.
1. Charge the battery fully before using it for the first time.
2. Push the battery into the battery holder until it engages with an audible click.
3. Check that the battery is seated securely.

10 English 2092403 *2092403*
5.1.3 Removing the battery
1. Press the release buttons on the battery.
2. Pull the battery out of its holder in the device.
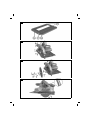
5.1.4 Removing the saw blade 3
WARNING
Risk of burning injury. A hot accessory tool, clamping flange or clamping screw and the sharp edges of the
saw blade present hazards.
▶Wear protective gloves when changing saw blades.
1. Remove the battery.
2. Insert the hex key into the saw blade clamping screw.
3. Press the spindle lockbutton and hold it in this position.
4. Turn the saw blade clamping screw with the hex key until the spindle lock button engages fully.
5. Release the clamping screw by turning the hex key in the direction of the direction-of-rotation arrow.
6. Remove the clamping screw from the outer clamping flange.
7. Open the pivoting guard by swinging it to the side and then remove the saw blade.
If necessary, the mounting flange can be removed for cleaning.
5.1.5 Fitting the saw blade 4
CAUTION
Risk of damage! Unsuitable or incorrectly fitted saw blades may damage the saw.
▶Only use blades which are suitable for this saw. Observe the direction-of-rotation arrow on the saw
blade.
▶Use only saw blades equipped with a rated maximum permissible speed that is at least as high as the
maximum speed stated on the product.
Check that the blade to be fitted complies with the technical requirements and that it is well
sharpened. A sharp saw blade is an essential requirement for a perfect cut.
1. Remove the battery.
2. Clean the mounting flange and the clamping flange.
3. Fit the mounting flange onto the arbor the right way round.
4. Open the pivoting guard.
5. Fit the new saw blade.
6. Install the outer clamping flange the right way round.
7. Insert the clamping screw.
8. Insert the hex key into the saw blade clamping screw.
9. Press the arbor lock button.
10. Secure the clamping flange with the clamping screw by turning the hex key in the direction opposite to
the direction-of-rotation arrow.
➥ The spindle lock button engages.
11. Before using the power tool, check that the saw blade is correctly seated and tightened securely.
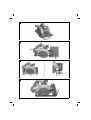
5.1.6 Adjusting the cutting depth 5
1. Remove the battery.
2. Release the cutting depth adjustment clamping lever.
3. Lift the product in a scissor movement and set the desired cutting depth by closing the clamping lever.
The cutting depth should always be set to a depth approx. 5 to 10 mm greater than the thickness
of the material to be cut.
The depth setting can be read from the scale and pointer at the rear of the blade guard.

*2092403* 2092403 English 11
5.1.7 Setting the miter cut angle 6
1. Remove the battery.
2. Release the cutting angle adjustment clamping lever.
3. Pivot the product into the desired position.
The cutting angle preset makes it easy to set the maximum angle (22.5°, 45°, 50°)
4. Tighten the cutting angle adjustment clamping lever.
5.1.8 Sawing along a line 7
At the front edge of the base plate of the circular saw is a line indicator for straight cuts and miter cuts
(0° and 45°). This permits accurate cutting at the desired miter angle. The edge of the line indicator
corresponds to the inside of the saw blade. There is a cutting line indicator at the opening for the saw
blade at the front end of the base plate.
Secure the workpiece to prevent movement.
Position the workpiece so that the saw blade is free to rotate beneath it.
Check to ensure that the on/off switch on the power tool is in the “off” position.
Position the forward section of the saw’s base plate on the workpiece but do not bring the blade into
contact with the workpiece.
1. Insert the battery.
2. Press and hold down the switch-on interlock and switch the product on by pressing the on/off button.
3. Guide the product along the cutting line on the workpiece at a suitable speed.
5.1.9 Installing / adjusting the fence 8
1. Remove the battery.
2. Screw the clamping screw into the base plate, leaving enough space to slide the fence through.
3. Slide the fence guide under the clamping screw.
4. Set the fence to the correct width for the cut.
5. Tighten the clamping screw.
The fence (single-arm/twin-arm) can be fitted on either side of the base plate. The twin-arm fence
can be used only with the large base plate
The fence can be used to make accurate cuts along the edge of a workpiece or to rip strips of
equal width.
5.1.10 Fitting the guide rail adapter 9
The saw can be equipped with a guide rail adapter which is available as an accessory.
When using saws with a small base plate, please use a guide rail adapter that fits the guide rail.
1. Remove the battery.
2. Remove the fence, if fitted.
3. Fit the base plate into the side retaining channels of the guide rail adapter.
4. Fully insert the base plate into the guide rail adapter.
5. Lock the guide rail adapter by pressing in the two sliders as far as they will go.
5.2 Work
5.2.1 Switching on
▶Press and hold down the switch-on interlock and switch the product on by pressing the on/off button.
5.2.2 Switching off
▶Release the on/off switch to stop the machine.

12 English 2092403 *2092403*
5.2.3 Longitudinal cuts at 0° 10
1. Place the circular saw on the guide rail with the groove marked “0°” on the rib on the rail.
2. Press and hold down the switch-on interlock and switch the product on by pressing the on/off button.
3. Guide the product along the rail and through the workpiece at a suitable speed.
5.2.4 Longitudinal cuts at angles up to 50° 11
1. Set the angle.
WARNING
Risk of collision when making mitered cuts Collision between saw blade and guide rail
▶Guide the saw along the guide rail with the outer edge of the guide rail adapter on the rib on the guide
rail. The saw blade will otherwise collide with the guide rail.
2. Place the saw on the guide rail with the groove marked “1°- 50°” on the rib of the rail.
3. Press and hold down the switch-on interlock and switch the product on by pressing the on/off button.
4. Guide the product along the rail and through the workpiece at a suitable speed.
5.2.5 Making cuts at an angle across the surface of the workpiece 12
1. Position the guide rail with the zero mark at the edge of the workpiece and then pivot the rail until the
desired angle shown on the angle scale is opposite the zero mark. The cutting angle indicated is the
angle of deviation from a straight, right-angled cut.
2. Secure the guide rail with the two screw clamps.
3. Place the circular saw on the guide rail with the groove marked “0°” on the rib on the rail.
4. Press and hold down the switch-on interlock and switch the product on by pressing the on/off button.
5. Guide the product along the rail and through the workpiece at a suitable speed.
5.2.6 Using the saw without a dust and chip removal system
1. Check that the sawdust is ejected without obstruction.
2. If required, the hose connector can be removed from the blade guard by slackening the hex socket screw
with the hex key supplied with the product.
6 Care and maintenance
WARNING
Risk of injury with battery inserted !
▶Always remove the battery before carrying out care and maintenance tasks!
Care and maintenance of the tool
• Carefully remove stubborn dirt.
• Clean the air vents carefully with a dry brush.
• Use only a slightly damp cloth to clean the casing. Do not use cleaning agents containing silicone as
these can attack the plastic parts.
Care of the Liion batteries
• Keep the battery free from oil and grease.
• Use only a slightly damp cloth to clean the casing. Do not use cleaning agents containing silicone as
these may attack the plastic parts.
• Avoid ingress of moisture.
Maintenance
• Check all visible parts and controls for signs of damage at regular intervals and make sure that they all
function correctly.
• Do not operate the product if signs of damage are found or if parts malfunction. Have it repaired
immediately by Hilti Service.
• After cleaning and maintenance, fit all guards or protective devices and check that they function correctly.
To help ensure safe and reliable operation, use only genuine Hilti spare parts and consumables. Spare
parts, consumables and accessories approved by Hilti for use with the product can be found at your
local Hilti Store or online at: www.hilti.group.

*2092403* 2092403 English 13
6.1 Cleaning the safety guard
1. Remove the saw blade before cleaning the safety guard parts.
2. Clean the safety guard parts carefully with a dry brush.
3. Use a suitable tool to remove deposits or cuttings from the inside surfaces of the safety guard parts.
4. Fit the saw blade.
6.2 Procedure if the chip / dust channel is blocked
1. Remove the battery.
2. Clean the chip / dust channel.
Remove the saw blade if necessary. → page 10
3. Check for misalignment or binding of moving parts, breakage of parts and any other condition that may
affect operation of the product.
6.3 Checks after cleaning and maintenance
After cleaning or maintenance, check that all safety devices are fitted and that they function faultlessly.
▶To check the pivoting guard, open the guard fully by moving the guard operating lever.
➥ The pivoting guard must close quickly and completely when the guard operating lever is released.
7 Transport and storage of cordless tools
Transport
CAUTION
Accidental starting during transport !
▶Always transport your products with the batteries removed!
▶Remove the battery.
▶Never transport batteries in bulk form (loose, unprotected).
▶Check the tool and batteries for damage before use after long periods of transport.
Storage
CAUTION
Accidental damage caused by defective or leaking batteries !
▶Always store your products with the batteries removed!
▶Store the tool and batteries in a place that is as cool and dry as possible.
▶Never store batteries in direct sunlight, on heating units or behind a window pane.
▶Store the tool and batteries in a place where they cannot be accessed by children or unauthorized
persons.
▶Check the tool and batteries for damage before use after long periods of storage.
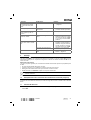
8 Troubleshooting
▶If the trouble you are experiencing is not listed in this table or you are unable to remedy the problem by
yourself, please contact Hilti Service.
8.1 The circular saw is not in working order
Malfunction Possible cause Action to be taken
The LEDs do not light. The battery is not fully inserted. ▶Insert the battery.
The battery is discharged. ▶Charge the battery.
The battery is too hot or too cold. ▶Bring the battery to the correct
ambient temperature.

14 English 2092403 *2092403*
Malfunction Possible cause Action to be taken
1 LED flashes. The battery is discharged. ▶Charge the battery.
The battery is too hot or too cold. ▶Bring the battery to the correct
ambient temperature.
4 LEDs flash. The circular saw was overloaded
briefly.
▶Release the on/off switch and
then press it again.
The overheating prevention cut-out
has been activated.
▶Allow the circular saw to cool
down and clean the air vents.
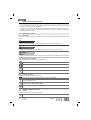
8.2 The circular saw is in working order
Trouble or fault Possible cause Action to be taken
The on/off button cannot be
pressed, i.e. the button is
locked.
Not a fault (safety function). ▶Press the switch-on interlock.
Running speed suddenly
drops considerably. The battery is discharged. ▶Charge the battery.
Saw advance pressure is too high. ▶Reduce advance pressure and
switch the power tool back on.
Chips / cuttings are not trans-
ported into the chip collector
and thus fall onto the base
plate.
The chip collector is full. ▶Empty the chip collector.
The chip ejector channel is
blocked.
▶Clean the ejector. → page 13
The saw blade stalls. Saw advance pressure is too high. ▶Reduce advance pressure and
switch the power tool back on.
The battery runs down more
quickly than usual. Battery condition is not optimal. ▶Replace the battery.
The battery does not en-
gage with an audible "double
click".
The retaining lugs on the battery
are dirty.
▶Clean the retaining lugs and
push the battery in until it
engages. Contact Hilti Service
if the problem persists.
The circular saw or battery
gets very hot. Electrical fault. ▶Switch off the circular saw
immediately. Remove the
battery and keep it under
observation. Allow the battery
to cool down. Contact Hilti
service.
The product is overloaded (appli-
cation limits exceeded).
▶Select a tool that is suitable for
its intended use.
Saw vibrates severely The saw blade is installed incor-
rectly
▶Install the saw blade correctly.
→ page 10
9 Disposal
Most of the materials from which Hilti tools and appliances are manufactured can be recycled. The
materials must be correctly separated before they can be recycled. In many countries, your old tools,
machines or appliances can be returned to Hilti for recycling. Ask Hilti Service or your Hilti representative
for further information.
Battery disposal
Improper disposal of batteries can result in health hazards from leaking gases or fluids.
▶DO NOT send batteries through the mail!
▶Cover the terminals with a non-conductive material (such as electrical tape) to prevent short circuiting.
▶Dispose of your battery out of the reach of children.
▶Dispose of the battery at your Hilti Store, or consult your local governmental garbage disposal or public
health and safety resources for disposal instructions.
▶Do not dispose of power tools, electronic equipment or batteries as household waste!
Sidan laddas...
Sidan laddas...
Sidan laddas...
Sidan laddas...
Sidan laddas...
Sidan laddas...
Sidan laddas...
Sidan laddas...
Sidan laddas...
Sidan laddas...
Sidan laddas...
Sidan laddas...
Sidan laddas...
Sidan laddas...
Sidan laddas...
Sidan laddas...
Sidan laddas...
Sidan laddas...
Sidan laddas...
Sidan laddas...
Sidan laddas...
Sidan laddas...
Sidan laddas...
Sidan laddas...
Sidan laddas...
Sidan laddas...
Sidan laddas...
Sidan laddas...
Sidan laddas...
Sidan laddas...
Sidan laddas...
Sidan laddas...
Sidan laddas...
Sidan laddas...
Sidan laddas...
Sidan laddas...
Sidan laddas...
Sidan laddas...
Sidan laddas...
Sidan laddas...
Sidan laddas...
Sidan laddas...
Sidan laddas...
Sidan laddas...
Sidan laddas...
Sidan laddas...
Sidan laddas...
Sidan laddas...
Sidan laddas...
Sidan laddas...
Sidan laddas...
Sidan laddas...
Sidan laddas...
Sidan laddas...
Sidan laddas...
Sidan laddas...
Sidan laddas...
Sidan laddas...
Sidan laddas...
Sidan laddas...
Sidan laddas...
Sidan laddas...
Sidan laddas...
Sidan laddas...
Sidan laddas...
Sidan laddas...
Sidan laddas...
Sidan laddas...
Sidan laddas...
Sidan laddas...
Sidan laddas...
Sidan laddas...
Sidan laddas...
Sidan laddas...
Sidan laddas...
Sidan laddas...
Sidan laddas...
Sidan laddas...
Sidan laddas...
Sidan laddas...
Sidan laddas...
Sidan laddas...
Sidan laddas...
Sidan laddas...
Sidan laddas...
Sidan laddas...
Sidan laddas...
Sidan laddas...
Sidan laddas...
Sidan laddas...
Sidan laddas...
Sidan laddas...
Sidan laddas...
Sidan laddas...
Sidan laddas...
Sidan laddas...
Sidan laddas...
Sidan laddas...
Sidan laddas...
Sidan laddas...
Sidan laddas...
Sidan laddas...
Sidan laddas...
Sidan laddas...
Sidan laddas...
Sidan laddas...
Sidan laddas...
Sidan laddas...
Sidan laddas...
Sidan laddas...
Sidan laddas...
Sidan laddas...
Sidan laddas...
Sidan laddas...
Sidan laddas...
Sidan laddas...
Sidan laddas...
Sidan laddas...
Sidan laddas...
Sidan laddas...
Sidan laddas...
Sidan laddas...
Sidan laddas...
Sidan laddas...
Sidan laddas...
Sidan laddas...
Sidan laddas...
Sidan laddas...
Sidan laddas...
Sidan laddas...
Sidan laddas...
Sidan laddas...
Sidan laddas...
Sidan laddas...
Sidan laddas...
Sidan laddas...
Sidan laddas...
Sidan laddas...
Sidan laddas...
Sidan laddas...
Sidan laddas...
Sidan laddas...
Sidan laddas...
Sidan laddas...
Sidan laddas...
Sidan laddas...
Sidan laddas...
Sidan laddas...
Sidan laddas...
Sidan laddas...
Sidan laddas...
Sidan laddas...
Sidan laddas...
Sidan laddas...
Sidan laddas...
Sidan laddas...
Sidan laddas...
Sidan laddas...
Sidan laddas...
Sidan laddas...
Sidan laddas...
Sidan laddas...
Sidan laddas...
Sidan laddas...
Sidan laddas...
Sidan laddas...
Sidan laddas...
Sidan laddas...
Sidan laddas...
Sidan laddas...
Sidan laddas...
Sidan laddas...
Sidan laddas...
Sidan laddas...
Sidan laddas...
Sidan laddas...
Sidan laddas...
Sidan laddas...
Sidan laddas...
Sidan laddas...
Sidan laddas...
Sidan laddas...
Sidan laddas...
Sidan laddas...
Sidan laddas...
Sidan laddas...
Sidan laddas...
Sidan laddas...
Sidan laddas...
Sidan laddas...
Sidan laddas...
Sidan laddas...
Sidan laddas...
Sidan laddas...
Sidan laddas...
Sidan laddas...
Sidan laddas...
Sidan laddas...
Sidan laddas...
Sidan laddas...
Sidan laddas...
Sidan laddas...
Sidan laddas...
Sidan laddas...
Sidan laddas...
Sidan laddas...
Sidan laddas...
Sidan laddas...
Sidan laddas...
Sidan laddas...
Sidan laddas...
Sidan laddas...
Sidan laddas...
Sidan laddas...
Sidan laddas...
Sidan laddas...
Sidan laddas...
Sidan laddas...
Sidan laddas...
Sidan laddas...
Sidan laddas...
Sidan laddas...
Sidan laddas...
Sidan laddas...
Sidan laddas...
Sidan laddas...
Sidan laddas...
Sidan laddas...
Sidan laddas...
Sidan laddas...
Sidan laddas...
Sidan laddas...
Sidan laddas...
Sidan laddas...
Sidan laddas...
Sidan laddas...
Sidan laddas...
Sidan laddas...
Sidan laddas...
Sidan laddas...
Sidan laddas...
Sidan laddas...
Sidan laddas...
Sidan laddas...
Sidan laddas...
Sidan laddas...
Sidan laddas...
Sidan laddas...
Sidan laddas...
Sidan laddas...
Sidan laddas...
Sidan laddas...
Sidan laddas...
Sidan laddas...
Sidan laddas...
Sidan laddas...
Sidan laddas...
Sidan laddas...
Sidan laddas...
Sidan laddas...
Sidan laddas...
Sidan laddas...
Sidan laddas...
Sidan laddas...
Sidan laddas...
Sidan laddas...
Sidan laddas...
Sidan laddas...
Sidan laddas...
Sidan laddas...
Sidan laddas...
Sidan laddas...
Sidan laddas...
Sidan laddas...
Sidan laddas...
Sidan laddas...
Sidan laddas...
Sidan laddas...
Sidan laddas...
Sidan laddas...
Sidan laddas...
Sidan laddas...
Sidan laddas...
Sidan laddas...
Sidan laddas...
Sidan laddas...
Sidan laddas...
Sidan laddas...
-
 1
1
-
 2
2
-
 3
3
-
 4
4
-
 5
5
-
 6
6
-
 7
7
-
 8
8
-
 9
9
-
 10
10
-
 11
11
-
 12
12
-
 13
13
-
 14
14
-
 15
15
-
 16
16
-
 17
17
-
 18
18
-
 19
19
-
 20
20
-
 21
21
-
 22
22
-
 23
23
-
 24
24
-
 25
25
-
 26
26
-
 27
27
-
 28
28
-
 29
29
-
 30
30
-
 31
31
-
 32
32
-
 33
33
-
 34
34
-
 35
35
-
 36
36
-
 37
37
-
 38
38
-
 39
39
-
 40
40
-
 41
41
-
 42
42
-
 43
43
-
 44
44
-
 45
45
-
 46
46
-
 47
47
-
 48
48
-
 49
49
-
 50
50
-
 51
51
-
 52
52
-
 53
53
-
 54
54
-
 55
55
-
 56
56
-
 57
57
-
 58
58
-
 59
59
-
 60
60
-
 61
61
-
 62
62
-
 63
63
-
 64
64
-
 65
65
-
 66
66
-
 67
67
-
 68
68
-
 69
69
-
 70
70
-
 71
71
-
 72
72
-
 73
73
-
 74
74
-
 75
75
-
 76
76
-
 77
77
-
 78
78
-
 79
79
-
 80
80
-
 81
81
-
 82
82
-
 83
83
-
 84
84
-
 85
85
-
 86
86
-
 87
87
-
 88
88
-
 89
89
-
 90
90
-
 91
91
-
 92
92
-
 93
93
-
 94
94
-
 95
95
-
 96
96
-
 97
97
-
 98
98
-
 99
99
-
 100
100
-
 101
101
-
 102
102
-
 103
103
-
 104
104
-
 105
105
-
 106
106
-
 107
107
-
 108
108
-
 109
109
-
 110
110
-
 111
111
-
 112
112
-
 113
113
-
 114
114
-
 115
115
-
 116
116
-
 117
117
-
 118
118
-
 119
119
-
 120
120
-
 121
121
-
 122
122
-
 123
123
-
 124
124
-
 125
125
-
 126
126
-
 127
127
-
 128
128
-
 129
129
-
 130
130
-
 131
131
-
 132
132
-
 133
133
-
 134
134
-
 135
135
-
 136
136
-
 137
137
-
 138
138
-
 139
139
-
 140
140
-
 141
141
-
 142
142
-
 143
143
-
 144
144
-
 145
145
-
 146
146
-
 147
147
-
 148
148
-
 149
149
-
 150
150
-
 151
151
-
 152
152
-
 153
153
-
 154
154
-
 155
155
-
 156
156
-
 157
157
-
 158
158
-
 159
159
-
 160
160
-
 161
161
-
 162
162
-
 163
163
-
 164
164
-
 165
165
-
 166
166
-
 167
167
-
 168
168
-
 169
169
-
 170
170
-
 171
171
-
 172
172
-
 173
173
-
 174
174
-
 175
175
-
 176
176
-
 177
177
-
 178
178
-
 179
179
-
 180
180
-
 181
181
-
 182
182
-
 183
183
-
 184
184
-
 185
185
-
 186
186
-
 187
187
-
 188
188
-
 189
189
-
 190
190
-
 191
191
-
 192
192
-
 193
193
-
 194
194
-
 195
195
-
 196
196
-
 197
197
-
 198
198
-
 199
199
-
 200
200
-
 201
201
-
 202
202
-
 203
203
-
 204
204
-
 205
205
-
 206
206
-
 207
207
-
 208
208
-
 209
209
-
 210
210
-
 211
211
-
 212
212
-
 213
213
-
 214
214
-
 215
215
-
 216
216
-
 217
217
-
 218
218
-
 219
219
-
 220
220
-
 221
221
-
 222
222
-
 223
223
-
 224
224
-
 225
225
-
 226
226
-
 227
227
-
 228
228
-
 229
229
-
 230
230
-
 231
231
-
 232
232
-
 233
233
-
 234
234
-
 235
235
-
 236
236
-
 237
237
-
 238
238
-
 239
239
-
 240
240
-
 241
241
-
 242
242
-
 243
243
-
 244
244
-
 245
245
-
 246
246
-
 247
247
-
 248
248
-
 249
249
-
 250
250
-
 251
251
-
 252
252
-
 253
253
-
 254
254
-
 255
255
-
 256
256
-
 257
257
-
 258
258
-
 259
259
-
 260
260
-
 261
261
-
 262
262
-
 263
263
-
 264
264
-
 265
265
-
 266
266
-
 267
267
-
 268
268
-
 269
269
-
 270
270
-
 271
271
-
 272
272
-
 273
273
-
 274
274
-
 275
275
-
 276
276
-
 277
277
-
 278
278
-
 279
279
-
 280
280
-
 281
281
-
 282
282
-
 283
283
-
 284
284
-
 285
285
-
 286
286
-
 287
287
-
 288
288
-
 289
289
-
 290
290
-
 291
291
-
 292
292
-
 293
293
-
 294
294
-
 295
295
-
 296
296
-
 297
297
-
 298
298
-
 299
299
-
 300
300
-
 301
301
-
 302
302
-
 303
303
-
 304
304
-
 305
305
-
 306
306
-
 307
307
-
 308
308


Hilti SC 70W-A22 Cordless Circular Saw Användarmanual
- Typ
- Användarmanual
på andra språk
- slovenčina: Hilti SC 70W-A22 Cordless Circular Saw Používateľská príručka
- eesti: Hilti SC 70W-A22 Cordless Circular Saw Kasutusjuhend
- 日本語: Hilti SC 70W-A22 Cordless Circular Saw ユーザーマニュアル
- Türkçe: Hilti SC 70W-A22 Cordless Circular Saw Kullanım kılavuzu
- dansk: Hilti SC 70W-A22 Cordless Circular Saw Brugermanual
