GATE Amfibi XL 56-204 Instructions For Use Manual
- Kategori
- Uppladdningsbara batterier
- Typ
- Instructions For Use Manual

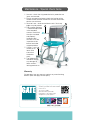
Amfibi
Hygiene chair
™
Amfibi XL 56-204
Instructions for use

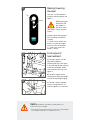
Raising/lowering
the seat
The seat is raised/lowered
using the remote control (see
figure 1).
Manoeuvring may
take place with
the patient in
the chair; make
sure there is no risk of pinch
injuries.
Audible signals during opera-
tions (warning symbol/N.B.
symbol);
• 3 short buzzes means the
battery must be recharged
(chair can only be lowered).
• 1 short buzz means the
battery is empty.
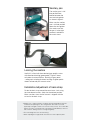
Foot support/
heel restraint
a) The foot support can be
adjusted in height by
removing the clips (see figure
2) and moving the foot support
to the desired height. Make
sure to replace the clips (see
gure 3).
b) The foot support can be
swung to the side by grasping it
at arrow B and lifting/swinging.
c) The foot support platform
can be swung upwards (c1)
and/or angled (c2) as desired.
Safety Read these instructions carefully before use.
• Never stand on the Ambi.
• The Patient Charge Nurse/Nurse Practitioner is responsible for
ensuring that the product is suitable for its user.
Bruksanvisning Bure
Justering av handtag
Handtagen justeras till önskad position genom att:
Ratt lossas, justera in handtag
Ratt låses
Upp
Ned
Min
Max
Höjning/sänkning
av stativ (El)
Önskad höjd justeras med hjälp
av fjärrkontrollen
Pil <UPP> resp. Pil <NED>
Breddning av stativ
(endast Bure Double)
Önskad bredd (max/min) justeras
med hjälp av fjärrkontrollen:
Håll in Pil <vänster> = Minimal
breddning av benstativ.
Håll in Pil <höger>
= Maximal breddning av
benstativ.
Justering av armstödsplattor (Hö/Vä)
För optimalt stöd kan Armstödsplattor breddjusteras:
Ratt lossas, armstödsplattas läge justeras. Ratt låses
Låsning av hjul
Hjulen låses genom att fotbroms aktiveras.
Upplåsning av hjul
För att lossa bromsen – återställ.
1. Uttag för batterikontakt
2. Uttag för stickpropp
(OBS! För att IP-klassning ska gälla så ska
stickpropp ALLTID vara ansluten till styrbox)
3. Uttag för fjärrkontroll
4. Uttag för ställdon - höj/sänk
5. Uttag för ställdon - breddning (Endast Bure Double)
OBS! Var noga med att kontakter ansluts till rätt uttag eftersom detta annars
kan skada ställdon.
Laddning av batteri ska ske då gåbordet inte används.
(Batteriet kan aldrig överladdas.) Laddning görs genom
att stickpropp ansluts till eluttag.
Innan första användningen så bör batteriet
laddas 24 timmar.
Kopplingsschema Styrbox
(Bure El/Bure Double/Bure Extra)
Laddning av batteri
(Bure El/Bure Double/Bure Extra)
2
3
4
1
5
a
b
B
c1
c2
a
b
B
c1
c2
Ned
Upp
3
2
1
Up
Down
Bruksanvisning Bure
Justering av handtag
Handtagen justeras till önskad position genom att:
Ratt lossas, justera in handtag
Ratt låses
Upp
Ned
Min
Max
Höjning/sänkning
av stativ (El)
Önskad höjd justeras med hjälp
av fjärrkontrollen
Pil <UPP> resp. Pil <NED>
Breddning av stativ
(endast Bure Double)
Önskad bredd (max/min) justeras
med hjälp av fjärrkontrollen:
Håll in Pil <vänster> = Minimal
breddning av benstativ.
Håll in Pil <höger>
= Maximal breddning av
benstativ.
Justering av armstödsplattor (Hö/Vä)
För optimalt stöd kan Armstödsplattor breddjusteras:
Ratt lossas, armstödsplattas läge justeras. Ratt låses
Låsning av hjul
Hjulen låses genom att fotbroms aktiveras.
Upplåsning av hjul
För att lossa bromsen – återställ.
1. Uttag för batterikontakt
2. Uttag för stickpropp
(OBS! För att IP-klassning ska gälla så ska
stickpropp ALLTID vara ansluten till styrbox)
3. Uttag för fjärrkontroll
4. Uttag för ställdon - höj/sänk
5. Uttag för ställdon - breddning (Endast Bure Double)
OBS! Var noga med att kontakter ansluts till rätt uttag eftersom detta annars
kan skada ställdon.
Laddning av batteri ska ske då gåbordet inte används.
(Batteriet kan aldrig överladdas.) Laddning görs genom
att stickpropp ansluts till eluttag.
Innan första användningen så bör batteriet
laddas 24 timmar.
Kopplingsschema Styrbox
(Bure El/Bure Double/Bure Extra)
Laddning av batteri
(Bure El/Bure Double/Bure Extra)
2
3
4
1
5

The sanitary pan is slid
into position from
behind between the
seat and wire guides
as shown in figure 4.
Make sure the sanitary
pan is slid into position
above the wire guides.
Also make sure that
the pan is in the right
position in relation to
the seat/cut-out.
Locking the castors
Amfibi XL is fitted with three braked (grey pedal) castors
with directional locking (green pedal). Figure 5 shows
activation of castor functions. Braking via grey pedal
– rolling and swiveling disabled. Locking via green pedal –
wheels roll normally but cannot swivel.
Installation/adjustment of back-strap
Fasten the back-strap around the rear frame – lock using
the side-release buckles. Adjust to the desired position.
Make sure the cut-out for the armrest is aligned with the
cut-out in the back-strap.
• Battery care – make a practice of always removing the battery from the
control box and placing it in the charger when the chair is not used
(especially overnight or when out of use for a day or two). The control box
always consumes a small amount of electricity and the battery is then at
risk of serious damage if it is not charged regularly.
• The user Weigh must not exceed 250 kg.
• When adjusting the height; make sure there is no risk of pinch injuries.
4
5
Sanitary pan

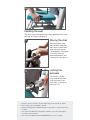
Installing the seat
The seat is easily attached with the clips underneath that snap
onto the seat frame (see figure 6).
Moving the chair
We recommend using
the handlebar whenever
the chair must be moved
(with/without a patient).
The handlebar is designed
so that the chair can
be moved forwards and
turned easily (see figure 7).
6
7
8
• Observe caution on inclines and when passing over thresholds or similar.
• Never stand on the FOOTREST – tip risk.
• Battery charging must ALWAYS take place in dry spaces, never in wet rooms
or similar.
• The chair must NEVER be used without a battery as this may damage the
control box and electronics.
• The chair must NEVER be used UNDERWATER (in a pool or similar).
Locking the
armrests
The armrest is locked
in the extended position.
To lift the armrest, pull
out the pin (1) and raise
the armrest (2).
1
2

Battery installation/
removal
The battery is usually located in
the control box and is held in place
magnetically. Battery removal:
Twist the battery 90° – pull it out.
Installation: Slide the battery into the
control box (figure 9). The battery
is locked into position magnetically
followed by a beep to signal every-
thing is OK.
Audible warnings when
battery is installed;
• 2 long buzzes means
calibration must be
carried out (see above).
• 5 short buzzes means the battery
must be recharged before operations.
Charging the battery
Remove the battery from the control box and place it in the charger
supplied. Connect the charger to the mains (red lamp lights up –
charging). When the battery is fully charged the green lamp lights up.
NOTE! Battery charging must always take place in dry spaces. The
chair may NOT be used when the battery is removed – water may enter
the control box and damage it.
The chair is fabricated from steel tubes (painted externally/internally)
and aluminium. Exposed parts that are not painted are made of
aluminium/stainless steel. The chair is cleaned in the normal manner
(autoclave proof to 60 degrees (does not apply to control box and
battery) and normal detergents). Take care to check that the product
9
System calibration
If power is cut during operation or in direct connection with
operations (within 5 seconds of the chair’s having been manoeuvred)
it may be necessary to reset/recalibrate the system. This is done to
synchronize the actuator proximity sensors.
Calibration:
Press both of the remote control buttons UP/DOWN
simultaneously for around 10 seconds until a beep is heard. Release
the buttons. Press the the DOWN button and run the chair to its
lowest position. Release the button. The system confirms the action
with a buzzer. The system may then be used normally.
Maintenance (annually)
Bruksanvisning Bure
Justering av handtag
Handtagen justeras till önskad position genom att:
Ratt lossas, justera in handtag
Ratt låses
Upp
Ned
Min
Max
Höjning/sänkning
av stativ (El)
Önskad höjd justeras med hjälp
av fjärrkontrollen
Pil <UPP> resp. Pil <NED>
Breddning av stativ
(endast Bure Double)
Önskad bredd (max/min) justeras
med hjälp av fjärrkontrollen:
Håll in Pil <vänster> = Minimal
breddning av benstativ.
Håll in Pil <höger>
= Maximal breddning av
benstativ.
Justering av armstödsplattor (Hö/Vä)
För optimalt stöd kan Armstödsplattor breddjusteras:
Ratt lossas, armstödsplattas läge justeras. Ratt låses
Låsning av hjul
Hjulen låses genom att fotbroms aktiveras.
Upplåsning av hjul
För att lossa bromsen – återställ.
1. Uttag för batterikontakt
2. Uttag för stickpropp
(OBS! För att IP-klassning ska gälla så ska
stickpropp ALLTID vara ansluten till styrbox)
3. Uttag för fjärrkontroll
4. Uttag för ställdon - höj/sänk
5. Uttag för ställdon - breddning (Endast Bure Double)
OBS! Var noga med att kontakter ansluts till rätt uttag eftersom detta annars
kan skada ställdon.
Laddning av batteri ska ske då gåbordet inte används.
(Batteriet kan aldrig överladdas.) Laddning görs genom
att stickpropp ansluts till eluttag.
Innan första användningen så bör batteriet
laddas 24 timmar.
Kopplingsschema Styrbox
(Bure El/Bure Double/Bure Extra)
Laddning av batteri
(Bure El/Bure Double/Bure Extra)
2
3
4
1
5

1
2
3
4
5
201-10-23, 3
Warranty
We provide a two-year warranty against any manufacturing
defects (does not apply to wear parts).
1. Armrest – check that slip protection/wrist protection are
intact and secured.
2. Electric actuator/raise-lower: check the function of the
remote control and that the electric actuator attachment
devices are not loose.
3. Seat/soft seat – whole and without cracks. No sharp
edges may be present.
4. Foot support platforms
– whole and adjustable
in the intended
manner. Check that
the clips are whole
and properly
fastened. Heel
restraints must be
in position at the
back of each foot
support platform.
5. Castors – must
not be stiff or
loose. Also
check that
the brakes
work.
6. The Softbackrest
should be without
any damages in
fabric or belts/
lockingmechanism.
Maintenance - Special check items
PMS 322 C
DIN PARTNER I VÅRDEN
Would you like to know more?
Contact us at:
Tel: +46 371 31800
Gate Rehab Development AB
Industrigatan 2 | SE-330 21 Reftele
[email protected] | www.gaterd.se
PMS 322 C
DIN PARTNER I VÅRDEN
YOUR HEALTHCARE PARTNER
6
-
 1
1
-
 2
2
-
 3
3
-
 4
4
-
 5
5
-
 6
6


GATE Amfibi XL 56-204 Instructions For Use Manual
- Kategori
- Uppladdningsbara batterier
- Typ
- Instructions For Use Manual
på andra språk
- English: GATE Amfibi XL 56-204
Andra dokument
-
Etac Swift Mobile Tilt Användarmanual
-
 Eurovema Euroflex Miniflex Classic Användarmanual
-
 Etac Clean Comfort - old version Användarmanual
-
 Etac Clean Height Adjustable - old version Användarmanual
-
Molift Smart 150 Användarmanual
-
Etac Swift Mobile S M Tilt Användarmanual
-
 Molift Mover 180 Användarmanual
-
Etac Swift Mobil-2 Användarmanual
-
-
Etac Clean shower commode chair Användarmanual


