
kühlschrank / refrigerator / kylskåp / jääkaappi
refrigerateur / koelkast
GEBRAUCHSANWEISUNGEN
INSTRUCTION BOOKLET
BRUKSANVISNING
KÄYTTÖOHJE
MODE D’EMPLOI
GEBRUIKSAANWIJZING
2222 751-87
ERN 16300 ERN 23500

2
Sicherheitshinweise
Bevor Sie Ihr neues Kältegerät in Betrieb
nehmen, lesen Sie bitte diese
Gebrauchsanweisung aufmerksam durch.
Diese sind Sicherheitshinweise. Wir ersuchen Sie
daher, die folgenden Punkte vor der Installation
des Gerätes und seiner Inbetriebnahme
aufmerksam durchzulesen.
Es wird empfohlen, diese Gebrauchsanweisung gut
aufzubewahren und bei einem eventuellen Verkauf
des Gerätes dem neuen Besitzer auszuhändigen.
Benutzung im Haushalt
• Die Kühl- und/oder Gefrierschränke sind zur
Einlagerung und/oder zum Einfrieren von
Lebensmitteln bestimmt.
• Vor der Installation sicherstellen, dass das Gerät
nicht beschädigt ist. Mögliche Transportschäden
sind dem Händler unverzüglich mitzuteilen.
•
Das Gerät ist schwer. Scharfe Metallkanten am
Gerät hinten und unten stellen ein Verletzungsrisiko
dar. Beim Aufstellen oder Verschieben sind
Schutzhandschuhe zu tragen.
• Sollte die Installation des Gerätes eine Änderung
der elektrischen Hausinstallation verlangen, so darf
diese nur von Elektro-Fachkräften durchgeführt
werden.
• Bitte prüfen, dass das Netzkabel nicht von der
Geräterückseite eingeklemmt und beschädigt wird.
Ein beschädigtes Netzkabel kann überhitzen und
einen Brand verursachen.
• Keine schweren Gegenstände bzw. das Gerät
selbst auf das Netzkabel stellen. Kurzschluss- und
Brandgefahr!
• Den Netzstecker nie am Kabel aus der Steckdose
ziehen, besonders wenn das Gerät aus der Nische
gezogen wurde. Eine Beschädigung des
Netzkabels kann Kurzschluss, Feuer und/oder
Stromschlag verursachen.
• Keine Elektrogeräte (z.B. Eismaschinen) in das
Gerät stellen.
• Es sollten keine kohlensäurehaltigen Getränke in
das Gefrier- bzw. Frosterfach eingestellt werden,
sie könnten platzen.
• Speiseeis und Eiswürfel nicht unmittelbar aus dem
Gefrierfach in den Mund nehmen. Sehr kaltes Eis
kann an Lippen oder Zunge festfrieren und
Verletzungen verursachen.
• Tiefkühlgut nicht mit nassen Händen berühren. Die
Hände könnten daran festfrieren.
• Tritt eine Störung oder ein Defekt ein, versuchen
Sie nicht, das Gerät selbst zu reparieren.
Elektrogeräte dürfen nur von Elektro-Fachkräften
repariert werden, da durch unsachgemässe
Reparaturen erhebliche Folgeschäden entstehen
können. Sich an die nächstgelegene
Kundendienststelle wenden und nur Original-
Ersatzteile anfordern.
Sicherheit für Kinder
• Das Gerät darf von Kindern und Personen, deren
physische, sensorische oder geistige Fähigkeiten
sowie Mangel an Erfahrung und Kenntnissen einen
sicheren Gebrauch des Gerätes ausschließen, nur
unter Aufsicht oder nach entsprechender
Einweisung durch eine Person benutzt werden, die
sicherstellt, dass sie sich den Gefahren des
Gebrauchs bewusst sind.
Kinder sind zu beaufsichtigen, sodass sie nicht
am Gerät spielen können.
• Die Teile des Verpackungsmaterials (z.B.
Kunststoffhüllen, Polystyrol) können für Kinder
gefährlich werden. Erstickungsgefahr!
• Im Falle der Entsorgung des Gerätes ist das
Anschlusskabel durchzutrennen und der
Türverschluss unbrauchbar zu machen, damit sich
spielende Kinder nicht im Gerät einschließen
können.
Umweltnormen
• Das Gerät darf nicht mit dem Hausmüll oder
Sperrmüll entsorgt werden. Auskunft über
Abholtermine oder Sammelplätze gibt die örtliche
Gemeindeverwaltung an.
Hinweise zur Benutzung der Gebrauchsanweisung
Die folgenden Symbole erleichtern das Lesen der Gebrauchanweisung:
Sicherheitshinweise bezüglich der Benutzung des Gerätes
Ratschläge für den korrekten Gebrauch und die optimale Ausnutzung des Gerätes.
Informationen zum Umweltschutz

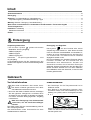
Inhalt
Sicherheitshinweise . . . . . . . . . . . . . . . . . . . . . . . . . . . . . . . . . . . . . . . . . . . . . . . . . . . . . . . . . . . . . . . . . . . . . .2
Entsorgung . . . . . . . . . . . . . . . . . . . . . . . . . . . . . . . . . . . . . . . . . . . . . . . . . . . . . . . . . . . . . . . . . . . . . . . . . . . . .3
Gebrauch Vor Inbetriebnahme / Inbetriebnhame . . . . . . . . . . . . . . . . . . . . . . . . . . . . . . . . . . . . . . . . . . . . . . . .3
Temperaturregelung / Kühlabteilausstattung / Tipps . . . . . . . . . . . . . . . . . . . . . . . . . . . . . . . . . . . . . . . . . . . . .4
Wartung Abtauen / Reinigung / Innenbeleuchtung . . . . . . . . . . . . . . . . . . . . . . . . . . . . . . . . . . . . . . . . . . . . . . .5
Wenn etwas nicht funktioniert / Kundendienst und Ersatzteile / Technische Angabe . . . . . . . . . . . . . . . .6
Türanschlagwechsel . . . . . . . . . . . . . . . . . . . . . . . . . . . . . . . . . . . . . . . . . . . . . . . . . . . . . . . . . . . . . . . . . . . . . .7
Installation Aufstellung . . . . . . . . . . . . . . . . . . . . . . . . . . . . . . . . . . . . . . . . . . . . . . . . . . . . . . . . . . . . . . . . . . .7
Elektrischer Anschluss . . . . . . . . . . . . . . . . . . . . . . . . . . . . . . . . . . . . . . . . . . . . . . . . . . . . . . . . . . . . . . . . . . .8
Einbau . . . . . . . . . . . . . . . . . . . . . . . . . . . . . . . . . . . . . . . . . . . . . . . . . . . . . . . . . . . . . . . . . . . . . . . . . . . . . . . . .8
Gerät ist eingeschaltet. Den Stillstand des Gerätes
erhält man durch Drehen des Thermostatknopfes
auf das Symbol «O».
Inbetriebnahme
• Der Drehknopf für die Temperaturwahl ist im
Kühlraum rechts.
• Den Stecker in die Steckdose einsetzen. Kühl-
schranktür öffnen und Thermostatknopf von der
Stellung «O» (STOP) aus im Uhrzeigersinn drehen.
•Das
Gebrauch
Vor Inbetriebnahme
Man sollte mindestens 2 Std. warten, bevor
das Gerät in Betrieb genommen wird, damit
das Kältemittel zurückströmen kann.
• Bevor Sie das Gerät in Betrieb nehmen, beseitigen
Sie den typischen «Neugeruch» am besten durch
Auswaschen der Innenteile mit lauwarmem Wasser
und einem neutralen Reinigungsmittel. Sorgfältig
nachtrocknen.
Bitte keine Reinigungs- bzw. Scheuermittel
verwenden, die das Gerät beschädigen
könnten.
Das Gerät sowie Teile der Innenausstattung sind für
den Transport geschützt.
Alle Klebebänder sowie Polsterteile aus dem
Geräteinnenraum entfernen.
3
Entsorgung
Verpackungsmaterialien
• Die mit dem Symbol gekennzeichneten
Materialien sind recyclingfähig.
>PE<=Polyäthylen
>PS<=Polystyrol
>PP<=Polypropylen
Sämtliche Verpackungsmaterialien sind
recyclingfähig.
In Deutschland können Sie die Verpackung an den
Händler zurückgeben, bei dem Sie das Gerät gekauft
haben.
Entsorgung von Altgeräten
Das Symbol auf dem Produkt oder seiner
Verpackung weist darauf hin, dass dieses Produkt
nicht als normaler Haushaltsabfall zu behandeln ist,
sondern an einem Sammelpunkt für das Recycling
von elektrischen und elektronischen Geräten
abgegeben werden muss.
Durch Ihren Beitrag zum korrekten Entsorgen dieses
Produkts schützen Sie die Umwelt und die
Gesundheit Ihrer Mitmenschen. Umwelt und
Gesundheit werden durch falsches Entsorgen
gefährdet. Weitere Informationen über das Recycling
dieses Produkts erhalten Sie von Ihrem Rathaus,
Ihrer Müllabfuhr oder dem Geschäft, in dem Sie das
Produkt gekauft haben.

4
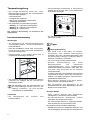
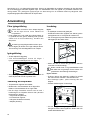
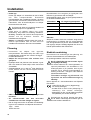
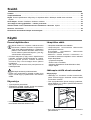
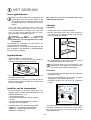
Kühlabteilausstattung
Abstellregale
• Zur Einlagerung von Lebensmittel-Packungen
verschiedener Größe, sind die Abstellfläche
höhenverstellbar.
• Dazu die Abstellfläche soweit nach vorne ziehen,
bis sie sich nach oben oder unten abschwenken
und herausnehmen lässt.
• Das Einsetzen in eine andere Höhe bitte in
umgekehrter Reihenfolge vornehmen.
• Zur besseren Raumnutzung können die vorderen
Halbteile der Ablagen auf die rückwärtigen
hinaufgelegt werden.
Die Glasablage über der Gemüseschale und
die Flascheablage müssen immer in der
Stellung verbleiben, um eine korrekte
Luftzirkulation zu gewährleisten.
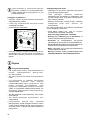
Türabsteller
• die Abstellregale der Innentür sind
höhenverstellbar.
• das Abstellregal stufenweise in Pfeilrichtung
drücken bis es frei wird; dann in der gewünschten
Höhe wieder anbringen.
• Zur besseren Reinigung kann die obere Ablage
genommen werden.
D338
Temperaturregelung
• Die richtige Einstellung erhält man, unter
Berücksichtigung folgender, die Innentemperatur
beeinflussender Faktoren:
• Raumtemperatur
• Häufigkeit des Türöffnens
• Menge der eingelagerten Lebensmittel,
• Aufstellung des Gerätes.
• Die Temperatur wird automatisch geregelt.
• Stellung „1“ = wärmste Innentemperatur
• Stellung „6“ = kälteste Innentemperatur
• Stellung „0“ = Kühlung aus
Die mittlere Einstellung ist meistens die
geeigneteste.
Tipps
Energie-Einsparung
• Das Gerät nicht in der Nähe von Herden,
Heizkörpern oder anderen Wärmequellen
aufstellen. Bei hoher Umgebungstemperatur läuft
der Kompressor häufiger und länger. Bitte im
Abschnitt “Aufstellung” nachsehen.
• Tür nur so lange wie nötig geöffnet lassen.
• Höchste Kälteeinstellung bei hoher
Raumtemperatur und erheblicher
Lebensmittelmenge kann fortdauernden
Kühlschrank-Betrieb verursachen, dabei kann sich
eine Reif- oder Eisschicht an der hinteren
Innenwand bilden.
In diesem Falle den Thermostatknopf auf wärmere
Temperaturen stellen, damit das automatische
Abtauen, mit folglich geringerem Stromverbrauch,
gewährleistet werden kann.
• Keine warmen Speisen in das Gerät stellen.
Warme Speisen erst abkühlen lassen.
• Den Verflüssiger, das Metallgitter an der
Geräterückseite, mit einem Staubsauger oder einer
Bürste immer sauber halten.
Richtiges Kühlen
• keine warmen Speisen oder dampfenden
Flüssigkeiten in den Kühlschrank einstellen.
• Geruchverbreitende Lebensmittel müssen
abgedeckt oder eingewickelt werden.
• Die Lebensmittel müssen so eingelagert werden,
dass die Kälte um sie frei zirkulieren kann.
Nachstehend einige praktische Ratschläge:
• Fleisch (alle Sorten) in Plastikfolie einpacken und
auf die Glasplatte, die sich über der Gemüseschale

befindet, legen. In dieser Lage kann das Fleisch
längstens 1-2 Tage aufbewahrt werden.
• Gekochte Nahrungsmittel, kalte Platten, usw.
zugedeckt aufbewahren. Sie können auf jede
beliebige Glasablage gelegt werden.
• Obst und Gemüse: nach vorherigem Säubern und
Waschen in den Gemüseschalen) aufbewahren.
• Butter und Käse: in speziellen Behältern
aufbewahren oder in Alu- bzw. Plastikfolie
einpacken, um den Kontakt mit der Luft zu
vermeiden.
• Milch in Flaschen: gut verschlossen in den
Flaschenhalter der Innentür stellen.
Wenn Bananen, Kartoffeln, Zwiebeln und
Knoblauch nicht verpackt sind, sollten sie nicht
in den Kühlschrank gegeben werden.
5
Wartung
Vor jeder Reinigungsarbeit immer den
Netzstecker aus der Steckdose ziehen.
Dieses Gerät erhält im Kaltekreislauf
Kohlenwasserstoff. Aus diesem Grund darf
die Wartung und das Nachfüllen
ausschließlich von autorisierten
Fachpersonal durchgeführt werden.
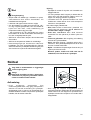
Abtauen
• An der Rückwand des Gerätes bildet sich im
Betrieb eine Reifsicht, die in den Stillstandszeiten
des Kompressors von selbst abtaut. Das
Tauwasser läuft durch eine Rinne in eine
Plastikschale auf der Rückseite des Gerätes (über
dem Kompressor) und verdunstet dort.
• Reinigen Sie regelmäßig das Ablaufloch des
Abtauwassers. Verwenden Sie hierzu den Reiniger,
der sich schon im Ablaufloch befindet.
D037
Reinigung
Bitte keine Reinigungs- bzw. Scheuermittel
verwenden, die das Gerät beschädigen
könnten.
Benutzen Sie nie Metallgegenstände um
das Gerät zu reinigen, da es beschädigt
werden könnte.
Den Innenraum mit lauwarmem Wasser und einem
neutralen Reinigungsmittel reinigen.
Gut nachwaschen und sorgfältig trocknen.
Um einen sicheren Betrieb des Gerätes zu
gerwährleisten, einmal im Jahr den Sockel-Grill
abbauen und die Luftkanäle mit einem Staubsauger
reinigen. Dies begünstigt den guten Betrieb mit
folglicher Stromersparnis.
Stillstandszeiten
• Den Stecker aus der Steckdose ziehen. Alle
Lebensmittel herausnehmen und Gerät reinigen.
• Die Tür offen lassen, um im Inneren eine gute
Luftzirkulation zu gewährleisten und somit
Geruchsbildung zu vermeiden.
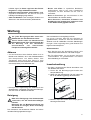
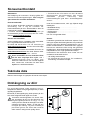
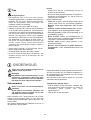
Innenbeleuchtung
• Vor dem Lampenwechsel Gerät abschalten und
den Netzstecker ziehen.
1. Lösen Sie die Befestigungsschraube der
Lampenabdeckung.
2. Heben Sie den beweglichen Teil ab, indem Sie
wie in der Abbildung gezeigt darauf drücken.
3. Defekte Lampe durch eine neue Lampe gleicher
Leistung auswechseln.
D411

6
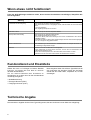
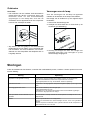
Wenn etwas nicht funktioniert
Kundendienst und Ersatzteile
Falls das Gerät Störungen aufweisen sollte, bevor Sie den Kundendienst verständigen, überprüfen Sie
zuerst folgendes:
Störung Abhilfe
Im Gerät wird es nicht kalt genug
Gerät kühlt zu stark.
Der Kompressor läuft ständig
Wasser im Kühlschrank.
Geräusche
Der Drehknopf auf kältere Temperatur drehen.
Die Lebensmittel müssen so eingelagert werden, dass die Kälte um sie frei zirkulieren
kann.
Tür richtig schließen.
Die Umgebungstemperatur ist zu warm.
Der Drehknopf auf wärmere Temperatur drehen.
Der Drehknopf auf niedrigere Zahlen drehen.
Die Umgebungstemperatur ist zu warm.
Achten Sie darauf, dass diese Öffnungen nicht durch Sockelblenden oder Geschirr
abgedeckt werden.
Innerhalb der letzen 24 Std. wurden größere Mengen warmer Lebensmittel eingelagert.
Tür nur so lange wie nötig geöffnet lassen.
Die Ablauföffnung an der Rückwand im Geräteinnenraum ist verstopft. Mit einem nicht
scharfkantigen Gegenstand reinigen.
Manchmal sind sie charakterstisch für Kältegeräte.
Wenn Kältemittel in dünne Rohre einströmt, können Sie ein blubberndes oder
plätscherndes Geräusch hören.
Immer wenn der Kompressor ein- oder ausschaltet, ist ein Klicken zu hören.
Geräusche können durch das Instand setzen der Möbelstruktur entstehen.
Sollten Sie nach o.e. Prüfungen zu keinem Resultat
kommen, so wenden Sie sich bitte an unseren
nächsten Kundendienst.
Um ein rasches Beheben des Schadens zu
ermöglichen, ist es beim Anruf an den Kundendienst
notwendig anzugeben:
• Modellbezeichnung
• Erzeugnis-Nummer (PNC)
• Fertigungs-Nummer (S-No.)
Diese Angaben finden Sie auf dem Typschild links an
der Innenseite des Gerätes. Damit Sie die Daten
schnell bei der Hand haben, empfehlen wir, sie hier
einzutragen.
Technische Angabe
Die technischen Angaben sind auf dem Typschild genannt, das auf der linken inneren Seite der Anlage liegt.

Ferner ist auch am hinteren Einbauschrankteil ein
Lüftungskamin mit folgenden Massen notwendig:
Tiefe 50 mm
Breite 540 mm
7
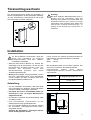
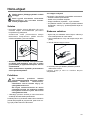
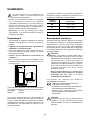
Zur Transportsicherung wurde die Gerätetür an
beiden Auschlagseiten mit Scharnierstiften befestigt.
Je nach Türanschlag, Scharnierstift (A und B) auf
einer Seite oben und unten entfernen.
Achtung!
Bei einer niedrigen Raumtemperatur (z.B. im
Winter) kann es vorkommen, dass die
Dichtung nicht perfekt am Schrank haftet. Die
Wiederherstellung der Dichtung erfolgt
automatisch nach gewisser Zeit. Wollen Sie
aber diesen Prozess beschleunigen, so
genügt es die Dichtung mit einem Fön zu
erwärmen.
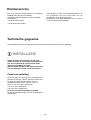
Türanschlag wechseln
B
A
Installation
Vor der Installation sicherstellen, dass das
Gerät nicht beschädigt ist. Mögliche
Transportschäden sind dem Händler
unverzüglich mitzuteilen.
• Während das Gerät in Betrieb ist, werden der
Verflüssiger und der Kompressor, die sich auf der
Rückseite des Gerätes befinden, heiß. Aus
Gründen der Sicherheit muss eine
Mindestbelüftung gesichert sein. Siehe
Aufstellungsanweisungen.
• Wichtig: Beschädigte Versorgungskabel müssen
durch ein Spezialkabel bzw. einen Spezialsatz
ersetzt werden, die beim Hersteller oder dem
Kundendienststellen erhältlich sind.
Aufstellung
• Vor der Installation sicherstellen, dass das Gerät
nicht beschädigt ist. Mögliche Transportschäden
sind dem Händler unverzüglich mitzuteilen.
• Das Gerät darf nicht in unmittelbarer Nähe von
Heizkörpern oder sonstigen Wärmequelle
aufgestellt werden.
• Ein Standort mit direkter Sonneneinstrahlung sollte
vermieden werden.
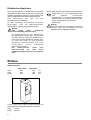
• Eine ausreichende Luftzirkulation an der
Geräterückseite muss gewährleistet sein.
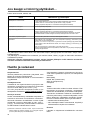
• Für eine optimale Belüftung des Gerätes müssen
die minimalen Lüftungsquerschnitet (Abb.)
eingehalten werden.
Achtung: Die Ventilations - Öffnungen müssen
immer saubergehalten werden.
Die Klimaklasse finden Sie auf dem Typschild, das
sich links im Innenraum des Gerätes befindet.
Nachstehende Tabelle zeigt, welche
Umgebungstemperatur welcher Klimaklasse
zugeordnet ist:
Klimaklasse
SN +10 bis +32°C
+16 bis +32°C
+18 bis +38°C
+18 bis +43°C
N
ST
T
für Umgebungstemperatur von
50 mm
min.
200 cm
2
200 cm
2
min.
D526

Dieses Gerät entspricht der folgende EWG Richtlinie:
- 73/23 EWG vom 19.2.73 (Niederspannung)
und folgende Änderungen;
- 87/308 EWG vom 2.6.87 (Funkentstörung);
- 89/336 EWG vom 03/05/89 (Elektromagne-
tische Verträglichkeit) und folgende
Änderungen.
Wichtig
Es muss möglich sein, das Gerät vom Netz zu
trennen; nach der Installation muss die
Steckdose daher zugänglich bleiben.
Einbau
Maßzeichnungen
ERN 16300 ERN 23500
Höhe 880 1225 mm
Tiefe 550 550 mm
Breite 560 560 mm
Ferner ist auch am hinteren Einbauschrankteil ein
Lüftungskamin mit folgenden Massen notwendig:
Tiefe 50 mm
Breite 540 mm
PR0
540
50
3
2
1
Elektrischer Anschluss
Bevor Sie den Stecker in die Steckdose einstecken,
überprüfen Sie bitte, dass die auf dem Typschild des
Gerätes angegebene Spannung sowie Frequenz mit
dem Anschlusswert des Hauses übereinstimmen.
Eine Abweichung von ±6% von der
Nominalspannung ist zulässig.
Für die Anpassung des Gerätes an andere
Spannungen muss ein Spartransformator
angemessener Leistung vorgeschaltet werden.
Wichtig
Das Gerät muss unbedingt
vorschriftsmäßig geerdet werden.
Zu diesem Zweck ist der Stecker des
Anschlusskabels mit dem dafür vorgesehenen
Kontakt versehen. Sollte die Netzleitung im
Haus nicht mit einer Erdleitung versehen sein,
so muss das Gerät an eine getrennte
Erdleitung vorschriftsmäßig und unter
Hinzuziehung eines Fachmanns
angeschlossen werden.
Die Erzeugerfirma lehnt jede
Verantwortung ab, falls diese
Unfallverhütungsvorschrift nicht beachtet
wird.
8

D132
D022
1
2
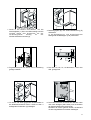
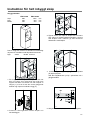
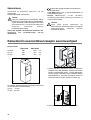
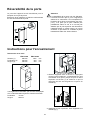
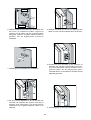
1. Gerät in die Nische einschieben, bis die
Anschlagleiste (1) oben am Möbel anliegt und die
vordere Kante des Scharniers mit der
Türöffnungsseite bündig an der
Nischenseitenwand ansteht (2).
2. Fugenabdeckprofil am Gerät, wie in Abbildung
gezeigt ankleben.
I
3. Tür öffnen und Gerät gegenüber der Bandseite an
die Möbelseitenwand rücken. Gerät mit den 4
beiliegenden Schrauben (I) befestigen.
B
E
C
D
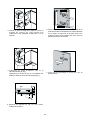
4. Belüftungsgitter (B) und Scharnierabdeckung (E)
aufstecken.
In die Befestigungs- und Scharnierlöcher
beiliegende Abdeckkappen (C-D) eindrücken.
PR266
Ha
Hb
Hc
Hd
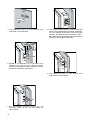
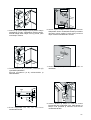
5. Die Teile Ha, Hb, Hc, Hd abnehmen, wie in der
Abb. gezeigt wird.
6. Die Schiene auf der Innenseite der Möbeltür oben
und unten auflegen (siehe Abb.) und die Position
der äußeren Bohrlöcher anzeichnen.
Nachdem die Löcher gebohrt wurden, die Schiene
mit den mitgelieferten Schrauben befestigen.
2
1
m
m
2
1
m
m
ca. 50 mm
90°
90°
ca. 50 mm
9

10
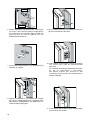
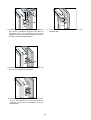
7. Die Abdeckung (Hc) in die Scheine (Ha)
eindrücken, bis sie einrastet.
PR33
Hc
Ha
PR167
Ha
Hb
8mm
8. Gerätetür und Möbeltür auf ca. 90°öffnen. Den
Winkel (Hb) in der Schiene (Ha) einsetzen.
Gerätetür und Möbeltür zusammenhalten und die
Bohrlöcher anzeichnen (siehe Abb.).
9. Die Winkeleisen entfernen und 8 mm vom
äusseren Rand der Tür mit dem Nagel (K)
kennzeichnen.
PR167
Ha
8mm
K
PR168
Hb
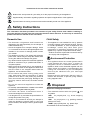
10. Den Winkel wieder auf der Schiene anbringen
und mit den mitgelieferten Schrauben befestigen.
Für eine allfällig notwendige Ausrichtung der
Möbeltür, den Spielraum der Langlöcher nutzen.
Nach Beendigung der Arbeiten den einwandfreien
Verschluss der Gerätetür überprüfen.
11. Die Abdeckung (Hd) in den Winkel (Hb)
eindrücken, bis sie einrastet.
PR167/1
Hd
Hb

11
Child Safety
• This appliance is not intended for use by persons
(including children) with reduced physical, sensory
or mental capabilities, or lack of experience and
knowledge, unless they have been given
supervision or instruction concerning use of the
appliance by a person responsible for their safety.
Children should be supervised to ensure that they
do not play with the appliance.
Environment Protection
• This appliance does not contain gasses which
could damage the ozone layer, in either its
refrigerant circuit or insulation materials. The
appliance shall not be discarded together with the
urban refuse and rubbish. Avoid damaging the
cooling unit. Information on your local disposal
sites may be obtained from your municipal
authorities.
Remove the plug and ensure that any locks or
catches are removed, to prevent young children
being trapped inside.
Disposal
Appliance Packaging Information
• The materials marked with the symbol are
recyclable.
>PE< for polyethylene, e.g. sheet wrapping
material
>PS< for polystyrene, e.g. padding material
(always CFC-free)
>POM< polyoxymethylene, e.g. plastic clips.
All materials are environmentally sound!
Safety Instructions
This information has been provided in the interests of your safety. Please read it before installing or
using the appliance. Please retain the instruction book for future reference. If owner ship is transferred,
please leave the user manual for the new owner.
Domestic Use
• The domestic refrigerators and freezers are
designed to be used specifically for the storage of
edible foodstuffs only.
• Check the appliance for transport damage. Under
no circumstances should a damaged appliance be
installed. In the event of damage please contact
your retailer.
• This appliance is heavy. The edges and projecting
parts of the cabinet may be sharp. Be careful when
moving the cabinet and always use gloves.
• Any electrical work required to install this appliance
should be carried out by a qualified electrician or
competent person.
• Make sure that the power plug is not squashed or
damaged by the back of the appliance. Make sure
that the cable is not trapped underneath the
appliance, nor touches the motor.
• Do not remove the power cord by pulling on its
lead, particularly when the appliance is being
pulled out of its niche. If the power plug socket is
loose, do not insert the power plug. Damage to the
cord may cause a short-circuit, fire and/or electric
shock.
• Do not use electrical appliances inside the
appliance.
• Do not keep carbonated drinks or bottles in the freezer
compartment. The glass bottles may break.
• Ice lollies can cause ‘frost/freezer burns’ if
consumed straight from the freezer.
• It is dangerous to try and alter the specifications or
modify this product in any way.
• Under no circumstances should you attempt to
repair the appliance yourself. Refer to your local
Service Centre, and always insist on genuine spare
parts.
Instructions for the use of the instructions booklet
Notes which are important for your safety or for the proper functioning of the appliance
Supplementary information regarding operation and practical applications of the appliance.
Tips and notes concerning economical and environmentally sound use of the appliance

Safety Instructions . . . . . . . . . . . . . . . . . . . . . . . . . . . . . . . . . . . . . . . . . . . . . . . . . . . . . . . . . . . . . . . . . . . . . .11
Disposal . . . . . . . . . . . . . . . . . . . . . . . . . . . . . . . . . . . . . . . . . . . . . . . . . . . . . . . . . . . . . . . . . . . . . . . . . . . . . . .12
Use and Control Before Use / Starting the appliance / Temperatur control . . . . . . . . . . . . . . . . . . . . . . . . . . .12
Internal parts / Hints . . . . . . . . . . . . . . . . . . . . . . . . . . . . . . . . . . . . . . . . . . . . . . . . . . . . . . . . . . . . . . . . . . . .13
Maintenance Defrosting / Cleaning / Changing the light bulb . . . . . . . . . . . . . . . . . . . . . . . . . . . . . . . . . . . . .14
Something not Working / Customer Service and Spare Parts / Technical Specifications . . . . . . . . . . . .15
Door reversal . . . . . . . . . . . . . . . . . . . . . . . . . . . . . . . . . . . . . . . . . . . . . . . . . . . . . . . . . . . . . . . . . . . . . . . . . . .16
Installation Positioning . . . . . . . . . . . . . . . . . . . . . . . . . . . . . . . . . . . . . . . . . . . . . . . . . . . . . . . . . . . . . . . . . . .16
Electrical connection . . . . . . . . . . . . . . . . . . . . . . . . . . . . . . . . . . . . . . . . . . . . . . . . . . . . . . . . . . . . . . . . . . . .13
Building-in . . . . . . . . . . . . . . . . . . . . . . . . . . . . . . . . . . . . . . . . . . . . . . . . . . . . . . . . . . . . . . . . . . . . . . . . . . . . .17
12
Before Use
Wait two hours before connecting the
appliance to allow the oil to flow back in the
compressor.
• Before using the appliance for the first time, wash
the interior and all internal accessories with
lukewarm water and some neutral soap so as to
remove the typical smell of a brand-new product,
then dry thoroughly.
Do not use detergents or abrasive
powders, as these will damage the finish.
• Remove safety elements used for transportation.
Use and Control
Contents
Starting the appliance
• Insert the plug into the wall socket and turn the
thermostat knob clockwise beyond position «O»
(OFF).
• The thermostat control situated inside the fridge
compartment regulates the temperature of the
appliance.
• Turn the thermostat control to the required setting.
Temperature Control
• The following effects are of significance in respect
of the interior temperature:
• Ambient temperature
• Quantity and temperature of the food stored;
• Frequency with which the door is opened and
how long it is left open
• the location of the appliance.
• The temperature inside the appliance is
automatically adjusted.
• Setting „1“ = hightest temperature, warmest
setting
• Setting „6“ = lowest temperature, coldest
setting.
• Setting „
•
“ = Off
A medium setting is generally the most suitable.
Disposal of old appliances
The symbol on the product or on its packaging indicates that this product may not be treated as
household waste. Instead it shall be handed over to the applicable collection point for the recycling of electrical
and electronic equipment. By ensuring this product is disposed of correctly, you will help prevent potential
negative consequences for the environment and human health, which could otherwise be caused by
inappropriate waste handling of this product. For more detailed information about recycling of this product,
please contact your local city office, your household waste disposal service or the shop where you purchased
the product.

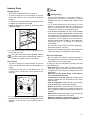
Internal Parts
Storage shelves
• The shelves can be removed for cleaning.
• To permit storage of food packages of various
sizes, the shelves can be placed at different
heights.
• To remove the internal shelf pull forward until it can
be tipped up or down and removed.
• Please do the same in reverse to insert the shelf at
a different height.
• For better use of space, the front half-shelves can
lie over the rear ones.
The glass shelf above the vegetable drawers
and the bottle shelf should always remain in
position, to ensure correct air circulation.
Door shelves
• To permit storage of food packages of various
sizes, the central door shelf can be adjusted in
height.
• Gradually pull the shelf in the direction of the
arrows until it comes free, then reposition as
required.
• For more thorough cleaning, the top and bottom
door sheves can be removed by pulling them in the
direction of the arrows, then refitting them in
position.
13
D338
Hints
Saving Energy
• Pay careful attention to where the cabinet is
placed. See the section “Installation”. When
installed correctly the cabinet will consume less
energy.
• Try to avoid keeping the doors open for long
periods or opening the doors too frequently as
warm air will enter the cabinet and cause the
compressor to switch on unnecessarily often.
• If the ambient temperature is high, the thermostat
knob is on the coldest setting (higher numbers) and
the appliance is fully loaded, the compressor may
run continuously, causing frost or ice to form on the
evaporator. If this happens, turn the knob to a
warmer setting (lower numbers) to allow automatic
defrosting and so a saving in electricity
consumption.
• Do not place warm foods inside the appliance.
Allow warm foods to cool first.
• Keep the heat emitting condenser, the metall grille
on the rear wall of your appliance, always clean.
Hints for refrigeration
• Do not store warm food or evaporating liquids in
the refrigerator and do cover or wrap up the food,
particularly if it has a strong smell.
To help you use your refrigerator correctly, here are
some useful hints:
• Raw meat (beef, pork, lamb & poultry): wrap in
polythene bags and place on top of the salad
compartment, this being the coldest spot in the
refrigerator.
Meat can only be stored safely in this way for
one or two days at the most.
• Cooked food, cold cuts, jelly, etc.: these should
be well covered and can be stored on any of the
glass shelves.
• Fruit & vegetables: these should be thoroughly
cleaned and placed in the bottom drawer/s.
• Butter & cheese: these should be placed in
special airtight containers or wrapped in aluminium
foil or polythene bags to keep out as much air as
possible.
• Milk bottles: these should have a top and should
be stored in the bottle rack on the door.
Bananas, potatoes, onions and garlic, if not
packed, must not be kept in the refrigerator.

14
Cleaning
Never use metal objects for cleaning your
appliance as it may get damaged.
NEVER use detergents, abrasive powders,
highly perfumed cleaning products or wax
polishes to clean the interior as these will
damage the surface and leave a strong
odour.
Clean the inside with warm water and bicarbonate of
soda. Rinse and dry thoroughly.
To guarantee a safe operation of the fridge, once a
year remove the ventilation grill at the base and
clean the air channels with a vacuum cleaner.
When the appliance is not in use
Disconnect the appliance from the electricity supply.
Empty all foods and clean the appliance, leaving the
doors ajar to prevent unpleasant smells.
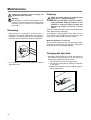
Changing the light bulb
• Should the interior light fail to work, first switch off
the appliance and disconnect from the electricity
supply, then replace the bulb as follows:
1. unscrew the light cover securing screws.
2. unhook the moving part by pressing it as shown
in the figure.
3. Replace the bulb by other with another with the
same charcteristics.
D411
Maintenance
Unplug the appliance before carrying out
any maintenance operation.
Warning
This appliance contains hydrocarbons in its
cooling unit maintenance and recharging must
therefore only be carried out by authorised
technicians.
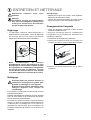
Defrosting
• Defrosting the refrigerator compartment is
automatic. The defrost water drains out through a
trough into a container at the back of the appliance,
above the motor compressor, where it evaporates.
• It is important to periodically clean the defrost
water drain hole.
D037

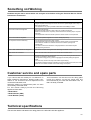
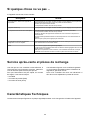
Technical specifications
The technical data is indicated in the rating plate on the left side inside the appliance.
15
This information can be found on the rating plate
inside the cabenit on the left hand wall. We
recommend that you enter this information here, so
that it is handy if needed.
If you cannot find the remedy for a malfunction in
these operating instructions, please contact your
dealer or our customer service department and
consult the Guarantee card.
Selective ordering of replacement parts can save
unnecessary travel and costs.
For this reason always provide the following
appliance information:
• Model Name
• Model Number (PNC)
• Serial Number (S-No.)
Customer service and spare parts
Something not Working
Problems may be due to causes which can easily be solved before calling the Technical Service. Please
follow these instructions:
Level properly the appliances if it is not well levelled.
Weight surpasses the storage limit of the door shelf so spread weight more evenly or
take some products out.
The appliance is not properly installed. Please look in the “Building-in” section.
Set a lower temperature.
Distribute the food products to allow cold air to circulate around them.
Make sure that the door is completely closed and that the insulating strip is complete
and clean.
The temperature where the cabinet is placed is above normal room temperature.
Turn the temperature regulator to a warmer setting temporarily.
Turn the thermostat knob to a lower number.
The temperature where the cabinet is placed is above normal room temperature.
Check that the ventilation is sufficient and that the ventilation openings are
unobstructed.
The cause could be the introduction of large quantities of food and/or frequent
opening/closing of the door.
Sometimes is normal. During automatic defrosting frost thaws on the cooling plate.
Place the drain hose at the back of the cabinet above the drain bowl.
Sometimes this is normal. Temperature control may cause clicking sounds when the
system is connected or disconnected.
The injected cooling gas may produce a gurgling sound while passing through the
tubes.
The motor may cause a humming noise and/or slight bumping.
The insulation material used has a tendency to slighly increase noise levels, how ever it
allows for much better insulation and a lower energy consumption.
Door does not close
It is too warm inside the refrigerator
It is too cold inside the refrigerator.
The compressor works continuously.
There is water inside/outside the refrigerator.
Water comes out on the floor.
Noises
SYMPTOM SOLUTION

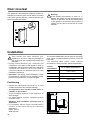
Positioning
• Unpack the cabinet and check that it is in good
condition and free of any transport damage.
• The appliance must not be located close to
radiators or gas cookers.
• Avoid prolonged exposure of the appliance to
direct sunlight.
• For safety reasons, minimum ventilation must be
as shown in Fig.
Attention: keep ventilation openings clear of
obstruction.
• It is necessary that the niche is provided with a
conduct of venti-lation having the following
dimensions:
Depth 50 mm
Width 540 mm
16
Door reversal
The appliance’s door has been locked in position for
transport by means of pins on both sides. According
to the door opening direction, remove relevant pins
at the top and at the bottom.
Warning!
If the ambient temperature is cold (i.e. in
Winter), the gasket may not fit perfectly to the
cabinet. In that case, wait for the natural fitting
of the gasket or accelerate this process by
heating up the part involved with a normal
hairdrier.
B
A
Installation
Take utmost care when handling your
appliance so as not to cause any damages to
the cooling unit with consequent possible fluid
leakages.
• During normal operation, the condenser and
compressor at the back of the appliance heat up
considerably. Always ensure that there is adequate
ventilation as a failure to do this will result in
component failure and possible food loss. See
installation instructions.
• Important: if the supply cord is damaged, it must
be replaced by a special cord or assembly availa-
ble from the manufacturer or its service agent.
The climate classification can be found on the rating
plate, which is located inside the cabinet on the left
hand wall.
The following table shows which ambient
temperature is correct for each climate classification:
Climate
classification
SN +10 to +32°C
+16 to +32°C
+18 to +38°C
+18 to +43°C
N
ST
T
for an ambient temperature of
50 mm
min.
200 cm
2
200 cm
2
min.
D526

This appliance complies with the following E.E.C.
Directives:
- 87/308 EEC of 2/6/87 relative to radio
interference suppression.
- 73/23 EEC of 19.2.73 (Low Voltage
Directive)
and subsequent modifications.
- 89/336 EEC of 3.5.89 (Electromagnetic
Compatibility Directive) and subsequent
modifications.
Attention!
It must
be possible to disconnect the appliance
from the mains power supply; the plug must
therefore be easily accessible after installation.
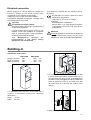
Building-in
Electrical connection
Before plugging in, ensure that the voltage and
frequency shown on the serial number plate
correspond to your domestic power supply.
Voltage can vary by ±6% of the rated voltage.
For operation with different voltages, a suitably sized
auto-transformer must be used.
Important
The appliance must be earthed.
The power supply cable plug is provided with a
contact for this purpose.
If the domestic power supply socket is not
earthed. connect the appliance to a separate
earth in compliance with current regulations,
consulting a specialist technician.
The Manufacturer declines all
responsibility if the above safety
precautions are not observed.
D132
D022
1
2
1. Fit the appliance in the niche by making sure that
it stands against the interior surface of the unit on
the side where the door hinges of the appliances
are fitted. Insert the appliance until the upper strip
butts up against the unit (1) and make sure that
the lower hinge is in line with the surface of the
unit (2).
2. Apply joint the sealing strip as shown in figure.
Dimensions of the recess
ERN 16300 ERN 23500
Height of housing 880 1225 mm
Depth of housing 550 550 mm
Width of housing 560 560 mm
It is necessary that the niche is provided with a
conduct of ventilation having the following
dimensions:
Depth 50 mm
Width 540 mm
PR0
540
50
3
2
1
17

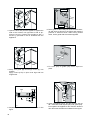
4. Snap vent grille (B) and hinge cover (E) into
position.
Apply covers (C-D) on joint cover lugs and into
hinge holes.
3. Open the door and push the appliance against the
side of the kitchen unit opposite to that of ap-
pliance hinges. Fasten the appliance with 4
screws (I) provided in the kit included with the
appliance.
I
B
E
C
D
18
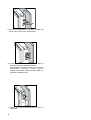
5. Separate parts Ha, Hb, Hc, Hd as shown in the
figure.
6. Place guide on the inside part of the furniture door,
up and down as shown in the figure and mark the
position of external holes. After having drilled
holes, fix the guide with the screws supplied.
2
1
m
m
2
1
m
m
ca. 50 mm
90°
90°
ca. 50 mm
7. Fix cover (Hc) on guide (Ha) until it clips into
place.
PR33
Hc
Ha
PR167
Ha
Hb
8mm
8. Open the appliance door and the furniture door at
90°. Insert the small square (Hb) into guide (Ha).
Put together the appliance door and the furniture
door and mark the holes as indicated in the figure.
PR266
Ha
Hb
Hc
Hd

19
PR168
Hb
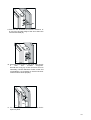
10. Place the small square on the guide again and fix
it with the screws supplied.
Should the lining up of the furniture door be
necessary, use the clearance of slots. At the end
of operations, it is necessary to check if the door
of the furniture closes properly.
11. Fix cover (Hd) on the small square (Hb) until it
clips into place.
PR167
Ha
8mm
K
PR167/1
Hd
Hb
9. Remove the brackets and mark a distance of
8 mm from the outer edge of the door where the
nail must be fitted (K).

20
måste utföras av en behörig elektriker eller
fackman.
• Service skall utföras av ett auktoriserat
serviceföretag. Använd endast original reservdelar.
• Försök aldrig att reparera skåpet på egen hand.
• Reparationer som utförs av personer med
otillräckliga kunskaper kan förorsaka personskador
eller ännu svårare fel på produkten. Kontakta
närmaste serviceföretag och använd alltid
originaldelar.
• Detta skåp innehåller kolväten i kylkretsen;
underhåll och omladdning får därför endast utföras
av en auktoriserad tekniker.
• Använd aldrig metallföremål vid rengöring av
skåpet, eftersom detta kan förorsaka skador.
Användning
• Skåpet är avsett för förvaring av matvaror för
normalt hushållsbruk enl. denna anvisning.
• Fryst mat bör inte frysas om efter upptining.
• Var noga med att följa tillverkarens
rekommendationer avseende förvaringstid. Se
motsvarande anvisningar.
• Skåpets innermodul innehåller kanaler för
kylmedium. Om dessa punkteras kan skåpet
skadas allvarligt och matvarorna förstöras.
ANVÄND DÄRFÖR ALDRIG VASSA FÖREMÅL för
att skrapa bort frost eller is. Frost avlägsnas med
den isskrapa som medföljer skåpet. Massiv is får
aldrig brytas eller huggas loss från skåpet. Låt alltid
isen smälta av sig själv vid avfrostning. Se
avfrostningsanvisningarna.
• Förvara aldrig kolsyrad eller mousserande dryck i
frysen. De kan nämligen explodera och skada
skåpet.
• Avfrostningen får inte pâskyndas på annat sätt än
som rekommenderas av tillverkaren. Mekaniska
eller andra artificiella hjälpmedel får inte användas.
Installation
• Se till att nätsladden inte kommer i kläm under
skåpet.
Säkerhet
Det är av största vikt att denna bruksanvisning
förvaras tillsammans med skåpet för framtida
behov. Låt alltid bruksanvisningen följa med
skåpet vid flyttning eller ägarbyte, så att den som
använder skåpet kan läsa om alla funktioner och
säkerhetsföreskrifter.
Dessa varningar motiveras av säkerhetsskäl. Det
är viktigt att du tar del av dem innan skåpet
installeras och används.
Med varningstriangeln och/eller uppmaningen framhävs informationer som är viktiga för
Din säkerhet eller för skåpets funktionsduglighet.
Efter denna symbol erhåller Du kompletterande informationer om skåpets funktioner och dess praktiska
användning.
Kännetecknar tips och anmärkningar för skåpets ekonomiska och miljövänliga användning.
Allmänna säkerhetsföreskrifter
• Denna apparat är inte avsedd att användas av
personer (inklusive barn) med nedsatt eller
begränsad fysisk, sensorisk eller mental förmåga,
eller av personer i avsaknad av erforderliga
kunskaper, såvida inte apparaten brukas under
överinseende av en ansvarig vuxen person eller
efter instruktioner från densamma.
Barn bör alltid övervakas när de använder
apparaten, för att säkerställa att de inte leker med
den.
• Det kan vara farligt att ändra specifikationer eller
göra ändringar i skåpet.
• Stäng alltid av skåpet och dra ur stickproppen före
rengöring eller service.
• Skåpet är tungt. Var försiktig när skåpet flyttas.
• Iskuber kan ge upphov till frysskador om de äts
direkt ur frysfacket.
• Hantera alltid skåpet med största försiktighet
för att undvika skador på kylaggregatet (risk för
vätskeläckage).
• Skåpet skall inte placeras i närheten av någon
värmekälla som t.ex. spis eller diskmaskin.
• Utsätt inte skåpet för direkt solbelysning under
längre perioder.
• Sörj för tillräcklig ventilation av skåpets
baksida för att undvika skador på kylkretsen.
• Använd aldrig andra elektriska apparater (t ex
glassmaskiner) inuti skåpet.
Service/reparation
• Alla elarbeten som krävs för att installera skåpet
Sidan laddas...
Sidan laddas...
Sidan laddas...
Sidan laddas...
Sidan laddas...
Sidan laddas...
Sidan laddas...
Sidan laddas...
Sidan laddas...
Sidan laddas...
Sidan laddas...
Sidan laddas...
Sidan laddas...
Sidan laddas...
Sidan laddas...
Sidan laddas...
Sidan laddas...
Sidan laddas...
Sidan laddas...
Sidan laddas...
Sidan laddas...
Sidan laddas...
Sidan laddas...
Sidan laddas...
Sidan laddas...
Sidan laddas...
Sidan laddas...
Sidan laddas...
Sidan laddas...
Sidan laddas...
Sidan laddas...
Sidan laddas...
Sidan laddas...
Sidan laddas...
Sidan laddas...
Sidan laddas...
Sidan laddas...
Sidan laddas...
Sidan laddas...
Sidan laddas...
-
 1
1
-
 2
2
-
 3
3
-
 4
4
-
 5
5
-
 6
6
-
 7
7
-
 8
8
-
 9
9
-
 10
10
-
 11
11
-
 12
12
-
 13
13
-
 14
14
-
 15
15
-
 16
16
-
 17
17
-
 18
18
-
 19
19
-
 20
20
-
 21
21
-
 22
22
-
 23
23
-
 24
24
-
 25
25
-
 26
26
-
 27
27
-
 28
28
-
 29
29
-
 30
30
-
 31
31
-
 32
32
-
 33
33
-
 34
34
-
 35
35
-
 36
36
-
 37
37
-
 38
38
-
 39
39
-
 40
40
-
 41
41
-
 42
42
-
 43
43
-
 44
44
-
 45
45
-
 46
46
-
 47
47
-
 48
48
-
 49
49
-
 50
50
-
 51
51
-
 52
52
-
 53
53
-
 54
54
-
 55
55
-
 56
56
-
 57
57
-
 58
58
-
 59
59
-
 60
60


