QUICK SETUP GUIDE
www.bualotech.com
EN DE FR IT ES PT NL SV
NO
DA FI
LinkStation Mini
LS-WSGL/R1


1
EN
Buff alo LinkStation Mini (LS-WSGL/R1)
Package contents includes:
• LinkStation Mini
• Ethernet Cable
• AC adapter
• LinkNavigator Installation CD
• Quick Setup Guide
• Warranty Card
Thank you for purchasing a Bu alo LinkStation Mini.
Package Contents
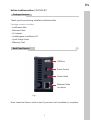
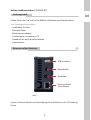
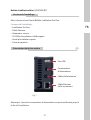
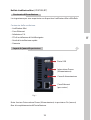
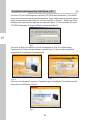
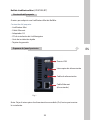
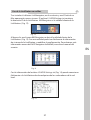
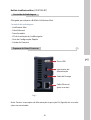
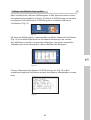
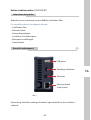
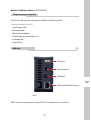
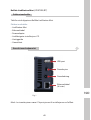
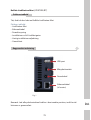
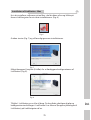
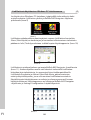
Back Panel Layout
1
Fig: 1
Note: Leave the Power switch in the On position until installation is complete.
USB Port
Power Switch
Ethernet Cable
(to router)
Power Cable

EN
2
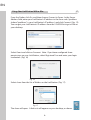
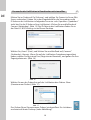
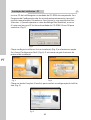
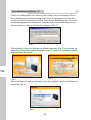
Installing Your LinkStation - PC
2
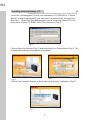
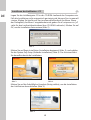
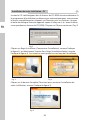
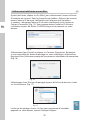
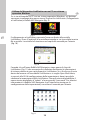
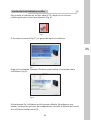
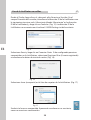
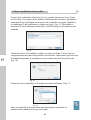
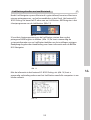
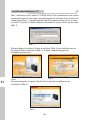
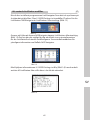
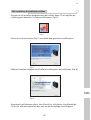
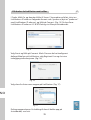
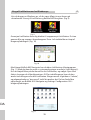
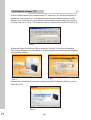
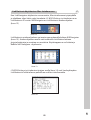
Insert the LinkNavigator CD into your computer’s CD-ROM drive. If Setup
doesn’t launch automatically, you can launch it manually by clicking Start,
then Run.... When the Run dialog opens, type d:\setup.exe (where “d” is the
drive letter of your CD-ROM). Press OK to continue. (Fig: 2)
Fig: 2
Fig: 3
Fig: 4
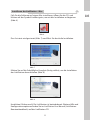
Click on Begin Installation (Fig: 3) and select the Easy Setup option (Fig: 4). The
wizard will guide you through the installation.
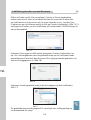
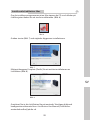
Fig: 5
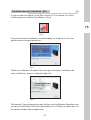
Click on the Complete button to nish the setup of your LinkStation (Fig: 5).

3
EN
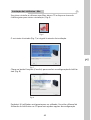
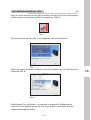
Installing Your LinkStation - Mac
3
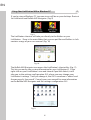
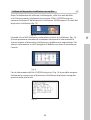
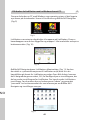
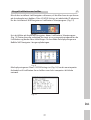
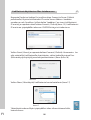
Fig: 6
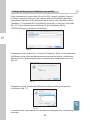
Fig: 8
Fig: 7
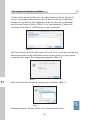
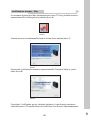
Click on the Complete button to nish the setup of your LinkStation (Fig: 8).
If you are installing the software on a Mac, open the CD and click the
LinkNavigator icon to begin installation. (Fig: 6)
The wizard will launch (Fig: 7) and guide you through the installation.
Congratulations! Your LinkStation is ready to use. Please see the LinkStation
User Manual on your CD for more help and con guration options.

EN
4
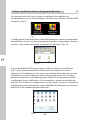
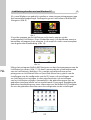
Using Your LinkStation With a Windows PC
4
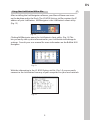
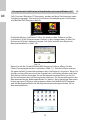
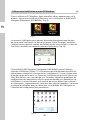
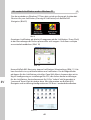
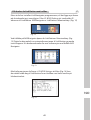
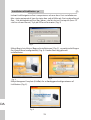
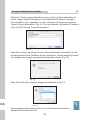
If you’re using a Windows PC, two new icons will be on your desktop: Shortcut
for LinkStation and Buffalo NAS Navigator. (Fig: 9)
The LinkStation shortcut will take you directly to the folders on your
LinkStation. Share is the main folder that you can put les and folders in. Info
contains a copy of your user manual. (Fig: 10)
The Bualo NAS Navigator icon opens the LinkStation’s client utility. (Fig:11)
This lets you easily view system information for your LinkStation(s). If you
right-click on your LinkStation’s icon and choose Open Web Admin, it will
take you to the settings con guration GUI, where you may change your
LinkStation’s settings. Until you change it, the GUI’s username is “admin” and
the password is “password”. Consult your user manual for more information
on the Bualo NAS Navigator and the settings conguration GUI.
Fig: 9
Fig: 10
Fig: 11

5
EN
Using Your LinkStation With a Mac
5
After installing the LinkNavigator software, your Mac will have new icons
on the desktop and in the Dock. The LS-WSGLSettings.txt file contains the IP
address of your LinkStation. NASNavigator is the LinkStation’s client utility.
(Fig: 12)
Clicking NASNavigator opens the LinkStation’s client utility. (Fig: 13) This
lets you easily view system information for your LinkStation and change its
settings. Consult your user manual for more information on the Bualo NAS
Navigator.
With the information in the LS-WSGLSettings.txt le, (Fig: 14) you can easily
connect to the LinkStation from any of your computers on your local network.
Fig: 12
Fig: 13
Fig: 14

EN
6
Using Your LinkStation With a Mac
5
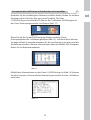
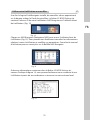
From the Finder, click Go, and then choose Connect to Server. In the Server
Address field, enter your LinkStation’s IP address in the form smb://ipaddress
(where “ipaddress” is your LinkStation’s IP address), and click Connect. (Fig: 15)
You can get your LinkStation’s IP address from the LS-WSGLSettings.txt file on
your desktop.
Select Guest and click on Connect. Note: If you have configured share
permissions on your LinkStation, select Registered User and enter your login
credentials. (Fig: 16)
Select share from the list of folders on the LinkStation. (Fig: 17)
The share will open. A link to it will appear on your desktop, as shown.
Fig: 16
Fig: 17
Fig: 15

7
EN
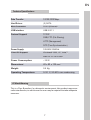
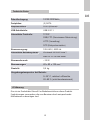
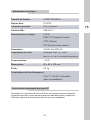
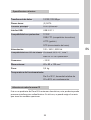
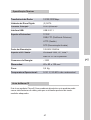
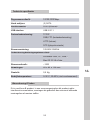
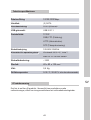
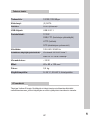
Technical Specifi cations
Data Transfer: 10/100/1000 Mbps
Hard Drives: (2) SATA
Main Connector: RJ-45 (Ethernet)
USB Interface: USB 2.0/1.1
Protocol Support: TCP/IP
SMB, FTP (File Sharing)
HTTP (Management)
NTP (Time Synchronisation)
Power Supply: 100-240V 50/60Hz
Client OS Support: Windows®
2000, XP, Vista™
Mac OS 10.3.9 or later
Power Consumption: ~15 W
Dimensions: 40 x 82 x 135 mm
Weight: 0.5 Kg
Operating Temperature: 0-35˚ C; 20-80% non-condensing
Client OS Support:
Windows®
2000, XP, Vista™
Mac OS 10.3.9 or later
Dimensions:
40 x 82 x 135 mm
Main Connector:
RJ-45 (Ethernet)
Data Transfer:
10/100/1000 Mbps
This is a Class B product. In a domestic environment, this product may cause
radio interference, in which case the user may be required to take adequate
measures.
CE Mark Warning

EN
8
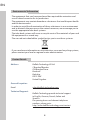
Environmental Information
• The equipment that you have purchased has required the extraction and
use of natural resources for its production.
• The equipment may contain hazardous substances that could impact health
and the environment.
• In order to avoid the dissemination of those substances in our environment
and to diminish the pressure on the natural resources, we encourage you to
use the appropriate take-back systems.
• The take-back systems will reuse or recycle most of the materials of your end
life equipment in a sound way.
• The crossed-out wheeled bin symbol invites you to use those systems.
• If you need more information on the collection, reuse and recycling systems,
please contact your local or regional waste administration.
Contact Details
Address: Bualo Technology UK Ltd
2 Bracknell Beeches
Old Bracknell Lane
Bracknell
Berkshire
RG12 7BW
United Kingdom
General Inquiries:
Email sales@bualo-technology.com
Technical Support:
Bualo Technology provide technical support
in English, German, French, Italian and
Spanish.
For opening hours and relevant telephone
numbers, please go to:
http://www.bualo-technology.com/contact

DE
PB
9
DE
Buff alo LinkStation Mini (LS-WSGL/R1)
Der Packungsinhalt umfasst:
• LinkStation Pro Duo
• Ethernet-Kabel
• Wechselstromadapter
• LinkNavigator-Installations-CD
• Handbuch für die Schnellinstallation
• Garantiekarte
Vielen Dank, dass Sie sich für die Bu alo LinkStation entschieden haben.
Packungsinhalt
Elemente auf der Rückseite
1
Abb. 1
Hinweis: Netzschalter bis zur Beendigung der Installation in der ON-Stellung
lassen.
USB-Anschluss
Netzschalter
Ethernet-Kabel
(zum Router)
Netzkabel

DE
10
11
DE
DE
10
11
DE
Installieren der LinkStation – PC
2
Legen Sie die LinkNavigator-CD in das CD-ROM-Laufwerk des Computers ein.
Falls die Installation nicht automatisch gestartet wird, können Sie sie manuell
starten. Klicken Sie hierfür auf Start und anschließend auf Ausführen. Wenn
das Dialogfeld „Ausführen“ eingeblendet wird, geben Sie d:\setup.exe ein („d“
steht für den Laufwerksbuchstaben Ihres CD-ROM-Laufwerks). Klicken Sie auf
OK, um die Installation fortzusetzen (Abb. 2).
Abb. 2
Abb. 3
Abb. 4
Klicken Sie auf Begin Installation (Installation beginnen) (Abb. 3), und wählen
Sie die Option Easy Setup (Einfache Installation) (Abb. 4). Der Assistent führt
Sie daraufhin durch die Installation.
Abb. 5
Klicken Sie auf die Schaltäche Complete (Fertig stellen), um die Installation
der LinkStation abzuschließen (Abb. 5).

DE
10
11
DE
DE
10
11
DE
Installieren der LinkStation – Mac
3
Abb. 6
Abb. 8
Abb. 7
Klicken Sie auf die Schalt äche Complete (Fertig stellen), um die Installation
der LinkStation abzuschließen (Abb. 8).
Falls Sie die Software auf einem Mac installieren, ö nen Sie die CD, und
klicken auf das Symbol LinkNavigator, um mit der Installation zu beginnen
(Abb. 6).
Der Assistent wird gestartet (Abb. 7) und führt Sie durch die Installation.
Herzlichen Glückwunsch! Die LinkStation ist betriebsbereit. Weitere Hilfe und
Kon gurationsoptionen nden Sie im LinkStation User Manual (LinkStation-
Benutzerhandbuch) auf der LinkStation-CD.

DE
12
13
DE
DE
12
13
DE
Verwenden der LinkStation in Kombination mit einem Windows-PC
4
Falls Sie einen Windows-PC benutzen, werden auf dem Desktop zwei neue
Symbole angezeigt: Shortcut for LinkStation (Verknüpfung zur LinkStation)
und Buffalo NAS Navigator (Abb. 9).
Die Verknüpfung „LinkStation“ führt Sie direkt zu den Ordnern auf der
LinkStation. Share (Gemeinsamer Ordner) ist der Hauptordner, in dem Sie
Dateien und Ordner ablegen können. Info (Info) enthält eine Kopie des
Benutzerhandbuchs. (Abb. 10)
Wenn Sie auf das Symbol Bualo NAS Navigator klicken, önen Sie das
Client-Dienstprogramm der LinkStation (Abb. 11). Auf diese Weise können
Sie ganz einfach Systeminformationen der LinkStation(s) einsehen. Wenn Sie
mit der rechten Maustaste auf das Symbol der LinkStation klicken und Open
Web Admin wählen, kommen Sie zur Kongurationsoberäche, in der Sie
die Einstellungen der LinkStation ändern können. Die Voreinstellung für den
Benutzernamen der Bedienoberäche ist „admin“, das zugehörige Kennwort
lautet „password“. Weitere Informationen über den Bualo NAS Navigator
und die Bedienoberäche für Kongurationseinstellungen nden Sie im
Benutzerhandbuch.
Abb. 9
Abb. 10
Abb. 11

DE
12
13
DE
DE
12
13
DE
Verwenden der LinkStation in Kombination mit einem Mac
5
Nachdem Sie die LinkNavigator-Software installiert haben, finden Sie auf dem
Desktop und im Dock des Mac zwei neue Symbole. Die Datei
LS-WSGLSettings.txt enthält die IP-Adresse der LinkStation. NAS Navigator ist
das Client-Dienstprogramm der LinkStation (Abb. 12).
Wenn Sie auf das Symbol NAS Navigator klicken, wird das Client-
Dienstprogramm der LinkStation geönet (Abb. 13). Auf diese Weise können
Sie ganz einfach Systeminformationen für die LinkStation(s) einsehen und die
Einstellungen ändern. Weitere Informationen über den Bualo NAS Navigator
nden Sie im Benutzerhandbuch.
Mithilfe der Informationen aus der Datei LS-WSGLSettings.txt (Abb. 14) können
Sie alle Computer in Ihrem lokalen Netzwerk ganz einfach mit der LinkStation
verbinden.
Abb. 12
Abb. 13
Abb. 14

DE
14
15
DE
DE
14
15
DE
Verwenden der LinkStation in Kombination mit einem Mac
5
Klicken Sie im Finder auf Go (Gehe zu), und wählen Sie Connect to Server (Mit
Server verbinden). Geben Sie in das Eingabefeld für die Serveradresse die
IP-Adresse der LinkStation in folgender Form ein: smb://ipaddress (“ipaddress”
steht hier für die IP-Adresse Ihrer LinkStation). Klicken Sie anschließend auf
Connect (Verbinden). (Abb. 15) Die IP-Adresse der LinkStation finden Sie in
der Datei LS-WSGLSettings.txt auf Ihrem Desktop.
Wählen Sie „Guest“ (Gast), und klicken Sie anschließend auf „Connect“
(Verbinden). Hinweis: Wenn Sie auf der LinkStation Freigaben eingerichtet
haben, wählen Sie Registered User (Registrierter Benutzer), und geben Sie Ihre
Zugangsdaten ein. (Abb. 16)
Wählen Sie aus der Ordnerliste auf der LinkStation den Ordner Share
(Gemeinsamer Ordner) (Abb. 17).
Der Ordner Share (Gemeinsamer Ordner) wird geöffnet. Ein Link dazu
erscheint auf ihrem Desktop (siehe Abbildung).
Abb. 16
Abb. 17
Abb. 15

DE
14
15
DE
DE
14
15
DE
Technische Daten
Datenübertragung: 10/100/1000 Mbit/s
Festplatten: (2) SATA
Hauptanschluss: RJ-45 (Ethernet)
USB-Schnittstelle: USB 2.0/1.1
Unterstützte Protokolle: TCP/IP
SMB, FTP (Gemeinsame Dateinutzung)
HTTP (Verwaltung)
NTP (Zeitsynchronisation)
Stromversorgung: 100–240 V, 50/60 Hz
Unterstützte Betriebssysteme: Windows® 2000/XP/Vista™
Mac OS 10.3.9 oder höher
Stromverbrauch: ~15 W
Abmessungen: 40 x 82 x 135 mm
Gewicht: 0,5 kg
Umgebungstemperatur bei Betrieb:
0–35° C, relative Luftfeuchte
20–80 % (nicht kondensierend)
Unterstützte Betriebssysteme:
Windows® 2000/XP/Vista™
Mac OS 10.3.9 oder höher
Abmessungen:
40 x 82 x 135 mm
Hauptanschluss:
RJ-45 (Ethernet)
Datenübertragung:
10/100/1000 Mbit/s
Dies ist ein Produkt der Klasse B. Im Wohnbereich kann dieses Produkt
Funkstörungen verursachen, die vom Benutzer durch entsprechende
Maßnahmen zu beseitigen sind.
CE-Warnung

DE
16
PB
DE
Umweltschutz-Information
• Für die Herstellung des von Ihnen gekauften Produkts wurden natürliche
Ressourcen verwendet.
• Das Produkt kann gefährliche Substanzen enthalten, die sich schädlich auf
Gesundheit und Umwelt auswirken können.
• Um die Umweltbelastung durch diese Substanzen und den Verbrauch
natürlicher Ressourcen zu verringern, fordern wir Sie dazu auf, die
entsprechenden Rücknahmesysteme zu nutzen.
• Durch Nutzung eines Rücknahmesystems werden die meisten Materialien
Ihrer ausgesonderten Geräte aufbereitet oder wieder verwendet.
• Das Symbol mit der durchgestrichenen Mülltonne fordert Sie dazu auf, ein
solches System zu nutzen.
• Sollten Sie mehr Informationen über Sammel-, Wiederverwendungs- und
Wiederaufbereitungssysteme benötigen, wenden Sie sich an die regionalen
Abfallzweckverbände.
Kontaktdaten
Adresse: Bualo Technology UK Ltd.
2 Bracknell Beeches
Old Bracknell Lane
Bracknell
Berkshire
RG12 7BW
United Kingdom
Allgemeine Fragen:
E-Mail sales@bualo-technology.com
Technischer Support:
Bualo Technology bietet technischen
Support in den Sprachen Deutsch, Englisch,
Französisch, Italienisch und Spanisch.
Unsere Geschäftszeiten und wichtige
Telefonnummern nden Sie unter:
http://www.bualo-technology.com/contact

17
FR
Buff alo LinkStation Mini (LS-WSGL/R1)
Contenu de l'emballage :
• LinkStation Pro Duo
• Câble Ethernet
• Adaptateur secteur
• CD-ROM d'installation LinkNavigator
• Guide d'installation rapide
• Carte de garantie
Merci d’avoir acheté l’unité Bu alo LinkStation Pro Duo.
Contenu de l'emballage
Présentation de la face arrière
1
Fig. 1
Remarque : laissez le commutateur d'alimentation en position Marche jusqu'à
la n de l'installation.
Port USB
Commutateur
d'alimentation
Câble Ethernet
(relié au routeur)
Câble d'alimentation

FR
18
Installation de votre LinkStation - PC
2
Insérez le CD LinkNavigator dans le lecteur de CD-ROM de votre ordinateur. Si
le programme d'installation ne démarre pas automatiquement, vous pouvez
le lancer manuellement en cliquant sur Démarrer, puis sur Exécuter. Lorsque
la boîte de dialogue Exécuter apparaît, tapez d:\setup.exe (« d » étant la lettre
correspondant au lecteur de CD-ROM). Cliquez sur OK pour continuer. (Fig. 2)
Fig. 2
Fig. 3
Fig. 4
Cliquez sur Begin Installation (Commencer l'installation), comme l'indique
la gure 3), et sélectionnez l'option Easy Setup (Installation facile), comme
l’indique la gure 4). L'assistant va vous guider tout au long de l'installation.
Fig. 5
Cliquez sur le bouton Complete (Terminer) pour terminer l’installation de
votre LinkStation, comme l’indique la gure 5).
Sidan laddas...
Sidan laddas...
Sidan laddas...
Sidan laddas...
Sidan laddas...
Sidan laddas...
Sidan laddas...
Sidan laddas...
Sidan laddas...
Sidan laddas...
Sidan laddas...
Sidan laddas...
Sidan laddas...
Sidan laddas...
Sidan laddas...
Sidan laddas...
Sidan laddas...
Sidan laddas...
Sidan laddas...
Sidan laddas...
Sidan laddas...
Sidan laddas...
Sidan laddas...
Sidan laddas...
Sidan laddas...
Sidan laddas...
Sidan laddas...
Sidan laddas...
Sidan laddas...
Sidan laddas...
Sidan laddas...
Sidan laddas...
Sidan laddas...
Sidan laddas...
Sidan laddas...
Sidan laddas...
Sidan laddas...
Sidan laddas...
Sidan laddas...
Sidan laddas...
Sidan laddas...
Sidan laddas...
Sidan laddas...
Sidan laddas...
Sidan laddas...
Sidan laddas...
Sidan laddas...
Sidan laddas...
Sidan laddas...
Sidan laddas...
Sidan laddas...
Sidan laddas...
Sidan laddas...
Sidan laddas...
Sidan laddas...
Sidan laddas...
Sidan laddas...
Sidan laddas...
Sidan laddas...
Sidan laddas...
Sidan laddas...
Sidan laddas...
Sidan laddas...
Sidan laddas...
Sidan laddas...
Sidan laddas...
Sidan laddas...
Sidan laddas...
Sidan laddas...
Sidan laddas...
Sidan laddas...
Sidan laddas...
Sidan laddas...
Sidan laddas...
-
 1
1
-
 2
2
-
 3
3
-
 4
4
-
 5
5
-
 6
6
-
 7
7
-
 8
8
-
 9
9
-
 10
10
-
 11
11
-
 12
12
-
 13
13
-
 14
14
-
 15
15
-
 16
16
-
 17
17
-
 18
18
-
 19
19
-
 20
20
-
 21
21
-
 22
22
-
 23
23
-
 24
24
-
 25
25
-
 26
26
-
 27
27
-
 28
28
-
 29
29
-
 30
30
-
 31
31
-
 32
32
-
 33
33
-
 34
34
-
 35
35
-
 36
36
-
 37
37
-
 38
38
-
 39
39
-
 40
40
-
 41
41
-
 42
42
-
 43
43
-
 44
44
-
 45
45
-
 46
46
-
 47
47
-
 48
48
-
 49
49
-
 50
50
-
 51
51
-
 52
52
-
 53
53
-
 54
54
-
 55
55
-
 56
56
-
 57
57
-
 58
58
-
 59
59
-
 60
60
-
 61
61
-
 62
62
-
 63
63
-
 64
64
-
 65
65
-
 66
66
-
 67
67
-
 68
68
-
 69
69
-
 70
70
-
 71
71
-
 72
72
-
 73
73
-
 74
74
-
 75
75
-
 76
76
-
 77
77
-
 78
78
-
 79
79
-
 80
80
-
 81
81
-
 82
82
-
 83
83
-
 84
84
-
 85
85
-
 86
86
-
 87
87
-
 88
88
-
 89
89
-
 90
90
-
 91
91
-
 92
92
-
 93
93
-
 94
94


på andra språk
- italiano: Buffalo LS-WSGL Manuale del proprietario
- español: Buffalo LS-WSGL El manual del propietario
- Deutsch: Buffalo LS-WSGL Bedienungsanleitung
- português: Buffalo LS-WSGL Manual do proprietário
- français: Buffalo LS-WSGL Le manuel du propriétaire
- English: Buffalo LS-WSGL Owner's manual
- dansk: Buffalo LS-WSGL Brugervejledning
- suomi: Buffalo LS-WSGL Omistajan opas
- Nederlands: Buffalo LS-WSGL de handleiding
Relaterade papper
-
Buffalo LINKSTATION PRO DUO Bruksanvisning
-
-
-
-
Buffalo TeraStation 1200 Installationsguide
-
-
-
-