Gre CSPAN Electric Cordless Rechargeable Pool and Spa Vacuum Cleaner Användarmanual
- Typ
- Användarmanual

www.grepool.com
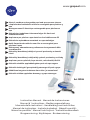
Electric cordless rechargeable pool and spa vacuum cleaner
Limpiafondos inalámbrico eléctrico recargable para piscinas y
spa
Nettoyeur sans l électrique rechargeable pour piscines et
spa
Elektrischer kabelloser Vakuumreiniger für Pool und
Schwimmbecken
Aspiratore per piscina e spa elettrico ricaricabile senza li
Elektrische oplaadbare zwembad- en spa-stofzuiger
Robô limpa-fundos elétrico sem os e recarregável para
piscinas e spas
Elektryczny, akumulatorowy odkurzacz do czyszczenia SPA
oraz basenów
Elektrický bezdrátový dobíjecí vysavač pro bazény a domácí
lázně
Elektrický bezdrôtový nabíjateľný vysávač pre bazény a vírivky
Aspirator pentru piscină și spa electric, reîncărcabil, fără r
Elektrisk sladdlös uppladdningsbar pool och spa-sugare
Elektrisk ledningsfri genopladelig støvsuger til pool og spa
Sähköinen langaton ladattava uima-allas- ja ammeimuri
Elektrisk trådløs oppladbar basseng- og spa-støvsuger
EN
ES
FR
DE
IT
NL
PT
PO
CS
SK
RO
SV
Instruction Manual - Manual de Instrucciones
Manuel d´instructions - Bedienungsanleitung
Manuale delle instruzioni - Handleiding met instructies
Manual de instruções - Instrukcja obsługi - Návod k použití -
Návod na použitie - Manual Instrucţiuni - Instruktionshandbok
Brugsanvisning- Käyttöopas - Bruksanvisning
HIMCSPAN.23
Ref. CSPAN
DK
FI
NO


EN
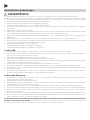
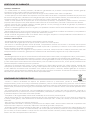
SAFETY WARNING
WARNING
The cleaner is not a toy, and is operated by people older than 8 years age.
Any people who operates the cleaner, has to read the manual carefully before work it.
1. Cleaning and user maintenance shall not be made by children without supervision.
2. The cleaner is designed to clean the swimming pool, spa.
3. Please use the original batteries and charger when using.
4. Only charging it when the cleaner is power off.
5. Put the cleaner into a clean and dry place. Do not expose it under the sun, or close to explosive.
6. Do not work it when out of water.
7. Do not close to the vacuum head when it is working, due to its suction power, especially for the human
body, animals, hairs or clothes.
8. Do not disassemble the cleaner without professional guidance or notice from the authorized distributor
or manufacturer.
9. Do not leak the lubricant oil, and it causes water polluted.
10. Stop to work the cleaner when there is anything wrong; Please contact with the authorized distributor or
replace it to the original parts/accessories
11. Cleaner working conditions:
11.1 Maximum applicable water depth: 40 - 300cm.
11.2 Water temperature: 4°C( 39.2°F )-35°C( 95°F )
1. USB line
1. Only output voltage 5V is allowed for charger including USB joint.
2. For indoor use only. The charger should not be used outdoor and not be exposed to rain, humidity, any
liquid or heat.
3. Keep the charger out of children.
4. Never use the charger if any damage is found.
5. Do not handle the cleaner and charger with wet hands and bare feet, when charging the cleaner.
6. Disconnect the charger from power when not in use.
7. If the USB line is damaged, it must be replaced by a new charger to avoid danger.
8. Make sure the cleaner, USB lane and charger are totally dry before charging.
9. Charge the cleaner 5 hours prior to the rst use.Normally cleaner can be operated about 30 minutes after
fully charged.
2. Battery disposal
1. The cleaner battery is a lithium battery, it must be disposed properly, please contact with your local authority
for more information.
2. Never attempt to disassemble the lithium battery.
3. Remove all personal items such as rings, bracelets, necklaces and watches when unwiring a lithium battery
from the vacuum unit.
4. The battery causes short circuit current, as well as severe burning when it is high enough.
5. Wear complete eye protection, gloves and protective clothing when removing the battery pack.
6. No smoking or sparkling ame near the robot , or it may causes unknow gases.
7. If acid comes in contact with skin and clothing, wash immediately with plenty of soap and water
8. If acid comes in contact with eyes, immediately ood eye with running cool water for at least 15 minutes.
Get medical attention immediately.
Above warning and cautions are not intended to incorporate all possible instances for risks and/or
severe injury. Pool/spa owners should always exercise intensive caution and common sense when operating
the cleaner.

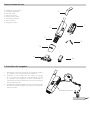
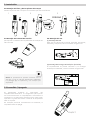
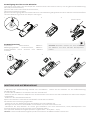
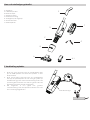
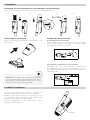
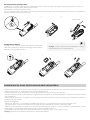
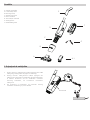
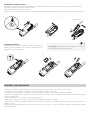
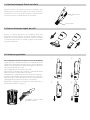
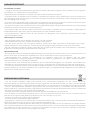
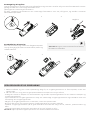
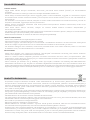
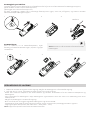
How to use it
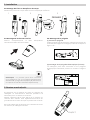
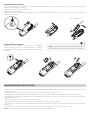
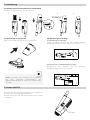
1. Charger connection
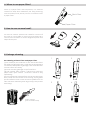
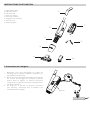
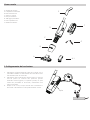
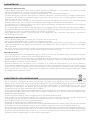
A. Vacuum head
A-1. Round Brush
B. Front lter
C. Paper lter
D. Motor body
E. Portable handle
F. Back lter
G. USB charger
A
Indicator light
B
C
D
E
A-1
G
F
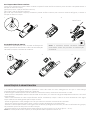
1. Plug one end of the charging cable into the USB
charger and one end of the charger into the
power supply.
2. Plug the other end of the charging line into
the charging port of the cleaner (as shown in
the gure). At this time, the red indicator of the
product lights up, indicating normal charging.
3. After about 5 hours, the green indicator of the
charger lights up and the battery is fully charged.

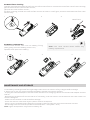
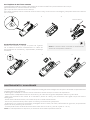
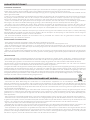
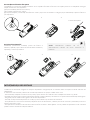
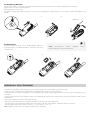
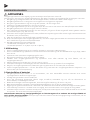
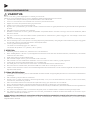
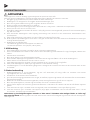
2. Installation
3. Power ON/OFF
2.1 Filter element assembly and body parts assembly
Assemble the body parts in the direction of the arrow.
CLOSE
2.2 Assembly of vacuum head
Insert the entire vacuum head directly into the Front
lter.
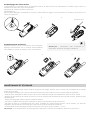
2.3 Handle assembly
(1) Handle assembly
This handle is used to clean walls, steps, seats and
corners, as shown in gure “A”.
(2) Assembly of telescopic pole (not included)
Cleaner can be connected to a standard telescopic
pole, as shown in gure «B».
3.1 Press and hold the power switch button of the
cleaner for 2-3 seconds to start the machine.
Please put the product into water for operation to
prevent oil seal failure when the product idles.
3.2 When the switch button is pressed again, the
cleaner shuts down.
1 2 3 4
Note: the product can be connected with
handle (A) or a standard telescopic pole (B)
(telescopic rod (B) is optional and needs to be
purchased additionally).
A
B
ON/OFF

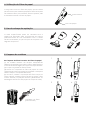
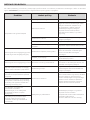
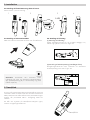
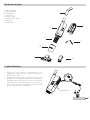
4. When to use paper lter?
5. How to use vacuum head?
6. Garbage cleaning
There is a paper lter with shipment, it is used to
collect ne dust and rubblishes; For daily cleaning,
such as leaves, fruits, stone, there is no need to such
a paper lter.
To use the cleaner without vac head for corners of
the pool, it can be after or with the high speed as it
can be used at same to cleans angles of pools and
steps of the pool.
Filter cleaner
(not included into)
6.1 Cleaning of front filter and paper filter
(1) For example, the buttons on the two sides of the
transparent garbage cover under the drawing board
remove the transparent garbage cover and the lter
element from the body.
(2) Clean out the garbage in the front lter.
(3) Use a paper lter cleaner / machine to clean the
paper lter. (The cleaner / machine needs to buy
seperately).
(4) First install the cleaned lter element to the body,
then install the front lter to the body, and tighten
the front lter to the «close» direction. (Reference: 2.1
lter element assembly and large body component
assembly)
1
3
2
4
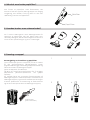
Back lter
Paper lter

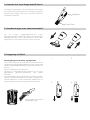
6.2 Back filters cleaning
(1) Press and hold the button at the front end of the back lter to remove the whole lter cover from the body;
(2) Then take out the internal lter screen;
(3) Clean the internal lter screen;
(4) After cleaning, reinstall the internal lter screen as shown in the gure, and then assemble the lter cover
on the body.
1. The battery discharges itself during storage. Make sure the cleaner is fully charged before storage.
2. When not in use, you must recharge the battery at least every three months.
• Unplug the external adapter from the socket and then the charging cable from the external adapter and the
cleaner.
• Remove the accessories from the cleaner. If necessary, rinse the cleaner and accessories with clean water. Do
not use detergent.
• Make sure the cleaner is drained before storage.
• Use a wet cloth to clean and dry the cleaner and its accessories.
• Store in a well ventilated place away from sunlight, heat, re sources, pool chemicals and children.
• The storage environment temperature should be 10ºC – 25ºC (50ºF– 77ºF).
Note: higher temperature may shorten battery life.
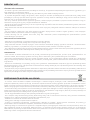
6.3 Battery replacement
Unscrew the screws, take out the battery xing
plate, gently press the battery power cord,
separate and replace the battery.
Note: User must consult dealer before any
battery replacement.
Back lters
321
1 2 3 4
MAINTENANCE AND STORAGE

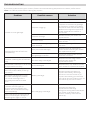
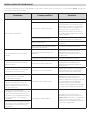
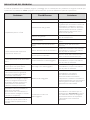
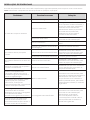
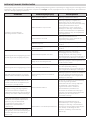
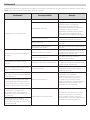
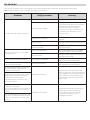
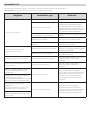
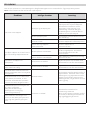
TROUBLESHOOTING
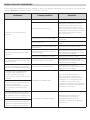
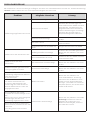
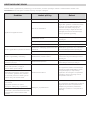
If you have problems with your cleaner, follow the troubleshooting steps below to restore performance.
Note: turn off the power before making any repairs.
Problem Possible causes Solution
Unable to clean garbage
The battery is low Please recharge.
Impeller clogging
Turn off the cleaner and check the
impeller to remove the garbage.
If necessary, contact your dealer
for further instructions. Warning!
Before servicing the equipment,
make sure that the cleaner is
turned off.
Impeller damage Please contact your dealer for
replacement.
The lter is full Clean up the garbage from the
lter screen.
There is too much garbage in the
lter element Clean the garbage of lter
element.
Garbage ows out of the front
transparency
Anti pour blade damage Replace the anti reverse ow
piece. Please contact your dealer
for replacement parts.
The garbage is too full Clean the waste of lter screen
and lter element.
Rubbish is leaking out of the lter
bag The lter bag is damaged Replace the lter bag. Please
contact your dealer for
replacement parts.
The handle / telescopic link cannot
be assembled correctly V-clip damaged Replace the v-clip. Please contact
your dealer for replacement parts.
The fully charged battery cannot
start the product after pressing
the switch
Battery damage.
Please contact the dealer to
replace the battery. Warning!
Don't turn on the cleaner and
replace the battery yourself. This
can cause serious or fatal injury, so
the warranty will not be valid.
The power consumption is too
fast. After starting the product,
the overall working time is
obviously less than the rated
time
When charging the product, the
indicator will not light up.
(ensure that the charger and
cleaner are connected correctly
and completely) The charging is damage.
Contact the dealer for
replacement. Warning!
Using the wrong external adapter
will result in damage to the
cleaner / battery and void the
warranty.
If the charging time exceeds 6-8
hours, the red light is always on
and the green light is not on.

GUARANTEE CERTIFICATE
GENERAL TERMS
· In accordance with these provisions, the seller guarantees that the product corresponding to this guarantee
(“the Product”) is in perfect condition at the time of delivery.
· The Guarantee Term for the Product is two (2) years from the time it is delivered to the purchaser.
· In the event of any defect in the Product that is notied by the purchaser to the seller during the Guarantee
Term, the seller will be obliged to repair or replace the Product, at his own cost and wherever he deems suitable,
unless this is impossible or unreasonable.
· If it is not possible to repair or replace the Product, the purchaser may ask for a proportional reduction in the
price or, if the defect is sufciently signicant, the termination of the sales contract.
· The replaced or repaired parts under this guarantee, will not extend the guarantee period of the original
Product, but will have a separate guarantee.
· In order for this guarantee to come into effect, the purchaser must provide proof of the date of purchase and
delivery of the Product.
· If, after six months from the delivery of the Product to the purchaser, he noties a defect in the Product, the
purchaser must provide proof of the origin and existence of the alleged defect.
· This Guarantee Certicate is issued without prejudice to the rights corresponding to consumers under
national regulations.
INDIVIDUAL TERMS
· This guarantee covers the products referred to in this manual.
· This Guarantee Certicate will only be applicable in European Union countries.
· For this guarantee to be effective, the purchaser must strictly follow the Manufacturer’s instructions included
in the documentation provided with the Product, in cases where it is applicable according to the range and
model of the Product.
· When a time schedule is specied for the replacement, maintenance or cleaning of certain parts or
components of the Product, the guarantee will only be valid if this time schedule has been followed.
LIMITATIONS
· This guarantee will only be applicable to sales made to consumers, understanding by “consumer”, a person
who purchases the Product for purposes not related to his professional activities.
· The normal wear resulting from using the product is not guaranteed. With respect to expendable or
consumable parts, components and/or materials, such as batteries, light bulbs, etc. the stipulations in the
documentation provided with the Product, will apply.
· The guarantee does not cover those cases when the Product; (I) has been handled incorrectly; (II) has been
repaired, serviced or handled by non- authorised people or (III) has been repaired or serviced not using original
parts. In cases where the defect of the Product is a result of incorrect installation or start-up, this guarantee
will only apply when said installation or start-up is included in the sales contract of the Product and has been
conducted by the seller or under his responsibility.
CROSSED-OUT WASTE CONTAINER
· In order to reduce the amount of waste of electric and electronic apparatus, to reduce the danger of
components, to encourage the reuse of apparatus, to assess waste and to set up a suitable waste treatment
system, with the aim of improving the efciency of environmental protection, a set of rules has been established
applicable to the manufacture of the product and other rules regarding the correct environmental treatment
when these products become waste.
· It is also intended to improve the environmental practices of all agents involved in electrical and electronic
goods, including manufacturers, distributors, users and particularly those directly involved in the treatment of
waste derived from these apparatus.
· From 13th August 2005, there are two ways of disposing of this apparatus:
· If you purchase a new equivalent apparatus or which has the same functions as the one you wish to dispose
of, you can hand it over, free of charge, to the distributor when making your purchase.
· You can take it to local collection points.
· We shall cover waste treatment costs.
· The apparatus are labelled with a symbol of a “crossed-out waste container”. This symbol means that the
apparatus is subject to selected waste collection, different from general waste collection.
· Our products are designed and manufactured with top-quality, environmental-friendly materials
and components, which can be reused and recycled. In spite of this, several parts of this product are not
biodegradable and therefore it should not be left in the environment. For the correct recycling of this product,
please completely detach the electrical motor from the rest of the ltration equipment.

ES
ADVERTENCIAS DE SEGURIDAD
ADVERTENCIA
El limpiafondos no es un juguete y debe manejarlo una persona mayor de 8años.
Toda persona que maneje el limpiafondos debe leer el manual con detenimiento antes de utilizarlo.
1. La limpieza y el mantenimiento por parte del usuario no deben ser realizados por niños sin supervisión.
2. El limpiafondos está diseñado para limpiar piscinas y spa.
3. Utilice solo las baterías y el cargador originales cuando lo utilice.
4. Cargue la batería únicamente cuando el limpiafondos esté apagado.
5. Guarde el limpiadondos en un lugar limpio y seco. No lo exponga a la luz solar ni lo coloque cerca de
explosivos.
6. No lo utilice fuera del agua.
7. No sitúe nada cerca de la tapa de aspirado cuando está en funcionamiento, debido a su potencia de
succión, en especial partes del cuerpo, animales, cabello o prendas.
8. No desmonte el limpiafondos sin asistencia profesional o aviso del distribuidor autorizado o del fabricante.
9. No deje que se ltre el aceite lubricante, contamina el agua.
10. No utilice el limpiafondos si hay algún problema. Póngase en contacto con el distribuidor autorizado o
sustituya con las piezas o accesorios originales.
11. Condiciones operativas del limpiafondos:
11.1 Profundidad máxima del agua: 40 - 300cm.
11.2 Temperatura del agua: 4°C( 39.2°F )-35°C( 95°F )
1. Cargador USB
1. Sólo se permite una tensión de salida de 5V para el cargador, incluyendo el USB.
2. Uso exclusivo en interiores. El cargador no debe utilizarse en exteriores y no debe estar expuesto a la lluvia,
a la humedad, a líquidos o al calor.
3. Mantenga el cargador fuera del alcance de los niños.
4. No utilice el cargador si detecta algún daño.
5. No manipule el limpiafondos ni el cargador con las manos húmedas ni con los pies descalzos cuando el
limpiafondos esté en carga.
6. Desconecte el cargador de la corriente cuando no lo utilice.
7. Si el cable está dañado, deberá sustituirse por uno nuevo para evitar peligros.
8. Asegúrese de que el limpiafondos, cable USB y cargador están completamente secos antes de la carga.
9. Cargue el limpiafondos durante 5 horas antes del primer uso. Cuando la batería está completa, el
limpiafondos podrá usarse durante 30 minutos aproximadamente.
2. Retirada de la batería
1. La batería del limpiafondos es de litio y se debe retirar de la forma adecuada; póngase en contacto con la
administración local para más información.
2. Nunca trate de desmontar la batería de litio.
3. Quítese todos los accesorios, como anillos, pulseras, collares y relojes cuando suelte los cables de la batería
de litio de la unidad de aspirado.
4. La batería causa un cortocircuito, así como quemaduras graves cuando es lo sucientemente fuerte.
5. Cuando extraiga el conjunto de baterías, protéjase con gafas, guantes y prendas adecuadas.
6. No fume ni encienda chispas ni llamas cerca del limpiafondos, porque puede causar gases desconocidos.
7. Si la piel o una prenda entran en contacto con el ácido, lávelas inmediatamente con abundante agua y
jabón.
8. Si el ácido entra en contacto con los ojos, aclárelos inmediatamente con agua corriente y fresca durante al
menos 15minutos. Acuda a un servicio médico de inmediato.
Las advertencias y las precauciones anteriores no pretenden ser exhaustivas ni recoger todos los
supuestos de riesgos ni de lesiones graves. Los propietarios de las piscinas o spa deben prestar en todo
momento una atención plena y aplicar el sentido común al manejar.

Instrucciones de uso
1. Conexión del cargador
A. Cabezal de aspirado
A-1. Cepillo redondo
B. Filtro frontal
C. Filtro de papel
D. Cuerpo del motor
E. Asa de transporte
F. Filtro trasero
G. Cargador USB
A
Piloto luminoso
B
C
D
E
A-1
G
F
1. Enchufe el cable de carga en el cargador USB y
el cargador en la fuente de alimentación.
2. Enchufe el otro extremo del cable de carga
en el puerto de carga del limpiafondos (como
se muestra en la gura). En este momento, el
indicador rojo del producto se ilumina, indicando
una carga normal.
3. Después de aproximadamente 5 horas de carga,
la batería estará cargada y el piloto luminoso se
pondrá verde.

2. Instalación
3. Encendido / Apagado
2.1 Montaje del filtro y de las piezas del cuerpo
Monte las piezas del cuerpo en el sentido que marca la echa.
2.2 Montaje del cabezal de succión
Introduzca el cabezal del limpiafondos en la tapa del
ltro frontal.
2.3 Montaje del asa
(1) Montaje del asa
Este asa se utiliza para limpiar paredes, escalones,
asientos y esquinas, como muestra la gura «A».
(2) Montaje del mango telescópico (incluido)
El limpiafondos se puede conectar a un mango
telescópico estándar, como muestra la gura «B».
3.1 Mantenga pulsado el interruptor del
limpiafondos durante 2 o 3 segundos para poner
en funcionamiento el limpiafondos. Introduzca el
producto en el agua para que funcione, para evitar
que falle la junta del aceite mientras el dispositivo
esté en reposo.
3.2 Cuando presiona nuevamente los botones, el
limpianfondos se apaga.
1 2 3 4
Note: El producto se puede conectar con el
asa (A) o con el mango telescópico estándar.
La pértiga (B) es opcional y se compra por
separado.
A
B
ON/OFF
CERRAR

4. Uso del ltro de papel
5. Uso del cabezal de aspirado
6. Limpieza de residuos
En el paquete se incluye un ltro de papel que se
utiliza par recoger polvo y residuos pequeños. Para la
limpieza de residuos cotidianos, como hojas, frutos
y piedras, no es necesario utilizar el ltro de papel.
El uso del limpiafondos sin el cabezal de aspirado
para las esquinas de la piscina puede ser posterior
o simultáneo a la alta velocidad, o para limpiar las
esquinas y los escalones de la piscina.
limpiador del ltro
(no incluido)
6.1 Limpieza del filtro frontal y el filtro de papel
(1) Los botones de los laterales de la cubierta
transparente debajo del depósito extraen esta
cubierta y el elemento ltrante del cuerpo.
(2) Limpie los residuos del ltro frontal.
(3) Utilice un limpiador de ltro de papel o una
máquina para limpiarlo. (El limpiador y la máquina
se deben comprar por separado.)
(4) En primer lugar, instale el ltro limpio en el
cuerpo; a continuación instale el ltro frontal en el
cuerpo y por último gira el ltro frontal a la posición
«cerrado».(Referencia: 2.1 Montaje del ltro y de las
piezas del cuerpo)
1
3
2
4
Filtro trasero
Filtro de papel

6.2 Limpieza de los filtros traseros
(1) Mantenga pulsado el botón del frontal de la cubierta del ltro para extraerla del cuerpo.
(2) Desatornille la cubierta trasera del ltro;
(3) Limpie el ltro interno de la cubierta
(4) Tras la limpieza, vuelve a colocar el ltro interior tal y como se ve en la imagen y después monta la cubierta
en el cuerpo.
1. La batería se descarga sola cuando el dispositivo está guardado. Asegúrese de que el robot está completamente
cargado antes de guardarlo.
2. Recargue la batería al menos una vez cada tres meses aunque no utilice el dispositivo.
•Desenchufe el adaptador externo de la toma y el cable de carga del adaptador externo y del robot.
•Retire los accesorios del robot. Si es necesario, aclare el robot y sus accesorios con agua limpia. No utilice
detergente.
•Antes del almacenamiento, cerciórese de que el robot está drenado.
•Utilice un paño húmedo para limpiar el robot y los accesorios y séquelos.
•Guárdelo en un lugar bien ventilado, protegido de la luz solar, del calor, de fuentes de ignición, de productos
químicos de la piscina y de los niños.
•La temperatura de almacenamiento debe estar entre los 10°C y los 25°C (50°F – 77°F).
Nota: Si la temperatura es superior, la duración de la batería puede acortarse.
6.3 Sustitución de la batería
Suelte los tornillos y saque la placa de jación
de la batería. Presione suavemente el cable de
alimentación de la batería y separándolo, sustituya
la batería.
Nota: El usuario debe consultar al distribuidor
antes de reemplazar la batería.
Filtro trasero
321
1 2 3 4
MANTENIMIENTO Y ALMACENAJE

RESOLUCIÓN DE PROBLEMAS
Si tiene problemas con el limpiafondos, siga estos pasos para recuperar su rendimiento. Nota: apague el
dispositivo antes de repararlo.
Problema Causas posibles Solución
No limpia los residuos.
La batería está baja. Recargue la batería.
El impulsor está obstruido.
Apague el limpiafondos,
compruebe si el impulsor tiene
residuos y límpielos. Si necesita
más indicaciones, póngase en
contacto con su distribuidor.
Advertencia: Antes de revisar el
limpiafondos, asegúrese de que
está apagado.
El propulsor está dañado. Póngase en contacto con el
distribuidor para la sustitución.
El ltro está lleno. Limpie los residuos de la pantalla
del ltro.
Hay un exceso de residuos en el
elemento de ltrado. Limpie los residuos del ltro.
Los residuos salen de la parte
frontal.
La cuchilla antivertidos está
dañada.
Sustituya la pieza antireujo.
Póngase en contacto con el
distribuidor para las piezas de
sustitución.
El depósito de residuos está lleno. Limpie la pantalla y el ltro.
Los residuos se ltran desde la
bolsa del ltro. La bolsa del ltro está rota.
Sustituyas la bolsa del ltro.
Póngase en contacto con el
distribuidor para las piezas de
sustitución.
El asa o el mango no se pueden
ensamblar correctamente. La pinza en V está dañada Sustituya la pinza en V. Póngase
en contacto con el distribuidor
para las piezas de sustitución.
El producto no se enciende
a pesar de tener la batería
plenamente cargada
La batería está deteriorada.
Póngase en contacto con el
distribuidor para sustituir la
batería. Advertencia: No encienda
el limpiafondos ni sustituya la
batería usted mismo. Puede
causar lesiones graves o mortales
y la garantía dejará de ser válida.
La batería se agota demasiado
rápido. Después de poner en
marcha el producto, el tiempo
total de trabajo es menor que el
tiempo indicado.
Cuando el producto está
cargando no se enciende el piloto
luminoso. (asegúrese de que el
cargador y el limpiafondos estén
correctamente conectados y
cargados. El cargador está dañado
Póngase en contacto con el
distribuidor para su sustitución.
¡Atención! El uso de un adaptador
externo incorrecto provocará
daños en el limpiafondos / batería
y anulará la garantía.
Si el tiempo de carga supera las
6-8 horas, la luz roja está siempre
encendida y la luz verde no se
enciende.

CERTIFICADO DE GARANTÍA
ASPECTOS GENERALES
• De acuerdo con estas disposiciones, el vendedor garantiza que el producto correspondiente a esta garantía
(“el Producto”) no presenta ninguna falta de conformidad en el momento de su entrega.
• El Período de Garantía para el Producto es de dos (2) años y se calculará desde el momento de su entrega al
comprador.
• Si se produjera una falta de conformidad del Producto y el comprador lo noticase al vendedor durante el
Periodo de Garantía, el vendedor deberá reparar o sustituir el Producto a su propio coste en el lugar donde
considere oportuno, salvo que ello sea imposible o desproporcionado.
• Cuando no se pueda reparar o sustituir el Producto, el comprador podrá solicitar una reducción proporcional
del precio o, si la falta de conformidad es sucientemente importante, la resolución del contrato de venta.
• Las partes sustituidas o reparadas en virtud de esta garantía no ampliarán el plazo de la garantía del Producto
original, si bien dispondrán de su propia garantía.
• Para la efectividad de la presente garantía, el comprador deberá acreditar la fecha de adquisición y entrega
del Producto.
• Cuando hayan transcurrido más de seis meses desde la entrega del Producto al comprador y éste alegue falta
de conformidad de aquél, el comprador deberá acreditar el origen y la existencia del defecto alegado.
• El presente Certicado de Garantía no limita o prejuzga los derechos que correspondan a los consumidores
en virtud de normas nacionales de carácter imperativo.
CONDICIONES PARTICULARES
• La presente garantía cubre los productos a que hace referencia este manual.
• El presente Certicado de Garantía será de aplicación únicamente en los países de la Unión Europea.
• Para la ecacia de esta garantía, el comprador deberá seguir estrictamente las indicaciones del Fabricante
incluidas en la documentación que acompaña al Producto, cuando ésta resulte aplicable según la gama y
modelo del Producto.
• Cuando se especique un calendario para la sustitución, mantenimiento o limpieza de ciertas piezas o
componentes del Producto, la garantía sólo será válida cuando se haya seguido dicho calendario correctamente.
LIMITACIONES
• La presente garantía únicamente será de aplicación en aquellas ventas realizadas a consumidores,
entendiéndose por “consumidor”, aquella persona que adquiere el Producto con nes que no entran en el
ámbito de su actividad profesional.
• No se otorga ninguna garantía respecto del normal desgaste por uso del producto. En relación con las piezas,
componentes y/o materiales fungibles o consumibles como pilas, bombillas etc., se estará a lo dispuesto en la
documentación que acompañe al Producto, en su caso.
• La garantía no cubre aquellos casos en que el Producto: (I) haya sido objeto de un trato incorrecto; (II) haya
sido reparado, mantenido o manipulado por persona no autorizada o (III) haya sido reparado o mantenido con
piezas no originales.
• Cuando la falta de conformidad del Producto sea consecuencia de una incorrecta instalación o puesta en
marcha, la presente garantía sólo responderá cuando dicha instalación o puesta en marcha esté incluida en
el contrato de compra-venta del Producto y haya sido realizada por el vendedor o bajo su responsabilidad.
CONTENEDOR DE BASURA CON RUEDAS TACHADO
• Con objeto de reducir la cantidad de residuos de aparatos eléctricos y electrónicos, la peligrosidad de los
componentes, fomentar la reutilización de los aparatos, la valorización de sus residuos y determinar una gestión
adecuada tratando de mejorar la ecacia de la protección ambiental, se establecen una serie de normas
aplicables a la fabricación del producto y otras relativas a la correcta gestión ambiental cuando se conviertan
en residuo.
• Así mismo, se pretende mejorar el comportamiento ambiental de todos los agentes que intervienen en el
ciclo de vida de los aparatos eléctricos y electrónicos, como son los productores, los distribuidores, los usuarios
y en particular, el de aquellos agentes directamente implicados en la gestión de los residuos derivados de
estos aparatos.
• A partir del 13 Agosto de 2005 cuando usted quiera desechar este aparato, tiene dos posibles sistemas de
devolución:
• Si adquiere uno nuevo que sea de tipo equivalente o realice las mismas funciones que el que desecha, podrá
entregarlo, sin coste, en el acto de la compra al distribuidor.
• Podrá llevarlo al sitio que destinen las diferentes entidades locales.
• Nosotros nos haremos cargo de los costes de gestión.
• Los aparatos van etiquetados con el símbolo de un “contenedor de basura con ruedas tachado”, este símbolo
es indicativo de la necesaria recogida selectiva y diferenciada del resto de las basuras urbanas.
• Nuestros productos están diseñados y fabricados con materiales y componentes de alta calidad, respetuosos
con el medio ambiente, que pueden ser reutilizables y reciclados. Aun así, las diferentes partes que componen
este producto no son biodegradables, por lo que no se deben abandonar en el medio ambiente. Se debe de
reciclar por separado, para ello separar el motor eléctrico del resto del equipo de ltración.

FR
CONSIGNES DE SÉCURITÉ
AVERTISSEMENT
Le nettoyeur n’est pas un jouet et seules les personnes âgées de plus de 8 ans peuvent l’utiliser.
Avant de manipuler le nettoyeur, il est nécessaire de lire attentivement le manuel d’utilisation.
1. Le nettoyage et l’entretien de la part de l’utilisateur ne doivent pas être effectués par des enfants sans
surveillance.
2. Le nettoyeur est conçu pour nettoyer les piscines et les spas.
3. Utilisez uniquement les batteries et le chargeur originaux.
4. Chargez la batterie uniquement lorsque le nettoyeur est éteint.
5. Conservez le nettoyeur dans un lieu propre est sec. Ne pas l’exposer au rayonnement solaire et ne pas le
placer près d’explosifs.
6. Ne mettez pas le nettoyeur en marche hors de l’eau.
7. Ne rien placer près du couvercle d’aspiration lorsque l’appareil est en marche en raison de sa puissance de
succion, en particulier des parties du corps, animaux, cheveux ou vêtements.
8. Ne pas démonter le nettoyeur sans une assistance professionnelle ou les indications du distributeur
autorisé ou du fabricant.
9. Empêchez la ltration de l’huile lubriante étant donné qu’elle pollue l’eau.
10. N’utilisez pas le nettoyeur en cas de problème. Contactez le distributeur autorisé ou remplacez avec les
pièces ou accessoires originaux.
11. Conditions opérationnelles du nettoyeur :
11.1 Profondeur maximale de l’eau : 40 - 300cm.
11.2 empérature de l’eau : 4°C( 39.2°F )-35°C( 95°F )
1. Câble USB
1. Le chargeur USB ne doit être utilisé qu’avec une tension de sortie de 5 V.
2. Usage exclusif en intérieur. Le chargeur ne doit pas être utilisé à l’extérieur ni exposé à la pluie, l’humidité,
les liquides ou la chaleur.
3. Maintenir le chargeur hors de portée des enfants.
4. Ne pas utiliser le chargeur si un dommage a été détecté.
5. Ne pas manipuler le nettoyeur ni le chargeur avec les mains humides ni avec les pieds nus quand ce
dernier est en charge.
6. Débrancher le chargeur lorsqu’il n’est pas utilisé.
7. Si le câble USB est endommagé, vous devez le remplacer pour éviter tout danger.
8. Vériez que le nettoyeur, le câble USB et le chargeur sont complètement secs avant de mettre l’appareil
en charge.
9. Chargez le nettoyeur pendant 5 heures avant la première utilisation. Normalement, vous pouvez utiliser le
nettoyeur 30 minutes après sa charge complète.
2. Retrait de la batterie
1. La batterie du nettoyeur est au lithium et doit être retirée correctement : Pour plus d’informations, contactez
l’administration locale.
2. N’essayez jamais de démonter la batterie au lithium.
3. Retirer tous les accessoires tels que bagues, bracelets, colliers et montres quand vous lâchez les câbles de
la batterie au lithium de l’unité d’aspiration.
4. La batterie provoque un court-circuit ainsi que des brûlures graves lorsqu’elle est assez forte.
5. Lorsque vous retirez la batterie, protégez-vous avec des lunettes, des gants et des vêtements appropriés.
6. Ne pas fumer ni allumer d’étincelles ou de ammes à proximité du nettoyeur, car cela peut provoquer des
gaz inconnus.
7. i la peau ou les vêtements entrent en contact avec un acide, il faudra laver immédiatement avec beaucoup
d’eau et de savon.
8. En cas de contact de l’acide avec les yeux, rincez-les immédiatement avec de l’eau fraîche pendant au
moins 15 minutes. Rendez-vous immédiatement dans un service médical.If acid comes in contact with eyes,
immediately ood eye with running cool water for at least 15 minutes.Get medical attention immediately.
Les avertissements et précautions précédents ne sont pas exhaustifs et ils ne comprennent pas toutes
les hypothèses de risque ou de blessures graves. Les propriétaires des piscines ou spas doivent à tout
moment être pleinement attentifs et faire preuve de bon sens lorsqu’ils utilisent le nettoyeur.

INSTRUCTIONS D’UTILISATION
1. Connexion du chargeur
A. Tête d’aspiration
A-1. Brosse ronde
B. Filtre frontal
C. Filtre en papier
D. Corps du moteur
E. Poignée de transport
F. Filtre arrière
G. USB chargeur
A
Témoin
B
C
D
E
A-1
G
F
1. Branchez l’une des extrémités du câble de
recharge sur le chargeur USB et le chargeur sur
l’alimentation électrique.
2. Branchez l’autre extrémité du câble de recharge
sur le port de recharge du nettoyeur (comme
illustré dans la gure). Le témoin lumineux
rouge situé sur l’appareil s’allume, indiquant une
recharge normale.
3. Au bout de 5 heures, le témoin lumineux
vert s’allume, indiquant que la batterie est
complètement chargée.

2. Installation
3. Bouton marche/arrêt
2.1 Montage du filtre et des pièces du corps
Montez les pièces du corps dans le sens indiqué par la èche.
2.2 Montage de la tête de succion
Insérez complètement la tête d’aspiration
directement dans le ltre frontal.
2.3 Montage de la poignée
(1) Montez la poignée
Cette poignée est utilisée pour nettoyer les parois, les
marches, les sièges et les angles, comme l’indique la
gure « A ».
(2) Montage de la poignée télescopique (incluse)
Le nettoyeur peut être connecté à une poignée
télescopique standard, comme le montre la gure
« B ».
3.1 Appuyez sur le bouton de mise en marche du
nettoyeur et maintenez-le enfoncé pendant 2-3
secondes pour le mettre en marche.
Mettez l’appareil dans l’eau avant de le mettre en
marche an d’éviter tout dysfonctionnement du
joint étanche à l’huile lorsque le produit est à l’arrêt.
3.2 Si vous appuyez à nouveau sur le bouton de mise
en marche, le nettoyeur s’arrête.
1 2 3 4
Remarque : le produit peut être connecté
à la poignée A ou à la poignée télescopique
standard B. (la tige télescopique (B) est fournie
en option et doit être achetée séparément).
A
B
ON/OFF
FERMER

4. Utilisation du ltre en papier
5. Utilisation de la tête d’aspiration
6. Nettoyage des déchets
Le paquet comprend un ltre en papier qui est
employé pour collecter la poussière et les petits
déchets. Pour nettoyer les déchets quotidiens,
comme par exemple les feuilles, les fruits et les
pierres, il n’est pas nécessaire d’utiliser le ltre en
papier.
L’utilisation du nettoyeur sans la tête d’aspiration
pour les angles de la piscine peut être ultérieure ou
simultanée à la haute vitesse, ou pour nettoyer les
angles et les marches de la piscine.
nettoyant du ltre
(non inclus)
6.1 Nettoyage du filtre frontal et du filtre en
papier
(1) Les boutons des côtés du couvercle transparent
sous le réservoir permettent d’extraire ce couvercle
et l’élément ltrant du corps.
(2) Enlevez les saletés du ltre frontal.
(3) Utilisez un nettoyeur de ltre en papier ou une
machine pour le nettoyer.
(Le nettoyeur et la machine doivent être achetés
séparément).
(4) ) Installez d’abord l’élément ltrant nettoyé dans
le corps de l’appareil, puis le ltre frontal, et serrez ce
dernier dans la direction « Fermer ». (Référence : 2.1
Montage du ltre et des parties du corps)
1
3
2
4
Filtre arrière
Filtre en papier
Sidan laddas...
Sidan laddas...
Sidan laddas...
Sidan laddas...
Sidan laddas...
Sidan laddas...
Sidan laddas...
Sidan laddas...
Sidan laddas...
Sidan laddas...
Sidan laddas...
Sidan laddas...
Sidan laddas...
Sidan laddas...
Sidan laddas...
Sidan laddas...
Sidan laddas...
Sidan laddas...
Sidan laddas...
Sidan laddas...
Sidan laddas...
Sidan laddas...
Sidan laddas...
Sidan laddas...
Sidan laddas...
Sidan laddas...
Sidan laddas...
Sidan laddas...
Sidan laddas...
Sidan laddas...
Sidan laddas...
Sidan laddas...
Sidan laddas...
Sidan laddas...
Sidan laddas...
Sidan laddas...
Sidan laddas...
Sidan laddas...
Sidan laddas...
Sidan laddas...
Sidan laddas...
Sidan laddas...
Sidan laddas...
Sidan laddas...
Sidan laddas...
Sidan laddas...
Sidan laddas...
Sidan laddas...
Sidan laddas...
Sidan laddas...
Sidan laddas...
Sidan laddas...
Sidan laddas...
Sidan laddas...
Sidan laddas...
Sidan laddas...
Sidan laddas...
Sidan laddas...
Sidan laddas...
Sidan laddas...
Sidan laddas...
Sidan laddas...
Sidan laddas...
Sidan laddas...
Sidan laddas...
Sidan laddas...
Sidan laddas...
Sidan laddas...
Sidan laddas...
Sidan laddas...
Sidan laddas...
Sidan laddas...
Sidan laddas...
Sidan laddas...
Sidan laddas...
Sidan laddas...
Sidan laddas...
Sidan laddas...
Sidan laddas...
Sidan laddas...
Sidan laddas...
Sidan laddas...
Sidan laddas...
Sidan laddas...
Sidan laddas...
Sidan laddas...
Sidan laddas...
Sidan laddas...
Sidan laddas...
Sidan laddas...
Sidan laddas...
-
 1
1
-
 2
2
-
 3
3
-
 4
4
-
 5
5
-
 6
6
-
 7
7
-
 8
8
-
 9
9
-
 10
10
-
 11
11
-
 12
12
-
 13
13
-
 14
14
-
 15
15
-
 16
16
-
 17
17
-
 18
18
-
 19
19
-
 20
20
-
 21
21
-
 22
22
-
 23
23
-
 24
24
-
 25
25
-
 26
26
-
 27
27
-
 28
28
-
 29
29
-
 30
30
-
 31
31
-
 32
32
-
 33
33
-
 34
34
-
 35
35
-
 36
36
-
 37
37
-
 38
38
-
 39
39
-
 40
40
-
 41
41
-
 42
42
-
 43
43
-
 44
44
-
 45
45
-
 46
46
-
 47
47
-
 48
48
-
 49
49
-
 50
50
-
 51
51
-
 52
52
-
 53
53
-
 54
54
-
 55
55
-
 56
56
-
 57
57
-
 58
58
-
 59
59
-
 60
60
-
 61
61
-
 62
62
-
 63
63
-
 64
64
-
 65
65
-
 66
66
-
 67
67
-
 68
68
-
 69
69
-
 70
70
-
 71
71
-
 72
72
-
 73
73
-
 74
74
-
 75
75
-
 76
76
-
 77
77
-
 78
78
-
 79
79
-
 80
80
-
 81
81
-
 82
82
-
 83
83
-
 84
84
-
 85
85
-
 86
86
-
 87
87
-
 88
88
-
 89
89
-
 90
90
-
 91
91
-
 92
92
-
 93
93
-
 94
94
-
 95
95
-
 96
96
-
 97
97
-
 98
98
-
 99
99
-
 100
100
-
 101
101
-
 102
102
-
 103
103
-
 104
104
-
 105
105
-
 106
106
-
 107
107
-
 108
108
-
 109
109
-
 110
110
-
 111
111


Gre CSPAN Electric Cordless Rechargeable Pool and Spa Vacuum Cleaner Användarmanual
- Typ
- Användarmanual
på andra språk
- italiano: Gre CSPAN Electric Cordless Rechargeable Pool and Spa Vacuum Cleaner Manuale utente
- slovenčina: Gre CSPAN Electric Cordless Rechargeable Pool and Spa Vacuum Cleaner Používateľská príručka
- español: Gre CSPAN Electric Cordless Rechargeable Pool and Spa Vacuum Cleaner Manual de usuario
- Deutsch: Gre CSPAN Electric Cordless Rechargeable Pool and Spa Vacuum Cleaner Benutzerhandbuch
- polski: Gre CSPAN Electric Cordless Rechargeable Pool and Spa Vacuum Cleaner Instrukcja obsługi
- português: Gre CSPAN Electric Cordless Rechargeable Pool and Spa Vacuum Cleaner Manual do usuário
- français: Gre CSPAN Electric Cordless Rechargeable Pool and Spa Vacuum Cleaner Manuel utilisateur
- dansk: Gre CSPAN Electric Cordless Rechargeable Pool and Spa Vacuum Cleaner Brugermanual
- Nederlands: Gre CSPAN Electric Cordless Rechargeable Pool and Spa Vacuum Cleaner Handleiding
- română: Gre CSPAN Electric Cordless Rechargeable Pool and Spa Vacuum Cleaner Manual de utilizare
Relaterade papper
Andra dokument
-
Bestway 58620 Flowclear AquaGlide Bruksanvisning
-
BWT BC40 Användarmanual
-
BWT BC 40 Användarmanual
-
Hoover SM4000C4 JAZZ VOITURE Bruksanvisning
-
Simplicity ENG, MDL 11000B 12000B 123P0B Användarmanual
-
Black & Decker NV4820N Användarmanual
-
Black & Decker NV3610N Användarmanual
-
Dyson DC34 ANIMAL PRO Bruksanvisning
-
Nilfisk-ALTO Handy 2-in-1 Användarmanual
-
Koenic KVR 7221 Bruksanvisning