
3
Schrittzähler
Bedienungs- und Sicherheitshinweise
H14347
Pedometer
Operation and Safety Notes
ASkelmittAri
Käyttö- ja turvaohjeet
StegräknAre
Bruksanvisning och säkerhetsanvisningar
Skridttæller
Betjenings- og sikkerhetshenvisninger

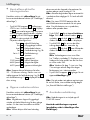
GB / IE Operation and Safety Notes Page 5
FI Käyttö- ja turvaohjeet Sivu 16
SE Bruksanvisning och säkerhetsanvisningar Sidan 26
DK Betjenings- og sikkerhetshenvisninger Side 36
DE / AT / CH Bedienungs- und Sicherheitshinweise Seite 46

3
A
B
1
12
10
7
11
8
13
9
2
3
6
5
4

4
C
D
30
29
15
16
14
25 22 21 2024 23
19
17
18
26
27
28

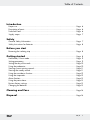
5 GB/IE
Table of Contents
Introduction
Proper use ........................................................................................................................... Page 6
Description of parts ............................................................................................................ Page 6
Technical Data ................................................................................................................... Page 6
Supply scope ...................................................................................................................... Page 7
Safety
General Safety Information ............................................................................................... Page 7
Safety Instructions for Batteries ......................................................................................... Page 8
Before you start
Removing the isolating strip ............................................................................................... Page 8
Getting started........................................................................................................... Page 8
Hold mode / Count mode .................................................................................................. Page 9
Setting parameters ............................................................................................................ Page 9
Setting the day of the week ............................................................................................... Page 10
Using the pedometer ......................................................................................................... Page 10
Viewing current training records ....................................................................................... Page 11
Viewing the weekly record ................................................................................................ Page 11
Using the countdown function ........................................................................................... Page 12
Using the stopwatch........................................................................................................... Page 12
Alarm function .................................................................................................................... Page 13
Using the panic alarm ........................................................................................................ Page 13
Restore factory settings ...................................................................................................... Page 13
Changing the batteries ...................................................................................................... Page 13
Cleaning and Care .................................................................................................. Page 14
Disposal ........................................................................................................................... Page 14

6 GB/IE
Introduction
Pedometer
Q
Introduction
Familiarise yourself with the prod-
uct before using it for the first time.
In addition please refer carefully to
the operating instructions below and the safety
advice. Use the product only as described
and for the indicated purpose. Keep these
instructions in a safe place. If you pass the
product on to anyone else, please ensure that
you also pass on all the documentation.
Q
Proper use
This pedometer records the number of steps
taken, distance covered and time elapsed.
The pedometer also displays average speed,
maximum speed and current speed as well as
calories and fat burned, and fat burned in per
cent. The device also functions as a stop-watch,
timer alarm and as a panic alarm. Any other
use or modification of the device constitute im-
proper use and may result in injury and / or
damage to the device. The manufacturer is not
liable for damage caused by improper use.
The device is not intended for commercial use.
Q
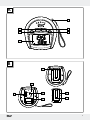
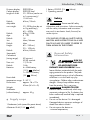
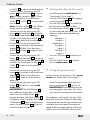
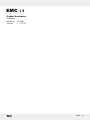
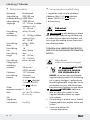
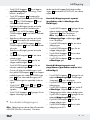
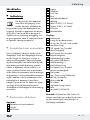
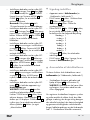
Description of parts
Device:
1
Panic alarm plug with wrist strap
2
SET button
3
MODE button
4
Display
5
CLEAR button
6
FUNC button
7
Screw
8
Battery compartment cover
9
Belt clip
10
Battery CR2032 (3 V, lithium)
11
Batteries LR44 (1.5 V, alkali)
12
RESET button
13
Battery compartment
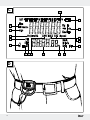
Display:
14
Function bar
15
Low battery indicator
16
kg, cm, km; lb, inch, mile – symbol
(size indicator)
17
CUR Speed / km / h - symbol
(current speed)
18
MAX Speed / km / h - symbol
(maximum speed)
19
Fat-burning symbol
20
kcal symbol (kilocalories)
21
Fat-burning in %
22
Multifunction display
23
AVG Speed / km / h icon
(average speed)
24
Alm symbol
25
Time / Timer display (time / elapsed time)
/ Countdown
26
Alarm icon
27
PM icon
28
Stopwatch display
29
Age
30
Sex (MAN / WOMAN)
Note: It is not possible to switch off the LCD
screen on the device. However, the power
consumption required to operate the LCD is
very low and comparable to that of a wrist-
watch.
Q
Technical Data
Measuring method: pendulum
Step display: 999,999 steps

7 GB/IE
Introduction / Safety
Distance display: 9999.99 km
Calorie display: 9999.99 kcal
Length of stride: 30 - 200 cm (can be set
to 1 cm accuracy) /
10 - 80 inch
Default: 60 cm / 25 inch
Adjustable
user weight: 30 - 200 kg (can be set
to 1 kg accuracy) /
60 – 400 lb
Default: 60 kg / 120 lb
Age: 5 – 99
Default: 18
Sex: Man / Woman
Default: Man
Height: 60 – 250 cm /
20 – 100 inch
Default: 60 cm / 65 inch
Stopwatch /
Countdown
(timing range): 59 minutes /
59.59 seconds
Time unit: 12 / 24 hr
Default: 24 hr
Batteries: 4 x LR44 battery
(1.5 V
, alkaline)
1 x CR2032 battery
(3 V
, lithium)
Permissible
temperature range: 0 - 50 °C
Dimensions: approx. 76 x 70 x
40 mm (W x H x D)
Weight:
Pedometer
(without battery): approx. 53 g
Q
Supply scope
1 Pedometer (with ripcord for panic alarm)
4 Batteries LR44 (1.5 V
, alkali)
1 Battery CR2032 (3 V , lithium)
1 Operating manual
Safety
WARNING!
Please read all safety
information and instructions. Failure to comply
with the safety information and instructions
may result in an electric shock, fire and / or
severe injuries.
YOU SHOULD STORE ALL SAFETY INFOR-
MATION AND INSTRUCTIONS IN A SAFE
PLACE IN CASE YOU NEED TO REFER TO
THEM AGAIN IN THE FUTURE!
General Safety
Information
J
WARNING!
RISK OF
FATAL INJURY AND RISK
OF ACCIDENTS FOR
INFANTS AND CHILDREN! Never
leave children unattended with the pack-
aging material or the product. The pack-
aging material carries a risk of suffocation,
and there is a risk of fatal injury by
strangulation. Children often underestimate
dangers. Always keep children away
from the product. This is not a toy.
WARNING!
DANGER TO LIFE!
Batteries can be swallowed, which may
represent a danger to life. If a battery has
been swallowed, medical help is required
immediately.
J Do not use the device if it is damaged.
Damaged devices represent a danger of
death from electric shock!
J Do not expose the device to
- extreme temperatures,

8 GB/IE
Safety / Before you start / Getting started
- strong vibrations,
- heavy mechanical loads,
- direct sunlight,
- moisture / rain.
Otherwise there is a danger that the
device will be damaged.
J Please note that the guarantee does not
cover damage caused by incorrect han-
dling, non-compliance with the operating
instructions or interference with the device
by unauthorised individuals.
J Under no circumstances should you take
the device apart. Improper repairs may
place the user in considerable danger.
Repairs should only be carried out by
specialist personnel.
Safety Instructions
for Batteries
J Remove the batteries from the device if
they are not going to be used for a
prolonged period.
J
CAUTION! DANGER OF
EXPLOSION! The batteries
must never be recharged!
J Make sure that the polarity is correct
when you insert a battery. This is indicated
in the battery compartment
13
.
J If necessary, clean the batteries and
device contacts with a dry cloth before
inserting the batteries.
J Insert the battery type CR2032 and the
four batteries type LR44 into the device.
Otherwise the pedometer will not work
properly.
J Remove spent batteries immediately from
the device. There is an increased danger
of leaks!
J Batteries must not be disposed of in the
normal domestic waste!
J Every consumer is legally obliged to dis-
pose of batteries in the proper manner!
J Keep batteries away from children; do
not throw them in the fire, short-circuit
them or take them apart.
J If the above instructions are not complied
with, the batteries may discharge them-
selves beyond their end voltage. There is
then a danger of leaking. If the batteries
have leaked inside your device, you
should remove them immediately in order
to prevent damage to the device!
J Avoid contact with the skin, eyes and mu-
cous membranes. Any parts of the body
coming into contact with battery acid
should be rinsed off with copious amounts
of water and / or a doctor contacted if
necessary!
J Only use the type of battery specified.
Q
Before you start
Q
Removing the isolating strip
The batteries are already installed in the
device on delivery.
j Pull the insulating strip at the back of the
appliance off in the direction indicated by
the arrow. An acoustic signal will sound.
Your pedometer is now ready to be configured.
Q
Getting started
Before using the device for the first time, you
have to set the following parameters: unit of
measurement (metric or US system), length of
step, body weight, height, age, sex, time unit
(12-hour/24-hour clock), current time, alarm

9 GB/IE
Getting started
function. Otherwise the functions of the
pedometer cannot be used properly.
Note: After you have set all the parameters
before using it for the first time, you can
change the parameters at any time. The only
thing you cannot change at a later date is the
unit of measurement (metric or US system). If
you wish to change the unit of measurement,
you will have to remove all the batteries
10
,
11
from the battery compartment
13
or press the
RESET button
12
. This process resets the preset
values again.
Q
Hold mode / Count mode
When you start the device, the pedometer is
automatically in count mode.
Note: In hold mode the measuring func-
tions of the pedometer are disabled.
j Press and hold the MODE button
3
for
about 3 seconds. An acoustic signal will
sound. The display
will flash alter-
nately with the number of the steps.
j Press and hold the MODE button
3
for
approx. 3 seconds to enter count
mode. You will hear a signal.
dis-
appears.
Q
Setting parameters
j When you start to operate the device for
the first time or switch the device to hold
mode (see “Hold mode/counting mode”),
you can set or change various parameters.
j To do so, press the SET button
2
, to get
to set mode. The word “SET” will light
up in the LC display.
j The indicators kg, cm, km or lb, inch, mile
16
flash. Press the buttons MODE
3
or CLEAR
5
to set the desired unit of
measurement (metric or US system).
j Confirm your entry by pressing the SET
button
2
. The word STRIDE will appear
in the function bar
14
. The cm symbol
16
and the preset value 60 cm / 25 inch flash
in the LC display. Press the buttons MODE
3
or CLEAR
5
in order to set the de-
sired length of your stride.
Note: You can specify a stride length of
between 30 to 200 cm / 10 to 80 inch.
Tip: Press the MODE
3
or CLEAR
5
button for about 3 seconds. This will speed
up the process of setting the values. You
can use this fast way of setting the param-
eters for the setting procedures that follow.
j Confirm the entry by pressing the SET
button
2
. The word WEIGHT will appear
in the functionbar
14
. The kg symbol
16
and the preset value 60 kg / 120 lb flash
in the LC display. Press the buttons MODE
3
or CLEAR
5
to set the desired weight.
Note: You can specify a weight of
between 30 to 200 kg / 60 to 400 lb.
j Confirm the entry by pressing the SET
button
2
. The word HEIGHT will appear
in the function bar
14
. The preset value
flashes in the LC Display. Press the MODE
3
or CLEAR
5
button to enter the desired
value.
Note: A value between 60 and 250 cm /
20 and 100 inch can be entered.
j Confirm your settings by pressing the
SET button
2
. The LC display shows the
AGE
29
indicator and the number 18 as
the preset value. Press the MODE
3
or
CLEAR
5
button to enter the desired age.
Note: Any age between 5 and 99 years
can be entered.
j Confirm the entry by pressing the SET
button
2
. The words MAN or WOMAN
will light up. Press the buttons MODE
3

10 GB/IE
Getting started
or CLEAR
5
in order to set the desired sex.
j Confirm the entry by pressing the SET
button
2
. The word Time
25
as well as
(24-hour format) or (12-hour
format) will light up. Press the buttons
MODE
3
or CLEAR
5
to set the desired
time format.
Note: The PM symbol
27
in the 12-hour
format stands for afternoon/evening.
j Confirm the entry by pressing the SET
button
2
. The word time
25
will appear
and the hour of the multifunction display
22
will flash. Press the buttons MODE
3
or
CLEAR
5
in order to set the desired time.
j Confirm the entry by pressing the SET
button
2
. The minutes in the multifunction
display
22
will flash. Press the buttons
MODE
3
or CLEAR
5
in order to set the
desired time.
j Confirm the entry by pressing the SET
button
2
. The word ALM
24
will light up
and the hour of the multifunction display
22
will flash. Press the buttons MODE
3
or
CLEAR
5
in order to set the desired
alarm time.
j Confirm the entry by pressing the SET
button
2
. The minutes of the multifunction
display
22
will flash. Press the button
MODE
3
in order to set the desired
alarm time.
j Confirm the entry by pressing the SET
button
2
. The device is now in hold
mode again.
IMPORTANT! The CLEAR button
5
has a different function after setting the
alarm. Press the CLEAR button
5
to
activate the alarm. The alarm symbol
26
will appear in the LC display. Press the
CLEAR button
5
again to deactivate the
alarm. The alarm symbol
26
will go out
(see also “Alarm function”).
Q
Setting the day of the week
j Switch the device to hold mode (see
“Hold mode / Count mode”).
j Press the FUNC button
6
. DAY appears
on the function bar
14
.
j Press the SET button
2
. The number for
the day of the week starts to flash.
j Press the buttons MODE
3
or CLEAR
5
to set the required day of the week. The
different numbers have the following
meanings:
Monday = 1
Tuesday = 2
Wednesday = 3
Thursday = 4
Friday = 5
Saturday = 6
Sunday = 7
j Press the SET button
2
to confirm your
entry.
j Press the FUNC button
6
3 times to
return to hold mode.
Q
Using the pedometer
For this function, the device must be in count
mode (see “Hold mode / Count mode”).
j Attach the pedometer tightly onto your
belt using the belt clip
9
(see Fig. D).
IMPORTANT! The pedometer must be
secured properly and safely. This is the
only way to ensure accurate measurement.
The pedometer now registers the jolts of the
body and records the number of steps taken,
the distance covered, the time required and
calculates the current speed, the maximum
speed and the average speed as well as the
calories consumed, the body fat burnt and

11 GB/IE
Getting started
the body fat burnt in %. The pedometer auto-
matically detects whether you are walking or
running.
Note: The recorded values are approximate.
A varying stride length and external factors
such as clothing, terrain etc. can hinder exact
measurement.
Tip! Switch the device to hold mode to
prevent unwanted measurement (route to
training location etc.) (see “Hold mode /
Count mode”).
Q
Viewing current training
records
For this function, the device must be in count
mode (see “Hold mode / Count mode”).
j Press the MODE button
3
. STEPS appears
on the function bar
14
. The number of
steps taken appears on the LCD screen
4
.
Other training data appear on the LCD
screen
4
. Press the MODE button
3
to
switch from one item to the next.
It is possible to display the following:
Time
25
= current time
km
16
= distance covered
kcal
20
= calories burned
Fat
19
= Fat-burning in kg / lb
Fat in %
21
= Fat-burning in %
Timer
25
= elapsed time
CUR Speed
17
= current speed
MAX Speed
18
= maximum speed
AVG Speed
23
= average speed
Note: Only after you have exercised non-stop
for 20 – 30 minutes will your body start to
burn fat. That is why it will take a while before
the amount of fat you have burnt (in kg/lb)
19
and the amount of fat you have burnt in %
21
are indicated in the LC display.
Q
Viewing the weekly record
For this function, the device must be in count
mode (see “Hold mode / Count mode”).
Note: The pedometer stores the distance
covered and the calories burned for the current
week of training. You also have the option of
viewing separate training days.
Note: The record for a week always starts
on a Monday. Please note that all the data
recorded in the week is always deleted at
midnight on Sunday.
Note: The current daily records are automat-
ically stored in the weekly record every day
at midnight and reset to 0.
Note: Either the large CR2032 battery or
the small LR44 batteries are used to store the
data. All the stored data are erased if all the
batteries are out of the device at the same time.
j Press the FUNC button
6
to switch to
function mode. DAY appears on the
function bar
14
. The km
16
and kcal
20
icons and the corresponding data for the
entire week of training appear on the
LCD screen.
j Press the MODE button
3
to switch from
one training day to the next. The km
16
and kcal
20
icons and the corresponding
data for each of the training days appear
on the LCD screen.
Note: The days of the week are repre-
sented by numbers (see “Setting the day
of the week”). If no number appears
under DAY, the LCD is displaying the
results for the entire week of training.
Note: Please note that the records for
Day 7 are not displayed. Day 7 is either
the current day or has not yet occurred in

12 GB/IE
Getting started
the current week of training.
j Press the FUNC button
6
3 times to get
back to counting mode.
Note: Please note that you can only delete
data for the week as a whole – not for separate
training days (see “Restore factory settings”).
Q
Using the countdown
function
Note: The countdown can count down from
up to 23:59.59 hours.
Using the countdown function
separately (the device is in counting
or hold mode):
j Press the FUNC button
6
in order to get
to countdown mode. The “Timer” indi-
cator flashes in the LC display.
j Press the button SET
2
. The hour of the
countdown will flash. Press the buttons
MODE
3
or CLEAR
5
in order to set
the desired number of hours.
j Confirm the entry by pressing the SET
button
2
. The minutes of the countdown
will flash. Press the buttons MODE
3
or
CLEAR
5
in order to set the desired
number of minutes.
j Confirm the entry by pressing the SET but-
ton
2
. The second display will flash. Press
the buttons MODE
3
or CLEAR
5
in order
to set the desired number of seconds.
j Confirm the entry by pressing the SET
button
2
.
j Press the MODE button
3
to start the
countdown.
j Press the MODE button
3
again to stop
the countdown.
j Press the MODE button
3
again to
continue the countdown.
j If you wish to cancel the countdown, first
press the MODE button
3
to stop the
countdown and then press the CLEAR
button
5
to set the countdown to 0.
j As soon as the countdown has come to
an end, an acoustic signal will sound.
j Press the FUNC
6
, CLEAR
5
, SET
2
or
MODE button
3
to deactivate the acoustic
signal.
j Press the FUNC button
6
twice to get
back into counting mode.
Q
Using the stopwatch
Note: The stopwatch measures time up to a
maximum of 59:59.99 (minutes / seconds).
Beyond this amount the multifunction display
22
is automatically reset to 00:00.00 and continues
counting.
Using the stopwatch alone
(the device is in count or hold mode):
j Press the FUNC button
6
3 times to get
back to stopwatch mode. The word
Stopwatch
28
will light up in the LC display.
Note: The pedometer is not active in
stopwatch mode.
appears on
the LCD.
j Press the MODE button
3
to start the
stopwatch.
j Press the MODE button
3
again to stop
the stopwatch.
j Press the CLEAR button
5
to set the stop-
watch to 0.
j Press the FUNC button
6
to return to
count mode.

13 GB/IE
Getting started
Using the stopwatch with the
pedometer (the device must be in
count mode):
j Press the FUNC button
6
3 times to get
into stopwatch mode. The word Stop-
watch
28
will light up in the LC display.
j Press the MODE button
3
to start the
stopwatch.
j Press the FUNC button
6
to switch to
count mode. The pedometer is active.
The stopwatch continues running in the
background.
j Press the FUNC button
6
3 times to
return to stopwatch mode.
j Press the MODE button
3
again to stop
the stopwatch.
j Press the CLEAR button
5
to set the stop-
watch to 0.
Note: The stopwatch can only be set to
0 in stopwatch mode.
j Press the FUNC button
6
to return to
count mode.
Q
Alarm function
j Set the required alarm time (see “Setting
parameters”).
Note: The set alarm is activated every
day. The alarm signal rings for approx.
1 minute.
j Press the FUNC
6
, CLEAR
5
, SET
2
or
MODE button
3
to deactivate the audible
signal.
Q
Using the panic alarm
j The alarm is triggered when the panic
alarm plug
1
is pulled out of the device.
j Pull out the panic alarm plug
1
on the
wrist strap to trigger the panic alarm.
j Insert the panic alarm plug
1
back into
the device to switch off the panic alarm.
Note: Four new LR44 batteries will sound
the panic alarm for about five minutes. We
recommend that you test the panic alarm
briefly when you wish to use the pedometer.
Replace the four LR44 batteries without delay
if the low battery state indicator
15
illuminates.
Q
Restore factory settings
j If the equipment is exposed to a strong
electro-magnetic high-frequency field, or
if there is electro-static discharge, this may
lead to malfunctions. If malfunctions do
occur, for example the buttons do not
reach or the display is shown incorrectly,
press the RESET button
12
to reset the
equipment to the factory defaults. Use a
thin, pointed object to do this. The mal-
functions should then be eliminated.
IMPORTANT! Please note that this will
delete all data. It will then be necessary
to reset all the parameters.
Q
Changing the batteries
The device takes two different battery types.
Note: You should replace the smaller batteries
(type LR44) immediately when the low battery
state indicator
15
illuminates. If the smaller
batteries (type LR44) become exhausted or
low in charge, then the panic alarm and
pedometer functions cannot be used. Do not
use the pedometer without the larger battery
(CR2032) in place or with a discharged larger
battery (CR2032). The data storage function

14 GB/IE
Getting started / Cleaning and Care / Disposal
is not available to you if the larger battery
(CR2032) is discharged or not in place.
Note: Either the large CR2032 battery or
the small LR44 batteries are used to store the
data. All the stored data are erased if all the
batteries are out of the device at the same time.
j Release the screw
7
on the battery com-
partment cover
8
using a small appro-
priate screwdriver (not included). Remove
the cover (see Fig. B).
j Take out the exhausted batteries.
Note: Use a pointed object (e.g. paper
clip) to remove the batteries.
j Insert four new batteries type LR44
(1.5 V
) and / or one battery type
CR2032 (3 V
).
Note: Make sure you fit the batteries the
right way round (polarity). The correct
polarity is shown inside the battery
compartment
13
.
j Put the battery compartent cover
8
back
on to the battery compartment
13
. The
LC display comes on automatically.
j Fasten the battery compartment lid
8
back onto the battery compartment
13
by tightening the screw
7
by means of a
Phillips screwdriver.
Q
Cleaning and Care
j Clean the outside of the device only with
a soft dry cloth. Use a slightly dampened
soft cloth to remove more stubborn dirt.
j Do not under any circumstances use liquids
or cleaning agents, as they will damage
the device.
Q
Disposal
The packaging is made entirely of
recyclable materials, which you
may dispose of at local recycling
facilities.
Contact your local refuse disposal authority
for more details of how to dispose of your
worn-out product.
To help protect the environment,
please dispose of the product
properly when it has reached the
end of its useful life and not in the
household waste. Information on
collection points and their opening
hours can be obtained from your
local authority.
Faulty or used batteries must be recycled in
accordance with Directive 2006 / 66 / EC.
Please return the batteries and / or the device
to the available collection points.
Pb Hg
Environmental damage
through incorrect disposal
of the batteries!
Batteries may not be disposed of with the usual
domestic waste. They may contain toxic
heavy metals and are subject to hazardous
waste treatment rules and regulations. The
chemical symbols for heavy metals are as
follows: Cd = cadmium, Hg= mercury,
Pb = lead. That is why you should dispose of
used batteries at a local collection point.

15 GB/IE
EMC
Product Description:
Pedometer
Model-no.: H14347
Version: 11 / 2010

16 FI
Johdanto
Määräystenmukainen käyttö ............................................................................................. Sivu 17
Osien kuvaus ...................................................................................................................... Sivu 17
Tekniset tiedot ..................................................................................................................... Sivu 17
Toimitukseen kuuluu ........................................................................................................... Sivu 18
Turvallisuus
Yleiset turvaohjeet .............................................................................................................. Sivu 18
Paristojen turvallisuusohjeet ............................................................................................... Sivu 19
Ennen käyttöönottoa
Eristysliuskojen poisto ......................................................................................................... Sivu 19
Käyttöönotto ............................................................................................................... Sivu 19
Hold-toiminto / laskuritoiminto ........................................................................................... Sivu 20
Parametrien asetus ............................................................................................................. Sivu 20
Viikonpäivän asetus ........................................................................................................... Sivu 21
Askelmittarin käyttö ............................................................................................................ Sivu 21
Aktuellien treeniarvojen kutsu ............................................................................................ Sivu 22
Viikkokatsauksen haku ....................................................................................................... Sivu 22
Countdown laskennan käyttö ............................................................................................ Sivu 23
Sekuntikellon käyttö ........................................................................................................... Sivu 23
Hälytystoiminto ................................................................................................................... Sivu 24
Paniikkihälytyksen käyttö ................................................................................................... Sivu 24
Toimitustilan palauttaminen ................................................................................................ Sivu 24
Paristojen vaihto ................................................................................................................. Sivu 24
Puhdistus ja hoito .................................................................................................... Sivu 25
Jätehuolto ...................................................................................................................... Sivu 25
Sisällysluettelo

17 FI
Johdanto
Askelmittari
Q
Johdanto
Tutustu laitteeseen ennen ensim-
mäistä käyttöönottoa. Lue sitä varten
tämä käyttöohje ja turvallisuusohjeet.
Käytä laitetta ainoastaan kuvatulla tavalla ja
mainitussa käyttötarkoituksessa. Säilytä käyt-
töohje huolellisesti. Anna kaikki asiakirjat lait-
teen mukana mahdolliselle uudelle omistajalle.
Q
Määräystenmukainen
käyttö
Tämä askelmittari laskee otettujen askelten
määrän, kuljetun matkan ja siihen käytetyn
ajan. Muita näytössä olevia arvoja ovat keski-
nopeus, suurin nopeus, senhetkinen nopeus
sekä kalorinkulutus, rasvanpoltto ja rasvan-
poltto prosentteina. Lisäksi laite on varustettu
kellolla, sekuntikellolla ja hälytystoiminnolla
sekä paniikkihälytyksellä. Muunlainen käyttö
tai muutosten teko laitteeseen on määräysten-
vastaista ja siitä voi seurata tapaturmavaara
ja / tai laitteen vaurioituminen. Valmistaja ei
ota mitään vastuuta määräystenvastaisesta
käytöstä aiheutuneista vahingoista. Laite ei
ole tarkoitettu ammattimaiseen käyttöön.
Q
Osien kuvaus
Laite:
1
Paniikkihälytyspistoke rannekkeella
2
SET-painike
3
MODE-painike
4
Näyttöruutu
5
CLEAR-painike
6
FUNC-painike
7
Ruuvi
8
Paristotilan kansi
9
Vyöklipsi
10
Paristo CR2032 (3 V, litium)
11
Paristot LR44 (1,5 V, alkaliparisto)
12
RESET-painike
13
Paristotila
Näyttöruutu:
14
Toimintopaneeli
15
Alhaisen paristolatauksen näyttö
16
kg, cm, km; lb, inch, mile-symboli
(koon näyttö)
17
CUR Speed / km / h-symboli
(senhetkinen nopeus)
18
MAX Speed / km / h-symboli
(suurin nopeus)
19
Rasvanpolttosymboli
20
kcal-symboli (kilokalorit)
21
Rasvanpoltto %
22
Yleisnäyttö
23
AVG Speed / km / h-symboli (keskinopeus)
24
ALM-symboli
25
Time / ajastinnäyttö (kellonaika /
mitattu aika) / countdown-laskenta
26
Hälytyssymboli
27
PM-symboli
28
Stopwatch - näyttö (sekuntikello)
29
Ikä
30
Sukupuoli (MAN / WOMAN)
Huomautus: Laitteen LC-näyttöä ei voida
kytkeä pois päältä. LC-näytön virrankulutus
käytössä on erittäin vähäinen, se on
verrattavissa rannekellon virrankulutukseen.
Q
Tekniset tiedot
Mittausmenetelmä: Värähtelymenetelmä
Askelnäyttö: 999.999 askelta

18 FI
Johdanto / Turvallisuus
Matkanäyttö: 9999,99 km
Kalorinäyttö: 9999,99 kcal
Askelpituus: 30 – 200 cm (asetettavissa
1 cm:n tarkkuudella) /
10 – 80 tuumaa
Esiasetus: 60 cm / 25 tuumaa
Asetettava
käyttäjän paino: 30 – 200 kg (asetettavissa
1 kg:n tarkkuudella) /
60 – 400 lb
Esiasetus: 60 kg / 120 lb
Ikä: 5 – 99
Esiasetus: 18
Sukupuoli: Mies / nainen
Esiasetus: Mies
Pituus: 60 – 250 cm /
20 – 100 tuumaa
Esiasetus: 60 cm / 65 tuumaa
Sekuntikello /
countdown
(mittausalue): 59 minuuttia /
59,99 sekuntia
Ajan näyttömuoto: 12 / 24 tuntia
Esiasetus: 24 tuntia
Paristot: 4 x paristoa LR44
(1,5 V
, alkali)
1 x paristo CR2032
(3 V
, litium)
Sallitut lämpötilat: 0 – 50 °C
Mitat: n. 76 x 70 x 40 mm
(l x k x s)
Paino:
Askelmittari
(ilman paristoa): n. 53 g
Q
Toimitukseen kuuluu
1 askelmittari (paniikkihälytyksen hälytysnarulla)
4 paristoa LR44 (1,5 V
, alkaliparisto)
1 paristo CR2032 (3 V
, litium)
1 käyttöohje
Turvallisuus
VAROLTUS!
Lue kaikki turva- ja muut
ohjeet! Turva- ja muiden ohjeiden laiminlyönti
voi aiheuttaa sähköiskun, tulipalon ja / tai
vakavia loukkaantumisia.
SÄILYTÄ KAIKKI TURVA- JA MUUT OHJEET
TULEVAA TARVETTA VARTEN!
Yleiset turvaohjeet
J
VAROLTUS!
PIKKU-
LAPSIA JA LAPSIA UHKAA
HENGEN- JA TAPATUR-
MAVAARA! Älä koskaan anna pak-
kausmateriaalia ja tuotetta lasten käsiin
ilman valvontaa. Pakkausmateriaali voi
aiheuttaa tukehtumisvaaran ja kuristumis-
vaaran. Lapset eivät useinkaan tunnista
uhkaavia vaaroja. Pidä siksi lapset aina
loitolla tuotteesta. Tuote ei ole mikään
lasten leikkikalu.
VAROLTUS!
HENGENVAARA! Paris-
tojen nieleminen voi olla hengenvaarallista.
Pariston nielleen henkilön on välittömästi
mentävä lääkärille.
J Älä ota laitetta käyttöön, jos se on viallinen.
Vioittuneet laitteet merkitsevät sähköiskun
aiheuttamaa hengenvaaraa.
J Älä altista laitetta
- äärimmäisille lämpötiloille,
- voimakkaille värähtelyille,
- suurelle mekaaniselle kuormitukselle,
- suoralle auringonvalolle,
- ei saa altistaa kosteudelle / sateelle.
Laite voi vioittua.
J Huomaa, että takuu ei korvaa väärästä
käsittelystä, käyttöohjeen tietojen noudat-
tamatta jättämisestä tai valtuuttamattomien

19 FI
Turvallisuus / Ennen käyttöönottoa / Käyttöönotto
henkilöiden toimenpiteistä aiheutuvia vikoja.
J Älä koskaan pura laitetta osiin. Asiantun-
temattomasti tehdyt korjaukset voivat
aiheuttaa käyttäjälle huomattavia vaarati-
lanteita. Anna korjaukset vain ammattiliik-
keen tehtäväksi.
Paristojen
turvallisuusohjeet
J Poista paristot laitteesta, jos sitä ei ole
käytetty pitkään aikaan.
J
VARO! RÄJÄHDYSVAA-
RA! Älä koskaan lataa
paristoja uudelleen!
J Noudata paristoja paikoilleen asentaessasi
napaisuusmerkintöjä. Ne näytetään
paristotilassa
13
.
J Puhdista paristo- ja laitekosketus tarvitta-
essa, ennen kuin laitat paristot lokeroon.
J Aseta sekä paristo tyyppi CR2032 että
neljä paristoa tyyppi LR44 laitteeseen.
Muuten askelmittari ei pysty toimimaan
kunnolla.
J Ota käytetyt paristot pikaisesti pois
laitteesta. Paristot voivat vuotaa!
J Paristoja ei saa hävittää tavallisen
kotitalousjätteen mukana!
J Laki velvoittaa jokaista käyttäjää hävittä-
mään paristot määräysten mukaisesti!
J Pidä paristot lasten ulottumattomissa, älä
heitä niitä tuleen, älä oikosulje niitä äläkä
pura niitä.
J Jos edellä mainittuja ohjeita ei noudateta,
paristot voivat tyhjentyä loppujännitettä
tyhjemmiksi. Se voi silloin alkaa vuotaa.
Jos laitteessa olevat paristot ovat vuotaneet,
ota ne pois välittömästi laitteen vioittumisen
estämiseksi!
J Vältä kosketusta ihoon, silmiin ja limakal-
voihin. Jos pariston happoa joutuu iholle,
huuhtele kyseinen kohta runsaalla
määrällä vettä ja / tai mene lääkäriin!
J Käytä ainoastaan ohjeissa ilmoitettuja
paristotyyppejä.
Q
Ennen käyttöönottoa
Q
Eristysliuskojen poisto
Paristot sisältyvät laitteeseen jo toimitettaessa.
j Vedä eristysliuskat pois laitteen takapuo-
lelta nuolen suuntaan. Kuuluu äänimerkki.
Askelmittari on nyt valmis asetettavaksi.
Q
Käyttöönotto
Ennen laitteen ensimmäistä käyttöönottoa on
asetettava seuraavat parametrit: Mittayksikkö
(metrinen tai US-järjestelmä), askelpituus,
käyttäjän paino, pituus, ikä, sukupuoli, aikayk-
sikkö (12 / 24 tuntia), aktuelli kellonaika,
hälytystoiminto. Muussa tapauksessa askelmit-
tarin toimintoja ei voida käyttää hyväksi.
Huomautus: Kun olet ennen ensimmäistä
käyttöä asettanut kaikki parametrit kerran, voit
milloin tahansa sen jälkeen muuttaa yksittäiset
eri parametrit. Ainoastaan mittayksikköä
(metrinen tai US-järjestelmä) ei voida muuttaa
enää jälkikäteen. Mikäli haluat muuttaa
mittayksikön, kaikki paristot
10
,
11
on otetta-
va paristotilasta
13
tai painettava RESET-pai-
niketta
12
. Tässä toiminnossa asetetaan taas
esiasetetut arvot.

20 FI
Käyttöönotto
Q
Hold-toiminto /
laskuritoiminto
Laitteen käyttöönotossa askelmittari on
utomaattisesti laskuritoiminnossa.
Huomautus: Hold-toiminnossa askel-
mittarin mittaustoiminnot ovat pois käytöstä.
j Pidä MODE-painiketta
3
painettuna noin
3 sekuntia. Kuuluu äänimerkki. Näyttö
vilkkuu vuorotellen askelten määrän
kanssa ja näyttöruutuun tulee sana SET.
j Paina MODE-painiketta
3
noin 3 sekuntia
päästäksesi laskuritoimintoon. Kuuluu
äänimerkki. Näyttö
sammuu.
Q
Parametrien asetus
j Kun otat laitteen käyttöön ensimmäisen
kerran tai kytket laitteen Hold-toimintoon
(katso „Hold-toiminto / laskuritoiminto“),
voit asettaa tai muuttaa eri parametrit.
j Paina SET-painiketta
2
päästäksesi
syöttötoimintoon. LC-näyttöruudussa
näytetään SET.
j Näytöt kg, cm, km tai lb, inch, mile
16
vilkkuvat. Paina painiketta MODE
3
tai
CLEAR
5
asettaaksesi halutun mittayksikön
(metrinen tai US-järjestelmä).
j Vahvista syöttö painamalla SET-painiketta
2
. Toimintopaneelille
14
tulee näyttöön
STRIDE. LC-näyttöruutuun tulee cm-symboli
16
sekä esiasetettu arvo 60 cm tai 25
tuumaa. Paina painikkeita MODE
3
tai
CLEAR
5
halutun askelpituuden
asettamiseksi.
Huomautus: Askelpituus voidaan aset-
taa 30 cm - 200 cm:n tai 10 - 80 tuuman
välille.
Ohje: Pidä painikkeita MODE
3
tai
CLEAR
5
noin 3 sekuntia alaspainettuina.
Näin nopeutat arvojen asetusta. Tätä
pika-asetusta voit käyttää hyväksi myös
seuraavissa asetuksissa.
j Vahvista syöttö painamalla SET-painiketta
2
. Toimintopaneelille
14
tulee näyttöön
WEIGHT. LC-näyttöruutuun tulee kg-
symboli
16
sekä esiasetettu arvo 60 kg
tai 120 lb. Paina painikkeita MODE
3
tai CLEAR
5
halutun painon asettamiseksi.
Huomautus: Käyttäjän paino voidaan
säätää 30 - 200 kilon tai 60 – 400 lb
välille.
j Vahvista syöttö painamalla SET-painiketta
2
. Toimintopaneelille
14
tulee näyttöön
HEIGHT. Toimintopaneelilla vilkkuu
esiasetettu arvo. Paina painikkeita MODE
3
tai CLEAR
5
halutun pituuden asetta-
miseksi.
Huomautus: Käyttäjän pituus voidaan
asettaa 60 ja 250 cm:n tai 20 ja 100
tuuman välille.
j Vahvista syöttö painamalla SET-painiketta
2
. LC-näytgtöruutuun tulee näyttö AGE
29
sekä luku 18 esiasennettuna arvona.
Paina painikkeita MODE
3
tai CLEAR
5
halutun iän asettamiseksi.
Huomautus: Iäksi voidaan asettaa
5 – 99 vuotta.
j Vahvista syöttö painamalla SET-painiketta
2
. Näytöt MAN tai WOMAN syttyvät.
Paina painikkeita MODE
3
tai CLEAR
5
halutun sukupuolen asettamiseksi.
j Vahvista syöttö painamalla SET-painiketta
3
. Näytöt Time
25
sekä (24-tunnin
näyttömuoto) tai
(12-tunnin näyttö-
muoto) syttyvät. Paina painikkeita MODE
3
tai CLEAR
5
halutun näyttömuodon
asettamiseksi.
Huomautus: PM-symboli
27
on
12-tunnin näyttömuodossa iltapäivälle.
j Vahvista syöttö painamalla SET-painiketta
2
. Näyttöön tulee Time
25
ja yleisnäy-
Sidan laddas...
Sidan laddas...
Sidan laddas...
Sidan laddas...
Sidan laddas...
Sidan laddas...
Sidan laddas...
Sidan laddas...
Sidan laddas...
Sidan laddas...
Sidan laddas...
Sidan laddas...
Sidan laddas...
Sidan laddas...
Sidan laddas...
Sidan laddas...
Sidan laddas...
Sidan laddas...
Sidan laddas...
Sidan laddas...
Sidan laddas...
Sidan laddas...
Sidan laddas...
Sidan laddas...
Sidan laddas...
Sidan laddas...
Sidan laddas...
Sidan laddas...
Sidan laddas...
Sidan laddas...
Sidan laddas...
Sidan laddas...
Sidan laddas...
Sidan laddas...
Sidan laddas...
Sidan laddas...
Sidan laddas...
-
 1
1
-
 2
2
-
 3
3
-
 4
4
-
 5
5
-
 6
6
-
 7
7
-
 8
8
-
 9
9
-
 10
10
-
 11
11
-
 12
12
-
 13
13
-
 14
14
-
 15
15
-
 16
16
-
 17
17
-
 18
18
-
 19
19
-
 20
20
-
 21
21
-
 22
22
-
 23
23
-
 24
24
-
 25
25
-
 26
26
-
 27
27
-
 28
28
-
 29
29
-
 30
30
-
 31
31
-
 32
32
-
 33
33
-
 34
34
-
 35
35
-
 36
36
-
 37
37
-
 38
38
-
 39
39
-
 40
40
-
 41
41
-
 42
42
-
 43
43
-
 44
44
-
 45
45
-
 46
46
-
 47
47
-
 48
48
-
 49
49
-
 50
50
-
 51
51
-
 52
52
-
 53
53
-
 54
54
-
 55
55
-
 56
56
-
 57
57


Crivit H14347 Operation and Safety Notes
- Typ
- Operation and Safety Notes
- Denna manual är också lämplig för
på andra språk
- Deutsch: Crivit H14347
- English: Crivit H14347
- dansk: Crivit H14347
- suomi: Crivit H14347
Andra dokument
-
Silva ex step Bruksanvisning
-
-
Oregon Scientific PE828 Användarmanual
-
Auriol Z31793 Operation and Safety Notes
-
Oregon Scientific Fitness Electronics SP200 Användarmanual
-
Trekstor i-Beat Jump BT Användarguide
-
Oregon Scientific PE980 Användarmanual
-
-
Oregon PE329 Användarmanual
-
Sony SRF-M80 Bruksanvisning