
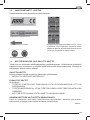
ISTRUZIONI PER L’USO E MANUTENZIONE
USE AND MAINTENANCE MANUAL
GEBRAUCHS- UND WARTUNGSANLEI-
TUNG
INSTRUCTIONS POUR L’UTILISATION ET
L’ENTRETIEN
INSTRUCCIONES DE USO Y
MANTENIMIENTO
INSTRUÇÕES DE USO E MANUTENÇÃO
BRUGS OG
VEDLIGEHOLDELSESANVISNINGER
BRUKSANVISNING OCH UNDERHÅLL
INSTRUKSJONER FOR BRUK
OG VEDLIKEHOLD
KÄYTTÖ- JA HUOLTO-OHJEET
NAUDOJIMO IR TECHNINĖS PRIEŽIŪROS
INSTRUKCIJA
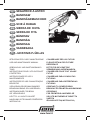
SEGATRICE A ASTRO
BANDSAW
BANDSÄGEMASCHINE
SCIE À RUBAN
SIERRA DE CINTA
SERRA DE FITA
BÅNDSAV
BANDSÅG
BÅNDSAG
VANNESAHA
JUOSTINIS PJŪKLAS
www.femi.it
CONSERVARE PER USI FUTURI
PLEASE RETAIN FOR FUTURE
REFERENCE
BITTE FÜR DIE KÜNFTIGE
VERWENDUNG AUFBEWAHREN.
CONSERVER POUR TOUT USAGE
FUTUR
CONSERVAR PARA CONSULTAS
FUTURAS
CONSERVAR PARA REFERÊNCIAS
FUTURAS
OPBEVAR TIL SENERE BRUG
BEVARA FÖR FRAMTIDA ANVÄNDNING
OPPBEVAR
FOR FREMTIDIG ANVENDELSE
SÄILYTÄ MYÖHEMPÄÄ TARVETTA
VARTEN
IŠSAUGOKITE ŠIĄ INSTRUKCIJĄ
IT
EN
DE
FR
ES
PT
PT
DA
SE
NO
FI
LT

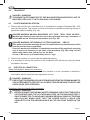
NOTA:
le fi gure che non riportano nessuna specifi ca sul tipo di macchina a cui fanno riferimento,
valgono per tutte le versioni:
NOTE:
fi gures which provide no specifi c indication as to which type of machine they refer to are
valid for all versions:
ANMERKUNG:
Die Abbildungen, bei denen kein bestimmter Maschinentyp angegeben ist, auf den sie
sich beziehen, gelten für alle Versionen:
REMARQUE :
les fi gures ne reportant aucune spécifi cation sur le type de machine à laquelle elles font
référence, sont valables pour toutes les versions :
NOTA:
las fi guras en las que no se indica el tipo de máquina al que hacen referencia son válidas
para todas las versiones:
NOTA:
as fi guras que não contêm nenhuma especifi cação sobre o tipo de máquina à qual fazem
referência, são válidas para todas as versões:
BEMÆRK:
Figurer uden specifi kationer vedrørende den maskintype de henviser til gælder for alle
modellerne:
OBS:
fi gurerna som inte hänvisar till en specifi k typ av maskin gäller för alla versioner:
MERK:
fi gurer som ikke angir hvilke maskintyper de referer til, gjelder for alle utgaver.
HUOMIO:
Kuvat, joissa ei kerrota tietoja konemallista, johon ne viittaavat, koskevat kaikki malleja.
PASTABA:
paveikslėliai, kuriuose nėra specifi nių nuorodų konkrečiam mašinų tipui, galioja visoms
versijoms:
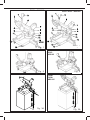
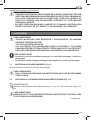
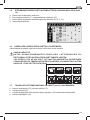
SEGATRICI MANUALI
MANUAL BANDSAWS
MANUELLE BANDSÄGEMASCHINEN
SCIES MANUELLES
SIERRAS MANUALES
SERRAS MANUAIS
MANUELLE SAVE
SÅGMANUALER
MANUELLE BÅNDSAGER
MANUAALISET SAHAT
RANKINIAI JUOSTINIAI PJŪKLAI
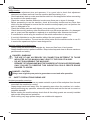
780XL, 782XL, 783XL, SN105 XL
IT
EN
DE
FR
ES
PT
SEGATRICE TAGLIO AUTONOMO
AUTONOMOUS CUTTING BANDSAW
SÄGEMASCHINE MIT AUTOMATISCHEM SCHNITT
SCIE COUPE AUTONOME
SIERRA DE CORTE AUTÓNOMO
SERRA DE CORTE AUTÓNOMO
AUTONOM SKÆRESAV
AUTONOM SKÄRSÅG
BÅNDSAG SELVSTYRENDE KUTTING
AUTOMAATTISEN LEIKKUUN SAHA
AUTONOMINO PJOVIMO JUOSTINIAI PJŪKLAI
ABS105
DA
SE
NO
FI
LT

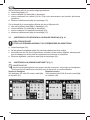
780XL - SN105XL
780XL - SN105XL
782XL
783XL
ABS105
782XL
783XL
ABS105
782XL-783XL / ABS105
780XL - SN105XL
2
2
1
5
7
8
9
10
10
optional
optional
13
13
4
6
11
11
12
12
3
15
15
14
14
2
2
1
5
7
8
9
10
10
13
13
4
6
11
11
12
12
3
16
16
15
15
14
14
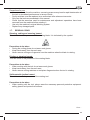
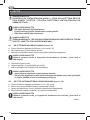
900 ÷ 950 mm
900 ÷ 950 mm
900 ÷ 950 mm
900 ÷ 950 mm
Fig. 1 Fig. 1
Fig. 2 Fig. 2
Fig. 3A Fig. 3A

782XL-783XL
ABS105
780XL - SN105XL
780XL - SN105XL
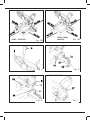
mm 800
mm 800
mm 800
mm 800
mm 800
mm 800
mm 800
mm 800
mm 800
mm 800
mm 800
mm 800
mm 800
mm 800
mm 800
mm 800
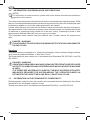
15
23
24
24
25
25 9
10
10
20
20
21
21
22
22
22
3
27
27
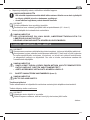
Fig. 4 Fig. 5
Fig. 6 Fig. 7
Fig. 3B Fig. 3B

782XL-783XL - ABS105
782XL-783XL - ABS105
ABS105
780XL - SN105XL
26
26
28
28
26
26
27
27
29
29
30
30
18
19
1
7
29
29
30
30
2
31
31
29
29
30
30
2
26
26
31
31
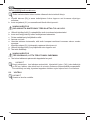
Fig. 7 Fig. 8
Fig. 9
Fig. 10
Fig. 9

TRANSLATION OF THE ORIGINAL INSTRUCTIONS
INDEX
EN
1. INTRODUCTION TO USE ...........................................................................................20
1.1. HOW TO CONSULT THIS MANUAL AND THE SYMBOLS ADOPTED ...............20
1.2. WARNING STICKERS - INDICATIONS ................................................................21
1.3. TYPE OF USE AND CONTRAINDICATIONS. .....................................................21
1.4. TECHNICAL FEATURES ......................................................................................22
1.5. GENERAL SAFETY REGULATIONS ....................................................................22
1.6. SAFETY PRECAUTIONS DURING USE .............................................................24
1.7. RESIDUAL RISKS ................................................................................................25
1.8. INFORMATION CONCERNING NOISE AND VIBRATIONS ................................26
1.9. INFORMATION ON ELECTROMAGNETIC COMPATIBILITY .............................26
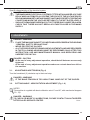
1.10. MAIN MACHINE COMPONENTS (Fig. 1) ............................................................27
1.11. MACHINE DESCRIPTION (Fig. 1) .......................................................................27
2. INSTALLATION ..........................................................................................................27
2.1 CONTENTS OF THE PACKAGING ......................................................................27
2.2. REMOVING THE PACKAGING ............................................................................27
2.3. HANDLING .........................................................................................................27
2.4. TRANSPORT ........................................................................................................28
2.5. POSITIONING/WORK STATION .........................................................................28
2.6. ELECTRICAL CONNECTION ...............................................................................28
3. ADJUSTMENTS ...........................................................................................................29
3.1. ADJUSTING BLADE TENSION (Fig. 4) ...............................................................29
3.2. CUTTING ANGLE - HEAD ROTATION ADJUSTMENT (Fig. 1-6) ........................29
3.3 ADJUSTING THE SLIDING BLADE GUIDE POSITION (Fig. 8) ..........................30
3.4. CUTTING SPEED ADJUSTMENT (Fig. 7) ...........................................................30
3.5. ADJUSTING THE FEED SPEED FOR THE AUTONOMOUS CUTTING VERSION
(Fig. 10) .................................................................................................................31
3.6. CORRECT POSITIONING OF THE WORKPIECE IN THE CLAMP ..................31
3.7. INSTALLATION AND ADJUSTMENT OF THE BAR HOLDER (Fig. 5)
(OPTIONAL) .........................................................................................................31
4. USE ...............................................................................................................................32
4.1. USE AS A MANUAL BANDSAW (Fig. 1-4) ...........................................................32
4.2. USE AS AN AUTONOMOUS CUTTING BANDSAW (Fig. 1 - 10) .........................32
5. MAINTENANCE - STORAGE - ASSISTANCE - DISPOSAL .......................................33
5.1. INSTRUCTIONS FOR REPLACING THE SAW BLADE (Fig. 9) .........................33
5.2. LUBRICATION ......................................................................................................34
5.3. CLEANING - TASKS TO BE PERFORMED .........................................................35
5.4. CHECKS ...............................................................................................................35
5.5. STORAGE OF THE MACHINE WHEN NOT IN USE ...........................................35
5.6. ASSISTANCE .......................................................................................................35
5.7. DISPOSAL OF THE MACHINE, PACKAGING AND MATERIALS PRODUCED BY
MAINTENANCE OPERATIONS ...........................................................................35
6. TROUBLESHOOTING ................................................................................................36
19
EN

1. INTRODUCTION TO USE
NOTES
The Use and Maintenance Manual is made up of two parts, this document and the additional
sheet which is an integral part of the instructions.
This User Manual is aimed at professional users.
DANGER - WARNING
BEFORE USING THE MACHINE PLEASE READ THIS MANUAL CAREFULLY SO
THAT YOU BECOME FAMILIAR WITH THE MACHINE, ITS ENVISAGED USE AND
ANY RISKS ASSOCIATED WITH IT.
Keep the Use and Maintenance Manual in good condition: Remember, it is an integral part of
the machine. Always refer to the manual to get best machine performance in maximum safety
while performing the operations described therein.
This manual must be kept in an easily accessible place, near the machine, at all times so that
it can be consulted whenever necessary.
DANGER - WARNING
USE THE MACHINE SOLELY AND EXCLUSIVELY FOR THE USES INDICATED
AND IN ACCORDANCE WITH THE RECOMMENDATIONS PROVIDED IN THIS
MANUAL. NEVER TAMPER WITH IT, FORCE IT OR USE IT IN ANY INAPPROPRIATE
MANNER.
1.1. HOW TO CONSULT THIS MANUAL AND THE SYMBOLS ADOPTED
Please pay particular attention to the words “WARNING”, “DANGER”, “CAUTION” and “NOTES”
as used in this manual.
To draw the user’s attention to certain information and provide warning messages, the operations
described in this manual are accompanied by symbols and notes to highlight the presence of
any hazards and indicate the safe use of the equipment.
These symbols and notes belong to various categories as indicated below:
DANGER - WARNING: IMPORTANT INFORMATION CONCERNING GENERAL
SAFETY.
DANGER - CAUTION: highlights situations where careful and sensible actions are
essential.
NOTES: information of a technical nature.
20
EN

1.2. WARNING STICKERS - INDICATIONS
The stickers affi xed to the machine are indicated below.
Company logo / CE Mark
Indication of direction of rotation.
Serial number / Year of manufacture
Indication of motor characteristics and data S4-
20% 1/4 min = intermittent periodic duty-type with
starting, time of operation at constant load at the
power indicated for 1 minute and a rest time of 4
minutes.
Wear PPE.
1.3. TYPE OF USE AND CONTRAINDICATIONS.
The machine has been designed and built for cold cutting metal materials. For this operation
the workpiece is held in place by a clamp and the cutting blade is held in the cutting position
by the operator who stands in front of the machine during use.
PERMITTED USE
The machine can be used to work on:
• METAL OR SIMILAR MATERIALS
FORBIDDEN USE
It is forbidden to:
• OPERATE ON NON-METALS, ORGANIC MATERIALS AND/OR FOOD STUFFS,
• OPERATE ON MATERIALS WHICH MAY RELEASE TOXIC SUBSTANCES DURING THE
WORK PROCESS.
• USE ANY TYPE OF LUBRICANT DURING CUTTING
21
EN

PERSONNEL AUTHORIZED TO USE THE MACHINE
This machine has been designed and manufactured to be used by qualifi ed personnel with
adequate training, experience and skills. Below you will fi nd a list of basic requirements:
Operators / Apprentices:
• may be male or female
• must be aged 14 or over
• must have full use of both hands
• must have no physical or mental disabilities
• must know and fully understand the contents of the user manual.
PERMITTED AMBIENT CONDITIONS
Ambient condition operating limits:
• operating ambient with a temperature between + 5°C – + 40°C
• relative humidity 50 % at a temperature of + 40 °C
• maximum operating altitude: 1,000 m.a.s.l ;
• the machine must be used in an environment which is protected from the elements.
DANGER - CAUTION
The machine does not have any signifi cant environmental impact, however it must
still be evaluated by the user in order to minimize any possible negative effects.
DANGER - WARNING
THIS MACHINE IS NOT SUITABLE FOR USE IN POTENTIALLY EXPLOSIVE
ATMOSPHERES.
1.4. TECHNICAL FEATURES
NOTES
For information on the machine’s technical features, please refer to the relative document
provided as an appendix to this manual.
1.5. GENERAL SAFETY REGULATIONS
DANGER - WARNING
WHEN USING ELECTRICAL TOOLS IT IS ESSENTIAL TO OBSERVE BASIC SAFETY
PRECAUTIONS AT ALL TIMES TO REDUCE THE RISK OF FIRE, ELECTRIC SHOCK
AND INJURY.
READ ALL THESE INSTRUCTIONS CAREFULLY BEFORE PROCEEDING TO USE
THIS PRODUCT AND KEEP THEM IN A SAFE PLACE.
NOTES
The indication “PLACE THE MACHINE IN SAFETY CONDITIONS” means unplug the
machine’s power supply cable from the mains socket.
Cont....
22
EN

Ambient Conditions:
- Avoid using the machine in locations which are very humid or in the presence of fl ammable
liquids or gas.
- Always keep the work area tidy and clear of work residues; untidy work benches and work
areas are a source of potential danger.
Clothing and personal protective equipment:
- Always wear appropriate clothing: do not wear clothing with loose sleeves or any accessories
such as scarves, necklaces, bracelets or any other object which may get caught up in the
machine’s moving parts.
- Always wear the necessary personal protective equipment: regulation safety glasses/
goggles, well-fi tting gloves, earmuffs or ear plugs.
- It is advisable to wear slip-resistant safety footwear.
- When necessary, suitably tie back long hair to prevent any risk of it becoming trapped or
entangled in moving parts.
- Wear an approved dust mask.
Care and Use of electrical components:
- Always handle the power cable with care: Never use it to lift the machine. Do not pull on
the cable to disconnect the plug from the power socket. Keep the cable away from sharp
edges, oil and high temperatures.
- Should it be necessary to use an extension fl ex, make sure it is of an approved type.
- Regularly check the condition of power cables. If damaged have them repaired by an
authorized after sales service centre.
- Regularly check any extension fl exes being used and replace them if damaged.
- Whenever the machine is used outdoors, only use extension fl exes which have been
approved for outdoor use and are marked accordingly.
- Avoid contact with any earthed objects.
General safety precautions:
- Keep unauthorized persons and children away from the machine: never allow them to come
near or into contact with it.
- Always check what you are doing.
- DO NOT use the machine if you are tired.
- Always stay in a comfortable and well-balanced position.
- Never leave tools or measuring devices on the machine.
- Adopt safe working methods.
- Unplug the machine from the power supply when it is not in use, before performing any
maintenance operations and before replacing accessories or tools.
- Keep your face away from the cutting area to avoid inhaling any fumes which may be
generated by oily substances found on ferrous materials.
Cont....
23
EN

Safety checks:
- Remove the adjustment pins and spanners. It is a good rule to check that adjustment
spanners have been removed from the machine before switching it on.
- Avoid inadvertent start-up: make sure that the switch is in the stop position before connecting
the machine to the power supply.
- Check the various machine elements to make sure there are no signs of damage.
- Before proceeding to use the machine, check all the safety devices and any other item
which may be damaged to ensure that the machine works properly and can perform the
task it is designed to do.
- Check that mobile parts are well aligned, move smoothly and are intact.
- Check the mounting and any other condition which may infl uence operation. Any damaged
part or guard must be repaired or replaced at an authorized after sales service centre.
- It is essential to avoid using the machine if the switch malfunctions in any way.
- It is strictly forbidden to use the machine without the tool guards in place.
- Do not force the machine. The end results will be better and the machine safer to use if it
is used at the speed and rhythm it was designed for.
Machine upkeep and maintenance:
- Always keep the handles and handgrips dry, clean and free from oil and grease.
- Always keep the tools in perfect condition. Keep tools sharp and clean to ensure maximum
performance and safety.
DANGER - WARNING
• THE USE OF ANY ACCESSORY OR CONNECTION DIFFERENT TO THOSE
INDICATED IN THIS MANUAL MAY LEAD TO THE RISK OF INJURY.
• DO NOT DISASSEMBLE THE MACHINE:
REPAIRS TO THE MACHINE MUST BE CARRIED OUT BY SKILLED PERSONNEL
ONLY. FAILURE TO OBSERVE THIS INDICATION COULD CREATE GRAVE
DANGER TO USERS.
DANGER - CAUTION
Always use original spare parts to guarantee correct and safe operation.
1.6. SAFETY PRECAUTIONS DURING USE
Accident prevention warnings:
- It is strictly forbidden to remove any waste material or parts of the workpiece from the work
area when the machine is running.
- Always keep hands well away from the operating area when the machine is in motion;
before performing any operation, release the stop button and wait for the tool to come to a
complete standstill.
- Before starting the machine always check that all the safety guards are correctly installed
and provide adequate tool protection.
- When cutting very large pieces always use suitable side supports.
24
EN

Precautions for use:
- Never needlessly force the machine: excessive pressure may lead to rapid deterioration of
the tool or decreased performance in terms of fi nish.
- Faulty switches must be replaced at an authorized after sales service centre.
- Only use the tools recommended in this manual.
- Check that the wrenches used for maintenance and adjustment operations have been
removed from the machine before starting it.
- Use only the machine’s original blocking system.
- Replace any damaged parts.
1.7. RESIDUAL RISKS
Shearing, cutting and severing hazard:
This risk is due to the presence of the rotating blade. It is indicated by the symbol:
Precautions to be taken
• During the cutting phase do not wear work gloves.
• Keep hands away from the work area.
• Never remove cuttings or fragments from the machine when the blade is rotating.
Friction or abrasion hazard:
This risk is due to the presence of the rotating blade.
Precautions to be taken
• When working with the tool do not wear work gloves.
• Keep hands away from the work area.
• Never remove cutting residues or workpiece fragments when the tool is rotating.
Solid material ejection hazard:
This risk is due to the presence of the rotating tool.
Precautions to be taken
• When working with the tool, always wear the necessary personal protective equipment:
safety glasses and protective footwear.
Cont....
25
EN

1.8. INFORMATION CONCERNING NOISE AND VIBRATIONS
NOTES
For information on noise emissions, please refer to the relative document provided as an
appendix to this manual.
The noise values indicated are emission levels and not necessarily safe operating levels. While
there is a correlation between emission levels and exposure levels, this cannot reliably be used
to determine whether or not further safety precautions are needed.
Factors which infl uence the real level of a worker’s exposure include the duration of exposure,
the characteristics of the working environment, other sources of noise, for example the number
of machines or operations being carried out in the near vicinity. Furthermore, levels of safe
exposure may be fi xed differently from one country to another.
This information does however help the machine user to better assess the hazards and
risks.
DANGER - WARNING
IT IS ADVISABLE TO USE SUITABLE HEARING PROTECTION SUCH AS EARMUFFS
OR EAR PLUGS.
Vibrations
The mean frequency-weighted r.m.s. hand-arm acceleration value in normal cutting conditions
using correctly sharpened blades, is less than 2.5 m/s2.
Test measurements were carried out in accordance with Standards EN ISO 5349-1 and EN
ISO 5349-2.
DANGER - WARNING
VIBRATIONS DURING REAL MACHINE USE MAY DIFFER FROM THOSE DECLARED
AS THE TOTAL VIBRATION VALUE DEPENDS VERY MUCH ON HOW THE MACHINE
IS USED.
IT IS THEREFORE NECESSARY TO IDENTIFY THE MOST APPROPRIATE SAFETY
MEASURES REQUIRED FOR SAFEGUARDING THE OPERATOR BASED ON
ESTIMATED EXPOSURE TIMES AND REAL CONDITIONS OF USE.
1.9. INFORMATION ON ELECTROMAGNETIC COMPATIBILITY
Electromagnetic emissions from the machine do not exceed the limits defi ned by the relative
standards for the envisaged conditions of use.
Testing was carried out in accordance with Standards EN 55014-1 and EN 55014-2.
Cont....
26
EN

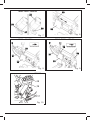
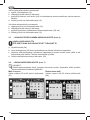
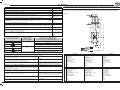
1.10. MAIN MACHINE COMPONENTS (Fig. 1)
(1) Control handgrip
(2) Blade tensioning handwheel
(3) Start button
(4) Sliding blade guide
(5) Machine body
(6) Blade
(7) Motor
(8) Power switch
(9) Swivel support
(10) Bar holder
(11) Clamp
(12) Clamp drive
(13) Base
(14) Arm locking pin
(15) Swivel support lock knob
(16) Kill switch “AUTONOMOUS CUTTING” only
1.11. MACHINE DESCRIPTION (Fig. 1)
The bandsaw is made up of two main parts: the machine body (5) complete with motor and
drive system (7) which is joined, by means of a swivel support (9), to the bottom section, made
up of a base (13) and clamp (11).
2. INSTALLATION
2.1 CONTENTS OF THE PACKAGING
• n. 1 bandsaw
• n. 1 Bar holder (OPTIONAL)
• User Manual
• Supplementary insert
2.2. REMOVING THE PACKAGING
Remove the box used to protect the machine during transport.
It is advisable to keep the packaging for future use (for transporting or storing the machine).
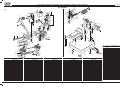
2.3. HANDLING
a. Insert the special block by means of the pin (14).
b. Lift the machine as illustrated in (Fig. 2)
NOTE - Machine weight:
For information on the weight of the machine described in this manual, please refer to the
relative document with all the technical details provided as an appendix to this manual.
(ABS105)
27
EN

2.4. TRANSPORT
DANGER - WARNING
TO ENSURE SAFE TRANSPORT OF THE MACHINE FROM ONE WORK PLACE TO
ANOTHER, REPLACE IT IN ITS ORIGINAL PACKAGING.
2.5. POSITIONING/WORK STATION
a. Position the machine on a work bench or on a pedestal at a height of between 900 – 950
mm from the ground. The surface on which the machine is placed must be big enough to
guarantee machine stability (Fig. 3A).
DANGER-WARNING MANUAL BANDSAWS
Machine positioning in the work area must be performed ensuring a clearance of
at least 800 mm on all sides of the machine (see Fig. 3B).
DANGER-WARNING AUTONOMOUS CUTTING BANDSAW
This model of machine must only be used in a dedicated environment/area to which
unauthorized access is prohibited.
If no such work area is available, it is advisable to cordon off the machine’s operating
area (2 metres of clearance on all sides of the bandsaw) (Fig. 3B) using red and
white safety chains and yellow lines on the fl oor.
Put up a “No access to unauthorized persons” sign.
b. Position the machine in a work area with adequate lighting.
c. It is advisable to secure the machine to the workbench with M8 screws using the holes
provided on the base.
2.6. ELECTRICAL CONNECTION
Safety Standards for electrical connections
- Check that the mains system to which the machine is to be connected is earthed in
accordance with the relative safety regulations in force.
DANGER - WARNING
CHECK THAT THE POWER SUPPLY SYSTEM IS EQUIPPED WITH A THERMOMAGNETIC
CIRCUIT BREAKER TO PROTECT ALL CONDUCTORS FROM SHORT CIRCUIT AND
OVERLOADS (SEE APPENDIX).
Preliminary tests and checks after connection
DANGER - WARNING
- BEFORE CONNECTING THE MACHINE TO THE MAINS, CHECK THAT THE SUPPLY
VOLTAGE MATCHES THE VOLTAGE INDICATED ON THE MACHINE ITSELF.
- ONCE CONNECTED, TO AVOID ANY POSSIBLE RESIDUAL RISKS OF TRIPPING
AND FALLING, MAKE SURE THAT THE POWER SUPPLY CABLE LIES
COMPLETELY ON THE GROUND AND IS NOT AT ANY POINT RAISED IN THE
AIR.
Cont....
ART. 780XL, 782XL, 783XL, SN105XL
ABS105
28
EN

Specific characteristics of the electrical system
DANGER - WARNING
- THE BANDSAW’S ELECTRICAL SYSTEM IS FITTED WITH AN UNDER-VOLTAGE
RELAY WHICH AUTOMATICALLY OPENS THE CIRCUIT IF THE VOLTAGE DROPS
BELOW A MINIMUM SET LIMIT AND INHIBITS AUTOMATIC RESET OF OPERATING
CONDITIONS WHEN THE VOLTAGE RETURNS TO THE SET RATED LEVELS.
- SHOULD THE MACHINE SUDDENLY CUT OUT THERE IS NO CAUSE FOR ALARM.
CHECK THAT THERE HAS NOT BEEN A VOLTAGE FAILURE IN THE MAINS
SUPPLY.
3. ADJUSTMENTS
DANGER - WARNING
- PLACE THE MACHINE IN SAFETY CONDITIONS AS DESCRIBED IN THE HEADING
“GENERAL SAFETY REGULATIONS”.
- WEAR PROTECTIVE GLOVES.
- ALL THE PROCEDURES FOR MACHINE ADJUSTMENTS AND USE DESCRIBED
IN THE FOLLOWING HEADINGS MUST BE PERFORMED ONLY AFTER THIS
INSTRUCTION, USE AND MAINTENANCE MANUAL HAS BEEN READ AND
UNDERSTOOD IN FULL.
DANGER - CAUTION
- At the end of every adjustment operation, check that all fasteners are securely
tightened.
- At the end of every adjustment operation make sure no tools have been left on
the machine.
3.1. ADJUSTING BLADE TENSION (Fig. 4)
Turn the handwheel (2) clockwise up to the travel stop.
DANGER - WARNING
- IF THE BAND TENSION IS TOO HIGH IT MAY JUMP OUT OF THE GUIDES.
3.2. CUTTING ANGLE - HEAD ROTATION ADJUSTMENT (Fig. 1-6)
NOTES
The machine is supplied with basic calibration set at 0° and 45°, with mechanical stoppers
(23 - 25).
DANGER - WARNING
TO CHECK OR MODIFY CALIBRATIONS, PLEASE CONTACT AN AUTHORIZED
AFTER SALES SERVICE CENTRE. Cont....
29
EN

To adjust the cutting angles proceed as follows:
a. slacken the knob (15);
b. turn the swivel support (9) using the handgrip;
c. stop rotation when the pointer (24) is aligned with the selected position on the graduated
scale on the base;
d. block the swivel support by tightening the knob (15).
To return to initial conditions, proceed as follows:
a. release the swivel support by slackening the knob (15);
b. turn the swivel support (9) using the handgrip;
c. stop rotation at the end of the mechanical stroke (23);
d. block the swivel support by tightening the knob (15).
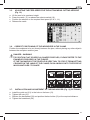
3.3 ADJUSTING THE SLIDING BLADE GUIDE POSITION (Fig. 8)
DANGER - CAUTION
PERFORM ADJUSTMENT OPERATIONS WHENEVER YOU PREPARE A WORK
PHASE.
a. Slacken the knob (29),
b. Slide the blade guide (30) until it is as close to the workpiece as possible.
c. Simulate the work phase to be performed to make sure that there is no interference and/
or contact between the blade guide, the workpiece and other parts of the machine.
d. Block the blade guide in position by tightening the knob (29).
3.4. CUTTING SPEED ADJUSTMENT (Fig. 7)
NOTES
Adjust the cutting speed as indicated in this manual. The device for regulating speed
depends on the specifi c machine model.
2-speed version
Select the speed (60 or 80 m/min) using the
switch (27).
Electronic version
Select the speed (from 30 to 80 m/min) using
the speed regulator (28).
30
EN

3.5. ADJUSTING THE FEED SPEED FOR THE AUTONOMOUS CUTTING VERSION
(Fig. 10)
a. Lift the arm to its maximum height.
b. Press the catch (17) to release the selector switch (19).
c. Position the selector on the required feed speed (H, M, L, LL).
d. Release the catch.
3.6. CORRECT POSITIONING OF THE WORKPIECE IN THE CLAMP
Position the workpiece to be cut directly between the jaws, without placing any other object/s
between the workpiece and the jaws.
DANGER - WARNING
TO POSITION FLAT OR SPECIAL SHAPED PROFILES, PLEASE REFER TO THE
EXAMPLES PROVIDED IN THE FIGURE.
IF THE THICKNESS OF THE PROFILE IS VERY THIN, TO STOP IT FROM GETTING
CRUSHED IN THE JAWS OF THE CLAMP, PUSH A MOULD INTO THE PROFILE
WHICH MATCHES ITS SHAPE.
3.7. INSTALLATION AND ADJUSTMENT OF THE BAR HOLDER (Fig. 5) (OPTIONAL)
a. Install the guide rod (21) in the hole on the base (13).
b. Tighten the nuts (22).
c. Slacken the handwheel (20) and position the bar holder (10) at the required distance.
d. Tighten the handwheel (20).
31
EN

4. USE
DANGER - WARNING
THE MACHINE IS FITTED WITH A MAINS SWITCH (8) (FIG.1) TO BE ACTIVATED
BEFORE ANY WORK IS PERFORMED. ONCE WORK HAS BEEN COMPLETED,
TURN OFF THE MAINS SWITCH.
DANGER - CAUTION
• NEVER wear gloves when using the machine.
• Before commencing a new job, always remove the cuttings left from the previous
task.
• Keep hands well away from the cutting zone.
DANGER - WARNING
RUNNING IN THE BLADE: PERFORM A CORRECT RUNNING-IN PROCEDURE AS
INDICATED IN THE HEADING “BLADE REPLACEMENT”
4.1. USE AS A MANUAL BANDSAW (Fig. 1-4)
a. Secure the workpiece to be cut in the clamp using the relative lever (12).
b. Press button (3) to commence work.
c. Lower the head slowly until it comes into contact with the workpiece.
DANGER - CAUTION
To avoid breaking the blade, reduce pressure as soon as the blade comes into
contact with the workpiece.
d. Complete cutting up to the end of the stroke,
e. Release the button (3) to stop work.
f. Lift the head as far as it will go.
DANGER - CAUTION
• Let the cut piece fall onto the base of the machine.
• NEVER bring hands anywhere near the cutting zone until the head has returned
to its full height and the blade has come to a complete standstill.
4.2. USE AS AN AUTONOMOUS CUTTING BANDSAW (Fig. 1 - 10)
a. Secure the workpiece to be cut in the clamp using lever (12).
b. With your left hand lift the arm up to its maximum height.
c. Manually lower the head until it is 5 mm from the workpiece.
d. With your right hand activate the button (18) to start the cutting process.
DANGER - CAUTION
To avoid breaking the blade, reduce pressure as soon as the blade comes into
contact with the workpiece.
e. Let go of the head and wait for cutting to be completed up to the end of the stroke.
Cont....
32
EN

DANGER - CAUTION
• NEVER bring hands anywhere near the cutting zone until the head has returned
to its full height and the blade has come to a complete standstill.
• Let the cut piece fall onto the base of the machine.
NOTES
At the end of the work process the machine stops automatically.
If necessary the machine can be stopped by pressing the kill switch (16 - Fig.1).
f. Lift the head as far as it will go.
DANGER - WARNING
IN THE EVENT OF EXCESSIVE CUTTING PRESSURE THE CURRENT LIMITER OR
THE THERMAL CIRCUIT BREAKER WILL TRIP.
LESSEN THE CUTTING PRESSURE TO SAFEGUARD THE MACHINE.
5. MAINTENANCE - STORAGE - ASSISTANCE - DISPOSAL
NOTES
Routine maintenance operations which can be performed by the user are described
below.
Have the machine repaired by expert personnel only. This machine complies with all
the relevant safety prescriptions. Repairs to the machine must be carried out by skilled
personnel only using original spare parts. Failure to observe this recommendation could
jeopardize user safety.
DANGER - WARNING
• BEFORE PERFORMING ANY MAINTENANCE WORK, PLACE THE MACHINE IN
SAFETY CONDITIONS AS DESCRIBED IN HEADING “SAFETY PRECAUTIONS
DURING USE”.
• PLACE THE POWER CABLE IN A COIL NEAR THE MACHINE.
5.1. INSTRUCTIONS FOR REPLACING THE SAW BLADE (Fig. 9)
DANGER - WARNING
WEAR PROTECTIVE GLOVES.
Tools required:
Suitable Allen keys and/or Phillips screwdrivers are needed to replace the blade.
Cont....
33
EN
Sidan laddas ...
Sidan laddas ...
Sidan laddas ...
Sidan laddas ...
Sidan laddas ...
Sidan laddas ...
Sidan laddas ...
Sidan laddas ...
Sidan laddas ...
Sidan laddas ...
Sidan laddas ...
Sidan laddas ...
Sidan laddas ...
Sidan laddas ...
Sidan laddas ...
Sidan laddas ...
Sidan laddas ...
Sidan laddas ...
Sidan laddas ...
Sidan laddas ...
Sidan laddas ...
Sidan laddas ...
Sidan laddas ...
Sidan laddas ...
Sidan laddas ...
Sidan laddas ...
Sidan laddas ...
Sidan laddas ...
Sidan laddas ...
Sidan laddas ...
Sidan laddas ...
Sidan laddas ...
Sidan laddas ...
Sidan laddas ...
Sidan laddas ...
Sidan laddas ...
Sidan laddas ...
Sidan laddas ...
Sidan laddas ...
Sidan laddas ...
Sidan laddas ...
Sidan laddas ...
Sidan laddas ...
Sidan laddas ...
Sidan laddas ...
Sidan laddas ...
Sidan laddas ...
Sidan laddas ...
Sidan laddas ...
Sidan laddas ...
Sidan laddas ...
Sidan laddas ...
Sidan laddas ...
Sidan laddas ...
Sidan laddas ...
Sidan laddas ...
-
 1
1
-
 2
2
-
 3
3
-
 4
4
-
 5
5
-
 6
6
-
 7
7
-
 8
8
-
 9
9
-
 10
10
-
 11
11
-
 12
12
-
 13
13
-
 14
14
-
 15
15
-
 16
16
-
 17
17
-
 18
18
-
 19
19
-
 20
20
-
 21
21
-
 22
22
-
 23
23
-
 24
24
-
 25
25
-
 26
26
-
 27
27
-
 28
28
-
 29
29
-
 30
30
-
 31
31
-
 32
32
-
 33
33
-
 34
34
-
 35
35
-
 36
36
-
 37
37
-
 38
38
-
 39
39
-
 40
40
-
 41
41
-
 42
42
-
 43
43
-
 44
44
-
 45
45
-
 46
46
-
 47
47
-
 48
48
-
 49
49
-
 50
50
-
 51
51
-
 52
52
-
 53
53
-
 54
54
-
 55
55
-
 56
56
-
 57
57
-
 58
58
-
 59
59
-
 60
60
-
 61
61
-
 62
62
-
 63
63
-
 64
64
-
 65
65
-
 66
66
-
 67
67
-
 68
68
-
 69
69
-
 70
70
-
 71
71
-
 72
72
-
 73
73
-
 74
74
-
 75
75
-
 76
76


på andra språk
- italiano: Femi FEMSN105XL Manuale utente
- eesti: Femi FEMSN105XL Kasutusjuhend
- English: Femi FEMSN105XL User manual
Relaterade papper
Andra dokument
-
DeWalt DW738 Användarmanual
-
Ferm BSM1007 Bruksanvisning
-
DeWalt DW876 Användarmanual
-
Meec tools 023441 Användarmanual
-
Einhell Classic TC-SB 200/1 Användarmanual
-
-
Trend T18S/MS184S2 184mm 18V 5.0Ah Li-Ion TXLi Cordless Double-Bevel Mitre Saw Användarmanual
-
Hitachi C12RSH - 305mm Slide Compound Mitre Saw Handling Instructions Manual
-