POINT PRO POCG7000 KAFFEKVERN Bruksanvisning
- Kategori
- Små hushållsapparater
- Typ
- Bruksanvisning

Coffee Grinder
POCG7000
User Manual

2
GB
NO
FI
DK
SE
Thank you for purchasing your new
Point Pro Series Coee Grinder.
These operating instructions will help you use it properly and safely. We recommend
that you spend some time reading this instruction manual in order that you fully
understand all the operational features it oers. Read all the safety instructions
carefully before use and keep this instruction manual for future reference.
Takk for at du kjøpte din nye kaekvern i Point Pro Series.
Denne bruksanvisningen vil hjelpe deg med å bruke den på en trygg og riktig måte. Vi
anbefaler at du tar deg tid til å lese gjennom hele bruksanvisningen for å bli fortrolig
med alle funksjonene som tilbys. Les alle sikkerhetsanvisningene nøye før bruk, og
oppbevar bruksanvisningen for fremtidig referanse.
Kiitos uuden Point Pro -sarjan kahvimyllyn ostamisesta.
Nämä käyttöohjeet opastavat sinua käyttämään laitetta oikein ja turvallisesti.
Suosittelemme, että käytät hetken tämän käyttöoppaan lukemiseen, jotta ymmärrät
täysin, mitä toimintoja laitteessa on. Lue kaikki turvallisuusohjeet huolellisesti ennen
laitteen käyttöä ja säilytä käyttöopas myöhempää tarvetta varten.
Tak for købet af din nye kaekværn i Point Pro-serien.
Disse brugervejledninger hjælper dig med at bruge dette apparat rigtigt og sikkert. Vi
anbefaler, at du læser denne brugervejledning, så du får en fuld forståelse af hvordan
alle funktionerne virker. Læs sikkerhedsforskrifterne grundigt inden brug, og gem
denne brugervejledning til senere brug.
Tack för att du köpt din nya kaekvarn i Point Pro-serien.
Denna bruksanvisning hjälper dig att använda den på ett säkert och korrekt sätt.
Vi rekommenderar att du tar dig tid att läsa igenom denna bruksanvisning för att till
fullo förstå alla driftfunktioner som den erbjuder. Läs noga igenom alla
säkerhetsinstruktioner före användning och spara bruksanvisningen för framtida bruk.

3
NO
DK
SE FI GB
Instruction Manual – English ..........................page 4 - 13
Bruksanvisning – Norsk ...................................side 14 - 23
Käyttöopas - Suomi .........................................sivu 24 - 33
Brugervejledning – Dansk ................................side 34 - 43
Bruksanvisning – Svenska ...............................sida 44 - 53

4
IMPORTANT SAFEGUARDS
Read all instructions.
To protect against fire, electric shock and injury to
persons, do not immerse cord, plugs or machine in water
or other liquid.
Unplug from outlet when not in use, before putting on or
taking o parts, and before cleaning. To unplug, grasp
plug and pull from electrical outlet. Never pull cord.
Avoid contact with moving parts.
To reduce the risk of severe injury to persons or damage
to the appliance, keep hands and utensils out of the
coee bean box while grinding, and when the appliance is
plugged in.
Do not operate the grinder with a damaged cord or plug,
when the appliance malfunctions, or is dropped or
damaged in any manner. In this case, return the appliance
to the approved Service Center for examination, repair, or
electrical or mechanical adjustment.
The use of attachments not recommended may cause
fire, electric shock or injuries.
Do not use outdoors.
Do not let the cord hang over the edge of the table,
counter or touch hot surfaces, including the stove.
Check coee bean box for presence of foreign objects
before using.
Always operate the burr grinder with the lid securely in
place.
Do not place on or near a hot gas, electric burner or in a
heated oven.
This product is designed for household use only. Any
commercial use, inappropriate use or failure to
comply with the instructions will void the manufacturer's
warranty.
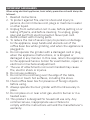
When using electrical appliances, basic safety precautions should always be
followed:
1.
2.
3.
4.
5.
6.
7.
8.
9.
10.
11.
12.
13.

5
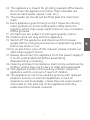
This appliance is meant for grinding roasted coee beans.
Do not use the appliance for other than intended use
(such as hard seeds, spices, nuts, etc.);
The powder jar should not be filled past the maximum
mark.
Every appliance goes through a strict inspection during
mass production, and is tested with coee beans for
grinding, which may cause slight traces of use or residual
coee grounds.
All machines are subject to stringent quality control.
Children shall not play with the appliance.
Switch o the appliance and disconnect from power
supply before changing accessories or approaching parts
that move while in use.
For an electronic copy of this manual, please contact our
after sales support centre.
Always disconnect the appliance from the power supply if
it is left unattended and before assembling,
disassembling or cleaning.
Cleaning and user maintenance shall not be carried out by
children unless they are 8 years or older and supervised.
This appliance shall not be used by children. Keep the
appliance and its cord out of reach of children.
The appliance is not to be used by persons with reduced
physical, sensory or mental capabilities, or lack of
experience and knowledge, unless they are supervised or
instructed on the safe use of the appliance and they
understand the hazards involved.
14.
15.
16.
17.
18.
19.
20.
21.
22.
23.
24.
GB

6
SAVE THESE INSTRUCTIONS
CAUTION
This appliance is for household use only. Any servicing other
than cleaning and user maintenance should be performed by
the nearest authorized Service Center.
Do not immerse appliance in water.
To reduce the risk of fire or electric shock, do not dismantle
the appliance. Repair should be done by an authorized
Service Center only.
SHORT CORD INSTRUCTIONS
Regarding your Cord Set:
Short power-supply cord is provided to reduce the risks
resulting from entangling in or tripping over a longer cord.
Extension cords should be used with caution.
If an extension cord is used, (1) the marked electrical
rating of the extension cord should be at least as great as
the electrical rating of the appliance, (2) if the appliance is
of the grounded type, the extension cord should be of a
grounded type and (3) the longer cord should be arranged
so that it will not drape over the counter top or table top
where it can be pulled on by children or tripped over.
A.
B.
C.

7
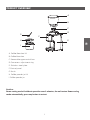
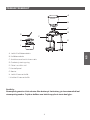
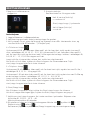
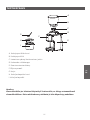
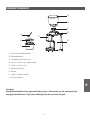
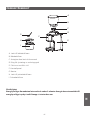
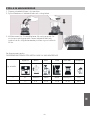
PRODUCT OVERVIEW
A. Coee Bean box lid
B. Coee Bean box
C. Removable upper conical burr
D. Coarseness adjustment ring
E. Stainless steel plate
F. Control panel
G. Brush
H. Coee powder jar lid
I. Coee powder jar
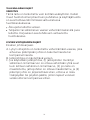
Caution:
Power saving mode: If without operation over 3 minutes, the unit enters Power saving
mode automatically, press any button to restart.
GB
A
B
C
D
E
F
G
H
I

OPERATION
Before using the coee grinder, wipe the housing and Coee bean box with a clean damp cloth.
Wash the coee powder jar and the coee powder jar lid in hot soapy water, then rinse and dry.
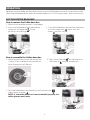
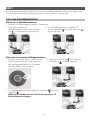
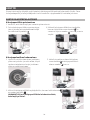
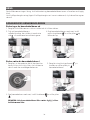
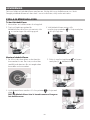
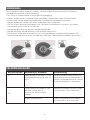
SET THE COFFEE BEAN BOX
How to remove the Coee bean box
1. Make sure the coee grinder is unplugged.
Press the Coee bean box release lever
located at the opposite of the
grinding size markings.
2. Turn the Coee bean box counter-clockwise
until the unlock icon aligns with the
arrow and lift it up.
3.
How to assemble the Coee bean box
Make sure the top part of the conical burr
is clear. If not, use the brush provided to
clean the top part of the burr.
1. Align the unlock icon on the base with
the arrow on the Coee bean box.
2.
Turn the Coee bean box clockwise until the lock icon
aligns with the arrow . .
NOTE: If the coee bean box is not assembled properly, the
coee grinder won't work.
3.
8

9
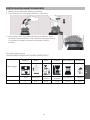
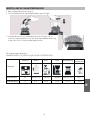
SET COFFEE GRIND SIZE
1. Put the coee powder jar at the correct position.
2. Fill coee beans into coee bean box, close the lid.
The coee grinder has 51 grind size options. To adjust the
grind size, rotate the coee bean box and adjust from fine
to coarse according to the type of coee you want.
3.
See chart below:
GRIND SIZE SETTING RECOMMENDATIONS
Coee
Type
Espresso
Mocca
Siphon
Filter
Pour Over
French
Press
Grind
Size
Fine
Middle Fine
Middle
Middle
Middle
Coarse
Coarse
Grind
Setting
1-7 8-15 16-26 27-34 35-43 44-51
GB

10
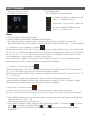
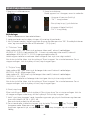
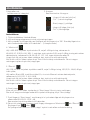
OPERATION INSTRUCTIONS
2. Button instruction
This unit has 3 buttons below:
- Leftmost (white light)
- Time "-" button/reduce mode
Instructions
1. Add coee beans into the coee bean box.
2. Select the coarseness by rotating the coarseness adjustment ring.
3. After the system is powered on, the buzzer beeps once, and the screen displays”88”. The
standby mode is displayed, and the default working time is 10 seconds. -- (3 lights on)
4. "Time minus" button
To adjust the grind time between 40S–10S, short press to reduce time by 1S. The sequence is
40, 39, 38, 37... 12, 11, 10. To adjust time between 10S~1S, short press to reduce time by 0.1S. The
sequence is 10, 9.9, 9.8, 9.7... 1.2, 1.1, 1.0. The time does not circle back to the beginning after 1S.
Long press to adjust the time more quickly, short press displays selected grinding time. After
setting the time, press the "Start/Stop button" to start grinding beans. To stop grinding, press
the start/stop button again.
5. "Time plus" button
To adjust the grind time between 10S–40S, short press to increase time by 1S. The sequence is
10, 11, 12, 13... 39, 40. Time does not circle back to the beginning after 40S.
To adjust the grind time between 1S–10S, short press to increase time by 0.1S. The sequence is
1.0, 1.1, 1.2, 1.3... 9.8, 9.9, 10.
Long press time to increase rapidly, display selected grinding time with a short press.
After setting the time, press the "Start button" to start grinding beans. To stop grinding, press
the start/stop button again.
1.
- Start/stop button // pulse mode
- Far right (white light)
- Time "+" button/incremental mode
6. Start/stop button
After selecting the time, press “Start/stop button” to start grinding.
If you want to stop grinding during operation, press “Start/stop button” one more time.
Long press the "start/stop button", the machine enters the pulse working mode, and the
screen displays the working time 0.1,0.2,0.3...10,11....40.
The maximum grinding time is 40 seconds.
To turn on or o the buzzer, long press the "Time Minus " and "Time plus" buttons.
Screen display " " or " ".
There is a beep sound indication after pressing "Start/Stop button".
7.
8.
Make sure the coee
grinder is plugged.

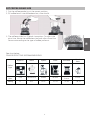
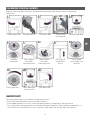
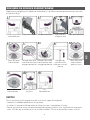
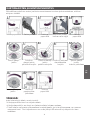
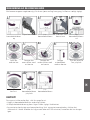
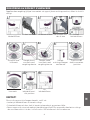
CLEANING CONICAL BURRS
Regular cleaning helps the burrs achieve consistent grinding results which is especially
important.
Unlock Bean Box Remove beans Lock Bean Box Run grinder
untill empty
Remove bean Box
Remove
upper burr
Clean upper
burr with
cleaning brush
Clean lower
burr with
cleaning brush
Clean grind
outlet with
brush
Push upper
burr firmly into
position
Lock upper burr Align Bean Box
into position
Lock Bean Box
IMPORTANT!
For your appliance to run correctly, make certain that:
• The lid of the coee bean box is correctly closed.
• The coee powder jar and its lid are correctly placed in the body of the appliance.
• This appliance is equipped with an overheat protective device. If the appliance overheats, it
will switch o automatically. In this case let it cool down for 20 minutes then restart.
11
GB

MAINTENANCE
To keep all your coee`s aroma and to avoid a degradation of the ground coee, empty the
ground coee container after each use.
• Always unplug from the power outlet before cleaning.
• Never place the grinder, power supply cord or plug in water or under running water.
• Do not use strong detergents or abrasive pads to clean the appliance.
• Clean the lids and the ground coee holder in warm, soapy water.
• To remove the upper burr, hold of the upper mill and turn counter clockwise, then raise it
vertically to remove.
• Clean the upper burr with the cleaning brush.
• Carefully clean the inside of the coee bean box with a damp cloth.
• To replace the upper burr, insert the burr and turn it once in the clockwise direction. For
proper alignment, residual coee and coee grounds in the lower burr will need to be
cleared.
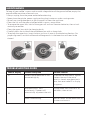
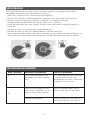
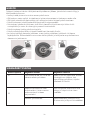
TROUBLESHOOTING GUIDE
Code in display Trouble description Trouble solution
E1 No bean box or bean box is not
connected tightly.
Assemble the bean box or tighten
the bean box until the micro
switch is closed, once bean box is
close then error code E1 in display
disappears.
E2
Total operating is 240s
continuously, it powers o
automatically to protect the unit.
Unplug power cord, wait for it to
cool down, then restart.
Motor is overheating. Wait for motor to cool down over 20
minutes and restart.
12

SPECIFICATION
This symbol on the product or in the instructions means that your electrical and
electronic equipment should be disposed at the end of its life separately from
your household waste. There are separate collection systems for recycling in the
EU. For more information, please contact the local authority or the retailer where
you purchased the product.
Model: POCG7000
Rated voltage: 220-240V~ 50-60Hz
Rated Power: 165W
Power International AS,
PO Box 523, 1471 Lørenskog, Norway
Power Norge:
https://www.power.no/kundeservice/
T: 21 00 40 00
Expert Danmark:
https://www.expert.dk/kundeservice/
T: 70 70 17 07
Power Danmark:
https://www.power.dk/kundeservice/
T: 70 33 80 80
Punkt 1 Danmark:
https://www.punkt1.dk/kundeservice/
T: 70 70 17 07
Power Finland:
https://www.power.fi/tuki/asiakaspalvelu/
T: 0305 0305
Power Sverige:
https://www.power.se/kundservice/
T: 08 517 66 000
13
GB

14
VIKTIGE SIKKERHETSFORANSTALTNINGER
Les alle instruksjonene.
For å beskytte mot brann, elektrisk støt og personskade
må ledningen, støpsler og maskinen ikke dyppes i vann
eller annen væske.
Koble fra stikkontakten når ikke i bruk, før deler tas av og
på og før rengjøring. For å trekke ut støpselet tar du tak i
støpselet og trekker det ut av stikkontakten. Trekk aldri i
ledningen.
Unngå å berøre bevegelige deler.
For å redusere risikoen for alvorlig personskade eller
skade på apparatet må hender og redskaper holdes
utenfor kaebønneboksen under kverning og når
apparatet er koblet til stikkontakt.
Ikke bruk kvernen med en skadet ledning eller støpsel
eller hvis apparatet har en feil, blir mistet i bakken eller er
skadet på noen måte. Send i så fall apparatet til et
godkjent servicesenter for undersøkelse, reparasjon eller
elektrisk eller mekanisk justering.
Bruk av tilbehør som ikke anbefales kan føre til brann,
elektrisk støt eller personskade.
Ikke bruk utendørs.
Ikke la ledningen henge over kanten av bord eller benk
eller komme nær varme overflater, inkludert komfyr.
Kontroller at det ikke er fremmedlegemer i
kaebønneboksen før bruk.
Bruk alltid kaekvernen med lokket på plass.
Ikke plasser på eller nær en varm gass- eller elektrisk
komfyr eller i en oppvarmet ovn.
Dette produktet er kun beregnet for husholdningsbruk.
Enhver kommersiell bruk, upassende bruk eller
manglende overholdelse av instruksjonene vil
ugyldiggjøre produsentens garanti.
Ved bruk av elektriske apparater bør alltid grunnleggende forholdsregler for
sikkerhet følges:
1.
2.
3.
4.
5.
6.
7.
8.
9.
10.
11.
12.
13.

15
NO
Dette apparatet skal kun brukes til å kverne brente
kaebønner. Ikke bruk apparatet til annet enn tiltenkt
bruk (som harde frø, krydder, nøtter osv.);
Beholderen for kvernet kae skal ikke fylles over
maksimumsmerket.
Hvert apparat inspiseres strengt under masseproduksjon,
og det testes ved å kverne kaebønner. Derfor kan det
være små spor av bruk eller rester av kvernet kae.
Alle maskiner er underlagt streng kvalitetskontroll.
Barn skal ikke leke med apparatet.
Slå av apparatet og koble det fra stikkontakten før du
skifter tilbehør eller nærmer deg deler som beveger seg
under bruk.
Du kan få elektronisk kopi av denne håndboken ved å
kontakte vårt kundestøttesenter.
Koble alltid apparatet fra stikkontakten hvis det blir
stående uten tilsyn, samt før du monterer, demonterer
eller rengjør.
Rengjøring og vedlikehold for bruker skal ikke gjøres av
barn med mindre de er 8 år eller eldre og er under tilsyn.
Apparatet skal ikke brukes av barn. Hold apparatet og
strømledningen utilgjengelige for barn.
Apparatet skal ikke brukes av personer med reduserte
fysiske evner, sanseevner eller mentale evner, eller som
mangler erfaring og kunnskap, med mindre de er under
oppsyn eller har fått instruksjoner.
14.
15.
16.
17.
18.
19.
20.
21.
22.
23.
24.

TA VARE PÅ DISSE INSTRUKSJONENE
OBS
Dette apparatet er kun til husholdningsbruk. All annen
service enn rengjøring og brukervedlikehold bør utføres hos
nærmeste autoriserte servicesenter.
Ikke senk apparatet i vann.
For å redusere faren for brann eller elektrisk støt skal
apparatet ikke demonteres. Reparasjon bør kun utføres av
et autorisert servicesenter.
INSTRUKSJON OM KORT LEDNING
Om ledningssettet:
Det følger med en kort strømledning for å redusere
risikoen for at den blir viklet inn i en annen ledning eller at
man snubler over den.
Man må være forsiktig om man skal bruke skjøteledning.
Hvis det brukes en skjøteledning: (1) Den merkede
elektriske merkingen til skjøteledningen skal være minst
like høy som den elektriske kapasiteten til apparatet. (2)
Hvis apparatet har jording, skal skjøteledningen også ha
jording. (3) En lengre kabel skal plasseres på slik måte at
den ikke faller over disken eller bordplaten slik at den kan
trekkes i av barn eller snubles over.
A.
B.
C.
16

PRODUKTOVERSIKT
A. Lokk til kaebønneboks
B. Kaebønneboks
C. Avtakbar øvre konisk kvernstein
D. Grovhetsjusteringsring
E. Plate i rustfritt stål
F. Kontrollpanel
G. Børste
H. Lokk til kvernet kae
I. Krukke til kvernet kae
Forsiktig:
Strømsparingsmodus: Hvis enheten ikke brukes på 3 minutter, går den automatisk inn i
strømsparingsmodus. Trykk en hvilken som helst knapp for å starte den igjen.
17
NO
A
B
C
D
E
F
G
H
I

DRIFT
Før du bruker kaekvernen, tørker du av huset og kaebønneboksen med en ren, fuktet klut.
Vask krukken til kvernet kae og lokket dens i varmt såpevann, skyll og tørk.
STILL INN KAFFEBØNNEKSEN
Slik tar du av kaebønneboksen
1. Sørg for at kaekvernen er koblet fra stikkontakt.
Trykk utløserspaken for
kaebønneboksen. Den er på motsatt
side av merkene for kverningsgrad.
2. Vri kaebønneboksen mot klokken til
opplåsingsikonet er på linje med pilen ,
og løft den opp.
3.
Slik setter du sammen kaebønneboksen
Sørg for at den øvre delen av den koniske
kvernsteinen er klar. Hvis ikke bruker du
den medfølgende børsten til å rengjøre
den øvre delen av kvernsteinen.
1. Sett opplåsingsikonet på linje basen
med pilen på kaebønneboksen.
2.
Vri kaebønneboksen med klokken til låseikonet er på linje
med pilen .
MERK: Hvis kaebønneboksen ikke er riktig montert, vil
ikke kaekvernen fungere.
3.
18

STILLE INN KVERNINGSGRAD
1. Sett krukken til kvernet kae i riktig posisjon.
2. Legg kaebønner i kaebønneboksen, og lukk lokket.
Kaekvernen kan settes til en av 51 kverningsgrader. Juster
kverningsgraden ved å dreie kaebønneboksen og justere
fra fin til grov etter hvordan du skal lage kae.
3.
Se diagrammet nedenfor:
ANBEFALINGER FOR INNSTILLING AV KVERNINGSGRAD
Kaetype
Espresso Mokka Sifon Filter Håndbrygg Presskanne
Kverningsgrad
Fin Middels fin Middels Middels Mellomgrov Grov
Kverninnstilling
1-7 8-15 16-26 27-34 35-43 44-51
19
NO

DRIFTSINSTRUKSER
2. Knappinstruksjon
Denne enheten har 3 knapper under:
-Helt til venstre (hvitt lys)
-«-» reduser tid
Instruksjoner
Legg kaebønner i kaebønneboksen.
Velg kverningsgrad ved å dreie justeringsringen for grovhet.
Når systemet slås på, piper det én gang, og skjermen viser «88». Ventemodus vises, og
standard driftstid er 10 sekunder. -- (3 lamper lyser)
4. «Tid minus»-knapp
I tidsrommet 40–10 sek. reduseres tiden med 1 sek. for hvert kort trykk, og det vises med 2
sifre, i rekkefølgen 40, 39, 38, 37 … 12, 11, 10. I tidsrommet 10–1 sek. reduseres tiden med 0,1
sek. for hvert kort trykk, og det vises med 2 sier og et desimaltegn i midten, i rekkefølgen 10,
9.9 ,9.8 ,9.7 … 1.2, 1.1 ,1.0. Det stopper ved 1 sek.
Langt trykk for å justere tiden raskere, kort trykk viser valgt kvernetid.
Når du har stilt inn tiden, trykker du «Start-knappen» for å kverne bønnene. Trykk
start/stopp-knappen igjen for å slutte å kverne.
5. «Tid pluss»-knapp
I tidsrommet 10–40 sek. økes tiden med 1 sek. for hvert kort trykk, og det vises med 2 sifre, i
rekkefølgen 10, 11, 12, 13 … 39, og opptil 40.
I tidsrommet 1–10 sek. økes tiden med 0,1 sek. for hvert kort trykk, og det vises med 2 sier og
et desimaltegn i midten, i rekkefølgen 1.0, 1.1, 1.2, 1.3 … 9.8, 9.9, 10.
Langt trykk for å justere tiden raskere, kort trykk viser valgt kvernetid.
Når du har stilt inn tiden, trykker du «Start-knappen» for å kverne bønnene. Trykk
start/stopp-knappen igjen for å slutte å kverne.
1.
- Start/stopp-knapp // pulsmodus
- Helt til høyre (hvitt lys)
- «+» øk tid
6. Start/Stopp-knapp
Når «Tidtaker»-knappen er valgt, trykker du «Start/stopp-knapp» for å kverne.
Hvis du vil stoppe kverningen igjen, trykker du «Start/stopp-knappen» en gang til.
Hold inne «start/stopp-knappen» for å sette maskinen i pulsmodus. Skjermen viser
driftstiden 0.1, 0.2 0.3 … 10, 11 … 40.
Maksimal kvernetid er 40 sekunder.
Slå på eller av lyden ved å holde inne knappene «Mindre tid» og «Mer tid» .
Skjermvisning « » eller « ».
Det høres et pip når du trykker «Start/Stopp-knappen» og når kverningen er ferdig.
7.
8.
Sørg for at kaekvernen er
plugget inn.
20
1.
2.
3.
Sidan laddas ...
Sidan laddas ...
Sidan laddas ...
Sidan laddas ...
Sidan laddas ...
Sidan laddas ...
Sidan laddas ...
Sidan laddas ...
Sidan laddas ...
Sidan laddas ...
Sidan laddas ...
Sidan laddas ...
Sidan laddas ...
Sidan laddas ...
Sidan laddas ...
Sidan laddas ...
Sidan laddas ...
Sidan laddas ...
Sidan laddas ...
Sidan laddas ...
Sidan laddas ...
Sidan laddas ...
Sidan laddas ...
Sidan laddas ...
Sidan laddas ...
Sidan laddas ...
Sidan laddas ...
Sidan laddas ...
Sidan laddas ...
Sidan laddas ...
Sidan laddas ...
Sidan laddas ...
Sidan laddas ...
Sidan laddas ...
-
 1
1
-
 2
2
-
 3
3
-
 4
4
-
 5
5
-
 6
6
-
 7
7
-
 8
8
-
 9
9
-
 10
10
-
 11
11
-
 12
12
-
 13
13
-
 14
14
-
 15
15
-
 16
16
-
 17
17
-
 18
18
-
 19
19
-
 20
20
-
 21
21
-
 22
22
-
 23
23
-
 24
24
-
 25
25
-
 26
26
-
 27
27
-
 28
28
-
 29
29
-
 30
30
-
 31
31
-
 32
32
-
 33
33
-
 34
34
-
 35
35
-
 36
36
-
 37
37
-
 38
38
-
 39
39
-
 40
40
-
 41
41
-
 42
42
-
 43
43
-
 44
44
-
 45
45
-
 46
46
-
 47
47
-
 48
48
-
 49
49
-
 50
50
-
 51
51
-
 52
52
-
 53
53
-
 54
54


POINT PRO POCG7000 KAFFEKVERN Bruksanvisning
- Kategori
- Små hushållsapparater
- Typ
- Bruksanvisning
på andra språk
Relaterade papper

Andra dokument
-
Electrolux EEG8000 Användarmanual
-
Wilfa WSFB-100S SVART UNIFORM KAFFEKVERN, STÅL Bruksanvisning
-
Sage SCG820 Användarmanual
-
Melitta MOLINO® Bruksanvisningar
-
-
Sage SES881 Användarguide
-
Sage SES878 Användarguide
-
-
-
Wilfa CLASSIC Aroma Bruksanvisning