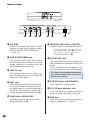
Yamaha SH-01 Bruksanvisning
- Kategori
- Gitarrtillbehör
- Typ
- Bruksanvisning


2
(4)-8
Power supply/AC power adaptor
• Only use the voltage specified as correct for the instrument.
The required voltage is printed on the name plate of the
instrument.
• Use the specified adaptor (PA-3C or an equivalent recom-
mended by Yamaha) only. Using the wrong adaptor can
result in damage to the instrument or overheating.
• Check the electric plug periodically and remove any dirt or
dust which may have accumulated on it.
• Do not place the AC adaptor cord near heat sources such
as heaters or radiators, and do not excessively bend or oth-
erwise damage the cord, place heavy objects on it, or place
it in a position where anyone could walk on, trip over, or
roll anything over it.
Do not open
• Do not open the instrument or attempt to disassemble the
internal parts or modify them in any way. The instrument
contains no user-serviceable parts. If it should appear to
be malfunctioning, discontinue use immediately and have
it inspected by qualified Yamaha service personnel.
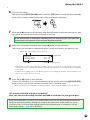
Water warning
• Do not expose the instrument to rain, use it near water or in
damp or wet conditions, or place containers on it contain-
ing liquids which might spill into any openings.
• Never insert or remove an electric plug with wet hands.
Fire Warning
• Do not put burning items, such as candles, on the instru-
ment. A burning item may fall over and cause a fire.
If you notice any abnormality
• If the AC adaptor cord or plug becomes frayed or damaged,
or if there is a sudden loss of sound during use of the in-
strument, or if any unusual smells or smoke should appear
to be caused by it, immediately turn off the power switch,
disconnect the adaptor plug from the outlet, and have the
instrument inspected by qualified Yamaha service person-
nel.
CAUTION
Always follow the basic precautions listed below to avoid the possibility of physical injury to
you or others, or damage to the instrument or other property. These precautions include, but
are not limited to, the following:
PRECAUTIONS
PLEASE READ CAREFULLY BEFORE PROCEEDING
* Please keep this manual in a safe place for future reference.
Power supply/AC power adaptor
• When removing the electric plug from the instrument or an
outlet, always hold the plug itself and not the cord. Pulling
by the cord can damage it.
• Unplug the AC power adaptor when not using the instru-
ment, or during electrical storms.
• Do not connect the instrument to an electrical outlet using
a multiple-connector. Doing so can result in lower sound
quality, or possibly cause overheating in the outlet.
Battery
• Always make sure all batteries are inserted in conformity
with the +/- polarity markings. Failure to do so might result
in overheating, fire, or battery fluid leakage.
• Always replace all batteries at the same time. Do not use
new batteries together with old ones. Also, do not mix bat-
tery types, such as alkaline batteries with manganese bat-
teries, or batteries from different makers, or different types
of batteries from the same maker, since this can cause over-
heating, fire, or battery fluid leakage.
• Do not dispose batteries in fire.
WARNING
Always follow the basic precautions listed below to avoid the possibility of serious injury or
even death from electrical shock, short-circuiting, damages, fire or other hazards. These pre-
cautions include, but are not limited to, the following:

3
(4)-8
• Do not attempt to recharge batteries that are not intended
to be charged.
• When the batteries run out, or if the instrument is not to be
used for a long time, remove the batteries from the instru-
ment to prevent possible leakage of the battery fluid.
• Keep batteries away from children.
• If the batteries do leak, avoid contact with the leaked fluid.
If the battery fluid should come in contact with your eyes,
mouth, or skin, wash immediately with water and consult a
doctor. Battery fluid is corrosive and may possibly cause
loss of sight or chemical burns.
Location
• Do not expose the instrument to excessive dust or vibra-
tions, or extreme cold or heat (such as in direct sunlight,
near a heater, or in a car during the day) to prevent the
possibility of panel disfiguration or damage to the internal
components.
• Do not use the instrument in the vicinity of a TV, radio,
stereo equipment, mobile phone, or other electric devices.
Otherwise, the instrument, TV, or radio may generate noise.
• Do not place the instrument in an unstable position where
it might accidentally fall over.
• Before moving the instrument, remove all connected adap-
tor and other cables.
Connections
• Before connecting the instrument to other electronic com-
ponents, turn off the power for all components. Before turn-
ing the power on or off for all components, set all volume
levels to minimum. Also, be sure to set the volumes of all
components at their minimum levels and gradually raise
the volume controls while playing the instrument to set the
desired listening level.
Maintenance
• When cleaning the instrument, use a soft, dry cloth. Do not
use paint thinners, solvents, cleaning fluids, or chemical-
impregnated wiping cloths.
Handling caution
• Never insert or drop paper, metallic, or other objects into
the gaps on the panel or card slot. If this happens, turn off
the power immediately and unplug the power cord from the
AC outlet. Then have the instrument inspected by qualified
Yamaha service personnel.
• Do not place vinyl, plastic or rubber objects on the instru-
ment, since this might discolor the panel.
• Do not rest your weight on, or place heavy objects on the
instrument, and do not use excessive force on the buttons,
switches or connectors.
• Do not operate the instrument for a long period of time at a
high or uncomfortable volume level, since this can cause
permanent hearing loss. If you experience any hearing loss
or ringing in the ears, consult a physician.
Saving data
Backing up the Memory Card (SmartMedia)
• To protect against data loss through media damage, we rec-
ommend that you save your important data to your com-
puter.
Yamaha cannot be held responsible for damage caused by improper use or modifications to the instrument, or data that is
lost or destroyed.
Always turn the power off when the instrument is not in use.
When using a power adaptor, even when the power switch is in the "STANDBY" position, electricity is still flowing to the instru-
ment at the minimum level. When you are not using the instrument for a long time, make sure you unplug the AC power adaptor
from the wall AC outlet.
Make sure to discard used batteries according to local regulations.

4
Introduction
Thank you for purchasing the Yamaha Sound Sketcher SH-01. The SH-01 utilizes
SmartMedia
TM
memory cards to allow quick and easy recording and playback of audio
without the inconvenience of having to select the sound input source (built-in mic, external
mic, instrument, CD player, MD player, etc.). To give you greater creative control over the
sound you want to create, the SH-01 features mix recording that lets you overdub additional
parts, DSP effects, a built-in tuner, repeat playback function, and more. The SH-01 is also
equipped with an USB port, which lets you connect the device to a computer.
To get the fullest in both use and life out of your SH-01 we urge you to read this Owner’s
Manual carefully. After reading the manual, please keep it in a safe place for future refer-
ence.
See the accompanying sheet for a list of accessories and distributors.
• Copying of the commercially available music data and/or audio files is strictly prohibited except
for your personal use.
• The company names and product names in this Owner’s Manual are the trademarks or
registered trademarks of their respective companies.
• The screen displays as illustrated in this Owner’s Manual are for instructional purposes, and
may appear somewhat different from the screens which appear on your instrument.
• SmartMedia is a tradmark of the Toshiba Corporation.
• Sound Sketcher is powered by PortalPlayer, Inc.
• PortalPlayer and the PortalPlayer logo are trademarks owned by PortalPlayer, Inc.
• MPEG Layer-3 audio coding technology licensed from Fraunhofer IIS and Thomson multimedia.
COPYRIGHT NOTICE
This product incorporates and bundles computer programs in which Yamaha owns
copyrights or with respect to which it has license to use other's copyrights. Any unau-
thorized use of such programs outside personal use is not permitted under relevant
laws. Any violation of copyright has legal consequences.
DON'T MAKE, DISTRIBUTE OR USE ILLEGAL COPIES.

5
Contents
What Can the SH-01 Do? .................................................................. 6
Nomenclature .................................................................................... 8
Power Supply ................................................................................... 11
When Using the Power Adaptor ................................................................ 11
When Using Batteries ................................................................................ 11
About the SmartMedia
TM
Memory Cards ....................................... 12
About the Connections................................................................... 14
Instrument/Microphone Connections ........................................................ 14
Connecting Headphones/External Sound System ................................... 15
Connecting a CD/MD Player or Other Audio Source ................................ 15
Connecting to a Computer ....................................................................... 16
Using the SH-01
Record with the Built-In Microphone ............................................ 17
Try Out the Mix Recording Function ............................................. 20
Using the Tuner Function ....................................................................... 24
Recording from a CD/MD Player, or Other Audio Source ............ 29
Mastering ......................................................................................... 30
File Management ............................................................................. 31
File Backup ............................................................................................... 31
Changing a File Name (Rename) ............................................................. 32
Delete an Unneeded File .......................................................................... 32
Delete All Files .......................................................................................... 33
Format the Memory Card ......................................................................... 34
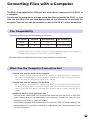
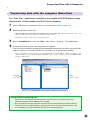
Converting Files with a Computer ................................................. 35
File Compatibility ...................................................................................... 35
What Can the Computer Connection Do? ................................................ 35
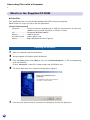
What’s in the Supplied CD ROM .............................................................. 36
Transferring data with the computer (Data Filer) ...................................... 37
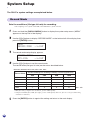
System Setup .................................................................................. 38
Record Mode ............................................................................................ 38
Adjusting the Contrast .............................................................................. 39
Effect Setup .............................................................................................. 40
Specifications .................................................................................. 41
Effect Type List ................................................................................ 42
Error Messages ............................................................................... 46
Troubleshooting .............................................................................. 47

6
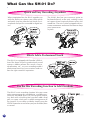
Quick and Easy Recording Anywhere
What Can the SH-01 Do?
When inspiration hits, the SH-01 supplies you
with the ability to capture your ideas quick
and easily. Just sing into the unit’s built-in mi-
crophone and you are recorded in digital ste-
reo.
Effects Add a Professional Touch
The SH-01 is equipped with Yamaha’s DSP ef-
fects like those found in professional sound
systems. Adding effects like reverb, chorus,
equalization, etc., to your recordings adds a
professional touch to your creations and cre-
ates the right mood for inspiration.
Use the Mix Recording Function to Add Overdubs
The SH-01’s mix recording function let’s you create
entire arrangements by overdubbing, or adding suc-
cessively recorded layers, to your original record-
ing. Start with a rhythm guitar part then add a lead
part, or create a four part a capella arrangement all
by yourself. If you make a mistake, simply press the
UNDO button to cancel what you just recorded, then
re-record.
The SH-01 also lets you connect a guitar or
keyboard directly to the unit, making it easy
to capture those inspired phrases when the
mood hits. The unit is also equipped with ac-
curate metronome and tuner functions to keep
your instruments
in pitch.

7
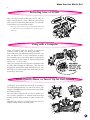
What Can the SH-01 Do?
You can also record audio from a CD, MD, or
other sound source. Sing a duet or play along
with your favorite artist and use the mix record-
ing function to record the results.
• Copying of the commercially available music data and/
or audio files is strictly prohibited except for your per-
sonal use.
Using with a Computer
Data recorded with the SH-01 is stored in
memory cards as MP3 (or WAV) file data.
Since these are standard sound file formats, you
can use these files in your computer as well.
For example, you can easily attach a sound file
that contains a voice letter or some background
music, etc., to an e-mail.
You can connect the unit to your computer with
a USB cable through its USB port. This lets you
reorganize sound files made with the SH-01, use
MP3 files you download from web sites for mix
recording, and more.
Recording from a CD/MD
Listen Quietly Alone, or Turn it Up for Your Friends
Ordinarily you would use the built-in speakers
for audio playback but you can also use a pair
of stereo headphones for those times you’d like
to listen privately.
You can also connect the unit to an audio sys-
tem, guitar amplifier, or sound reinforcement
system, and let others enjoy in your creative tal-
ent.
Whether the volume is loud or soft, the SH-01’s
digital audio always sounds great.

8
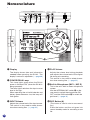
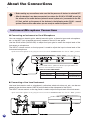
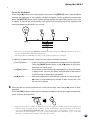
Nomenclature
q Display
The display shows data and information
needed when operating the SH-01. The
display’s contrast is adjustable. (→ page 39)
w POWER/PEAK Lamp
This lamp lights green when the SH-01
power is switched “ON” (when the SH-01 is
being operated).
The lamp lights red when the input source
level is too high.
When operating the unit with batteries and
battery power becomes low, the lamp will
flash green.
e INPUT Volume
Adjusts the volume level of the input source.
This control is also used to select charac-
ters when naming files. (→ page 32)
r PLAY Volume
Adjusts the volume level during playback
and adjusts the volume level of the original
file during mix recording.
This control is also used to select charac-
ters when naming files. (→ page 32)
t Built-in Microphone (MIC L, MIC R)
This is the unit’s built-in stereo microphone
system.
Use the INTERNAL MIC switch @7 on the
rear panel to switch the microphone ON/
OFF, and the GAIN switch @6 to switch the
gain level. (→ page 14)
y REC Button (S)
(This button is used to start a new record-
ing.)
Press the button and the unit goes into
record standby mode for recording a new
file.
@5 @6 @7 @8 @9 #0 #1
q
t
y
i
o
!0 !1
!2
@0
@1
!3
!4
!5
!7
!9
e
r
!8
!6
w
u
@2
@3
@4

9
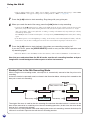
Nomenclature
u PAUSE Button (D)
Press this button during playback to momen-
tarily stop playback.
i MIX Button ( )
(This button is used to record an overdub.)
Press this button and the unit goes into mix
recording standby mode.
o ENTER Button (
W
/
A
)
Press this button to Start/Stop both playback
and recording functions.
This button is also used to enter the selected
menu, and to carry out and set settings.
!0 ESCAPE Button
Press this button if you want to cancel the
setting and return to the display previous to
the one you are currently in.
!1 SELECT Button
This button is used to advance through menu
or parameter selections when the setting
contains multiple items.
!2 –/+ Buttons (
E
/
R
)
These buttons are used to skip to the next
or previous file (song). They can be used
either during playback or while playback is
stopped. Press and hold the buttons to fast-
forward or fast-rewind the song.
The buttons are also used to change param-
eter values or to carry out/cancel the set-
ting.
!3 DISPLAY/MENU Button
Press this button to switch from one display
mode to the next. (→ page 25)
Press and hold the button to display the sys-
tem setup menu.
!4 REPEAT Button
This button is used to repeat playback of a
song (file).
The SH-01 has two types of repeat. Single
repeat is used to repeat the current song in
its entirety, and AB repeat is used to repeat
a defined segment within the song.
(→ page 26)
!5 PAN Button
This button is used to access the setting to
adjust the stereo volume balance.
(→ page 21)
!6 EFFECT Button
This button is used to access effect settings.
(→ page 20)
!7 TUNER Button
This button is used to activate the SH-01’s
built-in tuner mode. (→ page 24)
!8 UNDO/DELETE Button
This button is used to cancel the previous
operation in which the data in the memory
was changed. (→ page 19)
You can also press and hold the button to
delete the currently selected file.
(→ page 32)
!9 METRONOME Button
This button switches the metronome ON/
OFF, and sets the metronome tempo or op-
erating mode. (→ page 22)
@0 Built-in Speakers
These are the unit’s built-in stereo speak-
ers.
* The speakers will not sound when the INTER-
NAL MIC switch @7 is switched ON, or when
a plug is plugged into the LINE OUT/
PHONES jack @3.
@1 Card Slot (3.3V CARD)
This slot accepts a standard SmartMedia
TM
memory card, which is used for data stor-
age. (→ page 12)

10
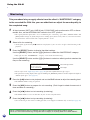
Nomenclature
@5 @6 @7 @8 @9 #0 #1
@2 VOLUME
Controls the volume of the SH-01’s built-in
speakers and the output signal level deliv-
ered via the LINE OUT/PHONES jack.
(→ page 14)
@3 LINE OUT/PHONES Jack
This miniature stereo jack can be used to
connect the output of the SH-01 to an audio
system, mixer, etc., or connect a pair of ste-
reo headphones for monitoring.
@4 LINE IN Jack
This miniature stereo jack is used to con-
nect a line device such as a CD player, MD
player, etc., to the SH-01.
@5 INST. Jack
This standard monaural jack can be used
to connect an electric instrument such as
an electric guitar, or a vocal microphone to
the SH-01. The instrument’s output level
can be adjusted with the GAIN switch @6.
@6 GAIN Switch (HIGH/LOW)
Switches the gain of the internal micro-
phone and INST. jack @5.
@7 INTERNAL MIC Switch (ON/OFF)
Switches the built-in microphone ON/OFF.
* The internal speakers will not sound when
the INTERNAL MIC switch @7 is switched
ON, or when a plug is plugged into the
LINE OUT/PHONES jack @3.
@8 PICKUP MIC Jack
This miniature monaural jack is used to con-
nect a condenser microphone (DC2V) to the
SH-01.
This is a powered jack that delivers a DC
2V to the pickup mic via the connected plug.
This jack allows the direct connection
of a Yamaha MC7 Wind Instrument
Pickup to the SH-01.
@9 POWER Switch (ON/STANDBY)
This is the SH-01’s power switch.
#0 DC IN (Power Adaptor) Jack
If you use the power adaptor (PA-3C) to
power the SH-01, connect it to this jack.
#1 USB Port
This port is used to connect the SH-01 di-
rectly to a computer. (→ page 16)
@2 @3 @4

11
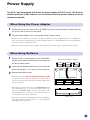
The SH-01 can be powered with either the power adaptor (PA-3C) or six 1.5V AA size
alkaline batteries (LR6) however, we recommend that the power adaptor be used
whenever possible.
Power Supply
1
Set the SH-01’s power switch to the “STAND BY”
position, then remove the battery cover located on
the unit’s bottom panel.
2
Insert the new batteries making sure you follow the
polarity markings (+/-) as shown in the illustration.
3
Replace the battery cover.
* Make sure that only
AA size alkaline batteries (LR6)
are used in the device. The use of manganese batteries may
result an extremely shortened battery life depending upon
the type of battery.
* When battery power becomes low, the POWER/PEAK lamp
will rapidly flash green. As power runs down more seri-
ously, the “BATTERY LOW” message will appear in the
display. When this occurs, replace the batteries with a new
set of six batteries as soon as possible.
* Never mix new batteries with old, mix batteries of different
types (mix alkaline with manganese, etc.), or mix batteries
from different manufacturers.
When Using Batteries
When Using the Power Adaptor
1
Set the SH-01’s power switch to the “STANDBY” position, then plug the DC output cable into
the DC IN jack on the unit’s rear panel.
2
Plug the power adaptor into a convenient wall AC power socket.
* When the power adaptor is used, power is delivered from the power adaptor to the device although the
device has batteries installed. To keep batteries from leaking we recommend that they be removed from the
unit when the power adaptor is used.
* Make sure you use only the power adaptor specified for use with the voltage in your particular region.
battery cover
AA size alkaline batteries (LR6) x6

12
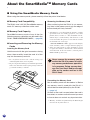
About the SmartMedia
TM
Memory Cards
■ Using the SmartMedia Memory Cards
When using the memory cards, please carefully follow the points listed below.
Removing the Memory Card
After confirming that the SH-01 is not access-
ing* data in the memory card, grip the edge of
the card and pull firmly outward.
* The SH-01 accesses data from the memory card for
operations such as recording, playback, save, load,
format, delete, rename, etc. Also, the SH-01 will au-
tomatically access the memory card whenever a card
is inserted while the power is switched on in order
to determine the card’s type.
“DO NOT REMOVE CARD” appears in the display
when a memory card access operation is in progress.
* There are some instances where the SH-01 can not
recognize the memory card when the card is removed
and reinserted. In such an instance, turn the power
OFF and ON again (reset).
Never remove the memory card or
switch the SH-01’s power off while
any memory card-access operation
is in progress. Doing so may dam-
age the card itself and/or corrupt
data on the card as well as in the
SH-01 itself.
Formatting the Memory Card
Not all memory cards can be used as is. Before
any memory card is used with the SH-01, it
should be formatted (default) by the SH-01.
(→ page 34)
All data in the card is erased when the card is
formatted, so make sure that the card you want
to format does not contain any important data.
* Memory cards that are formatted by the SH-01 might
not work in any other devices.
● Memory Card Compatibility
The SH-01 uses 3.3V (3V) SmartMedia memory
cards. 5V memory cards can not be used.
● Memory Card Capacity
SmartMedia memory cards of any of the five
following memory capacities can be used in the
SH-01: 16MB/32MB/64MB/128MB. (→ page 38)
● Inserting and Removing the Memory
Cards
Inserting the Memory Card
Hold the card with the gold connectors facing
down, then carefully insert the card all of the
way into the memory card slot.
* Be careful not to insert the card the wrong way
around (upside-down, back-to-front).
* To prevent possible damage or abnormal operation,
make sure that dirt or other foreign objects do not
get into the memory card slot.

13
● Memory Card Handling Precautions
Handling and Storing Memory Cards
• Data stored in the memory cards can become
lost or damaged by static electricity. Before
touching a memory card, it is advisable to
touch a metal object (doorknob, aluminum
window frame, etc.) to discharge your body
before handling the card.
• When the memory cards is not to be used for
an extended period of time, remove it from
the slot and keep it in a clean, dry place. Es-
pecially when using battery power, battery life
will be shortened.
• Do not expose the memory cards to direct
sunlight, high temperatures (inside a car dur-
ing the daytime, close to a heating appliance,
etc.), or excessively low temperatures.
• Do not drop, place heavy objects on, or bend
the memory card.
• Avoid touching the memory card’s electrical
contacts (the gold section on the top surface)
or allow metal objects to come into contact
with the card’s contacts.
• Do not place the memory cards close to any-
thing that has a strong magnetic field (televi-
sions, loudspeakers, etc.).
• Do not attach anything other than the ap-
proved labels (memo, etc.) to the memory
cards. Make sure labels are securely applied
to the proper spaces.
Attach the write-protect seal
to this circular area.
About the SmartMedia
TM
Memory Cards
Protecting Your Data from Accidental Erasure
To protect important data from being acciden-
tally erased, the memory cards can be write-
protected by attaching the supplied write-pro-
tect seal on the circular area just below the card’s
contacts.
To save data to a memory card that is write-
protected, remove the write-protect seal from
the memory card. Never reuse a write-protect
seal once it has been removed.
Back Up Your Data
To protect your data from the worst that could
happen, we recommend that you back up all of
your important data to a computer.

14
About the Connections
Instrument/Microphone Connections
● Connecting an Instrument or Vocal Microphone
You can connect an electric guitar, electric/acoustic guitar, a dynamic type vocal microphone,
etc., to the INST. jack (standard monaural) located on the unit’s rear panel.
Use the GAIN switch (HIGH/LOW) to adjust the input gain to match the output level of the
instrument or microphone.
The INPUT volume control on the top panel is used to adjust the input volume level of the
instrument/microphone.
* If the internal microphone is not going to be used, switch the INTERNAL MIC switch to its “OFF” position.
•
Before making any connections, make sure that the power on all devices is switched OFF.
• After the devices have been connected, turn down the SH-01’s VOLUME as well as
the volume of the audio devices (external sound system, etc.) connected to the SH-
01. Next, switch on the power of the devices in the following order: SH-01→sound
system. Reverse this order when you are ready to switch the power OFF.
● Connecting a Line Level Instrument
Line level instruments such as a keyboard, synthesizer, electronic drum set, etc., can be con-
nected to the miniature stereo LINE IN jack located on the side panel of the SH-01.
The INPUT volume control on the top panel is used to adjust the input level of the instrument.
* If the internal microphone is not going to be used, switch the INTERNAL MIC switch to the “OFF” position.
Use the GAIN switch to optimize the SH-01’s input gain with the out-
put level of the instrument or microphone.
• How to set the GAIN Switch
GAIN Switch HIGH LOW
INST. jack being used Vocal Mic Guitar
Using the built-in mic Home recording Recording loud vol-
umes in a studio, etc.

15
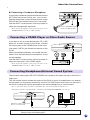
About the Connections
Connecting a CD/MD Player or Other Audio Source
Connecting Headphones/External Sound System
The miniature stereo type LINE OUT/PHONES jack located on the side of the unit is the SH-01’s
output jack.
This jack can be used to connect the output of the SH-01 to a pair of headphones or an external
sound system for convenient monitoring. Use the VOLUME output level control on the side of
the SH-01 to adjust the volume produced by the stereo headphones or sound system.
* Use a cable with connectors that accommodate the connections found on both devices.
* The built-in speakers will not produce sound when the LINE OUT/PHONES jack is in use.
● Connecting a Condenser Microphone
If you have a condenser microphone like the Yamaha
MC7 Wind Instrument Pickup, etc., you can con-
nect the microphone to the miniature monaural type
PICKUP MIC jack located on the unit’s rear panel.
Use the INPUT volume control on the top panel to
adjust the microphone’s input level.
* If the internal microphone is not going to be used, set the
INTERNAL MIC switch to its “OFF” position.
If you want to use an audio device like a CD or MD
player as an audio source for the SH-01, connect
the output jacks on the CD/MD player to the minia-
ture stereo LINE IN jack located on the side of the
SH-01.
When connecting the devices, use a cable with con-
nectors that accommodate the connections found
on both devices.
Use the INPUT volume control on the top panel to
adjust the input level of the CD/MD player.
* If the internal microphone is not going to be used, set the
INTERNAL MIC switch to its “OFF” position.
Adjust the volume for the head-
phones or sound system.
Set the INTERNAL MIC
switch to the “OFF” position.
CAUTION
: Do not use headphones at a high level volume for an extended period of time.
Doing so may cause hearing loss.

16
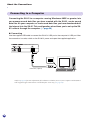
Connecting the SH-01 to a computer running Windows
®
98SE or greater, lets
you manage sound data files you have created with the SH-01, create sound
data files on your computer, or load sound data files you have downloaded off
the Internet into the SH-01. This configuration also allows you to set up the SH-
01’s effects through the computer. (→ page 36)
● Connecting
Use the supplied USB cable to connect the SH-01’s USB port to the computer’s USB port. After
the connection is made, switch on the SH-01’s power and open the supplied application.
Connecting to a Computer
About the Connections
USB Cable (supplied)
* Refer to page 35 for more information file and data availability between your computer and the SH-01.
* The supplied application must be installed before connecting (→ page 36)

17
NO SONG ¨
02/04
SONGå002 01:54¨
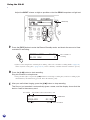
First, try some basic recording and playback.
Using the SH-01
Use the SH-01’s Built-In Microphone to Record
1
Insert the supplied memory card into the SH-01’s memory card slot, then turn the unit’s
POWER switch to the “ON” position.
* While the SH-01 is starting up, “YAMAHA SOUND SKETCHER” will appear in the display. Button
operation is not possible at this time.
After “YAMAHA SOUND SKETCHER” appears on the display, the following display will appear.
Record with the Built-In Microphone
This message indicates that the SH-01 can not recognize any files (.MP3, .WAV) in the
memory card. Also, when the internal microphone is switched on, the internal microphone
icon appears in the lower right corner of the display. In this step we will use the internal
microphone so set the INTERNAL MIC switch to it ON position.
If a file is present that the SH-01 recognizes, the following display (also known as the main
display) will appear.
The file number and the total number of all previously recorded files found in the memory
card are displayed on the top half of the display, while the file name and its total time are
displayed on the bottom half of the display.
* Files are listed in alphabetical order.
* If there is no card in the memory card slot when the POWER is switch ON, “NO CARD” will appear on
the display. Insert a memory card into the memory card slot.
* If the SH-01 does not recognize the memory card, “UNSUPPORTED CARD” will appear on the dis-
play. Follow the procedure described on page 34 in the “Formatting the Memory Card” section and
format the memory card.
2
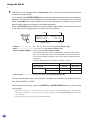
Now let’s try and record a song.
Adjust the record level while singing a few bars of the song.
* The level meter mode (shown below), which can be displayed by pressing the [DISPLAY/MENU] but-
ton, is useful in this case.
File name
Total time for the selected file
File number Total number of files in the memory card
Internal Microphone icon
LEVEL ------------*
NO SONG ¨

18
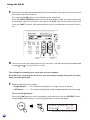
Using the SH-01
Adjust the INPUT volume as high as possible so that the PEAK lamp does not light red.
Time available for
recording
UNDO mark
File name Total time of the selected file
File number Total number of files in the memory card
MEMORY FREE 06:38
01/01 NEW ¨
01/01 ´
SONGå001 01:26¨
PEAK lamp
3
Press the [REC] button to enter the Record Standby mode, and check the amount of time
available for recording.
* If there is not enough time available for recording, either select another recording mode (→page 38),
delete any unnecessary files (→page 32, 33), or use a memory card that has more available capacity.
4
Press the [W/A] button to start recording.
Sing into the built-in microphones.
* Using too much force to press the
[W/A]
buttons to start/stop recording may result in recording of the
sound made by the button being pressed. Press the buttons gently.
5
After you are finished singing, press the [W/A] button to stop recording.
The file you just recorded is automatically given a name, and the display shows that the
data is saved in the memory card.

19
Using the SH-01
6
Next, try and playback what you just recorded.
First, turn the INTERNAL MIC switch located on the rear panel to its OFF position (speaker
output is disabled when this switch is left ON).
Press the [W/A] button to start playback.
Use the PLAY volume and VOLUME controls to adjust the volume produced by the built-in
speakers.
How does it sound? If you want to try again, simply press the [UNDO/DELETE] button. This
carries out the Undo command (cancel) which deletes the data you just recorded from the
memory card.
* When the SH-01 is switched OFF, or when the memory card is removed, UNDO is cleared and reset.
This is the basic manner in which recording and playback is done with the SH-
01. However, the SH-01 can do much more than this.
Next, let’s try out some of the SH-01’s other functions and try doing an overdub.
Recording Mode (record file type, audio quality)
The SH-01 can record data to the memory card in either MP3 or WAV file formats. When the MP3 file format is
used, 4 different bit depths are available.
Recording Mode: MP3-64k, MP3-96k, MP3-128k, MP3-192k, WAV
The bit rate refers to the degree of accuracy used when converting data. It’s kind of like comparing the 3X-speed
mode and normal speed mode on your home video deck. If you compare MP3-64k and MP3-96k files, the MP3-64k
file will use up less memory however audio quality will be inferior to the MP3-96k file. The WAV format offers better
audio quality than MP3 but it requires a larger amount of memory. The MP3-128k format delivers an excellent
balance between audio quality and memory and should be adequate for normal recordings.
However, sound quality will deteriorate slightly with mix recording, so we recommend that MP3-192k when mix
recording is to be used continuously. The factory default setting is MP3-192k.
Refer to the “Recording Mode” section (→page 38) for more information on how to set the recording mode.
Factory Set
This operation is used to return the SH-01’s internal settings back to their factory defaults.
When the factory set function is carried out, all settings such as those for the
recording mode, etc., and the data for the ADD-ON effects are returned to their
factory defaults, so please use caution. Also, the file name and number will
restart from SONG_001. Data stored in the memory card is safe from this op-
eration and will not be lost when the operation is carried out.
To carry out the factory set operation, hold down both the [DISPLAY/MENU] button and the [EFFECT] button,
and switch ON the power. The message “FACTORY SET OK?” appears in the display asking you for confirma-
tion before carrying out the operation. Press the [+] button to carry out the operation. To cancel the factory set
operation, press the [–] button.
File Name
When the SH-01 creates a new file for a new recording, the new file is automatically given a file name such as
SONG_xxx. The “xxx” represents a three-digit number given to the file name, starting from 001 and increasing
in increments of 1 (SONG_002, SONG_003 ...). This number’s value will continue to increase by 1 unless the
SH-01’s factory set operation is carried out (refer to the “Factory Set” section described below).

20
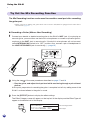
The Mix Recording function can be used to overdub a vocal part after recording
the guitar part.
* Before you start recording your guitar make sure its in tune. The SH-01 is equipped with a tuner that is
described on page 24.
● Recording a Guitar (Make a New Recording)
1
Connect your electric or electric/acoustic guitar to the SH-01’s INST. jack. If you playing an
acoustic guitar, you can either use the built-in microphones or connect a dynamic type mi-
crophone to the INST. jack to record audio. If the built-in microphones will not be used,
switch INTERNAL MIC switch to its “OFF” position. Also, connect a pair of headphones to
the LINE OUT/PHONES jack for monitoring. (→ page 15)
Try Out the Mix Recording Function
Using the SH-01
Effect Category Name
Effect Type
2
Using the step
2
of the same procedures described on page 17 and 18
• Play the guitar, and adjust the input level while monitoring through a pair of head-
phones.
At this point, preparation for recording the guitar is complete, but let’s try adding some of the
SH-01’s on-board effects to the guitar’s sound.
3
Press the [EFFECT] button to display the effect settings.
The Effect Category name will appear on the top half of the display and the Effect Type will
appear on the bottom half of the display.
OFF
CAT:BASIC
TYP:INTERNAL MIC
Sidan laddas ...
Sidan laddas ...
Sidan laddas ...
Sidan laddas ...
Sidan laddas ...
Sidan laddas ...
Sidan laddas ...
Sidan laddas ...
Sidan laddas ...
Sidan laddas ...
Sidan laddas ...
Sidan laddas ...
Sidan laddas ...
Sidan laddas ...
Sidan laddas ...
Sidan laddas ...
Sidan laddas ...
Sidan laddas ...
Sidan laddas ...
Sidan laddas ...
Sidan laddas ...
Sidan laddas ...
Sidan laddas ...
Sidan laddas ...
Sidan laddas ...
Sidan laddas ...
Sidan laddas ...
Sidan laddas ...
Sidan laddas ...
Sidan laddas ...
-
 1
1
-
 2
2
-
 3
3
-
 4
4
-
 5
5
-
 6
6
-
 7
7
-
 8
8
-
 9
9
-
 10
10
-
 11
11
-
 12
12
-
 13
13
-
 14
14
-
 15
15
-
 16
16
-
 17
17
-
 18
18
-
 19
19
-
 20
20
-
 21
21
-
 22
22
-
 23
23
-
 24
24
-
 25
25
-
 26
26
-
 27
27
-
 28
28
-
 29
29
-
 30
30
-
 31
31
-
 32
32
-
 33
33
-
 34
34
-
 35
35
-
 36
36
-
 37
37
-
 38
38
-
 39
39
-
 40
40
-
 41
41
-
 42
42
-
 43
43
-
 44
44
-
 45
45
-
 46
46
-
 47
47
-
 48
48
-
 49
49
-
 50
50


Yamaha SH-01 Bruksanvisning
- Kategori
- Gitarrtillbehör
- Typ
- Bruksanvisning
på andra språk
- italiano: Yamaha SH-01 Manuale del proprietario
- čeština: Yamaha SH-01 Návod k obsluze
- español: Yamaha SH-01 El manual del propietario
- Deutsch: Yamaha SH-01 Bedienungsanleitung
- polski: Yamaha SH-01 Instrukcja obsługi
- português: Yamaha SH-01 Manual do proprietário
- français: Yamaha SH-01 Le manuel du propriétaire
- 日本語: Yamaha SH-01 取扱説明書
- Türkçe: Yamaha SH-01 El kitabı
- English: Yamaha SH-01 Owner's manual
- dansk: Yamaha SH-01 Brugervejledning
- русский: Yamaha SH-01 Инструкция по применению
- suomi: Yamaha SH-01 Omistajan opas
- Nederlands: Yamaha SH-01 de handleiding
- română: Yamaha SH-01 Manualul proprietarului