SEVERIN KG 2392 Användarmanual
- Kategori
- Smörgåsproducenter
- Typ
- Användarmanual

Kontaktgrill 4
Contact grill 10
Gril viande 15
Contact grill 21
Grill de contacto 27
Grill 33
Kontaktgrill 39
Elgrill 44
Parilagrilli 49
Grill dwupłytowy Contact 54
Τοστιέρα/ψηστιέρα 60
Контактный электрогриль 66
104 x 142 mm
DE Gebrauchsanleitung
GB Instructions for use
FR Mode d’emploi
NL Gebruiksaanwijzing
ES Instrucciones de uso
IT Manuale d’uso
DK Brugsanvisning
SE Bruksanvisning
FI Käyttöohje
PL Instrukcja obsługi
GR Oδηγίες χρήσεως
RU Руководство по эксплуатации
ART.-NO. KG 2392

2
104 x 142 mm
Liebe Kundin, lieber Kunde,
wir wünschen Ihnen mit dem Qualitätsprodukt aus dem Hause
SEVERIN viel Freude und bedanken uns für Ihr Vertrauen.
Die Marke SEVERIN steht seit über 120 Jahren für Beständigkeit,
deutsche Qualität und Entwicklungskraft. Jedes Gerät wurde mit
Sorgfalt hergestellt und geprüft.
Mit der sprichwörtlichen Sauerländer Gründlichkeit, Genauigkeit und
Ehrlichkeit überzeugt das Familienunternehmen aus Sundern seit der
Gründung 1892 mit innovativen Produkten Kunden in aller Welt.
In den sieben Produktgruppen Kaffee, Frühstück, Küche, Grillen,
Haushalt, Personal Care und Kühlen & Gefrieren bietet SEVERIN mit
über 250 Produkten ein umfassendes Elektrokleingeräte-Sortiment.
Für jeden Anlass das richtige Produkt!
Lernen Sie die SEVERIN-Produktvielfalt kennen und besuchen Sie uns
unter www.severin.de oder www.severin.com.
Ihre
Geschäftsleitung und Mitarbeiter
der SEVERIN Elektrogeräte GmbH

104 x 142 mm
3
2
3
1
5
7
4
6
15
13
14
16
8
9
10
12
11

4
104 x 142 mm
Kontaktgrill
Liebe Kundin, lieber Kunde,
die Gebrauchsanweisung sorgfältig vor
der Benutzung des Gerätes durchlesen
und für den weiteren Gebrauch
aufbewahren. Das Gerät darf nur von
Personen benutzt werden, die mit den
Sicherheitsanweisungen vertraut sind.
Anschluss
Das Gerät nur an eine vorschriftsmäßig
installierte Schutzkontaktsteckdose
anschließen. Die Netzspannung muss
der auf dem Typenschild des Gerätes
angegebenen Spannung entsprechen. Das
Gerät entspricht den Richtlinien, die für die
CE-Kennzeichnung verbindlich sind.
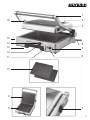
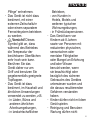
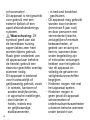
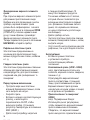
Aufbau
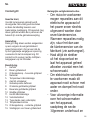
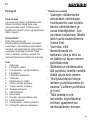
1. Griff
2. obereGrilläche
3. Auslöseknopf obere Grillplatte
4. Anschlussleitung
5. Temperaturkontrollleuchte
6. Ein-/Aus-Schalter
7. Einstellhebel der verschiedenen
Bedienpositionen
8. untere geriffelte Grillplatte
9. obere geriffelte Grillplatte
10. glatte Grillplatten
11. Betriebskontrollleuchte
12. Fettauffangschale
13. Typenschild (unter dem Gerät)
14. Temperaturregler
15. Auslöseknopf untere Grillplatte
16. ArretierstiftobereGrilläche
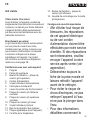
Sicherheitshinweise
∙Um Gefährdungen zu
vermeiden und um
Sicherheitsbestimmungen
einzuhalten, dürfen
Reparaturen am Gerät und
an der Anschlussleitung
nur durch unseren
Kundendienst durchgeführt
werden. Daher im
Reparaturfall unseren
Kundendienst telefonisch
oder per Mail kontaktieren
(siehe Anhang).
∙Vor jeder Reinigung den
Netzstecker ziehen und das
Gerät abkühlen lassen.
∙Das Gerät darf aus
Gründen der elektrischen
Sicherheit nicht mit
Flüssigkeiten behandelt
oder gar darin eingetaucht
werden.
∙Nähere Angaben zur
Reinigung bitte dem
Abschnitt „Reinigung und
DE

104 x 142 mm
5
Pege“ entnehmen.
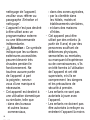
∙Das Gerät ist nicht dazu
bestimmt, mit einer
externen Zeitschaltuhr
oder einem separatem
Fernwirksystem betrieben
zu werden.
∙ Vorsicht! Dieses
Symbol gibt an, dass
während des Betriebes
die Temperatur der
berührbarenOberächen
sehr hoch sein kann.
Berühren Sie das
Gerät daher nur am
Griff und benutzen Sie
gegebenenfalls geeignete
Topappen.
∙Das Gerät ist dazu
bestimmt, im Haushalt und
ähnlichen Anwendungen
verwendet zu werden, z.B.
- in Läden, Büros und
anderen ähnlichen
Arbeitsumgebungen,
- in landwirtschaftlichen
Betrieben,
- von Kunden in
Hotels, Motels und
weiteren typischen
Wohnumgebungen,
- in Frühstückspensionen.
∙Das Gerät kann von
Kindern ab 8 Jahren
sowie von Personen mit
reduzierten physischen,
sensorischen oder
mentalen Fähigkeiten
oder Mangel an Erfahrung
und/oder Wissen
benutzt werden, wenn
sie beaufsichtigt oder
bezüglich des sicheren
Gebrauchs des Gerätes
unterwiesen wurden und
die daraus resultierenden
Gefahren verstanden
haben.
∙Kinder dürfen nicht mit dem
Gerät spielen.
∙Reinigung und Benutzer-
Wartung dürfen nicht

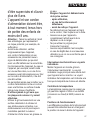
6
104 x 142 mm
durch Kinder durchgeführt
werden, es sei denn sie
sind 8 Jahre und älter und
werden beaufsichtigt.
∙Kinder jünger als 8 Jahre
sind vom Gerät und
der Anschlussleitung
fernzuhalten.
∙Halten Sie Kinder von
Verpackungsmaterial fern. Es besteht
u.a. Erstickungsgefahr!
∙Vor der Inbetriebnahme das komplette
Gerät inkl. Anschlussleitung und
eventueller Zubehörteile auf Mängel
und Beschädigungen überprüfen, die
die Funktionssicherheit des Gerätes
beeinträchtigen könnten. Falls das
Gerät z.B. zu Boden gefallen ist oder an
der Anschlussleitung gezogen wurde,
können von außen nicht erkennbare
Schäden vorliegen. In diesen Fällen das
Gerät nicht in Betrieb nehmen.
∙Achten Sie darauf, dass weder das
Gehäuse noch die Anschlussleitung des
Gerätes mit einer heißen Kochplatte
oder offenem Feuer in Berührung
kommt.
∙ Den Kontaktgrill niemals ohne
Grillplatten betreiben.
∙Stellen Sie das Gerät auf eine
wärmebeständige,spritzunempndliche
Unterlage, da Spritzbildung bei
fetthaltigem Grillgut unvermeidbar ist.
∙Das Gerät ausschalten und den
Netzstecker ziehen,
-nach jedem Gebrauch,
-bei Störungen während des
Betriebes,
-vor jeder Reinigung des Gerätes.
∙Den Netzstecker nicht an der
Anschlussleitung aus der Steckdose
ziehen; fassen Sie den Netzstecker an.
∙Das Gerät nur im abgekühlten Zustand
transportieren und wegstellen.
∙Den Griff nicht zum Transportieren des
Gerätes benutzen.
∙Wird das Gerät falsch bedient, oder
zweckentfremdet verwendet, kann keine
Haftung für evtl. auftretende Schäden
übernommen werden.
Ein-/Aus-Schalter mit Kontrollleuchten
Das Gerät wird mit dem Ein-/Aus-
Schalter eingeschaltet. Die rote
Betriebskontrollleuchte leuchtet auf,
solange das Gerät eingeschaltet ist. Die
grüne Temperaturkontrollleuchte leuchtet
auf, sobald die eingestellte Temperatur
erreicht ist.
Temperaturregler
Die gewünschte Grilltemperatur kann
stufenlos von MIN (Warmhalten) bis MAX
(Grillen) eingestellt werden.
Bedienpositionen
Mit dem Einstellhebel an der rechten
Geräteseite können die verschiedenen
Bedienpositionen eingestellt werden:

104 x 142 mm
7
BBQ MODE: Durch Festhalten des
Einstellhebels in dieser Position kann die
obereGrillächezumBarbecue-Grillenund
Reinigen ganz aufgeklappt werden (siehe
‚ArretierungobereGrilläche’).
OPEN: Das Gerät kann geöffnet werden.
LOCK:DieobereGrillächeistverriegelt
und das abgekühlte Gerät kann
transportiert werden.
LOW – HIGH: Die Höhe der oberen
Grillächekanninfünfverschiedenen
Positionen zum Kontaktgrillen oder
Überbacken der Dicke des Gargutes
angepasst werden.
Arretierung obere Grilläche
BeimAufklappenderoberenGrillächein
die Barbecue-/Reinigungs-Stellung muss
dieobereGrillächearretiertwerden.
Dazu den Einstellhebel zunächst in die
Position OPEN stellen und den Griff leicht
herunterdrücken. Dadurch arretiert die
obereGrillächeamArretierstift.Nunden
Einstellhebel auf die Position BBQ MODE
stellen und das Gerät öffnen.
Geriffelte Grillplatten:
Diese Grillplatten eignen sich besonders
zum Grillen von Fleischprodukten wie
Steak, Bratwurst etc.
Glatte Grillplatten:
Diese Grillplatten eignen sich besonders
zum Grillen von Gemüse und
Meeresfrüchten, zur Sandwichzubereitung
oder zum Überbacken.
Erste Inbetriebnahme
∙Grillplatten mit einem feuchten Tuch
abwischen und abtrocknen.
∙Das Gerät schließen.
∙Netzstecker einstecken und Gerät mit
dem Ein-/Aus-Schalter einschalten. Den
Temperaturregler auf die MAX-Position
stellen.
∙Den Kontaktgrill ca. 15 Minuten
ohne Grillgut aufheizen, damit der
typische Eigengeruch abklingt (leichte
Rauchentwicklung möglich, daher für
ausreichende Lüftung sorgen.)
∙Gerät abkühlen lassen.
∙Dann Grillplatten erneut abwischen und
abtrocknen.
∙ Diesen Vorgang mit den geriffelten und
den glatten Grillplatten durchführen.
Bedienung
∙ Gewünschte Grillplatten einsetzen und
das Gerät vor dem Aufheizen in die
gewünschte Bedienposition bringen:
Kontaktgrillen (LOW – HIGH)
z.B. Schnitzel, Bratwurst, Sandwich,
Panini usw.:
DieEinstellungderoberenGrilläche
der Dicke des Grillguts anpassen.
DieobereGrillächesolltenachdem
Eingeben des Grillguts gleichmäßig auf
demGrillgutauiegen,diesesabernicht
zerdrücken.
Überbacken (HIGH)
z.B. Toastgerichte:
DieobereGrillächemitHilfedes
Einstellhebels in die höchste Position
stellen. Bitte achten Sie darauf, dass
sichdieobereGrillächeineiner
waagerechtenPositionbendet.

8
104 x 142 mm
Barbecuegrillen (BBQ MODE)
z.B. Steak, Schnitzel, Bratwurst:
Den Einstellhebel zunächst in die
Position OPEN stellen, den Griff leicht
herunterdrücken. Dadurch arretiert
dieobereGrilläche.Danachdie
obereGrillächeleichtöffnen,den
Einstellhebel auf die Position BBQ
MODE stellen, festhalten und das Gerät
öffnen.
∙Netzstecker in die Steckdose stecken
und das Gerät mit dem Ein-/Aus-
Schalter einschalten.
∙Achten Sie darauf, dass die
Fettauffangschale eingesetzt ist und
entleeren Sie sie während des Betriebs
rechtzeitig.
∙Mit dem Temperaturregler den
gewünschten Temperaturbereich
einstellen.
∙Aufheizzeit abwarten bis die grüne
Temperaturkontrollleuchteaueuchtet.
∙Die antihaftbeschichteten Grillplatten
brauchen nur zu Beginn leicht
eingefettet werden.
∙Der Kontaktgrill ist jetzt betriebsbereit.
∙ObereGrillächegegebenenfallsöffnen.
∙Grill- bzw. Backgut eingeben. Die Grill-
bzw. Backzeiten hängen vom Grill- bzw.
Backgut ab.
∙Keine spitzen oder scharfen
Gegenstände zur Entnahme des
Grillgutes benutzen, damit die
antihaftbeschichteten Grillplatten nicht
beschädigt werden.
∙Nach Beendigung der
Speisenzubereitung Netzstecker ziehen
und den Kontaktgrill bei geschlossenen
Grillächenabkühlenlassen.
Reinigung und Pege
∙Vor jeder Reinigung den Netzstecker
ziehen und den Kontaktgrill bei
geschlossenenGrillächenabkühlen
lassen.
∙Das Gerät darf aus Gründen der
elektrischen Sicherheit nicht mit
Flüssigkeit behandelt oder gar darin
eingetaucht werden.
∙Die Außenseite des Kontaktgrills
nur mit einem angefeuchteten Tuch
reinigen und mit einem trockenen Tuch
nachwischen.
∙ Reinigung der Grillplatten:
Die Grillplatten können zur leichteren
Reinigung entnommen werden. Öffnen
Sie dazu das Gerät und stellen Sie die
obereGrillächesenkrecht.DrückenSie
den Auslöseknopf der oberen Grillplatte
und nehmen Sie die Grillplatte ab.
Zum Entnehmen der unteren Grillplatte
drücken Sie den Auslöseknopf der
unteren Grillplatte und nehmen Sie die
Grillplatte ab.
Die Grillplatten im Spülwasser reinigen
und danach gründlich abtrocknen.
Nach der Reinigung die Grillplatten
wieder einsetzen. Beachten Sie
dabei, dass die Aussparungen an den
Grillplatten in die Winkel am Gerät
greifen.
∙ Die Fettauffangschale kann ebenfalls im
Spülwasser gereinigt werden.

104 x 142 mm
9
Ersatzteile und Zubehör
Ersatzteile oder Zubehör können bequem
im Internet auf unserer Website http://www.
severin.de unter dem Unterpunkt „Service
Center / Ersatzteil-Shop“ bestellt werden.
Entsorgung
Geräte, die mit diesem Symbol
gekennzeichnet sind, müssen
getrennt vom Hausmüll entsorgt
werden. Diese Geräte enthalten
wertvolle Rohstoffe, die wiederverwertet
werden können. Eine ordnungsgemäße
Entsorgung schützt die Umwelt und die
Gesundheit Ihrer Mitmenschen. Ihre
Gemeindeverwaltung bzw. Ihr Fachhändler
gibt Auskunft über die ordnungsgemäße
Entsorgung.

10
104 x 142 mm
Contact grill
Dear Customer,
Before using the appliance, read the
following instructions carefully and keep
this manual for future reference. The
appliance must only be used by those
familiar with these instructions.
Connection to the mains supply
The appliance should only be connected to
an earthed socket installed in accordance
with the regulations. Make sure that the
supply voltage corresponds with the
voltage marked on the rating label of the
appliance. This product complies with all
binding CE directives on labelling.
Familiarisation
1. Handle
2. Upper grill element
3. Release button – upper grill plate
4. Power cord
5. Temperature indicator lamp
6. On/Off switch
7. Operating position lever
8. Lower ribbed grill plate
9. Upper ribbed grill plate
10. Smooth grill plates
11. Main indicator lamp
12. Fat collection tray
13. Rating label (on underside)
14. Temperature control
15. Release button – lower grill plate
16. Locking pin for upper grill element
Important safety instructions
∙ In order to avoid hazards,
repairs to this electrical
appliance or its power
cord must be carried out
by our customer service.
If repairs are needed,
please send the appliance
to our customer service
department (see appendix).
∙ Before cleaning the
appliance, ensure it is
disconnected from the
power supply and has
cooled down completely.
∙ To avoid the risk of electric
shock, do not clean the
appliance with water and
do not immerse it in water.
∙ For detailed information
on cleaning the appliance,
please refer to the
section ‘General care and
cleaning’.
∙ The appliance is not
intended to be operated by
GB

104 x 142 mm
11
means of an external timer
or separate remote-control
system.
∙ Caution: This
symbol indicates that
the accessible housing
surfaces may become
very hot during operation.
Do not touch any part of
the appliance except the
handle; use suitable oven
cloths if necessary.
∙This appliance is intended
for domestic or similar
applications, such as
- inshops,ofcesand
other similar working
environments,
- in agricultural areas,
- by customers in hotels,
motels etc. and similar
establishments,
- in bed-and breakfast type
environments.
∙ This appliance may be
used by children (at least
8 years of age) and by
persons with reduced
physical, sensory or mental
capabilities, or lacking
experience and knowledge,
provided they have been
given supervision or
instruction concerning the
use of the appliance and
fully understand all dangers
and safety precautions
involved.
∙ Children must not be
permitted to play with the
appliance.
∙ Children must not be
permitted to carry out any
cleaning or maintenance
work on the appliance
unless they are supervised
and at least 8 years of age.
∙ The appliance and its
power cord must be kept
well away from children
under 8 at all times.

12
104 x 142 mm
∙Caution: Keep any packaging materials
well away from children – such materials
are a potential source of danger, e.g. of
suffocation.
∙ Every time the appliance is used, the
main body including the power cord as
wellasanyattachmentttedshould
be checked thoroughly for any defects.
Should the appliance, for instance, have
been dropped onto a hard surface, or if
excessive force has been used to pull
the power cord, it must no longer be
used: even invisible damage may have
adverse effects on the operational safety
of the appliance.
∙Do not allow the housing or the power
cord to touch hot surfaces (E.g. cooker
hotplates) or come into contact with any
other heat sources.
∙Do not operate the grill without the
grill plates tted.
∙During operation, the appliance must
be placed on a heat-resistant surface,
impervious to splashes and stains.
When cooking food with a high fat or
moisture content, splashes are not
always avoidable.
∙ Always switch off and remove the
plug from the wall socket
-after use,
-in cases of malfunction, and
-during cleaning.
∙ When removing the plug from the wall
socket, never pull on the power cord;
always grip the plug itself.
∙Before moving or storing the appliance,
ensure it has cooled down completely.
∙Do not use the handle to carry the
appliance.
∙ No responsibility is accepted if damage
results from improper use, or if these
instructions are not complied with.
On/Off switch with indicator lamps
Use the On/Off switch to turn the appliance
on. The main red indicator lamp remains
lit as long as the appliance is switched
on. The green temperature indicator lamp
comes on once the pre-set temperature is
reached.
Temperature control
The required grill temperature can be
adjusted continuously from MIN (keeping
warm) to MAX (grilling).
Operating positions
The different operating positions can be
selected by means of the adjusting lever on
the right-hand side:
BBQ MODE: With the lever held in this
position, the upper grill element can be
opened completely for BBQ-style grilling,
and also for thorough cleaning (see
Locking the upper grill element).
OPEN: The appliance can be fully opened.
LOCK: The upper grill plate is locked in
place and the appliance can be moved
afterasufcientcooling-downperiod.
LOW – HIGH: The height of the upper grill
elementcanbeadjustedtovedifferent
heights for contact grilling or cooking ‘au
gratin’,dependingonthethicknessofthe
food to be cooked.

104 x 142 mm
13
Locking the upper grill element
When opening the upper grill element into
the barbecue-/cleaning position, it must be
locked:puttheleverrstintotheOPEN
position and push the handle lightly down;
in that way, the upper grill element will be
locked by the pin. Now put the lever to the
BBQ MODE position, when the appliance
can be opened.
Ribbed grill plates
Particularly suitable for grilling meat
products such as steak, sausages etc.
Smooth grill plates
Particularly suitable for vegetables and
seafood, for making sandwiches or for
grilling‘augratin’.
Before using for the rst time
∙ Clean the grill plates with a damp, lint-
free cloth and wipe dry afterwards.
∙ Close the unit.
∙ Insert the plug into a suitable wall outlet,
and use the On/Off switch to turn the
appliance on. Set the temperature
control to its MAX position.
∙ Let the grill heat up for about 15 minutes
without any food. This will remove the
smelltypicallyencounteredwhenrst
switching on a grill. (A little smoke may
be emitted; this is quite normal, but
ensurethereissufcientventilation.)
∙ Let the appliance cool down.
∙ Clean the grill plates again with a damp,
lint-free cloth and wipe dry afterwards.
∙Both ribbed and smooth plates must be
cleaned in this way.
Operation
∙ Fit the required grill plates and set the
appliance up in the desired operating
position.
Contact grilling (LOW – HIGH)
E.g. cutlet or escalope, fried sausage,
sandwich, panini etc.:
adjust the upper grill element to the
thickness of the food to be grilled. The
upper grill element should be in level
contact with the food but should not
press down on it.
Cooking ‘au gratin’ (HIGH)
E.g. toasted dishes:
use the adjusting lever to bring the
upper grill element to its highest (and
horizontal) position.
Barbecue-type grilling (BBQ MODE)
E.g. steak, cutlet or escalope, fried
sausage:
puttheleverrsttotheOPEN position
and push the handle down lightly; in
that way, the upper grill element will
be locked. Now open the upper grill
element slightly, put the lever to the
BBQ MODE position, hold the lever and
open the appliance fully.
∙ Insert the plug into a suitable wall outlet,
and use the On/Off switch to turn the
appliance on.
∙ Ensure that the fat collection tray is in
place; always empty it in good time
during operation.
∙ Use the temperature control to choose
the desired temperature level.
∙ Wait until pre-heating is complete and
the green temperature indicator lamp
comes on.

14
104 x 142 mm
∙ The non-stick grill plates only need to be
slightlygreasedwhenrstused.
∙ The grill is now ready for use.
∙ Open the lid if necessary.
∙ Place the items to be cooked into
the unit. The cooking or grilling time
depends largely on the nature of the
food to be cooked.
∙ In order to prevent the non-stick grill
plates from being damaged, do not use
sharp or pointed objects while placing or
removing food items.
∙ After cooking is complete, remove the
plug from the wall socket and allow
sufcienttimefortheunittocooldown
with the plates closed.
General care and cleaning
∙ Before cleaning the appliance, remove
the plug from the wall socket and make
sure that the grill has cooled down
completely with the plates closed.
∙ To avoid the risk of electric shock, do not
clean the appliance with water and do
not immerse it in water.
∙ The outside of the grill may be cleaned
with a soft damp cloth only. Wipe dry
with a dry cloth afterwards.
∙ Cleaning the non-stick grill plates:
The plates can be removed for easy
cleaning: open the unit and put the
upper element in a vertical position;
then push the release button to remove
the plate.
To remove the lower plate, push the
lower-plate release button and remove
the plate.
Clean the plates in warm soapy water;
dry thoroughly afterwards.
Replace the plates in the unit after
cleaning. Ensure that the recesses on
the plates engage on the brackets on
the unit.
∙The fat collection tray can also be
cleaned with hot soapy water.
DisposalDevices marked with this symbol
must be disposed of separately
from your household waste, as
they contain valuable materials
which can be recycled. Proper disposal
protects the environment and human
health. Your local authority or retailer can
provide information on the matter.

104 x 142 mm
15
Gril viande
Chère cliente, Cher client,
Avantd’utilisercetappareil,veuillezlire
soigneusement les instructions suivantes et
conserver ce manuel pour future référence.
L’appareildoitêtreutiliséexclusivement
par des personnes familiarisées avec les
présentes instructions.
Branchement au secteur
Legrildevraitêtrebranchéexclusivement
sur une prise de courant avec terre,
installée selon les normes. Assurez-vous
quelatensiond’alimentationcorrespond
à la tension indiquée sur la plaque
signalétiquedel’appareil.Ceproduit
est conforme aux directives obligatoires
relatives au marquage CE.
Familiarisez-vous avec votre appareil
1. Poignée
2. Partie gril supérieure
3. Bouton de libération – plaque de
cuisson gril supérieure
4. Cordond’alimentation
5. Voyant indicateur de température
6. Interrupteurmarche/arrêt
7. Levier de position de fonctionnement
8. Plaque de cuisson gril inférieure
cannelée
9. Plaque de cuisson gril supérieure
cannelée
10. Plaques de cuisson gril lisses
11. Voyant indicateur principal
12. Bac de récupération des graisses
13. Plaquesignalétique(sousl’appareil)
14. Contrôle de la température
15. Bouton de libération – plaque de
cuisson gril inférieure
16. Goupille de verrouillage pour la partie
gril supérieure
Consignes de sécurité importantes
∙And’évitertoutrisquede
blessures, les réparations
de cet appareil électrique
ou de son cordon
d’alimentationdoiventêtre
effectuées par notre service
clientèle. Si des réparations
sont nécessaires, veuillez
envoyerl’appareilànotre
service après-vente (voir
appendice).
∙ Débranchez toujours la
chedelaprisemuraleet
laissezrefroidirl’appareil
avant de le nettoyer.
∙ Pour éviter le risque de
chocs électriques, ne pas
nettoyerl’appareilàl’eau
et ne pas le plonger dans
l’eau.
∙ Pour des informations
détaillées concernant le
FR

16
104 x 142 mm
nettoyagedel’appareil,
veuillez vous référer au
paragraphe ‘Entretien et
nettoyage’.
∙L’appareiln’estpasdestiné
àêtreutiliséavecun
programmateur externe
ou une télécommande
indépendante.
∙ Attention : Ce symbole
indique que les surfaces
extérieures accessibles
peuvent devenir très
chaudes pendant le
fonctionnement. Ne
touchez aucune partie
del’appareilàpart
la poignée ; servez-
vousd’unemaniquesi
nécessaire.
∙Cet appareil est destiné à
une utilisation domestique
ou similaire, telle que
- dans des bureaux
et autres locaux
commerciaux,
- dans des zones agricoles,
- par la clientèle dans
les hôtels, motels et
établissements similaires,
- et dans des maisons
d’hôtes.
∙Cetappareilpeutêtre
utilisé par des enfants (à
partir de 8 ans) et par des
personnes souffrant de
déciencesphysiques,
sensorielles ou mentales,
oumanquantd’expérience
oudeconnaissances,s’ils
ontétéformésàl’utilisation
del’appareiletontété
supervisés,ets’ilsen
comprennent les dangers
et les précautions de
sécurité à prendre.
∙ Les enfants ne sont pas
autorisés à jouer avec
l’appareil.
∙ Les enfants ne doivent pas
êtreautorisésànettoyerou
entretenirl’appareilàmoins

104 x 142 mm
17
d’êtresupervisésetd’avoir
plus de 8 ans.
∙L’appareiletsoncordon
d’alimentationdoiventêtre,
à tout moment, tenus hors
de portée des enfants de
moins de 8 ans.
∙ Attention :Tenezlesenfantsàl’écart
des emballages, qui représentent
un risque potentiel, par exemple, de
suffocation.
∙Avanttouteutilisation,vériez
soigneusementquel’appareil,
soncordond’alimentationetses
accessoires ne présentent aucun
signe de détérioration qui pourrait
avoir un effet néfaste sur la sécurité de
fonctionnementdel’appareil.Aucasoù
l’appareil,parexemple,seraittombé
sur une surface dure, ou si une force
excessive aurait été employée pour tirer
surlecordond’alimentation,ilnedoit
plusêtreutilisé.
∙ Ne permettez jamais que le boîtier ou le
cordond’alimentationentreencontact
avecuneammeousurfacechaude
tellequ’uneplaquechauffante.
∙N’utilisez jamais le gril sans que
les plaques de cuisson n’y soient
attachées.
∙ Utilisez le gril exclusivement sur une
surface résistante à la chaleur et
aux éclaboussures et taches. Les
éclaboussures ne sont pas toujours
inévitables pendant la cuisson
d’alimentsàforteteneurengraisseou
en eau.
∙ Éteignez l’appareil et débranchez-le
de la prise secteur
-après utilisation,
-en cas de fonctionnement
défectueux,
-avant de nettoyer l’appareil.
∙Nedébranchezpasl’appareilentirant
surlecordon;tireztoujourssurlache.
∙Assurez-vousquel’appareila
complètement refroidi avant de le
déplacer ou de le ranger.
∙Ne pas utiliser la poignée pour
transporterl’appareil.
∙Aucuneresponsabilitén’estacceptée
en cas de dégâts dus à une mauvaise
utilisation ou si on ne se conforme pas à
ces consignes.
Interrupteur marche/arrêt avec voyants
indicateurs
Mettezl’appareilenmarchegrâceà
l’interrupteurmarche/arrêt.Levoyant
indicateur rouge principal reste allumé tant
quel’appareilestenmarche.Levoyant
indicateurdetempératureverts’allumeune
fois que la température choisie est atteinte.
Contrôle de la température
La température requise pour la cuisson au
grilpeutêtrerégléeàl’innietvadeMIN
(conserver au chaud) à MAX (cuisson au
gril).
Positions de fonctionnement
Les différentes positions de fonctionnement
peuventêtresélectionnéesenchangeant
lapositiondulevieràdroitedel’appareil:

18
104 x 142 mm
BBQ MODE: Lorsque le levier est dans
cette position, la partie gril supérieure peut
êtreentièrementouvertepourunecuisson
de style barbecue, ainsi que pour permettre
un nettoyage à fond (voir paragraphe
‘Verrouillage de la partie gril supérieure’).
OPEN:L’appareilpeutêtreentièrement
ouvert.
LOCK: La plaque de cuisson gril
supérieureestverrouilléeetl’appareilpeut
êtredéplacéaprèsavoirsufsamment
refroidi.
LOW – HIGH: La hauteur de la partie
grilsupérieurepeutêtreajustéeselon
cinq niveaux différents pour permettre
une cuisson gril contact ou une cuisson
‘augratin’,enfonctiondel’épaisseurdes
aliments à cuire.
Verrouillage de la partie gril supérieure
Lorsque vous ouvrez la partie gril
supérieure pour la mettre en position
barbecue/nettoyage,celle-cidoitêtre
verrouillée:placezlelevierd’aborden
position OPEN (OUVERT) et appuyez
légèrement sur la poignée ; de cette façon,
la partie gril supérieure sera verrouillée
par la goupille. Puis placez le levier sur
la position BBQ MODE (MODE BBQ), et
l’appareilpeutêtreouvert.
Plaques de cuisson gril cannelées
Conviennent plus particulièrement pour
la cuisson au gril des viandes comme les
steaks, les saucisses, etc.
Plaques de cuisson gril lisses
Conviennent plus particulièrement pour la
cuisson des légumes et des fruits de mer,
pour préparer des sandwiches ou pour
réaliser des gratins.
Avant la première utilisation
∙Nettoyezlesplaquesdecuissonàl’aide
d’unchiffonhumideetnonpelucheux.
Essuyez ensuite.
∙Fermezl’appareil
∙Branchezlachesuruneprisemurale
adaptéeetàl’aidedel’interrupteur
marche/arrêt,mettezl’appareilen
marche. Réglez le contrôle de la
température sur la position MAX.
∙ Il est conseillé de laisser le gril chauffer
sans aliment pendant 15 minutes.
Ceciaurapoureffetd’éliminerl’odeur
caractéristique accompagnant la mise
en circuit initiale de tout gril. (Une
légère fumée risque de se dégager; ce
phénomène est normal mais veillez à
prévoiruneaérationsufsante).
∙Laissezrefroidirl’appareil.
∙ Nettoyez les plaques de cuisson avec
un chiffon non-pelucheux humide et
séchez-les ensuite.
∙Les plaques cannelées et lisses doivent
êtrenettoyéesdecettefaçon.
Fonctionnement
∙Installez les plaques de cuisson gril
requisesetmettezl’appareildansla
position de fonctionnement désirée.
Cuisson contact au gril (LOW – HIGH)
(BASSE – HAUTE)
Par ex. une côtelette ou une escalope,
une saucisse à frire, un sandwich, un

104 x 142 mm
19
panini etc.:
Ajustez la partie gril supérieure selon
l’épaisseurdesalimentsàgriller.
La partie gril supérieure doit venir
s’appuyeràplatsurlesaliments,mais
ne doit pas les écraser.
Cuisson ‘au gratin’ (HIGH) (HAUTE)
Par ex. des plats toastés :
Servez-vous du levier pour relever au
plushaut(etàl’horizontale)lapartiegril
supérieure.
Cuisson au gril style barbecue (BBQ
MODE) (MODE BBQ)
Par ex. un steak, une côtelette ou une
escalope, une saucisse à frire :
Placezd’abordleleviersurlaposition
OPEN (OUVERT) puis appuyez
légèrement sur la poignée ; de cette
façon, la partie gril supérieure est
verrouillée. Ensuite, relevez légèrement
la partie gril supérieure, placez le
levier sur la position BBQ MODE
(MODE BBQ), tenez le levier et ouvrez
entièrementl’appareil.
∙Insérezlachedansuneprisemurale
appropriéeetàl’aidedel’interrupteur
marche/arrêt,mettezl’appareilen
marche.
∙ Assurez-vous que le bac de
récupération des graisses est bien en
place ; videz-le toujours pendant le
fonctionnementavantqu’ilnedéborde.
∙ Servez-vous du contrôle de la
température pour sélectionner la
température désirée.
∙ Attendez que le préchauffage soit
terminé et que le voyant indicateur de
températureverts’allume.
∙ Les plaques de cuisson antiadhésives
devrontêtrelégèrementgraisséeslors
de la première utilisation uniquement.
∙Legrilestmaintenantprêtpourl’emploi.
∙ Ouvrez la partie gril supérieure si
nécessaire.
∙ Placez les denrées à cuire dans
l’appareil.Letempsdecuissonoude
grillage dépendra en grande partie de la
nature des aliments concernés.
∙Pouréviterd’endommagerlesplaques
de cuisson antiadhésives, abstenez-
vousd’utiliserdesinstruments
tranchants ou pointus pour poser les
aliments sur le gril ou les en retirer.
∙ Une fois que la cuisson est terminée,
débranchezlachedelaprisemuraleet
laissezrefroidirl’appareilenlaissantles
plaques de cuisson fermées.
Entretien et nettoyage
∙Avantdenettoyerl’appareil,débranchez
lachedelaprisemuraleetassurez-
vousquel’appareilabieneuletemps
de refroidir avec les plaques de cuisson
fermées.
∙ Pour éviter le risque de choc électrique,
nenettoyezpasl’appareilàl’eauetne
leplongezpasdansl’eau.
∙ Nettoyez les surfaces extérieures du gril
exclusivementàl’aided’unchiffondoux
ethumide.Essuyezensuiteàl’aided’un
chiffon sec.
∙ Nettoyage des plaques de cuisson gril
aurevêtementanti-adhésif:
Lesplaquespeuventêtreretirées
pour un nettoyage plus facile : ouvrez
l’appareiletplacezlapartiesupérieure
en position verticale ; puis appuyez

20
104 x 142 mm
légèrement sur le bouton de libération
pour libérer la plaque.
Pour retirer la plaque inférieure,
appuyez sur le bouton de libération de la
plaque inférieure et libérer la plaque.
Nettoyezlesplaquesàl’eauchaude
savonneuse ; séchez ensuite
soigneusement.
Replacezlesplaquesdansl’appareil
après le nettoyage. Assurez-vous que
lesencochesdesplaquess’engagent
biendanslessupportsdel’appareil.
∙ Le bac de récupération des graisses
peutégalementêtrenettoyéàl’eau
chaude savonneuse.
Mise au rebut
Les appareils qui portent ce
symboledoiventêtrecollectéset
traités séparément de vos
déchets ménagers, car ils
contiennent des matériaux précieux qui
peuventêtrerecyclés.Envous
débarrassant correctement de ces
appareils, vous contribuez à la prévention
de potentiels effets négatifs sur la santé
humaineetl’environnement.Votremairie
ou le magasin auprès duquel vous avez
acquisl’appareilpeuventvousdonnerdes
informations à ce sujet.
Sidan laddas...
Sidan laddas...
Sidan laddas...
Sidan laddas...
Sidan laddas...
Sidan laddas...
Sidan laddas...
Sidan laddas...
Sidan laddas...
Sidan laddas...
Sidan laddas...
Sidan laddas...
Sidan laddas...
Sidan laddas...
Sidan laddas...
Sidan laddas...
Sidan laddas...
Sidan laddas...
Sidan laddas...
Sidan laddas...
Sidan laddas...
Sidan laddas...
Sidan laddas...
Sidan laddas...
Sidan laddas...
Sidan laddas...
Sidan laddas...
Sidan laddas...
Sidan laddas...
Sidan laddas...
Sidan laddas...
Sidan laddas...
Sidan laddas...
Sidan laddas...
Sidan laddas...
Sidan laddas...
Sidan laddas...
Sidan laddas...
Sidan laddas...
Sidan laddas...
Sidan laddas...
Sidan laddas...
Sidan laddas...
Sidan laddas...
Sidan laddas...
Sidan laddas...
Sidan laddas...
Sidan laddas...
Sidan laddas...
Sidan laddas...
Sidan laddas...
Sidan laddas...
Sidan laddas...
Sidan laddas...
Sidan laddas...
Sidan laddas...
-
 1
1
-
 2
2
-
 3
3
-
 4
4
-
 5
5
-
 6
6
-
 7
7
-
 8
8
-
 9
9
-
 10
10
-
 11
11
-
 12
12
-
 13
13
-
 14
14
-
 15
15
-
 16
16
-
 17
17
-
 18
18
-
 19
19
-
 20
20
-
 21
21
-
 22
22
-
 23
23
-
 24
24
-
 25
25
-
 26
26
-
 27
27
-
 28
28
-
 29
29
-
 30
30
-
 31
31
-
 32
32
-
 33
33
-
 34
34
-
 35
35
-
 36
36
-
 37
37
-
 38
38
-
 39
39
-
 40
40
-
 41
41
-
 42
42
-
 43
43
-
 44
44
-
 45
45
-
 46
46
-
 47
47
-
 48
48
-
 49
49
-
 50
50
-
 51
51
-
 52
52
-
 53
53
-
 54
54
-
 55
55
-
 56
56
-
 57
57
-
 58
58
-
 59
59
-
 60
60
-
 61
61
-
 62
62
-
 63
63
-
 64
64
-
 65
65
-
 66
66
-
 67
67
-
 68
68
-
 69
69
-
 70
70
-
 71
71
-
 72
72
-
 73
73
-
 74
74
-
 75
75
-
 76
76


SEVERIN KG 2392 Användarmanual
- Kategori
- Smörgåsproducenter
- Typ
- Användarmanual
på andra språk
- italiano: SEVERIN KG 2392 Manuale utente
- Deutsch: SEVERIN KG 2392 Benutzerhandbuch
- polski: SEVERIN KG 2392 Instrukcja obsługi
- français: SEVERIN KG 2392 Manuel utilisateur
- dansk: SEVERIN KG 2392 Brugermanual
- Nederlands: SEVERIN KG 2392 Handleiding