
DSL801
EN Cordless Drywall Sander INSTRUCTION MANUAL 8
SV Batteridriven väggslip BRUKSANVISNING 19
NO Batteridrevet slipemaskin for
gipsplater BRUKSANVISNING 30
FI Akkukäyttöinen
varsihiomakone KÄYTTÖOHJE 41
DA Akku sandslibemaskine til
gipsplader BRUGSANVISNING 52
LV Bezvada ģipškartona
slīpmašīna LIETOŠANAS INSTRUKCIJA 63
LT Belaidis gipso kartono
šlifuoklis NAUDOJIMO INSTRUKCIJA 74
ET Juhtmeta kipsplaadilihvija KASUTUSJUHEND 85
RU Аккумуляторная
шлифовальная машина РУКОВОДСТВО ПО
ЭКСПЛУАТАЦИИ 96

12
3
Fig.1
1
2
Fig.2
1
AB
Fig.3
1
2
3
Fig.4
1
Fig.5
1
Fig.6
1
2
Fig.7
21
Fig.8
2

1
Fig.9
1
2
3
Fig.10
1 2
3
Fig.11
1
2
3
4
5
Fig.12
Fig.13
3

1
Fig.14
1
2
Fig.15
12
Fig.16
Fig.17
Fig.18
Fig.19
4

1
Fig.20
1
2
3
4
Fig.21
1
2
3
Fig.22
1
Fig.23
12
21
Fig.24
Fig.25
5

1
Fig.26
21
Fig.27
1
Fig.28
1
Fig.29
12
21
Fig.30
12
Fig.31
6

13
2
Fig.32
7

8ENGLISH
ENGLISH (Original instructions)
SPECIFICATIONS
Model: DSL801
Paper size 225 mm
Pad diameter 210 mm
No load speed 1,000 - 1,800 min-1
Dimensions (L x W x H) 1,120 mm - 1,540 mm x 278 mm x 273 mm
Rated voltage D.C. 18 V
Net weight 4.6 - 5.8 kg
• Duetoourcontinuingprogramofresearchanddevelopment,thespecicationshereinaresubjecttochange
without notice.
• Specicationsmaydierfromcountrytocountry.
• Theweightmaydierdependingontheattachment(s),includingthebatterycartridge.Thelightestandheavi-
estcombination,accordingtoEPTA-Procedure01/2014,areshowninthetable.
Applicable battery cartridge and charger
Batterycartridge BL1815N/BL1820B/BL1830B/BL1840B/BL1850B/BL1860B
Charger DC18RC/DC18RD/DC18RE/DC18SD/DC18SE/DC18SF/
DC18SH
• Someofthebatterycartridgesandchargerslistedabovemaynotbeavailabledependingonyourregionof
residence.
WARNING: Only use the battery cartridges and chargers listed above.Useofanyotherbatterycartridges
andchargersmaycauseinjuryand/orre.
Intended use
Thetoolisintendedforsandingdrywallorceiling.
Noise
ThetypicalA-weightednoiseleveldeterminedaccord-
ingtoEN62841-2-4:
Sound pressure level (LpA):75dB(A)
Uncertainty(K):3dB(A)
Thenoiselevelunderworkingmayexceed80dB(A).
NOTE:
Thedeclarednoiseemissionvalue(s)hasbeen
measured in accordance with a standard test method
andmaybeusedforcomparingonetoolwithanother.
NOTE:
Thedeclarednoiseemissionvalue(s)mayalso
beusedinapreliminaryassessmentofexposure.
WARNING: Wear ear protection.
WARNING: The noise emission during actual
use of the power tool can dier from the declared
value(s) depending on the ways in which the
tool is used especially what kind of workpiece is
processed.
WARNING: Be sure to identify safety mea-
sures to protect the operator that are based on an
estimation of exposure in the actual conditions of
use (taking account of all parts of the operating
cycle such as the times when the tool is switched
o and when it is running idle in addition to the
trigger time).
Vibration
Thevibrationtotalvalue(tri-axialvectorsum)deter-
minedaccordingtoEN62841-2-4:
Workmode:discsanding
Vibrationemission(ah, DS):2.5m/s2 or less
Uncertainty(K):1.5m/s2
NOTE:Thedeclaredvibrationtotalvalue(s)hasbeen
measured in accordance with a standard test method
andmaybeusedforcomparingonetoolwithanother.
NOTE:Thedeclaredvibrationtotalvalue(s)mayalso
beusedinapreliminaryassessmentofexposure.
WARNING: The vibration emission during
actual use of the power tool can dier from the
declared value(s) depending on the ways in which
the tool is used especially what kind of workpiece
is processed.
WARNING: Be sure to identify safety mea-
sures to protect the operator that are based on an
estimation of exposure in the actual conditions of
use (taking account of all parts of the operating
cycle such as the times when the tool is switched
o and when it is running idle in addition to the
trigger time).

9ENGLISH
EC Declaration of Conformity
For European countries only
TheECdeclarationofconformityisincludedasAnnexA
to this instruction manual.
SAFETY WARNINGS
General power tool safety warnings
WARNING: Read all safety warnings, instruc-
tions, illustrations and specications provided
with this power tool.Failuretofollowallinstructions
listedbelowmayresultinelectricshock,reand/or
seriousinjury.
Save all warnings and instruc-
tions for future reference.
Theterm"powertool"inthewarningsreferstoyour
mains-operated(corded)powertoolorbattery-operated
(cordless) power tool.
Cordless drywall sander safety
warnings
Safety Warnings Common for Sanding Operations:
1. This power tool is intended to function as a
sander. Read all safety warnings, instructions,
illustrations and specications provided with
this power tool.Failuretofollowallinstructions
listedbelowmayresultinelectricshock,reand/
orseriousinjury.
2.
Operations such as grinding, wire brushing,
polishing or cutting-o are not recommended
to be performed with this power tool. Operations
forwhichthepowertoolwasnotdesignedmay
createahazardandcausepersonalinjury.
3. Do not use accessories which are not speci-
cally designed and recommended by the tool
manufacturer.Justbecausetheaccessorycan
beattachedtoyourpowertool,itdoesnotassure
safe operation.
4. The rated speed of the accessory must be at
least equal to the maximum speed marked on
the power tool.Accessoriesrunningfasterthan
theirratedspeedcanbreakandyapart.
5. The outside diameter and the thickness of your
accessory must be within the capacity rating
of your power tool.Incorrectlysizedaccessories
cannotbeadequatelyguardedorcontrolled.
6. Do not use a damaged accessory. Before each
use inspect the accessory such as pad for
cracks, tear or excess wear. If power tool or
accessory is dropped, inspect for damage or
install an undamaged accessory. After inspect-
ing and installing an accessory, position your-
self and bystanders away from the plane of
the rotating accessory and run the power tool
at maximum no-load speed for one minute.
Damagedaccessorieswillnormallybreakapart
during this test time.
7. Wear personal protective equipment.
Depending on application, use face shield,
safety goggles or safety glasses. As appro-
priate, wear dust mask, hearing protectors,
gloves and workshop apron capable of stop-
ping small abrasive or workpiece fragments.
Theeyeprotectionmustbecapableofstopping
yingdebrisgeneratedbyvariousoperations.
Thedustmaskorrespiratormustbecapableof
ltratingparticlesgeneratedbyyouroperation.
Prolongedexposuretohighintensitynoisemay
cause hearing loss.
8. Keep bystanders a safe distance away from
work area. Anyone entering the work area
must wear personal protective equipment.
Fragmentsofworkpieceorofabrokenaccessory
mayyawayandcauseinjurybeyondimmediate
area of operation.
9. Hold the power tool by insulated gripping
surfaces only, when performing an operation
where the cutting tool may contact hidden
wiring. Contact with a "live" wire will also make
exposed metal parts of the power tool "live" and
could give the operator an electric shock.
10. Position the cord clear of the spinning acces-
sory.Ifyoulosecontrol,thecordmaybecutor
snaggedandyourhandorarmmaybepulledinto
thespinningaccessory.
11. Never lay the power tool down until the acces-
sory has come to a complete stop. The spinning
accessorymaygrabthesurfaceandpullthe
powertooloutofyourcontrol.
12. Do not run the power tool while carrying it at
your side.Accidentalcontactwiththespinning
accessorycouldsnagyourclothing,pullingthe
accessoryintoyourbody.
13. Do not operate the power tool near ammable
materials. Sparks could ignite these materials.
14. Do not use accessories that require liquid
coolants.Usingwaterorotherliquidcoolants
mayresultinelectrocutionorshock.
Kickback and Related Warnings
Kickbackisasuddenreactiontoapinchedorsnagged
rotatingpadoranyotheraccessory.Pinchingorsnag-
gingcausesrapidstallingoftherotatingaccessory
whichinturncausestheuncontrolledpowertooltobe
forcedinthedirectionoppositeoftheaccessory’srota-
tionatthepointofthebinding.
Forexample,ifapadissnaggedorpinchedbythe
workpiece, the edge of the pad that is entering into the
pinch point can dig into the surface of the material caus-
ingthepadtoclimboutorkickout.Thepadmayeither
jumptowardorawayfromtheoperator,dependingon
directionofthepad’smovementatthepointofpinching.
Padmayalsobreakundertheseconditions.
Kickbackistheresultofpowertoolmisuseand/or
incorrectoperatingproceduresorconditionsandcanbe
avoidedbytakingproperprecautionsasgivenbelow.
1. Maintain a rm grip on the power tool and
position your body and arm to allow you to
resist kickback forces. Always use auxiliary
handle, if provided, for maximum control over
kickback or torque reaction during start-up.
Theoperatorcancontroltorquereactionsorkick-
backforces,ifproperprecautionsaretaken.

10 ENGLISH
2. Never place your hand near the rotating acces-
sory.Accessorymaykickbackoveryourhand.
3. Do not position your body in the area where
power tool will move if kickback occurs.
Kickbackwillpropelthetoolindirectionopposite
tothewheel’smovementatthepointofsnagging.
4. Use special care when working corners, sharp
edges etc. Avoid bouncing and snagging the
accessory.Corners,sharpedgesorbouncing
haveatendencytosnagtherotatingaccessory
andcauselossofcontrolorkickback.
5. Do not attach a saw chain woodcarving blade
or toothed saw blade.Suchbladescreatefre-
quentkickbackandlossofcontrol.
Safety Warnings Specic for Sanding Operations:
1. Do not use excessively oversized sanding
disc paper. Follow manufacturers recommen-
dations, when selecting sanding paper. Larger
sandingpaperextendingbeyondthesanding
padpresentsalacerationhazardandmaycause
snagging,tearingofthediscorkickback.
Additional Safety Warnings:
1. Do not leave the tool running. Operate the tool
only when hand-held.
2. Check that the workpiece is properly
supported.
3. Pay attention that the pad continues to rotate
after the tool is switched o.
4. If working place is extremely hot and humid,
or badly polluted by conductive dust, use a
short-circuit breaker (30 mA) to assure opera-
tor safety.
5. Do not use the tool on any materials contain-
ing asbestos.
6. Do not use cloth work gloves during operation.
Fibersfromclothglovesmayenterthetool,which
causestoolbreakage.
7. Always work in well ventilated area.
8. When placing the tool, place it on a at and
stable surface.
9. When operating the tool, connect the tool to a
vacuum cleaner as much as possible to keep
the working area clean and prevent the oper-
ator from inhaling particles generated by the
operation.
10. Handle and store accessories with care.
SAVE THESE INSTRUCTIONS.
WARNING: DO NOT let comfort or familiarity
with product (gained from repeated use) replace
strict adherence to safety rules for the subject
product. MISUSE or failure to follow the safety
rules stated in this instruction manual may cause
serious personal injury.
Important safety instructions for
battery cartridge
1. Before using battery cartridge, read all instruc-
tions and cautionary markings on (1) battery
charger, (2) battery, and (3) product using
battery.
2. Do not disassemble or tamper with the battery
cartridge.Itmayresultinare,excessiveheat,
or explosion.
3. If operating time has become excessively
shorter, stop operating immediately. It may
result in a risk of overheating, possible burns
and even an explosion.
4. If electrolyte gets into your eyes, rinse them
out with clear water and seek medical atten-
tion right away. It may result in loss of your
eyesight.
5. Do not short the battery cartridge:
(1) Do not touch the terminals with any con-
ductive material.
(2) Avoid storing battery cartridge in a con-
tainer with other metal objects such as
nails, coins, etc.
(3) Do not expose battery cartridge to water
or rain.
A battery short can cause a large current
ow, overheating, possible burns and even a
breakdown.
6. Do not store and use the tool and battery car-
tridge in locations where the temperature may
reach or exceed 50 °C (122 °F).
7. Do not incinerate the battery cartridge even if
it is severely damaged or is completely worn
out. The battery cartridge can explode in a re.
8. Do not nail, cut, crush, throw, drop the battery
cartridge, or hit against a hard object to the
battery cartridge.Suchconductmayresultina
re,excessiveheat,orexplosion.
9. Do not use a damaged battery.
10. The contained lithium-ion batteries are subject
to the Dangerous Goods Legislation require-
ments.
Forcommercialtransportse.g.bythirdparties,
forwardingagents,specialrequirementonpack-
agingandlabelingmustbeobserved.
Forpreparationoftheitembeingshipped,consult-
inganexpertforhazardousmaterialisrequired.
Pleasealsoobservepossiblymoredetailed
national regulations.
Tapeormaskoopencontactsandpackupthe
batteryinsuchamannerthatitcannotmove
around in the packaging.
11. When disposing the battery cartridge, remove
it from the tool and dispose of it in a safe
place. Follow your local regulations relating to
disposal of battery.
12. Use the batteries only with the products
specied by Makita.Installingthebatteriesto
non-compliantproductsmayresultinare,exces-
siveheat,explosion,orleakofelectrolyte.
13. If the tool is not used for a long period of time,
the battery must be removed from the tool.

11 ENGLISH
14. During and after use, the battery cartridge may
take on heat which can cause burns or low
temperature burns. Pay attention to the han-
dling of hot battery cartridges.
15. Do not touch the terminal of the tool imme-
diately after use as it may get hot enough to
cause burns.
16. Do not allow chips, dust, or soil stuck into the
terminals, holes, and grooves of the battery
cartridge.Itmayresultinpoorperformanceor
breakdownofthetoolorbatterycartridge.
17. Unless the tool supports the use near
high-voltage electrical power lines, do not use
the battery cartridge near high-voltage electri-
cal power lines.Itmayresultinamalfunctionor
breakdownofthetoolorbatterycartridge.
18. Keep the battery away from children.
SAVE THESE INSTRUCTIONS.
CAUTION: Only use genuine Makita batteries.
Useofnon-genuineMakitabatteries,orbatteriesthat
havebeenaltered,mayresultinthebatterybursting
causingres,personalinjuryanddamage.Itwill
alsovoidtheMakitawarrantyfortheMakitatooland
charger.
Tips for maintaining maximum
battery life
1. Charge the battery cartridge before completely
discharged. Always stop tool operation and
charge the battery cartridge when you notice
less tool power.
2. Never recharge a fully charged battery car-
tridge. Overcharging shortens the battery
service life.
3.
Charge the battery cartridge with room tempera-
ture at 10 °C - 40 °C (50 °F - 104 °F). Let a hot
battery cartridge cool down before charging it.
4. When not using the battery cartridge, remove
it from the tool or the charger.
5. Charge the battery cartridge if you do not use
it for a long period (more than six months).
Important safety instructions for
wireless unit
1. Do not disassemble or tamper with the wire-
less unit.
2. Keep the wireless unit away from young chil-
dren. If accidentally swallowed, seek medical
attention immediately.
3. Use the wireless unit only with Makita tools.
4. Do not expose the wireless unit to rain or wet
conditions.
5. Do not use the wireless unit in places where
the temperature exceeds 50 °C (122 °F).
6. Do not operate the wireless unit in places
where medical instruments, such as heart
pace makers are nearby.
7. Do not operate the wireless unit in places
where automated devices are nearby. If oper-
ated,automateddevicesmaydevelopmalfunction
or error.
8. Do not operate the wireless unit in places
under high temperature or places where
static electricity or electrical noise could be
generated.
9. The wireless unit can produce electromagnetic
elds (EMF) but they are not harmful to the
user.
10. The wireless unit is an accurate instrument. Be
careful not to drop or strike the wireless unit.
11. Avoid touching the terminal of the wireless
unit with bare hands or metallic materials.
12. Always remove the battery on the product
when installing the wireless unit into it.
13. When opening the lid of the slot, avoid the
place where dust and water may come into the
slot. Always keep the inlet of the slot clean.
14. Always insert the wireless unit in the correct
direction.
15. Do not press the wireless activation button
on the wireless unit too hard and/or press the
button with an object with a sharp edge.
16. Always close the lid of the slot when
operating.
17. Do not remove the wireless unit from the slot
while the power is being supplied to the tool.
Doingsomaycauseamalfunctionofthewireless
unit.
18. Do not remove the sticker on the wireless unit.
19. Do not put any sticker on the wireless unit.
20. Do not leave the wireless unit in a place where
static electricity or electrical noise could be
generated.
21. Do not leave the wireless unit in a place sub-
ject to high heat, such as a car sitting in the
sun.
22. Do not leave the wireless unit in a dusty or
powdery place or in a place corrosive gas
could be generated.
23. Sudden change of the temperature may bedew
the wireless unit. Do not use the wireless unit
until the dew is completely dried.
24. When cleaning the wireless unit, gently wipe
with a dry soft cloth. Do not use benzine, thin-
ner, conductive grease or the like.
25. When storing the wireless unit, keep it in the
supplied case or a static-free container.
26. Do not insert any devices other than Makita
wireless unit into the slot on the tool.
27. Do not use the tool with the lid of the slot dam-
aged.Water,dust,anddirtcomeintotheslotmay
cause malfunction.
28. Do not pull and/or twist the lid of the slot more
than necessary.Restorethelidifitcomeso
from the tool.
29. Replace the lid of the slot if it is lost or
damaged.
SAVE THESE INSTRUCTIONS.

12 ENGLISH
FUNCTIONAL DESCRIPTION
CAUTION: Always be sure that the tool is
switched o and the battery cartridge is removed
before adjusting or checking function on the tool.
Installing or removing battery cartridge
CAUTION: Always switch o the tool before
installing or removing of the battery cartridge.
CAUTION: Hold the tool and the battery car-
tridge rmly when installing or removing battery
cartridge.Failuretoholdthetoolandthebattery
cartridgermlymaycausethemtoslipoyourhands
andresultindamagetothetoolandbatterycartridge
andapersonalinjury.
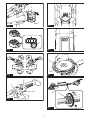
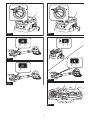
►Fig.1: 1. Red indicator 2. Button 3.Batterycartridge
Toremovethebatterycartridge,slideitfromthetool
whileslidingthebuttononthefrontofthecartridge.
Toinstallthebatterycartridge,alignthetongueonthe
batterycartridgewiththegrooveinthehousingandslip
itintoplace.Insertitallthewayuntilitlocksinplace
withalittleclick.Ifyoucanseetheredindicatoras
showninthegure,itisnotlockedcompletely.
CAUTION: Always install the battery cartridge
fully until the red indicator cannot be seen. If not,
itmayaccidentallyfalloutofthetool,causinginjuryto
youorsomeonearoundyou.
CAUTION: Do not install the battery cartridge
forcibly.Ifthecartridgedoesnotslideineasily,itis
notbeinginsertedcorrectly.
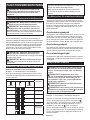
Indicating the remaining battery capacity
Only for battery cartridges with the indicator
►Fig.2: 1. Indicator lamps 2.Checkbutton
Pressthecheckbuttononthebatterycartridgetoindi-
catetheremainingbatterycapacity.Theindicatorlamps
light up for a few seconds.
Indicator lamps Remaining
capacity
Lighted O Blinking
75% to 100%
50% to 75%
25% to 50%
0% to 25%
Charge the
battery.
Thebattery
mayhave
malfunctioned.
NOTE: Depending on the conditions of use and the
ambienttemperature,theindicationmaydierslightly
fromtheactualcapacity.
NOTE:Therst(farleft)indicatorlampwillblinkwhen
thebatteryprotectionsystemworks.
Tool / battery protection system
Thetoolisequippedwithatool/batteryprotectionsys-
tem.Thissystemautomaticallycutsopowertothe
motortoextendtoolandbatterylife.Thetoolwillauto-
maticallystopduringoperationifthetoolorbatteryis
placedunderoneofthefollowingconditions:
Overload protection
Whenthetoolorbatteryisoperatedinamannerthat
causesittodrawanabnormallyhighcurrent,thetool
automaticallystopsandthelampblinks.Inthissit-
uation,turnthetooloandstoptheapplicationthat
causedthetooltobecomeoverloaded.Thenturnthe
tool on to restart.
Overheat protection
Whenthetoolorbatteryisoverheated,thetoolstops
automaticallyandthelamplightsup.Inthiscase,letthe
toolandbatterycoolbeforeturningthetoolonagain.
Overdischarge protection
Whenthebatterycapacityisnotenough,thetoolstops
automatically.Inthiscase,removethebatteryfromthe
toolandchargethebattery.
Switch action
CAUTION: Before installing the battery car-
tridge into the tool, always check to see that the
switch trigger actuates properly and returns to
the "OFF" position when released.
CAUTION: Switch can be locked in "ON" posi-
tion for ease of operator comfort during extended
use. Apply caution when locking tool in "ON"
position and maintain rm grasp on tool.
CAUTION: Do not install the battery cartridge
with the lock button engaged.
CAUTION: When not operating the tool,
depress the trigger-lock button from side to
lock the switch trigger in the OFF position.
►Fig.3: 1.Trigger-lockbutton
►Fig.4: 1. Switch trigger 2.Lockbutton3. Trigger-
lockbutton
Topreventtheswitchtriggerfromaccidentallypulled,
thetrigger-lockbuttonisprovided.Tostartthetool,
depressthetrigger-lockbuttonfromA( ) side and pull
the switch trigger. Release the switch trigger to stop.
Afteruse,depressthetrigger-lockbuttonfromB( )
side.
Forcontinuousoperation,depressthelockbuttonwhile
pulling the switch trigger, and then release the switch
trigger.Tostopthetool,pulltheswitchtriggerfully,then
release it.

13 ENGLISH
Speed adjusting dial
►Fig.5: 1.Speedadjustingdial
Therotationspeedofthetoolcanbechangedbyturn-
ingthespeedadjustingdial.Thetablebelowshows
thenumberonthedialandthecorrespondingrotation
speed.
Number Speed
11,000 min-1
21,200 min-1
31,400 min-1
41,600 min-1
51,800 min-1
NOTICE: The speed adjusting dial can be turned
only as far as 5 and back to 1. Do not force it past
5 or 1, or the speed adjusting function may no
longer work.
Overload and overheat indicator
lamp
►Fig.6: 1. Indicator lamp
If the tool is operated with excessive load, the tool stops
automaticallyandtheindicatorlampblinksinred.Inthis
case, reduce the load on the tool.
Ifthetoolisoverheated,thetoolstopsautomatically
and the indicator lamp lights up in red. In this case, let
thetoolcooldownbeforeturningthetoolonagain.
Electronic function
Thetoolsequippedwithelectronicfunctionareeasyto
operatebecauseofthefollowingfeatures.
Constant speed control
Possibletogetnenish,becausetherotatingspeedis
kept constant even under the loaded condition.
Soft start feature
Softstartbecauseofsuppressedstartingshock.
ASSEMBLY
CAUTION: Always be sure that the tool is
switched o and the battery cartridge is removed
before carrying out any work on the tool.
Installing the abrasive disc
►Fig.7: 1.Abrasivedisc2. Pad
Removeanydirtorforeignmatterfromthepad,and
thenattachtheabrasivedisctothepadwhilealigning
theholesintheabrasivediscwiththoseinthepad.
Adjusting the pipe length
CAUTION: When adjusting the pipe length,
hold the tool horizontally. Otherwise, the pipe
lengthmaychangeunintentionallyanditmaycause
aninjuryormalfunctionofthetool.
NOTICE: Do not extend the pipe beyond the
limit.Failuretodosomaycauseamalfunctionof
the tool.
►Fig.8: 1. Sleeve 2. Pipe
Toadjustthepipelength,loosenthesleeve,thenadjust
the length of the pipe, and then tighten the sleeve.
Hex wrench storage
►Fig.9: 1. Hex wrench
When not in use, store the hex wrench as shown in the
guretokeepitfrombeinglost.
Installing or removing the pad
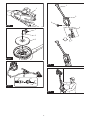
►Fig.10: 1. Hex wrench 2. Bolt 3. Pad
Toremovethepad,removetheabrasivediscfromthe
pad,andthenturntheboltcounterclockwisewithahex
wrench. To install the pad, perform the removal proce-
dure in reverse.
CAUTION: Make sure that the pad is secured
properly.Looseattachmentwillrunoutofbalance
andcauseanexcessivevibrationwhichmaycause
loss of control.
Connecting a vacuum cleaner
Optional accessory
Whenyouwishtoperformoperationcleanly,connecta
Makitavacuumcleanertoyourtool.Connectahoseof
the vacuum cleaner to the dust nozzle using the front
cu24.
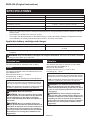
►Fig.11: 1. Hose of the vacuum cleaner 2.Frontcu
24 3. Dust nozzle
Installing or removing the extension
handle
Optional accessory
To install the extension handle, attach the extension
handletothetoolandsecureitwiththeknobrmly.Be
sure to insert the end of the tool into the holder of the
extension handle. To remove the extension handle,
perform the installation procedure in reverse.
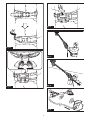
►Fig.12: 1.Extensionhandle2.Knob3. Holder
4.Endoftool5. Mounting hole
WARNING: Use the mounting hole of the tool
only for attaching the extension handle.
Usingthemountingholeforanyotherpurposemay
cause an unexpected accident.

14 ENGLISH
OPERATION
CAUTION: Only use Makita genuine pads for
sanding (optional accessories).
CAUTION: Make sure the work material is
secured and stable. Falling object may cause
personal injury.
CAUTION: Hold the tool rmly with one hand
on the switch handle and the other hand on the
front grip when operating the tool.
CAUTION: Do not run the tool at high load
over an extended time period.Itmayresultintool
malfunctionwhichcauseselectricshock,reand/or
seriousinjury.
CAUTION: Be careful not to touch the rotating
part.
NOTICE: Never force the tool. Excessivepressure
mayleadtodecreasedsandingeciency,damaged
pad, or shorten tool life.
NOTICE: Continuous operation at high speed
may damage work surface.
1. Positionthetoollightlyagainsttheworksurface.
Applylightpressureenoughtoalignthesandinghead
with the work surface.
2. Applyadditionalpressuretoengagethepad
on the work surface. Move the tool in an overlapping
patterninconstantmotiontosmooththedrywall
compound.
►Fig.13
Operating the tool with the
extension handle
Optional accessory
CAUTION: Hold the tool rmly with one hand
on the switch handle and the other hand on the
extension handle when operating the tool with the
extension handle.
CAUTION: Take extra care for the footing and
balance when handling the tool with the extension
handle.
1. Wearthebeltfortheextensionhandleasshownin
thegure.
►Fig.14: 1. Belt
2. Attachtheholdertothebelt.
►Fig.15: 1. Holder 2. Belt
3. Put the end of the extension handle into the holder
to support the tool.
►Fig.16: 1.Endofextensionhandle2. Holder
Operatethetoolinthesamewayasthetoolwithoutthe
extension handle.
►Fig.17
Youcanalsooperatethetoolwithoutusingthebeltand
theholderasshowninthegure.
►Fig.18
WIRELESS ACTIVATION
FUNCTION
Optional accessory
What you can do with the wireless
activation function
Thewirelessactivationfunctionenablescleanandcom-
fortableoperation.Byconnectingasupportedvacuum
cleanertothetool,youcanrunthevacuumcleaner
automaticallyalongwiththeswitchoperationofthetool.
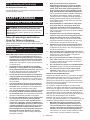
►Fig.19
To use the wireless activation function, prepare follow-
ingitems:
• Awirelessunit(optionalaccessory)
• Avacuumcleanerwhichsupportsthewireless
activation function
The overview of the wireless activation function setting
is as follows. Refer to each section for detail procedures.
1. Installing the wireless unit
2. Tool registration for the vacuum cleaner
3. Starting the wireless activation function
Installing the wireless unit
Optional accessory
CAUTION: Place the tool on a at and stable
surface when installing the wireless unit.
NOTICE:
Clean the dust and dirt on the tool before
installing the wireless unit.Dustordirtmaycause
malfunction if it comes into the slot of the wireless unit.
NOTICE:
To prevent the malfunction caused by static,
touch a static discharging material, such as a metal part
of the tool, before picking up the wireless unit.
NOTICE:
When installing the wireless unit, always
be sure that the wireless unit is inserted in the cor-
rect direction and the lid is completely closed.
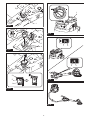
1. Openthelidonthetoolasshowninthegure.
►Fig.20: 1. Lid
2. Insert the wireless unit to the slot and then close
the lid.
Wheninsertingthewirelessunit,aligntheprojections
with the recessed portions on the slot.
►Fig.21: 1. Wireless unit 2.Projection3. Lid
4. Recessed portion
Whenremovingthewirelessunit,openthelidslowly.
Thehooksonthebackofthelidwillliftthewirelessunit
asyoupullupthelid.
►Fig.22: 1. Wireless unit 2. Hook 3. Lid
Afterremovingthewirelessunit,keepitinthesupplied
case or a static-free container.
NOTICE: Always use the hooks on the back of
the lid when removing the wireless unit. If the
hooks do not catch the wireless unit, close the lid
completelyandopenitslowlyagain.

15 ENGLISH
Tool registration for the vacuum cleaner
NOTE:AMakitavacuumcleanersupportingthe
wirelessactivationfunctionisrequiredforthetool
registration.
NOTE:Finishinstallingthewirelessunittothetool
beforestartingthetoolregistration.
NOTE: During the tool registration, do not pull the
switch trigger or turn on the power switch on the
vacuum cleaner.
NOTE: Refer to the instruction manual of the vacuum
cleaner, too.
Ifyouwishtoactivatethevacuumcleaneralongwith
theswitchoperationofthetool,nishthetoolregistra-
tionbeforehand.
1. Installthebatteriestothevacuumcleanerandthe
tool.
2. Setthestand-byswitchonthevacuumcleanerto
"AUTO".
►Fig.23: 1.Stand-byswitch
3. Pressthewirelessactivationbuttononthevac-
uum cleaner for 3 seconds until the wireless activation
lampblinksingreen.Andthenpressthewirelessacti-
vationbuttononthetoolinthesameway.
►Fig.24: 1.Wirelessactivationbutton2. Wireless
activation lamp
If the vacuum cleaner and the tool are linked success-
fully,thewirelessactivationlampswilllightupingreen
for2secondsandstartblinkinginblue.
NOTE:Thewirelessactivationlampsnishblinking
in green after 20 seconds elapsed. Press the wireless
activationbuttononthetoolwhilethewirelessacti-
vationlamponthecleanerisblinking.Ifthewireless
activationlampdoesnotblinkingreen,pushthewire-
lessactivationbuttonbrieyandholditdownagain.
NOTE: When performing two or more tool registra-
tionsforonevacuumcleaner,nishthetoolregistra-
tiononebyone.
Starting the wireless activation
function
NOTE:Finishthetoolregistrationforthevacuum
cleaner prior to the wireless activation.
NOTE: Refer to the instruction manual of the vacuum
cleaner, too.
Afterregisteringatooltothevacuumcleaner,the
vacuumcleanerwillautomaticallyrunsalongwiththe
switch operation of the tool.
1. Install the wireless unit to the tool.
2. Connect the hose of the vacuum cleaner with the
tool.
►Fig.25
3. Setthestand-byswitchonthevacuumcleanerto
"AUTO".
►Fig.26: 1.Stand-byswitch
4. Pushthewirelessactivationbuttononthetool
briey.Thewirelessactivationlampwillblinkinblue.
►Fig.27: 1.Wirelessactivationbutton2. Wireless
activation lamp
5. Pull the switch trigger of the tool. Check if the
vacuumcleanerrunswhiletheswitchtriggerisbeing
pulled.
To stop the wireless activation of the vacuum cleaner,
pushthewirelessactivationbuttononthetool.
NOTE: The wireless activation lamp on the tool will
stopblinkinginbluewhenthereisnooperationfor
2hours.Inthiscase,setthestand-byswitchonthe
vacuumcleanerto"AUTO"andpushthewireless
activationbuttononthetoolagain.
NOTE:Thevacuumcleanerstarts/stopswithadelay.
There is a time lag when the vacuum cleaner detects
a switch operation of the tool.
NOTE: The transmission distance of the wireless unit
mayvarydependingonthelocationandsurrounding
circumstances.
NOTE: When two or more tools are registered to one
vacuumcleaner,thevacuumcleanermaystartrun-
ningevenifyoudonotpulltheswitchtriggerbecause
another user is using the wireless activation function.

16 ENGLISH
Description of the wireless activation lamp status
►Fig.28: 1. Wireless activation lamp
Thewirelessactivationlampshowsthestatusofthewirelessactivationfunction.Refertothetablebelowforthe
meaning of the lamp status.
Status Wireless activation lamp Description
Color
On
Blinking
Duration
Standby Blue 2 hours Thewirelessactivationofthevacuumcleanerisavailable.The
lampwillautomaticallyturnowhennooperationisperformed
for 2 hours.
When
the tool is
running.
Thewirelessactivationofthevacuumcleanerisavailableandthe
tool is running.
Tool
registration
Green 20 seconds Readyforthetoolregistration.Waitingfortheregistrationbythe
vacuum cleaner.
2 seconds Thetoolregistrationhasbeennished.Thewirelessactivation
lampwillstartblinkinginblue.
Cancelling
tool
registration
Red 20 seconds Readyforthecancellationofthetoolregistration.Waitingforthe
cancellationbythevacuumcleaner.
2 seconds Thecancellationofthetoolregistrationhasbeennished.The
wirelessactivationlampwillstartblinkinginblue.
Others Red 3 seconds The power is supplied to the wireless unit and the wireless activa-
tion function is starting up.
O - - The wireless activation of the vacuum cleaner is stopped.
Cancelling tool registration for the
vacuum cleaner
Perform the following procedure when cancelling the
tool registration for the vacuum cleaner.
1. Installthebatteriestothevacuumcleanerandthe
tool.
2. Setthestand-byswitchonthevacuumcleanerto
"AUTO".
►Fig.29: 1.Stand-byswitch
3. Pressthewirelessactivationbuttononthevac-
uum cleaner for 6 seconds. The wireless activation
lampblinksingreenandthenbecomered.Afterthat,
pressthewirelessactivationbuttononthetoolinthe
sameway.
►Fig.30: 1.Wirelessactivationbutton2. Wireless
activation lamp
Ifthecancellationisperformedsuccessfully,thewire-
less activation lamps will light up in red for 2 seconds
andstartblinkinginblue.
NOTE:Thewirelessactivationlampsnishblinkingin
red after 20 seconds elapsed. Press the wireless acti-
vationbuttononthetoolwhilethewirelessactivation
lamponthecleanerisblinking.Ifthewirelessacti-
vationlampdoesnotblinkinred,pushthewireless
activationbuttonbrieyandholditdownagain.

17 ENGLISH
Troubleshooting for wireless activation function
Beforeaskingforrepairs,conductyourowninspectionrst.Ifyoundaproblemthatisnotexplainedinthemanual,
donotattempttodismantlethetool.Instead,askMakitaAuthorizedServiceCenters,alwaysusingMakitareplace-
ment parts for repairs.
State of abnormality Probable cause (malfunction) Remedy
The wireless activation lamp does
notlight/blink.
The wireless unit is not installed into the tool.
Thewirelessunitisimproperlyinstalled
into the tool.
Installthewirelessunitcorrectly.
Theterminalofthewirelessunitand/or
theslotisdirty.
Gentlywipeodustanddirtontheterminalofthe
wireless unit and clean the slot.
Thewirelessactivationbuttononthe
toolhasnotbeenpushed.
Pushthewirelessactivationbuttononthetool
briey.
Thestand-byswitchonthevacuum
cleanerisnotsetto"AUTO".
Setthestand-byswitchonthevacuumcleanerto
"AUTO".
Nopowersupply
Supplythepowertothetoolandthevacuumcleaner.
Cannotnishtoolregistration/can-
cellingtoolregistrationsuccessfully.
The wireless unit is not installed into the tool.
Thewirelessunitisimproperlyinstalled
into the tool.
Installthewirelessunitcorrectly.
Theterminalofthewirelessunitand/or
theslotisdirty.
Gentlywipeodustanddirtontheterminalofthe
wireless unit and clean the slot.
Thestand-byswitchonthevacuum
cleanerisnotsetto"AUTO".
Setthestand-byswitchonthevacuumcleanerto
"AUTO".
Nopowersupply
Supplythepowertothetoolandthevacuumcleaner.
Incorrect operation
Pushthewirelessactivationbuttonbrieyandperform
thetoolregistration/cancellationproceduresagain.
Thetoolandvacuumcleanerareaway
from each other (out of the transmission
range).
Get the tool and vacuum cleaner closer to each other. The
maximumtransmissiondistanceisapproximately10m
howeveritmayvaryaccordingtothecircumstances.
Beforenishingthetoolregistration/
cancellation;
- the switch trigger on the tool is pulled or;
-thepowerbuttononthevacuum
cleaner is turned on.
Pushthewirelessactivationbuttonbrieyand
performthetoolregistration/cancellationprocedures
again.
The tool registration procedures for the
toolorvacuumcleanerhavenotnished.
Performthetoolregistrationproceduresforboththe
tool and the vacuum cleaner at the same timing.
Radiodisturbancebyotherappliances
whichgeneratehigh-intensityradio
waves.
Keepthetoolandvacuumcleanerawayfromthe
appliancessuchasWi-Fidevicesandmicrowave
ovens.
The vacuum cleaner does not run
along with the switch operation of
the tool.
The wireless unit is not installed into the tool.
Thewirelessunitisimproperlyinstalled
into the tool.
Installthewirelessunitcorrectly.
Theterminalofthewirelessunitand/or
theslotisdirty.
Gentlywipeodustanddirtontheterminalofthe
wireless unit and clean the slot.
Thewirelessactivationbuttononthe
toolhasnotbeenpushed.
Pushthewirelessactivationbuttonbrieyandmake
surethatthewirelessactivationlampisblinkinginblue.
Thestand-byswitchonthevacuum
cleanerisnotsetto"AUTO".
Setthestand-byswitchonthevacuumcleanerto
"AUTO".
More than 10 tools are registered to the
vacuum cleaner.
Perform the tool registration again.
If more than 10 tools are registered to the vacuum
cleaner,thetoolregisteredearliestwillbecancelled
automatically.
The vacuum cleaner erased all tool registrations.
Perform the tool registration again.
Nopowersupply
Supplythepowertothetoolandthevacuumcleaner.
Thetoolandvacuumcleanerareaway
from each other (out of the transmission
range).
Get the tool and vacuum cleaner closer each other. The
maximumtransmissiondistanceisapproximately10m
howeveritmayvaryaccordingtothecircumstances.
Radiodisturbancebyotherappliances
whichgeneratehigh-intensityradio
waves.
Keepthetoolandvacuumcleanerawayfromthe
appliancessuchasWi-Fidevicesandmicrowave
ovens.
The vacuum cleaner runs while the
tool's switch trigger is not pulled.
Other users are using the wireless
activation of the vacuum cleaner with
their tools.
Turnothewirelessactivationbuttonoftheother
tools or cancel the tool registration of the other
tools.

18 ENGLISH
MAINTENANCE
CAUTION: Always be sure that the tool is
switched o and the battery cartridge is removed
before attempting to perform inspection or
maintenance.
NOTICE: Never use gasoline, benzine, thinner,
alcohol or the like. Discoloration, deformation or
cracks may result.
TomaintainproductSAFETYandRELIABILITY,
repairs,anyothermaintenanceoradjustmentshould
beperformedbyMakitaAuthorizedorFactoryService
Centers,alwaysusingMakitareplacementparts.
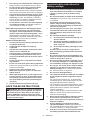
Storing the tool in the tool bag
Whenstoringthetoolinthetoolbag,xitwiththehook
andloopfastenersasshowninthegure.
►Fig.31: 1. Hook and loop fastener 2. Tool
When storing the tool and the extension handle in the
toolbag,xthemwiththehookandloopfastenersas
showninthegure.
►Fig.32: 1. Hook and loop fastener 2.Extension
handle 3. Tool
OPTIONAL
ACCESSORIES
CAUTION: These accessories or attachments
are recommended for use with your Makita tool
specied in this manual.Theuseofanyother
accessories or attachments might present a risk of
injurytopersons.Onlyuseaccessoryorattachment
for its stated purpose.
Ifyouneedanyassistanceformoredetailsregard-
ingtheseaccessories,askyourlocalMakitaService
Center.
• Abrasivedisc
• Pad
• Extensionhandle(withbeltandholder)
• Wireless unit
• Makitagenuinebatteryandcharger
NOTE:Someitemsinthelistmaybeincludedinthe
toolpackageasstandardaccessories.Theymay
dierfromcountrytocountry.

19 SVENSKA
SVENSKA (Originalinstruktioner)
SPECIFIKATIONER
Modell: DSL801
Pappersstorlek 225 mm
Rondellens diameter 210 mm
Hastighetutanbelastning 1 000 - 1 800 min-1
Dimensioner (L x B x H) 1 120 mm - 1 540 mm x 278 mm x 273 mm
Märkspänning 18 V likström
Nettovikt 4,6 - 5,8 kg
•
Pågrundavvårtpågåendeprogramförforskningochutvecklingkandessaspecikationerändrasutanföregåendemeddelande.
• Specikationerkanvarieramellanolikaländer.
• Viktenkanvarieraberoendepåtillbehören,inklusivebatterikassett.Denlättasteochdentyngstakombinatio-
nenenligtEPTA-procedur01/2014visasitabellen.
Tillgänglig batterikassett och laddare
Batterikassett BL1815N/BL1820B/BL1830B/BL1840B/BL1850B/BL1860B
Laddare DC18RC/DC18RD/DC18RE/DC18SD/DC18SE/DC18SF/
DC18SH
• Vissaavbatterikassetternaochladdarnapålistanovankanskeintennstillgängligaidinregion.
VARNING: Använd endast batterikassetter och laddare från listan ovan.Användningavandrabatterikas-
setterochladdarekanorsakapersonskadaoch/ellerbrand.
Avsedd användning
Verktygetäravsettförslipningavgipsväggarellertak.
Buller
DennormalabullernivånförA-belastningärbestämd
enligtEN62841-2-4:
Ljudtrycksnivå(LpA):75dB(A)
Mättolerans(K):3dB(A)
Bullernivånvidarbetekanöverstiga80dB(A).
OBS:Detdeklareradebullervärdetharuppmättsi
enlighet med standardtestmetoden och kan användas
förjämförandetavenmaskinmedenannan.
OBS:Detdeklareradebulleremissionsvärdetkan
ocksåanvändasienpreliminärbedömningavexpo-
neringförvibration.
VARNING: Använd hörselskydd.
VARNING: Bulleremissionen under faktisk
användning av maskinen kan skilja sig från det
deklarerade värdet, beroende på hur maskinen
används och särskilt vilken typ av arbetsstycke
som behandlas.
VARNING: Var noga med att identiera säker-
hetsåtgärder för att skydda användaren, vilka är
grundade på en uppskattning av graden av expo-
nering för vibrationer under de faktiska använd-
ningsförhållandena, (ta, förutom avtryckartiden,
med alla delar av användarcykeln i beräkningen,
som till exempel tiden då maskinen är avstängd
och när den går på tomgång).
Vibration
Dettotalavibrationsvärdet(treaxladvektorsumma)
bestämtenligtEN62841-2-4:
Arbetsläge:skivslipning
Vibrationsemission(ah, DS):2,5m/s2 eller lägre
Mättolerans(K):1,5m/s2
OBS:
Detdeklareradetotalavibrationsvärdethar
uppmätts i enlighet med standardtestmetoden och kan
användasförjämförandetavenmaskinmedenannan.
OBS:
Detdeklareradetotalavibrationsvärdetkanocksåanvän-
dasienpreliminärbedömningavexponeringförvibration.
VARNING: Vibrationsemissionen under fak-
tisk användning av maskinen kan skilja sig från
det deklarerade värdet, beroende på hur maski-
nen används och särskilt vilken typ av arbetss-
tycke som behandlas.
VARNING: Var noga med att identiera säker-
hetsåtgärder för att skydda användaren, vilka är
grundade på en uppskattning av graden av expo-
nering för vibrationer under de faktiska använd-
ningsförhållandena, (ta, förutom avtryckartiden,
med alla delar av användarcykeln i beräkningen,
som till exempel tiden då maskinen är avstängd
och när den går på tomgång).
EG-försäkran om överensstämmelse
Gäller endast inom EU
EG-försäkranomöverensstämmelseinkluderassom
bilagaAtilldennabruksanvisning.

20 SVENSKA
SÄKERHETSVARNINGAR
Allmänna säkerhetsvarningar för
maskiner
VARNING: Läs alla säkerhetsvarningar, anvis-
ningar, illustrationer och specikationer som
medföljer det här maskinen.Underlåtenhetattfölja
instruktionernakanledatillelstötar,brandoch/eller
allvarliga personskador.
Spara alla varningar och instruk-
tioner för framtida referens.
Termen ”maskin” som anges i varningarna hänvisar till
dineldrivnamaskin(sladdansluten)ellerbatteridrivna
maskin (sladdlös).
Säkerhetsvarningar för batteridriven
väggslip
Allmänna säkerhetsvarningar för sliparbeten:
1. Denna maskin är avsedd att fungera som en
slipmaskin (med sandpapper). Läs igenom alla
säkerhetsvarningar, anvisningar, illustrationer
och specikationer som medföljer denna
maskin.Underlåtenhetattföljainstruktionerna
kanledatillelstötar,brandoch/ellerallvarliga
personskador.
2. Den här maskinen rekommenderas inte för
sliparbete med slipskiva eller stålborsts-, pole-
rings- eller kaparbeten. Om maskinen används
tillandraarbetenändeavseddakandetorsaka
fara och leda till personskada.
3. Använd inte tillbehör som inte är särskilt till-
verkade och rekommenderade av maskinens
tillverkare.Ävenometttillbehörkanfästaspå
maskinen garanterar detta inte säker funktion.
4. Tillbehörets nominella varvtal måste vara
minst lika med det maximala varvtalet som
anges på verktyget.Tillbehörsomanvändsöver
det nominella varvtalet kan gå sönder och orsaka
skador.
5. Tillbehörets ytterdiameter och tjocklek måste
vara anpassad till elverktygets kapacitets-
klassning.Tillbehöriolämpligstorlekkaninte
skyddasellerstyrastillräckligtväl.
6. Använd inte ett skadat tillbehör. Kontrollera
tillbehöret, till exempel polerrondellen, före
varje användning så att sprickor och slitage
inte har uppstått. Om du tappar maskinen
eller ett tillbehör ska du kontrollera att det
inte har uppstått några skador, eller så ska
tillbehöret bytas ut mot ett som inte är skadat.
Efter kontroll och montering av tillbehör ska
du och kringstående personer hålla avstånd
från det roterande tillbehöret samtidigt som du
kör maskinen på maximal hastighet utan last
i en minut.Skadadetillbehörgårnormaltsönder
under den här testtiden.
7. Använd personlig skyddsutrustning. Använd
visir, korgglasögon eller skyddsglasögon
beroende på arbetsuppgift. Använd vid
behov dammskydd, hörselskydd, handskar
och skyddsförkläde som stoppar små bitar
slipmaterial eller fragment från arbetss-
tycket.Ögonskyddetmåstekunnastoppay-
gandefragmentsomuppstårvidolikaarbeten.
Dammskyddetellerandningsskyddetmåstekunna
ltrerapartiklarsomuppstårvidolikaarbeten.
Långtidikraftigtbullerkanorsakahörselskador.
8. Håll personer i omgivningen på säkert avstånd
från arbetsområdet. Alla som benner sig
i arbetsområdet måste använda skyddsut-
rustning.Delaravarbetsstycketellerdefekta
tillbehörkanygaivägochorsakaskadorutanför
arbetsområdet.
9. Håll maskinen endast i de isolerade handtagen
om det nns risk för att skärverktyget kan
komma i kontakt med en dold elkabel. Om skär-
verktygetkommerikontaktmedenströmförande
ledningblirmaskinensmetalldelarströmförande
och kan ge användaren en elektrisk stöt.
10. Placera nätsladden på avstånd från det rote-
rande tillbehöret. Om du förlorar kontrollen kan
nätsladden kapas eller fastna och din hand eller
armkandrasinidetroterandeverktyget.
11. Lägg aldrig elverktyget åt sidan förrän det har
stannat helt.Detroterandetillbehöretkangripa
tag i underlaget och du kan förlora kontrollen över
maskinen.
12. Kör inte verktyget samtidigt som du bär det.
Oavsiktligkontaktmeddetroterandetillbehöret
kan leda till att det fastnar i dina kläder och dras in
mot kroppen.
13. Använd inte verktyget i närheten av lättan-
tändliga material. Gnistor kan antända dessa
material.
14. Använd inte tillbehör som kräver ytande kyl-
vätskor.Attanvändavattenellerandraytande
kylvätskorkanorsakadödsfallellerelektriska
stötar.
Bakåtkast och relaterade varningar
Bakåtkast är en plötslig reaktion på att den rote-
randepolerrondellenellernågotannattillbehörhar
klämtsfast.Nypochkärvningorsakarstegringav
detroterandetillbehöret,ochorsakarisinturattden
okontrollerade maskinen tvingas i motsatt riktning vid
kärvningspunkten.
Tillexempel,omenpolerrondellblockerasellerkläms
fastavarbetsstycketkanpolerrondellensskärande
kantgrävasiginimaterialytanvidinklämningsstället
och orsaka att polerrondellen klättrar eller studsar
tillbaka.Polerrondellenkanantingenhoppamoteller
frånanvändaren,beroendepåpolerrondellensrörelse-
riktning vid klämpunkten. Polerrondellen kan även gå
sönder under dessa omständigheter.
Bakåtkastberorpåovarsamhetoch/ellerfelaktiga
arbetsrutiner,ochkanundvikasgenomattvidtanedan-
ståendeförebyggandeåtgärder.
Sidan laddas...
Sidan laddas...
Sidan laddas...
Sidan laddas...
Sidan laddas...
Sidan laddas...
Sidan laddas...
Sidan laddas...
Sidan laddas...
Sidan laddas...
Sidan laddas...
Sidan laddas...
Sidan laddas...
Sidan laddas...
Sidan laddas...
Sidan laddas...
Sidan laddas...
Sidan laddas...
Sidan laddas...
Sidan laddas...
Sidan laddas...
Sidan laddas...
Sidan laddas...
Sidan laddas...
Sidan laddas...
Sidan laddas...
Sidan laddas...
Sidan laddas...
Sidan laddas...
Sidan laddas...
Sidan laddas...
Sidan laddas...
Sidan laddas...
Sidan laddas...
Sidan laddas...
Sidan laddas...
Sidan laddas...
Sidan laddas...
Sidan laddas...
Sidan laddas...
Sidan laddas...
Sidan laddas...
Sidan laddas...
Sidan laddas...
Sidan laddas...
Sidan laddas...
Sidan laddas...
Sidan laddas...
Sidan laddas...
Sidan laddas...
Sidan laddas...
Sidan laddas...
Sidan laddas...
Sidan laddas...
Sidan laddas...
Sidan laddas...
Sidan laddas...
Sidan laddas...
Sidan laddas...
Sidan laddas...
Sidan laddas...
Sidan laddas...
Sidan laddas...
Sidan laddas...
Sidan laddas...
Sidan laddas...
Sidan laddas...
Sidan laddas...
Sidan laddas...
Sidan laddas...
Sidan laddas...
Sidan laddas...
Sidan laddas...
Sidan laddas...
Sidan laddas...
Sidan laddas...
Sidan laddas...
Sidan laddas...
Sidan laddas...
Sidan laddas...
Sidan laddas...
Sidan laddas...
Sidan laddas...
Sidan laddas...
Sidan laddas...
Sidan laddas...
Sidan laddas...
Sidan laddas...
-
 1
1
-
 2
2
-
 3
3
-
 4
4
-
 5
5
-
 6
6
-
 7
7
-
 8
8
-
 9
9
-
 10
10
-
 11
11
-
 12
12
-
 13
13
-
 14
14
-
 15
15
-
 16
16
-
 17
17
-
 18
18
-
 19
19
-
 20
20
-
 21
21
-
 22
22
-
 23
23
-
 24
24
-
 25
25
-
 26
26
-
 27
27
-
 28
28
-
 29
29
-
 30
30
-
 31
31
-
 32
32
-
 33
33
-
 34
34
-
 35
35
-
 36
36
-
 37
37
-
 38
38
-
 39
39
-
 40
40
-
 41
41
-
 42
42
-
 43
43
-
 44
44
-
 45
45
-
 46
46
-
 47
47
-
 48
48
-
 49
49
-
 50
50
-
 51
51
-
 52
52
-
 53
53
-
 54
54
-
 55
55
-
 56
56
-
 57
57
-
 58
58
-
 59
59
-
 60
60
-
 61
61
-
 62
62
-
 63
63
-
 64
64
-
 65
65
-
 66
66
-
 67
67
-
 68
68
-
 69
69
-
 70
70
-
 71
71
-
 72
72
-
 73
73
-
 74
74
-
 75
75
-
 76
76
-
 77
77
-
 78
78
-
 79
79
-
 80
80
-
 81
81
-
 82
82
-
 83
83
-
 84
84
-
 85
85
-
 86
86
-
 87
87
-
 88
88
-
 89
89
-
 90
90
-
 91
91
-
 92
92
-
 93
93
-
 94
94
-
 95
95
-
 96
96
-
 97
97
-
 98
98
-
 99
99
-
 100
100
-
 101
101
-
 102
102
-
 103
103
-
 104
104
-
 105
105
-
 106
106
-
 107
107
-
 108
108


på andra språk
- eesti: Makita DSL801 Kasutusjuhend
- English: Makita DSL801 User manual
- dansk: Makita DSL801 Brugermanual
Relaterade papper
-
Makita DGA517Z без аккум. и ЗУ (189931) Användarmanual
-
Makita VC009G Användarmanual
-
Makita VC002GL Användarmanual
-
Makita DGA900 Användarmanual
-
Makita PV001G Användarmanual
-
Makita DKP181 Användarmanual
-
-
-
Makita DHS680 Användarmanual
-