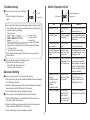
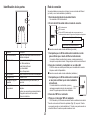
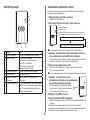
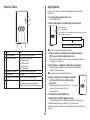
Panasonic CZTAW1 Bruksanvisningar
- Kategori
- Routrar
- Typ
- Bruksanvisningar

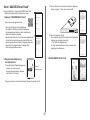
GB
English ��������������������2
F
Français ������������������9
I
Italiano ������������������16
E
Español �����������������23
D
Deutsch�����������������30
NL
Nederlands �����������37
N
Norsk���������������������44
DK
Dansk ��������������������51
S
Svenska ����������������58
FIN
Suomi ��������������������65
CZ
��������������������72
PL
Polski ��������������������79
TR
Türkçe �������������������86
GK
��������������� 93
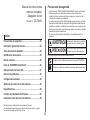
Operating Instructions
<Full Version>
Network Adaptor
Model No. CZ‑TAW1

2
•
Read the following “SAFETY PRECAUTIONS” carefully before installation.
• Electrical work must be installed by a licensed electrician. Be sure to use
the correct rating and main circuit for the model to be installed.
•
The caution items stated here must be followed because these important
contents are related to safety. The meaning of each indication used is as
below. Incorrect installation due to ignoring of the instruction will cause harm
• Please leave this installation manual with the unit after installation.
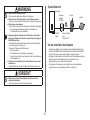
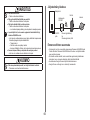
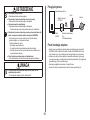
WARNING
This indication shows the possibility of
causing death or serious injury.
CAUTION
This indication shows the possibility of
causing injury or damage to properties.
Symbol with white background denotes item that is PROHIBITED
from doing.
Symbol with dark background denotes item that must be carried out.
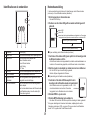
Table of Contents
������������������������������������������������������ 2
��������������������������������������������������������� 3
Before Installing the Adaptor ������������������������������������� 3
������������������������������������������������������ 4
���������������������������������������������������� 4
Starting “AQUAREA Smart Cloud” ���������������������������� 5
Reading LED Lamps ���������������������������������������������������� 6
Troubleshooting ���������������������������������������������������������� 7
Advanced Setting �������������������������������������������������������� 7
����������������������������������������������� 7
���������������������������������������������������������������� 8
����������������������������������������� 8
������������������������������������ 8
Operating Instructions
<Full Version>
Network Adaptor
Model No. CZ‑TAW1
Thank you for purchasing this Panasonic product.
Please read these instructions carefully before using this product, and save
this manual for future use.

3
WARNING
– This can cause electric shock.
– This can cause electric shock or ignition.
– This can cause electric shock or ignition.
Request any repairs from the place of purchase or the installer.
–
Not doing so may cause smoke, ignition, electric shock, or burns.
Examples of problems and malfunctions
• There is a burning smell
• Water or a foreign object has gotten inside
Immediately request repair from the place of purchase or the
installer.
Request installation from the place of purchase or an installer�
– Not doing so may cause electric shock or ignition.
CAUTION
checking the adaptor�
– This can cause injury from falls.
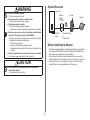
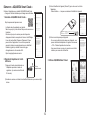
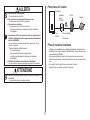
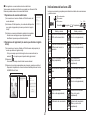
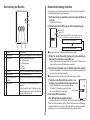
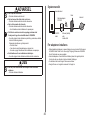
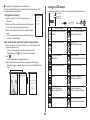
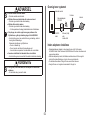
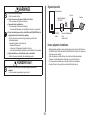
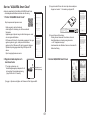
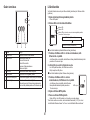
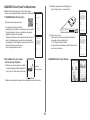
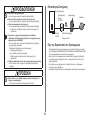
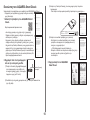
Indoor unit
Network
adaptor
CZ‑TAW1
Router
Internet
CN‑CNT
cable
Ethernet (Wired)
or
Wireless LAN
Before Installing the Adaptor
•
the Panasonic AQUAREA Smart Cloud. Panasonic AQUAREA Smart
Cloud cannot be accessed with any other adaptor.
• Do not attach the adaptor to metal as wireless performance will be
adversely affected. Use the wired connection if you have no alternative.
• We recommend you use Google Chrome as your Internet browser.
• Google Chrome is a registered trademark of Google Inc.

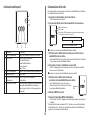
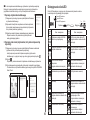
4
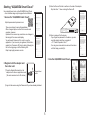
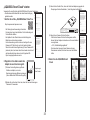
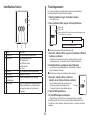
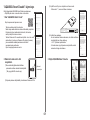
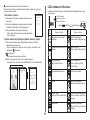
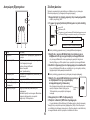
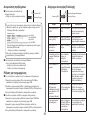
1
2
3
4 5 6
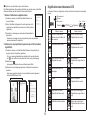
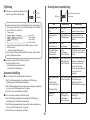
No. Item Description
1 Power LED Indicates that the adaptor is being supplied
with power.
2 Status LED Indicates the status of the adaptor.
3 Link LED Indicates the communication status of the
adaptor.
4 WPS switch Switches WPS ON.
5 Register/Reset switch Enables user registration and resetting.
6 Check switch Check the communication status of the
adaptor.
Switches between Ethernet and Wireless
modes each time it is pressed and held for
10 seconds.
You can establish a connection with the internet with either the Ethernet
mode (wired) or the Wireless mode (wireless).
1
The Power LED lights.
2
The colour of the Status LED indicates the connection mode�
Power LED
Status LED
The colour of the Status LED changes each time the Check
switch is pressed and held for 10 seconds.
When connecting using the Ethernet mode (wired)
1
Ethernet mode is on�
If the Ethernet mode is not on, press and hold the Check switch for
10 seconds to switch to the Ethernet mode.
2
The Link LED lights to indicate that the connection has been established.
Use a shielded LAN cable.
When connecting using the Wireless mode (wireless)
1 Check the Status LED is blue to
on�
If the Wireless mode is not on, press and
hold the Check switch for 10 seconds to
switch to the Wireless mode.
2
3
The Status LED and Link LED light when communication is established.
* Refer to Troubleshooting (P.7), “When you cannot connect in the
Wireless mode” or “When you cannot connect in the Ethernet mode” when
you cannot connect to the network.
WPS switch

5
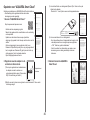
Starting “AQUAREA Smart Cloud”
Use a smartphone to set up the AQUAREA Smart Cloud.
•
1 Access the “AQUAREA Smart Cloud”�
There is no charge for using this application.
Other charges may be incurred for connection and
operation, however.
Updates to the service may mean there are changes to
the design of the screen and display.
You will need a Panasonic ID in order to use the
register for a Panasonic ID (free) by either following the
link on the login page or at the following URL.
2 Register both the adaptor and
the indoor unit�
1)
Press the Register/Reset switch on the
adaptor to enter the user registration mode.
(The mode remains active for 30 minutes.)
2)
Log into the service using the Panasonic ID you have already obtained.
Register/Reset
switch
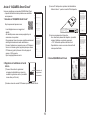
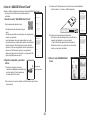
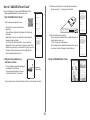
3) Enter the Device ID which is written on the side of the adaptor.
Skip the letter “‑” when entering the Device ID.
NETWORK ADAPTOR
CZ-TAW1
DEVICE ID:XXXXX-XXXXX
MADE IN CHINA
WLAN MAC:
XX:XX:XX:XX:XX:XX
LAN MAC:
XX:XX:XX:XX:XX:XX
S/N No:
X03YWWXXXXX
4) Enter a password for the device.
If you forget the password for the device, you can
reset the adaptor and then re‑register it.
You can give a name and zone name to the indoor
unit that helps you identify it.
3 Use the AQUAREA Smart Cloud�

6
To register an additional user on the indoor unit
Multiple users (family members, for example) with different Panasonic IDs
can access the same indoor unit.
1 Additional user operations
1) Log into the service using the Panasonic ID of the
additional user.
2)
Enter the Device ID and Device password that was
registered by the owner (the user that initially
registered).
3) Enter a message requesting approval from the owner.
Enter a message so that the owner can identify the
person making the request.
2
1) Log into the service using the Panasonic ID of the owner (the user that
initially registered).
If there is a message requesting registration from an additional user,
2)
The request message from the additional user is displayed.
3)
Select the appropriate privileges for the user and approve their request.
After approving, the additional user will also be able to use the
AQUAREA Smart Cloud.
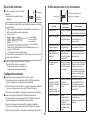
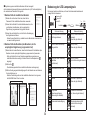
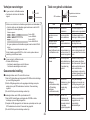
Reading LED Lamps
The lamps light and blink to notify you of the communication status and
possible errors.
Power LED
Status LED
Link LED
1 s
0.2 s
LED Status and Solution LED Status and Solution
A2W power off or cable not
connect
LAN (IP has not been
acquired)
(Blue or Green Blinking)
A2W power on before soft
wake up
LAN (IP Retrieving)
(Blue or Green Blinking)
A2W cannot connect
(Red Blinking)
LAN (IP collision)
(Red and Blue or Green
Blinking)
Immediately after startup LAN (Server interruption)
Normal
(Blue or Green Blinking)
User registration in
(Blue or Green Blinking)
Firmware Updating
(Red and Blue and Green
Blinking)
Timer implementation in
(White and Blue or Green
Blinking)

7
Troubleshooting
When you cannot connect in the Wireless
mode
signal.
How to check the strength of the wireless signal (press the Check switch)
Link LED is lighting or blinking.
<Wireless signal>
When there is no problem with the wireless signal but the Status
LED does not light
* If the wireless signal strength is BAD or worse, connect using the
Ethernet mode.
When you cannot connect in the Ethernet mode
• When the Status LED does not light
Check the router connections.
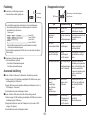
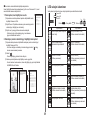
Advanced Setting
When you want to set the IP of the wired LAN manually
1) Start the IP setting tool on the attached CD‑ROM and save the settings
to a USB memory device.
2) Attach the USB memory device with the saved settings to the adaptor
and press and hold the WPS switch for 10 seconds.
3) The Link LED lights when the settings are complete.
When you want to set the SSID of the wireless LAN manually
1) Start the SSID setting tool on the attached CD‑ROM and save the
settings to a USB memory device.
2) Detach the USB memory device and then attach to the adaptor and
press and hold the WPS switch for 10 seconds.
3) The Link LED lights when the settings are complete.
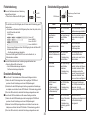
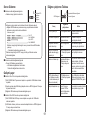
Link LED
Check switch
Register/Reset switch
Check switchWPS switch
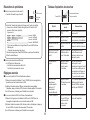
Aim Remarks
To switch WPS ON Press the WPS
switch.
This is only effective when
Wireless mode is on.
To register a user Press the Register/
Reset switch.
This is only effective when
communications have been
established.
To check the status of
communications
Press the Check
switch.
LEDs are displayed according
to the connection status.
To switch between the
Ethernet and Wireless
modes
Press the Check
switch for at least
10 seconds.
The settings for each mode
are maintained even if you
change the mode.
To reset the software Press the Register/
Reset switch for at
least 10 seconds.
This starts the process for
the software to reset itself.
When resetting, checks are
and this is updated if a new
version is available.
To specify the SSID
manually.
(in Wireless mode)
To specify the IP
manually.
(in Ethernet mode)
Press the WPS
switch for at least
10 seconds.
Connection is by WPS/
DHCP if there are no
settings to load from the
USB memory device.
To initialize the adaptor
Simultaneously
press the WPS
switch and the
Check switch for at
least 10 seconds.
This restores the adaptor’s
settings to the factory defaults.

8
Input Voltage DC 5 V (From ID unit)
Power consumption Max 2.5 W
Size 100 mm (H) × 70 mm (W) × 23 mm (D)
Mass Approx. 80 g
Interfaces 1 × Wireless LAN, 1 × Ethernet, 1 × USB
Radio protocol 2.4 GHz, 802.11 b/g/n
to the latest version.
version once per day, and if an update is required, the update is applied and
the device restarts automatically. Operations are not possible while the
device is being restarted (which takes about 1 minute).
(1) The software developed independently by or for Panasonic Corporation,
(2) The software owned by third party and licensed to Panasonic
Corporation,
(3) The software licensed under the GNU General Public License, Version
2.0 (GPL V2.0),
(4) The software licensed under the GNU LESSER General Public License,
Version 2.1 (LGPL V2.1), and/or
(5) Open source software other than the software licensed under the GPL
V2.0 and/or LGPL V2.1.
The software categorized as (3) – (5) are distributed in the hope that it will
be useful, but WITHOUT ANY WARRANTY, without even the implied
warranty of MERCHANTABILITY or FITNESS FOR A PARTICULAR
PURPOSE.
Please refer to the detailed terms and conditions thereof shown in the
attached CD‑ROM.
That CD‑ROM is also including a complete machine‑readable copy of the
corresponding source code covered under GPL V2.0, LGPL V2.1 or the
other licenses with the obligation to do so, as well as the respective
copyright notice thereof.
Hereby, “Panasonic Corporation” declares that this product is
in compliance with the essential requirements and other
relevant provisions of Directive 1999/5/EC.
The full text of the EU declaration of conformity is available at the
Marketing Europe GmbH, Winsbergring 15, 22525 Hamburg, Germany
the centre of Ny‑Alesund on Svalbard.
Disposal of Old Equipment
This symbols on the products, packaging, and/or
accompanying documents means that used electrical and
electronic products must not be mixed with general
household waste.
For proper treatment, recovery and recycling of old
products, please take them to applicable collection points
in accordance with your national legislation.
By disposing of them correctly, you will help to save
valuable resources and prevent any potential negative
effects on human health and the environment.
For more information about collection and recycling,
please contact your local municipality.
Penalties may be applicable for incorrect disposal of this
waste, in accordance with national legislation.

9
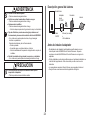
Mesures de précaution
•
Veuillez attentivement lire ces « MESURES DE PRECAUTION » avant d’installer
l’appareil.
•
Les travaux électriques doivent être exécutés par un électricien autorisé.
Assurez‑vous d’utiliser la bonne cote et le bon circuit principal pour le modèle que
vous installez.
•
Les articles de précaution stipulés ici, doivent être suivis pour des raisons de
incorrecte dû à ne pas tenir compte des instructions, peut causer des blessures
•
Gardez ce mode d’emploi près de l’appareil, après l’installation.
AVERTISSEMENT
danger mortel ou un risque de
blessure sérieuse.
ATTENTION
risque de blessure sérieuse, ou
d’endommagement aux environs.
Le symbole avec un arrière‑plan blanc, vous avertit qu’une action est
strictement DEFENDUE.
Le symbole avec un arrière‑plan sombre, vous avertit qu’une action doit
être effectuée.
Table des matières
Mesures de précaution ���������������������������������������������������������
9
����������������������������������������������
10
Avant d’installer l’adaptateur ���������������������������������������������
10
�����������������������������������������������������
11
Connexion réseau ���������������������������������������������������������������
11
Démarrer « AQUAREA Smart Cloud » �������������������������������
12
�������������������������������������
13
Résolution de problèmes ����������������������������������������������������
14
Réglages avancés ���������������������������������������������������������������
14
Tableau d’opération des touches ���������������������������������������
14
������������������������������������������������������������������������
15
Fonction Mise à jour du micrologiciel �������������������������������
15
Information sur les licences de logiciel ����������������������������
15
Mode d’emploi
<Version complète>
Adaptateur Réseau
N° de modèle CZ‑TAW1
Nous vous remercions d’avoir acheté ce produit Panasonic.
Veuillez attentivement lire ces instructions avant d’utiliser le produit, et conserver ce
mode d’emploi pour consultation future.

10
AVERTISSEMENT
Ne jamais toucher l’appareil avec des mains mouillés�
–
Ceci peut créer une décharge électrique.
laver avec de l’eau�
–
Ceci peut créer une décharge électrique ou un départ de feu.
–
Ceci peut créer une décharge électrique ou un départ de feu.
Pour des réparations, veuillez contacter l’endroit d’achat ou l’installeur.
problème ou une panne et coupez l’électricité alimentant l’AQUAREA�
–
Ignorer cette précaution peut créer un développement de fumées, un
départ de feu, des décharges électriques ou des brûlures.
Exemples de problèmes et de mauvais fonctionnements
•
Il y a une odeur de fumée
•
Il y a de l’eau ou un corps étranger dans l’appareil
Contactez l’endroit d’achat ou l’installeur pour une réparation.
Demandez une nouvelle installation de l’endroit d’achat ou de
l’installeur�
–
Si vous ignorez cette précaution, vous risquez des décharges
électriques ou un départ de feu.
ATTENTION
Il est interdit de vous mettre sur des endroits instables lorsque
vous travaillez avec l’adaptateur ou quand vous le contrôlez�
–
Vous risquez des blessures.
Unité intérieure
Adaptateur réseau
CZ‑TAW1
Routeur
Internet
Câble
CN‑CNT
Ethernet (câblé)
ou
Avant d’installer l’adaptateur
•
pour le Smart Cloud AQUAREA de Panasonic. Le Smart Cloud AQUAREA de
Panasonic ne peut pas être accédé avec un autre adaptateur.
•
N’installez jamais l’adaptateur sur du métal. Cela posera des problèmes pour la
•
Nous vous avisons d’utiliser Google Chrome comme navigateur Internet.
•
Google Chrome est une marque déposée de Google Inc.

11
1
2
3
4 5 6
N° Article Description
1 LED marche/arrêt Indique que l’adaptateur est sous tension.
2 LED statut Indique le statut de l’adaptateur.
3 LED connexion Indique le statut de connexion de l’adaptateur.
4 Touche WPS Pour brancher le WPS.
5 Touche inscription/reset Pour l’activation d’un enregistrement d’utilisateur
et du reset.
6 Touche de contrôle Contrôle du statut de connexion de l’adaptateur.
Appuyez sur la touche et tenez‑la enfoncée
pendant 10 secondes, pour changer entre le
Connexion réseau
1
Mettez l’unité intérieure sous tension�
Le LED marche/arrêt s’illumine.
2
La couleur du LED statut indique le mode de connexion�
LED marche/arrêt
LED statut
La couleur du LED statut change chaque fois que la touche de
contrôle est appuyée et tenue enfoncée pendant 10 secondes.
1
Ethernet est établi�
Si le mode Ethernet n’est pas établi, appuyez la touche de contrôle et tenez‑la
enfoncée pendant 10 secondes, pour changer vers le mode Ethernet.
2
Raccordez le routeur et l’adaptateur avec un câble LAN�
Le LED connexion s’illumine pour indiquer que la connexion a été établie.
Utilisez toujours un câble LAN blindé.
1
touche de contrôle et tenez‑la enfoncée pendant
2
Mettez le WPS en marche sur le routeur�
3
Le LED statut et le LED connexion s’illuminent dès que la connexion est établie.
*
Si vous n’obtenez pas de connexion, consultez « Pas de connexion dans le mode
de problèmes (P.14).
Touche WPS

12
Démarrer « AQUAREA Smart Cloud »
Utilisez un Smartphone pour installer l’AQUAREA Smart Cloud.
•
1
Accédez « AQUAREA Smart Cloud »�
L’utilisation de cette application est gratuite.
Mais il se peut qu’il y aura d’autres frais pour la connexion ou
l’opération.
Des mises à jour pour le service peuvent indiquer des
pouvoir utiliser l’application. Si vous n’êtes pas encore
Panasonic (gratuit) en utilisant le lien sur la page
d’enregistrement ou à la suivante URL.
2
Registrez l’adaptateur et l’unité
intérieure�
1)
Appuyez la touche inscription/reset sur
l’adaptateur pour aller au mode de
registration. (Le mode reste actif durant
30 minutes.)
2)
obtenu.
Touche
inscription/reset
3)
l’adaptateur.
NETWORK ADAPTOR
CZ-TAW1
DEVICE ID:XXXXX-XXXXX
MADE IN CHINA
WLAN MAC:
XX:XX:XX:XX:XX:XX
LAN MAC:
XX:XX:XX:XX:XX:XX
S/N No:
X03YWWXXXXX
4)
Entrez un mot de passe pour l’appareil.
Si vous avez oublié le mot de passe pour l’appareil, vous
pouvez réinitialiser l’adaptateur et le registrer de nouveau.
P.14 « Tableau d’opération des touches »
Vous pouvez donner un nom et un nom de zone à l’unité
3
Utilisez AQUAREA Smart Cloud�

13
Registrer un nouvel utilisateur pour l’unité intérieure
Panasonic différent peuvent accéder la même unité intérieure.
1
Actions d’utilisateurs supplémentaires
1)
nouvel utilisateur.
2)
registré par le propriétaire (la personne qui a fait la première
registration).
3)
Soumettez un message pour une demande d’acceptation du
propriétaire.
Soumettez un message à ce que le propriétaire puisse reconnaître la
personne demandant l’acceptation.
2
1)
personne qui a fait la première registration).
S’il y a un message demandant une registration d’un nouvel utilisateur,
un « » sera visible en haut à gauche de l’écran sur la première page.
2)
Sélectionnez « ».
3)
Sélectionnez les privilèges appropriés pour l’utilisateur et acceptez leur
demande.
Après avoir accepté la demande, le nouvel utilisateur pourra également
utiliser AQUAREA Smart Cloud.
L’indicateur s’illumine et clignote pour indiquer le statut de connexion et de possibles
erreurs.
LED marche/arrêt
LED statut
LED connexion
1 sec.
0,2 sec.
LED Statut et solution LED Statut et solution
Le A2W n’est pas mis en
marche ou bien le câble n’est
pas connecté
LAN (IP n’a pas été acquit)
(Clignotant en bleu ou vert)
A2W branché avant réveil LAN (récupération IP)
(Clignotant en bleu ou vert)
A2W n’a pas de connexion
(Clignotant en rouge)
LAN (collision IP)
(Clignotant en rouge et bleu ou
vert)
Immédiatement après le
démarrage
LAN (interruption du serveur)
Normal
(Clignotant en bleu ou vert)
Registration d’utilisateur
(Clignotant en bleu ou vert)
Mise à jour du micrologiciel
(Clignotant en rouge et bleu et
vert)
Mise en œuvre du minuteur
(Clignotant en blanc et bleu ou
vert)

14
Résolution de problèmes
connexion (illuminé ou clignotant).
<
s’illumine pas
Controlez les connexions du routeur.
Utilisez le mode Ethernet.
Pas de connexion par le mode Ethernet
•
Le LED statut ne s’illumine pas
Contrôlez les connexions du câble LAN.
Contrôlez les connexions du routeur.
Réglages avancés
Si vous voulez établir le IP du LAN câblé manuellement
1)
Démarrez le logiciel d’installation IP sur le CD‑ROM joint et sauvegardez les
paramètres sur une barrette mémoire USB.
2)
Attachez la barrette mémoire USB avec les paramètres sauvegardés à
l’adaptateur, appuyez la touche WPS et tenez‑la enfoncée pendant 10 secondes.
3)
Le LED connexion s’illumine quand l’installation est complète.
1)
Démarrez le logiciel pour l’installation du SSID sur le CD‑ROM joint et
sauvegardez les paramètres sur une barrette mémoire USB.
2)
Détachez la barrette mémoire USB, attachez celle‑ci à l‘adaptateur et appuyez
la touche WPS et tenez‑la enfoncée pendant 10 secondes.
3)
Le LED connexion s’illumine quand l’installation est complète.
LED connexion
Touche de
contrôle
Tableau d’opération des touches
Touche inscription/reset
Touche de contrôleTouche WPS
Objectif
Opération de la
touche
Commentaires
Mettre le WPS en marche
Appuyez la touche
WPS.
Ceci n’est que possible dans le
Enregistrer un utilisateur Appuyez la touche
inscription/reset.
Ceci n’est que possible quand
les connexions ont été établies.
Contrôle du statut des
connexions
Appuyez la touche de
contrôle.
Les LEDs s’illuminent pour
indiquer le statut de connexion.
Changer entre le mode
Ethernet et le mode
Appuyez la touche de
contrôle durant au
moins 10 secondes.
Les paramètres pour les
modes différents seront
maintenus, même si vous
changez de mode.
Réinitialisation du
logiciel
Appuyez la touche
inscription/reset
durant au moins
10 secondes.
Ceci met le procédé en
marche pour le reset
automatique du logiciel. Durant
le reset, des contrôles pour le
micrologiciel sont effectués, et
une mise à jour est effectuée
s’il y a une nouvelle version.
manuellement
manuellement
(en mode Ethernet).
Appuyez la touche
WPS durant au moins
10 secondes.
S’il n’y a pas de paramètres à
télécharger de la barrette
mémoire USB, la connexion
sera faite par WPS/DHCP.
Initialiser l’adaptateur
Appuyez simultanément
la touche WPS et la
touche de contrôle
durant au moins
10 secondes.
Ceci réinitialise les paramètres
d’usine de l’adaptateur.

15
Tension d’entrée 5 Volt courant continu (de l’unité ID)
Consommation d’énergie Max. 2,5 Watt
Dimension 100 mm (H) x 70 mm (L) x 23 mm (P)
Poids Environ 80 gr.
Interfaces
Protocol radio 2,4 GHz, 802.11 b/g/n
Fonction Mise à jour du micrologiciel
Ce produit peut se connecter via Internet au serveur de mise à jour des
micrologiciels Panasonic pour actualiser automatiquement la dernière version du
micrologiciel de l’appareil.
micrologiciel correspond à la dernière version, et si une mise à jour est requise, la
mise à jour est appliquée et l’appareil redémarre automatiquement. Aucune
opération n’est possible pendant le redémarrage de l’appareil (d’une durée d’environ
1 minute).
Information sur les licences de logiciel
(1) Des logiciels développés indépendamment par ou pour Panasonic Corporation,
(2)
Des logiciels détenus par une troisième partie et autorisés à Panasonic Corporation,
(3) Des logiciels licenciés sous la licence publique générale GNU, version 2.0 (GPL
V2.0),
(4) Des logiciels licenciés sous la licence publique générale GNU LESSER,
version 2.1 (LGPL V2.1), et/ou
(5) Des logiciels à code source ouverte, autres que les logiciels licenciés sous GPL
V2.0 et/ou LGPL V2.1.
Les logiciels catégorisés (3) – (5) sont distribués avec l’espérance qu’ils seront
utiles, mais SANS AUCUNE GARANTIE, même sans la GARANTIE DE QUALITE
MARCHANDE ou APTITUDE POUR UN CAS PARTICULIER.
Consultez les termes et conditions détaillés sur le CD‑ROM joint.
Ce CD‑ROM contient également une copie complètement lisible par ordinateur de la
source correspondante, couverte sous GPL V2.0, LGPL V2.1 ou une des autres
déposées des licences et sources.
Par la présente, “Panasonic Corporation” déclare que ce produit est
en conformité avec les exigences essentielles et les autres clauses
Les clients peuvent télécharger un exemplaire de la DoC originale de nos
Marketing Europe GmbH, Winsbergring 15, 22525 Hamburg, Allemagne
centre de Ny ‑Alesund au Svalbard.
L’élimination des équipements usagés
dans la documentation qui l’accompagne, ce pictogramme
indique que appareils électriques et électroniques usagés,
doivent être séparées des ordures ménagères.
adéquats des appareils usagés, veuillez les porter à l’un des
points de collecte prévus, conformément à la législation
nationale en vigueur.
En les éliminant conformément à la réglementation en vigueur,
vous contribuez à éviter le gaspillage de ressources précieuses
ainsi qu’à protéger la santé humaine et l’environnement.
Pour de plus amples renseignements sur la collecte et le recyclage,
veuillez vous renseigner auprès des collectivités locales.
Le non‑respect de la réglementation relative à l’élimination des
déchets est passible d’une peine d’amende.

16
Precauzioni di sicurezza
•
Leggere attentamente le seguenti “PRECAUZIONI DI SICUREZZA” prima di
eseguire l’installazione.
•
I lavori elettrici devono essere condotti da un elettricista autorizzato. Accertarsi di
utilizzare l’intensità e il circuito principale adatti al modello da installare.
•
È necessario rispettare gli elementi di attenzione qui riportati poiché tali contenuti
indicazione è riportato di seguito. L’installazione errata dovuta all’inosservanza
delle seguenti indicazioni.
•
Conservare il manuale di installazione insieme all’unità una volta installata.
ALLERTA
Questa indicazione mostra la possibilità di
causare morte o gravi lesioni.
ATTENZIONE
Questa indicazione mostra la possibilità di
causare lesioni o danni alle proprietà.
Il simbolo su sfondo bianco denota un’operazione la cui esecuzione è
PROIBITA.
Il simbolo su sfondo nero denota un’operazione che deve essere seguita.
Sommario
Precauzioni di sicurezza �����������������������������������������������������
16
Panoramica del sistema������������������������������������������������������
17
Prima di installare l’adattatore �������������������������������������������
17
Indicazione delle parti ���������������������������������������������������������
18
Connessione della rete �������������������������������������������������������
18
Avvio di “AQUAREA Smart Cloud” ������������������������������������
19
Lettura delle lampade LED �������������������������������������������������
20
Soluzione dei problemi �������������������������������������������������������
21
Impostazioni avanzate ��������������������������������������������������������
21
��������������������������
21
�����������������������������������������������������������������������������
22
�����������������������������
22
�����������������������������
22
Istruzioni operative
<Versione completa>
Adattatore di rete
Modello n. CZ‑TAW1
Grazie per aver acquistato questo prodotto Panasonic.
Leggere attentamente le istruzioni prima di utilizzare questo prodotto e conservare
questo manuale per usi futuri.

17
ALLERTA
Non toccare con le mani bagnate�
–
Ciò può causare shock elettrici.
Non spolverare con panni bagnati o lavare in acqua�
–
Ciò può causare shock elettrici o accensione.
–
Ciò può causare shock elettrici o accensione.
Richiedere qualsiasi tipo di riparazione al proprio rivenditore o
all’installatore.
Interromperne l’utilizzo non appena si avverta un qualsiasi tipo di
problema o malfunzionamento e spegnere qualsiasi alimentazione
elettrica di AQUAREA�
–
In caso contrario, potrebbero generarsi fumo, accensione, shock
elettrici o scottature.
Esempi di problemi e malfunzionamenti
•
C’è odore di bruciato
•
Sono entrati all’interno acqua o oggetti esterni
Richiedere immediatamente la riparazione al rivenditore o
all’installatore.
Richiedere l’installazione al rivenditore o all’installatore�
–
In caso contrario, potrebbero generarsi shock elettrici o accensione.
ATTENZIONE
si controlla�
–
Ciò può causare lesioni conseguenti a cadute.
Panoramica del sistema
Unità interna
Adattatore
di rete
CZ‑TAW1
Router
Internet
Cavo
CN‑CNT
Ethernet (cablato)
o
LAN wireless
Prima di installare l’adattatore
•
AQUAREA Smart Cloud di Panasonic. AQUAREA Smart Cloud di Panasonic non
è accessibile da altri adattatori.
•
Non collegare l’adattatore a metalli, poiché le prestazioni wireless verranno
cavo.
•
Si consiglia di usare Google Chrome come browser di Internet.
•
Google Chrome è un marchio registrato di Google Inc.

18
Indicazione delle parti
1
2
3
4 5 6
N. Elemento Descrizione
1 LED di alimentazione Indica che l’adattatore è alimentato a corrente.
2 LED di stato Indica lo stato dell’adattatore.
3 LED di collegamento Indica lo stato di comunicazione dell’adattatore.
4 Interruttore WPS Attiva il WPS.
5 Interruttore di registrazione/
azzeramento
Abilita la registrazione dell’utente e
l’azzeramento.
6
Passa dalla modalità Ethernet a wireless e
viceversa ogni volta che lo si tiene premuto per
10 secondi.
Connessione della rete
È possibile stabilire una connessione a Internet con la Modalità Ethernet (cablato) o
1
Accendere l’alimentazione per l’unità interna�
Il LED di alimentazione si illumina.
2
Il colore del LED di stato indica la modalità di connessione�
LED di alimentazione
LED di stato
Il colore del LED di stato cambia ogni qualvolta si tenga premuto
Quando ci si connette usando la Modalità Ethernet (cablato)
1
modalità Ethernet sia attiva�
10 secondi per passare alla Modalità Ethernet.
2
Connettere il router e l’adattatore al cavo LAN�
Il LED di collegamento si illumina per indicare che la connessione è stabilita.
Usare un cavo LAN schermato.
1
accertarsi che la modalità Wireless sia attiva�
Se la Modalità wireless non è attiva, tenere
per passare alla Modalità wireless.
2
Attivare il WPS nel router�
3
Premere l’Interruttore WPS nell’adattatore�
Il LED di stato e il LED di collegamento si illuminano quando la comunicazione
è stabilita.
*
Consultare le Soluzione dei problemi (P.21), “Quando non è possibile connettersi
in Modalità wireless” o “Quando non è possibile connettersi in Modalità Ethernet”
quando non è possibile connettersi alla rete.
Interruttore
WPS

19
Avvio di “AQUAREA Smart Cloud”
Usare uno smartphone per impostare AQUAREA Smart Cloud.
•
senza preavviso.
1
Accedere ad “AQUAREA Smart Cloud”�
L’uso dell’applicazione non è soggetto ad
addebiti.
Altri addebiti possono essere comunque applicati per la
connessione e le operazioni.
nel design della schermata e nella visualizzazione.
Per usare l’applicazione è necessario avere un ID Panasonic.
Se non ci si è ancora registrati, registrarsi prima per ottenere
l’ID Panasonic (gratuito) attraverso il link nella pagina di
accesso o l’URL seguente.
2
Registrare sia l’adattatore sia l’unità
interna�
1)
Premere l’Interruttore di registrazione/
azzeramento nell’adattatore per inserire la
modalità di registrazione utente. (La modalità
rimane attiva per 30 minuti.)
2)
Accedere al servizio usando l’ID Panasonic precedentemente ottenuto.
Interruttore di
registrazione/
azzeramento
3)
Inserire l’ID del dispositivo riportato a lato dell’adattatore.
Saltare la lettera “‑“ quando si immette l’ID del dispositivo.
NETWORK ADAPTOR
CZ-TAW1
DEVICE ID:XXXXX-XXXXX
MADE IN CHINA
WLAN MAC:
XX:XX:XX:XX:XX:XX
LAN MAC:
XX:XX:XX:XX:XX:XX
S/N No:
X03YWWXXXXX
4)
Inserire una password per il dispositivo.
Se si dimentica la password del dispositivo, è possibile
azzerare l’adattatore e registrarlo nuovamente.
È possibile dare un nome e un nome di zona all’unità
3
Usare AQUAREA Smart Cloud�

20
Per registrare altri utenti nell’unità interna
Più utenti (familiari, per esempio) con ID Panasonic diversi possono accedere alla
stessa unità interna.
1
Operazioni di utenti aggiunti
1)
Accedere al servizio usando l’ID Panasonic dell’utente
aggiunto.
2)
Inserire l’ID e la password del dispositivo registrato dal
proprietario (l’utente inizialmente registrato).
3)
Inserire un messaggio con la richiesta di approvazione da
parte del proprietario.
Inserire un messaggio in modo che il proprietario possa
2
1)
Accedere al servizio utilizzando l’ID Panasonic del proprietario (l’utente
inizialmente registrato).
Se è presente un messaggio che richiede la registrazione da parte di un
2)
Si visualizza il messaggio di richiesta dall’utente aggiunto.
3)
Selezionare i privilegi appropriati per l’utente e approvarne la richiesta.
Dopo l’approvazione, anche l’utente aggiunto sarà in grado di utilizzare
AQUAREA Smart Cloud.
Lettura delle lampade LED
possibili errori.
LED di alimentazione
LED di stato
LED di collegamento
Illuminato
SPENTO
Lampeggiante
1 s
0,2 s
LED Stato e soluzione LED Stato e soluzione
A2W spento o cavo non
collegato
LAN (IP non acquisito)
(Blu o verde lampeggiante)
A2W acceso prima della
riattivazione software
LAN (recupero IP)
(Blu o verde lampeggiante)
A2W non può connettersi
(Lampeggiamento in rosso)
LAN (collisione IP)
(Rosso e blu o verde
lampeggianti)
Subito dopo l’avvio LAN (interruzione server)
Normale
(Blu o verde lampeggiante)
Registrazione utente attiva
(Blu o verde lampeggiante)
(Rosso e blu e verde
lampeggianti)
Conferma di comunicazione Implementazione del timer attiva
(Bianco e blu o verde
lampeggianti)
Sidan laddas ...
Sidan laddas ...
Sidan laddas ...
Sidan laddas ...
Sidan laddas ...
Sidan laddas ...
Sidan laddas ...
Sidan laddas ...
Sidan laddas ...
Sidan laddas ...
Sidan laddas ...
Sidan laddas ...
Sidan laddas ...
Sidan laddas ...
Sidan laddas ...
Sidan laddas ...
Sidan laddas ...
Sidan laddas ...
Sidan laddas ...
Sidan laddas ...
Sidan laddas ...
Sidan laddas ...
Sidan laddas ...
Sidan laddas ...
Sidan laddas ...
Sidan laddas ...
Sidan laddas ...
Sidan laddas ...
Sidan laddas ...
Sidan laddas ...
Sidan laddas ...
Sidan laddas ...
Sidan laddas ...
Sidan laddas ...
Sidan laddas ...
Sidan laddas ...
Sidan laddas ...
Sidan laddas ...
Sidan laddas ...
Sidan laddas ...
Sidan laddas ...
Sidan laddas ...
Sidan laddas ...
Sidan laddas ...
Sidan laddas ...
Sidan laddas ...
Sidan laddas ...
Sidan laddas ...
Sidan laddas ...
Sidan laddas ...
Sidan laddas ...
Sidan laddas ...
Sidan laddas ...
Sidan laddas ...
Sidan laddas ...
Sidan laddas ...
Sidan laddas ...
Sidan laddas ...
Sidan laddas ...
Sidan laddas ...
Sidan laddas ...
Sidan laddas ...
Sidan laddas ...
Sidan laddas ...
Sidan laddas ...
Sidan laddas ...
Sidan laddas ...
Sidan laddas ...
Sidan laddas ...
Sidan laddas ...
Sidan laddas ...
Sidan laddas ...
Sidan laddas ...
Sidan laddas ...
Sidan laddas ...
Sidan laddas ...
Sidan laddas ...
Sidan laddas ...
Sidan laddas ...
Sidan laddas ...
-
 1
1
-
 2
2
-
 3
3
-
 4
4
-
 5
5
-
 6
6
-
 7
7
-
 8
8
-
 9
9
-
 10
10
-
 11
11
-
 12
12
-
 13
13
-
 14
14
-
 15
15
-
 16
16
-
 17
17
-
 18
18
-
 19
19
-
 20
20
-
 21
21
-
 22
22
-
 23
23
-
 24
24
-
 25
25
-
 26
26
-
 27
27
-
 28
28
-
 29
29
-
 30
30
-
 31
31
-
 32
32
-
 33
33
-
 34
34
-
 35
35
-
 36
36
-
 37
37
-
 38
38
-
 39
39
-
 40
40
-
 41
41
-
 42
42
-
 43
43
-
 44
44
-
 45
45
-
 46
46
-
 47
47
-
 48
48
-
 49
49
-
 50
50
-
 51
51
-
 52
52
-
 53
53
-
 54
54
-
 55
55
-
 56
56
-
 57
57
-
 58
58
-
 59
59
-
 60
60
-
 61
61
-
 62
62
-
 63
63
-
 64
64
-
 65
65
-
 66
66
-
 67
67
-
 68
68
-
 69
69
-
 70
70
-
 71
71
-
 72
72
-
 73
73
-
 74
74
-
 75
75
-
 76
76
-
 77
77
-
 78
78
-
 79
79
-
 80
80
-
 81
81
-
 82
82
-
 83
83
-
 84
84
-
 85
85
-
 86
86
-
 87
87
-
 88
88
-
 89
89
-
 90
90
-
 91
91
-
 92
92
-
 93
93
-
 94
94
-
 95
95
-
 96
96
-
 97
97
-
 98
98
-
 99
99
-
 100
100


Panasonic CZTAW1 Bruksanvisningar
- Kategori
- Routrar
- Typ
- Bruksanvisningar
på andra språk
- italiano: Panasonic CZTAW1 Istruzioni per l'uso
- Deutsch: Panasonic CZTAW1 Bedienungsanleitung
- Türkçe: Panasonic CZTAW1 Kullanma talimatları
- dansk: Panasonic CZTAW1 Betjeningsvejledning
- Nederlands: Panasonic CZTAW1 Handleiding