
ALLURE 270
USER GUIDE
MANUEL D’UTILISATEUR
HANDLEIDING
BRUKSANVISNING
BRUGERVEJLEDNING
ANVÄNDARHANDBOK
KÄYTTÖOHJE
MANUALE D’USO
ȅįȘȖȚİı ȋȡȘıȘı
HASZNÁLATI ÚTMUTATÓ
V 1.1

GB The features described in this manual are published with reservation to
modifications.
F Les possibilités décrites dans ce manuel sont publiées sous réserve de
modifications.
NL De in deze handleiding beschreven mogelijkheden worden gepubliceerd
onder voorbehoud van wijzigingen.
S Funktionerna i denna bruksanvisning publiceras med reservation för
ändringar.
DK Vi forbeholder os retten til ændringer af de specifikationer, der er beskrevet
i denne brugsanvisning.
N Funksjoner beskrevet i denne manualen kan endres uten nærmere
informasjon.
SF Tässä ohjekirjassa julkaissut tiedot voivat muuttua ilman ennakkoilmoitusta.
I Le caratteristiche descritte nel presente manuale vengono pubblicate con
riserva di modifica.
GR ȅȚ ȜİȚIJȠȣȡȖȓİȢ ʌȠȣ ʌİȡȚȖȡȐijȠȞIJĮȚ ıIJȠ ʌĮȡȩȞ İȖȤİȚȡȓįȚȠ, įȘµȠıȚİȪȠȞIJĮȚ µİ
İʌȚijȪȜĮȟȘ IJȣȤȩȞ IJȡȠʌȠʌȠȚȒıİȦȞ.
HU A jelen használati útmutatóban leírt adatokra a gyártó fenntartja a változtatás
jogát.
This product is in compliance with the essential requirements and other relevant provisions of the R&TTE directive 1999/5/EC.
The Declaration of conformity can be found on :
http://www.topcom.net/support/cedeclarations.php

Topcom Allure 270 3
Topcom Allure 270
ENGLISH
1 Before Initial use 4
1.1 Intended Purpose 4
1.2 Caller ID 4
1.3 Connection 4
2 Cleaning 4
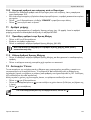
3 Disposal of the device (environment) 4
4 Safety advice 5
5 Buttons/LED 6
6 Display 6
7 Installation 7
7.1 Battery installation 7
7.2 Installing power supply and line cord 7
8 Getting started 7
8.1 Initialisation 7
8.2 Settings 8
8.3 Making a phone call 9
8.4 Last number redial 10
8.5 Music on hold 10
8.6 Ringer volume 10
8.7 Flash Key 10
9 Caller ID 10
9.1 General information 10
9.2 Call list 10
9.3 Talking Caller ID 11
9.4 Scrolling through the Call List 11
9.5 Calling a number from the Call List 11
9.6 Erasing numbers from the Call List 11
9.7 VIP list 11
9.8 Voice mail 12
10 Phone Book 12
10.1 Use of the alphanumerical keypad 12
10.2 Adding a number to the Phone Book 13
10.3 Selecting and calling a number from the Phone Book 13
10.4 Changing a number and name from the Phone Book 13
10.5 Erasing a number and name from the Phone Book 13
11 Memory numbers 13
11.1 Adding a number to a Direct Memory 14
11.2 Calling a Direct Memory number 14
12 Sleep mode 14
13 Answering machine 14
13.1 Recording an outgoing messages (OGM) 14
13.2 Turning Answering Machine ON/OFF 15
13.3 Day and Time stamp 15
13.4 Number of rings 15
13.5 Messages 15
13.6 Playback of Incoming Messages 16
13.7 Recording a conversation 16
13.8 Memory Full 16
13.9 Remote Operation 16
14 Technical Data 17
15 Topcom warranty 18
15.1 Warranty period 18
15.2 Warranty handling 18
15.3 Warranty exclusions 18

4 Topcom Allure 270
Topcom Allure 270
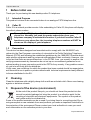
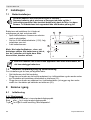
1 Before Initial use
Thank you for purchasing this new desktop caller ID telephone.
1.1 Intended Purpose
This product is intend to be connected indoor to an analogue PSTN telephone line.
1.2 Caller ID
Caller ID is a network provider service. After subscribing to Caller ID, this phone will display
the caller’s phone number.
1.3 Connection
This device has been designed and manufactured to comply with the 98/482/EC rule,
referent to the Pan European connection of a terminal to the Public Switching Telephone
Network (PSTN) and following the established guidelines by the 1999/5/EC Directive about
radio electric equipments and the reciprocal acknowledge of their conformity. However, due
to the fact that there are some differences in the PSTNs from one country to another, the
verifying measurements by themselves do not set up an unconditional guarantee for an
optimal working in every connection point to the PSTN of any country .If any problem comes
up, get in touch firstly with the distributor.
In any case, use conditions for which the product has been created should be respected as
well as avoid its use in public or private networks with technical requirements clearly different
to those established in the EU.
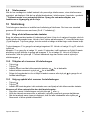
2 Cleaning
Clean the telephone with a slightly damp cloth or with an anti-static cloth. Never use cleaning
agents or abrasive solvents.
3 Disposal of the device (environment)
At the end of the product lifecycle, you should not throw this product into the
normal household garbage but bring the product to a collection point for the
recycling of electrical and electronic equipments. The symbol on the product,
user guide and/or box indicate this.
Some of the product materials can be re-used if you bring them to a recycling point. By re-
using some parts or raw materials from used products you make an important contribution to
the protection of the environment.Please contact your local authorities in case you need
more information on the collection points in your area.
To use ‘Caller ID’ (display caller), this service has to be activated on your
phone line. Normally you need a separate subscription from your
telephone company to activate this function. If you don’t have the Caller ID
function on your phone line, the incoming telephone numbers will NOT be
shown on the display of your telephone.

Topcom Allure 270 5
Topcom Allure 270
ENGLISH
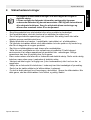
4 Safety advice
• Do not operate the equipment if the telephone cable or the equipment itself is damaged.
• If the equipment is dropped, it must be checked by an electrician before further use.
• Dangerous voltages are present inside the equipment. Never open the housing or insert
objects through the ventilation holes.
• Do not allow liquids to get into the equipment. In case of emergency, pull out the plug
from the socket.
• Similarly, if a fault develops during use or before you start to clean the equipment, pull
the plug out of the socket.
• Do not touch plug contacts with sharp or metal objects.
• Do not carry out any modifications or repairs to the equipment yourself. Have repairs
done to the equipment or the mains cable only by a specialist service centre.
Unsatisfactory repairs can lead to considerable danger for the user.
• Children frequently underestimate the dangers associated with electrical equipment.
Therefore you must never leave children unsupervised in the vicinity of electrical
equipment.
• The equipment is not to be used in a damp room (e.g. bathrooms) or rooms where there
is a lot of dust.
• Equipment connected to the telephone line during a thunderstorm can be damaged by
lightning. Therefore you should pull the plug out of the main socket during a storm.
• To completely disconnect the equipment from the electricity supply, the plug must be
removed from the socket. When doing this, always pull on the plug itself and never on
the cable.
The following safety advice must always be followed before using
electrical equipment.
Please read carefully through the following information concerning
safety and proper use. Make yourself familiar with all the functions of the
equipment. Be careful to keep these advice notes and if necessary pass
them on to a third party.

6 Topcom Allure 270
Topcom Allure 270
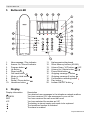
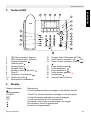
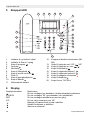
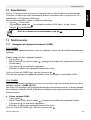
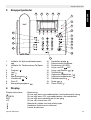
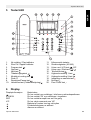
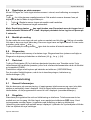
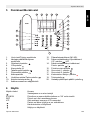
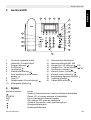
5 Buttons/LED
6 Display
Display information Description
You received new messages in the telephone network mailbox
XX NEW You have received ‘XX’ new messages in your call list
REP You have received the call more than once
VIP You have selected the number as VIP
The battery is almost empty and needs to be replaced
The handsfree function is activated
The alarm is enabled
1
2
3
4
5
6
7
8
9
10
11
12
13
14
15
16
17
18
19 20
+
-
Ø
1. New message / Play indicator
2. Answer On / Record indicator
3. Program button
4. Up button
5. Down button
6. Call back button
7. Music on Hold button
8. Flash R
9. Redial / Pause button
10. Handsfree button
11. Alphanumerical keyboard
12. Direct Memory buttons (M1-M3)
13. Volume Down / VIP button /VIP
14. Volume Up / Delete button /
15. Phone Book button
16. Outgoing message 1 button
17. Outgoing message 2 button
18. Conversation recording button
19. Play button
20. Answer ON/OFF button

Topcom Allure 270 7
Topcom Allure 270
ENGLISH
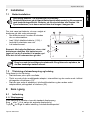
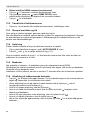
7 Installation
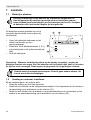
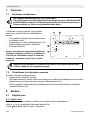
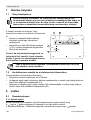
7.1 Battery installation
Batteries must be installed to prevent that
messages are lost during power failure.
• Open the battery compartment at the
bottom of the unit using a screwdriver.
• Insert 3 AAA Alcaline batteries (1,5V),
following the polarity as shown.
• Close the battery compartment.
Note: When the battery indicator is shown,
the batteries must be replaced. When the
batteries are removed, you have 5 minutes
to replace them. After that time, the memory
will be lost.
7.2 Installing power supply and line cord
For installation, do the following:
• Put the telephone on a flat surface.
• Plug one end of the supplied adapter into the electric socket and the other end into the
connector on the backside of telephone (21).
• Plug one end of the adaptor into the telephone wall outlet and the other end into the
adapter jack on the backside of the telephone (22).
8 Getting started
8.1 Initialisation
8.1.1 Display language
After installing the batteries, the default display language is shown.
Use or to select the desired display language.
Press to go to the next setting ‘Memory capacity’.
Never change batteries when the telephone line is connected !
Dispose of batteries at a designated battery disposal unit and not in the
household waste. Do not short-circuit & dispose of in fire. Remove the
batteries if this device is not going to be used for a long period.
+
-+-
3 X AAA Alkaline
21
22
23
24
Only use the charger plug supplied. Do not use other chargers, as this
may damage the batteries cells.

8 Topcom Allure 270
Topcom Allure 270
8.1.2 Memory capacity
The maximum capacity of the Allure 270 is 84 entries including names and numbers.
This number can be dedicated to the Phonebook and/or the Caller ID list. In this setting you
have to select the capacity of the Phonebook.
Use or to select the phonebook memory ‘MAX DATABANK = XXX (default 032)’.
Press to confirm the phonebook memory.
The Caller ID list memory size will be displayed briefly and the unit will go to standby mode.
To have acces to the memory setting, you have to remove the batteries for more than 10
minutes.
All stored information will be erased after initialisation.
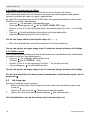
8.2 Settings
8.2.1 Setting the language of the display text.
When you did not change the language during initialisation, you can select it as follows:
• Press for 3 seconds.
• Use or to select the desired display language.
• Press to go to the next setting.
• If no button is pressed within 10 seconds, the unit will return to standby mode.
8.2.2 Setting the display contrast.
You can select the desired contrast as follows:
• Press button for 3 seconds, the display language is shown.
• Press button again.
• Use or button to select the desired display contrast.
• Press to go to the next setting.
If no button is pressed within 10 seconds, the unit will return to standby mode.
8.2.3 Setting the Date and Time
When you have a subscription to the Caller ID service and your telephone provider sends the
date and time together with the telephone number, the phone’s clock will be set
automatically. The year must be set manually.
It is also possible to set the clock manually:
• Press for 3 seconds, the display language is shown.
• Press 2 times. The year will blink.
• Use or to select the year.
• Press to confirm the year and change to month.
• Repeat the previous steps for changing and confirming month, day, hour and minutes.
• After confirming the minutes, you will go to the next setting.
If no button is pressed within 10 seconds, the unit will return to standby mode.
This Allure 270 has multi-function keys, which perfom different function
depending on the status of the telephone. Please follow the user-guide
carefully to avoid any perceived mal-function.

Topcom Allure 270 9
Topcom Allure 270
ENGLISH
8.2.4 Setting the Local Prefix (5 digits)
The Local prefix must be set, when you are not allowed to dial out your own area code.
If there is an incoming call, starting with the programmed prefix, the code will not be displayed
and not be stored in the call list.
ex. When 012 is programmed and 0123456789 is the incomming call number, 3456789 is
displayed and stored in the call list.
• Press for 3 seconds, the display language is shown.
• Press repeatedly until ‘SET LOCAL CODE ‘ is display.
• Use or to select the first digit of the local code (0-9 or ‘-’ to unselect).
• Press confirm the first digit and change next digit.
• Repeat the previous steps for a the 5 digits.
When no local prefix must be set select (- - - - -).
• After confirming the last digit, you will go to the next setting.
If no button is pressed within 10 seconds, the unit will return to standby mode.
8.2.5 Setting the Prefix
If you need to dial out a one digit prefix before a telephone number from the call list or
phonebook, you have to set the Dial Prefix.
• Press for 3 seconds, the display language is shown.
• Press until ‘PREFIX‘ is display.
• Use or to select the prefix (0-9 or ‘-’ to unselect).
• Press button confirm the prefix.
If no button is pressed within 10 seconds, the unit will return to standby mode.
To dial out the prefix before the selected number out of the call list of phonebook,
press twice.
8.3 Making a phone call
There are 2 ways to make a phone call :
1. Enter the telephone number. If needed, you can erase the last digits by pressing .
Pick up the handset or press . The phone number will be dialled automatically.
2. Pick up the receiver or press the Handsfree button . Enter the telephone number.
Note: The call duration timer is shown on the 1e line of the display [mm:ss].

10 Topcom Allure 270
Topcom Allure 270
8.4 Last number redial
The Allure 270 saves the 3 last dialled telephone numbers in the memory with indication of
the call duration.
Press to scroll through the redial memory. When the desired number appears on the
display, there are two ways to call back :
1. Press . The desired number will be dialled automatically in handsfree.
2. Pick up the receiver. The number will be dialled automatically.
Note: The Redial button can also be used as a Pause button while entering a
telephone number !The letter ‘P’ appears on the display on the location where you
have added a pause of 3 sec.
8.5 Music on hold
It is possible to put the caller on Hold during a conversation by pressing . You can now talk
freely without the caller hearing you. The caller will hear a digital melody. The melody can be
changed by pressing or .
Press the Music on Hold button again if you want to resume your conversation.
8.6 Ringer volume
When you receive a phone call, the unit will ring. The ring volume can be adjusted by means
of the Ring Volume switch at the back of the phone (Hi- , Lo- ). (24)
8.7 Flash Key
Press the Flash button (R) to use certain services as ‘Call Waiting’ (if this service is provided
by your telephone company); or to transfer phone calls when you are using a telephone
exchange (PABX).
The flashtime can be selected by the switch on the back of the phone (100/300/600ms).
Before changing the flashtime switch, the power supply, batteries and line cord must be
removed. (23)
9 Caller ID
9.1 General information
When you have a subscription to the Caller ID service, the caller’s phone number and name
(when supported by the network) will appear on the display. If you saved the telephone
number with the name in the Phone Book, the programmed name will be shown on the
display (name tagging function).
9.2 Call list
The size of the call list has been set when initializing the telephone. The phone numbers you
have received more than once, will not be stored, but the repeat indicator REP will be
displayed. Every incoming number is saved in the Call List with indication of date and time.
In standby mode the number of new received calls is shown on the display. The new
message LED will blink until you have checked all New messages.

Topcom Allure 270 11
Topcom Allure 270
ENGLISH
9.3 Talking Caller ID
When the Talking Caller ID is activated, the incomming telephone number will be announced
through the speaker. Also when you scroll through the call list or phonebook, the number is
announced.
To set activate/deactivate the Talking Caller ID:
• Press for 3 seconds, the display language is shown.
• Press until ‘VOICE OFF’ or ‘VOICE ON’ is displayed.
•Select ‘VOICE ON’ and times the number has be announced (1-3) by pressing or .
•Select ‘VOICE OFF’ to disable the Talking Caller ID.
• Press confirm the prefix.
9.4 Scrolling through the Call List
You can scroll through the Call list by pressing or .
If no button is pressed within 10 seconds, you will return to standby mode.
9.5 Calling a number from the Call List
• Select the desired telephone number.
• Press . The number will be dialled automatically in handsfree mode.
If you want to dial the prefix (See 8.2.5 ”Setting the Prefix”), press twice.
• Pick up the handset if you want to communicate over the handset.
9.6 Erasing numbers from the Call List
9.6.1 Erasing one number
• Select the number you wish to erase.
• If the Talking Caller ID is activated, wait until the announcement is finished.
• Press briefly. “ERASED” appears on the display.
• Press or , the next number in the call list is displayed.
9.6.2 Erasing the entire Call List
• Enter the Call List and select a number not indicated with VIP (See 9.7 ”VIP list”)
• If the Talking Caller ID is active, wait until the announcement is finished.
• Press for 2 seconds , “ALL ERASED“ appears on the display.
If no button is pressed within 10 seconds, the unit will return to standby mode.
When erasing the entire call list, VIP numbers will remain saved (See 9.7 ”VIP list”).
9.7 VIP list
Numbers can be protected to be removed out of the call list when selecting ‘ERASE ALL’.
Therefore the number must be assigned as VIP.
All VIP numbers are visible in the Call list, but can also be checked in a separate VIP list.

12 Topcom Allure 270
Topcom Allure 270
9.7.1 Assigning a number to the VIP list.
• Scroll through the Call list by pressing or .
• If the Talking Caller ID is active, wait until the announcement is finished.
• Press the VIP button. The VIP icon will be displayed.
9.7.2 Selecting and calling a number from the VIP List
• Press VIP repeatedly to scroll through the VIP list.
• If the Talking Caller ID is active, wait until the announcement is finished.
• Press . The number will be dialled automatically in handsfree mode.
• Pick up the handset if you want to communicate over the handset.
9.7.3 Erasing individual numbers from the VIP List
• Select the VIP number you wish to erase out of the Call list.
• If the Talking Caller ID is active, wait until the announcement is finished.
• Press the VIP button. The VIP icon disappears.
• Press briefly. “ERASED” appears on the display.
• The next number in the call list is displayed.
9.8 Voice mail
When you have received a voice mail message in your Personal Voice Mail Box, the Voice
Mail symbol appears on the display. As soon as you have listened to the messages in the
mailbox, the symbol disappears.
* Voice mail is a network feature. Check with your network operator if this is available
on your line.
10 Phone Book
The size of the phonebook has been set when initializing the telephone. Default, 32
telephone numbers with name can be stored (See 8.1 ”Initialisation”).
10.1 Use of the alphanumerical keypad
Use the alphanumerical keypad to enter text. To select a letter, press the corresponding
button. For ex. if you press numerical button ‘5’, the first character (J) will be shown on the
display. Press multiple times if you want to select another character under this button.
Press button ‘2’ twice to select the letter ‘B’. If you want to select ‘A’ as well as ‘B’, press
button ‘2’ once to select ‘A’, wait for 2 seconds until the cursor has moved to the next location
and press then button ‘2’ twice to select ‘B’. To add a space, press 1. Wrong entered
characters can be erased by pressing the Erase button .

Topcom Allure 270 13
Topcom Allure 270
ENGLISH
10.2 Adding a number to the Phone Book
• Press .
•Press .
• Enter the name by means of the alphanumerical keypad and to confirm.
• Enter the telephone number and press to confirm.
• Follow the previous steps for adding another number or twice to leave the setting.
10.3 Selecting and calling a number from the Phone Book
•Press .
•Press .
• Enter the first letter of the desired name by means of the alphanumerical keypad.
Numbers will be sorted on the first letter only.
• Search for the name in the Phone Book by pressing or .
• If the Talking Caller ID is active, the number is announcement through the speaker.
• When the desired name is shown on the display, pick up the handset or press . The
number will be dialled automatically.
10.4 Changing a number and name from the Phone Book
• Select the desired number from the Phone Book by name as mentioned in 10.3.
• If the Talking Caller ID is active, the number is announcement through the speaker.
• Press .
• Edit the name when necessary.
• Press .
• Edit the number when necessary.
•Press .
• Press twice to leave the phonebook.
10.5 Erasing a number and name from the Phone Book
• Select the desired number from the Phone Book by name as mentioned in 10.3.
• If the Talking Caller ID is active, the number is announcement through the speaker.
• Press for 2 seconds , “ERASED“ appears on the display.
• Press to leave the menu.
11 Memory numbers
You can program 3 Direct numbers (max 16 digits). These memory numbers can be dialled
by pressing M1-M3.

14 Topcom Allure 270
Topcom Allure 270
11.1 Adding a number to a Direct Memory
• Press M1 for 2 seconds.
• Enter the telephonenumber.
• Press the desired Direct Memory key (M1-M3)
11.2 Calling a Direct Memory number
• Press the desired Direct Memory key, the stored number is displayed.
• Press handsfree or pick up the handset.
12 Sleep mode
To avoid that you are disturbed during a specific period, you can activate the sleep mode.
The telephone will not ring during sleep mode, except for calls dedicated as VIP in the call
list. VIP calls will always ring.
Once the sleep mode time is past, the telephone will always ring.
• Press for 2 seconds
• Press repeatedly to select the sleep time (0-24 hours in steps of 1 hour)
• Press to confirm, the sleeptime is displayed
13 Answering machine
13.1 Recording an outgoing messages (OGM)
13.1.1 OGM1
OGM1 is the Outgoing Message that each caller will hear when your answering device
answers the call.
To record the Outgoing Message 1:
• Press and hold .
• After you hear a beep, release and start saying your outgoing message (max 30
seconds).
• Press again to end recording.
• The device will playback the recorded message after a beep.
To check your OGM1 again, press briefly.
When no outgoing message is recorded, a pre-programmed OGM will be used.
Direct memories can only be overwritten, not erased.
To disable the sleep mode, press .

Topcom Allure 270 15
Topcom Allure 270
ENGLISH
13.1.2 OGM2
OGM2 is the message that the caller will hear that is calling from the telephone number which
is set in the menu ‘OGM2 CID NO’.
When the Allure 270 receives the preprogrammed Caller ID number, this message will be
playbacked instead of OGM1. With this function you can record dedicated messages for one
person.
a. To record OGM2
• Press and hold .
• After you hear a beep, release and start saying you outgoing message.
• Press again to end recording.
• The device will playback the recorded message after a beep.
To check your OGM2 again, press briefly.
b. To set the OGM2 caller ID number
• Press for 3 seconds, the display language is shown.
• Press repeatedly until ‘OGM2 CID NO‘ is displayed.
• Enter the telephone number by means of the numerical keypad.
• Press confirm.
13.2 Turning Answering Machine ON/OFF
• Press to switch the answering machine ON or OFF. The setting is displayed.
13.3 Day and Time stamp
Every time a message is recorded, the date and time will also be stored.
When playing back a message, the date and time of the recording will be announced before
the message. The language of the Voice Prompt is indicated on the giftbox. The display
language of the device functions is the same as the voice prompt.
13.4 Number of rings
To set the number of rings before the telephone answers a call:
• Press and hold the on/off button until ‘AUTO RINGER X’ is displayed.
• Press or to select the number of rings (1-6).
If you set the number of rings to 1, the talking caller ID will not work because the time for
pronouncing the number is too short.
13.5 Messages
After answering the call, the caller will hear your outgoing message (OGM).
He can record a message (max 30 seconds) after the beep. As soon as you have new
messages the number of new messages will be displayed.
The recording will be interrupted when it detect silence for 7 seconds or when you pick up a
the telephone.

16 Topcom Allure 270
Topcom Allure 270
13.6 Playback of Incoming Messages
• Press to play all new messages. For each message, the internal voice announces the
day and time the message was recorded.
• During playback, you can go to next message by pressing or to the previous message
by pressing .
• To stop playback press .
• To delete the actual message press and hold button during playback of the message.
• To increase the volume during playback, press briefly.
• To decrease the volume, press briefly.
• After you have listened to the new messages, press the and hold to listen to all stored
messages.
13.7 Recording a conversation
A conversation of maximum 3 minutes can be recorded.
To start recording, press for 3 seconds. A beep will confirm that the recording started.
To end recording, press again.
To playback, press briefly in standby.
13.8 Memory Full
The display indicates when the memory is full.
When there is a new incomming call when the memory is full, the oldest message will be
deleted.
13.9 Remote Operation
The answering machine can be operated remotely using a touch-tone phone (DTMF tone
selection system).
13.9.1 Setting the security code
The 4 digit remote code is necessary for remote operation (default: 0123).
To set the code:
• Press for 3 seconds, the display language is shown.
• Press repeatedly until ‘SET REMOTE CODE‘ is displayed.
• Enter the new code by means of the numerical keypad.
• Press confirm.
If no button is pressed within 10 seconds, the unit will return to standby mode.

Topcom Allure 270 17
Topcom Allure 270
ENGLISH
13.9.2 Using the remote operation
• Call your machine, the unit will turn on after 10 rings and you will hear the OGM
message.
• After the beep, slowly dial the Security code, you will hear one short beeps for
confirmation.
• Enter the next codes to use the desired function.
14 Technical Data
Dialing mode: Tone (DTMF)
Flash: 100/300/600ms
Caller ID: DTMF/FSK
Total recording time: 17 minutes (including OGM, ICM and Conversation
recording time)
Batteries: 3 x 1.5V, AAA non-rechargeable
Power supply: DC 9V
Ambient temperature: +5 °C to +45 °C
Permitted relative air humidity: 25 to 85 %
#1
#2
#3
#4
#5
#7
#8
#9
#0
*1
*2
*3
*4
*5
Broadcast the next message
Broadcast the previous message
Delete the actual message
To stop the operation
To broadcast the outgoing message (Press */# to stop)
To broadcast the message (Press */# to stop)
To broadcast all messages
To broadcast the new messages
Exit the remote control
To change OGM1
To change OGM2
To set the special incoming number. Enter the number and press # to confirm. The
number will be broadcasted for confirmation
To set the monitor function OFF, when the monitor function is on, you can hear the
noise in the room nearby the telephone
To set the monitor function ON

18 Topcom Allure 270
Topcom Allure 270
15 Topcom warranty
15.1 Warranty period
The Topcom units have a 24-month warranty period. The warranty period starts on the day
the new unit is purchased.
Consumables or defects causing a negligible effect on operation or value of the equipment
are not covered.
The warranty has to be proven by presentation of the original purchase receipt, on which the
date of purchase and the unit-model are indicated.
15.2 Warranty handling
A faulty unit needs to be returned to a Topcom service centre including a valid purchase note.
If the unit develops a fault during the warranty period, Topcom or its officially appointed
service centre will repair any defects caused by material or manufacturing faults free of
charge.
Topcom will at its discretion fulfil its warranty obligations by either repairing or exchanging
the faulty units or parts of the faulty units. In case of replacement, colour and model can be
different from the original purchased unit.
The initial purchase date shall determine the start of the warranty period. The warranty period
is not extended if the unit is exchanged or repaired by Topcom or its appointed service
centres.
15.3 Warranty exclusions
Damage or defects caused by incorrect treatment or operation and damage resulting from
use of non-original parts or accessories not recommended by Topcom are not covered by
the warranty.
The warranty does not cover damage caused by outside factors, such as lightning, water and
fire, nor any damage caused during transportation.
No warranty can be claimed if the serial number on the units has been changed, removed or
rendered illegible.

Topcom Allure 270 19
Topcom Allure 270
FRANÇAIS
1 Avant la première utilisation 20
1.1 Utilisation prévue 20
1.2 Identification de l’appelant (Caller ID) 20
1.3 Connexion 20
2 Nettoyage 20
3 Mise au rebut de l’appareil (environnement) 21
4 Conseil de sécurité 21
5 Boutons/DEL 22
6Écran 22
7 Installation 23
7.1 Installation des piles 23
7.2 Installation de l’alimentation et du cordon téléphonique 23
8 Bien démarrer 24
8.1 Initialisation 24
8.2 Réglages 24
8.3 Passer un appel 26
8.4 Rappel du dernier numéro composé 26
8.5 Music on hold 26
8.6 Volume de sonnerie 26
8.7 Touche Flash 26
9 Caller ID 27
9.1 Informations générales 27
9.2 Liste d’appels 27
9.3 Caller ID parlante 27
9.4 Parcourir la liste d’appels 27
9.5 Appeler un numéro de la liste d’appels 27
9.6 Effacer des numéros de la liste d’appels 28
9.7 Liste VIP 28
9.8 Boîte vocale 29
10 Répertoire 29
10.1 Utilisation du clavier alphanumérique 29
10.2 Ajouter un numéro au répertoire 29
10.3 Sélectionner et appeler un numéro du répertoire 29
10.4 Changer un numéro et un nom dans le répertoire 30
10.5 Effacer un numéro et un nom du répertoire 30
11 Numéros de mémoire 30
11.1 Ajouter un numéro à la mémoire directe 30
11.2 Appeler un numéro de mémoire directe 30
12 Mode sommeil 31
13 Répondeur 31
13.1 Enregistrer un message sortant (OGM) 31
13.2 Activer / désactiver le répondeur 32
13.3 Jour et heure 32
13.4 Nombre de sonneries 32
13.5 Messages 32
13.6 Lecture des messages entrants 33
13.7 Enregistrer une conversation 33
13.8 Mémoire pleine 33
13.9 Commande à distance 33
14 Données techniques 34
15 Garantie Topcom 35
15.1 Période de garantie 35
15.2 Traitement de la garantie 35
15.3 Exclusions de garantie 35

20 Topcom Allure 270
Topcom Allure 270
1 Avant la première utilisation
Nous vous remercions d’avoir acheté ce nouveau téléphone de bureau avec identification de
l’appelant.
1.1 Utilisation prévue
Ce produit est prévu pour être connecté à l’intérieur à une ligne téléphonique analogique
PSTN.
1.2 Identification de l’appelant (Caller ID)
L’identification de l’appelant est un service de l’opérateur. Dès que vous serez abonné au
service Caller ID, le téléphone affichera le numéro de téléphone de l’appelant.
1.3 Connexion
Cet appareil a été conçu et fabriqué pour satisfaire à la norme 98/482/EC, en référence à la
connexion paneuropéenne d’un terminal au Public Switching Telephone Network (PSTN) et
suivant les directives établies par la Directive 1999/5/EC sur les équipements
radioélectriques et la reconnaissance réciproque de leur conformité. Toutefois, étant donné
qu’il existe certaines différences dans les PSTN d’un pays à l’autre, les mesures de
vérification en elles-mêmes ne constituent pas une garantie inconditionnelle du
fonctionnement optimal dans tous les points de connexion au PSTN d’un quelconque pays.
Si des problèmes surviennent, veuillez contacter votre distributeur en premier lieu.
En tous cas, le client est tenu de respecter les conditions d’utilisation pour lesquelles le
produit a été créé ainsi que d’éviter d’utiliser le produit dans des réseaux privés ou publics
clairement différents de ceux établis dans l’Union européenne.
2 Nettoyage
Nettoyez le téléphone avec un tissu légèrement humide ou avec un chiffon antistatique.
N’utilisez jamais d’agents de nettoyage ou de solvants abrasifs.
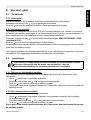
Pour utiliser la fonction ’Caller ID’ (affichage de l’appelant), ce service
doit être activé sur votre ligne téléphonique. Normalement, vous devez
souscrire un abonnement supplémentaire auprès de votre opérateur
pour activer cette fonction. Si vous ne possédez pas la fonction Caller ID
sur votre ligne, les numéros entrants ne s’afficheront PAS à l’écran de
votre téléphone.
Sidan laddas...
Sidan laddas...
Sidan laddas...
Sidan laddas...
Sidan laddas...
Sidan laddas...
Sidan laddas...
Sidan laddas...
Sidan laddas...
Sidan laddas...
Sidan laddas...
Sidan laddas...
Sidan laddas...
Sidan laddas...
Sidan laddas...
Sidan laddas...
Sidan laddas...
Sidan laddas...
Sidan laddas...
Sidan laddas...
Sidan laddas...
Sidan laddas...
Sidan laddas...
Sidan laddas...
Sidan laddas...
Sidan laddas...
Sidan laddas...
Sidan laddas...
Sidan laddas...
Sidan laddas...
Sidan laddas...
Sidan laddas...
Sidan laddas...
Sidan laddas...
Sidan laddas...
Sidan laddas...
Sidan laddas...
Sidan laddas...
Sidan laddas...
Sidan laddas...
Sidan laddas...
Sidan laddas...
Sidan laddas...
Sidan laddas...
Sidan laddas...
Sidan laddas...
Sidan laddas...
Sidan laddas...
Sidan laddas...
Sidan laddas...
Sidan laddas...
Sidan laddas...
Sidan laddas...
Sidan laddas...
Sidan laddas...
Sidan laddas...
Sidan laddas...
Sidan laddas...
Sidan laddas...
Sidan laddas...
Sidan laddas...
Sidan laddas...
Sidan laddas...
Sidan laddas...
Sidan laddas...
Sidan laddas...
Sidan laddas...
Sidan laddas...
Sidan laddas...
Sidan laddas...
Sidan laddas...
Sidan laddas...
Sidan laddas...
Sidan laddas...
Sidan laddas...
Sidan laddas...
Sidan laddas...
Sidan laddas...
Sidan laddas...
Sidan laddas...
Sidan laddas...
Sidan laddas...
Sidan laddas...
Sidan laddas...
Sidan laddas...
Sidan laddas...
Sidan laddas...
Sidan laddas...
Sidan laddas...
Sidan laddas...
Sidan laddas...
Sidan laddas...
Sidan laddas...
Sidan laddas...
Sidan laddas...
Sidan laddas...
Sidan laddas...
Sidan laddas...
Sidan laddas...
Sidan laddas...
Sidan laddas...
Sidan laddas...
Sidan laddas...
Sidan laddas...
Sidan laddas...
Sidan laddas...
Sidan laddas...
Sidan laddas...
Sidan laddas...
Sidan laddas...
Sidan laddas...
Sidan laddas...
Sidan laddas...
Sidan laddas...
Sidan laddas...
Sidan laddas...
Sidan laddas...
Sidan laddas...
Sidan laddas...
Sidan laddas...
Sidan laddas...
Sidan laddas...
Sidan laddas...
Sidan laddas...
Sidan laddas...
Sidan laddas...
Sidan laddas...
Sidan laddas...
Sidan laddas...
Sidan laddas...
Sidan laddas...
Sidan laddas...
Sidan laddas...
Sidan laddas...
Sidan laddas...
Sidan laddas...
Sidan laddas...
Sidan laddas...
Sidan laddas...
Sidan laddas...
Sidan laddas...
Sidan laddas...
Sidan laddas...
Sidan laddas...
Sidan laddas...
Sidan laddas...
Sidan laddas...
Sidan laddas...
Sidan laddas...
Sidan laddas...
Sidan laddas...
Sidan laddas...
-
 1
1
-
 2
2
-
 3
3
-
 4
4
-
 5
5
-
 6
6
-
 7
7
-
 8
8
-
 9
9
-
 10
10
-
 11
11
-
 12
12
-
 13
13
-
 14
14
-
 15
15
-
 16
16
-
 17
17
-
 18
18
-
 19
19
-
 20
20
-
 21
21
-
 22
22
-
 23
23
-
 24
24
-
 25
25
-
 26
26
-
 27
27
-
 28
28
-
 29
29
-
 30
30
-
 31
31
-
 32
32
-
 33
33
-
 34
34
-
 35
35
-
 36
36
-
 37
37
-
 38
38
-
 39
39
-
 40
40
-
 41
41
-
 42
42
-
 43
43
-
 44
44
-
 45
45
-
 46
46
-
 47
47
-
 48
48
-
 49
49
-
 50
50
-
 51
51
-
 52
52
-
 53
53
-
 54
54
-
 55
55
-
 56
56
-
 57
57
-
 58
58
-
 59
59
-
 60
60
-
 61
61
-
 62
62
-
 63
63
-
 64
64
-
 65
65
-
 66
66
-
 67
67
-
 68
68
-
 69
69
-
 70
70
-
 71
71
-
 72
72
-
 73
73
-
 74
74
-
 75
75
-
 76
76
-
 77
77
-
 78
78
-
 79
79
-
 80
80
-
 81
81
-
 82
82
-
 83
83
-
 84
84
-
 85
85
-
 86
86
-
 87
87
-
 88
88
-
 89
89
-
 90
90
-
 91
91
-
 92
92
-
 93
93
-
 94
94
-
 95
95
-
 96
96
-
 97
97
-
 98
98
-
 99
99
-
 100
100
-
 101
101
-
 102
102
-
 103
103
-
 104
104
-
 105
105
-
 106
106
-
 107
107
-
 108
108
-
 109
109
-
 110
110
-
 111
111
-
 112
112
-
 113
113
-
 114
114
-
 115
115
-
 116
116
-
 117
117
-
 118
118
-
 119
119
-
 120
120
-
 121
121
-
 122
122
-
 123
123
-
 124
124
-
 125
125
-
 126
126
-
 127
127
-
 128
128
-
 129
129
-
 130
130
-
 131
131
-
 132
132
-
 133
133
-
 134
134
-
 135
135
-
 136
136
-
 137
137
-
 138
138
-
 139
139
-
 140
140
-
 141
141
-
 142
142
-
 143
143
-
 144
144
-
 145
145
-
 146
146
-
 147
147
-
 148
148
-
 149
149
-
 150
150
-
 151
151
-
 152
152
-
 153
153
-
 154
154
-
 155
155
-
 156
156
-
 157
157
-
 158
158
-
 159
159
-
 160
160
-
 161
161
-
 162
162
-
 163
163
-
 164
164
-
 165
165
-
 166
166
-
 167
167
-
 168
168
-
 169
169
-
 170
170
-
 171
171
-
 172
172


på andra språk
- italiano: Topcom 270 Manuale utente
- français: Topcom 270 Manuel utilisateur
- Türkçe: Topcom 270 Kullanım kılavuzu
- dansk: Topcom 270 Brugermanual
Relaterade papper
-
Topcom Magio 105 Användarmanual
-
-
Topcom Fidelity 1010 Användarmanual
-
Topcom Sologic A811 Användarguide
-
 Sedna SE-DECT-V1 Användarmanual
-
-
-
-
-
Topcom BUTLER M1250 Användarmanual
