Denver TCU-211 Användarmanual
- Kategori
- CD-spelare
- Typ
- Användarmanual
Denna manual är också lämplig för

INSTRUCTION MANUAL
Please read this manual carefully before using, and keep it for future reference.
CD BOOMBOX
TCU-211


Content
English -----------------------------------------------------------------------------2
Deutsche---------------------------------------------------------------------------9
Español----------------------------------------------------------------------------16
Français---------------------------------------------------------------------------23
Italiano-----------------------------------------------------------------------------30
Nederlands-----------------------------------------------------------------------37
Svenska---------------------------------------------------------------------------44

Safety, Environmental and Setup Instructions
ENG
ENVIRONMENTAL PROTECTION
Do not dispose of this product with the normal household
waste at the end of its life cycle. Return it to a collection
point for the recycling of electrical and electronic devices.
This is indicated by the symbol on the product, user
manual or packaging
The materials are reusable according to their markings. By
reusing, recycling or other forms of utilization of old devices you
make an important contribution to the protection of our
environment.
Please contact your local authorities for details about collection
points.
WARNING
Risk of electric shock
Do not open!
Caution: To reduce the risk of electric shock, do not remove the
cover (or back). There are no user serviceable parts inside.
Refer servicing to qualified service personnel.
This symbol indicates the presence of dangerous
voltage inside the enclosure, sufficient enough to
cause electric shock.
This symbol indicates the presence of important
operating and maintenance instructions for the device
Used batteries are hazardous waste and NOT to be
disposed of with the household waste! As a
consumer you are legally obligated to return all
batteries for environmentally responsible recycling –
no matter whether or not the batteries contain harmful
substances*)
Return batteries free of charge to public collection points in your
community or shops selling batteries of the respective kind.
Only return fully discharged batteries
*) marked Cd = cadmium, Hg = mercury, Pb = lead
Only use mercury and cadmium-free batteries.
Used batteries are hazardous waste and NOT to be
disposed of with the household waste!!!
Keep batteries away from children. Children migh
swallow batteries
Contact a physician immediately if a battery was
swallowed.
Check your batteries regularly to avoid battery leakage.
Batteries shall not be exposed to excessive heat such as
sunshine, fire or the like.
CAUTION: Danger of explosion if battery is incorrectly
replaced
Replace only with the same or equivalent type
CAUTION - INVISIBLE LASER
RADIATION WHEN OPENING THE
COVER OR PRESSING THE SAFETY
INTERLOCK. AVOID EXPOSURE TO
THE LASER BEAM.
The device is equipped with a “Class 1 Laser”. Avoid
exposure to the laser beam as this could cause eye
injuries.
Use the device in dry indoor environments only.
Protect the device from humidity.
This apparatus is for moderate climates areas
use, not suitable for use in tropical climates
countries.
No objects filled with liquids, such as vases, shall
be placed on the apparatus.
The mains plug or an appliance coupler is used
as the disconnect device, the disconnect devices
shallremain readily operable.
Connect this device to a properly installed and
earthed wall outlet only. Make sure the mains
voltage corresponds with the specifications on
the rating plate.
Make sure the mains cable stays dry during
operation. Do not pinch or damage the mains
cable in any way.
A damaged mains cable or plug must
immediately be replaced by an authorized service
center.
In case of lightning, immediately disconnect the
device from the mains supply.
Children should be supervised by parents when
using the device.
Clean the device with a dry cloth only.
Do NOT use CLEANING AGENTS or ABRASIVE
CLOTHS!
Do not expose the device to direct sunlight or
other heat sources.
Install the device at a location with sufficient
ventilation in order to prevent heat accumulation.
Do not cover the ventilation openings!
Install the device at a safe and vibration-free
location.
Install the device as far away as possible from
computers and microwave units; otherwise radio
reception may be disturbed.
Do not open or repair the enclosure. It is not safe
to do so and will void your warranty. Repairs only
by authorized service/ customer center.
No naked flame sources, such as lighted
candles, should be placed on the unit.
When you are necessary to ship the unit store it
in its original package. Save the package for this
purpose.
In case of malfunction due to electrostatic
discharge or fast transient (burst), remove and
reconnect the power supply.
If the unit is not using for a long period of time,
disconnect it from the power supply by
unplugging the power plug. This is to avoid the
risk of fire.
2

3
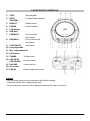
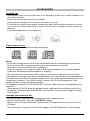
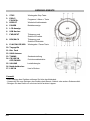
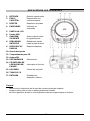
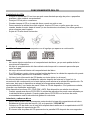
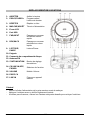
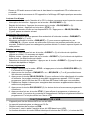
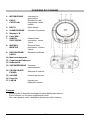
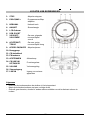
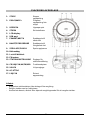
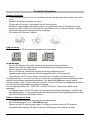
LOCATION OF CONTROLS
1. STOP
Stop playback
2. PROG
/FOLDER+
Program/Folder playback
3. REPEAT
Repeat tracks
4. POWER
Power indicator
5. LCD display
6. USB port
7. FWD/NEXT
Go to next title
fast forward
8. REV/BACK
Go to previous title
fast reverse
9. PLAY/PAUSE
Play/Pause
10. Carrying handle
11. Disc compartment lid
12. FM antenna
13. TUNING
Tuning control
14. CD/LINE IN
OFF/FM/USB
Function switch
15. VOLUME
Volume control
16. AC socket
17. LINE IN
External appliance socket
General
- Pull the power plug from the electrical outlet before cleaning.
- Clean the exterior with a lightly damp cloth.
- Do not use petrol, alcohol or other abrasive cleansers to clean the exterior.
E
NG

4
BEFORE USE
Unpacking
- remove all packaging.
- Check for presence of all parts and for transport damage. In case of damage or incomplete
delivery, please contact your dealer (-> Guarantee).
- Please keep the packaging. The appliance can be stored in it if it is not used for a longer period
of time.
- Place the appliance on a level, stable, clean and dry surface.
- Ensure that there is sufficient ventilation. Keep a minimum distance of 5cm between the
product and other objects or walls.
Power supply
- The appliance can either be powered through an electrical outlet or with batteries.
- Insert the power cable into the AC~IN at the back of the appliance. Connect the power plug to
a suitable electrical outlet. Make sure that the power supply voltage is the same as needed for
the appliance.
Battery operation
- Open the battery compartment at the bottom of the appliance.
- Insert 6 “C” size (UM-2) batteries, according to the polarity markings inside the battery
compartment and on the batteries.
- Use batteries of high quality only. Batteries of low quality might leak and cause damage. Do not
use new and old batteries together. Close the battery compartment lid after insert the batteries.
- The appliance is ready for operation.
- IMPORTANT: Do not use the appliance with an electrical outlet and batteries at the same time.
Remove batteries before connecting the appliance to mains power and remove the power
cable if the appliance is to be powered by batteries
- NOTE: The appliance draws a small amount of power even if it is not turned on. If you do not
use the appliance for a longer period of time, disconnect the power plug or remove all batteries.
IMPORTANT NOTE
- Automatic switch-off: The appliance will switch off about 8 – 10 minutes after finishing last
playback or after pressing the PLAY/PAUSE button to pause playback. If you will not use the
appliance any longer, set the function switch to the OFF position and unplug the power cable
with plug.
RADIO OPERATION
Antenna
- The appliance is equipped with a telescopic antenna located at the back of the appliance. Pull
out the antenna completely. Rotate and reposition the appliance to achieve the best reception.
Selecting a station
- Set the function switch (14) to FM position.
- Rotate the Tuning control to seek the next strong and clear radio station.
ENG

5
CD OPERATION
Handling CDs
- Although the quality of the compact disc is not affected by a little dust or small scratches, you
should care for them.
- Protect the compact disc from dust or scratches.
- Always store the compact disc in the disc case when not in use.
- To maintain the original sound quality, occasionally wipe off the compact disc with a soft cloth,
from center to the outer edge (not in a circular motion). Do not use petrol or other solvents for
cleaning.
- Touch the compact disc on the edges only.
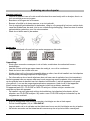
Audio Compact Discs
- Only use compact discs with the logo shown below.
Notes:
- Do not insert foreign objects into the disc compartment as this could damage the mechanics.
- Do not leave the disc compartment open longer than necessary to avoid dirt.
- Do not touch the lens inside the disc compartment.
- When the compact disc is heavily soiled or has many fingerprints on it, then the playback
quality may be affected (delayed playback or “skipping”).
- The information from the compact disc is read by a laser from an optical lens (do not touch).
If the appliance is brought into a warm room after being in the cold, a build up of condensation on
the optical lens may affect the playback quality. In this case, let the appliance adjust to the room
temperature for approx. 1 hour before using it. Remove the CD from the appliance. If the
problem persists, consult an authorized dealer.
This appliance reads CD, CD-R/-RW and MP3-CD discs. Other discs are not supported by this
appliance.
- When playing CD-R/-RW discs the playback quality might be influenced by the quality of the
burned disc. When burning CD-R/-RW disc with audio files we recommend using the slowest
burning speed
Inserting and removing a disc
- Flip the carrying handle back, before opening the disc compartment lid.
- Set the function switch (14) to the “CD/LINE IN” position.
- Place an audio CD with its label side upward in the CD compartment and close the lid of the
CD player.
- The total number of tracks on the CD will be appear in the LED Display after a few seconds.
ENG

6
Playing a disc
- Track 1 will be started after inserting a CD. The playback starts playing the first track.
- Pausing playback: Press the “PLAY/PAUSE” button (9).
- Continuing playback: Press the “PLAY/PAUSE” button (9) again.
- Stopping playback: Press the “STOP” button (1).
- Forward to next folder for MP3-CD discs: Press “PROG/FOLDER+” (2) to forward to next folder.
Searching a track
- During playback, titles can be searched using the “FWD/NEXT” or “REV/BACK” button (7 or 8).
- Press and hold “FWD/NEXT” (7) to fast forward or “REV/BACK” (8) to reverse in order to find a
particular position with a track. Let go when you reach the desired position. Playback will now
continue from this position.
Repeat a track
- Repeat 1: Press the “REPEAT” button (3) once, the repeat indicator will flash continuously.
This single track will be repeated.
- Repeat all: Press the “REPEAT” button (3) twice, the repeat indicator will stay lighted. The
whole disc will be repeated.
- To cancel repeat function: Press the “REPEAT” button (3) until the lighted repeat indicator
turned
off.
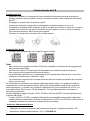
Programmed playback
1. Set the appliance to “STOP” mode and press the PROG/FOLDER+ button (2). P lights
up & P01 flashes.
2. Press “FWD/NEXT” or “REV/BACK” button (7 or 8) to select your desired tracks.
3. Press the PROG/FOLDER+ button (2) to confirm selected title and save to memory.
The next track number to be programmed and appears: P02.You can program up to 20
CD-title or 99 MP3 titles in any desired order.
4. Repeat the steps above to save additional tracks into the program memory.
5. Press the PLAY/PAUSE button (9). The playback of all programmed tracks starts.
6. Press the STOP button (1) twice to delete the program and to return to normal mode.
Opening the disc compartment lid also deleted the program and P is not shown in the
LCD display anymore.
USB OPERATION
- The appliance can play MP3 files from a USB stick.
- The maximum handling capacity is up to 32 GB.
- Set the function switch to USB position.
- Track 1 will be started after inserting a USB media into the USB port.
- The playback function of USB mode is identical to MP3 CD playback (-> CD operation).
LINE - IN CONNECTION
- Insert one side of the audio cable (requires 3.5mm stereo plug, not supplied) into the line- out
jack or phones jack on your MP3 player and the other side to the aux-in jack on the unit.
- Set the function switch (14) to CD/LINE IN position.
- Turn on your external device and follow the playback instruction.
ENG

7
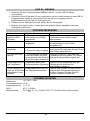
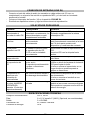
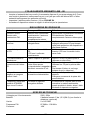
TROUBLESHOOTING
Symptoms
Possible cause
Solution
Noise or sound
distorted on FM
broadcast
Station not tuned properly.
Telescopic antenna is not
fully extended
Fine tune the FM broadcast station. Fully
extend the FM telescopic antenna
Appliance does not
work.
Power cable is not
connected properly.
Check if the power cable is properly
connected to the AC socket at the back of
the appliance and to an electrical outlet.
Unable to play a CD
Unit not in CD function
mode.
CD is installed incorrectly.
Select CD function mode.
Insert CD with label side up.
CD skips while
playing
Disc is dirty or scratched.
Wipe CD with clean cloth or use
another disc.
Intermittent sound
from CD player
Dirty or defective disc. Dirty
pick up lens.
Player is subject to
excessive shock or
vibration.
Clean or replace the defective disc. Use a
CD-lens cleaning disc to clean the lens.
Relocate the player away from shock
or vibration.
Appliance does not
react to pressed
buttons/keys
Malfunction due to
electrostatic discharge.
Disconnect the appliance from the power
supply.
Connect the power plug again to an
electrical outlet.
Appliance enters
STANDBY mode
after 10 minutes
(approx.)
Power saving function
enabled
This is normal operation due to new ECO
regulation requirements this product
incorporates a power saving feature.
TECHNICAL SPECIFICATIONS
Power supply: 230V~ 50Hz
Power consumption: 14W Max
Standby consumption: 0.5W
Power Amps: 2 x 1W
Max Output Power: 2 x 1.1W
Frequency bands: FM 87.5 - 108 MHz
Batteries: 9V
6 x 1.5V "C" size/UM-2/LR14 (Optional, not supplied)
ENG

ALL RIGHTS RESERVED, COPYRIGHT DENVER ELECTRONICS A/S
Electric and electronic equipment and included batteries contains materials, components and
substances that can be hazardous to your health and the environment, if the waste material (discarded
electric and electronic equipment and batteries) is not handled correctly.
Electric and electronic equipment and batteries is marked with the crossed out trash can symbol, seen
below. This symbol signifies that electric and electronic equipment and batteries should not be
disposed of with other household waste, but should be disposed of separately.
As the end user it is important that you submit your used batteries to the approriate and designated
facility. In this manner you make sure that the batteries are recycled in accordance with legislature and
will not harm the environment.
All cities have established collection points, where electric and electronic equipment and batteries can
either be submitted free of charge at recycling stations and other collection sites, or be collected from
the households. Additional information is available at the technical department of your city.
Hereby, Inter Sales A/S declares that the radio equipment type TCU-211 is in compliance with
Directive 2014/53/EU. The full text of the EU declaration of conformity is available at the following
internet address: www.denver‐electronics.comandthenclickthesearchICONontoplineofwebsite.Write
modelnumber:tcu‐211Nowenterproductpage,andreddirectiveisfoundunderdownloads/otherdownloads
Operating Frequency Range: FM 87.5 - 108 MHz
Max Output Power: 2 x 1.1W
Imported by:
DENVER ELECTRONICS A/S
Omega 5A, Soeften
DK-8382 Hinnerup
Denmark
www.facebook.com/denverelectronics
8
ENG

Sicherheits- / Umwelt- / Aufstellhinweise
GER
HINWEIS ZUM UMWELTSCHUTZ
Dieses Produkt darf am Ende seiner Lebensdauer nicht über den
normalen Haushaltsabfall entsorgt werden, sondern muss an
einem Sammelpunkt für das Recycling von elektrischen und
elektronischen Geräten abgegeben werden. Das Symbol auf
dem Produkt in der Gebrauchsanleitung oder auf der
Verpackung weist darauf hin
Die Werkstoffe sind gemäß Ihrer Kennzeichnung wiederverwertbar. Mit
der Wiederverwendung der stofflichen Verwertung oder anderen Formen
der Verwertung von Altgeräten, leisten Sie einen wichtigen Beitrag zum
Schutze unserer Umwelt
Bitte fragen Sie Ihre Gemeindeverwaltung nach der zuständigen
Entsorgungsstelle.
WARNUNG
Gefahr elektrischer Schläge
Gerät nicht öffnen!
Zur Vermeidung von Stromschlägen darf dieses Gerät nicht geöffnet
werden. Es enthält keine Bauteile, die vom Benutzer gewartet oder
repariert werden können, Wartungs- und Reparaturarbeiten dürfen nur
von Fachpersonal ausgeführt werden.
Dieses Symbol zeigt an, dass im Inneren des
Gerätes gefährliche Spannungen vorhanden sind,
und einen Stromschlag verursachen können.
Dieses Symbol weist auf wichtige Bedienungs- und
Wartungsanweisungen bezüglich des Geräts hin.
Verbrauchte Batterien sind Sonderabfall und gehören
NICHT in den Hausmüll! Als Verbraucher sind Sie
gesetzlich verpflichtet alle Batterien und Akkus egal
ob Schadstoffe *) enthalten oder nicht zur
umweltschonenden Entsorgung zurückzugeben.
Sie können alle Batterien und Akkus bei den öffentlichen
Sammelstellen in Ihrer Gemeinde oder dort unentgeltlich ab-
geben wo Batterien und Akkus der betreffenden Art verkauf
werden.
Batterien und Akkus bitte nur in entladenem Zustand abgeben.
*) gekennzeichnet mit Cd = Cadmium, Hg =Quecksilber, Pb = Blei
Verwenden Sie nur Batterien, die frei von Quecksilber &
Cadmium sind.
Batterien dürfen nicht in die Hände von Kindern
gelangen. Kinder können Batterien verschlucken. Wurde
eine Batterie verschluckt, muss sofort medizinische Hilfe
in Anspruch genommen werden.
Überprüfen Sie regelmäßig die Batterien um ein
Auslaufen der Batterie zu vermeiden.
Batterien dürfen keiner Hitze (z. B. Sonnenbestrahlung),
Feuer ausgesetzt werden.
ACHTUNG: Explosionsgefahr bei falscher
Batteriehandhabung. Nur durch denselben oder
baugleichen Batterietyp ersetzen.
VORSICHT – UNSICHTBARE LASERSTRAHLUNG
TRITT AUS, WENN DER DECKEL GEÖFFNET, UND
DIE SICHERHEITSVERRIEGELUNG
NIEDERGEDRÜCKT WIRD. SETZEN SIE SICH
NICHT DEM STRAHL AUS.
Das Gerät verfügt über einen „Klasse 1 Laser“. Setzen
Sie sich nicht dem Laserstrahl aus, dies kann zu
Augenverletzungen führen.
Das Gerät ausnahmslos nur in trockenen Innenräumen
betreiben.
Niemals mit Feuchtigkeit in Verbindung bringen.
Schützen Sie das Gerät vor tropfenden oder
spritzenden Flüssigkeiten, und stellen Sie keine mit
Flüssigkeit gefüllten Gefäße (z. B. Vasen) auf das
Gerät.
Betreiben Sie das Gerät nur in einem gemäßigten
Klima.
Schließen Sie das Gerät nur an eine vorschriftsmäßig
installierte und geerdete Netzsteckdose an. Die
Netzspannung muss mit den Angaben auf dem
Typenschild des Gerätes übereinstimmen.
Achten Sie darauf, dass im Betrieb das Netzkabel
niemals nass oder feucht wird. Das Netzkabel darf
nicht eingeklemmt oder anderweitig beschädigt
werden.
Der Netzstecker dient als Trennvorrichtung und muss
ohne Schwierigkeiten benutzbar sein.
Achten Sie beim Verlegen des Netzkabels darauf,
dass es beim Betrieb des Gerätes nicht zu einer
Stolperfalle werden kann.
Lassen Sie beschädigte Netzstecker oder Netzkabel
sofort von dem Kundenservice austauschen.
Prüfen Sie das Gerät, das Netzkabel sowie den
Netzstecker regelmäßig auf sichtbare
Beschädigungen. Verwenden Sie das Gerät auf
keinen Fall, wenn Sie Beschädigungen festgestellt
haben.
Benutzen Sie das Gerät nicht, wenn es
Beschädigungen aufweist, wenn es heruntergefallen
ist oder nicht einwandfrei funktioniert.
Sie dürfen das Gehäuse nicht öffnen oder reparieren.
In diesem Falle ist die Sicherheit nicht gegeben und
die Garantie erlischt. Reparaturen sind ausschließlich
durch einen Service-Center/Kundencenter
auszuführen.
Ziehen Sie bei Gewitter oder einer längerer
Abwesenheit (z.B. Urlaub) den Netzstecker und
entnehmen Sie ggf. die Batterien.
Kinder sollten das Gerät nur unter Aufsicht
Erwachsener betreiben.
Lassen Sie das Gerät während des Gebrauchs nicht
unbeaufsichtigt.
Das Gerät ausnahmslos nur mit einem trockenen
Abstaubtuch reinigen.
KEINE REINIGUNGSMITTEL oder TÜCHER mit
GROBEN Material verwenden!!!
Das Gerät keiner Sonnenbestrahlung oder anderen
Hitzequellen aussetzen.
Stellen Sie das Gerät so auf, dass kein Hitzestau
entstehen kann, also frei und gut belüftet.
Achten Sie darauf, dass an den Seiten ein
Mindestabstand von 10 cm besteht, um eine
ausreichende Luftzirkulation zu gewährleisten.
Decken Sie niemals die Belüftungsöffnungen zu!!!
Offene Brandquellen, wie z.B. brennende Kerzen,
dürfen nicht auf das Gerät gestellt werden.
Das Gerät an einem sicheren, erschütterungsfreien
Platz aufstellen.
Benutzen Sie das Gerät nicht, wenn es
Beschädigungen aufweist, wenn es heruntergefallen
ist oder nicht einwandfrei funktioniert.
Gerät möglichst weit entfernt von Computern und
Mikrowellengeräten platzieren, da es sonst evtl. zu
Empfangsstörungen im Radiobetrieb kommen kann.
Treten wegen einer elektrostatischen Entladung oder
kurzeitigen Netzüberspannung Fehlfunktionen auf,
setzen Sie das Gerät zurück. Ziehen Sie hierfür den
Netzstecker bzw. Netzadapter und schließen ihn
nach einigen Sekunden wieder an.
9

10
BEDIENELEMENTE
1. STOP
Wiedergabe Stop Taste
2. PROG/
FOLDER+
Programm / Album + Taste
3. REPEAT
Wiederholfunktionstaste
4. POWER
Betriebsanzeige
5. LCD Anzeige
6. USB Buchse
7. FWD/NEXT
Titelsprung und
Suchlauf Vorwärts
8. REV/BACK
Titelsprung und
Suchlauf Rückwärts
9. PLAY/PAUSE/USB
Wiedergabe / Pause Taste
10. Tragegriffe
11. Disc Fach
12. UKW Antenne
13. TUNING
Sendereinstellung
14. CD/LINE IN
OFF/FM/USB
Funktionswahlschalter
15. VOLUME
Lautstärkeregler
16. Netzkabelbuchse
17. LINE IN
Line In Buchse
Generell:
- Zum Reinigen des Gerätes entfernen Sie bitte das Netzkabel.
- Verwenden Sie zum Reinigen des Gerätes kein Benzin, Alkohol oder andere Scheuermittel.
- Reinigen Sie das Gerät nur mit einem leicht feuchten Lappen.
GER

11
INBETRIEBNAHME
Auspacken
Entfernen Sie das Verpackungsmaterial.
Überprüfen sie alle Teile auf Transportschäden, bei Beschädigung oder unvollständiger
Lieferung wenden Sie sich bitte an Ihren Fachhändler (-> Garantie).
Bitte bewahren Sie die Verpackung auf. Das Gerät kann darin aufbewahrt werden, wenn es
für längere Zeit nicht benutzt wird.
Stellen Sie das Gerät auf eine ebene, stabile, saubere und trockene Unterlage.
Sorgen Sie für ausreichende Belüftung. Halten Sie einen Mindestabstand von 5 cm
zwischen dem Produkt und anderen Objekten oder Wänden.
Netzbetrieb
Das Gerät kann über das Stromnetz oder auch mittels Batterien betrieben werden.
Vergewissern Sie sich vor dem Betrieb, dass die SPANNUNGSANGABEN auf dem Gerät
der Spannung in Ihrem Haushalt entsprechen. Wickeln Sie das Netzkabel ab und schließen
Sie es an eine herkömmliche Steckdose an.
Batteriebetrieb (Batterien nicht mitgeliefert)
1. Ziehen Sie das Netzkabel aus der Buchse
2. Öffnen Sie den Deckel des Batteriefachs.
3. Legen Sie 6 Batterien des Typs UM-2 / LR14 ("C" -Größe) 1,5V in das Gerät ein. Stellen Sie
sicher, dass die Batterien der Polung entsprechend eingelegt sind.
4. Schließen Sie den Batteriefachdeckel.
HINWEIS:
Wenn ein Netzkabel angeschlossen ist, wird die Batteriestromversorgung automatisch
unterbrochen.
Wenn Sie das Gerät längere Zeit nicht benützen entfernen Sie das Netzkabel und die Batterien
aus dem Gerät.
Wichtiger Hinweis
Automatischer Standby-Modus
Gemäß ERP2-Richtlinie aktiviert das Gerät automatisch den STANDBY-Modus, falls es ca. 8 -
10 Minuten lang kein Audiosignal zur Verfügung stellt. Um das Gerät weiter zu verwenden,
schalten Sie es aus und erneut wieder ein.
UKW (FM) RADIO BETRIEB
Antenne
Ziehen Sie für einen optimalen Radioempfang die UKW Teleskopantenne für den Empfang
von UKW-Radiosendern vollständig aus und richten Sie diese entsprechend aus.
Sender einstellen
Schalten sie das Gerät ein, indem Sie den Funktionsschalter (14) auf die Position FM
schieben.
Wählen Sie mit der Sendereinstellung (13) die gewünschte Radiostation aus.
Stellen Sie die gewünschte Lautstärke mit dem Lautstärkeregler (15) ein.
GER

12
CD BETRIEB
CD Handhabung
Obwohl die Wiedergabequalität der CD nicht von ein wenig Staub oder kleine Kratzer
beeinträchtigt wird, sollten Sie die CD vor Staub oder Kratzern schützen. Lagern Sie dazu
CD in das Hülle, wenn sie nicht im Gebrauch ist.
Wischen Sie, wenn erforderlich, die CD mit einem weichen Tuch von der Mitte zur
Außenkante (nicht kreisförmig) ab. Verwenden Sie zum Reinigen kein Benzin oder andere
Lösungsmittel.
Berühren Sie die CD nur an den Kanten
Audio Compact Discs
Benützen sie nur CD’s mit folgendem Logo:
Bemerkung:
Dieses Gerät liest CDs, CD-R / -RW und MP3-CDs, andere Discs werden von diesem Gerät
nicht unterstützt.
Führen Sie keine Fremdkörper in das Disc-Fach ein, dies kann die Mechanik beschädigen.
Um eindringen von Schmutz zu verhindern, lassen Sie das Disc-Fach nicht länger als nötig
offen.
Die Informationen von der CD werden mit einem Laser von einer optischen Linse gelesen,
berühren Sie nicht die Linse im Disc-Fach.
Wenn die CD stark verschmutzt ist oder viele Fingerabdrücke enthält, kann die
Wiedergabequalität beeinträchtigt werden (verzögerte Wiedergabe oder "Überspringen").
Wenn ein kaltes Gerät in einen warmen Raum gebracht wird, kann eine Kondensatbildung auf
dem Objektiv die Wiedergabequalität beeinträchtigen. Nehmen Sie in diesem Fall die CD aus
dem Gerät und warten sie ca. 1 Stunde. Wenn das Problem weiterhin besteht, wenden Sie sich
an einen autorisierten Fachhändler.
Die Wiedergabequalität von CD-R / -RW-Discs kann durch die Qualität der gebrannten CD’s
beeinflusst werden. Beim Brennen von CD-R / -RW-Discs mit Audiodateien empfehlen wir die
langsamste Brenngeschwindigkeit.
Einlegen und Entnehmen der CD
Legen Sie den Tragegriff zurück und öffnen Sie das CD Fach.
Schieben Sie den Funktionswahlschalter (14) in die Position CD/LINE IN.
Legen Sie eine Audio CD mit dem Etikett noch oben ein und schließen sie das CD Fach.
GER

13
CD Wiedergabe
Das Gerät liest die CD ein und startet die Wiedergabe des ersten Titels.
Drücken Sie die PLAY/PAUSE Taste (9) um die Wiedergabe zu unterbrechen.
Drücken Sie die PLAY/PAUSE Taste (9) nochmals um die Wiedergabe fortzusetzen.
Drücken Sie die STOP Taste (1) um die Wiedergabe zu stoppen, die Gesamtanzahl der
Titel wird angezeigt.
Drücken Sie PROG/FOLDER+ Taste (2) um bei MP3-CD’s das nächste Album zu wählen.
Titelsuche
Drücken Sie während der Wiedergabe die FWD/NEXT oder REV/BACK Taste (7 oder 8)
um den nächsten bzw. den vorherigen Titel zu wählen.
Drücken und halten Sie während der Wiedergabe die FWD/NEXT oder REV/BACK Taste (7
oder 8) um den Titelsuchlauf vorwärts oder rückwärts zu starten. Nach loslassen der Taste
spielt das Gerät an der Position weiter.
Wiederholte Wiedergabe
Drücken Sie die „REPEAT“ Taste (3) einmal um den gegenwärtigen Titel zu wiederholen, die
Repeat Anzeige blinkt.
Drücken Sie die „REPEAT“ Taste (3) nochmals um die gesamte CD zu wiederholen, die
Repeat Anzeige ist dauerhaft an.
Drücken Sie Die „REPEAT“ Taste nochmals um die Wiederholfunktion abzuschalten.
Programmierte Wiedergabe
1. Sie können Titel nur im „STOP“-Modus programmieren.
2. Drücken Sie die „PROG/FOLDER+“ Taste (2); im Display erscheint die Anzeige „P01“.
3. Verwenden Sie die FWD/NEXT oder REV/BACK Tasten (7 oder 8), um den
gewünschten Titel auszuwählen.
4. Drücken Sie erneut die „PROG/FOLDER+“ Taste (2), um den ausgewählten Titel zu
speichern; im LCD erscheint und blinkt die Anzeige „P02“.
5. Wiederholen Sie die Schritte 2 und 3, um weitere Titel zu speichern. Sie können bis zu
20 Titel einer CD und bis zu 99 Titel einer MP3-Disc programmieren.
6. Drücken Sie die „PLAY/PAUSE“ Taste (9) um die Wiedergabe in der programmierten
Reihenfolge zu starten.
7. Beenden Sie die Wiedergabe durch drücken der „STOP“ Taste (1).
8. Um die programmierten Titel zu löschen, drücken Sie die „STOP“ Taste (1), öffnen Sie
das CD-Laufwerk oder wählen Sie einen anderen Betriebsmodus.
USB BETRIEB
Das Gerät kann MP3 Titel von einem USB Stick abspielen.
Die maximale Kapazität des USB Sticks darf bis zu 32 GB betragen.
Schieben Sie den Funktionsschalter (14) in die USB Position.
Schließen Sie Ihr USB-Gerät an den USB-Port des Geräts an. Das Gerät beginnt, die
Dateien auf dem USB-Gerät zu lesen und startet automatisch mit der Wiedergabe.
Die Wiedergabefunktionen im USB Betrieb sind identisch zu der CD Wiedergabe.
GER

14
LINE IN - EINGANG
1. Schieben Sie den Funktionsschalter (14) auf LINE IN, um den LINE IN-Modus
auszuwählen.
2. Schließen Sie ein Ende des 3.5 mm Audiokabels (nicht im Lieferumfang) an den LINE IN
Eingang dieses Geräts an. Das andere Ende an den Line-Ausgang oder die
Kopfhörerbuchse Ihres externen Audiogeräts an.
3. Schalten Sie Ihr Audiogerät ein und starten Sie die Wiedergabe.
4. Beenden Sie diese Funktion, indem Sie einen anderen Modus auswählen oder das
Audiogerät ausschalten.
STÖRUNGSBEHEBUNG
Problem
Mögliche Ursache
Behebung
Rauschen oder
gestörter UKW
Empfang
Antenne nicht ausgezogen
oder Sender nicht richtig
abgestimmt
Ziehen sie die Antenne vollständig aus.
Versuchen sie den Sender exakt
abzustimmen.
Keine Funktion
Netzkabel ist nicht richtig
eingesteckt.
Überprüfen Sie ob das Netzkabel richtig
in der Steckdose und im Gerät
eingesteckt ist.
CD wird nicht
abgespielt
Gerät ist nicht im CD Betrieb
CD ist nicht richtig eingelegt
Schieben Sie den Funktionsschalter auf
die Position CD und legen Sie die CD mit
dem Etikett nach oben ein.
CD setzt aus oder
springt
CD ist schmutzig, ist defekt
oder hat Kratzer, die Linse
ist verschmutzt das Gerät ist
Erschütterungen ausgesetzt.
Reinigen Sie die CD, die Linse oder
verwenden Sie eine andere CD. Stellen
Sie das Gerät erschütterungsfrei auf.
Gerät reagiert nicht
auf Tastendruck
Fehlfunktion nach einer
Elektrostatischen Entladung.
Ziehen Sie den Netzstecker aus der
Steckdose und schließen ihn
anschließend wieder an.
Gerät schaltet sich
nach ca. 20 Minuten
automatisch in den
Standby
Energiesparfunktion hat sich
bei nicht gebrauch aktiviert
Dies ist eine normale Funktion um die
gesetzlichen Energiesparrichtlinie zu
erfüllen. Schalten Sie das Gerät für
weiteren Gebrauch wieder ein.
TECHNISCHE DATEN
DC 9V
6 x 1.5 V UM-
2
/
L
R
1
4
("
C
"
-Größe) nicht im Lieferumfang
Netzbetrieb:
AC 230V ~ 50Hz
Leistungsaufnahme:
14 W
2 x 1 W
87,5 - 108 MHz
Ausgangsleistung:
UKW :
Batteriebetrieb:
GER

ALLERECHTEVORBEHALTEN,URHEBERRECHTEDENVERELECTRONICSA/S
ElektrischeundelektronischeGerätesowieBatterienenthaltenMaterialien,KomponentenundSubstanzen,welchefürSie
undIhreUmweltschädlichseinkönnen,soferndieAbfallmaterialien(entsorgteelektrischeundelektronischeAltgeräte
sowieBatterien)nichtkorrektgehandhabtwerden.
ElektrischeundelektronischeGerätesowieBatteriensindmitderdurchgestrichenenMülltonne,wieuntenabgebildet,
kenntlichgemacht.DiesesSymbolbedeutet,dasselektrischeundelektronischeAltgerätesowieBatteriennichtmitdem
Hausmüllentsorgtw
erdendürfen,siemüssenseparatentsorgtwerden.
AlsEndverbraucheristesnotwendig,dassSieIhreerschöpftenBatterienbeidenentsprechendenSammelstellenabgeben.
AufdieseWeisestellenSiesicher,dassdieBatterienentsprechendderGesetzgebungrecyceltwerdenundkeine
Umweltschädenanrichten.
StädteundGemeindenhabenSammelstelleneingerichtet,andenenelektrischeundelektronischeAltgerätesowie
BatterienkostenfreizumRecyclingabgegebenwerdenkönnen,alternativerfolgtauchAbholung.WeitereInformationen
erhaltenSiebeiderUmweltbehördeIhrerGemeinde.
HiermiterklärtInterSalesA/S,dassderFunkanlagentypTCU-211derRichtlinie2014/53/EUentspricht.Dervollständige
TextderEU-KonformitätserklärungistunterderfolgendenInternetadresseverfügbar:
BittegebenSie„www.denver-electronics.com“ein.KlickenSiedannaufdasSuchen-SYMBOLinderoberenLeiste
derWebseiteundgebenSiehierdieModellnummer„tcu-211“ein.
SiegelangennunzurProduktseite.DieFunkanlagenrichtlinie(Richtlinie2014/53/EU)findenSieunter
„downloads/otherdownloads“.
Betriebsfrequenzbereich: FM 87.5 - 108 MHz
Max. Ausgangsleistung: 2 x 1.1W
Importeur:
DENVERELECTRONICSA/S
Omega5A,Soeften
DK-8382Hinnerup
Dänemark
www.facebook.com/denverelectronics
GER
15

Medidas de seguridad, medioambientales y de montaje
ES
PROTECCIÓN MEDIOAMBIENTAL
No elimine este producto con la basura doméstica al terminar
su vida útil. Llévelo a un punto de recogida para reciclado de
aparatos eléctricos y electrónicos. Esto se indica mediante el
símbolo en el producto, en el manual de usuario o en el
embalaje.
Los materiales son reutilizables conforme a los símbolos. Al reutilizar,
reciclar u otras formas de utilización de aparatos antiguos, está
contribuyendo a proteger el medio ambiente.
Consulte a las autoridades la información sobre los puntos de recogida
ADVERTENCIA
Riesgo de sacudida eléctrica
¡No abrir!
Precaución: Para evitar el riesgo de sacudida eléctrica, no retire la tapa
(o parte posterior). No hay piezas útiles en el interior. Consulte cualquier
reparación a personal cualificado.
Este símbolo indica la presencia de tensión peligrosa en
el interior, la suficiente para provocar una sacudida
eléctrica.
Este símbolo indica la presencia de instrucciones de
funcionamiento y mantenimiento importantes para el
aparato.
Las baterías utilizadas son residuos peligrosos y No se
deben desechar con la basura doméstica. Como
consumidor está legalmente obligado a llevar todas las
baterías para un reciclaje de manera responsable, no
importa si las baterías contienen o no sustancias
perjudiciales.
Lleve las baterías sin gasto alguno a los puntos de recogida
públicos de su comunidad o a las tiendas que venden baterías del
tipo correspondiente.
Entregue solo baterías totalmente descargadas.
*) marcado Cd = cadmio, Hg = mercurio, Pb = plomo
CLASS 1 LASER PRODUCT
KLASSE 1 LASER PRODUKT
LUOKAN 1 LASER LAITE
KLASS 1 LASER APPARAT
PRODUCTO LASER CLASE 1
PRECAUCIÓN - RADIACIÓN INVISIBLE
DE LÁSER AL ABRIR LA TAPA O
PULSAR EL INTERBLOQUEO DE
SEGURIDAD. EVITE LA EXPOSICIÓN
AL HAZ DE LÁSER.
El dispositivo lleva incorporado un “Láser de Clase
1”. Evite la exposición al haz de láser porque podría
dañarse la vista.
Utilice el aparato solo en entornos secos e
interiores.
Proteja el aparato de la humedad.
No abra el aparato. ¡PELIGRO DE SACUDIDA
ELÉCTRICA! Consulte con personal cualificado
para su apertura y reparación.
Conecte el aparato a una toma de corriente
correctamente instalada y con conexión a tierra.
Asegúrese de que la tensión de la red se
corresponde con la que aparece en las
especificaciones.
Asegúrese de que el cable permanece seco
durante el funcionamiento. No pinche ni dañe el
cable de conexión a red de ningún modo.
Un cable de red dañado o clavija debe ser
reemplazado inmediatamente por el centro de
reparación autorizado.
En caso de tormenta, desenchufe de la red
inmediatamente.
Los padres deberán supervisar a los niños
cuando utilicen el aparato.
Limpie el aparato solamente con un paño seco.
NO utilice LIMPIADORES NI PAÑOS
ABRASIVOS
No exponga el aparato a la luz solar directa o a
otras fuentes de calor.
Instale el aparato en un lugar con suficiente
ventilación con el fin de evitar acumulación de
calor.
No cubra las aberturas de ventilación.
Coloque el aparato en un lugar seguro y sin
vibraciones.
Coloque el aparato lo más lejos posible de
ordenadores y microondas, de otro modo puede
resultar afectada la recepción de la radio.
No abra ni repare el aparato. No es seguro
hacerlo y anula la garantía. Las reparaciones
solo las pueden realizar los centros de atención
al cliente autorizados.
Utilice solo baterías sin mercurio y cadmio.
Las baterías utilizadas son residuos peligrosos y
no se deben desechar con la basura doméstica.
Lleve las baterías a su proveedor o a los puntos
de recogida de su comunidad.
Mantenga las baterías lejos de los niños.
Podrían tragarse las baterías. En caso de
tragarse una batería, consulte a un médico
inmediatamente.
Compruebe las baterías regularmente para
evitar fugas.
16

17
UBICACIÓN DE LOS CONTROLES
1. DETENER
Detener reproducción
2. PROG/
CARPETA+
Reproducción de
memoria/carpeta
3. REPETIR
Repetición de pistas
4. ENCENDIDO
Indicador de
encendido
5. PANTALLA LCD
6. Puerto USB
7. AVANZAR/
SIGUIENTE
Avance rápido hasta
la siguiente pista
8. REBOBINAR/
ANTERIOR
Rebobinado rápido
hasta la pista anterior
9. REPRODUCIR/
PAUSAR
Reproducir/pausar
10. Asa de transporte
11. Compartimento para CD
12. Antena FM
13. SINTONIZADOR
Sintonizador
14. CD/ENTRADA DE
LÍNEA/APAGAR/
FM/USB
Interruptor de función
15. VOLUMEN
Control del volumen
16. TOMA DE CA
17. ENTRADA
Entrada para
dispositivo externo
General
- Desenchufe el dispositivo de la toma de corriente antes de limpiarlo.
- Limpie la parte externa con un paño ligeramente húmedo.
- No utilice gasolina, alcohol u otros limpiadores abrasivos para limpiar el exterior.
ES

18
ANTES DE USAR
Desempaquetado
- Retire todo el embalaje.
- Compruebe que están todas las piezas y que no han sufrido daños durante el transporte. En
caso de existir daños o de recibir una entrega incompleta, póngase en contacto con su
distribuidor (-> Garantía).
- Por favor, conserve el embalaje. Puede guardar el aparato en el mismo si no lo va a utilizar
durante mucho tiempo.
- Coloque el aparato sobre una superficie plana, estable, limpia y seca.
- Asegúrese de que la ventilación sea la adecuada. Mantenga una distancia mínima de 5 cm
entre el producto y otros objetos o paredes.
Fuente de alimentación
- El aparato se puede alimentar a través de una toma de corriente o mediante pilas.
- Inserte el cable de alimentación en la ENTRADA CA de la parte posterior del aparato.
Enchufe el cable de alimentación a una toma de corriente en perfecto estado. Asegúrese de
que el voltaje de la fuente de alimentación es el adecuado para el aparato.
Funcionamiento mediante pilas
- Abra el compartimento de las pilas de la parte inferior del aparato.
- Introduzca 6 pilas de tamaño "C" (UM-2), siguiendo las marcas de polaridad indicadas en el
interior del compartimento de las pilas y en las propias pilas.
- Use únicamente pilas de alta calidad. Las pilas de baja calidad podrían producir fugas y
causar daños. No utilice pilas nuevas y viejas al mismo tiempo. Cierre la tapa del
compartimiento de las pilas después de introducir las pilas.
- El aparato está listo para su uso.
- IMPORTANTE: No utilice el aparato con la toma de corriente y las pilas al mismo tiempo.
Retire las pilas antes de conectar el aparato a la red y desenchufe el cable de alimentación
si va a usar el dispositivo mediante pilas
- NOTA: El dispositivo consume una pequeña cantidad de energía incluso cuando no está
encendido. Si no va a utilizar el dispositivo durante un período prolongado de tiempo,
desconecte el enchufe de alimentación o retire todas las pilas.
NOTA IMPORTANTE
- Desconexión automática: El dispositivo se apagará aproximadamente de 8 a 10 minutos
después de finalizar la última reproducción o después de pulsar el botón PLAY/PAUSE para
pausar la reproducción. Si no va a utilizar el aparato, coloque el interruptor de función en la
posición de APAGADO y desenchufe el cable de alimentación.
FUNCIONAMIENTO DE LA RADIO
Antena
- El dispositivo está equipado con una antena telescópica situada en la parte posterior del
aparato. Saque la antena por completo. Gire y vuelva a colocar el dispositivo para lograr la
mejor recepción.
Selección de emisoras
- Coloque el interruptor de función (14) en la posición FM.
- Mueva el sintonizador para buscar la siguiente sintonía de radio con una señal óptima.
1 ES
Sidan laddas ...
Sidan laddas ...
Sidan laddas ...
Sidan laddas ...
Sidan laddas ...
Sidan laddas ...
Sidan laddas ...
Sidan laddas ...
Sidan laddas ...
Sidan laddas ...
Sidan laddas ...
Sidan laddas ...
Sidan laddas ...
Sidan laddas ...
Sidan laddas ...
Sidan laddas ...
Sidan laddas ...
Sidan laddas ...
Sidan laddas ...
Sidan laddas ...
Sidan laddas ...
Sidan laddas ...
Sidan laddas ...
Sidan laddas ...
Sidan laddas ...
Sidan laddas ...
Sidan laddas ...
Sidan laddas ...
Sidan laddas ...
Sidan laddas ...
Sidan laddas ...
Sidan laddas ...
-
 1
1
-
 2
2
-
 3
3
-
 4
4
-
 5
5
-
 6
6
-
 7
7
-
 8
8
-
 9
9
-
 10
10
-
 11
11
-
 12
12
-
 13
13
-
 14
14
-
 15
15
-
 16
16
-
 17
17
-
 18
18
-
 19
19
-
 20
20
-
 21
21
-
 22
22
-
 23
23
-
 24
24
-
 25
25
-
 26
26
-
 27
27
-
 28
28
-
 29
29
-
 30
30
-
 31
31
-
 32
32
-
 33
33
-
 34
34
-
 35
35
-
 36
36
-
 37
37
-
 38
38
-
 39
39
-
 40
40
-
 41
41
-
 42
42
-
 43
43
-
 44
44
-
 45
45
-
 46
46
-
 47
47
-
 48
48
-
 49
49
-
 50
50
-
 51
51
-
 52
52


Denver TCU-211 Användarmanual
- Kategori
- CD-spelare
- Typ
- Användarmanual
- Denna manual är också lämplig för
på andra språk
- italiano: Denver TCU-211 Manuale utente
- español: Denver TCU-211 Manual de usuario
- Deutsch: Denver TCU-211 Benutzerhandbuch
- français: Denver TCU-211 Manuel utilisateur
- Nederlands: Denver TCU-211 Handleiding
Relaterade papper
Andra dokument
-
AudioSonic HF-1250 Användarmanual
-
König HAV-TR700BE Användarmanual
-
AudioSonic CD-571 Bruksanvisning
-
OK. OPD 250 Användarmanual
-
-
AudioSonic CD-1572 Användarmanual
-
Yamaha CD-S700 Bruksanvisning
-
Tristar CD-1589 Bruksanvisning
-
Yamaha CD-C600 Bruksanvisning
-
König HAV-PRCD15 Specifikation