König SEC-PH380 Användarmanual
- Kategori
- Dörrintercom-system
- Typ
- Användarmanual

2012-10-09
SEC-PH380
MANUAL (p. 2)
Door Viewer Camera with DVR
ANLEITUNG (S. 11)
Türspion-Kamera mit DVR
MODE D’EMPLOI (p. 20)
Judas de porte à caméra et à enregistreur
vidéo numérique (DVR)
GEBRUIKSAANWIJZING (p. 29)
Deurbel met Camerafunctie
MANUALE (p. 38)
Visore con telecamera da porta con DVR
MANUAL DE USO (p. 47)
Vídeoportero con DVR
HASZNÁLATI ÚTMUTATÓ (o. 56.)
Képfelvevős ajtókamera
KÄYTTÖOHJE (s. 65)
Ovikamera tallennuslaitteella
BRUKSANVISNING (s. 74)
Dörrkamera med DVR
NÁVOD K POUŽITÍ (s. 83)
Kamerové dveřní kukátko s DVR
MANUAL DE UTILIZARE (p. 92)
Cameră - vizor de uşă cu DVR
ΕΓΧΕΙΡΙ∆ΙΟ XPHΣHΣ (σελ. 101)
Θυροτηλεόραση με DVR
BRUGERVEJLEDNING (s. 110)
Dørkamera med DVR
VEILEDNING (s. 119)
Kamera-dørovervåker med DVR
ИНСТРУКЦИЯ (стр. 128)
Дверная камера/глазок с цифровой
записью

2
ENGLISH
Door Viewer Camera with DVR
Table of contents:
• Introduction (p. 2)
• Product parts (p. 2)
• Technical specifications (p. 3)
• Installation instructions (p. 3)
• Product description (p. 9)
• User instructions (p. 9)
• Maintenance (p. 10)
• Warranty (p. 19)
• Disclaimer (p. 19)
• Disposal (p. 19)
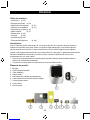
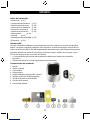
Introduction:
With this wireless door viewer camera you can make sure you will not get caught by surprise when
someone is at the door. Thanks to the electronic video system you will feel more secure before
opening the door. The built-in 128 MB microSD card can store up to 1,000 pictures of people who have
rung your doorbell. The door viewer camera is easy to install and has a 2.4" LCD colour monitor for a
clear view of the visitor.
• We recommend that you read this manual before installing/using the security camera system.
• Keep this manual in a safe place for future reference.
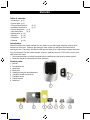
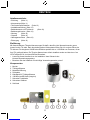
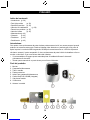
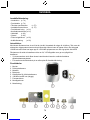
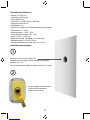
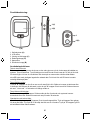
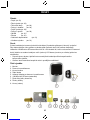
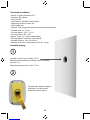
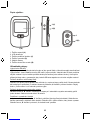
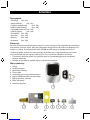
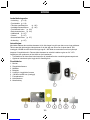
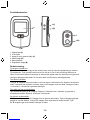
Product parts:
1. Monitor
2. Doorbell/camera
3. Metal tube
4. Back plate
5. Adhesive sticker for doorbell/camera
6. 128 MB microSD card (built-in)
7. Faceplate screw
8. Cabinet screws
9. Metal tool

3
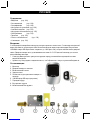
Technical specifications:
• Monitor: 2.4" colour LCD
• Resolution: 300 K pixels
• Viewing angle: 60°
• Internal memory: 128 MB, up to 1,000 pictures
• Integrated doorbell: Yes
• Intercom: No
• Protection: IP40 (do not expose the doorbell/camera to rain/water)
• Door thickness: 40 - 70 mm
• Operating temperature: –20°C ~ 60°C
• Working humidity: 10% - 95%
• Battery: 2x AA, 1.5 V (not incl.)
• Battery life: 5 months (5 x 30 sec. /day)
• Monitor dimensions: 119 x 83 x 25 mm
• Doorbell/camera dimensions: 59 x 40 x 14 mm
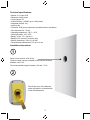
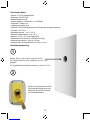
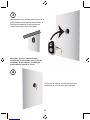
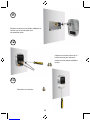
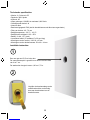
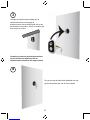
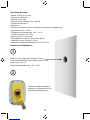
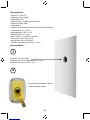
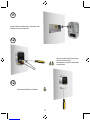
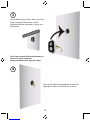
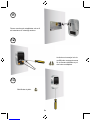
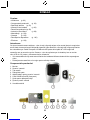
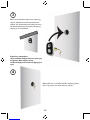
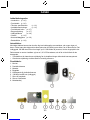
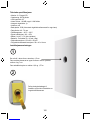
Installation instructions:
Drill a hole in the door of Ø1.50 cm.
The door viewer camera is suitable for doors with a thickness
between 4 and 7 cm.
The recommended height is between 1.60 and 1.75 m.
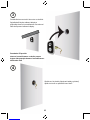
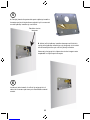
Peel off the cover of the adhesive
sticker and attach it to the backside
of the doorbell/camera.
1
2

4
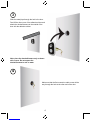
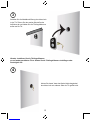
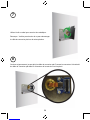
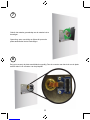
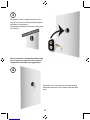
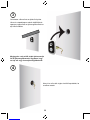
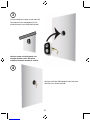
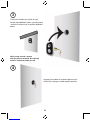
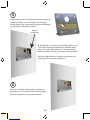
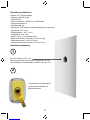
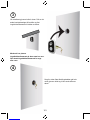
Slide the metal pipe through the hole in the door.
Peel off the other cover of the adhesive sticker and
attach the doorbell/camera to the outside of the
door with the adhesive sticker.
Note: place the doorbell/camera only on doors
with a cover. Do not expose the
doorbell/camera to rain or water
Make sure that the flat connection cable comes all the
way through the hole at the other end of the door.
4
3

5
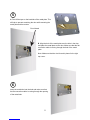
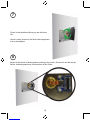
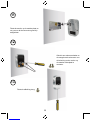
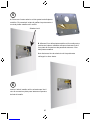
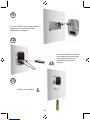
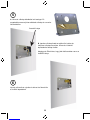
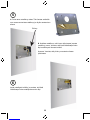
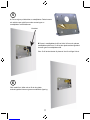
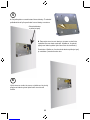
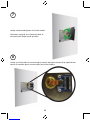
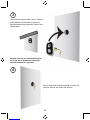
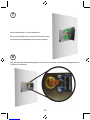
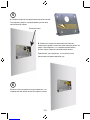
A. Peel off the tape on the backside of the metal plate. This
will help to prevent scratching the door while mounting the
metal plate and the monitor.
B. Align the hole of the metal plate over the hole in the door
and place the metal plate on the door. Make sure that the flat
connection cable is coming through the hole of the metal
plate.
Note: Make sure that the circuit board is placed in the right
top corner.
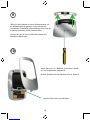
Insert the metal tube into the hole and make sure that
the flat connection cable is coming through the opening
of the metal tube.
6
5
Circuit board


7
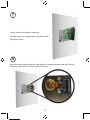
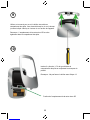
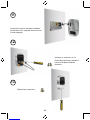
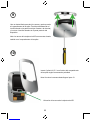
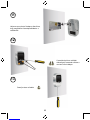
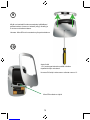
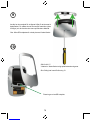
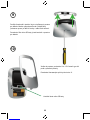
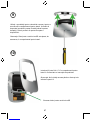
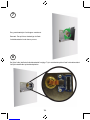
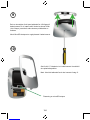
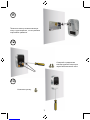
Use a screwdriver to open the housing to access the
battery compartment. You will have to unscrew the screw
on the front (displayed on the right) and the 4 other screws
on the back of the device.
Note: The microSD card slot is also placed in the battery
compartment.
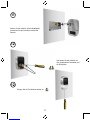
Insert 2x AA 1.5 V batteries inside the battery
compartment according to the polarity markings.
Note: Do not close the housing until step 13.
Location of the microSD card slot
9
10


9
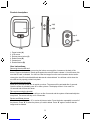
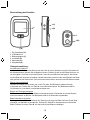
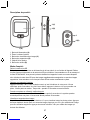
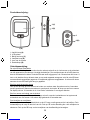
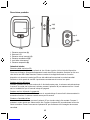
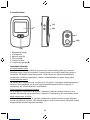
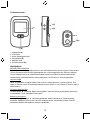
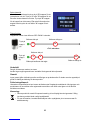
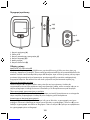
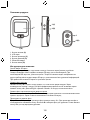
Product description:
1. Power button (A)
2. LCD screen
3. Review picture button (C)
4. Delete button (D)
5. Camera lens
6. Doorbell button (B)
User instructions:
Removing the microSD card
Remove the monitor cover by unscrewing the bottom screw and the 4 screws on the back of the
device. Remove the batteries. Gently push against the microSD card to release it. You will hear a click
once the SD card is released. You can now view the images from the card on another device and/or
reinsert the microSD card with additional data stored or data deleted. You will hear a click when the
microSD card is properly put back into place.
Take a picture from the inside
Press “A” if you want to see who is outside your door. The screen will be activated after 3 seconds.
Once the screen is activated, press “A” to take a picture. The display will be in “Live mode” for
10 seconds and will then shut down.
Take a picture using the doorbell
The visitor presses “B”. The screen will turn on after 6 seconds and the system will automatically take
one picture. The screen will stay on for 30 seconds.
Review and Delete pictures
When the screen is on, press “C” to review all pictures taken. Press the button repeatedly to see all of
the pictures. Press “D” to select the picture you wish to delete. Press “D” again to confirm that the
image must be deleted.
1 (A)
4 (D)
3 (C)
5
6 (B)
2

10
Change the Date/Time
Once the screen is activated, press “D” to adjust the date
and time. Press “C” or “D” to increase or decrease the date
and time. Press “A” to skip to the next menu. When all the
information has been entered correctly press and hold “A”
to exit.
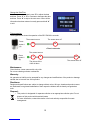
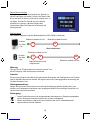
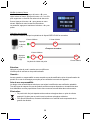
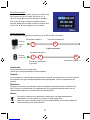
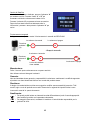
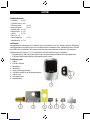
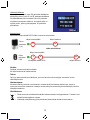
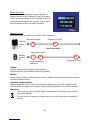
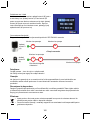
Timing operation
The diagram below shows the operation of the SEC-PH380 in seconds
Maintenance:
Clean the door viewer camera with a dry cloth.
Do not use cleaning solvents or abrasives.
Warranty:
No guarantee or liability can be accepted for any changes and modifications of the product or damage
caused due to incorrect use of this product.
Disclaimer:
Designs and specifications are subject to change without notice. All logos, brands and product names
are trademarks or registered trademarks of their respective holders and are hereby recognised as
such.
Disposal:
• This product is designated for separate collection at an appropriate collection point. Do not
dispose of this product with household waste.
• For more information, contact the retailer or the local authority responsible for waste
management.
3 6
314
33
Press
button 1
(A)
The screen turns on The screen turns off
<Time in seconds>
Press
button 6
(B)
The screen turns on
The screen turns off
The picture of the
visitor is taken

11
DEUTSCH
Türspion-Kamera mit DVR
Inhaltsverzeichnis:
• Einleitung (Seite 11)
• Komponenten (Seite 11)
• Technische Spezifikationen (Seite 12)
• Installationsanleitung (Seite 12)
• Bedienelemente und Funktionen (Seite 18)
• Bedienungshinweise (Seite 18)
• Wartung (Seite 19)
• Garantie (Seite 19)
• Haftungsausschluss (Seite 19)
• Entsorgung (Seite 19)
Einführung:
Mit dieser drahtlosen Türspion-Kamera sorgen Sie dafür, dass Sie nicht überrascht werden, wenn
jemand vor der Tür steht. Dank des elektronischen Videosystems fühlen Sie sich vor dem Öffnen der
Tür sicherer. Die integrierte 128 MB microSD-Karte speichert bis zu 1.000 Bilder von Personen, die an
Ihrer Tür geklingelt haben. Die Türspion-Kamera kann einfach installiert werden und hat einen 6 cm
LCD-Farbmonitor für ein klares Bild des Besuchers.
• Lesen Sie dieses Handbuch vor der Installation / dem Gebrauch des
Kamera-Überwachungssystems.
• Bewahren Sie das Handbuch für zukünftige Verwendungszwecke gut auf.
Komponenten:
1. Monitor
2. Türklingel/Kamera
3. Metalldurchführung
4. Rückplatte
5. Klebeband für Türklingel/Kamera
6. 128 MB microSD-Karte (integriert)
7. Schraube Frontblende
8. Schrauben Gehäuse
9. Schlüssel

12
Technische Daten:
• Monitor: 2,4" LCD-Farbbildschirm
• Auflösung: 300.000 Pixel
• Betrachtungswinkel: 60°
• Interner Speicher: 128 MB, bis zu 1.000 Bilder
• Integrierte Türklingel: Ja
• Gegensprechanlage: Nein
• Schutzart: IP40 (Türklingel/Kamera nicht Regen/Feuchtigkeit aussetzen)
• Türstärke: 40 -70 mm
• Betriebstemperatur: –20 °C - 60 °C
• Betriebs-Luftfeuchtigkeit: 10 % - 95 %
• Batterie: 2 x AA, 1,5 V (nicht mitgeliefert)
• Batterielaufzeit: 5 Monate (5 x 30 Sekunden/Tag)
• Abmessungen Monitor: 119 x 83 x 25 mm
• Abmessungen Türklingel/Kamera: 59 x 40 x 14 mm
Installationsanleitung:
Bohren Sie ein Loch mit Ø1,5 cm durch die Tür.
Die Türspion-Kamera ist für Türstärken von 4 bis 7 cm
geeignet.
Die empfohlene Einbauhöhe ist zwischen 1,60 und 1,75 m.
Ziehen Sie den Schutzfilm auf der
Rückseite des Aufklebers ab und
kleben Sie ihn auf die Rückseite
der Türklingel/Kamera.
1
2

13
Schieben Sie die Metalldurchführung durch das Loch
in der Tür. Ziehen Sie den zweiten Schutzfilm des
Aufklebers ab und kleben Sie die Türklingel/Kamera
außen auf die Tür.
Hinweis: Installieren Sie die Türklingel/Kamera
nur auf wettergeschützten Türen. Setzen Sie die Türklingel/Kamera nicht Regen oder
Feuchtigkeit aus
Achten Sie darauf, dass das flache Verbindungskabel
durch das Loch zur anderen Seite der Tür geführt wird.
4
3

14
A. Ziehen Sie den Schutzfilm auf der Rückseite der
Metallplatte ab. Dies vermeidet ein Verkratzen der Tür bei der
Montage der Metallplatte und des Monitors.
B. Richten Sie das Loch auf der Metallplatte mit dem Loch in
der Tür aus und setzen Sie die Metallplatte auf die Tür.
Achten Sie darauf, dass das flache Verbindungskabel durch
das Loch der Metallplatte geführt wird.
Hinweis: Achten Sie darauf, dass die Platine in der oberen
rechten Ecke ist.
Achten Sie darauf, dass das flache Verbindungskabel
durch die Metalldurchführung zur anderen Seite der Tür
geführt wird.
6
5
Platine


16
Öffnen Sie das Gehäuse mit einem Schraubenzieher, um
an das Batteriefach zu gelangen. Lösen Sie dazu die
Schraube der Frontblende (siehe Abbildung rechts) und die
4 anderen Schrauben auf der Geräterückseite.
Hinweis: Der Slot für die microSD-Karte befindet sich
ebenfalls im Batteriefach.
Setzen Sie 2x AA 1,5 V Batterien mit korrekter Polarität
ein, wie im Batteriefach aufgedruckt.
Hinweis: Schließen Sie das Gehäuse nicht vor Schritt 13.
Lage des Slots für die microSD-Karte
9
10


18
Beschreibung des Produkts:
1. Ein-/Ausschalter (A)
2. LCD-Bildschirm
3. Bildanzeigetaste (C)
4. Löschtaste (D)
5. Kameraobjektiv
6. Klingeltaste (B)
Gebrauchsanleitung:
microSD-Karte entfernen
Nehmen Sie das Gehäuse des Monitors ab; lösen Sie die untere Schraube und die 4 Schrauben auf
der Geräterückseite. Nehmen Sie die Batterien heraus. Drücken Sie die microSD-Karte leicht an, um
sie freizugeben. Sie hören einen leisen Klickton, wenn die microSD-Karte entriegelt ist. Sie können
nun die Bilder auf der Karte auf anderen Geräten betrachten; setzen Sie die microSD-Karte mit Daten
oder gelöscht in das Gerät zurück. Sie hören einen leisen Klickton, wenn die microSD-Karte einrastet.
Bild von innen aufnehmen
Drücken Sie Taste A, um zu sehen, wer vor der Tür steht. Der Bildschirm schaltet sich nach
3 Sekunden ein. Drücken Sie nun Taste A, um ein Bild aufzunehmen. Der Bildschirm bleibt für
10 Sekunden im „Live-Modus“ und schaltet sich dann aus.
Bild mit der Türklingel aufnehmen
Der Besucher drückt Taste B. Der Bildschirm schaltet sich nach 6 Sekunden ein und das System
nimmt automatisch ein Bild auf. Der Bildschirm bleibt für 30 Sekunden eingeschaltet.
Bilder betrachten und löschen
Bei eingeschaltetem Bildschirm drücken Sie Taste C zur Anzeige der Bilder. Drücken Sie die Taste
wiederholt, um alle Bilder zu durchlaufen. Drücken Sie Taste D zur Auswahl eines zu löschenden
Bildes. Drücken Sie erneut Taste D, um das Löschen des Bildes zu bestätigen.
1 (A)
4 (D)
3 (C)
5
6 (B)
2

19
Datum/Uhrzeit einstellen
Bei eingeschaltetem Bildschirm drücken Sie Taste D, um
Uhrzeit und Datum einzustellen. Drücken Sie Taste C oder
D, um den Wert für Datum und Uhrzeit zu erhöhen bzw. zu
verringern. Drücken Sie Taste A, um zum nächsten
Menüpunkt zu springen. Nach der Eingabe aller
Informationen halten Sie Taste A zum Verlassen des
Menüs gedrückt.
Zeitlicher Ablauf
Das folgende Diagramm zeigt den Betriebsablauf des SEC-PH380 in Sekunden
Wartung:
Reinigen Sie die Türspion-Kamera mit einem trockenen Tuch.
Keine Reinigungs- oder Scheuermittel verwenden.
Garantie:
Es kann keine Garantie oder Haftung für irgendwelche Änderungen oder Modifikationen des Produkts
oder für Schäden übernommen werden, die aufgrund einer nicht ordnungsgemäßen Anwendung des
Produkts entstanden sind.
Haftungsausschluss:
Design und technische Daten können ohne vorherige Ankündigung geändert werden. Alle Logos,
Marken und Produktnamen sind Marken oder eingetragene Marken ihrer jeweiligen Eigentümer und
werden hiermit als solche anerkannt.
Entsorgung:
• Dieses Produkt muss an einem entsprechenden Sammelpunkt zur Entsorgung abgegeben
werden. Entsorgen Sie dieses Produkt nicht mit dem Haushaltsmüll.
• Weitere Informationen erhalten Sie beim Verkäufer oder der für die Abfallwirtschaft
verantwortlichen örtlichen Behörde.
3 6
314
33
Drücken
Sie Taste
1 (A)
Bildschirm schaltet sich ein Bildschirm schaltet sich aus
<Zeit in Sekunden>
Drücken
Sie Taste
6 (B)
Bildschirm schaltet sich ein
Bildschirm schaltet sich aus
Bild des Besuchers wird
aufgenommen

20
FRANÇAIS
Judas de porte à caméra et à enregistreur vidéo numérique (DVR)
Table des matières :
• Introduction (p. 20)
• Éléments du produit (p. 20)
• Spécifications techniques (p. 21)
• Instructions d'installation (p. 21)
• Description du produit (p. 27)
• Mode d'emploi (p. 27)
• Maintenance (p. 28)
• Garantie (p. 28)
• Avertissement (p. 28)
• Élimination des déchets (p. 28)
Introduction :
Avec ce judas de porte à caméra sans fil, vous pouvez être sûr de ne pas être pris par surprise si
quelqu'un est derrière votre porte. Grâce à ce système vidéo électronique, vous sentirez plus en
sécurité avant d'ouvrir la porte. La carte mémoire micro-SD de 128 Mo intégrée peut enregistrer
jusqu'à 1.000 images de personnes qui sont venues sonner à votre porte. Le judas de porte à caméra
est facile d'installation et possède un moniteur couleur à cristaux liquides de 60 mm qui vous
permettra de bien voir votre visiteur.
• Nous vous recommandons de lire attentivement le présent manuel avant d'installer/utiliser le
système de caméras de surveillance.
• Conservez ce manuel dans un endroit sûr pour toute consultation future.
Éléments du produit :
1. Moniteur
2. Carillon de porte/caméra
3. Tube métallique
4. Plaque arrière
5. Autocollant pour carillon de porte/caméra
6. Carte mémoire micro-SD de 128 Mo (intégré)
7. Vis de la plaque avant
8. Vis du coffret
9. Outil en métal
Sidan laddas...
Sidan laddas...
Sidan laddas...
Sidan laddas...
Sidan laddas...
Sidan laddas...
Sidan laddas...
Sidan laddas...
Sidan laddas...
Sidan laddas...
Sidan laddas...
Sidan laddas...
Sidan laddas...
Sidan laddas...
Sidan laddas...
Sidan laddas...
Sidan laddas...
Sidan laddas...
Sidan laddas...
Sidan laddas...
Sidan laddas...
Sidan laddas...
Sidan laddas...
Sidan laddas...
Sidan laddas...
Sidan laddas...
Sidan laddas...
Sidan laddas...
Sidan laddas...
Sidan laddas...
Sidan laddas...
Sidan laddas...
Sidan laddas...
Sidan laddas...
Sidan laddas...
Sidan laddas...
Sidan laddas...
Sidan laddas...
Sidan laddas...
Sidan laddas...
Sidan laddas...
Sidan laddas...
Sidan laddas...
Sidan laddas...
Sidan laddas...
Sidan laddas...
Sidan laddas...
Sidan laddas...
Sidan laddas...
Sidan laddas...
Sidan laddas...
Sidan laddas...
Sidan laddas...
Sidan laddas...
Sidan laddas...
Sidan laddas...
Sidan laddas...
Sidan laddas...
Sidan laddas...
Sidan laddas...
Sidan laddas...
Sidan laddas...
Sidan laddas...
Sidan laddas...
Sidan laddas...
Sidan laddas...
Sidan laddas...
Sidan laddas...
Sidan laddas...
Sidan laddas...
Sidan laddas...
Sidan laddas...
Sidan laddas...
Sidan laddas...
Sidan laddas...
Sidan laddas...
Sidan laddas...
Sidan laddas...
Sidan laddas...
Sidan laddas...
Sidan laddas...
Sidan laddas...
Sidan laddas...
Sidan laddas...
Sidan laddas...
Sidan laddas...
Sidan laddas...
Sidan laddas...
Sidan laddas...
Sidan laddas...
Sidan laddas...
Sidan laddas...
Sidan laddas...
Sidan laddas...
Sidan laddas...
Sidan laddas...
Sidan laddas...
Sidan laddas...
Sidan laddas...
Sidan laddas...
Sidan laddas...
Sidan laddas...
Sidan laddas...
Sidan laddas...
Sidan laddas...
Sidan laddas...
Sidan laddas...
Sidan laddas...
Sidan laddas...
Sidan laddas...
Sidan laddas...
Sidan laddas...
Sidan laddas...
Sidan laddas...
Sidan laddas...
Sidan laddas...
Sidan laddas...
Sidan laddas...
-
 1
1
-
 2
2
-
 3
3
-
 4
4
-
 5
5
-
 6
6
-
 7
7
-
 8
8
-
 9
9
-
 10
10
-
 11
11
-
 12
12
-
 13
13
-
 14
14
-
 15
15
-
 16
16
-
 17
17
-
 18
18
-
 19
19
-
 20
20
-
 21
21
-
 22
22
-
 23
23
-
 24
24
-
 25
25
-
 26
26
-
 27
27
-
 28
28
-
 29
29
-
 30
30
-
 31
31
-
 32
32
-
 33
33
-
 34
34
-
 35
35
-
 36
36
-
 37
37
-
 38
38
-
 39
39
-
 40
40
-
 41
41
-
 42
42
-
 43
43
-
 44
44
-
 45
45
-
 46
46
-
 47
47
-
 48
48
-
 49
49
-
 50
50
-
 51
51
-
 52
52
-
 53
53
-
 54
54
-
 55
55
-
 56
56
-
 57
57
-
 58
58
-
 59
59
-
 60
60
-
 61
61
-
 62
62
-
 63
63
-
 64
64
-
 65
65
-
 66
66
-
 67
67
-
 68
68
-
 69
69
-
 70
70
-
 71
71
-
 72
72
-
 73
73
-
 74
74
-
 75
75
-
 76
76
-
 77
77
-
 78
78
-
 79
79
-
 80
80
-
 81
81
-
 82
82
-
 83
83
-
 84
84
-
 85
85
-
 86
86
-
 87
87
-
 88
88
-
 89
89
-
 90
90
-
 91
91
-
 92
92
-
 93
93
-
 94
94
-
 95
95
-
 96
96
-
 97
97
-
 98
98
-
 99
99
-
 100
100
-
 101
101
-
 102
102
-
 103
103
-
 104
104
-
 105
105
-
 106
106
-
 107
107
-
 108
108
-
 109
109
-
 110
110
-
 111
111
-
 112
112
-
 113
113
-
 114
114
-
 115
115
-
 116
116
-
 117
117
-
 118
118
-
 119
119
-
 120
120
-
 121
121
-
 122
122
-
 123
123
-
 124
124
-
 125
125
-
 126
126
-
 127
127
-
 128
128
-
 129
129
-
 130
130
-
 131
131
-
 132
132
-
 133
133
-
 134
134
-
 135
135
-
 136
136
-
 137
137
-
 138
138


König SEC-PH380 Användarmanual
- Kategori
- Dörrintercom-system
- Typ
- Användarmanual
på andra språk
- italiano: König SEC-PH380 Manuale utente
- slovenčina: König SEC-PH380 Používateľská príručka
- français: König SEC-PH380 Manuel utilisateur
- dansk: König SEC-PH380 Brugermanual
- română: König SEC-PH380 Manual de utilizare