
MOUNTING INSTRUCTION
Brand
SUZUKI
Model
TL 1000 S
Year
Art. No.
SU 805
Total length
280
mm
Stroke
50
mm
Reb.click
15
Comp.click
10
Preload
--
mm
Date
981026
Supplementary parts
192-01
231-01
439-01
439-03
440-01
Sticker / Dekal (2x)
Tie-rap / Buntband (2x)
Bolt / Skruv M10x1.25x40 (2x)
Bolt / Skruv M10x1.25x90
Lock nut / Låsmutter (3x)
1180-01
3106-01
3107-01
3107-02
Memo sticker / Memodekal
Bracket / Fäste
Spacer / Distans
Owners manual / Bruksanvisning
Spacer (blue) / Distans (blå)
Mounting instructions
1.
Palla upp MC:n så att bakhjulet hänger fritt i luften.
Demontera sadel och sidokåpor.
2.
Demontera standarddämparen genom att lossa de tre
fästskruvarna.
Öhlinsdämparen ersätter endast rotationsdämparen.
Orginalfjädern skall fortfarande användas.
3.
Lossa och flytta det relä som sitter nedanför
tankfästet på vänster sida till höger sida genom att
binda samman det med reläet på höger sida med
buntband 231-01. Var försiktig så att inga kablar
skadas eller kommer i kläm vid monteringen.
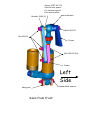
4.
Montera fästplattan 3106-01 till Öhlindämparen i
ramfästet för standarddämparen enligt skiss med
hjälp av skruvar 439-01 och muttrar 440-01 Vänta
med att dra fast dem helt tills dämparen är på plats.
5.
Lossa övre fästskruven till bakramen och skruva i
medföljande skruv 439-03 en bit. Sätt dämparen på
plats med den bredare distansen utåt enligt skiss.
Fortsätt att skruva i skruven och sätt dit distansen
3107-01. Skruva i skruven helt och dra fast den med
mutter 440-01. Dra fast alla skruvar till fästplattan
och övre dämparfästet.
Om du har den nyare typen av tankfäste som är
monterat i bakramens fäste, använd blå distans
3107-02 istället för 3107-01.
6. OBS! Det kan vara nödvändigt att fila ur lite på
tankfästet för att få plats.
7.
Montera nedre fästskruven (standardskruven) med
hjälp av att bända försiktigt med något under
dämparen för att trycka ihop den för att få i skruven.
8.
Montera sidokåpor och sadel. Kontrollera att alla
skruvar är åtdragna och att inget tar i när bakhjulet
fjädrar in.
9.
Klart för provtur!
1.
Put the motorcycle on a stand so that the rear wheel
is off the ground. Remove the seat and side covers.
2.
Remove the standard rotary damper. The standard
spring shall NOT be removed. The Öhlins shock just
replaces the rotary damper.
3.
Loosen the relay under the gas tank bracket on the
right side and move it to the left side. Mount it
together with the relay on the right side with the tie-
raps 231-01. Be careful so that the cables not are
damaged ore squeezed.
4.
Mount the bracket 3106-01 at the frame bracket for
the standard damper according to the sketch with
bolts 439-01 and nuts 440-01. Do not tighten the
bolts yet.
5.
Loosen the upper mounting bolt to the rear frame
and start to mount the supplied bolt 439-03. Put the
shock in place and go on screwing the bolt in. Mount
the spacer 3107-01 according to the sketch and
screw the bolt 439-03 the whole way and tighten it
with the nut 440-01. Tighten all screws to the
mounting bracket and upper shock mounting.
If you have the new type of gas tank bracket
mounted at the rear subframe bracket, use the blue
spacer 3107-02 instead of 3107-01.
6. NOTE! It can be necessary to grind in the gas
tank bracket to get enough clearance.
7.
Mount the lower mounting bolt (standard bolt) by
pushing the shock upwards carefully with some
suitable tool to compress the shock to be able to fit
the bolt.
8.
Mount the side covers and seat. Check that all bolts
are tightened and that there are no clearance
problems when the rear wheel is moving.
9.
Ready for a testride!
Öhlins Racin
g
AB frånsä
g
er si
g
allt ansvar för
skada på stötdämpare, motorc
y
kel eller person om
inte monterin
g
s- och skötsel instruktionerna har
föl
j
ts till fullo. In
g
en
g
aranti kan
g
es på funktion
eller livslängd om dessa instruktioner inte följts
Öhlins Racin
g
AB can not be responsible for an
y
dama
g
e to shock absorber, motorc
y
cle or person if
the mountin
g
- and maintainin
g
instructions are not
followed exactl
y
. Also no
g
uarantee can be
g
iven
for the performance and reliabilit
y
if these
instructions are not followed.

)UDPH
5HDUVXEIUDPH
%ROW
6SDFHU
8VHWKHEOXHVSDFHU
IRUWKHQHZW\SHRI
IXHOWDQNEUDFNHW
%UDFNHW
1XW
%ROW
[
)UDPH
6WDQGDUGEROWDQGQXW
/HIW
6LGH
6HHQIURPIURQW
6ZLQJDUP
-
 1
1
-
 2
2


på andra språk
- English: Ohlins SU805
Relaterade papper
-
Ohlins BM744 Mounting Instruction
-
-
-
-
-
-
-
-
-