Motorola MDC150 Användarmanual
- Kategori
- Köra inspelare
- Typ
- Användarmanual

Model: MDC150
USER’S GUIDE
Dashboard Camera
The features described in this user’s guide are subject to
modifications without prior notice.
EN DE PL SV

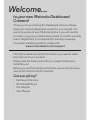
Welcome...
to your new Motorola Dashboard
Camera!
Thank you for purchasing the Dashboard Camera. Please
keep your original dated sales receipt for your records. For
warranty service of your Motorola product, you will need to
provide a copy of your dated sales receipt to conrm warranty
status. Registration is not required for warranty coverage.
For product related questions, please visit:
www.motorolastore.com/support
This User’s Guide has all the information you need to make
the most out of your product.
Please read the Safety Instructions on page 5 before you
install the unit.
Before you use the Dashboard Camera, we recommend you
insert a SD card into the SD card slot.
Got everything?
• Dashboard Camera
• Windshield Mount
• Car Adapter
• User Manual

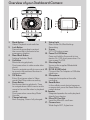
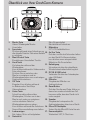
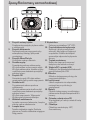
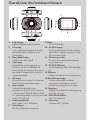
Overview of your Dashboard Camera
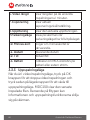
1. Mode Button
Video/ Playback mode switcher
2. Lock Button
Press while recording to protect
the current file in the event of an
emergency situation.
3. Menu/Back Button
Settings Switcher/ Back.
4. Up Button
Rewind during playback;
Short press when in video mode: take
photo.
Press to navigate up within menus and
to move to the previous file when in
playback mode.
5. OK Button
Enter; Short press when in Video
mode: Start/Stop video recording
6. Down Button
Fast forward during playback; Press
to navigate down within menus and to
move to the next file when in playback
mode.
Short press when recording: Mute/
Unmute.
7. Charge Indicator
Red: charging, Green: fully charged.
8. Status Light
Blue: Power On; Blue flashing:
Recording.
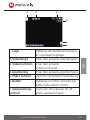
9. Screen
2.0” LCD colour screen.
10. Power On/Off Button
Press and hold for 3 seconds to turn
device On / Off, short press when On:
turn screen On/Off.
11. Mounting Nut
Screw up the supplied Windshield
Mount here.
12. DC-IN & USB Socket
Connect the Car Adapter or USB data
cable here.
13. Microphone
Integrated microphone for audio
recording.
14. Reset Button
In the unlikely event device becomes
unresponsive, press the Reset Button to
restart device.
15. Speaker
Integrated speaker for audio playback
directly from device.
16. Micro SD Card Slot
Insert the MicroSD card here.
17. Camera Lens
Wide Angle 140°, 4 glass lens.
10
13 14 1615
11 12
17

4
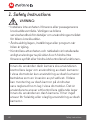
Safety Instructions
1. Safety Instructions
WARNING:
• Do not install the device within the driver’s or
passenger airbag operation range. Please refer to your
car’s service manual for details about the operation
range of your car’s airbags.
• Never modify modes, settings, or program your
device while your car is in motion.
• Ensure the device and its power cord are installed as
per the instructions on page 6, and do not obstruct
the driver’s line of sight or impede the operation of
any driving controls.
Before using the dash cam, the user shall check
the applicable laws on the use of dash cams.
In some jurisdictions, the use of dash cams can be
considered as an invasion of privacy.
Furthermore, the mounting of the dash cam on
the windshield might be regulated by law in some
jurisdictions.
It is the user’s responsibility to check the
applicable laws before using the dash cam. We do
not take any responsibility for wrong or unlawful
use of the dash cam.

5
Getting Started
EN
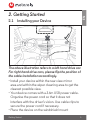
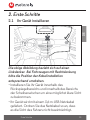
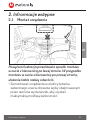
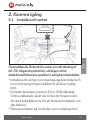
2. Getting Started
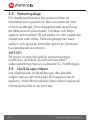
2.1 Installing your Device
The above illustration refers to a left-hand drive car.
For right-hand drive cars, please flip the position of
the cable installation accordingly.
• Install your device within the rear-view mirror
area and within the wiper cleaning area to get the
clearest possible view.
• Your device comes with a 3.6m USB power cable.
Organise the power cord so that it does not
interfere with the driver’s vision. Use cable clips to
secure the power cord if necessary.
• Place the device on the windshield mount
Najlepsze miejsce montażu

6
Getting Started
rst. Press the suction cup of the mount to the
windshield and press the lever to lock. Ensure the
mount is safely attached to the windshield.
• When using the dashboard camera device in
your car, we recommend that you always use the
cigarette charger in order to maintain the battery
level. The unit is not designed to run on battery
power alone, the battery is there for backup
purposes only.
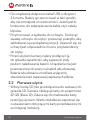
2.2 First Use
• Insert a SD card (not provided) in the SD card slot.
Your dashboard camera accepts SD cards of up to
32GB capacity (class 10). It is recommended that
you format the SD card. Please refer to the settings
described in this manual.
• Your dashboard camera will always power up
and begin recording automatically as soon as it is
connected to a power source.
Simply connect your dashboard camera to a power
source that comes on when you start the engine of
your vehicle, and the dashboard camera will start
recording automatically without you having to
remember to press on a button.

7
Using your Dashboard Camera
EN
• You can also power it ON or OFF manually by
pressing the On/O button.
• Whenever the device is turned ON or OFF, you will
see a splash screen showing the Motorola logo.
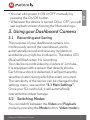
3. Using your Dashboard Camera
3.1 Recording and Saving
The purpose of your dashboard camera is to
continuously record the road ahead, and to
automatically record and save any incidents or
accidents you might be involved in. The status LED
(Blue) will flash when it is recording.
Your device records video by clusters of 1 minute.
It is equipped with a sensor that detects shocks.
Each time a shock is detected, it will permanently
save the cluster during which the event occurred.
The sensitivity of the sensor can be changed in the
settings menu, see section “4.1 Main Settings”.
Once your SD card is full, it will automatically
overwrite the oldest footage.
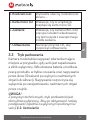
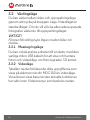
3.2 Switching Modes
You can switch between the Video and Playback
mode by pressing the Mode button. Video mode is

8
Using your Dashboard Camera
the default mode. To view or delete saved footages,
switch to Playback mode.
IMPORTANT!
The driver must never switch modes while the car is
in motion.
3.2.1 Mass Storage Mode
You can also connect the device (Power off state) to
your computer using the standard micro USB cable to
view and manage videos stored inside the SD card.
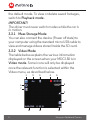
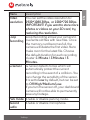
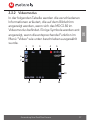
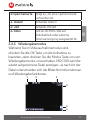
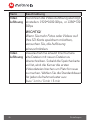
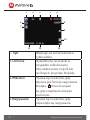
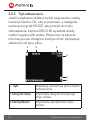
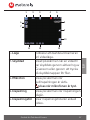
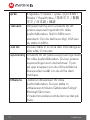
3.2.2 Video Mode
The table below explains the various information
displayed on the screen when your MDC150 is in
Video mode. Some icons will only be displayed
once the relevant function is selected within the
Video menu, as described below.
1
11 12 13
2 3 4 5
8
6
7
9
10

9
Using your Dashboard Camera
EN
1. Mode Indicates the dashboard camera is
in Video mode.
2. Protected Appears on screen when a
video file has been protected by
activation of the G Sensor or by the
pressing of the file protect button.
3. Microphone Appears on screen when Audio
Recording is active.
is displayed when the
microphone muted.
4. Recording Appears on screen when
recording is in progress.
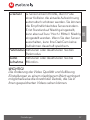
5. Recording Time Displays the recording time of the
current video.
6. Video Length Displays the length of the
individual recordings in minutes.
7. Exposure Displays the current Exposure
level setting.
8. Resolution Displays the current resolution.
9. Parking Mode Appears on screen when Parking
Mode has been turned on.
10. Memory Card Indicates whether a memory card
is present.

10
Using your Dashboard Camera
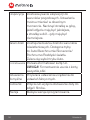
11. Date Current date
12. Time Current time
13. Battery Indicates whether MDC150 is
running on battery or external
power.
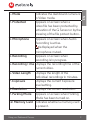
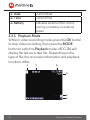
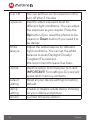
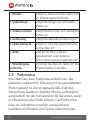
3.2.3 Playback Mode
While in video recording mode, press the OK button
to stop video recording, then press the MODE
button to switch to Playback mode. MDC150 will
display the last recorded file. Depending on the
type of file, the on-screen information and playback
functions differ.
1 2 3
4
5
6

11
Using your Dashboard Camera
EN
1. Mode Indicates the dashboard camera
is in Playback mode.
2. Video length Displays the current video
length.
3. Video number Displays the current video
number.
4. Resolution Displays the current resolution.
5. Micro SD card Displays SD card inserted or not.
6. Battery Indicates whether MDC150 is
running on battery or external
power.
7. Playback control Press the OK button to start
playback.
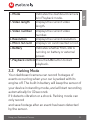
3.3 Parking Mode
Your dashboard camera can record footages of
events occurring when your car is parked with its
engine off. The built-in battery will keep the sensor of
your device in stand-by mode, and will start recording
automatically for 30 seconds
if it detects vibration or a shock. Parking mode can
only record
and save footage after an event has been detected
by the sensor.

12
Settings
IMPORTANT!
Due to technical reasons, Parking mode is disabled
by default. You can enable it in settings menu, see
section “4.1 Main Settings”.
3.4 Lock/Unlock the Video
In case of emergency, you can lock/unlock the
current video by pressing on the Lock button when
recording. The locked video footages will be saved
in the memory card until you remove them.
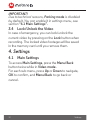
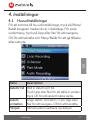
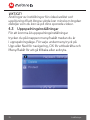
4. Settings
4.1 Main Settings
To access Main Settings, press the Menu/Back
button twice while in Video mode.
For each sub-menu, press Up or Down to navigate,
OK to confirm, and Menu/Back to go back or
cancel.

13
Settings
EN
Menu Description
Date/Time Set the date and time.
Press
Up
or
Down
to set each value;
press
OK
to switch to the next value.
Date Format
Set the date format. Press
Up
or
Down
to navigate,
OK
to confirm.
Beep Sound Enable or disable key sounds.
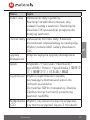
Language English / France / Deutsch / pyccKNN /
Polskie / YkpaiHcbka
/ 简体中文 / 繁体
中文 / 日本
語/韓語
Frequency Select exposure, used to adjust exposure
level for different lighting conditions.
Set by default to 50Hz; you can set it to
60Hz if you reside in the USA.

14
Settings
LCD Off You can set the LCD to never turn off or
turn off after 3 minutes
Exposure Used to adjust exposure level for
different light conditions. You can adjust
the exposure as you require. Press the
Up
button if you need the photos to be
clearer or
Down
button if you need it to
be darker.
White
Balance
Adjust the white balance for different
light conditions. You can set the white
balance to Auto/Daylight/Cloudy/
Tungsten/Fluorescent.
We recommend to leave it as Auto.
Format Use this option to format your SD Card.
IMPORTANT! Formatting a SD card will
erase all its memory contents.
Default
Setting
Reset all your device settings to factory
default.
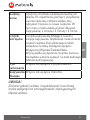
Stamp
Setting
Enable or disable a date stamp showing
on your videos and photos.
Version Current firmware version.

15
Settings
EN
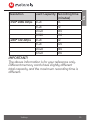
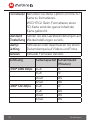
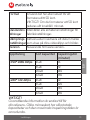
Resolution Card Capacity Recording time
(minutes)
1920*1080 30fps 4GB 35
8GB 70
16GB 140
32GB 280
1280*720 30fps 4GB 60
8GB 120
16GB 240
32GB 480
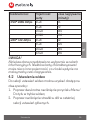
IMPORTANT!
The above information is for your reference only.
Dierent memory cards have slightly dierent
total capacity and the maximum recording time is
dierent.

16
Settings
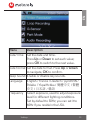
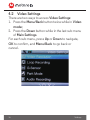
4.2 Video Settings
There are two ways to access Video Settings:
1. Press the Menu/Back button twice while in Video
mode;
2. Press the Down button while in the last sub-menu
of Main Settings.
For each sub-menu, press Up or Down to navigate,
OK to confirm, and Menu/Back to go back or
cancel.

17
Settings
EN
Menu Description
Video
resolution
You can set the video resolution to:
1920*1080 30fps, or 1280*720 30fps.
IMPORTANT! If you want to store more
photos or videos on your SD card, try
reducing the resolution.
Loop
Recording
Loop Recording allows your camera to
overwrite old files with new files. Once
the memory card becomes full, the
camera will delete the first video file to
make room for the latest file. Choose
the default duration for each recording
cluster: 1 Minute / 3 Minutes / 5
Minutes.
G-Sensor G Sensor detects forces which will
automatically protect the current
recording in the event of a collision. You
can change the sensitivity of the sensor.
It is set to Low by default, but can be set
to Off/High/Medium/Low.
If you turn the sensor off, your dashboard
camera will not be able to permanently
save any footage.
Park mode Enable or disable parking mode.
Record
audio
Enable or disable microphone.

18
Settings
IMPORTANT!
Changing the video quality and resolution settings
to a lower value might reduce the amount of details
you can see on your saved videos.
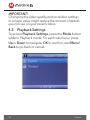
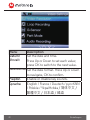
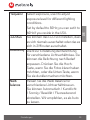
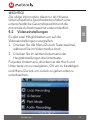
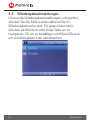
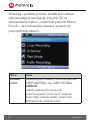
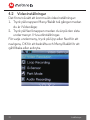
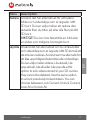
4.3 Playback Settings
To access Playback Settings, press the Mode button
while in Playback mode. For each sub-menu, press
Up or Down to navigate, OK to confirm, and Menu/
Back to go back or cancel.

19
Settings
EN
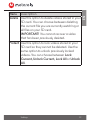
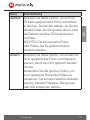
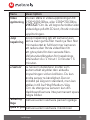
Menu Description
Delete Use this option to delete videos stored in your
SD card. You can choose between deleting
the current file you are currently watching or
all files on your SD card.
IMPORTANT! You cannot recover a video
that has been previously deleted.
Protect Use this option to lock videos stored in your
SD card so they cannot be deleted. Use the
same option to unlock previously locked
videos. You can choose between Lock
Current, Unlock Current, Lock All or Unlock
All.

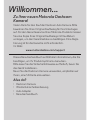
Willkommen...
Zu Ihrer neuen Motorola Dashcam
Kamera!
Vielen Dank für den Kauf der Dashcam Auto Kamera. Bitte
bewahren Sie Ihren Original-Kaufbeleg für Ihre Unterlagen
auf. Für den Garantieservice Ihres Motorola-Produkts müssen
Sie eine Kopie Ihres Original Kaufbelegs mit Kaufdatum
vorlegen, um den Garantiestatus zu bestätigen. Eine Regis-
trierung ist für die Garantie nicht erforderlich.
Im Web:
www.motorolastore.com/support
Dieses Benutzerhandbuch enthält alle Informationen, die Sie
benötigen, um Ihr Produkt optimal zu benutzen.
Bitte lesen Sie die Sicherheitshinweise auf Seite 5, bevor Sie
das Gerät installieren.
Bevor Sie die Dashcam-Kamera verwenden, empfehlen wir
Ihnen, eine SD-Karte einzusetzen.
Alles da?
• Dashcam Kamera
• Windschutzscheibenfassung
• Auto Adapter
• Benutzerhandbuch
Sidan laddas...
Sidan laddas...
Sidan laddas...
Sidan laddas...
Sidan laddas...
Sidan laddas...
Sidan laddas...
Sidan laddas...
Sidan laddas...
Sidan laddas...
Sidan laddas...
Sidan laddas...
Sidan laddas...
Sidan laddas...
Sidan laddas...
Sidan laddas...
Sidan laddas...
Sidan laddas...
Sidan laddas...
Sidan laddas...
Sidan laddas...
Sidan laddas...
Sidan laddas...
Sidan laddas...
Sidan laddas...
Sidan laddas...
Sidan laddas...
Sidan laddas...
Sidan laddas...
Sidan laddas...
Sidan laddas...
Sidan laddas...
Sidan laddas...
Sidan laddas...
Sidan laddas...
Sidan laddas...
Sidan laddas...
Sidan laddas...
Sidan laddas...
Sidan laddas...
Sidan laddas...
Sidan laddas...
Sidan laddas...
Sidan laddas...
Sidan laddas...
Sidan laddas...
Sidan laddas...
Sidan laddas...
Sidan laddas...
Sidan laddas...
Sidan laddas...
Sidan laddas...
Sidan laddas...
Sidan laddas...
Sidan laddas...
Sidan laddas...
Sidan laddas...
Sidan laddas...
-
 1
1
-
 2
2
-
 3
3
-
 4
4
-
 5
5
-
 6
6
-
 7
7
-
 8
8
-
 9
9
-
 10
10
-
 11
11
-
 12
12
-
 13
13
-
 14
14
-
 15
15
-
 16
16
-
 17
17
-
 18
18
-
 19
19
-
 20
20
-
 21
21
-
 22
22
-
 23
23
-
 24
24
-
 25
25
-
 26
26
-
 27
27
-
 28
28
-
 29
29
-
 30
30
-
 31
31
-
 32
32
-
 33
33
-
 34
34
-
 35
35
-
 36
36
-
 37
37
-
 38
38
-
 39
39
-
 40
40
-
 41
41
-
 42
42
-
 43
43
-
 44
44
-
 45
45
-
 46
46
-
 47
47
-
 48
48
-
 49
49
-
 50
50
-
 51
51
-
 52
52
-
 53
53
-
 54
54
-
 55
55
-
 56
56
-
 57
57
-
 58
58
-
 59
59
-
 60
60
-
 61
61
-
 62
62
-
 63
63
-
 64
64
-
 65
65
-
 66
66
-
 67
67
-
 68
68
-
 69
69
-
 70
70
-
 71
71
-
 72
72
-
 73
73
-
 74
74
-
 75
75
-
 76
76
-
 77
77
-
 78
78


Motorola MDC150 Användarmanual
- Kategori
- Köra inspelare
- Typ
- Användarmanual
på andra språk
- Deutsch: Motorola MDC150 Benutzerhandbuch
- polski: Motorola MDC150 Instrukcja obsługi
- English: Motorola MDC150 User manual
Relaterade papper
Andra dokument
-
Rusta 308015570101 Användarmanual
-
Ring RDC50 Snabbstartsguide
-
AIPTEK SportyCam Z3 Snabbstartsguide
-
AIPTEK T100 Bruksanvisning
-
König CSACWG100 Bruksanvisning
-
-
-
AVENTICS AF2 Bruksanvisning
-
AVENTICS Flow rate sensor, series AF2 Bruksanvisningar