UK: Indivo lift units for the kitchen
User and maintenance guide
DK: Indivo løfteenheder til køkken
Brugs- og vedligeholdelsesvejledning
NO: Indivo løfteenheter til kjøkken
Bruks- og vedlikeholdsveiledning
SE: Indivo lyftutrustning för kök
Bruks- och underhållsanvisning
DE: Indivo Hubeinheiten für die Küche
Gebrauchs- und Pegeanleitung
FR: Cadres de réglage en hauteur Indivo pour cuisine
Manuel d’utilisation et d’entretien
ES: Dispositivos de elevación para cocina Indivo
Funcionamiento y mantenimiento
NL: Indivo-liften voor de keuken
Gebruiks- en onderhoudshandleiding
RK1010 – RK1011 – RK1012
RK1013 – RK1014 – RK1020
RK1021 – RK1081 – RK1082
RK1083 – RK1100 – RK1101
RK1110 – RK1111 – RK1112
RK1113 – RK1114 – RK1181
RK1182 – RK1183

2
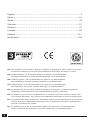
English ............................................................................................. 3
Dansk .............................................................................................21
Norsk ..............................................................................................39
Svenska ..........................................................................................57
Deutsch ..........................................................................................75
Français ..........................................................................................93
Español .........................................................................................111
Nederlands ....................................................................................129
UK: The guarantee covers faults or defects in material or manufacture within a period of 3 years.
Products are subject to minor technical modications and design deviations. E. & O.E.
DK: Garantien dækker i 3 år fra fakturadato for materiale- og fabrikationsfejl.
Der tages forbehold for trykfejl, tekniske ændringer og modelafvigelser.
NO: Garantien gjelder i 3 år fra fakturadato for material- og fabrikasjonsfeil.
Med forbehold for trykkfeil, tekniske endringer og modellforskjeller.
SE: Garantin gäller i 3 år från fakturadatum för material- och fabrikationsfel.
Med reservation för tryckfel, tekniska ändringar och modellavvikelser.
DE: Die Garantie gilt für drei Jahre ab Rechnungsdatum für Material- und Herstellungsfehler.
Druckfehler, technische Änderungen und Modellabweichungen vorbehalten.
FR: La garantie couvre les vices de fabrication et de matériaux pour une durée de 3 ans à partir
de la date de facturation. Sous réserve de modications techniques et d’erreurs d’impression.
ES: La garantía cubre fallos de material o fabricación durante los tres años posteriores a partir de
la fecha de factura. Mantenemos reservas en caso de problemas de presión, modicaciones
técnicas y variaciones de modelo.
NL: De garantie is tot 3 jaar na factuurdatum geldig voor materiaal- en fabricagefouten.
Onder voorbehoud van drukfouten, technische wijzigingen en modelafwijkingen.
3 år / 3 years / 3 jahre / 3 ans
Garanti / Guarantee / Garantie

3
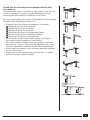
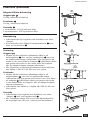
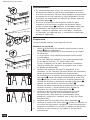
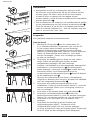
Thank you for choosing this Pressalit Care lift unit
for kitchens.
Combined with either a worktop or wall cabinet, the lift unit
makes it possible to create a height-adjustable kitchen,
ensuring the best working conditions for all users.
We hope that helpers and users will benefi t from the multiple
functions and advantages of the unit:
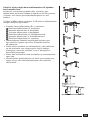
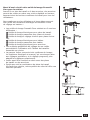
• Pressalit Care lift units are available in 6 variants:
1 Electrical lift units for worktops.
2 Manual lift units for worktops.
3 Manual lift units for worktops.
4 Electrical lift units for freestanding tables.
5 Manual lift units for freestanding tables.
6 Electrical lift units for wall cabinets.
• The fl exibility of the units makes it easy for helpers
and users to work together in the kitchen.
• The Indivo range includes three lift systems: electrical
and manual - both of which can be adjusted daily - and
infi nitely adjustable, suitable for periodical adjustment.
• Indivo can be combined with worktops and wall cabinets
at your discretion.
• Regardless of the combinations you choose, our safety
systems provide optimum safety.
1
2
3
5
4
6

4
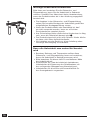
Important safety information
Please read and become familiar with the user and
maintenance guide before using the lift unit. Pressalit Care
cannot be held liable if the product is used in any way which
differs from that described in the guide.
• The information in the guide is based on correct fi tting
of the lift unit in accordance with our installation guide.
• If the product is defective or damaged, it must not be
used before it has been repaired by a service engineer.
• For safety reasons, nothing should obstruct the lift unit
when in movement. 7
• The product is not intended for play, and we therefore
recommend that it is not operated by children without
adult supervision.
• We reserve the right to amend this guide without prior
notice.
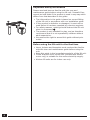
Before using the lift unit for the fi rst time
• Users, helpers and therapists must read and be familiar
with this user and maintenance guide before using the
unit.
• Keep this guide in the immediate proximity of the lift unit.
• Check that the unit's control box (models with electric
motor only) is suitable for the mains electricity supply.
• Kitchen lift units are for indoor use only.
7

5
8
9
10
max
100 kg
(165 lbs)
max
100 kg
(220 lbs)
max
100 kg
(220 lbs)
max
100 kg
(220 lbs)
(243 lbs)
max
110kg
max
110 kg
(243 lbs)
(485 lbs)
max
220kg
max
220 kg
(485 lbs)
11
12
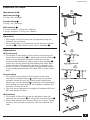
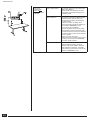
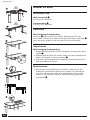
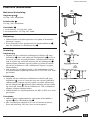
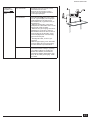
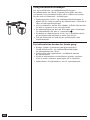
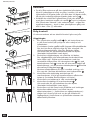
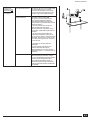
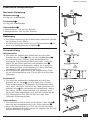
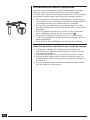
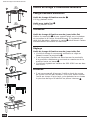
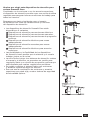
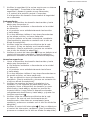
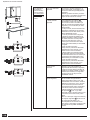
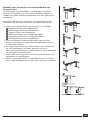
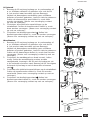
Electrical lift units
Maximum load
Wall-mounted 8
100 kg, incl. worktop.
Freestanding 9
100 kg, incl. worktop.
Wall cabinet 10
1 motor bracket: 110 kg incl. cabinet
2 motor brackets: 220 kg incl. cabinet
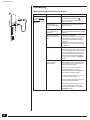
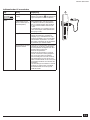
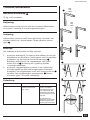
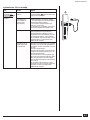
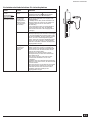
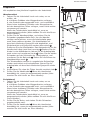
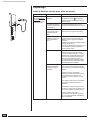
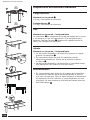
Operation
• The height of the lift units can be adjusted using the
switches on the frame.
• As an alternative or supplement to the frame-mounted
switches 11 a hand-held control unit is available.13
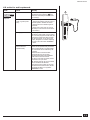
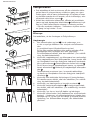
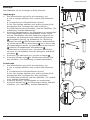
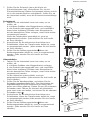
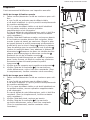
Adjustment
Wall-mounted
• The height of the electric lift unit can be set using the
frame-mounted switch 11 or hand-held remote control 13 ,
which has an up/down indicator. Raise the unit by
pressing and holding the upper part of the indicator.12
Lower the unit by pressing and holding the lower part
of the indicator. Release the indicator to stop the unit.
• When the unit is mounted at the recommended height,
it can be adjusted between 670 and 950 mm above the
fl oor.
Freestanding
• The height of the electric lift unit can be set using
the frame-mounted switch 11, which has an up/down
indicator. Raise the unit by pressing and holding the
upper part of the indicator.12 Lower the unit by pressing
and holding the lower part of the indicator. Release the
indicator to stop the unit.
• The unit can be adjusted to heights of between 680 and
980 mm above the fl oor.
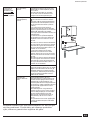
Wall cabinet
• The height of the lift unit can be adjusted using the
switches on the frame 11 or hand-held remote control.13
• When wall cabinets are lowered 430 mm to their lowest
position, they are also projected 180 mm towards the
user.
Electrical lift units
13

6
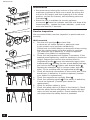
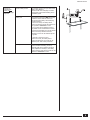
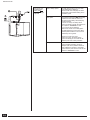
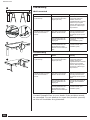
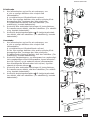
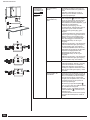
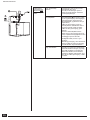
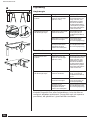
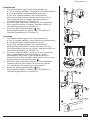
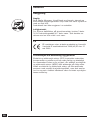
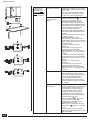
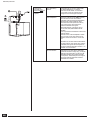
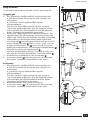
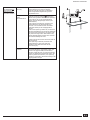
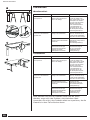
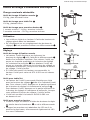
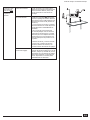
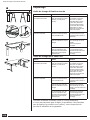
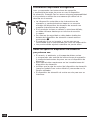
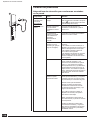
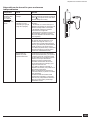
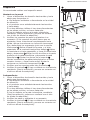
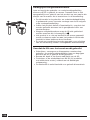
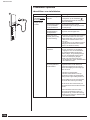
Maintenance
• We recommend running the motors on the unit to their
maximum positions at least once a week by raising the
unit to its full height, and then lowering it to its lowest
position, so that the internal, self-lubricating parts are
lubricated.14
• Reset the unit to maintain its smooth up/down
movement.15 Press the indicator until the unit stops at its
lowest position - release the lower indicator - press once
more and hold for 5 seconds.
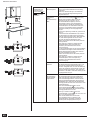
Service inspection
We recommend that a service inspection is performed once
annually.
Wall-mounted
1. Run the unit up/down 16 to check that:
a. there are no visible defects or abnormal noise.
b. the product runs up/down satisfactorily.
If there are no visible defects or abnormal noises coming
from the moving parts, no further action is required.
If a telescopic leg is defective, it must be replaced.
(Contact your dealer for replacement).
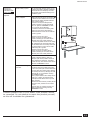
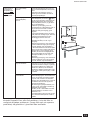
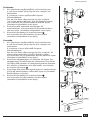
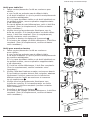
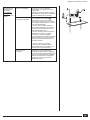
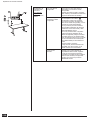
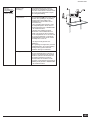
2. Check the wall brackets and tighten if necessary. If the
brackets need tightening, raise the worktop to maximum
height. Support and remove the worktop with its
longitudinal profi le.17 Lower the telescopic legs to their
lowest position.18 Slacken the two screws behind the legs,
and remove the legs.19 Tighten wall bracket bolts.20
Replace the telescopic legs in reverse order, and raise
them. Fit the worktop with its longitudinal profi le 21.
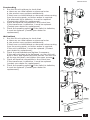
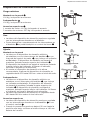
3. Check all electrical connections to the control box. If the
transformer is defective, it must be replaced (contact
your dealer for replacement).
4. Check the supports are correctly fi tted.22
5. Check the operating switch.23 If the switch is defective,
it must be replaced. (Contact your dealer for
replacement).
6. Check for broken cables or wires.
7. Check the safety device (if fi tted in the kitchen). Check
that the safety device rails/plates can move freely and
return to their neutral position. Check whether the lift
unit stops when the safety device is operated.
Electrical lift units
1
23
Min.
5Sek.
15
14
16
17
18

7
1
3
2
1
19
20
NB!
24
22
21
23
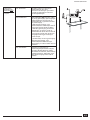
Freestanding
1. Run the lift unit up/down to check that:
a. there are no visual defects or abnormal noise.
b. the product runs up/down satisfactorily.
If there are no visible defects or abnormal noises coming
from the moving parts, no further action is required.
If a telescopic leg is defective, it must be replaced.
(Contact your dealer for replacement).
2. Check all electrical connections to the control box.
If the transformer is defective, it must be replaced.
(Contact your dealer for replacement).
3. Check the operating switch.23 If the switch is defective,
it must be replaced. (Contact your dealer for
replacement).
Wall cabinet
1. Run the lift unit up/down to check that:
a. there are no visual defects or abnormal noise.
b. the product runs up/down satisfactorily.
If there are no visible defects or abnormal noises coming
from the moving parts, no further action is required.
If the unit is defective, it must be replaced. (Contact
your dealer for replacement).
2. Check the wall brackets and tighten if necessary.
If the wall units have to be tightened, run the unit out/
down a little, and tighten the lower screws. Run the unit
all the way out/down, and tighten the upper screws.23
3. Check all electrical connections to the control box.
If the transformer is defective, it must be replaced
(contact your dealer for replacement).
4. Check the operating switch.24 If the switch is defective,
it must be replaced. (Contact your dealer for
replacement).
Electrical lift units

8
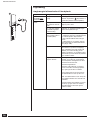
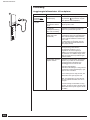
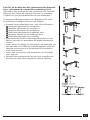
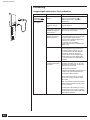
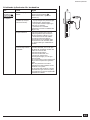
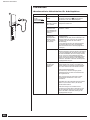
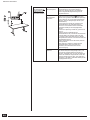
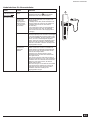
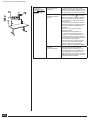
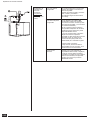
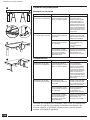
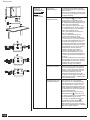
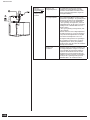
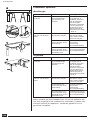
Faultfi nding
Wall-mounted lift unit for worktop
Fault Cause Remedy
Lift unit for
worktop without
safety rail
cannot be height-
adjusted.
No power. Check mains electricity is correctly
connected to the control box. a
(The control box will usually be located
under the worktop).
Telescopic legs not
mounted at the same
height.
Mount the telescopic legs at the same
height and level.
A sink or installation
cover collides with an
obstruction.
Check whether the installation cover
comes into contact with the skirting board
or the like.
Lift unit has not been
reset (e.g. after power
loss).
Reset the unit if possible:
1. Activate the indicator until the unit is in
its lowest position. Release the switch.
2. Activate the lower indicator again for
5 seconds.
3. The lift unit is now reset. (It may be
necessary to reset the unit several times
in succession).
Faulty plugs. Check plug from motor to extension lead,
and those in inlets 1 and 2 on the control
box. The male plugs have small steel pins
which can be easily bent when inserted
into the control box. If one of the pins is
bent, straighten it out before replacing
the plug in the control box. REMEMBER
to reset.
The frame-mounted
switch cannot be
operated easily.
Check whether the switch can be operated
freely and that it returns automatically to
neutral position. The movement can be
hindered by dirt or grease.
Check the frame-mounted switch:
Check that all wires are correctly
connected according to the installation
guide and that none are broken.
If a wire is incorrectly connected, the lift
unit cannot run up or down.
NB: If the lift unit will not rise, the switch
can be considered as defective.
If all wires from the switch are correctly
connected and none are broken, the
lift unit should be able to run up/down.
REMEMBER to reset.
Electrical lift units
a

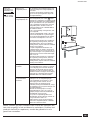
9
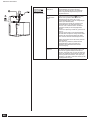
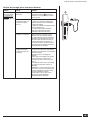
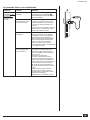
Lift unit for
worktop with
safety rail
cannot be height-
adjusted.
Fault in safety device. The worktop cannot run up or down if the
safety rail is defective.
Check that all wires and plugs are intact
and correctly connected according to the
installation guide.
Installation error on
safety rail. Use measurement device b (ohmmeter)
to detect current. Measure current on
the wire from the safety rail and its plug
(a close function).
- if there is current, the safety device
system is working. The lift unit should now
run up/down. REMEMBER to reset.
- if no current can be detected, remove
the plastic covers and slacken the screws
at the end of the safety rail. The rail should
now move freely. Note that the rail's
freedom to move can be hindered by dirt
or grease.
- check for current once more:
If there is current, the safety device
system is working. If no current can be
detected, see under "Faulty switches".
Faulty switches. Check whether one or more of the safety
system contacts is sticking, and if so,
attempt repair. If the problem cannot be
fi xed, replace the contact(s). The safety
system will only work when current can be
detected. REMEMBER to reset.
Electrical lift units
1
1
1
1
2
2
2
b

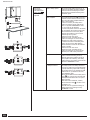
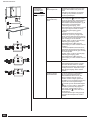
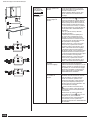
10
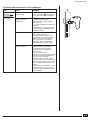
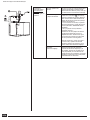
Lift unit for
worktop and
wall cabinet with
safety rail/plate,
cannot be height-
adjusted
Fault in safety system. The worktop/wall cabinet cannot run up
or down if the safety rail/plate is defective.
Check that all wires and plugs are intact
and correctly connected according to the
installation guide.
Installation error on
safety rail/plate. Use measurement device c (ohmmeter)
to detect current. Measure current on the
wires from the safety rail/plate and their
plug (a close function).
- if there is current, the safety device
system is working. The lift units should
now run up/down. REMEMBER to reset.
- if no current can be detected:
a. remove the plastic corners on the safety
rail, and slacken the screws at both ends.
The rail should now move freely. Note
that the rail's freedom to move can be
hindered by dirt or grease.
Check for current once more:
If there is current, the safety device
system is working. If no current can be
detected, see under "Faulty switches".
b. slacken all screws on the safety plate
until it can move freely. Note that the
plate's freedom to move can be hindered
by dirt or grease.
Check for current once more:
If there is current, the safety device
system is working. If no current can be
detected, see under "Faulty switches".
Faulty switches. Check whether one or more of the safety
system contacts is sticking, and if so,
attempt repair. If the problem cannot be
fi xed, replace the contact(s). The safety
system will only work when current can be
detected. REMEMBER to reset.
Jumper missing
in safety device box. If there is a combination in which one of
the safety inputs in the safety device box
is not in use, that input must be fi tted with
a jumper lead. If a jumper lead is missing,
the worktop will not run, although the wall
cabinets will run up and down correctly.
See installation guide.
When jumper lead and other safety device
plugs d (mk. 5 and 6) are inserted, both
worktop and wall cabinet will run up and
down correctly.
Note that in some instances, 2 safety
device boxes are used e, of which one is
marked 8-9-10.
If the lift units run up/down correctly, all
safety systems are working correctly.
REMEMBER to reset.
Electrical lift units
5
6
5
6
5
6
7
5
6
7
5
6
7
5
6
7
8
9
10
8
9
10
88
5
6
5
6
2
1
3
5
6
5
6
c
d
e

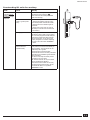
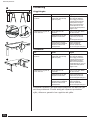
11
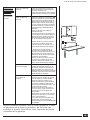
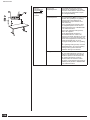
Freestanding lift units for worktop
Fault Cause Remedy
Lift unit for
worktop without
safety rail
cannot be height-
adjusted
No power. Check mains electricity is correctly
connected to the control box. f.
(The control box will usually be located
under the worktop).
Lift unit has not been
reset (e.g. after power
loss).
Reset the unit if possible:
1. Activate the indicator until the unit is
in its lowest position. Release the switch.
2. Activate the lower indicator again for
5 seconds.
3. The lift unit is now reset. (It may be
necessary to reset the unit several times
in succession).
Faulty plugs. Check plug from motor to extension lead,
and those in inlets 1 and 2 on the control
box. The male plugs have small steel pins
which can be easily bent when inserted
into the control box. If one of the pins
is bent, straighten it out before replacing
the plug in the control box. REMEMBER
to reset.
The frame-mounted
switch cannot be
operated easily.
Check whether the switch can be operated
freely and that it returns automatically to
neutral position. The movement can be
hindered by dirt or grease.
Check the frame-mounted switch:
Check that all wires are correctly connected
according to the installation guide and that
none are broken.
If a wire is incorrectly connected, the lift
unit cannot run up or down.
NB: If the lift unit will not rise, the switch
can be considered as defective.
If all wires from the switch are correctly
connected and none are broken, the lift
unit should be able to run up/down.
REMEMBER to reset.
Electrical lift units
f

12
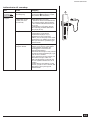
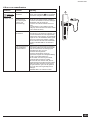
Lift unit for
worktop with
safety rail
cannot be height-
adjusted.
Fault in safety system. The worktop cannot run up or down if the
safety rail is defective.
Check that all wires and plugs are intact
and correctly connected according to the
installation guide.
Assembly error on
safety rail system. Use measurement device g (ohmmeter)
to detect current. Measure current on
the wire from the safety rail and its plug
(a close function).
- if there is current, the safety device
system is working. The lift unit should now
run up/down. REMEMBER to reset.
- if no current can be detected:
Remove the plastic corners on the safety
rails and slacken the screws at both ends.
The rails should now move freely. Note that
the rails' freedom to move can be hindered
by dirt or grease.
Check for current once more:
If there is current, the safety device system
is working. If no current can be detected,
see under "Faulty switches".
Faulty switches. Check whether one or more of the safety
system contacts is sticking, and if so,
attempt repair. If the problem cannot be
fi xed, replace the contact(s). The safety
system will only work when current can be
detected. REMEMBER to reset.
Electrical lift units
1
1
1
1
2
2
2
g

13
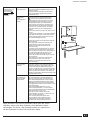
Lift units for wall cupboards
Fault Cause Remedy
Lift unit for wall
cupboard without
safety plate
cannot be height-
adjusted.
No power. Check mains electricity is correctly
connected to the control box. h (The
control box will usually be located under
the worktop).
Lift unit has not been
reset (e.g. after power
loss).
Reset the unit if possible:
1. Activate the indicator until the unit is in
its lowest position. Release the switch.
2. Activate the lower indicator again for
5 seconds.
3. The lift unit is now reset. (It may be
necessary to reset the unit several times
in succession).
Faulty plugs. Check plug from motor to extension lead,
and those in inlets 3 and 4 on the control
box. The male plugs have small steel pins
which can be easily bent when inserted
into the control box. If one of the pins
is bent, straighten it out before replacing
the plug in the control box. REMEMBER
to reset.
The frame-mounted
switch cannot be
operated easily.
Check whether the frame-mounted
switch can be operated freely and that it
returns automatically to neutral position.
The movement can be hindered by dirt
or grease.
Check the frame-mounted switch:
Check that all wires are correctly
connected according to the installation
guide and that none are broken.
If a wire is incorrectly connected, the lift
unit cannot run up or down.
NB: If the lift unit will not rise, the switch
can be considered as defective.
If all wires from the switch are correctly
connected and none are broken, the lift
unit should be able to run up/down.
REMEMBER to reset.
h
Electrical lift units

14
Lift unit for wall
cupboard with
safety plate
cannot be height-
adjusted
Fault in safety system. The wall cabinet cannot run up or down
if the safety plate is defective.
Check that all wires and plugs are intact
and correctly connected according to the
installation guide.
Assembly error on
safety plate. Use measurement device i (ohmmeter)
to detect current. Measure current on
the wire from the safety rail and its plug
(a close function).
- if there is current, the safety device
system is working. The lift unit should now
run out/down. REMEMBER to reset.
- if no current can be detected:
Slacken the screws on the safety plate.
The plate should now move freely. Note
that the plate's freedom to move can be
hindered by dirt or grease.
Check for current once more:
If there is current, the safety device
system is working. If no current can be
detected, see under "Faulty switches".
Faulty switches. Check whether one or more of the safety
system contacts is sticking, and if so,
attempt repair. If the problem cannot be
fi xed, replace the contact(s). The safety
system will only work when current can be
detected. REMEMBER to reset.
1234
3
3
3 3
i
Electrical lift units

15
Lift units for
worktop and
wall cabinet with
safety plates/rails
cannot be height-
adjusted.
Fault in safety system. The worktop/wall cabinets cannot run up
or down if the safety rail/plate is defective.
Check that all wires and plugs are intact
and correctly connected according to the
installation guide.
Installation error on
safety rail/plate. With measurement device (ohmmeter) j
to detect current. Measure current on the
wires from the safety rail/plate and their
plug (a close function).
- if there is current, the safety device
system is working. The lift units should
now run up/down. REMEMBER to reset.
- if no current can be detected:
a. slacken all screws on the safety plate
until it can move freely. Note that the
plate's freedom to move can be hindered
by dirt or grease.
Check for current once more:
If there is current, the safety device
system is working. If no current can be
detected, see under "Faulty switches".
b. remove the plastic corners on the safety
rail, and slacken the screws at both ends.
The rail should now move freely. Note that
the rail's freedom to move can be made
hindered by dirt or grease.
Check for current once more:
If there is current, the safety device
system is working. If no current can be
detected, see under "Faulty switches".
Faulty switches. Check whether one or more of the safety
system contacts is sticking, and if so,
attempt repair. If the problem cannot be
fi xed, replace the contact(s). The safety
system will only work when current can be
detected. REMEMBER to reset.
Jumper lead missing in
fuse box. If there is a combination in which one of
the safety inputs in the safety device box
is not in use, that input must be fi tted with
a jumper lead. If a jumper lead is missing,
the worktop will not run, although the wall
cabinets will run up and down correctly.
See installation guide.
When jumper lead and other safety device
plugs (mk. 5 and 6) are inserted, both
worktop and wall cabinet will run up and
down correctly.
Note that in some instance, 2 safety device
boxes are used, of which one is marked
8-9-10.
If the lift units run up/down correctly, all
safety systems are working correctly.
REMEMBER to reset.
Contact Pressalit Care or your dealer if the problem cannot
be remedied. Do not attempt to repair the product yourself,
as this will invalidate the guarantee.
2
1
3
5
6
5
6
j
Electrical lift units

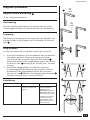
16
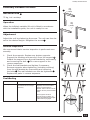
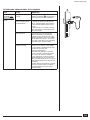
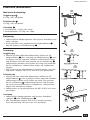
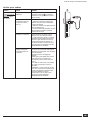
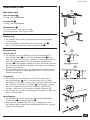
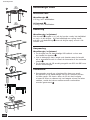
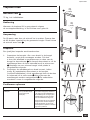
Manual lift units
Maximum load
Wall-mounted 25
100 kg, incl. worktop.
Freestanding 26
100 kg, incl. worktop.
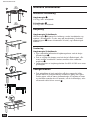
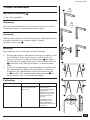
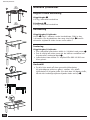
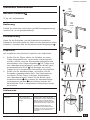
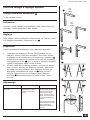
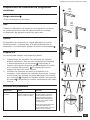
Operation
Wall-hanging/freestanding
Remove 27 hand crank from under worktop and fi t onto
drive shaft. If there is a frame around the worktop, push the 28
over the drive shaft to one side and fi t the hand crank.
Adjustment
Wall-hanging/freestanding
• Adjust the manual lift unit for height by turning the hand
crank.29
• Always stop turning the crank when you feel resistance at
either the upper or lower position.30
• The unit can be adjusted to heights of between 680 and
980 mm above the fl oor.
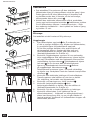
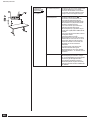
Maintenance
• We recommend winding the spindle on the unit to the
maximum positions at least once a week. by raising the
unit to its full height, and then lowering it to its lowest
position, so that the internal, self-lubricating parts are
lubricated.31
Min.
NB!
Max
NB!
27
(220 lbs)
ma x
100kg
max
100 kg
(220 lbs)
max
100 kg
(220 lbs)
max
100 kg
(220 lbs)
25
26
28
29
31
30
Manual lift units

17
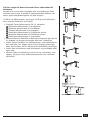
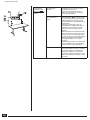
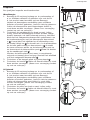
Service inspection
We recommend that a service inspection is performed once
annually.
Wall-mounted
1. Run the lift unit up/down to check that:
a. there are no visual defects or abnormal noise.
b. the product runs up/down satisfactorily.
If there are no visible defects or abnormal noises coming
from the moving parts, no further action is required.
If a telescopic leg is defective, it must be replaced.
(Contact your dealer for replacement).
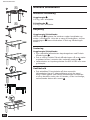
2. Check the wall brackets and tighten if necessary. If the
brackets need tightening, raise the worktop to maximum
height. Support the worktop with its longitudinal profi le,
and remove the angle gear and profi le.32
Remove the
worktop. The crank extension rod will hang free.33
Insert the crank in the extension rod, wind the worktop
down and remove.34 Slacken the two screws behind the
legs, and remove the legs.35 Tighten wall bracket bolts.36
Replace the telescopic legs in reverse order, and raise
them. Fit the worktop with its longitudinal profi le37
3. Check the supports are correctly fi tted.38
4. Check the crank.39 If the crank is defective, it must be
replaced. (Contact your dealer for replacement).
Freestanding
1. Run the lift unit up/down to check that:
a. there are no visual defects or abnormal noise.
b. the product runs up/down satisfactorily.
If there are no visible defects or abnormal noises coming
from the moving parts, no further action is required.
If a telescopic leg is defective, it must be replaced.
(Contact your dealer for replacement).
2. Check the legs and tighten if necessary.
3. Check the crank.40 If the crank is defective, it must be
replaced. (Contact your dealer for replacement).
34
1
3
2
1
35
36
33
32
Manual lift units

18
Faultfi nding
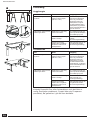
Wall-mounted
Fault Cause Remedy
Lift unit does not run
synchronously. The telescopic legs are
not mounted at the same
height (not level).
Run the unit as far down
to its lowest position as
possible. Detach the
longitudinal shaft on the side
where the leg is highest.
Insert an Allen key into the
leg and turn until the leg is
fully retracted.
The lift unit does not move
when the hand crank is
turned.
The crank is not correctly
fi tted on the drive shaft. Push the crank down as far
as it will go and turn until
the worktop moves up and
down.
The extension rod is not
correctly attached to the
angle gear.
Connect the rod correctly
to the gear.
(See installation guide).
The angle gear is not
correctly attached to the
longitudinal drive shaft
between the two telescopic
legs.
Connect the gear correctly
to the drive shaft. (See
installation guide).
Freestanding
Fault Cause Remedy
Lift unit does not run
synchronously. The telescopic legs are
not mounted at the same
height (not level).
Run the unit as far down
to its lowest position as
possible. Detach the
longitudinal shaft on the side
where the leg is highest.
Insert an Allen key into the
leg and turn until the leg is
fully retracted.
The lift unit does not move
when the hand crank is
turned.
The crank is not correctly
fi tted on the drive shaft. Push the crank down as far
as it will go and turn until
the worktop moves up and
down.
The extension rod is not
correctly attached to the
angle gear.
Connect the rod correctly to
the gear. (See installation
guide).
The angle gear is not
correctly attached to the
longitudinal drive shaft
between the two telescopic
legs.
Connect the gear correctly
to the drive shaft. (See
installation guide).
Contact Pressalit Care or your dealer if the problem cannot
be remedied. Do not attempt to repair the product yourself,
as this will invalidate the guarantee.
NB!
38
37
5
39
5
40
Manual lift units

19
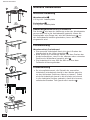
Infi nitely variable lift units
Maximum load 41
75 kg, incl. worktop.
Operation
When the infi nitely variable lift unit is fi tted in accordance
with the installation guide, the unit is ready for use.
Adjustment
Adjust the unit by slackening the screw. The unit can then be
set to the desired height. Retighten the screw.42
Service inspection
We recommend that a service inspection is performed once
annually.
1. Check the supports. Replace any broken supports.
Support the worktop and remove it from the support.43
Detach the support from the wall bracket by unscrewing
and removing the bolt. 43 Fit a new support in the
reverse sequence.
2. Check the wall brackets and tighten if necessary.
Remove supports when tightening (including worktop)
from the wall bracket by unscrewing and removing
the bolts.44 The wall brackets can now be tightened.45
Replace the parts in reverse sequence.
Faultfi nding
Fault Cause Remedy
Worktop not level. The telescopic legs are not
mounted at the same height
(not level).
If the supports cannot be height
adjusted, check the threaded
insert mounted inside the
bracket. There must be no screw
heads in the way of the threaded
inset.
If the supports cannot be
secured at a given height, we
recommend adjusting the height
a little before trying again.
(165 lbs)
max
75 kg
42
45
43
44
(165 lbs)
max
75 kg
max
75 kg
(165 lbs)
max
75 kg
(165 lbs)
41
Infi nitely variable lift units

20
General
Cleaning
Daily
Use ordinary soapy water. Avoid use of abrasive, corrosive or
chlorine-based cleaning products. Rinse off with clean water
and dry with a soft cloth.
These products cannot be cleaned in an autoclave.
Occasional
Use 3 parts 30% household vinegar to 7 parts water for
removal of lime deposits. Wipe off with a cloth dipped in
clean water and wrung out.
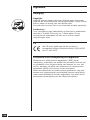
CE
The CE mark indicates that this product has been
manufactured according to the Machine Directive
2006/42/EC of 17 May 2006.
Information on disposal and recycling
Electrical and electronic equipment (EEE) contains materials,
components and substances which can be hazardous to
human health and the environment when waste from electric
and electronic equipment (WEEE) is not disposed of correctly.
Such equipment must not be disposed of with unsorted
domestic refuse, but must be collected separately. Waste
must be processed according to local authority instructions.
Sidan laddas...
Sidan laddas...
Sidan laddas...
Sidan laddas...
Sidan laddas...
Sidan laddas...
Sidan laddas...
Sidan laddas...
Sidan laddas...
Sidan laddas...
Sidan laddas...
Sidan laddas...
Sidan laddas...
Sidan laddas...
Sidan laddas...
Sidan laddas...
Sidan laddas...
Sidan laddas...
Sidan laddas...
Sidan laddas...
Sidan laddas...
Sidan laddas...
Sidan laddas...
Sidan laddas...
Sidan laddas...
Sidan laddas...
Sidan laddas...
Sidan laddas...
Sidan laddas...
Sidan laddas...
Sidan laddas...
Sidan laddas...
Sidan laddas...
Sidan laddas...
Sidan laddas...
Sidan laddas...
Sidan laddas...
Sidan laddas...
Sidan laddas...
Sidan laddas...
Sidan laddas...
Sidan laddas...
Sidan laddas...
Sidan laddas...
Sidan laddas...
Sidan laddas...
Sidan laddas...
Sidan laddas...
Sidan laddas...
Sidan laddas...
Sidan laddas...
Sidan laddas...
Sidan laddas...
Sidan laddas...
Sidan laddas...
Sidan laddas...
Sidan laddas...
Sidan laddas...
Sidan laddas...
Sidan laddas...
Sidan laddas...
Sidan laddas...
Sidan laddas...
Sidan laddas...
Sidan laddas...
Sidan laddas...
Sidan laddas...
Sidan laddas...
Sidan laddas...
Sidan laddas...
Sidan laddas...
Sidan laddas...
Sidan laddas...
Sidan laddas...
Sidan laddas...
Sidan laddas...
Sidan laddas...
Sidan laddas...
Sidan laddas...
Sidan laddas...
Sidan laddas...
Sidan laddas...
Sidan laddas...
Sidan laddas...
Sidan laddas...
Sidan laddas...
Sidan laddas...
Sidan laddas...
Sidan laddas...
Sidan laddas...
Sidan laddas...
Sidan laddas...
Sidan laddas...
Sidan laddas...
Sidan laddas...
Sidan laddas...
Sidan laddas...
Sidan laddas...
Sidan laddas...
Sidan laddas...
Sidan laddas...
Sidan laddas...
Sidan laddas...
Sidan laddas...
Sidan laddas...
Sidan laddas...
Sidan laddas...
Sidan laddas...
Sidan laddas...
Sidan laddas...
Sidan laddas...
Sidan laddas...
Sidan laddas...
Sidan laddas...
Sidan laddas...
Sidan laddas...
Sidan laddas...
Sidan laddas...
Sidan laddas...
Sidan laddas...
Sidan laddas...
Sidan laddas...
Sidan laddas...
Sidan laddas...
Sidan laddas...
Sidan laddas...
Sidan laddas...
Sidan laddas...
-
 1
1
-
 2
2
-
 3
3
-
 4
4
-
 5
5
-
 6
6
-
 7
7
-
 8
8
-
 9
9
-
 10
10
-
 11
11
-
 12
12
-
 13
13
-
 14
14
-
 15
15
-
 16
16
-
 17
17
-
 18
18
-
 19
19
-
 20
20
-
 21
21
-
 22
22
-
 23
23
-
 24
24
-
 25
25
-
 26
26
-
 27
27
-
 28
28
-
 29
29
-
 30
30
-
 31
31
-
 32
32
-
 33
33
-
 34
34
-
 35
35
-
 36
36
-
 37
37
-
 38
38
-
 39
39
-
 40
40
-
 41
41
-
 42
42
-
 43
43
-
 44
44
-
 45
45
-
 46
46
-
 47
47
-
 48
48
-
 49
49
-
 50
50
-
 51
51
-
 52
52
-
 53
53
-
 54
54
-
 55
55
-
 56
56
-
 57
57
-
 58
58
-
 59
59
-
 60
60
-
 61
61
-
 62
62
-
 63
63
-
 64
64
-
 65
65
-
 66
66
-
 67
67
-
 68
68
-
 69
69
-
 70
70
-
 71
71
-
 72
72
-
 73
73
-
 74
74
-
 75
75
-
 76
76
-
 77
77
-
 78
78
-
 79
79
-
 80
80
-
 81
81
-
 82
82
-
 83
83
-
 84
84
-
 85
85
-
 86
86
-
 87
87
-
 88
88
-
 89
89
-
 90
90
-
 91
91
-
 92
92
-
 93
93
-
 94
94
-
 95
95
-
 96
96
-
 97
97
-
 98
98
-
 99
99
-
 100
100
-
 101
101
-
 102
102
-
 103
103
-
 104
104
-
 105
105
-
 106
106
-
 107
107
-
 108
108
-
 109
109
-
 110
110
-
 111
111
-
 112
112
-
 113
113
-
 114
114
-
 115
115
-
 116
116
-
 117
117
-
 118
118
-
 119
119
-
 120
120
-
 121
121
-
 122
122
-
 123
123
-
 124
124
-
 125
125
-
 126
126
-
 127
127
-
 128
128
-
 129
129
-
 130
130
-
 131
131
-
 132
132
-
 133
133
-
 134
134
-
 135
135
-
 136
136
-
 137
137
-
 138
138
-
 139
139
-
 140
140
-
 141
141
-
 142
142
-
 143
143
-
 144
144
-
 145
145
-
 146
146
-
 147
147
-
 148
148


på andra språk
- español: Pressalit RK1181 Guía del usuario
- Deutsch: Pressalit RK1181 Benutzerhandbuch
- français: Pressalit RK1181 Mode d'emploi
- English: Pressalit RK1181 User guide
- dansk: Pressalit RK1181 Brugervejledning
- Nederlands: Pressalit RK1181 Gebruikershandleiding