Yamaha CVP-503 Bruksanvisning

Typ
Bruksanvisning
Accessory CD-ROM for Windows Installation Guide 1
Accessory CD-ROM for Windows
Installation Guide/Installationshandbuch/Manuel d’installation/Guía de instalación
SPECIAL NOTICES
The software and this Installation Guide are exclusive copyrights of Yamaha Corporation.
Use of the software and this guide is governed by the license agreement which the purchaser fully agrees to upon breaking the seal of the
CD-ROM packaging. (Please read carefully the Software Licensing Agreement at the end of this guide before installing the application.)
Copying of the software or reproduction of this guide in whole or in part by any means is expressly forbidden without the written consent of
the manufacturer.
•Yamaha makes no representations or warranties with regard to the use of the software and documentation and cannot be held responsible for
the results of the use of this guide and the software.
Copying of the commercially available music data is strictly prohibited except for your personal use.
The company names and product names in this guide are the trademarks or registered trademarks of their respective companies.
Software such as the USB-MIDI driver may be revised and updated without prior notice. Make sure to check and download the latest version
of the software from the following site.
http://music.yamaha.com/download/
Future upgrades of application and system software and any changes in specifications and functions will be announced separately.
BESONDERE HINWEISE
Dieses Programm und diese Installationsanleitung sind im Sinne des Urheberrechts alleiniges Eigentum der Yamaha Corporation.
Die Verwendung der Software sowie dieses Guides unterliegen der Lizenzvereinbarung, mit deren Bestimmungen sich der Käufer beim
Öffnen der CD-ROM-Verpackung in vollem Umfang einverstanden erklärt. (Bitte lesen Sie die Software-Lizenzvereinbarung am Ende dieses
Guides sorgfältig durch, bevor Sie die Anwendung installieren.)
Das Kopieren der Software und die Reproduktion dieser Anleitung, in welcher Form auch immer, in Teilen oder als Ganzes, sind nur mit
schriftlicher Genehmigung des Herstellers erlaubt und sonst ausdrücklich verboten.
•Yamaha leistet keinerlei Garantie hinsichtlich der Benutzung des Programms und der zugehörigen Dokumentation und übernimmt keine
Verantwortung für die Ergebnisse der Benutzung dieser Anleitung oder des Programms.
Das Kopieren im Handel erhältlicher Musikdaten ist nur für Ihren Privatgebrauch zulässig und sonst streng untersagt.
Die in diesem Leitfaden erwähnten Firmen- und Produktnamen sind Warenzeichen bzw. eingetragene Warenzeichen der jeweiligen Firmen.
Software wie z.B. der USB MIDI Driver kann ohne vorherige Benachrichtigung überarbeitet und aktualisiert werden. Achten Sie darauf, auf
der folgenden Website nach der neuesten Version der Software zu suchen und sie herunterzuladen.
http://music.yamaha.com/download/
Zukünftige Aktualisierungen von Anwendungs- und Systemsoftware sowie jede Änderung der technischen Daten und Funktionen werden
separat bekanntgegeben.
REMARQUES PARTICULIERES
Les droits d’auteurs (copyright) de ce logiciel et de ce manuel d’installation appartiennent exclusivement à Yamaha Corporation.
L'usage de ce logiciel et de ce guide est défini par l'accord de licence auquel l'acheteur déclare souscrire sans réserve lorsqu'il ouvre le sceau de
l'emballage du CD-ROM. (Veuillez lire attentivement l'accord de licence de logiciel situé à la fin de ce guide avant d'installer l'application.)
•Toute copie du logiciel et toute reproduction totale ou partielle de ce manuel, par quel moyen que ce soit, est expressément interdite sans
l’autorisation écrite du fabricant.
•Yamaha n’offre aucune garantie en ce qui concerne l’utilisation du logiciel et de la documentation. Yamaha ne peut en aucun cas être tenu
responsable des dommages éventuels résultant de l’utilisation de ce manuel et de ce logiciel.
•Toute copie de données musicales commercialisées est formellement interdite, sauf pour usage personnel.
Les noms des sociétés et des produits apparaissant dans ce guide sont des marques commerciales ou des marques déposées appartenant à leurs
détenteurs respectifs.
Les logiciels tels que le pilote USB MIDI sont susceptibles d’être révisés et mis à jour sans avertissement préalable. Veuillez toujours à vérifier
la version du logiciel utilisée et à télécharger la dernière version en date sur le site suivant :
http://music.yamaha.com/download/
Les remises à jour du programme et du système ainsi que toute modification des caractéristiques et fonctions seront annoncées séparément.
AVISOS ESPECIALES
El copyright del software y de la guía de instalación es propiedad exclusiva de Yamaha Corporation.
La utilización de este software y de esta guía debe ajustarse al acuerdo de licencia, con el que el comprador manifiesta su total conformidad al
abrir el CD-ROM. (Antes de instalar la aplicación, lea detenidamente el acuerdo de licencia de software que se incluye al final de esta guía.)
La copia del software o la reproducción total o parcial de este manual por cualquier medio sin la autorización escrita del fabricante está
expresamente prohibida.
•Yamaha no asume responsabilidad alguna ni ofrece garantía alguna en relación con el uso del software y de la documentación, y no puede ser
declarada responsable de los resultados de la utilización de este manual ni del software.
Queda terminantemente prohibida la copia de datos musicales disponibles comercialmente, excepto para uso personal.
Los nombres de compañías y de productos que aparecen en esta guía son marcas comerciales o marcas registradas de sus respectivas
compañías.
El software, por ejemplo el controlador USB MIDI, se puede revisar y actualizar sin previo aviso. Compruebe que existe la versión más reciente
del software y descárguela en el sitio siguiente:
http://music.yamaha.com/download/
Las futuras actualizaciones de la aplicación y del software del sistema, y cualquier cambio en las especificaciones y funciones, se anunciarán
independientemente.
EnglishDeutschFrançaisEspañol
EN
DE
FR
ES
2 Accessory CD-ROM for Windows Installation Guide
English
Important Notices about the CD-ROM
Data Types
This CD-ROM includes application software. Please refer to page 4 for software installation instructions.
This CD-ROM containing the software is not meant for use with an audio/visual system (CD player, DVD player, etc.). Do not
attempt to use the disk on equipment other than a computer.
Operating System (OS)
The applications in this CD-ROM are provided in versions for Windows operating systems.
CD-ROM Installation Procedure
1 Check the system requirements to make sure that the software will run on your computer (page 3).
2 Insert the included CD-ROM into the CD-ROM drive.
The Start window will appear automatically. (Users of Windows Vista will need to click [Start.exe] to open the Start window after
inserting the CD-ROM.)
3 Install the USB-MIDI driver to the computer (page 4).
4 Install the software (page 6).
5 Start up the software.
For subsequent operations, refer to the online manuals of the relevant software.
If you have any problems in driver installation, refer to the “Troubleshooting” on page 7.
n To view PDF files, you must install Adobe Reader on your computer.
If you do not have Adobe Reader, you can download the application from the Adobe website at the following URL:
http://www.adobe.com
CAUTION
2
Accessory CD-ROM for Windows Installation Guide 3
English
Contents of the CD-ROM
The start window as shown below will appear automatically when you insert the included CD-ROM. (Users of Windows Vista will need to
click [Start.exe] to open the Start window after inserting the CD-ROM.) By clicking each menu on the Start window, you can access the User
Registration page on the Internet and download some of the wide variety of application software available.
n The screen display as illustrated in this guide is for instructional purposes, and may appear somewhat different from the screens which appear on your
computer.
Some applications listed above are supplied with online manuals.
Minimum System Requirements
n For the System Requirements of the other software available in the CD-ROM, see the respective download page on the web. The download page can be
displayed by clicking the software menu on the Start window and the “download” button in the next page.
Application / Data Name Folder Name Contents
1
USB-MIDI Driver
(Windows 2000/XP)
USBdrv2k_
This software is necessary when using your instrument with a computer via a USB
connection. It enables MIDI communication and control between the instrument and the
computer.
USB-MIDI Driver
(Windows Vista)
USBdrvVista_
2
Online Services (Available at Yamaha website.)
Internet services can take your music to the next level. We offer content and services
designed especially for your instrument!
3
Manual Library (Available at Yamaha website.)
The following instructional materials are available for downloading from the Yamaha
Manual Library. Open the Yamaha Manual Library, then enter your model name in the
Model Name area to search the manuals.
•Reference Manual: Explains the advanced features of your instrument.
Internet Connection Guide: Explains how to connect your instrument directly to the
Internet and take advantage of the Internet Direct Connection services.
(PSR-S910/S710) Data List: Contains various important preset content lists such as
Voices, Styles, Effects, as well as MIDI-related information.
4
MEGAEnhancer (Available at Yamaha website.)
Allows conversion of conventional XG/GM song data to song data optimized for use with
the Mega Voice feature (on a compatible instrument or tone generator. MEGAEnhancer
makes MIDI guitar and bass tracks come to life, with enhanced realism and expression.
MEGAEnhancer can be downloaded from the Internet.
5
50 greats for the Piano SongData
Piano Song files which can be played back via the song playback function of the
instrument.
6
Musicsoft Downloader (Available at Yamaha website.)
Utilizing a connection between the instrument and a computer, this application allows
you to directly download song data to the instrument.
Musicsoft Downloader can be downloaded from the Internet.
7
User Registration (Available at Yamaha website.) This page allows you to take advantage of support and services offered to online users.
8
Product Information (Available at Yamaha website.) You can find the product information on the Yamaha Musical Instrument website.
Application/Data OS CPU Memory Hard Disk
USB Driver for Windows
2000/XP
Windows 2000/XP Home
Edition/XP Professional
733 MHz or higher; Intel® Pentium®/
Celeron® Processor family
256 MB or more at least 3 MB of free space
USB Driver for Windows
Vista
Windows Vista
1 GHz or higher; Intel® Pentium®/
Celeron® Processor family or Intel® 64
compatible processor
512 MB or more at least 3 MB of free space
1
234
7
8
5
6
3
4 Accessory CD-ROM for Windows Installation Guide
English
Software Installation
USB-MIDI Driver
To operate the instrument from your computer via USB, you’ll
need to install the appropriate driver software.
The USB-MIDI driver is software that transfers MIDI data back and
forth between sequence software and the instrument via a USB cable.
For Windows XP: See the column at right.
For Windows 2000: See page 5.
For Windows Vista: See page 5.
n
See the Yamaha Download page at the following URL for up-to-date
news on USB-MIDI driver:
http://music.yamaha.com/download/
Installing the driver on Windows XP
1 Start the computer and use the “Administrator” account
to log on to Windows XP.
2 Select [Start] [Control Panel].
If the control panel appears as “Pick a category”, click
“Switch to Classic View” in the upper left of the window.
All control panels and icons will be displayed.
3
Go to [System] [Hardware] [Driver Signing] and
check the radio button to the left of “Ignore–Install the
software anyway and don’t ask for my approval” and
click [OK].
n After completing the driver installation, make sure to restore the
original setting if necessary.
4 Click the [OK] button to close System Properties, and
then click “X” in the upper right of the window to close
the Control Panel.
5 Insert the included CD-ROM into the CD-ROM drive.
The Start window will appear automatically.
6 First, make sure the instrument is turned off, then use a USB
cable to connect the USB connector of the computer to the
USB TO HOST connector of the instrument. When the
instrument is turned on, the computer automatically displays
the “Found New Hardware Wizard.”
If the Wizard window is not displayed automatically, refer to
“Troubleshooting.”
If the system displays “Found New Hardware” in the lower right
corner, wait until “Found New Hardware Wizard” is displayed. (The
Wizard window may take a while to display on some computers.)
If the Wizard window prompts you to specify whether or not
to connect to Windows Update, select the radio button for
“No, not this time,” then click [Next].
n Refer to the Owner’s Manual of the instrument to connect the
instrument to the computer.
7 Check the radio button to the left of “Install the
software automatically (Recommended),” then click
[Next]. The system starts the installation.
n If during the installation the system displays “...has not passed
Windows Logo testing to verify its compatibility with Windows
XP,” click [Continue Anyway].
8 When the installation is complete, the system displays
“Completing the Found New Hardware Wizard.” Click [Finish].
(The Wizard window may take a while to display on some computers.)
9 Restart the computer.
If the system displays “Found New Hardware” in the lower right
corner, wait until “System Settings Change” is displayed. (The
Wizard window may take a while to display on some computers.)
n This Wizard window will not appear when using Windows XP
Professional x64 Edition. There is no need to restart the computer.
The USB-MIDI driver installation is complete.
Uninstall (Removing the installed application)
To remove any installed application software:
Select [Start] [Settings] [Control Panel] [Add/
Remove Programs] [Change or Remove Programs], then
select the application to be removed and click [Remove].
Follow the on-screen instructions to uninstall the
application.
n The button names or menus may differ depending on the
computer OS.
n For instructions on uninstalling the USB-MIDI driver, refer to
“How can I remove the driver?” in the “Troubleshooting”
section (page 7).
Check the drive name of the CD-ROM drive you will be using
(D:, E:, Q:, etc.) The drive name is displayed beside the CD-
ROM icon in your “My Computer” folder. The root directory
of the CD-ROM drive will be D:\ , E:\ , or Q:\ , respectively.
Computer
MIDI instrument
(Clavinova, Digital Workstation, etc.)
USB cable
Driver
Sequence
Software
4
Accessory CD-ROM for Windows Installation Guide 5
English
Installing the driver on Windows 2000
1 Start the computer and use the “Administrator” account
to log on to Windows 2000.
2 Select [Start] [Settings] [Control Panel] [System]
[Hardware] [Driver Signing] [File signature
verification], and check the radio button to the left of
“Ignore–Install all files, regardless of file signature” and
click [OK].
n After completing the driver installation, make sure to restore the
original setting if necessary.
3 Insert the included CD-ROM into the CD-ROM drive.
The Start window will appear automatically.
4 First, make sure the instrument is turned off, then use a USB
cable to connect the USB connector of the computer to the USB
TO HOST connector of the instrument. When the instrument is
turned on, the computer automatically displays the “Found
New Hardware Wizard.” Click [Next].
(The Wizard window may take a while to display on some computers.)
If the Wizard window is not displayed automatically, refer to
“Troubleshooting.”
n Refer to the Owner’s Manual of the instrument to connect the
instrument to the computer.
5 Check the radio button to the left of “Search for a suitable
driver for my device (Recommended)
,”
then click [Next].
6 Check the “CD-ROM drives” box and uncheck all other
items. Click [Next].
n
The system may ask you to insert a Windows CD-ROM while it
checks for the driver. Specify the “USBdrv2k_” folder of the CD-
ROM drive (such as D:\USBdrv2k_\) and continue the installation.
7 Click [Next].
n
If the Wizard panel informs you that “The software you are about
to install does not contain a Microsoft digital signature,” click [Yes].
8 When the installation is complete, the system displays
“Completing the Found New Hardware Wizard.” Click [Finish].
(The Wizard window may take a while to display on some computers.)
9 Restart the computer.
The USB-MIDI driver installation is complete.
Installing the driver on Windows Vista
1 Start the computer and use the “Administrator” account
to log on to Windows Vista.
2 Insert the included CD-ROM into the CD-ROM drive.
The AutoPlay window will appear.
3 Click [Run Start.exe].
The Start window will appear automatically.
4 First, make sure the instrument is turned off, then use a
USB cable to connect the USB connector of the computer
to the USB TO HOST connector of the instrument. When
the instrument is turned on, the computer automatically
displays the “Found New Hardware” window. Click
“Locate and install driver software (recommended)”.
If the window is not displayed automatically, refer to
“Troubleshooting.” (Some computers may take a while to
display the window.)
n Refer to the Owner’s Manual of the instrument to connect the
instrument to the computer.
n If the “User Account Control” window appears, click [Continue].
5 If a message allowing Windows to search online for
driver software appears, click “Don’t search online.”
6 If a message prompting you to insert the disk that came
with your device appears, click [Next].
The system starts the installation.
n If the “Windows Security” window appears, confirm this software
is authored by Yamaha Corporation then click [Install].
7 When the installation is complete, the system displays
the message “The software for this device has been
successfully installed,” then click [Close].
(Some computers may take a while to display the window.)
The USB-MIDI driver installation is complete.
5
6 Accessory CD-ROM for Windows Installation Guide
English
MEGAEnhancer
IMPORTANT
Instruments not compatible with the Mega Voice feature
cannot properly play back song data created with the
MEGAEnhancer program.
When installing MEGAEnhancer to Windows XP, 2000
or Vista, make sure to log on to the Administrator
account.
•To install MEGAEnhancer, your computer must be
connected to the Internet and be online.
1
Insert the included CD-ROM into the CD-ROM drive of
the computer.
The Start window will appear on the screen. Each menu on
the window indicates the application or data contained in the
Accessory CD-ROM.
2 Click “MEGAEnhancer” on the Start window.
The page which explains the details about MEGAEnhancer is
displayed on the window.
3 Click “MEGAEnhancer Homepage” button at the bottom
of the window.
The Download page on the web is displayed. Verify that your
system meets the requirements before installing the software.
Musicsoft Downloader
IMPORTANT
When installing Musicsoft Downloader to Windows XP,
2000 or Vista, make sure to log on to the Administrator
account.
•To install Musicsoft Downloader, your computer must be
connected to the Internet and be online.
1 Insert the included CD-ROM into the CD-ROM drive of
the computer.
The Start window will appear on the screen. Each menu on
the window indicates the application or data contained in the
Accessory CD-ROM.
2 Click “Musicsoft Downloader” on the Start window.
The page which explains the details about Musicsoft
Downloader is displayed on the window.
3 Click “Musicsoft Downloader Homepage” button at the
bottom of the window.
The Download page on the web is displayed. Verify that your
system meets the requirements before installing the software.
n
For the instrument including this Accessory CD-ROM, you can use
only the Musicsoft Downloader as a file transfer application software.
Other applications such as File Utility and Song Filer cannot be used.
6
Accessory CD-ROM for Windows Installation Guide 7
English
Troubleshooting
The driver cannot be installed.
Is the USB cable connected correctly?
Check the USB cable connection.
Disconnect the USB cable, then connect it again.
Is the USB function enabled on your computer?
When you connect the instrument to the computer for
the first time, if the “Add New Hardware Wizard” does not
appear, the USB function on the computer may be disabled.
Perform the following steps.
1 Select [Start] [Control Panel]* [System] [Hardware]
[Device Manager] (for Windows XP), or select [Start] [Settings]
[Control Panel] [System] [Hardware] [Device Manager]
(for Windows 2000), or select [Start] [Control Panel] [Device
Manager] (for Windows Vista).
* Classic View only in Windows XP.
2 Make sure that no “!” or “x” marks appear at “Universal Serial
Bus Controller” or “USB Root Hub.” If you see an “!” or “x”
mark, the USB controller is disabled.
Is any unknown device registered?
If driver installation fails, the instrument will be marked as an
“Unknown device,” and you will not be able to install the driver.
Delete the “Unknown device” by following the steps below.
1 Select [Start] [Control Panel]* [System] [Hardware]
[Device Manager] (for Windows XP), or select [Start] [Settings]
[Control Panel] [System] [Hardware] [Device Manager]
(for Windows 2000), or select [Start] [Control Panel] [Device
Manager] (for Windows Vista).
* Classic View only in Windows XP.
2 Look for “Other devices” in the menu “View devices by type.”
3 If you find “Other devices,” double-click it to extend the tree to
look for “Unknown device.” If one appears, select it and click the
[Remove] button.
4 Remove the USB cable from the instrument, and make the
connection again.
5 Install the driver again. (See page 4.)
When controlling the instrument from your computer via USB,
the instrument does not operate correctly or no sound is heard.
Did you install the driver (page 4)?
Is the USB cable connected correctly?
•Are the volume settings of the instrument, playback device, and
application program set to the appropriate levels?
•Have you selected an appropriate port in the sequence software?
If you are using a Clavinova, check whether the Piano Lock is
engaged or not.
•Are you using the latest USB-MIDI driver?
The latest driver can be downloaded from the web site (page 4).
Playback response is delayed.
Does your computer satisfy the system requirements?
Is any other application or device driver running?
Cannot suspend or resume the computer correctly.
Do not suspend the computer while the MIDI application is
running.
•You may not be able to suspend/resume normally, depending on the
particular environment (USB Host Controller, etc.). Even so, simply
disconnecting and connecting the USB cable will allow you to use
the instrument functions again.
How can I remove the driver?
1 Start the computer and use the “Administrator” account to
log on to Windows.
Close all applications and windows that are open.
2 Insert the included CD-ROM into the CD-ROM drive.
3 Select [Start] [My Computer] (for Windows XP), or select
[My Computer] (for Windows 2000), or select [Start]
[Computer] (for Windows Vista).
4 Right-click the CD-ROM icon and select “Open” from the
pop-up menu.
5 Select “USBdrvVista_” or “USBdrv2k_” folder
“uninstall” folder “uninstall.exe” file and launch the
“uninstall.exe.” file.
Follow the on-screen instructions to uninstall the driver.
n When using a 64-bit OS, click “uninstall_x64.exe.” from the
“USBdrvVista_” folder.
n If the “User Account Control” window appears, click [Continue].
6 When a message appears prompting you to restart the
computer for proper deletion of the driver, restart the
computer by following the on-screen instructions.
7
2 Accessory CD-ROM for Windows – Installationshandbuch
Wichtige Hinweise zur CD-ROM
Datentypen
Diese CD-ROM enthält Anwendungssoftware. Anweisungen zur Installation der Software finden Sie auf Seite 4.
Diese CD-ROM, auf der sich die Software befindet, ist nicht zur Verwendung mit einem Audio-/Videosystem gedacht
(CD-Player, DVD-Player usw.). Verwenden Sie die Disc ausschließlich an einem Computer.
Betriebssysteme
Die Anwendungen auf dieser CD-ROM werden in Versionen für Windows-Betriebssysteme bereitgestellt.
Verfahren zur Installation der CD-ROM
1 Überprüfen Sie die Systemanforderungen, um sicherzustellen, dass die Software auf Ihrem Computer ausgeführt
werden kann (Seite 3).
2 Legen Sie die mitgelieferte CD-ROM in das CD-ROM-Laufwerk ein.
Daraufhin erscheint automatisch das Startfenster. (Anwender von Windows Vista müssen nach dem Einlegen der CD-ROM auf
[Start.exe] klicken, um das Startfenster zu öffnen.)
3 Installieren Sie den USB-MIDI-Treiber auf dem Computer (Seite 4).
4 Installieren Sie die Software (Seite 6).
5 Starten Sie die Software.
Hinweise zur weiteren Bedienung der Software finden Sie in den mit der Software ausgelieferten Online-Anleitungen.
Falls Sie bei der Installation des Treibers Probleme haben, lesen Sie bitte im Kapitel „Fehlerbehebung“ auf Seite 7 nach.
Um PDF-Dateien anzeigen zu können, müssen Sie den Adobe Reader auf Ihrem Computer installieren.
Wenn Sie den Adobe Reader noch nicht besitzen, können Sie das Programm unter der folgenden URL von der Adobe-Website herunterladen:
http://www.adobe.com
VORSICHT
HINWEIS
Deutsch
8
Accessory CD-ROM for Windows – Installationshandbuch 3
Inhalt der CD-ROM
Das Startfenster (siehe unten) erscheint automatisch, wenn Sie die mitgelieferte CD-ROM einlegen. (Anwender von Windows Vista müssen
nach dem Einlegen der CD-ROM auf [Start.exe] klicken, um das Startfenster zu öffnen.) Durch Anklicken des jeweiligen Eintrags im
Startfenster erreichen Sie die Seite User Registration (Anwenderregistrierung) im Internet und können aus der Vielzahl von Anwendungs-
Software auswählen und diese herunterladen.
Die in diesem Guide abgebildeten Display-Anzeigen dienen nur der Veranschaulichung und können von der auf Ihrem Computer angezeigten
Darstellung abweichen.
Einige der oben aufgeführten Anwendungen werden mit Online-Anleitungen geliefert.
System-Mindestanforderungen
Für die Systemanforderungen anderer Software auf der CD-ROM beachten Sie die Informationen auf der entsprechenden Download-Seite im Internet.
Die Download-Seite lässt sich aufrufen mit einem Klick in das Software-Menü im Start-Fenster und Anklicken der „Download“-Schaltfläche auf der
dann erscheinenden Seite.
Bezeichnung der Anwendung/
Daten
Ordnername Inhalt
1
USB-MIDI Driver
(Windows 2000/XP)
USBdrv2k_
Diese Software benötigen Sie, wenn Ihr Instrument über eine USB-Verbindung an einen
Computer angeschlossen ist. Sie ermöglicht die Kommunikation und Steuerung über MIDI
zwischen dem Instrument und dem Computer.
USB-MIDI Driver
(Windows Vista)
USBdrvVista_
2
Online Services
(Erhältlich auf der
Yamaha-Website.)
Internet-Dienste können Ihre musikalischen Möglichkeiten deutlich erweitern. Wir bieten
Inhalte und Dienste, die speziell auf Ihr Instrument zugeschnitten sind!
3
Manual Library
(Erhältlich auf der
Yamaha-Website.)
Die folgenden Anschauungsmaterialien können von der Yamaha Manual Library
heruntergeladen werden. Öffnen Sie die Yamaha Manual Library, geben Sie im Bereich
„Model Name“ den Namen Ihres Modells ein, um die Anleitungen zu durchsuchen.
•Referenzanleitung: Beschreibt die erweiterten Möglichkeiten Ihres Instruments.
Internet Connection Guide Beschreibt, wie Sie das Instrument direkt mit dem Internet
verbinden, um die Internet-Direktverbindung nutzen zu können.
(PSR-S910/S710) Datenliste: Enthält verschiedene wichtige Listen zu vorprogrammierten
Inhalten wie Voices, Styles, Effekte sowie Informationen zu MIDI.
4
MEGAEnhancer
(Erhältlich auf der
Yamaha-Website.)
Ermöglicht die Konvertierung herkömmlicher XG-/GM-Song-Daten in Song-Daten, die für
die Verwendung mit der Mega-Voice-Funktion (an einem kompatiblen Instrument oder
Klangerzeuger) optimiert sind. MEGAEnhancer verleiht MIDI-Gitarren- und MIDI-
Bassspuren Lebendigkeit sowie mehr Realistik und stärkeren Ausdruck.
MEGAEnhancer kann auch aus dem Internet heruntergeladen werden.
5
50 greats for the Piano SongData
Piano-Song-Dateien, die über die Song-Wiedergabefunktion des Instruments wiedergegeben
werden können.
6
Musicsoft Downloader
(Erhältlich auf der
Yamaha-Website.)
Mithilfe einer Verbindung zwischen dem Instrument und einem Computer ermöglicht
Ihnen diese Anwendung, Song-Daten direkt auf das Instrument herunterzuladen.
Musicsoft Downloader steht auf der Yamaha-Website zum Download bereit.
7
User Registration
(Erhältlich auf der
Yamaha-Website.)
Auf dieser Seite nutzen Sie die Vorteile von Support sowie Dienste für Online-Anwender.
8
Product Information
(Erhältlich auf der
Yamaha-Website.)
Sie können die Produktinformationen auf der Website für Musikinstrumente von Yamaha
finden.
Anwendung/Daten Betriebssystem Prozessor Arbeitsspeicher Festplatte
USB Driver for
Windows 2000/XP
Windows 2000/XP Home
Edition/XP Professional
733 MHz oder schneller; Prozessor
der Familie Intel® Pentium®/Celeron®
256 MB oder mehr
mindestens 3 MB
freier Speicherplatz
USB Driver for
Windows Vista
Windows Vista
1 GHz oder schneller; Prozessor
der Familie Intel® Pentium®/Celeron®
oder mit Intel® 64 kompatibler Prozessor
512 MB oder mehr
mindestens 3 MB
freier Speicherplatz
1
234
7
8
5
6
HINWEIS
HINWEIS
Deutsch
9
4 Accessory CD-ROM for Windows – Installationshandbuch
Software-Installation
Deinstallieren (installierte Anwendung entfernen)
Um eine der installierten Anwendungen zu entfernen:
Wählen Sie [Start] [Einstellungen] [Systemsteuerung]
[Programme hinzufügen/entfernen] [Programme ändern
oder entfernen], wählen Sie das zu entfernende Programm
und klicken Sie auf [Entfernen...].
Befolgen Sie die Anweisungen auf dem Bildschirm zur
Deinstallation der Anwendung.
Je nach Betriebssystem können die Namen von
Schaltflächen oder Menüs anders lauten.
Anweisungen zur Deinstallation des USB-MIDI-Treibers
finden Sie unter „Wie kann ich den Treiber entfernen?“ im
Kapitel „Fehlerbehebung“ (Seite 7).
USB-MIDI-Treiber
Um das Instrument von einem Computer aus über USB bedienen
zu können, müssen Sie zunächst die passende Treibersoftware
(englisch: Driver) installieren.
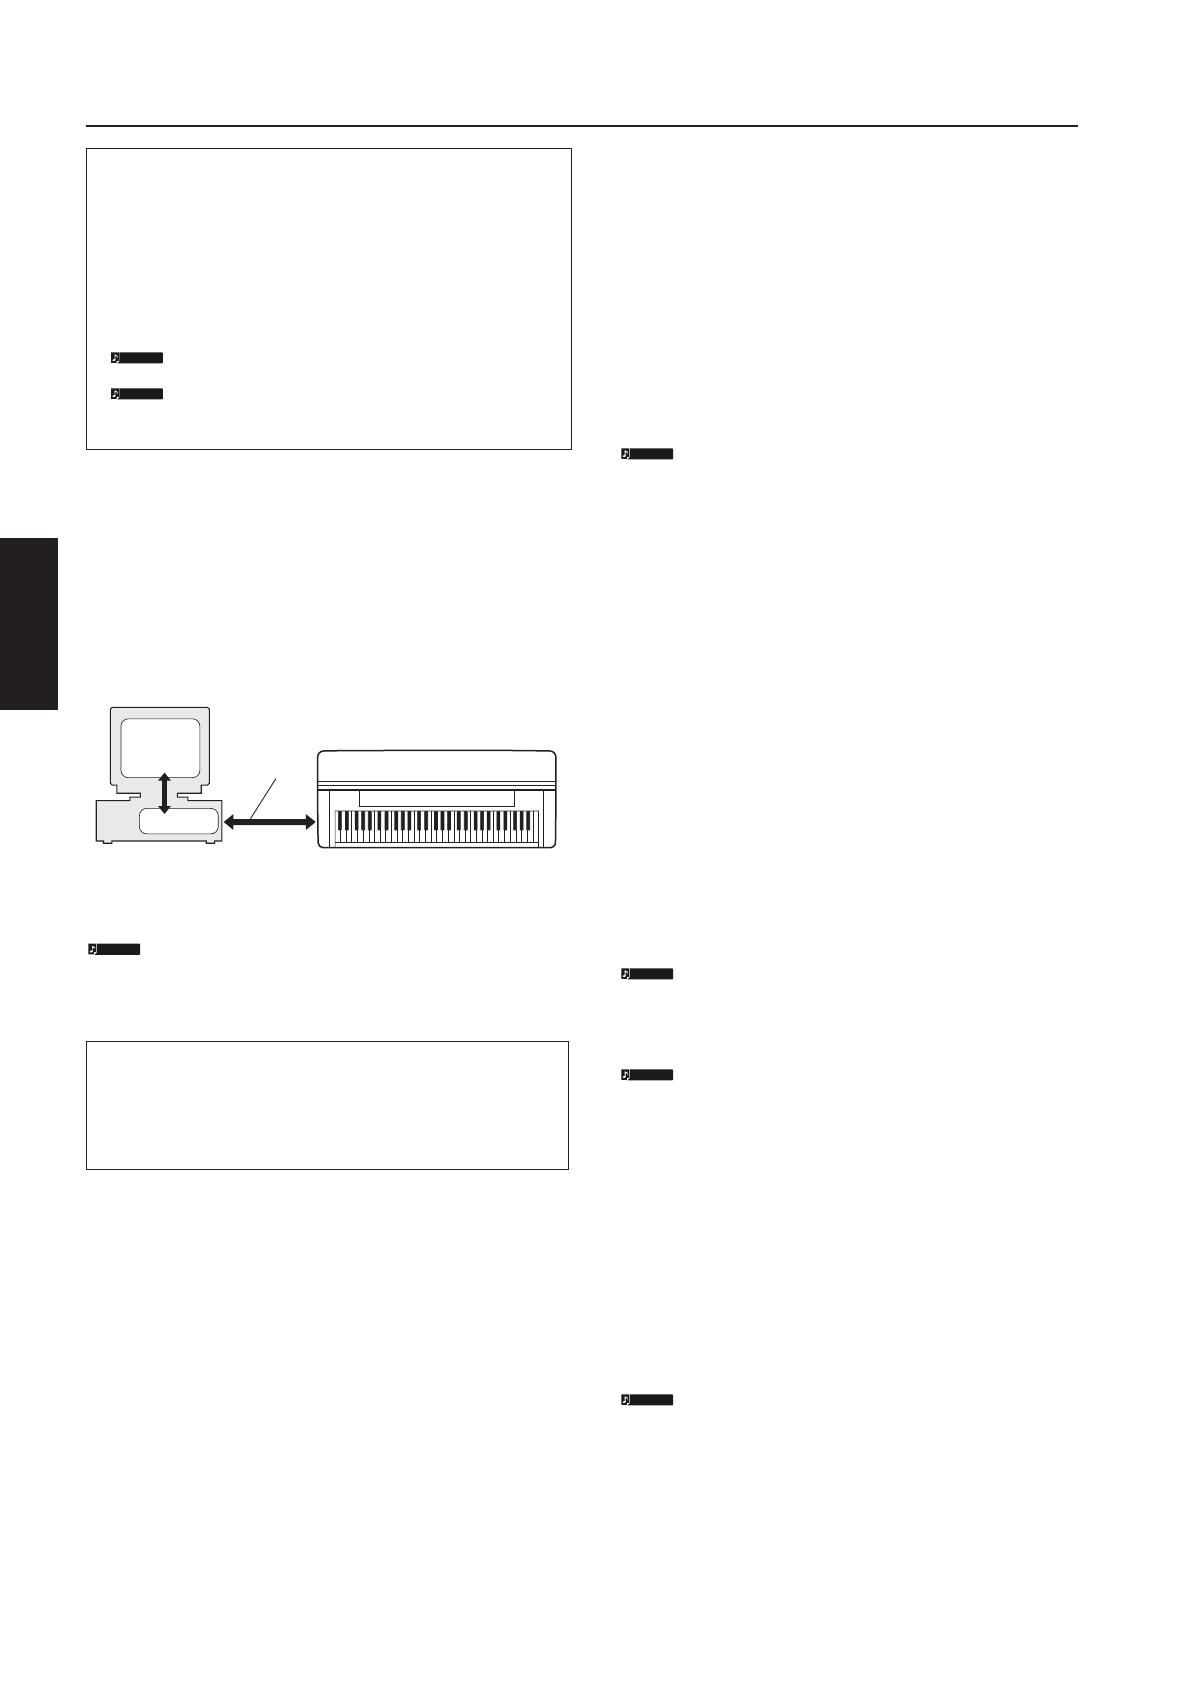
Der USB-MIDI-Treiber ist eine Software, die über ein USB-Kabel
MIDI-Daten zwischen der Sequencer-Software und dem Instrument
überträgt.
Für Windows XP: Siehe rechte Spalte.
Für Windows 2000: Siehe Seite 5.
Für Windows Vista: Siehe Seite 5.
Beachten Sie die Download-Seite von Yamaha unter folgendem
URL für aktuelle Informationen zum USB-MIDI-Treiber:
http://music.yamaha.com/download/
Überprüfen Sie die Laufwerksbezeichnung (D:, E:, Q: usw.)
Ihres CD-ROM-Laufwerks, die neben dem CD-ROM-Symbol
im Ordner „Arbeitsplatz“ Ihres Computers angezeigt wird.
(Das Stammverzeichnis des CD-ROM-Laufwerks ist
beispielsweise D:\, E:\ oder Q:\ usw.)
Installieren des Treibers unter Windows XP
1 Starten Sie den Computer, und melden Sie sich mit
dem Zugang „Administrator“ bei Windows XP an.
2 Wählen Sie [Start] [Systemsteuerung].
Falls im rechten Fenster der Systemsteuerung „Wählen Sie
eine Kategorie“ angezeigt ist, klicken Sie oben links im
Fenster auf „Zur klassischen Ansicht wechseln“. Alle
Symbole der Systemsteuerung werden angezeigt.
3
Gehen Sie zu [System] [Hardware]
[Treibersignierung] [Treibersignaturoptionen],
markieren Sie das Optionsfeld links neben „Ignorieren –
Software unabhängig von Zulassung installieren“, und
klicken Sie auf [OK].
Stellen Sie nach Beendigung der Treiberinstallation ggf. de
ursprüngliche Einstellung wieder her.
4 Klicken Sie auf [OK], um das Fenster „Eigenschaften von
System“ zu schließen, und klicken Sie dann oben rechts
im Fenster auf die Schaltfläche „X“, um die
Systemsteuerung zu schließen.
5 Legen Sie die mitgelieferte CD-ROM in das CD-ROM-
Laufwerk ein.
Daraufhin erscheint automatisch das Startfenster.
6 Vergewissern Sie sich zunächst, dass das Instrument
ausgeschaltet ist, und verwenden Sie dann ein USB-Kabel,
um die USB-Schnittstelle des Computers mit der Buchse USB
TO HOST am Instrument zu verbinden. Wenn das
Instrument eingeschaltet wird, wird auf dem Computer
automatisch der „Assistent für das Suchen neuer Hardware“
angezeigt.
Wenn das Assistentenfenster nicht automatisch erscheint,
lesen Sie weiter bei „Fehlerbehebung“.
Wenn das System „Neue Hardware gefunden“ in der unteren rechten
Ecke anzeigt, warten Sie, bis das entsprechende Assistentenfenster
erscheint. (Bei einigen Computern kann es eine Weile dauern, bis das
Assistentenfenster erscheint.)
Falls Sie der Assistent auffordert, anzugeben, ob eine
Verbindung zu Windows Update hergestellt werden soll,
wählen Sie die Option „Nein, diesmal nicht“, und klicken
Sie dann auf [Weiter].
Lesen Sie zum Anschließen des Instruments am Computer
die Bedienungsanleitung des Instruments.
7 Markieren Sie die Option „Software automatisch
installieren (empfohlen)“, und klicken Sie dann auf
[Weiter]. Das System beginnt mit der Installation.
Falls während der Installation die Meldung „…has not
passed Windows Logo testing to verify its compatibility
with Windows XP“ (…hat den Windows-Logo-Test zur
Verifizierung seiner Kompatibilität mit Windows XP nicht
bestanden) angezeigt wird, klicken Sie auf [Continue
Anyway] (Trotzdem fortfahren).
8 Sobald die Installation erfolgreich beendet wurde, erscheint
das Fenster „Fertig stellen des Assistenten“. Klicken Sie auf
[Fertig stellen].
(Bei einigen Computern kann es eine Weile dauern, bis das
Assistentenfenster erscheint.)
9 Starten Sie den Computer neu.
Wenn das System „Neue Hardware gefunden“ in der unteren
rechten Ecke anzeigt, warten Sie, bis „System Settings
Change“ (Systemeinstellungen ändern) erscheint.
(Bei einigen Computern kann es eine Weile dauern, bis das
Assistentenfenster erscheint.)
Dieses Assistentenfenster erscheint nicht, wenn Sie
Windows XP Professional x64 Edition verwenden. Es ist
nicht erforderlich, den Computer neu zu starten.
Die Installation des USB-MIDI-Treibers ist abgeschlossen.
HINWEIS
HINWEIS
Computer
MIDI-Instrument
(Clavinova, Digital Workstation, usw.)
USB-Kabel
Treiber
Sequenzer-
programm
HINWEIS
HINWEIS
HINWEIS
HINWEIS
HINWEIS
Deutsch
10
Accessory CD-ROM for Windows – Installationshandbuch 5
Installieren des Treibers unter Windows 2000
1 Starten Sie den Computer, und melden Sie sich mit dem
Zugang „Administrator“ bei Windows 2000 an.
2 Klicken Sie auf [Start] [Einstellungen]
[Systemsteuerung] [System] [Hardware]
[Treibersignierung] [Dateisignaturverifizierung],
wählen Sie die Option „Ignorieren–Alle Dateien
installieren, unabhängig von der Dateisignatur“ aus,
und klicken Sie auf [OK].
Stellen Sie nach Beendigung der Treiberinstallation ggf. de
ursprüngliche Einstellung wieder her.
3 Legen Sie die mitgelieferte CD-ROM in das CD-ROM-
Laufwerk ein.
Daraufhin erscheint automatisch das Startfenster.
4 Vergewissern Sie sich zunächst, dass das Instrument
ausgeschaltet ist, und verwenden Sie dann ein USB-Kabel,
um die USB-Schnittstelle des Computers mit der Buchse USB
TO HOST am Instrument zu verbinden. Wenn das Instrument
eingeschaltet wird, wird auf dem Computer automatisch der
„Assistent für das Suchen neuer Hardware“ angezeigt. Klicken
Sie auf [Weiter].
(Bei einigen Computern kann es eine Weile dauern, bis das
Assistentenfenster erscheint.)
Wenn das Assistentenfenster nicht automatisch erscheint,
lesen Sie weiter bei „Fehlerbehebung“.
Lesen Sie zum Anschließen des Instruments am Computer
die Bedienungsanleitung des Instruments
.
5 Markieren Sie die Option „Nach einem passenden Treiber
für das Gerät suchen (empfohlen)“ und klicken Sie dann
auf [Weiter].
6 Aktivieren Sie das Kästchen neben „CD-ROM-
Laufwerk“ und deaktivieren Sie alle anderen Kästchen.
Klicken Sie auf [Weiter].
Während der Suche nach dem Treiber fordert das System
Sie möglicherweise auf, eine Windows-CD-ROM
einzulegen. Geben Sie das Verzeichnis „USBdrv2k_“ auf
dem CD-ROM-Laufwerk an (also beispielsweise
„D:\USBdrv2k_\“), und setzen Sie die Installation fort.
7 Klicken Sie auf [Weiter].
Falls im Assistentenfenster die Meldung „The software you
are about to install does not contain a Microsoft digital
signature“ (Die Software, die Sie zu installieren versuchen,
enthält keine digitale Microsoft-Signatur) erscheint, klicken
Sie auf [Yes] (Ja).
8 Sobald die Installation erfolgreich beendet wurde, erscheint das
Fenster „Fertig stellen des Assistenten“. Klicken Sie auf [Fertig
stellen].
(Bei einigen Computern kann es eine Weile dauern, bis das
Assistentenfenster erscheint.)
9 Starten Sie den Computer neu.
Die Installation des USB-MIDI-Treibers ist abgeschlossen.
Installieren des Treibers unter Windows Vista
1 Starten Sie den Computer, und melden Sie sich mit dem
Zugang „Administrator“ bei Windows Vista an.
2 Legen Sie die mitgelieferte CD-ROM in das CD-ROM-
Laufwerk ein.
Daraufhin erscheint das AutoPlay-Fenster.
3 Klicken Sie auf [Run Start.exe].
Daraufhin erscheint automatisch das Startfenster.
4 Vergewissern Sie sich zunächst, dass das Instrument
ausgeschaltet ist, und verwenden Sie dann ein USB-
Kabel, um die USB-Schnittstelle des Computers mit der
Buchse USB TO HOST am Instrument zu verbinden.
Wenn das Instrument eingeschaltet wird, wird auf dem
Computer automatisch das Fenster „Assistent für das
Suchen neuer Hardware“ angezeigt. Klicken Sie auf
„Treibersoftware finden und installieren (empfohlen)“.
Wenn das Fenster nicht automatisch erscheint, lesen Sie im
Kapitel „Fehlerbehebung“ nach. (Bei einigen Computern kann
es eine Weile dauern, bis das Fenster angezeigt wird.)
Lesen Sie zum Anschließen des Instruments am Computer
die Bedienungsanleitung des Instruments
.
Wenn das Fenster „Benutzerkontensteuerung“ erscheint,
klicken Sie auf [Fortfahren]
.
5 Wenn eine Meldung erscheint, mit der Sie Windows
erlauben können, online nach Treibersoftware zu
suchen, klicken Sie auf „Nicht online suchen“.
6 Wenn eine Meldung erscheint, die Sie auffordert, die mit
Ihrem Gerät mitgelieferte CD einzulegen, klicken Sie auf
[Weiter].
Das System beginnt mit der Installation.
Wenn das Fenster „Windows-Sicherheit“ erscheint,
bestätigen Sie, dass diese Software durch die Yamaha
Corporation autorisiert wurde, und klicken Sie dann auf
[Installieren]
.
7 Nach Beendigung der Installation wird die Meldung
„Die Software für dieses Gerät wurde erfolgreich
installiert“ angezeigt. Klicken Sie dann auf [Schließen].
(Bei einigen Computern kann es eine Weile dauern, bis das
Fenster angezeigt wird.)
Die Installation des USB-MIDI-Treibers ist abgeschlossen.
HINWEIS
HINWEIS
HINWEIS
HINWEIS
HINWEIS
HINWEIS
HINWEIS
Deutsch
11
6 Accessory CD-ROM for Windows – Installationshandbuch
MEGAEnhancer
WICHTIG
Instrumente, die nicht mit der Mega-Voice-Funktion
kompatibel sind, können mit dem Programm
„MEGAEnhancer“ erzeugte Song-Daten nicht richtig
wiedergeben.
•Achten Sie bei der Installation von MEGAEnhancer
unter Windows XP, 2000 oder Vista darauf, sich als
Administrator anzumelden.
Für die Installation von MEGAEnhancer muss Ihr
Computer eine aktive Verbindung zum Internet haben.
1
Legen Sie die mitgelieferte CD-ROM in das CD-ROM-
Laufwerk des Computers ein.
Auf dem Bildschirm erscheint das Startfenster. Die einzelnen
Menüs in diesem Fenster stehen für die auf der Accessory
CD-ROM enthaltenen Anwendungen oder Daten.
2 Klicken Sie im Startfenster auf „MEGAEnhancer“.
Am Bildschirm wird die Seite angezeigt, auf der die
Einzelheiten zu MEGAEnhancer erläutert werden.
3 Klicken Sie im unteren Fensterbereich auf
„MEGAEnhancer Homepage“.
Es erscheint die Download-Seite im Web. Vergewissern Sie
sich, dass Ihr Betriebssystem die Anforderungen der Software
erfüllt.
Musicsoft Downloader
WICHTIG
•Achten Sie bei der Installation von Musicsoft Downloader
unter Windows XP, 2000 oder Vista darauf, sich als
Administrator anzumelden.
Für die Installation von Musicsoft Downloader muss Ihr
Computer eine aktive Verbindung zum Internet haben.
1 Legen Sie die mitgelieferte CD-ROM in das CD-ROM-
Laufwerk des Computers ein.
Auf dem Bildschirm erscheint das Startfenster. Die einzelnen
Menüs in diesem Fenster stehen für die auf der Accessory
CD-ROM enthaltenen Anwendungen oder Daten.
2 Klicken Sie im Startfenster auf „Musicsoft Downloader“.
Am Bildschirm wird die Seite angezeigt, auf der die
Einzelheiten zu Musicsoft Downloader erläutert werden.
3 Klicken Sie unten im Fenster auf die Schaltfläche
„Musicsoft Downloader Homepage“.
Es erscheint die Download-Seite im Web. Vergewissern Sie
sich, dass Ihr Betriebssystem die Anforderungen der Software
erfüllt.
Für das Instrument mit dieser Accessory CD-ROM können
Sie als Anwendungssoftware zur Dateiübertragung
ausschließlich Musicsoft Downloader verwenden. Andere
Anwendungen wie File Utility und Song Filer können nicht
verwendet werden.
HINWEIS
Deutsch
12
Accessory CD-ROM for Windows – Installationshandbuch 7
Fehlerbehebung
Der Treiber lässt sich nicht installieren.
Ist das USB-Kabel richtig angeschlossen?
Überprüfen Sie die USB-Kabelverbindung.
Ziehen Sie das USB-Kabel ab und stecken Sie es wieder an.
•Wurde die USB-Funktion auf Ihrem Computer aktiviert?
Falls beim erstmaligen Anschließen des Instruments an
den Computer der Hardware-Assistent nicht angezeigt
wird, ist auf dem Computer die USB-Funktion
möglicherweise nicht aktiviert. Führen Sie die folgenden
Schritte durch.
1 Wählen Sie [Start] [Systemsteuerung]* [System]
[Hardware] [Gerätemanager] (bei Windows XP), oder wählen
Sie [Start] [Einstellungen] [Systemsteuerung] [System]
[Hardware] [Gerätemanager] (bei Windows 2000), oder
wählen Sie [Start] [Systemsteuerung] [Gerätemanager]
(bei Windows Vista).
* Klassische Ansicht nur unter Windows XP.
2 Vergewissern Sie sich, dass neben „Universeller serieller Bus
Controller“ oder „USB Root Hub“ keine der Markierungen „!“
oder „x“ angezeigt wird. Falls dort ein solches Zeichen zu sehen
ist, ist der USB-Controller nicht aktiviert.
•Wurde ein unbekanntes Gerät registriert?
Falls die Treiberinstallation fehlschlägt, wird das Instrument
als „Unbekanntes Gerät“ registriert, und Sie können den
Treiber nicht installieren. Führen Sie die folgenden Schritte
durch, um das „unbekannte Gerät“ zu löschen.
1 Wählen Sie [Start] [Systemsteuerung]* [System]
[Hardware] [Gerätemanager] (bei Windows XP), oder wählen
Sie [Start] [Einstellungen] [Systemsteuerung] [System]
[Hardware] [Gerätemanager] (bei Windows 2000), oder
wählen Sie [Start] [Systemsteuerung] [Gerätemanager]
(bei Windows Vista).
* Klassische Ansicht nur unter Windows XP.
2 Wählen Sie die Option „Modelle nach Typ anzeigen“ aus, und
suchen Sie nach „anderen Geräten“.
3 Wenn Sie einen Eintrag bei „Andere Geräte“ finden, öffnen Sie
dessen Baumstruktur, indem Sie darauf doppelklicken, und
suchen Sie dort nach einem „unbekannten Gerät“. Falls Sie eines
finden, markieren Sie es, und klicken auf die Schaltfläche
[Entfernen].
4 Ziehen Sie das USB-Kabel vom Instrument ab, und stecken Sie es
gleich wieder ein.
5 Installieren Sie den Treiber erneut. (Siehe Seite 4.)
Wenn das Instrument vom Computer aus über USB bedient
wird, funktioniert es nicht richtig oder erzeugt keinen Ton.
•Wurde der Treiber installiert (Seite 4)?
Ist das USB-Kabel richtig angeschlossen?
Sind die Lautstärkeeinstellungen des Instruments, des
Wiedergabegeräts und der Anwendungssoftware auf geeignete
Werte gestellt?
•Wurde im Sequenzerprogramm der richtige Port ausgewählt?
•Falls Sie ein Clavinova verwenden, überprüfen Sie, ob die Piano-
Lock-Funktion des Clavinova aktiviert ist oder nicht.
Benutzen Sie den aktuellen USB-MIDI-Treiber?
Der neueste Treiber kann von der Website heruntergeladen
werden (Seite 4).
Die Wiedergabe erfolgt verzögert.
Erfüllt Ihr Computer die Systemanforderungen?
•Werden gleichzeitig andere Anwendungen oder Gerätetreiber
ausgeführt?
Der Standby-Modus des Rechners lässt sich nicht richtig
aktivieren bzw. beenden.
•Versetzen Sie den Computer nicht in den Ruhezustand, während
das MIDI-Programm läuft.
Sie können je nach Systemkonfiguration (USB Host Controller
usw.) den Computer eventuell nicht wie gewohnt in den
Ruhezustand versetzen. Dennoch sollte ein simples Abziehen und
Wiederanschließen des USB-Kabels dazu führen, dass Sie das
Instrument wieder steuern können.
Wie kann ich den Treiber entfernen?
1 Starten Sie den Computer, und melden Sie sich mit dem
Zugang „Administrator“ bei Windows an.
Schließen Sie sämtliche geöffneten Anwendungen und
Fenster.
2 Legen Sie die mitgelieferte CD-ROM in das CD-ROM-
Laufwerk ein.
3 Wählen Sie [Start] [Arbeitsplatz] (bei Windows XP),
oder wählen Sie [Arbeitsplatz] (bei Windows 2000), oder
wählen Sie [Start] [Computer] (bei Windows Vista).
4 Klicken Sie mit der rechten Maustaste auf das Symbol des
CD-ROM-Laufwerks, und wählen Sie [Öffnen] aus dem
Popup-Menü.
5 Wählen Sie den Ordner „USBdrvVista_“ oder „USBdrv2k_“
Ordner „uninstall“ Datei „uninstall.exe“, und starten
Sie die Datei „uninstall.exe“.
Folgen Sie den Anweisungen auf dem Bildschirm, um den
Treiber zu deinstallieren.
Wenn Sie ein 64-Bit-Betriebssystem verwenden, klicken Sie
im Ordner „USBdrvVista_“ auf „uninstall_x64.exe“
.
Wenn das Fenster „Benutzerkontensteuerung“ erscheint,
klicken Sie auf [Fortfahren]
.
6 Wenn ein Fenster erscheint, das Sie auffordert, den
Computer zum korrekten Löschen des Treibers neu zu
starten, folgen Sie zum Neustart des Computers den
Bildschirmanweisungen.
HINWEIS
HINWEIS
Deutsch
13
2 Accessory CD-ROM for Windows Manuel d'installation
Remarques importantes à propos du CD-ROM
Types de données
Ce CD-ROM contient des logiciels d'application. Pour obtenir des instructions relatives à l'installation des logiciels,
reportez-vous à la page 4.
Le CD-ROM contenant ce logiciel n'est pas destiné à être utilisé sur un système audio/visuel tel qu'un lecteur de CD ou de
DVD. N'essayez donc pas de l'insérer dans un équipement autre qu'un ordinateur.
Système d'exploitation
Les applications de ce CD-ROM sont proposées dans des versions compatibles avec les systèmes d'exploitation Windows.
Procédure d'installation du CD-ROM
1 Vérifiez la configuration du système afin d'être certain de pouvoir utiliser le logiciel sur votre ordinateur (page 3).
2 Insérez le CD-ROM inclus dans le lecteur de CD-ROM.
La fenêtre de démarrage apparaît automatiquement. (Les utilisateurs de Windows Vista doivent cliquer sur [Start.exe] pour ouvrir la
fenêtre de démarrage après l'insertion du CD-ROM.)
3 Installez le pilote USB-MIDI sur l'ordinateur (page 4).
4 Installez le logiciel (page 6).
5 Démarrez le logiciel.
Pour plus de détails sur les étapes ultérieures, reportez-vous au manuel en ligne du logiciel concerné.
En cas de problème d'installation du pilote, reportez-vous à la section « Résolution des problèmes » à la page 7.
n Pour lire les fichiers PDF, vous devez d'abord installer le logiciel Adobe Reader sur votre ordinateur.
Si vous ne disposez pas d'Acrobat Reader, vous pourrez le télécharger depuis le site Web d'Adobe à l'adresse suivante :
http://www.adobe.com
ATTENTION
Français
14
Accessory CD-ROM for Windows Manuel d'installation 3
Contenu du CD-ROM
La fenêtre de démarrage illustrée ci-dessous s'ouvre automatiquement lorsque vous insérez le CD-ROM fourni. (Les utilisateurs de Windows
Vista doivent cliquer sur [Start.exe] pour ouvrir la fenêtre de démarrage après l'insertion du CD-ROM.) En cliquant sur les différents menus
de la fenêtre de démarrage, vous pouvez accéder à la page User Registration du site Internet et télécharger une partie des nombreux logiciels
disponibles.
n Les illustrations d'écran figurant dans ce guide sont fournies à des fins didactiques et peuvent différer légèrement de celles qui apparaissent sur votre
ordinateur.
Certaines applications répertoriées ci-dessus sont fournies avec des manuels en ligne.
Configuration minimale requise
n Pour connaître la configuration minimale requise pour les autres logiciels disponibles sur le CD-ROM, reportez-vous à la page de téléchargement
correspondante du site web. Vous pouvez afficher la page de téléchargement en cliquant sur le menu des logiciels dans la fenêtre de démarrage, puis sur le
bouton « download » sur la page suivante.
Nom de l'application/
des données
Nom du dossier Contenu
1
USB-MIDI Driver
(Windows 2000/XP)
USBdrv2k_
Ce logiciel est indispensable lorsque vous utilisez l'instrument avec un ordinateur via une
connexion USB. Il permet de communiquer via le protocole MIDI et autorise le contrôle
entre l'instrument et l'ordinateur.
USB-MIDI Driver
(Windows Vista)
USBdrvVista_
2
Online Services
(Disponibles sur le site
Web de Yamaha)
Les services Internet peuvent vous aider à faire progresser votre musique au niveau
technique supérieur ! Nous vous offrons des contenus et des services spécialement conçus
pour votre instrument !
3
Manual Library
(Disponibles sur le site
Web de Yamaha)
Les supports d'instruction suivants sont disponibles pour le téléchargement depuis Yamaha
Manual Library (Bibliothèque des manuels Yamaha). Ouvrez Yamaha Manual Library et
entrez le nom de modèle souhaité dans la zone Model name (Nom de modèle) pour lancer la
recherche.
Manuel de référence : Décrit les fonctions avancées de l'instrument.
Guide de la connexion à Internet : Explique les modalités de connexion de l'instrument
directement à Internet ainsi que l'utilisation des services en ligne proposés via la fonction
Internet Direct Connection (Connexion directe à Internet).
(PSR-S910/S710) Liste des données : Contient diverses listes de données présélectionnées
importantes se rapportant notamment aux voix, aux styles et aux effets ainsi que des
informations liées à la norme MIDI.
4
MEGAEnhancer
(Disponible sur le site
Web de Yamaha)
Permet la conversion des données de morceau XG/GM conventionnelles en données de
morceau optimisées pour être utilisées avec la fonctionnalité Mega Voice (sur un instrument
compatible ou un générateur de sons). MEGAEnhancer donne vie aux pistes de basse et de
guitare MIDI pour plus de réalisme et d'expression.
Vous pouvez télécharger MEGAEnhancer à partir d'Internet.
5
50 greats for the Piano SongData
Fichiers de morceaux de piano pouvant être reproduits à l'aide de la fonction de
reproduction de morceau de l'instrument.
6
Musicsoft Downloader
(Disponible sur le site
Web de Yamaha)
Grâce à une connexion entre l'instrument et un ordinateur, cette application vous permet de
télécharger directement des données de morceau sur l'instrument.
Vous pouvez télécharger Musicsoft Downloader à partir d'Internet.
7
User Registration
(Disponible sur le site
Web de Yamaha)
Cette page vous permet de tirer profit du support et des services offerts aux utilisateurs en
ligne.
8
Product Information
(Disponibles sur le site
Web de Yamaha)
Vous trouverez toutes les informations relatives à nos produits sur le site Web consacré aux
instruments de musique de Yamaha.
Application/Données Système d'exploitation Processeur Mémoire Disque dur
Pilote USB pour
Windows 2000/XP
Windows 2000/XP Edition
familiale/XP Edition
professionnelle
733 MHz ou supérieur ; processeurs
Intel® Pentium® ou Celeron®
256 Mo ou plus
3 Mo minimum d'espace
libre
Pilote USB pour
Windows Vista
Windows Vista
1 GHz ou supérieur ; processeurs Intel®
Pentium®/Celeron® ou compatibles
Intel® 64
512 Mo ou plus
3 Mo minimum d'espace
libre
1
234
7
8
5
6
Français
15
4 Accessory CD-ROM for Windows Manuel d'installation
Installation des logiciels
Désinstallation
(suppression de l'application installée)
Pour supprimer un logiciel installé :
Sélectionnez [Démarrer] [Paramètres] [Panneau de
configuration] [Ajout/Suppression de programmes]
[Modifier ou supprimer des programmes], puis choisissez
l'application à supprimer et cliquez sur [Supprimer].
Suivez les instructions qui apparaissent à l'écran pour
désinstaller le logiciel.
n Les noms de touche ou de menu peuvent différer légèrement
selon le système d'exploitation de votre ordinateur.
n Pour obtenir des instructions sur la désinstallation et
la configuration du pilote USB-MIDI, reportez-vous au
paragraphe « Comment supprimer le pilote » de la section
« Résolution des problèmes » (page 7).
USB-MIDI Driver
Pour utiliser l'instrument à partir de votre ordinateur via un câble
USB, vous devez installer le pilote approprié.
USB-MIDI Driver est un logiciel qui permet le transfert de données
MIDI entre le logiciel de séquençage et l'instrument via un câble USB.
Pour Windows XP : voir la colonne de droite.
Pour Windows 2000 : voir page 5.
Pour Windows Vista : voir page 5.
n
Pour obtenir les toutes dernières informations sur le logiciel USB-
MIDI Driver, consultez la page Download du site web de Yamaha à
l'adresse suivante:
http://music.yamaha.com/download/
Vérifiez le nom du lecteur de CD-ROM (D:, E:, Q:, etc.), qui
apparaît à côté de l'icône du CD-ROM dans le dossier « Poste
de travail ». Le répertoire racine du lecteur de CD-ROM sera,
respectivement, D:\, E:\ ou Q:\.
Installation du pilote sous Windows XP
1 Démarrez l'ordinateur et utilisez le compte
« Administrateur » pour ouvrir une session Windows XP.
2 Sélectionnez [Démarrer] [Panneau de configuration].
Si le panneau de configuration affiche « Sélectionner une
catégorie », vous cliquerez sur « Basculer vers l'affichage
classique » dans le coin supérieur gauche de la fenêtre.
Tous les panneaux de configuration et les icônes s'affichent.
3
Sélectionnez [Système] [Matériel] [Signature du
pilote] puis cochez la case d'option à gauche de « Ignorer
– Forcer l'installation du logiciel sans demander mon
approbation » et cliquez sur [OK].
n Au terme de l'installation du pilote, prenez soin de restaurer la
configuration d'origine si nécessaire.
4 Cliquez sur le bouton [OK] pour fermer la boîte de
dialogue « Propriétés système », puis cliquez sur « X »,
dans le coin supérieur droit de la fenêtre, afin de fermer
le panneau de configuration.
5 Insérez le CD-ROM fourni dans le lecteur.
La fenêtre de démarrage apparaît automatiquement.
6 Vérifiez que l'instrument est hors tension et raccordez
le connecteur USB de l'ordinateur au connecteur USB
TO HOST de l'instrument à l'aide d'un câble USB. Lorsque
l'instrument est sous tension, l'ordinateur affiche
automatiquement l'Assistant Ajout de nouveau matériel
détecté.
Si la fenêtre de l'Assistant n'apparaît pas automatiquement,
reportez-vous à la section « Résolution des problèmes ».
Si le système affiche « Nouveau matériel détecté » dans le coin
inférieur droit, attendez que l'Assistant Ajout de nouveau matériel
détecté apparaisse. (Sur certains ordinateurs, l'affichage de la fenêtre
de l'Assistant peut prendre un certain temps.)
Si la fenêtre de l'Assistant vous invite à préciser si vous voulez
ou non vous connecter à Windows Update, sélectionnez
l'option « Non, pas cette fois », puis cliquez sur [Suivant].
n Reportez-vous au mode d'emploi de l'instrument pour connecter ce
dernier à l'ordinateur.
7 Cochez la case d'option à gauche de « Installer le logiciel
automatiquement (recommandé) » et cliquez sur
[Suivant]. Le système lance l'installation.
n Si, en cours d'installation, le système affiche le message « ...n'a pas
été validé lors du test permettant d'obtenir le logo Windows et
vérifiant sa compatibilité avec Windows XP », cliquez sur
[Continuer].
8 Lorsque l'installation est terminée, l'ordinateur affiche le
message « Fin de l'assistant Ajout de nouveau matériel détecté ».
Cliquez sur [Terminer].
(Sur certains ordinateurs, l'affichage de la fenêtre de
l'Assistant peut prendre un certain temps.)
9 Redémarrez l'ordinateur.
Si le système affiche « Nouveau matériel détecté » dans le coin
inférieur droit, attendez que « Modification des paramètres
système » s'affiche. (Sur certains ordinateurs, l'affichage de la
fenêtre de l'Assistant peut prendre un certain temps.)
n Cette fenêtre de l'Assistant ne s'affiche pas sous Windows XP
Edition professionnelle x64. Il n'est pas nécessaire de redémarrer
l'ordinateur.
L'installation du pilote USB-MIDI est terminée.
Ordinateur
Instrument MIDI
(Clavinova, Clavier Arrangeur
Professionnel, etc.)
Câble USB
Pilote
Logiciel de
séquençage
Français
16
Accessory CD-ROM for Windows Manuel d'installation 5
Installation du pilote sous Windows 2000
1 Démarrez l'ordinateur et utilisez le compte
« Administrateur » pour ouvrir une session
Windows 2000.
2 Sélectionnez [Démarrer] [Paramètres] [Panneau de
configuration] [Système] [Matériel] [Signature
du pilote] [Vérification des signatures de fichiers] et
cochez la case d'option à gauche de « Ignorer : installer
tous les fichiers, quelles que soient leurs signatures »,
puis cliquez sur [OK].
n Au terme de l'installation du pilote, prenez soin de restaurer la
configuration d'origine si nécessaire.
3 Insérez le CD-ROM fourni dans le lecteur.
La fenêtre de démarrage apparaît automatiquement.
4 Vérifiez que l'instrument est hors tension et raccordez le
connecteur USB de l'ordinateur au connecteur USB TO HOST
de l'instrument à l'aide d'un câble USB. Lorsque l'instrument
est sous tension, l'ordinateur affiche automatiquement
l'Assistant Ajout de nouveau matériel détecté. Cliquez sur
[Suivant].
(Sur certains ordinateurs, l'affichage de la fenêtre de
l'Assistant peut prendre un certain temps.)
Si la fenêtre de l'Assistant n'apparaît pas automatiquement,
reportez-vous à la section « Résolution des problèmes ».
n Reportez-vous au mode d'emploi de l'instrument pour connecter ce
dernier à l'ordinateur.
5 Cochez la case d'option à gauche de « Rechercher un pilote
approprié pour mon périphérique (recommandé)
»
et
cliquez sur [Suivant].
6 Cochez la case « Lecteurs de CD-ROM » et décochez tous
les autres éléments. Cliquez sur [Suivant].
n
Le système peut vous demander d'insérer un CD-ROM Windows
tandis qu'il recherche le pilote. Sélectionnez le dossier
« USBdrv2k_ » du lecteur de CD-ROM (par exemple,
D:\USBdrv2k_\) et poursuivez l'installation.
7 Cliquez sur [Suivant].
n
Si l'Assistant vous informe que « Le logiciel que vous êtes sur le
point d'installer ne contient pas de signature numérique
Microsoft », cliquez sur [Oui].
8 Lorsque l'installation est terminée, l'ordinateur affiche le
message « Fin de l'assistant Ajout de nouveau matériel détecté ».
Cliquez sur [Terminer].
(Sur certains ordinateurs, l'affichage de la fenêtre de
l'Assistant peut prendre un certain temps.)
9 Redémarrez l'ordinateur.
L'installation du pilote USB-MIDI est terminée.
Installation du pilote sous Windows Vista
1 Démarrez l'ordinateur et utilisez le compte
« Administrateur » pour ouvrir une session
Windows Vista.
2 Insérez le CD-ROM fourni dans le lecteur.
La fenêtre AutoPlay s'ouvre.
3 Cliquez sur [Run Start.exe].
La fenêtre de démarrage apparaît automatiquement.
4 Vérifiez que l'instrument est hors tension et raccordez le
connecteur USB de l'ordinateur au connecteur USB
TO HOST de l'instrument à l'aide d'un câble USB.
Lorsque l'instrument est sous tension, l'ordinateur
affiche automatiquement la fenêtre « Ajout de nouveau
matériel détecté ». Cliquez sur « Localiser et installer le
logiciel automatiquement (recommandé) ».
Si la fenêtre de l'Assistant n'apparaît pas automatiquement,
reportez-vous à la section « Résolution des problèmes ».
(Sur certains ordinateurs, l'affichage de cette fenêtre peut
prendre un certain temps.)
n Reportez-vous au mode d'emploi de l'instrument pour connecter ce
dernier à l'ordinateur.
n Si la fenêtre « Contrôle de compte utilisateur » apparaît, vous
cliquerez sur [Continuer].
5 Si un message autorisant Windows à effectuer une
recherche en ligne du pilote apparaît, cliquez sur
« Ne pas rechercher en ligne ».
6 Si un message vous invitant à insérer le disque fourni
avec le périphérique s'affiche, cliquez sur [Suivant].
Le système lance l'installation.
n Si la fenêtre « Sécurité de Windows » apparaît, vous vérifierez que
l'éditeur du logiciel est Yamaha Corporation puis cliquerez sur
[Installer].
7 Lorsque l'installation est terminée, le système affiche le
message « L'installation du logiciel du périphérique a
réussi. », puis cliquez sur [Fermer].
(Sur certains ordinateurs, l'affichage de cette fenêtre peut
prendre un certain temps.)
L'installation du pilote USB-MIDI est terminée.
Français
17
6 Accessory CD-ROM for Windows Manuel d'installation
MEGAEnhancer
IMPORTANT
Les instruments non compatibles avec la fonctionnalité
Mega Voice ne peuvent reproduire correctement les
données de morceau créées avec le programme
MEGAEnhancer.
Lors de l'installation de MEGAEnhancer sous
Windows XP, 2000 ou Vista, prenez soin d'ouvrir
une session avec le compte « Administrateur ».
L'installation de MEGAEnhancer nécessite que
l'ordinateur soit connecté à Internet et en ligne.
1
Insérez le CD-ROM fourni dans le lecteur de CD-ROM
de votre ordinateur.
La fenêtre de démarrage s'affiche. Chaque menu de la fenêtre
indique l'application ou les données présentes sur le CD-ROM
Accessory.
2 Dans la fenêtre de démarrage, cliquez sur
« MEGAEnhancer ».
La page d'information de MEGAEnhancer s'affiche.
3 Cliquez sur le bouton «MEGAEnhancer Homepage »
(Télécharger MEGAEnhancer) en bas de la fenêtre.
La page Download du site web s'affiche. Vérifiez que votre
système est conforme à la configuration minimale requise
avant d'installer le logiciel.
Musicsoft Downloader
IMPORTANT
Lors de l'installation de Musicsoft Downloader sous
Windows XP, 2000 ou Vista, prenez soin d'ouvrir une
session avec le compte «
Administrateur
».
L'installation de Musicsoft Downloader nécessite que
l'ordinateur soit connecté à Internet et en ligne.
1 Insérez le CD-ROM fourni dans le lecteur de CD-ROM
de votre ordinateur.
La fenêtre de démarrage s'affiche. Chaque menu de la fenêtre
indique l'application ou les données présentes sur le CD-ROM
Accessory.
2 Dans la fenêtre de démarrage, cliquez sur « Musicsoft
Downloader ».
La page d'information de Musicsoft Downloader s'affiche.
3 Cliquez sur le bouton «Musicsoft Downloader
Homepage » (Télécharger Musicsoft Downloader) en bas
de la fenêtre.
La page Download du site web s'affiche. Vérifiez que votre
système est conforme à la configuration minimale requise
avant d'installer le logiciel.
n
Dans le cas de l'instrument avec lequel est fourni ce CD-ROM
Accessory, Musicsoft Downloader est le seul logiciel d'application
de transfert de fichiers valide. Il est impossible d'utiliser d'autres
applications telles que File Utility ou Song Filer.
Français
18
Accessory CD-ROM for Windows Manuel d'installation 7
Résolution des problèmes
Installation du pilote impossible.
Le câble USB est-il raccordé correctement ?
Vérifiez la connexion du câble USB.
Déconnectez le câble USB, puis rebranchez-le.
La fonction USB est-elle activée sur votre ordinateur ?
Si la fenêtre « Assistant Ajout de nouveau matériel »
n'apparaît pas lorsque vous connectez l'instrument à
l'ordinateur pour la première fois, il est possible que la
fonction USB de l'ordinateur soit désactivée. Procédez
comme suit.
1 Sélectionnez [Démarrer] [Panneau de configuration]*
[Système] [Gestionnaire de périphériques] (pour Windows XP)
ou sélectionnez [Démarrer] [Paramètres] [Panneau de
configuration] [Système] [Matériel] [Gestionnaire de
périphériques] (pour Windows 2000) ou sélectionnez [Démarrer]
[Panneau de configuration] [Gestionnaire de périphériques]
(pour Windows Vista).
* Affichage classique uniquement sous Windows XP.
2 Assurez-vous qu'aucun symbole « ! » ou « x » n'apparaît à côté
de « Contrôleur de Bus USB » ou « Concentrateur USB racine ».
Si l'un de ces symboles apparaît, cela signifie que le contrôleur
USB est désactivé.
Des périphériques inconnus sont-ils enregistrés ?
Si l'installation du pilote échoue, l'instrument sera considéré
comme un « Périphérique inconnu » et vous ne parviendrez pas à
installer le pilote. Supprimez le « périphérique inconnu » en
procédant de la manière suivante.
1 Sélectionnez [Démarrer] [Panneau de configuration]*
[Système] [Gestionnaire de périphériques] (pour Windows XP)
ou sélectionnez [Démarrer] [Paramètres] [Panneau de
configuration] [Système] [Matériel] [Gestionnaire de
périphériques] (pour Windows 2000) ou sélectionnez [Démarrer]
[Panneau de configuration] [Gestionnaire de périphériques]
(pour Windows Vista).
* Affichage classique uniquement sous Windows XP.
2 Recherchez « Autres périphériques » dans le menu « Affichage »
sous « Périphériques par type ».
3 Si vous trouvez « Autres périphériques », double-cliquez dessus
pour développer l'arborescence et rechercher « Périphérique
inconnu ». S'il en existe un, sélectionnez-le et cliquez sur le
bouton [Supprimer].
4 Retirez le câble USB de l'instrument et rebranchez-le.
5 Réinstallez le pilote. (Voir page 4.)
Lorsque vous contrôlez l'instrument depuis votre ordinateur
via USB, il ne fonctionne pas correctement ou aucun son n'est
audible.
•Avez-vous installé le pilote (page 4) ?
Le câble USB est-il raccordé correctement ?
Les volumes de l'instrument, du périphérique de reproduction et
du programme d'application sont-ils réglés sur des niveaux
appropriés ?
•Avez-vous sélectionné un port approprié dans le logiciel
séquenceur ?
Si vous utilisez un Clavinova, vérifiez si la fonction Piano Lock
(Verrouillage de piano) est activée ou non.
Utilisez-vous la version la plus récente du pilote USB-MIDI ?
Vous pouvez télécharger la dernière version du pilote à partir
du site Web (page 4).
Réponse de reproduction décalée.
•Votre ordinateur respecte-t-il la configuration minimale requise ?
Une autre application ou un pilote de périphérique sont-ils en
cours d'exécution ?
Impossible d'arrêter ou de relancer l'ordinateur correctement.
N'interrompez pas l'ordinateur lorsque l'application MIDI est en
cours d'exécution.
Il est possible que vous ne puissiez pas arrêter/redémarrer
normalement, en fonction de votre environnement spécifique
(contrôleur d'hôte USB, etc.). Même dans ce cas, le simple fait de
déconnecter et de rebrancher le câble USB vous permettra d'utiliser
à nouveau les fonctions de l'instrument.
Comment faire pour supprimer le pilote ?
1 Démarrez l'ordinateur et utilisez le compte
« Administrateur » pour ouvrir une session Windows.
Fermez toutes les applications et les fenêtres ouvertes.
2 Insérez le CD-ROM fourni dans le lecteur.
3 Sélectionnez [Démarrer] [Poste de travail]
(sous Windows XP) ou sélectionnez [Poste de travail]
(sous Windows 2000) ou sélectionnez [Démarrer]
[Ordinateur] (sous Windows Vista).
4 Cliquez avec le bouton droit sur l'icône du CD-ROM et
sélectionnez « Ouvrir » dans le menu déroulant.
5 Sélectionnez le dossier « USBdrvVista_ » ou « USBdrv2k_ »
dossier « uninstall » fichier « uninstall.exe » et lancez
le fichier « uninstall.exe ».
Suivez les instructions à l'écran pour désinstaller le pilote.
n Si vous utilisez un système d'exploitation à 64 bits, vous devrez
cliquer sur « uninstall_x64.exe » dans le dossier « USBdrvVista_ ».
n Si la fenêtre « Contrôle de compte d'utilisateur » apparaît, vous
cliquerez sur [Continuer].
6 Lorsqu'un message apparaît à l'écran vous invitant à
redémarrer l'ordinateur pour effectuer correctement la
suppression du pilote, redémarrez l'ordinateur en suivant
les instructions qui s'affichent à l'écran.
Français
19
2 Accessory CD-ROM for Windows Guía de instalación
Avisos importantes sobre el CD-ROM
Tipos de datos
Este CD-ROM incluye software de aplicación. Consulte las instrucciones de instalación del software en la página 4.
No está previsto el uso del software de este CD-ROM con sistemas audiovisuales (reproductores de CD y DVD, etc.). No
intente utilizar el disco en un equipo que no sea el ordenador.
Sistema operativo
Las aplicaciones de este CD-ROM se suministran en versiones para sistemas operativos Windows.
Procedimiento de instalación del CD-ROM
1 Compruebe los requisitos del sistema para asegurarse de que el software funcionará en su ordenador (página 3).
2 Inserte el CD-ROM en la unidad de CD-ROM.
La ventana Inicio aparecerá automáticamente. (Los usuarios de Windows Vista tendrán que hacer clic en [Start.exe] para abrir la
ventana Inicio después de insertar el CD-ROM.)
3 Instale el controlador MIDI USB en el ordenador (página 4).
4 Instale el software (página 6).
5 Inicie el software.
Para los pasos siguientes, consulte los manuales en línea del software correspondiente.
Si tiene problemas para instalar el controlador, consulte la sección “Solución de problemas” en la página 7.
Para ver los archivos PDF, deberá instalar Adobe Reader en el ordenador.
Si no dispone de Adobe Reader, puede descargar la aplicación en el sitio web de Adobe en la siguiente URL:
http://www.adobe.com
ATENCIÓN
NOTA
Español
20
  • Page 1 1
  • Page 2 2
  • Page 3 3
  • Page 4 4
  • Page 5 5
  • Page 6 6
  • Page 7 7
  • Page 8 8
  • Page 9 9
  • Page 10 10
  • Page 11 11
  • Page 12 12
  • Page 13 13
  • Page 14 14
  • Page 15 15
  • Page 16 16
  • Page 17 17
  • Page 18 18
  • Page 19 19
  • Page 20 20
  • Page 21 21
  • Page 22 22
  • Page 23 23
  • Page 24 24
  • Page 25 25
  • Page 26 26
  • Page 27 27
  • Page 28 28
  • Page 29 29
  • Page 30 30
  • Page 31 31
  • Page 32 32

Yamaha CVP-503 Bruksanvisning

Typ
Bruksanvisning