Sony XR-CA400 Bruksanvisningar
- Kategori
- Mottagare för bilmedia
- Typ
- Bruksanvisningar
Denna manual är också lämplig för

2001 Sony Corporation
FM/MW/LW
Cassette
Car Stereo
3-226-701-22 (1)
FM/MW/LW Cassette Car Stereo
Operating Instructions
Manual de instrucciones
Bruksanvisning
Manual de instruções
δηγίες Λειτυργίας
GB
ES
PT
SE
XR-CA400
XR-CA410
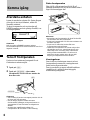
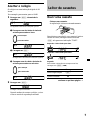
For installation and connections, see the supplied installation/connections
manual.
Para obtener información sobre la instalación y las conexiones, consulte el manual
de instalación/conexiones suministrado.
Vi hänvisar till det medföljande häftet angående montering/anslutningar.
Para a instalação e as ligações, consulte o manual de instalação/ligações
fornecido.
Για την εγκατάσταση και τις συνδέσεις, δείτε τ συνδευτικ εγειρίδι
εγκατάστασης/συνδέσεων.
GR

22
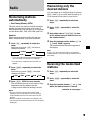
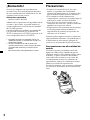
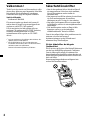
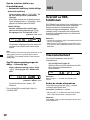
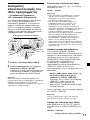
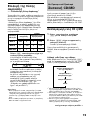
Welcome !
Thank you for purchasing this Sony Cassette
Player. This unit lets you enjoy a variety of
features using the following controller
accessory:
Optional accessory
Rotary commander RM-X4S
In addition to the cassette playback and radio
operations, you can expand your system by
connecting an optional CD/MD unit*
1
.
When you operate this unit or a connected
optional CD unit with the CD TEXT function,
the CD TEXT information will appear in the
display when you play a CD TEXT disc*
2
.
*
1
You can connect a CD changer, an MD changer,
a CD player, or an MD player.
*
2
A CD TEXT disc is an audio CD that includes
information such as the disc name, artist name,
and track names.
This information is recorded on the disc.
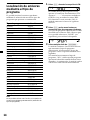
Precautions
• If your car was parked in direct sunlight
resulting in a considerable rise in
temperature inside the car, allow the unit to
cool off before operating it.
• If no power is being supplied to the unit,
check the connections first. If everything is in
order, check the fuse.
• If no sound comes from the speakers of a
two-speaker system, set the fader control to
the centre position.
• When a tape is played back for a long period,
the cassette may become warm because of
the built-in power amplifier. However, this is
not a sign of malfunction.
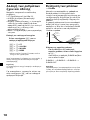
If you have any questions or problems
concerning your unit that are not covered in
this manual, please consult your nearest Sony
dealer.
To maintain high quality sound
If you have drink holders near your audio
equipment, be careful not to splash juice or
other soft drinks onto the car audio. Sugary
residues on this unit or cassette tapes may
contaminate the playback heads, reduce the
sound quality, or prevent sound reproduction
altogether.
Cassette cleaning kits cannot remove sugar
from the tape heads.

33
Notes on Cassettes
Cassette care
• Do not touch the tape surface of a cassette, as
any dirt or dust will contaminate the heads.
• Keep cassettes away from equipment with
built-in magnets such as speakers and
amplifiers, as erasure or distortion on the
recorded tape could occur.
• Do not expose cassettes to direct sunlight,
extremely cold temperatures, or moisture.
• Slack in the tape may cause the tape to be
caught in the machine. Before you insert the
tape, use a pencil or similar object to turn the
reel and take up any slack.
• Distorted cassettes and loose labels can cause
problems when inserting or ejecting tapes.
Remove or replace loose labels.
• The sound may become distorted while
playing the cassette. The cassette player head
should be cleaned after each 50 hours of use.
Slack
Cassettes longer than 90 minutes
The use of cassettes longer than 90 minutes is
not recommended except for long continuous
play. The tape used for these cassettes is very
thin and tends to stretch easily. Frequent
playing and stopping of these tapes may cause
them to become entangled in the cassette deck
mechanism.

44
Table of Contents
With Optional EquipmentThis Unit Only
Location of controls ................................................. 5
Getting Started
Resetting the unit ................................................ 6
Detaching the front panel .................................. 6
Setting the clock .................................................. 7
Cassette Player
Listening to a tape ............................................... 7
Playing a tape in various functions .................. 8
Radio
Memorizing stations automatically
— Best Tuning Memory (BTM).................... 9
Memorizing only the desired stations ............. 9
Receiving the memorized stations.................... 9
RDS
Overview of the RDS function ........................ 10
Displaying the station name............................ 10
Retuning the same programme automatically
— Alternative Frequencies (AF) ................. 11
Listening to traffic announcements ................ 12
Presetting the RDS stations with the AF and
TA data .......................................................... 13
Locating a station by programme type .......... 14
Setting the clock automatically ....................... 15
Other Functions
Labelling the rotary commander .................... 15
Using the rotary commander .......................... 16
Adjusting the sound characteristics ............... 17
Attenuating the sound ..................................... 17
Changing the sound and display settings ..... 18
Boosting the bass sound
— D-bass ....................................................... 18
Selecting the sound position
— “My Best sound Position” ..................... 19
CD/MD Unit
Playing a CD or MD ......................................... 19
Playing tracks repeatedly
— Repeat Play .............................................. 21
Playing tracks in random order
— Shuffle Play .............................................. 21
Additional Information
Maintenance....................................................... 21
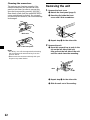
Removing the unit ............................................ 22
Specifications ..................................................... 23
Troubleshooting guide ..................................... 24

55
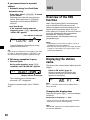
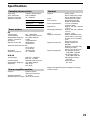
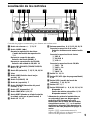
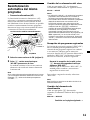
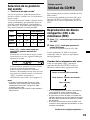
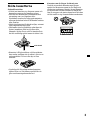
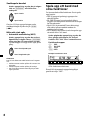
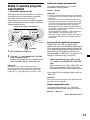
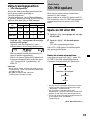
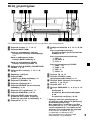
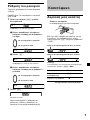
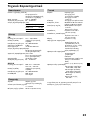
Location of controls
Refer to the pages listed for details.
1 Volume +/– button 7, 13, 17
2 MODE (o) button
During tape playback:
Playback direction change 7, 8
During radio reception:
BAND select 9
During CD/MD playback:
CD/MD unit select 19
3 SRC (SOURCE) (TUNER/TAPE/CD/MD)
button 7, 9, 19
4 SEL (select) button 7, 15, 17, 18, 19, 20
5 Display window
6 MBP (My Best sound Position)
button 19
7 D (D-BASS) button 18
8 Z (eject) button 7
9 RELEASE (front panel release) button
6, 22
q; ATT (attenuate) button 17
qa SENS/BTM button 9, 10, 13
qs RESET button (located on the front side
of the unit behind the front panel) 6
qd AF button 11, 13
qf Number buttons 8, 9, 12, 15, 18, 20, 21
During radio reception:
Preset number select 9, 12
During tape playback:
(3) REP 8
(5) BL SKIP 8
(6) ATA 8
During CD/MD playback:
(1) DISC – 20
(2) DISC + 20
(3) REP 21
(4) SHUF 21
qg TA button 12, 13
qh PTY/MTL (programme type/Metal)
button 8, 14
qj DSPL (display mode change) button
7, 10, 19, 20
qk OFF button* 6, 7
ql SEEK/AMS +/– button
8, 9, 10, 11, 14, 20
Seek 9
Automatic Music Sensor 8, 20
Manual search 10, 20
* Warning when installing in a car
without ACC (accessory) position on
the ignition key switch
Be sure to press (OFF) on the unit for two
seconds to turn off the clock display after
turning off the engine.
When you press (OFF) momentarily, the
clock display does not turn off and this
causes battery wear.
XR-CA400/CA410
RELEASE
SENS
AF123456TA
PTY
SEEK
AMS
DSPL
BTM
MTL
AT T
SEL
MODE
SRC
OFF
D
D-BASS
MBP
DISC REP SHUF BL SKIP ATA
SOURCE

66
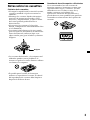
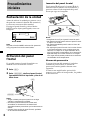
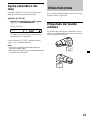
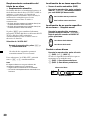
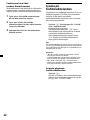
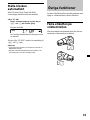
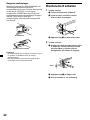
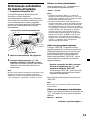
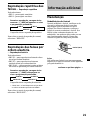
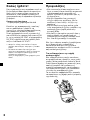
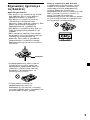
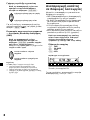
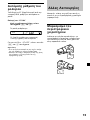
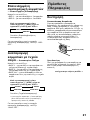
Attaching the front panel
Attach part A of the front panel to part B of
the unit as illustrated and push the left side
into position until it clicks.
Notes
• Be sure not to attach the front panel upside
down.
• Do not press the front panel too hard against the
unit when attaching it.
• Do not press too hard or put excessive pressure
on the display window of the front panel.
• Do not expose the front panel to direct sunlight
or heat sources such as hot air ducts, and do not
leave it in a humid place. Never leave it on the
dashboard of a car parked in direct sunlight or
where there may be a considerable rise in
temperature.
Caution alarm
If you turn the car ignition off without
removing the front panel, the caution alarm
will beep for a few seconds.
If you connect an optional power amplifier and
do not use the built-in amplifier, the beep
sound will be deactivated.
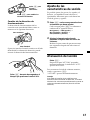
Getting Started
Resetting the unit
Before operating the unit for the first time or
after replacing the car battery, you must reset
the unit.
Remove the front panel and press the RESET
button with a pointed object, such as a
ballpoint pen.
Note
Pressing the RESET button will erase the clock
setting and some memorized functions.
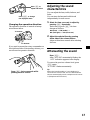
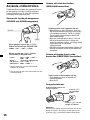
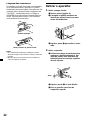
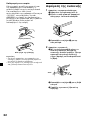
Detaching the front panel
You can detach the front panel of this unit to
protect the unit from being stolen.
1 Press (OFF).
2 Press (RELEASE), then slide the front
panel a little to the left, and pull it off
towards you.
Notes
• Be sure not to drop the panel when detaching it
from the unit.
• If you detach the panel while the unit is still
turned on, the power will turn off automatically
to prevent the speakers from being damaged.
• When carrying the front panel with you, use the
supplied front panel case.
RESET button
(OFF)
(RELEASE)
A
B

77
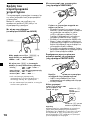
Cassette Player
Listening to a tape
Insert a cassette.
Playback starts automatically.
If a cassette is already inserted, to start
playback, press (SRC) repeatedly until
“TAPE” appears.
The side facing up is played.
The side facing down is played.
Tip
To change the tape‘s playback direction, press
(MODE) (o).
To Press
Stop playback (OFF)
Eject the cassette Z
continue to next page t
Setting the clock
The clock uses a 24-hour digital indication.
Example: To set the clock to 10:08
1 Press (DSPL) for two seconds.
The hour indication flashes.
1 Press either side of the volume button
to set the hour.
2 Press (SEL).
The minute indication flashes.
3 Press either side of the volume button
to set the minute.
2 Press (DSPL).
The clock starts.
After the clock setting is complete, the
display returns to normal playback mode.
to go forward
to go back
to go forward
to go back

88
Fast-winding the tape
During playback, press and hold either
side of (SEEK/AMS).
To start playback during fast-forwarding or
rewinding, press (MODE) (o).
Locating a specific track
— Automatic Music Sensor (AMS)
During playback, press either side of
(SEEK/AMS) momentarily for each track
you want to skip.
You can skip up to nine tracks at one time.
Note
The AMS function may not work when:
— the blanks between tracks are shorter than
four seconds
— there is noise between tracks
— there are long sections of low volume or quiet
sections.
To locate preceding tracks
To locate succeeding tracks
SEEK
AMS
AF123456TA
PTY
MTL
DISC REP SHUF BL SKIP ATA
Playing a tape in various
functions
You can play the tape in various functions:
•REP (Repeat Play) repeats the current track.
•BL SKIP (Blank Skip) skips blanks longer
than eight seconds.
•ATA (Automatic Tuner Activation) turns on
the tuner automatically when fast-winding
the tape.
•MTL (Metal) lets you play a metal or CrO2
tape.
During tape playback, press the desired
function button repeatedly until “ON” in
the display appears.
Function buttons
(3): REP
(5): BL SKIP
(6): ATA
(PTY): MTL
Example: ATA function
ATA function starts.
To return to normal playback function, select
“OFF.”
Rewind
Fast-forward
SEEK
AMS

99
Radio
Memorizing stations
automatically
— Best Tuning Memory (BTM)
The unit selects the stations with the strongest
signals and memorizes them in the order of
their frequencies. You can store up to 6 stations
on each band (FM1, FM2, FM3, MW, and LW).
Caution
When tuning in stations while driving, use
Best Tuning Memory to prevent accidents.
1 Press (SRC) repeatedly to select the
tuner.
Each time you press (SRC), the source
changes as follows:
B TUNER B CD*
1
TAPE*
2
b MD*
1
b
*
1
If the corresponding optional equipment is
not connected, this item will not appear .
*
2
If a tape is not inserted, this item will not
appear.
2 Press (MODE) repeatedly to select the
band.
Each time you press (MODE), the band
changes as follows:
B FM1 B FM2 B FM3 B MW B LW
3 Press (SENS) (BTM) for two seconds.
The unit stores stations in the order of their
frequencies on the number buttons.
A beep sounds when the setting is stored.
Notes
• The unit does not store stations with weak
signals. If only a few stations can be received,
some number buttons will retain their former
setting.
• When a number is indicated in the display, the
unit starts storing stations from the one currently
displayed.
Memorizing only the
desired stations
You can preset up to 18 FM stations (6 each for
FM1, 2, and 3), up to 6 MW stations, and up to
6 LW stations in the order of your choice.
1 Press (SRC) repeatedly to select the
tuner.
2 Press (MODE) repeatedly to select the
band.
3 Press either side of (SEEK/AMS) to tune
in the station that you want to store on
the number button.
4 Press the desired number button ((1) to
(6)) until “MEM” appears.
The number button indication appears in
the display.
Note
If you try to store another station on the same
number button, the previously stored station will
be erased.
Receiving the memorized
stations
1 Press (SRC) repeatedly to select the
tuner.
2 Press (MODE) repeatedly to select the
band.
3 Press the number button ((1) to (6)) on
which the desired station is stored.
continue to next page t

10
RDS
Overview of the RDS
function
Radio Data System (RDS) is a broadcasting
service that allows FM stations to send
additional digital information along with the
regular radio programme signal. Your car
stereo offers you a variety of services. Here are
just a few: retuning the same programme
automatically, listening to traffic
announcements, and locating a station by
programme type.
Notes
• Depending on the country or region, not all of
the RDS functions are available.
• RDS may not work properly if the signal strength
is weak or if the station you are tuned to is not
transmitting RDS data.
Displaying the station
name
The name of the current station lights up in the
display.
Select an FM station (page 9).
When you tune in an FM station that
transmits RDS data, the station name
appears in the display.
Note
The “*” indication means that an RDS station is
being received.
Changing the display item
Each time you press (DSPL), the item changes
as follows:
Station Name* (Frequency) y Clock
* When you tune in an FM station that transmits
RDS data, the station name appears.
Note
“NO NAME” appears if the received station does
not transmit RDS data.
If you cannot tune in a preset
station
— Automatic tuning/ Local Seek Mode
Automatic tuning:
Press either side of (SEEK/AMS) to search
for the station.
Scanning stops when the unit receives a
station. Press either side of (SEEK/AMS)
repeatedly until the desired station is
received.
Local Seek Mode:
If the automatic tuning stops too
frequently, press (SENS) repeatedly until
“LOCAL-ON” appears.
“LCL” indicator is displayed.
Only the stations with relatively strong
signals will be tuned in.
Tip
If you know the frequency of the station you want
to listen to, press either side of (SEEK/AMS) until
the desired frequency appears (manual tuning).
If FM stereo reception is poor
— Monaural Mode
During radio reception, press (SENS)
repeatedly until “MONO-ON” appears.
“MONO” indicator is displayed.
The sound improves, but becomes
monaural (“ST” disappears).
To return to normal mode, select “MONO-
OFF.”

11
Changing the display item
Each time you press (AF), the item changes as
follows:
AF-ON y AF-OFF
Notes
• When “NO AF” and the station name flash
alternately, it means that the unit cannot find an
alternative station in the network.
• If the station name starts flashing after selecting
a station with the AF function on, this indicates
that no alternative frequency is available. Press
either side of (SEEK/AMS) while the station name
is flashing (within eight seconds). The unit starts
searching for another frequency with the same PI
(Programme Identification) data (“PI SEEK”
appears and no sound is heard). If the unit
cannot find another frequency, “NO PI” appears,
and the unit returns to the previously selected
frequency.
Listening to a regional programme
The “REG-ON” (regional on) function lets you
stay tuned to a regional programme without
being switched to another regional station
(Note that you must turn the AF function on).
The unit is factory preset to “REG-ON,” but if
you want to turn off the function, do the
following.
During radio reception, press (AF) for
two seconds until “REG-OFF” appears.
Note that selecting “REG-OFF” might cause
the unit to switch to another regional
station within the same network.
To return to regional on, select “REG-ON.”
Note
This function does not work in the United
Kingdom and in some other areas.
Changing the display item
Each time you press (AF) for two seconds, the
item changes as follows:
REG-ON y REG-OFF
continue to next page t
Retuning the same
programme automatically
— Alternative Frequencies (AF)
The Alternative Frequencies (AF) function
automatically selects and retunes the station
with the strongest signal in a network. By
using this function, you can continuously
listen to the same programme during a long-
distance drive without having to retune the
station manually.
1 Select an FM station (page 9).
2 Press (AF) repeatedly until “AF-ON”
appears.
The unit starts searching for an alternative
station with a stronger signal in the same
network.
Note
When there is no alternative station in the area
and you do not need to search for an alternative
station, turn the AF function off by pressing (AF)
repeatedly until “AF-OFF” appears.
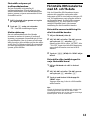
102.5MHz
96.0MHz
Frequencies change automatically.
Station
98.5MHz

12
Listening to traffic
announcements
The Traffic Announcement (TA) and Traffic
Programme (TP) data let you automatically
tune in an FM station that is broadcasting
traffic announcements even if you are listening
to other programme sources.
Press (TA) repeatedly until “TA-ON”
appears.
The unit starts searching for traffic
information stations. “TP” appears in the
display when the unit finds a station
broadcasting traffic announcements.
When the traffic announcement starts,
“TA” flashes. The flashing stops when the
traffic announcement is over.
Tip
If the traffic announcement starts while you are
listening to another programme source, the unit
automatically switches to the announcement and
goes back to the original source when the
announcement is over.
Notes
•
“NO TP” flashes for five seconds if the received
station does not broadcast traffic announcements.
Then, the unit starts searching for a station that
broadcasts it.
• When “EON” appears with “TP” in the display,
the current station makes use of broadcast traffic
announcements by other stations in the same
network.
To cancel the current traffic
announcement
Press (TA).
To cancel all traffic announcements, turn off
the function by pressing (TA) until
“TA-OFF” appears.
Local link function
(United Kingdom only)
The Local Link function lets you select other
local stations in the area, even if they are not
stored on your number buttons.
1 Press a number button that has a local
station stored on it.
2 Within five seconds, press the number
button of the local station again.
3 Repeat this procedure until the desired
local station is received.

13
Presetting the volume of traffic
announcements
You can preset the volume level of the traffic
announcements beforehand so you won’t
miss the announcement. When a traffic
announcement starts, the volume will be
automatically adjusted to the preset level.
1 Press the volume button to adjust the
desired volume level.
2 Press (TA) for two seconds.
“TA” appears and the setting is stored.
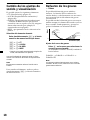
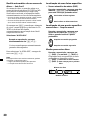
Receiving emergency
announcements
If an emergency announcement comes in while
you are listening to the radio, the programme
will automatically switch to it. If you are
listening to a source other than the radio, the
emergency announcements will be heard if
you set AF or TA to on. The unit will then
automatically switch to these announcements
no matter which source you are listening to at
the time.
Presetting the RDS
stations with the AF and
TA data
When you preset RDS stations, the unit stores
each station’s data as well as its frequency, so
you don’t have to turn on the AF or TA
function every time you tune in the preset
station. You can select a different setting (AF,
TA, or both) for individual preset stations, or
the same setting for all preset stations.
Presetting the same setting for all
preset stations
1 Select an FM band (page 9).
2 Press (AF) and/or (TA) to select “AF-ON”
and/or “TA-ON.”
Note that selecting “AF-OFF” or “TA-OFF”
stores not only RDS stations, but also non-
RDS stations.
3 Press (SENS) (BTM) until “BTM” flashes.
Presetting different settings for
each preset station
1 Select an FM band, and tune in the
desired station.
2 Press (AF) and/or (TA) to select “AF-ON”
and/or “TA-ON.”
3 Press the desired number button until
“MEM” appears.
Repeat from step 1 to preset other stations.
Tip
If you want to change the preset AF and/or TA
setting after you tune in the preset station, you
can do so by turning the AF or TA function on or
off.

14
1 Press (PTY) during FM reception.
The current programme type name appears
if the station is transmitting the PTY data.
“- - - - -” appears if the received station is
not an RDS station, or if the RDS data has
not been received.
If the TA function is ON, the unit starts
searching for the next station.
2 Press (PTY) repeatedly until the desired
programme type appears.
The programme types appear in the order
shown in the above table. Note that you
cannot select “NONE” (Not specified) for
searching.
3 Press either side of (SEEK/AMS).
The unit starts searching for a station
broadcasting the selected programme type.
When the unit finds the programme, the
programme type appears again for five
seconds.
“NO” and the programme type appear
alternately for five seconds if the unit
cannot find the programme type. It then
returns to the previously selected station.
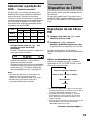
Locating a station by
programme type
You can locate the station you want by
selecting one of the programme types shown
below.
Programme types Display
News NEWS
Current Affairs AFFAIRS
Information INFO
Sports SPORT
Education EDUCATE
Drama DRAMA
Culture CULTURE
Science SCIENCE
Varied VARIED
Popular Music POP M
Rock Music ROCK M
Easy Listening EASY M
Light Classical LIGHT M
Classical CLASSICS
Other Music Type OTHER M
Weather WEATHER
Finance FINANCE
Children’s Programmes CHILDREN
Social Affairs SOCIAL A
Religion RELIGION
Phone In PHONE IN
Travel TRAVEL
Leisure LEISURE
Jazz Music JAZZ
Country Music COUNTRY
National Music NATION M
Oldies Music OLDIES
Folk Music FOLK M
Documentary DOCUMENT
Not specified NONE
Note
You cannot use this function in some countries
where no PTY (Programme Type selection) data is
available.

15
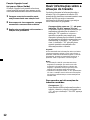
Other Functions
You can also control this unit with the rotary
commander (optional).
Labelling the rotary
commander
Depending on how you mount the rotary
commander, attach the appropriate label as
shown in the illustration below.
SEL
DSPL
MODE
SEL
DSPL
MODE
Setting the clock
automatically
The CT (Clock Time) data from the RDS
transmission sets the clock automatically.
Selecting “CT-ON”
During radio reception, press (SEL) and
(2) simultaneously.
The clock is set.
In one second the normal display
automatically appears.
To select “CT-OFF”, press (SEL) and (2)
simultaneously again.
Notes
• The CT function may not work even though an
RDS station is being received.
• There might be a difference between the time
set by the CT function and the actual time.

16
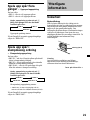
OFF
Rotate the VOL control to
adjust the volume.
Press (ATT) to
attenuate the
sound.
Press (OFF) to turn
off the unit.
Other operations
Note
When installing in a car without ACC (accessory)
position on the ignition key switch, press (OFF) for
two seconds to turn off the clock display after
turning off the engine.
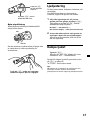
By rotating the control
(the SEEK/AMS control)
Rotate the control and release it to:
•Locate the beginnings of tracks on the
tape. Rotate and hold the control, and
release it to fast-wind the tape. To start
playback while fast-winding the tape,
press (MODE).
•Locate a specific track on a disc. Rotate
and hold the control until you locate the
specific point in a track, then release it to
start playback.
•Tune in stations automatically. Rotate and
hold the control to find a specific station.
By pushing in and rotating the
control (the PRESET/DISC control)
Push in and rotate the control to:
•Receive the stations memorised on the
number buttons.
•Change the disc.
Using the rotary
commander
The rotary commander works by pressing
buttons and/or rotating controls.
You can also control the optional CD or MD
units with the rotary commander.
By pressing buttons
(the SOURCE and MODE buttons)
Each time you press (SOURCE), the
source changes as follows:
TUNER t CD*
1
t MD*
1
t TAPE*
2
Pressing (MODE) changes the operation
in the following ways;
• Tuner : FM1 t FM2 t FM3 t MW
t LW
• Tape*
2
: playback direction
• CD unit*
1
: CD1 t CD2 t …
• MD unit*
1
: MD1 t MD2 t …
*
1
If the corresponding optional equipment is
not connected, the item will not appear.
*
2
If a tape is not inserted, this item will not
appear.
(SOURCE)
(MODE)

17
Adjusting the sound
characteristics
You can adjust the bass, treble, balance, and
fader.
You can store the bass and treble levels
independently for each source.
1 Select the item you want to adjust by
pressing (SEL) repeatedly.
Each time you press (SEL), the item
changes as follows:
BAS (bass) t TRE (treble) t
BAL (left-right) t FAD (front-rear)
2 Adjust the selected item by pressing
either side of the volume button.
Adjust within three seconds after selecting
the item.
Attenuating the sound
Press (ATT).
After “ATT-ON” momentarily flashes, the
“ATT” indication appears in the display.
To restore the previous volume level, press
(ATT) again.
“ATT-OFF” flashes momentarily.
Tip
When the interface cable of a car telephone is
connected to the ATT lead, the unit decreases the
volume automatically when a telephone call comes
in (Telephone ATT function).
Press (DSPL) to change
the displayed items.
Press (SEL) to
adjust and select.
To decrease
To increase
Changing the operative direction
The operative direction of controls is factory-
set as shown below.
If you need to mount the rotary commander on
the right hand side of the steering column, you
can reverse the operative direction.
Press (SEL) for two seconds while
pushing the VOL control.

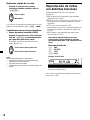
18
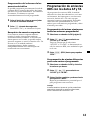
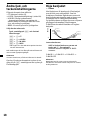
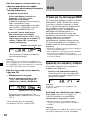
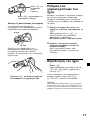
0dB
D.BASS-3
D.BASS-2
D.BASS-1
D.BASS-3
D.BASS-2
D.BASS-1
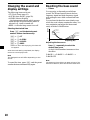
Boosting the bass sound
— D-bass
You can enjoy a clear and powerful bass
sound. The D-bass function boosts the low
frequency signal and high frequency signal
with a sharper curve than conventional bass
boost.
You can hear the bass line more clearly even
while the vocal volume remains the same. You
can emphasize and adjust the bass sound
easily with the D-BASS button.
Adjusting the bass curve
Press (D) repeatedly to select the
desired bass curve.
As the D-BASS number increases so does
the effect.
D.BASS-1 t D.BASS-2 t D.BASS-3 t
D.BASS-OFF
Note
The bass sound may distort at same volume. If the
bass sound distorts, select less effective bass curve.
Level
Frequency (Hz)
Changing the sound and
display settings
The following items can be set:
•CT (Clock Time) (page 15).
•A.SCRL (Auto Scroll)* (page 20).
•M.DSPL (Motion Display)
– the demonstration mode which appears
when the tape is ejected and no source is
selected (e.g., tuner is turned off).
•BEEP – to turn the beep sound on or off.
Selecting the desired item
Press (SEL) and the desired preset
number button simultaneously.
(SEL) + (2): CT
(SEL) + (3): A.SCRL*
(SEL) + (4): M.DSPL
(SEL) + (6): BEEP
* When no CD or MD is playing, this item will
not appear.
After the mode setting completed, the display
returns to normal play mode.
Note
The displayed item will differ depending on the
source.
To cancel the item, press (SEL) and the preset
number button simultaneously again.

19
GB
With Optional Equipment
CD/MD Unit
This unit can control external CD/MD units.
If you connect an optional CD unit with the
CD TEXT function, the CD TEXT information
will appear in the display when you play a CD
TEXT disc.
Playing a CD or MD
1 Press (SRC) repeatedly to select CD or
MD.
2 Press (MODE) until the desired unit
appears.
CD/MD playback starts.
When a CD/MD unit is connected, all the
tracks play from the beginning.
Changing the display item
Each time you press (DSPL) during CD, CD
TEXT, or MD playback, the item changes as
follows:
V
Elapsed playback time
V
Disc name*
1
/Artist name*
2
V
Track name*
3
V
Clock
*
1
If you have not labelled the disc or if there is no
disc name prerecorded on the MD, “NO NAME”
appears in the display.
*
2
If you play a CD TEXT disc, the artist name
appears in the display after the disc name (Only
for CD TEXT discs with the artist name).
*
3
If the track name of a CD TEXT disc or MD is not
prerecorded, “NO NAME” appears in the
display.
continue to next page t
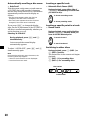
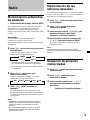
Selecting the sound
position — “My Best sound Position”
When you drive without passengers, you can
enjoy comfortable sound environment by
“My Best sound Position.”
“My Best sound Position” has two presets,
which adjust the sound level of balance and
fader. You can select one very easily with MBP
button.
Press (MBP) repeatedly until the desired
listening position.
Mode of “My Best sound Position” will be
shown in the display in order of the table.
After one second, the display goes back to
the normal playback mode.
If you want to adjust the sound level of
balance and fader more precisely, you can
do it in (SEL) button (See “Adjusting the
sound characteristics” on page 17).
Notes
• When the BAL (balance) or FAD (fader) in
“Adjusting the sound characteristics” (page17) is
adjusted, the MBP setting returns to OFF.
• When MBP is set to OFF, the BAL and FAD setting
is activated.
Display
window
MBP-A
MBP-B
MBP-OFF
Right
– 4dB
0
0
Left
0
– 4dB
0
Front
0
0
0
Rear
– 4dB
– 4dB
0
Balance Level
Fader Level

20
Locating a specific track
— Automatic Music Sensor (AMS)
During playback, press either side of
(SEEK/AMS) momentarily for each track
you want to skip.
Locating a specific point in a track
— Manual Search
During playback, press and hold either
side of (SEEK/AMS). Release when you
have found the desired point.
Switching to other discs
During playback, press (1) (DISC –) or
(2) (DISC +) button.
The desired disc in the current unit begins
playback.
(1) (DISC –): For preceding discs
(2) (DISC +): For succeeding discs
To locate succeeding tracks
To locate preceding tracks
To search forward
To search backward
Disc number
Track number
SEEK
AMS
SEEK
AMS
Automatically scrolling a disc name
— Auto Scroll
If the disc name, artist name, or track name on
a CD TEXT disc or MD exceeds 8 characters
and the Auto Scroll function is on, information
automatically scrolls across the display as
follows:
• The disc name appears when the disc has
changed (if the disc name is selected).
• The track name appears when the track has
changed (if the track name is selected).
If you press (DSPL) to change the display
item, the disc or track name of the CD TEXT or
MD disc is scrolled automatically whether you
set the function on or off.
Selecting “A.SCRL-ON”
During playback, press (SEL) and (3)
simultaneously.
In two seconds the normal display
automatically appears.
To select “A.SCRL-OFF”, press (SEL) and (3)
simultaneously again.
Note
For some discs with very many characters, the
following cases may happen:
— Some of the characters are not displayed.
— Auto Scroll does not work.
Sidan laddas...
Sidan laddas...
Sidan laddas...
Sidan laddas...
Sidan laddas...
Sidan laddas...
Sidan laddas...
Sidan laddas...
Sidan laddas...
Sidan laddas...
Sidan laddas...
Sidan laddas...
Sidan laddas...
Sidan laddas...
Sidan laddas...
Sidan laddas...
Sidan laddas...
Sidan laddas...
Sidan laddas...
Sidan laddas...
Sidan laddas...
Sidan laddas...
Sidan laddas...
Sidan laddas...
Sidan laddas...
Sidan laddas...
Sidan laddas...
Sidan laddas...
Sidan laddas...
Sidan laddas...
Sidan laddas...
Sidan laddas...
Sidan laddas...
Sidan laddas...
Sidan laddas...
Sidan laddas...
Sidan laddas...
Sidan laddas...
Sidan laddas...
Sidan laddas...
Sidan laddas...
Sidan laddas...
Sidan laddas...
Sidan laddas...
Sidan laddas...
Sidan laddas...
Sidan laddas...
Sidan laddas...
Sidan laddas...
Sidan laddas...
Sidan laddas...
Sidan laddas...
Sidan laddas...
Sidan laddas...
Sidan laddas...
Sidan laddas...
Sidan laddas...
Sidan laddas...
Sidan laddas...
Sidan laddas...
Sidan laddas...
Sidan laddas...
Sidan laddas...
Sidan laddas...
Sidan laddas...
Sidan laddas...
Sidan laddas...
Sidan laddas...
Sidan laddas...
Sidan laddas...
Sidan laddas...
Sidan laddas...
Sidan laddas...
Sidan laddas...
Sidan laddas...
Sidan laddas...
Sidan laddas...
Sidan laddas...
Sidan laddas...
Sidan laddas...
Sidan laddas...
Sidan laddas...
Sidan laddas...
Sidan laddas...
Sidan laddas...
Sidan laddas...
Sidan laddas...
Sidan laddas...
Sidan laddas...
Sidan laddas...
Sidan laddas...
Sidan laddas...
Sidan laddas...
Sidan laddas...
Sidan laddas...
Sidan laddas...
Sidan laddas...
Sidan laddas...
Sidan laddas...
Sidan laddas...
Sidan laddas...
Sidan laddas...
Sidan laddas...
Sidan laddas...
-
 1
1
-
 2
2
-
 3
3
-
 4
4
-
 5
5
-
 6
6
-
 7
7
-
 8
8
-
 9
9
-
 10
10
-
 11
11
-
 12
12
-
 13
13
-
 14
14
-
 15
15
-
 16
16
-
 17
17
-
 18
18
-
 19
19
-
 20
20
-
 21
21
-
 22
22
-
 23
23
-
 24
24
-
 25
25
-
 26
26
-
 27
27
-
 28
28
-
 29
29
-
 30
30
-
 31
31
-
 32
32
-
 33
33
-
 34
34
-
 35
35
-
 36
36
-
 37
37
-
 38
38
-
 39
39
-
 40
40
-
 41
41
-
 42
42
-
 43
43
-
 44
44
-
 45
45
-
 46
46
-
 47
47
-
 48
48
-
 49
49
-
 50
50
-
 51
51
-
 52
52
-
 53
53
-
 54
54
-
 55
55
-
 56
56
-
 57
57
-
 58
58
-
 59
59
-
 60
60
-
 61
61
-
 62
62
-
 63
63
-
 64
64
-
 65
65
-
 66
66
-
 67
67
-
 68
68
-
 69
69
-
 70
70
-
 71
71
-
 72
72
-
 73
73
-
 74
74
-
 75
75
-
 76
76
-
 77
77
-
 78
78
-
 79
79
-
 80
80
-
 81
81
-
 82
82
-
 83
83
-
 84
84
-
 85
85
-
 86
86
-
 87
87
-
 88
88
-
 89
89
-
 90
90
-
 91
91
-
 92
92
-
 93
93
-
 94
94
-
 95
95
-
 96
96
-
 97
97
-
 98
98
-
 99
99
-
 100
100
-
 101
101
-
 102
102
-
 103
103
-
 104
104
-
 105
105
-
 106
106
-
 107
107
-
 108
108
-
 109
109
-
 110
110
-
 111
111
-
 112
112
-
 113
113
-
 114
114
-
 115
115
-
 116
116
-
 117
117
-
 118
118
-
 119
119
-
 120
120
-
 121
121
-
 122
122
-
 123
123
-
 124
124


Sony XR-CA400 Bruksanvisningar
- Kategori
- Mottagare för bilmedia
- Typ
- Bruksanvisningar
- Denna manual är också lämplig för
på andra språk
- español: Sony XR-CA400 Instrucciones de operación
- português: Sony XR-CA400 Instruções de operação
- dansk: Sony XR-CA400 Betjeningsvejledning