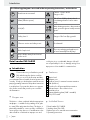
Parkside PHS 160 A1 Bruksanvisning
- Kategori
- Slipmaskiner
- Typ
- Bruksanvisning
Denna manual är också lämplig för

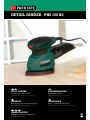
DETAIL SANDER PHS 160 B2
HÅNDSLIBER
Brugs- og sikkerhedsanvisninger
Oversættelse af den originale driftsvejledning
DETAIL SANDER
Operation and Safety Notes
Translation of original operation manual
HANDSLIP
Bruksanvisning och säkerhetsanvisningar
Översättning av bruksanvisning i original
KÄSIHIOMAKONE
Käyttö- ja turvaohjeet
Alkuperäisen käyttöohjeen käännös
HANDSCHLEIFER
Bedienungs- und Sicherheitshinweise
Originalbetriebsanleitung

DETAIL SANDER PHS 160 B2
GB / IE Operation and Safety Notes Page 5
FI Käyttö- ja turvaohjeet Sivu 13
SE Bruksanvisning och säkerhetsanvisningar Sidan 21
DK Brugs- og sikkerhedsanvisninger Side 29
DE / AT / CH Bedienungs- und Sicherheitshinweise Seite 37
Before reading, unfold the page containing the illustrations and familiarise yourself with all functions of the
device.
Käännä ennen lukemista kuvallinen sivu esiin ja tutustu seuraavaksi laitteen kaikkiin toimintoihin.
Vik ut bildsidan och ha den till hands när du läser igenom anvisningarna och gör dig bekant med
apparatens / maskinens funktioner.
Før du læser, vend siden med billeder frem og bliv bekendt med alle apparatets funktioner.
Klappen Sie vor dem Lesen die Seite mit den Abbildungen aus und machen Sie sich anschließend mit allen
Funktionen des Gerätes vertraut.

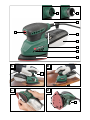
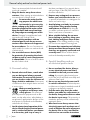
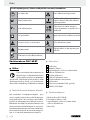
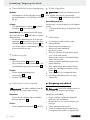
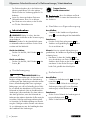
A B
C D
4b
8
7
6
2
4a
3
5
6
1
2


5 GB/IE
Table of contents
Introduction
Proper use ...................................................................................................................... Page 6
Features .........................................................................................................................Page 6
Included items ...............................................................................................................Page 6
Technical information ....................................................................................................Page 7
General safety advice for electrical power tools
1. Workplace safety .....................................................................................................Page 7
2.
Electrical safety .........................................................................................................Page 7
3. Personal safety .......................................................................................................... Page 8
4.
Careful handling and use of electrical power tools ...............................................Page 8
Safety advice relating specifically to this device ......................................................... Page 9
Preparing for use ...............................................................................................Page 9
Vacuum dust extraction ................................................................................................Page 10
Dust box for internal vacuum extraction ......................................................................Page 10
Reducer piece ...............................................................................................................Page 10
Attaching / detaching sanding sheets ..........................................................................Page 10
Rotating the backing plate ...........................................................................................Page 10
Advice on use ................................................................................................................ Page 11
Maintenance and cleaning .........................................................................Page 11
Service centre .......................................................................................................Pag e 11
Warranty ................................................................................................................... Page 11
Disposal ......................................................................................................................Page 12
Declaration of Conformity / Manufacturer....................................Page 12

6 GB/IE
Introduction
Introduction / General safety advice for electrical power tools
Detail sander PHS 160 B2
Q
Introduction
Please make sure you familiarise yourself
fully with the way the device works be-
fore you
use it for the first time and that
you understand how to handle electrical power tools
correctly. To help you do this please read the accom-
panying operating instructions. Keep these instructions
in a safe place. If you pass the device on to anyone
else, please ensure that you also pass on all the
documentation.
Q
Proper use
This device – when combined with the appropriate
sandpaper – is suitable for dry-sanding wood, plas-
tic, metal, filler and painted surfaces. The device is
particularly suitable for corners, profiles or difficult to
access places. Any other use or modification to the
device shall be considered as improper use and
could give rise to considerable dangers. We will
not accept liability for loss or damage arising from
improper use. Not suitable for commercial use.
Q
Features
1
Mains lead
2
Adapter port
3
Reducer piece for external vacuum extraction
4a
Tab (dust box)
4b
Dust box for self-generated dust extraction
5
Release button - dust collection box
6
Ventilation slots
7
Patented backing plate (360° rotatable)
8
ON / OFF switch
Q
Included items
1 Detail sander PHS 160 B2
1 Sanding sheet (Grit 120)
1 Reducer piece for external vacuum extraction
1 Operating instructions
The following pictograms are used in these operating instructions / on the device:
Read instruction manual!
Caution – electric shock!
Danger to life!
W
Watts (Effective power)
Risk of loss of life by electric shock
from damaged mains lead or mains
plug!
V
~
Volt (AC)
Wear hearing protection, dust protection
mask, protective glasses and protective
gloves.
Safety class II Danger of fire from flying sparks!
Observe caution and safety notes! Dust hazard!
Risk of explosion!
Dispose packaging and appliance in
an environmentally-friendly way!
Keep children away from electrical
power tools!

7 GB/IE
Introduction
Q
Technical information
Nom. power input: 160 W
Nominal voltage: 230 V∼ 50 Hz
Nominal speed: n
0
13000 min
-1
Nom. oscillation speed: n
0
26000 min
-1
Backing plate: 360° rotatable
Protection class: II /
Noise and vibration data:
Measured values for noise are determined in accord-
ance with EN 60745. The A-weighted noise level
of the electrical power tool are typically:
Sound pressure level: 80 dB(A)
Sound power level: 91 dB(A)
Uncertainty K: 3 dB
Wear ear protection!
Evaluated acceleration, typical:
Hand / arm vibration a
h
= 4.7 m / s
2
Uncertainty K = 1.5 m / s
2
The vibration level given in
these instructions has been measured in accordance
with a standardised measurement procedure specified
in EN 60745 and can be used to compare devices.
Different uses of the device give rise to different
vibration levels and in many cases they may exceed
the values given in these instructions. It is easy to
underestimate the vibration load if the electrical pow-
er tool is used regularly in particular circumstances.
Note: If you wish to make an accurate assessment
of the vibration loads experienced during a particular
period of working, you should also take into account
the intervening periods of time when the device is
switched off or is running but is not actually in use.
This can result in a much lower vibration load over
the whole of the period of working.
General safety advice for
electrical power tools
Read all the safety advice
and instructions! Failure to observe the safety
advice and instructions may result in electric shock,
fire and / or serious injury.
Keep all the safety advice and instructions
in a safe place for future reference!
The term “electrical tool” used in the safety advice
refers to electrical tools powered by mains electrici-
ty (by means of a mains lead) and electrical tools
powered by rechargeable batteries (without a
mains lead).
1.
Workplace safety
a) Keep your working area clean and
well lit. Untidy or poorly lit working areas
can lead to accidents.
b)
Do not work with the device
in potentially explosive envi-
ronments in which there are
inflammable liquids, gases or dusts.
Electrical power tools create sparks, which can
ignite dusts or fumes.
c)
Keep children and other
people away while you are
operating the electrical tool.
Distractions can cause you to lose control of
the device.
2.
Electrical safety
a)
The mains plug on the device must match
the mains socket. The plug must not
be modified in any way. Do not use
an adapter plug with devices fitted
with a protective earth. Unmodified
plugs and matching sockets reduce the risk of
electric shock.
b) Avoid touching earthed surfaces such
as pipes, radiators, ovens and refrig-
erators with any part of your body.
Introduction / General safety advice for electrical power tools

8 GB/IE
There is an increased risk of electric shock if
your body is earthed
.
c) Keep the device away from rain or
moisture. Water entering an electrical device
increases the risk of electric shock.
d)
Do not use the mains lead for
any purpose for which it was
not intended, e.g. to carry the
device, to hang up the device or to pull
the mains plug out of the mains socket.
Keep the mains lead away from heat,
oil, sharp edges or moving parts of the
device. Damaged or tangled mains leads
increase the risk of electric shock.
e) When working outdoors with an
electrical power tool always use ex-
tension cables that are also approved
for use outdoors. The use of an extension
cable suitable for outdoor use reduces the risk
of electric shock.
f) Use a residual current device (RCD)
for protection if operating the electri-
cal power tool in a moist environment
is unavoidable. The use of an RCD reduces
the risk of electric shock.
3. Personal safety
a) Remain alert at all times, watch what
you are doing and always proceed
with caution. Do not use the device if
you are tired or under the influence of
drugs, alcohol or medication. One mo
ment
of carelessness when using the device can lead
to serious injury.
b)
Wear personal protective
equipment and always wear
safety glasses. The wearing of
personal protective equipment such as dust
masks, non-slip safety shoes, safety helmets or
ear protectors, appropriate to the type of elec-
trical power tool used and work undertaken,
reduces the risk of injury.
c) Avoid unintentional operation of the
device. Check that the electrical power
tool is switched off before you connect
it to the mains, pick it up or carry it.
Accidents can happen if you carry the device
with your finger on the ON / OFF switch or with
the device switched on.
d) Remove any setting tools or spanners
before you switch the device on. A tool
or spanner left attached to a rotating part of a
device can lead to injury.
e) Avoid placing your body in an unnat-
ural position. Keep proper footing
and balance at all times. By doing this
you will be in a better position to control the
device in unforeseen circumstances.
f) Wear suitable clothing. Do not wear
loose clothing or jewellery. Keep your
hair, clothing and gloves clear of mov-
ing parts. Loose clothing, jewellery or long
hair can become trapped in moving parts.
g) If vacuum dust extraction and collection
devices are fitted do not forget to
check
that they are properly connected and
correctly used. The use of these devices
reduces the hazard presented by dust.
4.
Careful handling and use
of electrical power tools
a) Do not overload the device. Always
use an electrical power tool that is
intended for the task you are under-
taking. By using the right electrical power
tool for the job you will work more safely and
achieve a better result.
b) Do not use an electrical power tool if
its switch is defective. An electrical power
tool that can no longer be switched on and off
is dangerous and must be repaired.
c) Pull the mains plug from the socket
before you make any adjustments to
the device, change accessories or when
the device is put away. This precaution is
intended to prevent you from unintentionally
starting the device.
d) When not in use always ensure that
electrical power tools are kept out of
reach of children. Do not let anyone use
the device if he or she is not familiar
with it or has not read the instructions
General safety advice for electrical power tools / Preparing for use
General safety advice for electrical power tools

9 GB/IE
and advice. Electrical power tools are dan-
gerous when they are used by inexperienced
people.
e) Look after the device carefully. Check
that moving parts are working prop-
erly and move freely. Check for any
parts that are broken or damaged
enough to detrimentally affect the
functioning of the device. Have dam-
aged parts repaired before you use
the device. Many accidents have their origins
in poorly maintained electrical power tools.
f) Use the electrical power tool, accesso-
ries, inserted tools etc. in accordance
with these instructions and advice, and
the stipulations drawn up for this par-
ticular type of device. In doing this, take
into account the working conditions
and the task in hand. The use of electrical
power tools for purposes other than those in-
tended can lead to dangerous situations.
Safety advice relating
specifically to this device
Securely support the workpiece. Use clamps or
a vice to grip the workpiece firmly. This is much
safer than holding it in your hand.
Never support yourself by placing your hands
near or in front of the device or the workpiece
surface. A slip can result in injury.
If a dangerous situation arises, pull the mains
plug immediately out of the mains socket.
Always work with the mains lead leading
away from the rear of the device.
DANGER OF FIRE FROM FLYING
SPARKS! Abrading metal creates
flying sparks. For this reason, always
make sure that nobody is placed in any danger
and that there are no inflammable materials
near the working area.
NOXIOUS FUMES!
Any harmful / noxious dusts generated from
sanding represent a risk to the health of the
person operating the device and to anyone
near the work area.
DUST HAZ-
ARD! When sanding wood and in
particular when working on materials
that give rise to dusts that are hazardous to
health, the sander must be connected to a suit-
able external dust extraction device.
Wear protective glasses and a dust
mask!
Ensure that there is adequate ventilation when
working on plastic, paint, varnish etc.
Do not soak the materials or the surface you
are about to work on with liquids containing
solvents.
Do not abrade moistened materials or damp
surfaces.
Avoid sanding paints containing lead or other
substances hazardous to health.
Do not work on materials containing asbestos.
Asbestos is a known carcinogen.
Avoid contact with the moving sanding sheet.
Operate the device only with an attached
sanding sheet.
Never use the device for a purpose for which it
was not intended nor with non-original parts /
accessories. The use of tools or accessories
other than those recommended in the operating
instructions could lead to you suffering an injury.
Switch the device off and allow it to come to a
standstill before you put it down.
Always keep the device clean, dry and free of
oil or grease.
Q
Preparing for use
CAUTION! Make sure that the device is switc
hed
off before you connect it to the mains supply.
Note! Always switch on the delta sander before
bringing it into contact with the workpiece material.
Switching on the device:
Push the ON / OFF switch
8
into Position “I“.
Switching off the device:
Push the ON / OFF switch
8
into Position “0“.
General safety advice for electrical power tools / Preparing for use
General safety advice for electrical power tools

10 GB/IE
Q
Vacuum dust extraction
DANGER OF FIRE! There is
the danger of fire when working with electrical
devices that have a dust box or can be connected
to a vacuum cleaner. Under certain conditions the
wood dust in the dust extraction bag (or in the
vacuum‘s dust bag) may ignite, e.g. as a result of
flying sparks generated when abrading metals or
metal objects left in wood. This can happen partic-
ularly if the wood dust is mixed with paint residue
or other chemicals and the abraded particles are
hot from prolonged abrasion. Therefore you must
empty the device’s dust collection box and the
vacuum cleaner’s dust bag before taking a break
or stopping work and always avoid overheating of
the abraded particles and the device.
Wear a dust mask!
Always pull the mains plug is
out of the socket before doing any work on the
device.
Q
Dust box for internal
vacuum extraction
Mounting:
Slide the dust box for self-generated dust ext-
raction
4b
up to the stop on the hand sander.
Removal:
Press the release button
5
of the dust extraction
box for internal vacuum extraction
4b
and
withdraw it towards the rear of the device.
Note: Empty the dust collector in good time in or-
der to ensure the optimum removal of
4b
dust by
suction.
To do so, remove the dust box
4b
from the de-
vice as described above. Open the dust box
by pulling on the tab
4a
and remove the cover.
Now tap both parts to thoroughly clean them.
Q
Reducer piece
Connection:
Push the reducer piece
3
into the adapter
port
2
.
Push the hose of a suitable dust extraction de-
vice approved for that purpose (e.g. a workshop
vacuum cleaner) on to the reducer piece
3
.
Removal:
Pull the dust extraction device hose off the
reducer piece
3
.
Pull off the reducer piece
3
.
Q
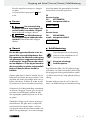
Attaching / detaching
sanding sheets
Always pull the mains plug is out
of the socket before doing any work on the device.
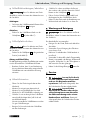
Attaching:
Sanding sheets are attached to the backing plate
7
by means of the hook and pile fastening.
Detaching:
Simply pull the sanding sheet off the backing
plate
7
(see Fig. C).
Q
Rotating the backing plate
Always pull the mains plug is out
of the socket before doing any work on the device.
Rotate the backing plate
7
into the desired
position (see Fig. D).
Sanding and surfaces:
The sanding output and the quality of the surface
finish are determined by the grade of grit on the
sanding sheet.
Always use sanding sheets with grades that
are suitable for the particular surface you are
sanding.
Preparing for use / Maintenance and cleaning / Service centre / Warranty
Preparing for use

11 GB/IE
Q
Advice on use
Switch the device on before placing it against
the workpiece.
Apply light sanding pressure only.
Advance the device at an even rate.
Change sanding sheets at the appropriate time.
Do not work on different types of material using
the same sanding sheet (e.g. wood and then
metal). To achieve the best sanding results you
should use unworn, undamaged sanding sheets.
Clean the sanding sheet from time to time with
a vacuum cleaner.
Sand difficult to reach places with the front or
side corners of the backing plate
7
.
Work in parallel and overlapping widths.
After sanding the workpiece, lift the device
from the workpiece before switching it off.
Q
Maintenance and cleaning
Always pull the mains plug is out
of the socket before doing any work on the device.
The delta sander is maintenance-free.
Clean the device frequently. This should be done
immediately after you have finished using it.
For cleaning the housing use a dry cloth only.
Remove any adhering sanding dust with a
narrow paint brush.
Never any kind of sharp object or petrol,
solvents or cleaning agents that might attack
plastic. Do not allow any liquids to enter the
inside of the device.
Always keep the ventilation slots
6
clear.
Q
Service centre
Have your device
repaired only by qualified specialist
personnel using original manufacturer
parts only. This will ensure that your device
remains safe to use.
If the plug or mains
lead needs to be replaced, always
have the replacement carried out by
the manufacturer or its service centre.
This will ensure that your device remains safe
to use.
Q
Warranty
The warranty for this appliance is for 3 year
s
from the date of purchase. The appliance
has been manufactured with care and
meticulously examined before delivery.
Please retain your receipt as proof of pur-
chase. In the event of a warranty claim,
please make contact by telephone with
our Service Department. Only in this way
can a post-free despatch for your goods
be assured.
The warranty covers only claims for material and
maufacturing defects, but not for transport damage,
for wearing parts or for damage to fragile components,
e.g. buttons or batteries. This product is for private use
only and is not intended for commercial use.
The warranty is void in the case of abusive and
improper handling, use of force and internal tam-
pering not carried out by our authorized service
branch. Your statutory rights are not restricted in
any way by this warranty.
The warranty period will not be extended by repairs
made unter warranty. This applies also to replaced
and repaired parts. Any damage and defects extant
on purchase must be reported immediately after
unpacking the appliance, at the latest, two days after
the purchase date. Repairs made after the expiration
of the warranty period are subject to payment.
GB
Service Great Britain
Tel.: 0871 5000 720
(0,10 GBP/Min.)
e-mail: k[email protected]
IAN 70625
Preparing for use / Maintenance and cleaning / Service centre / Warranty
Preparing for use

12 GB/IE
IE
Service Ireland
Tel: 1890 930 034
(0,08 EUR/Min. (peak)
0,06 EUR/Min. (off peak))
e-mail: k[email protected]
IAN 70625
Q
Disposal
The packaging is wholly composed of
environmentally-friendly materials that can
be disposed of at a local recycling centre.
Do not dispose of electrical
power tools with the household
rubbish!
In accordance with European Directive 2002 / 96 / EC
(covering waste electrical and electronic equipment)
and its transposition into national legislation, worn
out electrical power tools must be collected separately
and taken for environmentally compatible recycling.
Contact your local refuse disposal authority for
more details of how to dispose of your worn out
electrical devices.
Q
Declaration of Conformity /
Manufacturer
We, Kompernaß GmbH, the person responsible for
documents: Mr Semi Uguzlu, Burgstr. 21, D-44867
Bochum, Germany, hereby declare that this product
complies with the following standards, normative
documents and EU directives:
Machinery Directive
(2006 / 42 / EC)
EC Low Voltage Directive
(2006 / 95 / EC)
Electromagnetic Compatibility
(2004 / 108 / EC)
Applicable harmonized standards
EN 60745-1/A11:2010
EN 60745-2-4:2009
EN 62233:2008
EN 55014-1/A1:2009
EN 55014-2/A2:2008
EN 61000-3-2/A2:2009
EN 61000-3-3:2008
and confirm this with the CE symbol.
Type / Machine designation:
Detail sander PHS 160 B2
Date of manufacture (DOM): 11–2011
Serial number: IAN 70625
Bochum, 30.11.2011
Semi Uguzlu
- Quality Manager -
We reserve the right to make technical modifications
in the course of product development.
Sisällysluettelo
Warranty / Disposal / Declaration of Conformity / Manufacturer

13 FI
Sisällysluettelo
Aluksi
Tarkoituksenmukainen käyttö ....................................................................................... Sivu 14
Varustus ......................................................................................................................... Sivu 14
Toimituslaajuus .............................................................................................................. Sivu 14
Tekniset tiedot ................................................................................................................ Sivu 15
Sähkötyökaluja koskevat yleiset turvaohjeet
1. Työpaikkaturvallisuus ................................................................................................ Sivu 15
2.
Sähköturvallisuus ...................................................................................................... Sivu 15
3. Henkilöiden turvallisuus ............................................................................................ Sivu 16
4.
Sähkötyökalujen huolellinen käsittely ja käyttö ...................................................... Sivu 16
Laitekohtaisia turvallisuusohjeita .................................................................................. Sivu 17
Käyttöönotto
Pölynpoisto .................................................................................................................... Sivu 17
Pölyrasia pölynimuun .................................................................................................... Sivu 18
Supistuskappale ............................................................................................................ Sivu 18
Hioma-arkin kiinnitys / irrotus ........................................................................................ Sivu 18
Hiomalevyn pyörittäminen ............................................................................................ Sivu 18
Työvinkkejä .................................................................................................................... Sivu 18
Huolto ja puhdistus ........................................................................................... Sivu 18
Huolto........................................................................................................................... Sivu 19
Takuu ............................................................................................................................ Sivu 19
Hävittäminen ......................................................................................................... Sivu 19
Vaatimustenmukaisuusvakuutus / Valmistaja .......................... Sivu 20
Warranty / Disposal / Declaration of Conformity / Manufacturer

14 FI
Käsihiomakone PHS 160 B2
Q
Aluksi
T
utustu ennen käyttöönottoa laitteeseen, se
n
käyttöohjeisiin ja sähkölaitteita koskeviin
yleisiin turvallisuusohjeisiin. Lue tämä käyttö-
opas huolella. Säilytä käyttöopas huolellisesti. Saatat
myöhemmin tarvita sen tietoja. Jos luovut laitteesta,
anna uudelle omistajalle myös kaikki laitteen asiakirjat.
Q
Tarkoituksenmukainen käyttö
Laite on tarkoitettu – hiomapaperista riippuen – puun,
muovin, metallin, pohjustusaineen sekä lakattujen pin-
tojen kuivahiomiseen. Laite on erityisen sopiva nurkki
en,
profiilien tai vaikeapääsyisten paikkojen hiomiseen.
Kaikenlainen muu käyttö tai muutokset laitteessa eivät
vastaa tarkoituksenmukaista käyttöä ja niissä piilee
huomattava tapaturmavaara. Me emme vastaa tarkoi-
tuksenvastaisesta käytöstä aiheutuneista vahingoista.
Laite ei ole tarkoitettu ammattimaiseen käyttöön.
Q
Varustus
1
Verkkojohto
2
Adapterin liitäntä
3
Supistuskappale, jolla kone voidaan liittää
erilliseen imulaitteeseen
4a
Kiinnike (pölykotelo)
4b
Pölykotelo pölynimua varten
5
Pölynkeruulaatikon avauspainike
6
Tuuletusaukot
7
Patentoitu hiomalaikka (360° pyörivä)
8
PÄÄLLE- / POIS-Kytkin
Q
Toimituslaajuus
1 Käsihiomakone PHS 160 B2
1 Hiomapaperi (karkeus 120)
1 Supistuskappale, jolla kone voidaan liittää
erilliseen imulaitteeseen
1 Käyttöohje
Aluksi
Aluksi / Sähkötyökaluja koskevat yleiset turvaohjeet
Tässä käyttöohjeessa / laitteessa käytetään seuraavia kuvakkeita:
Lue käyttöohje! Varo sähköiskua! Hengenvaara!
W
Watti (Vaikutusteho)
Viallisen verkkojohdon tai pistokkeen
käyttöön liittyvän sähköiskun aiheutta-
ma hengenvaara!
V
~
Voltti (Vaihtojännite)
Pidä ja kuulonsuojainta, hengitys- /
pölysuojanaamaria, suojalaseja ja suo-
jakäsineitä.
Suojausluokka II Kipinöiden lentäessä uhkaa palovaara!
Huomioi varoitus- ja turvaohjeet! Pölyn aiheuttamat vaarat!
Räjähdysvaara!
Hävitä pakkaus ja laite ympäristöystä-
vällisesti!
Pidä lapset loitolla sähkötyökalusta!

15 FI
Aluksi
Aluksi / Sähkötyökaluja koskevat yleiset turvaohjeet
Q
Tekniset tiedot
Nimellisottoteho: 160 W
Nimellisjännite: 230 V∼ 50 Hz
Nimelliskierrosluku: n
0
13000 min
-1
Nimellisvärähtelyluku: n
0
26000 min
-1
Hiomalaikka: 360° pyörivä
Suojausluokka: II /
Melu- ja tärinätiedot:
Melun mittausarvo laskettu EN 60745 standardin
mukaisesti. Sähkötyökalun A-mitattu melutaso on
tyypillisesti:
Äänenpainetaso: 80 dB(A)
Äänitehotaso: 91 dB(A)
Epävarmuus K: 3 dB
Käytä kuulosuojaimia!
Arvioitu kiihtyvyys, tyypillisesti:
Käteen ja käsivarteen kohdistuva värinä
ah = 4,7 m / s
2
Epävarmuus K = 1,5 m / s
2
Näissä ohjeissa ilmoitettu
värähtelytaso on määritetty normissa EN 60745
standardoidulla mittausmenetelmällä ja sitä voidaan
käyttää laitevertailussa.
Värähtelytaso muuttuu sähkötyökalun käytön mukaan
ja se saattaa monesti ylittää tässä ohjeessa mainitun
arvon. Värähtelyrasitusta saatetaan aliarvioida, jos
sähkötyökalua säännöllisesti käytetään tällä tavalla.
Huomio: Liikekuormituksen arvioimiseksi tietyn
työajan kestäessä on huomioitava myös ajat, jolloin
laite on sammutettuna, tai ajat, jolloin laite on käyn-
nissä, mutta ei työkäytössä. Tämä saattaa vähentää
merkittävästi liikerasitusta kokonaistyöskentelyajan
kestäessä.
Sähkötyökaluja koskevat
yleiset turvaohjeet
Lue kaikki turva- ja muut
ohjeet! Turva- ja muiden ohjeiden laiminlyönti voi
aiheuttaa sähköiskun, tulipalon ja / tai vakavia louk-
kaantumisia.
Säilytä kaikki turva- ja muut ohjeet tulevaa
tarvetta varten!
Turvallisuusohjeissa käytetty käsite “sähkötyökalu“
koskee verkkokäyttöisiä sähkötyökoneita (verkko-
johdolla) ja akkukäyttösisiä sähkötyökoneita (ilman
johtoa).
1.
Työpaikkaturvallisuus
a) Pidä työskentelypaikka puhtaana ja
hyvin valaistuna. Epäjärjestys ja huono
valaistus voivat johtaa tapaturmiin.
b)
Älä käytä laitetta räjähdys-
vaarallisessa ympäristössä,
jossa säilytetään helposti
syttyviä nesteitä, kaasuja tai jossa
kehittyy pölyä. Sähkötyökalut kehittävät
kipinöintiä, joka voi sytyttää pölyn tai höyryn.
c)
Lapsien ja asiattomien henki-
löiden läsnäolo työpaikalla
laitteen ollessa käynnissä ei
ole sallittua. Voit helposti menettää kontrollin
laitteeseen.
2.
Sähköturvallisuus
a) Laitteen pistokkeen pitää sopia pisto-
rasiaan. Pistoketta ei saa muuttaa
millään tavalla. Älä käytä adapteria
yhdessä suojamaadoitettujen laitteiden
kanssa. Alkuperäinen pistoke ja sopivat pis-
torasia vähentävät sähköiskuvaaraa.
b) Vältä kosketusta maadoitettuihin pin-
toihin, kuten putkiin, lämpöpatterei-
hin, liesiin sekä jääkaappeihin. Vaarana
on saada sähköisku, jos kehosi on maadoitettu.

16 FI
c)
Älä pidä laitetta sateessa tai muussa
kosteudessa. Veden pääsy laitteeseen lisää
sähköisku vaaraa.
d) Älä kanna laitetta riiputta-
malla sitä kaapelista ja vedä
kaapeli irti pistorasiasta
pitämällä kiinni pistokkeesta. Älä jätä
kaapelia kuumaan paikkaan, älä
päästä siihen öljyä, varo teräviä reu-
noja sekä laitteen pyöriviä osia. Vialliset
tai kietoutuneet kaapelit lisäävät riskiä saada
sähköisku.
e) Jos työskentelet ulkotiloissa, käytä
silloin jatkokaapelia, jonka käyttö on
sallittu myös ulkotilaan. Ulkotilaan sovel-
tuva kaapeli vähentää riskiä saada sähköisku.
f) Jos sähkötyökalua joudutaan käyttä-
mään kosteassa ympäristössä, on
käytettävä vikavirtakytkintä. Vikavirta-
kytkimen käyttö pienentää sähköiskun vaaraa.
3. Henkilöiden turvallisuus
a) Ole aina tarkkaavainen, tarkista aina,
mitä teet ja toimi järkevästi sähkölait-
teilla työskennellessäsi. Älä käytä
laitetta, jos olet väsynyt, käyttänyt
huumeita, alkoholia tai lääkkeitä.
Epätarkkaavaisuus laitetta käytettäessä voi
aiheuttaa vaikeita loukkaantumisia.
b)
Käytä henkilökohtaisia tur-
vavarusteita ja suojalaseja
aina. Henkilökohtaisten turvavarus-
teiden käyttö, kuten pölynaamari, turvakengät,
kypärä tai kuulosuoja, vähentävät loukkaantu-
misriskiä.
c) Varo käynnistämästä laitetta vahin-
gossa. Varmista, että sähkötyökalu
on kytketty pois päältä, ennen kuin
liität sen pistorasiaan, nostat sen tai
kannat sitä. Tapaturmat ovat mahdollisia,
jos sormesi on laitetta kantaessasi virtakytki-
mellä tai laite on kytketty päälle.
d) Poista kaikki työkalut ja ruuviavaimet
paikalta ennen kuin kytket laitteen.
Pyörivässä laiteosassa oleva työkalu tai avain
voi johtaa tapaturmaan.
e) Vältä työskentelemästä epätavalli-
sessa asennossa. Asetu tukevaan
asentoon ja pysyttele koko ajan tasa-
painossa. Pystyt silloin hallitsemaan laitteen
erityisesti yllättävissä tilanteissa.
f) Käytä sopivaa vaatetusta. Älä käytä
löysiä vaatteita äläkä pidä koruja.
Hiukset, vaatteet ja käsineet on pidet-
tävä etäällä liikkuvista osista. Löysät
vaatteet, korut ja avonaiset hiukset voivat jäädä
kiinni liikkuviin osiin.
g) Jos laitteeseen asennetaan pölynimu-
ri- ja lastunkeruulaite, varmistu sitä
ennen, että osat on liitetty ja niitä käy-
tetään oikein. Näiden laitteiden liittäminen
vähentää pölystä aiheutuvia vaaroja.
4.
Sähkötyökalujen huolellinen
käsittely ja käyttö
a) Älä ylirasita laitetta. Käytä työssäsi
tätä työtä varten tarkoitettua sähkö-
työkalua. Sopivan sähkötyökalun kanssa
työskentelet paremmin ja varmemmin sen teho-
alueella.
b) Älä käytä mitään sähkötyökalua,
jonka käynnistyskytkin on viallinen.
Sähkötyökalu, jota ei voi enää kytkeä päälle
tai päältä, on vaarallinen ja se on korjattava.
c) Irrota pistotulppa pistorasiasta, ennen
kuin säädät laitetta, vaihdat sen va-
rusteita tai laitat sen varastoon. Nämä
varotoimenpiteet estävät sen, että laite käynnistyy
vahingossa.
d) Säilytä sähkötyökaluja silloin, kun nii-
tä ei käytetä, lasten ulottumattomissa.
Älä anna henkilöiden käyttää laitetta,
jos he eivät tunne sitä tai eivät ole lu-
keneet näitä käyttöohjeita. Sähkötyöka-
lut ovat vaarallisia, jos kokemattomat henkilöt
käyttävät niitä.
e) Hoida laitetta huolellisesti. Tarkasta,
toimivatko sen liikkuvat osat moit-
teettomasti ja että ne eivät jumitu;
tarkasta, onko joku osa katkennut tai
murtunut tai vahingoittunut niin, että
se haittaa laitteen toimintaa. Korjauta
Sähkötyökaluja koskevat yleiset turvaohjeet
Sähkötyökaluja koskevat yleiset turvaohjeet / Käyttöönotto

17 FI
Sähkötyökaluja koskevat yleiset turvaohjeet
Sähkötyökaluja koskevat yleiset turvaohjeet / Käyttöönotto
vialliset osat aina ennen kuin käytät
laitetta. Moni tapaturma johtuu huonosti
huolletuista sähkötyökaluista.
f) Käytä sähkötyökaluja, lisätarvikkei-
ta, käyttötarvikkeita jne. tässä esitet-
tyjen määräysten mukaisesti ja aina
erityistä tyyppiä vastaavasti.Ota
huomioon työolosuhteet ja työ. Sähkö-
työkalujen käyttö muuhun kuin sille määrättyyn
tarkoitukseen voi aiheuttaa vaarallisia tilanteita.
Laitekohtaisia
turvallisuusohjeita
Varmista työstettävä kappale. Käytä kiinnittimiä /
ruuvipuristinta kiinnittääksesi kappale. Näin se
on varmemmin kiinni, kuin kädellä pitäen.
Älä missään tapauksessa tue käsiäsi laitteen
viereen tai eteen tai työstettävälle pinnalle,
koska käsien luiskahtaessa uhkaa tapaturma.
Vedä vaaran uhatessa heti verkkopistoke
pistorasiasta.
Vie verkkokaapeli aina taakse laitteesta poispäin.
KIPINÖIDEN LENTÄESSÄ
UHKAA PALOVAARA! Jos hiot
metalleja, syntyy kipinöitä. Pidä siitä
syystä tarkasti huolta siitä, etteivät ihmiset joudu
vaaraan ja ettei työalueen lähistöllä ole mitään
palavia aineita.
MYRKYLLISIÄ HÖYRY-
JÄ! Työstössä syntyvät haitalliset / myrkylliset
pölyt vaarantavat käyttäjän tai lähellä olevien
henkilöiden terveyden.
PÖLYN AIHEUTTAMAT VAARAT!
Jos työskentelet pitemmän aikaa puun
parissa tai erityisesti jos työstät aineita, joista
syntyy terveydelle vaarallisia pölyjä, liitä laite
tarkoitukseen sopivaan pölynpoistoon.
Käytä suojalaseja ja pölynsuojanaa-
maria!
Huolehdi riittävästä tuuletuksesta työstäessäsi
muoveja, värejä, maaleja ym.
Älä kastele aineita tai työstettäviä pintoja liuo-
tusainepitoisilla nesteillä.
Älä työstä mitään kostutettuja materiaaleja tai
kosteita pintoja.
Vältä lyijypitoisten värien ja muiden terveydelle
vahingollisten aineiden hiomista.
Asbestipitoista materiaalia ei saa työstää.
Asbestia pidetään syöpää aiheuttavana.
Vältä kosketusta liikkuvaan hioma-arkkiin.
Käytä vain laitetta, johon on kiinnitetty
hioma-arkki.
Älä koskaan käytä laitetta väärään tarkoitukseen
ja käytä ainoastaan alkuperäisosia / -lisävarus-
teita. Muiden kuin käyttöohjeessa suositeltujen
osien tai muiden varusteiden käyttö voi merkitä
tapaturmavaaraa.
Annan päältä kytketyn laitteen pysähtyä täysin,
ennen kuin panet sen säilöön.
Laitteen on aina oltava puhdas, kuiva ja öljytön
tai rasvaton.
Q
Käyttöönotto
VARO! Varmista, että laite on kytketty päältä
ennen kuin liität sen virtalähteeseen.
Vinkki! Kytke kolmiohiomakone päälle aina en-
nen kuin se joutuu kosketuksiin materiaalin kanssa
ja vie se vasta sitten työstettävän kappaleen pinnalle.
Laitteen kytkeminen päälle:
Paina PÄÄLLE- / POIS-kytkin
8
asentoon “I“.
Laitteen kytkeminen pois päältä:
Paina PÄÄLLE- / POIS-kytkin
8
asentoon “0“.
Q
Pölynpoisto
PALOVAARA! Kun työsken-
nellään sähkölaitteilla, joissa on pölylaatikko tai
jotka voidaan yhdistää pölynpoistolla pölynimuriin,
uhkaa palovaara! Epäsuotuisissa olosuhteissa kuten
esim. kipinöiden lentäessä, hiottaessa metallia tai
metallin rippeitä puussa, voi puupöly pölysäkissä (tai
pölynimurin pölypussissa) syttyä itsestään palamaan.
Tämä voi tapahtua etenkin silloin, jos puupölyyn on
sekoittunut maalin tähteitä tai muita kemiallisia aineita
ja hiottava kappale on pitkän työskentelyn jälkeen
kuuma. Vältä siitä syystä ehdottomasti työstettävän
kappaleen ja laitteen ylikuumenemista ja tyhjennä

18 FI
Huolto ja puhdistus / Huolto / Takuu / Hävittäminen
Käyttöönotto / Huolto ja puhdistus
pölylaatikko tai pölynimurin pölypussi aina ennen
työtaukoja.
Käytä pölynsuojanaamaria!
Ennen kuin teet laitteessa töitä,
vedä aina verkkopistoke pistorasiasta.
Q
Pölyrasia pölynimuun
Liittäminen:
Työnnä pölykotelo imua varten
4b
käsihioma-
koneeseen vasteeseen asti.
Poisotto:
Paina oman imulaitteen
4b
pölynkeruulaatikon
vapautuspainiketta
5
ja vedä se takakautta pois.
Huomautus: Tehokkaan imemisen varmistamiseksi
tyhjennä pölykotelo
4b
ajoissa.
Ota pölykotelo
4b
yllä esitetyn kuvauksen mu-
kaisesti ulos laitteesta. Avaa pölykotelo kiinnik-
keestä vetämällä
4a
ja ota kansi pois. Puhdista
sen jälkeen molemmat osat perusteellisesti ko-
puttelemalla.
Q
Supistuskappale
Liitäntä:
Työnnä supistuskappale
3
adapteriliitännälle
2
.
Työnnä hyväksytyn pölynimurin (esim. tehdas-
pölynimurin letku) supistuskappaleelle
3
.
Poisotto:
Vedä pölynimulaitteen letku pois supistuskap-
paleelta
3
.
Vedä supistuskappale
3
pois.
Q
Hioma-arkin kiinnitys / irrotus
Ennen kuin teet töitä laitteessa,
vedä aina verkkopistoke pistorasiasta.
Kiinnitys:
Voit kiinnittää hioma-arkin tarran avulla
hiomalaikkaan
7
.
Irrotus:
Vedä hioma-arkki irti hiomalaikasta
7
(katso kuva C).
Q
Hiomalevyn pyörittäminen
Ennen kuin teet töitä laitteessa,
vedä aina verkkopistoke pistorasiasta.
Käännä hiomalevy
7
haluttuun asentoon
(katso kuva D).
Aineen poistaminen ja pinta:
Aineenpoistotehon ja pinnan hyvyyden määrää
hiomalehden rakeisuus.
Ota huomioon, että tarvitset eri materiaalien
työstöön juuri niihin sopivia hioma-arkkeja.
Q
Työvinkkejä
Vie laite päälle kytkettynä työstettävälle
kappaleelle.
Työskentele vähäisellä kosketuspaineella.
Työskentele tasaisella syötöllä.
Vaihda hioma-arkit ajoissa.
Älä koskaan hio samalla hioma-arkilla erilaisia
materiaaleja (esim. puuta ja sen jälkeen metal-
lia). Ainoastaan moitteettomilla hioma-arkeilla
saavutat hyviä hiontatuloksia.
Puhdista hioma-arkki välillä pölynimurilla.
Hio vaikeasti saavutettavat paikat hiomalevyllä
7
olevan hiomalehden etureunalla tai sivureu-
nalla.
Suorita hiontatapahtuma yhdensuuntaisesti ja
limitetysti hiontaradoille.
Nosta laite työstön jälkeen irti työstökappaleesta
ja katkaise sitten laitteesta virta.
Q
Huolto ja puhdistus
Ennen kuin teet töitä laitteessa,
vedä aina verkkopistoke pistorasiasta.

19 FI
Huolto ja puhdistus / Huolto / Takuu / Hävittäminen
Kolmiohiomakone on huoltovapaa.
Puhdista laite välittömästi työn päätettyäsi.
Käytä kotelon puhdistukseen kuivaa liinaa.
Poista laitteeseen tarttunut hiomapöly sutilla.
Älä käytä missään tapauksessa teräviä esinei-
tä, bensaa, liuotusaineita tai puhdistusaineita,
jotka syövyttävät muovia. Laitteen sisään ei saa
päästää vettä.
Pidä tuuletusaukot
6
aina vapaina.
Q
Huolto
Anna laitteen huolto-
toimenpiteet pätevien ammattihenki-
löiden tehtäväksi. Käytä ainoastaan
alkuperäisiä varaosia. Näin varmistat
laitteen turvallisen toiminnan.
Laitteen pistokkeen tai
virtajohdon saa vaihtaa vain laitteen
valmistaja tai sen valtuuttama huolto-
piste. Näin varmistat laitteen turvallisen
toiminnan.
Q
Takuu
Laitteen takuu on 3 vuotta ostopäivästä.
Laite on valmistettu huolellisesti ja tarkis-
tettu tarkasti ennen toimitusta. Säilytä os-
tokuitti todisteeksi takuun voimassaolosta.
Ota takuutapauksessa puhelimitse yhteyt-
tä huoltopisteeseesi. Vain näin voidaan
taata tuotteesi maksuton lähettäminen
huoltoon.
Takuu koskee ainoastaan materiaali- ja valmistusvir-
heitä, ei kuitenkaan kuljetusvaurioita, kuluvia osia
tai herkästi vaurioituvien osien, esim. kytkinten tai
akkujen vaurioita. Tuote on tarkoitettu ainoastaan
yksityiseen, ei kaupalliseen käyttöön.
Väärä tai asiaton käyttö, väkivallan käyttö ja muiden
kuin valtuutetun huoltopisteen suorittamat korjaukset
aiheuttavat takuun raukeamisen. Tämä takuu ei ra-
joita kuluttajan lakisääteisiä oikeuksia.
Takuukorjaus ei pidennä takuuaikaa. Tämä koskee
myös vaihdettuja ja korjattuja osia. Mahdollisista jo
ostettaessa olemassa olevista vahingoista ja puut-
teista on ilmoitettava välittömästi pakkauksesta pur-
kamisen jälkeen, kuitenkin viimeistään kaksi päivää
ostopäiväyksen jälkeen. Takuuajan jälkeen suoritetut
korjaukset ovat maksullisia.
FI
Huolto Suomi
Tel.: 010309 3582
e-mail: k[email protected]i
IAN 70625
Q
Hävittäminen
Pakkaus on valmistettu ympäristöystäväl-
lisistä kierrätettävistä materiaaleista.
Älä hävitä sähkötyökaluja
talousjätteiden mukana!
Sähkölaitteiden hävittämistä koskevan EU-normin
2002 / 96 / EC mukaan käytöstä poistettuja sähkö-
laitteita hävitettäessä on huolehdittava materiaalien
erottelusta ja kierrätyksestä.
Lisätietoja antavat mm. paikalliset ympäristöviran-
omaiset.
Käyttöönotto / Huolto ja puhdistus

20 FI
Vaatimustenmukaisuusvakuutus / Valmistaja
Q
Vaatimustenmukaisuusvakuutus /
Valmistaja
Me, Kompernaß GmbH, dokumentoinnista vastaava:
herra Semi Uguzlu, Burgstr. 21, D-44867 Bochum,
Saksa, vakuutamme täten, että tämä tuote vastaa
seuraavia standardeja, normatiivisia dokumentteja
ja EY-direktiivejä:
Konedirektiivi
(2006 / 42 / EC)
Pienjännitedirektiivi
(2006 / 95 / EC)
Elektromagneettista yhteensopivuutta
koskevat direktiivit
(2004 / 108 / EC)
Sovelletut harmonisoidut normit
EN 60745-1/A11:2010
EN 60745-2-4:2009
EN 62233:2008
EN 55014-1/A1:2009
EN 55014-2/A2:2008
EN 61000-3-2/A2:2009
EN 61000-3-3:2008
ja vahvistamme tämän CE-merkinnällä.
Tyyppi / Merkki:
Käsihiomakone PHS 160 B2
Date of manufacture (DOM): 11–2011
Sarjanumero: IAN 70625
Bochum, 30.11.2011
Semi Uguzlu
- Laatumanageri -
Oikeudet teknisiin muutoksiin edelleenkehitysmieles-
sä pidätetään.
Innehållsförteckning
Sidan laddas...
Sidan laddas...
Sidan laddas...
Sidan laddas...
Sidan laddas...
Sidan laddas...
Sidan laddas...
Sidan laddas...
Sidan laddas...
Sidan laddas...
Sidan laddas...
Sidan laddas...
Sidan laddas...
Sidan laddas...
Sidan laddas...
Sidan laddas...
Sidan laddas...
Sidan laddas...
Sidan laddas...
Sidan laddas...
Sidan laddas...
Sidan laddas...
Sidan laddas...
Sidan laddas...
Sidan laddas...
Sidan laddas...
-
 1
1
-
 2
2
-
 3
3
-
 4
4
-
 5
5
-
 6
6
-
 7
7
-
 8
8
-
 9
9
-
 10
10
-
 11
11
-
 12
12
-
 13
13
-
 14
14
-
 15
15
-
 16
16
-
 17
17
-
 18
18
-
 19
19
-
 20
20
-
 21
21
-
 22
22
-
 23
23
-
 24
24
-
 25
25
-
 26
26
-
 27
27
-
 28
28
-
 29
29
-
 30
30
-
 31
31
-
 32
32
-
 33
33
-
 34
34
-
 35
35
-
 36
36
-
 37
37
-
 38
38
-
 39
39
-
 40
40
-
 41
41
-
 42
42
-
 43
43
-
 44
44
-
 45
45
-
 46
46


Parkside PHS 160 A1 Bruksanvisning
- Kategori
- Slipmaskiner
- Typ
- Bruksanvisning
- Denna manual är också lämplig för
på andra språk
Relaterade papper
-
Parkside PHS 160 A1 Operation and Safety Notes
-
Parkside PHS 160 B2 Operation And Safety Notes Translation Of Original Operation Manual
-
Parkside 88933 Operation and Safety Notes
-
Parkside XQ2 SE Användarmanual
-
Parkside PSS 250 A1 Operation and Safety Notes
-
Parkside PDS 290 A1 Bruksanvisning
-
-
Parkside PDS 290 B2 Operation and Safety Notes
-
Kompernass KH 3185 DELTA SANDER Användarmanual
-