Parkside PEBH 1010 Operating And Safety Instructions Manual
- Kategori
- Roterande hammare
- Typ
- Operating And Safety Instructions Manual
Denna manual är också lämplig för

GB / IE / CY Operating and safety instructions Page 5
FI Käyttö- ja turvaohjeet Sivu 15
SE Bruks- och säkerhetsanvisningar Sidan 25
DK Betjenings- og sikkerhedsvejledning Side 35
NO Bruks- og sikkerhetshenvisninger Side 45
GR / CY Υποδείξεις χειρισμού και ασφαλείας Σελίδα 55
DE / AT Bedienungs- und Sicherheitshinweise Seite 65
Kompernaß GmbH
Burgstraße 21
44867 Bochum
(Germany)
Last Information Update · Tietojen tila · Informationsstatus
Tilstand af information · Opplysningenes gyldighet
Έκδοση των πληροφοριών · Stand der Informationen:
04 / 2008 · Ident.-No.: PEBH1010042008-3
HAMMER DRILL
Klappen Sie vor dem Lesen die Seite mit den Abbildungen aus und machen Sie sich anschließend
mit allen Funktionen des Gerätes vertraut.
Before you begin reading this information, please unfold the page with the illustrations
and familiarize yourself with all functions of the tool.
Käännä ennen lukemista kuvasivu esiin ja tutustu kaikkiin laitteen toimintoihin.
Slå upp sidan med illustrationer innan du börjar läsa och bekanta dig sedan med apparatens alla
funktioner.
Klap siden med billederne ud, før du læser teksten, og lær derefter alle maskinens funktioner at kende.
Fold ut siden med bildene før du begynner å lese, og bli så kjent med alle funksjonene til apparatet.
Ανοίξτε πριν από την ανάγνωση τη σελίδα με τις εικόνες και εν συνεχεία εξοικειωθείτε με όλες τις
λειτουργίες της συσκευής.
KAIRAUSVASARA
Käyttö- ja turvaohjeet
SLAGBOREMASKINE
Betjenings- og sikkerhedsvejledning
ΠΕΡΙΣΤΡΟΦΙΚΟ ΠΙΣΤΟΛΕΤΟ
Υποδείξεις χειρισμού και ασφαλείας
HAMMER DRILL
Operation and Safety Notes
BOHRHAMMER
Bedienungs- und Sicherheitshinweise
BORRHAMMARE
Bruks- och säkerhetsanvisningar
BORHAMMER
Bruks- og sikkerhetshenvisninger
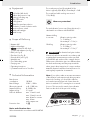
PEBH 1010

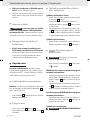
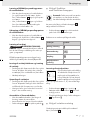
C D E
A B
3
8
9
7
5
6
10 21
4

5 GB/IE/CY
Table of content
Introduction
Intended Use ............................................................................................................ Page 6
Equipment ................................................................................................................. Page 7
Scope of Delivery ..................................................................................................... Page 7
Technical Information ............................................................................................... Page 7
General safety advice for electrical power tools
1. Workplace safety ................................................................................................ Page 8
2. Electrical safety .................................................................................................... Page 8
3. Personal safety ..................................................................................................... Page 8
4. Careful handling and use of electrical power tools ........................................... Page 9
Safety advice for hammer drill ................................................................................ Page 9
Attention! Service lines! ........................................................................................... Page 10
Original ancillaries / accessories ............................................................................ Page 10
Preparing for use
Assembling the Additional Handgrip ...................................................................... Page 10
Depth stop ................................................................................................................ Page 10
Inserting / Removing Tools ....................................................................................... Page 10
Quick action chuck for round-shank drills ............................................................... Page 10
Selecting the Function with the Function Selector Switch ....................................... Page 11
Selecting the Angle of Rotation ............................................................................... Page 12
Pre-selecting the Speed ............................................................................................ Page 12
Switching ON / OFF ................................................................................................ Page 12
Maintenance and Cleaning .......................................................................... Page 12
Disposal ........................................................................................................................... Page 12
Information
Service centre .......................................................................................................... Page 13
Declaration of conformity / Producer ...................................................................... Page 13
E3744_Hammer Drill_Content_LB3.indd 5 16.04.2008 8:26:20 Uhr

6 GB/IE/CY
Introduction
Pneumatic hammer drill with
chiselling action PEBH 1010
Q
Introduction
Please make sure you familiarise yourself
fully with the way the device works before
you use it for the first time and that you
understand how to handle electrical power tools
correctly. Further details can be found in the operating
instructions. Keep these instructions in a safe place.
If you pass the device on to anyone else, please
ensure that you also pass on all the documentation.
Q
Intended Use
The PEBH 1010 hammer drill is suitable for:
- hammer drilling in bricks, concrete and
natural stone
- drilling in wood, plastic and metal
- screwing in wood, plastic and metal
- chiselling in concrete, stone and plaster
Any other use of or changes to the device is consid-
ered to be inappropriate and harbours a consider-
able danger of accidents.
The manufacturer does not accept liability for damage
or losses occurring as a result of the device being
used for purposes other than those stated above.
The device is not intended for commercial use.
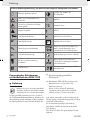
The following pictograms are used in these operating instructions / on the device:
Read instruction manual!
Device function selector switch
Observe caution and safety notes!
Chiselling
Caution – electric shock!
Danger to life!
Hammer drilling
Explosive material!
Drilling
Drill chuck, Made In Germany Chisel position adjuster
W
Watts (Effective power) Adjusting the chisel position
n
0
Rated idle running speed
Wear hearing protection, dust
protection mask, protective glasses
and protective gloves.
V
~
Voltage
Protect electrical power tools from
moisture!
Keep children away from electrical
power tools!
Check that the device, mains lead
and plug are in good condition!
Safety class II
Dispose packaging and appliance in
an environmentally-friendly way!
E3744_Hammer Drill_Content_LB3.indd 6 16.04.2008 8:26:21 Uhr

7 GB/IE/CY
Introduction
Q
Equipment
1
Tool holder (drill chuck)
2
Rubber dust protection cap
3
Locking / unlocking cap
4
ON / OFF switch
5
Locking button
6
Wheel for speed pre-selection
7
Clockwise / counter-clockwise switch
8
Function selector switch
9
Additional handgrip
10
Metal bit stop
Q
Scope of Delivery
1 Hammer drill
1 Additional handgrip
1
quick-action drill chuck
(13 mm) with adapter (see Fig. A)
3 Drills (see Fig. B)
1 Flat chisel (see Fig. B)
1 Pointed chisel (see Fig. B)
1 Metal bit stop
1 Tin of lubricating grease
1 Carrying case
1 Operating instructions
1 „Guarantee and Service“ booklet
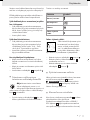
Q
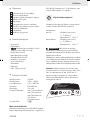
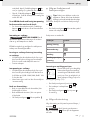
Technical Information
Rated power
consumption: 1010 W
Rated voltage: 230 V
~
, 50 Hz
Idle-running speed: n
0
0 - 1.100 / min
Impact frequency: 0 - 5.800 / min
Impact energy: 2.2 joules
Drill hole diameter: max. 13 mm for steel
max. 32 mm for wood
max. 26 mm for concrete
max. 82 mm
with compass saw
Protection class: II / &
Noise and vibration data:
Values determined in accordance with EN 60745.
The sound pressure level (A-weighted) of the
device is typically 99,6 dB (A). Uncertainty K = 3 dB.
The sound level while working can exceed
112,6 dB (A).
Wear ear protection!
The total vibration (vector sum of three directions) is
calculated in accordance with EN 60745:
Hammer drilling
in concrete: Vibration emission value
a
h
= 13.462 m / s
2
,
Uncertainty K = 1.5 m / s
2
Chiselling: Vibration emission value
a
h
= 12.320 m / s
2
,
Uncertainty K = 1.5 m / s
2
WARNING!
The vibration level given in these
instructions has been measured in accordance with
a standardised measurement procedure specified
in EN 60745 and can be used to compare devices.
Different uses of the device give rise to different vibra-
tion levels and in many cases they may exceed the
values given in these instructions. It is easy to underes-
timate the vibration load if the electrical power tool is
used regularly in particular circumstances.
Note: If you wish to make an accurate assessment
of the vibration loads experienced during a particu-
lar period of working, you should also take into
account the intervening periods of time when the
device is switched off or is running but is not actual-
ly in use. This can result in a much lower vibration
load over the whole of the period of working.
PEBH 1010
230 V
~
50 Hz · 1010 W · n
0
1.100 min
-1
Date of manufacture: 04-2008
KH 3162
Kompernaß GmbH · 44867 Bochum (Germany) · www.kompernass.com
E3744_Hammer Drill_Content_LB3.indd 7 16.04.2008 8:26:21 Uhr

8 GB/IE/CY
General safety advice for electrical power tools
General safety advice for
electrical power tools
WARNING!
Read all the safety advice
and instructions!
Failure to observe the safety advice and instructions
may result in electric shock, fire and / or serious injury.
KEEP ALL THE SAFETY ADVICE AND INSTRUCTIONS
IN A SAFE PLACE FOR FUTURE REFERENCE!
1. Workplace safety
a) Keep your working area clean and
well lit. Untidy or poorly lit working areas
can lead to accidents.
b)
Do not work with the device
in potentially explosive envi-
ronments in which there
are inflammable liquids, gases or
dusts. Electrical power tools create sparks,
which can ignite dusts or fumes.
c)
Keep children and other peo-
ple away while you are op-
erating the electrical tool.
Distractions can cause you to lose control of
the device.
2. Electrical safety
To avoid danger to life from
electric shock:
a)
The mains plug on the device must match
the mains socket. The plug must not
be modified in any way. Do not use
an adapter plug with devices fitted
with a protective earth. Unmodified
plugs and matching sockets reduce the risk of
electric shock.
b) Avoid touching earthed surfaces such
as pipes, radiators, ovens and refrig-
erators with any part of your body.
There is an increased risk of electric shock if
your body is earthed
.
c) Keep the device away from
rain or moisture. Water entering
an electrical device increases the
risk of electric shock.
d)
Do not use the mains lead for
any purpose for which it was
not intended, e.g. to carry the
device, to hang up the device or to pull
the mains plug out of the mains socket.
Keep the mains lead away from heat,
oil, sharp edges or moving parts of the
device. Damaged or tangled mains leads
increase the risk of electric shock.
e) When working outdoors with an
electrical power tool always use ex-
tension cables that are also approved
for use outdoors. The use of an extension
cable suitable for outdoor use reduces the risk
of electric shock.
f) Use a residual current device (RCD)
for protection if operating the electri-
cal power tool in a moist environment
is unavoidable. The use of an RCD reduces
the risk of electric shock.
3. Personal safety
a) Remain alert at all times, watch what
you are doing and always proceed
with caution. Do not use the device if
you are tired or under the influence of
drugs, alcohol or medication. One mo-
ment of carelessness when using the device
can lead to serious injury.
b)
Wear personal protective
equipment and always wear
safety glasses. The wearing of
personal protective equipment such as dust
masks, non-slip safety shoes, safety helmets or
ear protectors, appropriate to the type of elec-
trical power tool used and work undertaken,
reduces the risk of injury.
c) Avoid unintentional operation of the
device. Check that the electrical power
tool is switched off before you connect
it to the mains, pick it up or carry it.
E3744_Hammer Drill_Content_LB3.indd 8 16.04.2008 8:26:21 Uhr

9 GB/IE/CY
General safety advice for electrical power tools
Accidents can happen if you carry the device
with your finger on the ON / OFF switch or with
the device switched on.
d) Remove any setting tools or spanners
before you switch the device on. A tool
or spanner left attached to a rotating part of a
device can lead to injury.
e) Avoid placing your body in an unnat-
ural position. Keep proper footing
and balance at all times. By doing this
you will be in a better position to control the
device in unforeseen circumstances.
f) Wear suitable clothing. Do not wear
loose clothing or jewellery. Keep your
hair, clothing and gloves clear of mov-
ing parts. Loose clothing, jewellery or long
hair can become trapped in moving parts.
g) If vacuum dust extraction and collection
devices are fitted do not forget to
check
that they are properly connected
and
correctly used. The use of these devices re-
duces the hazard presented by dust.
4. Careful handling and use of
electrical power tools
a) Do not overload the device. Always
use an electrical power tool that is
intended for the task you are under-
taking. By using the right electrical power
tool for the job you will work more safely and
achieve a better result.
b) Do not use an electrical power tool if
its switch is defective. An electrical power
tool that can no longer be switched on and off
is dangerous and must be repaired.
c) Pull the mains plug from the socket
before you make any adjustments to
the device, change accessories or
when the device is put away. This pre-
caution is intended to prevent you from uninten-
tionally starting the device.
d) When not in use always ensure that
electrical power tools are kept out of
reach of children. Do not let anyone
use the device if he or she is not famil-
iar with it or has not read the instruc-
tions and advice. Electrical power tools are
dangerous when they are used by inexperi-
enced people.
e) Look after the device carefully. Check
that moving parts are working prop-
erly and move freely. Check for any
parts that are broken or damaged
enough to detrimentally affect the
functioning of the device. Have dam-
aged parts repaired before you use
the device. Many accidents have their origins
in poorly maintained electrical power tools.
f) Keep cutting tools clean and sharp.
Carefully maintained cutting tools with sharp
cutting edges are less likely to jam and are
easier to control.
g) Use the electrical power tool, accesso-
ries, inserted tools etc. in accordance
with these instructions and advice,
and the stipulations drawn up for this
particular type of device. In doing
this, take into account the working
conditions and the task in hand. The
use of electrical power tools for purposes other
than those intended can lead to dangerous
situations.
Safety advice
for hammer drill
J Wear ear protection. The effect
of noise can cause hearing loss.
J Use the auxiliary handle
9
supplied
with the device. Loss of control can lead to
injury.
J If the inserted tool jams, switch off the
electrical power tool immediately. Be
prepared for high reaction torques as they may
cause kickback.
J For your safety, the hammer drill
PEBH 1010 has been fitted with an
overload clutch. This ensures that the drive
is automatically disengaged if the drill bit jams.
Nevertheless, you must always keep proper
E3744_Hammer Drill_Content_LB3.indd 9 16.04.2008 8:26:21 Uhr

10 GB/IE/CY
General safety advice for electrical power tools / Preparing for use
footing and balance, hold the hammer drill
firmly with both hands and use the auxiliary
handle
9
.
J
Wear safety glasses and a
dust mask! POISONOUS
DUSTS! Working with harmful / noxious dusts
represents a risk to the health of the person op-
erating the device and to anyone near the
working area.
J Do not drill any material containing
asbestos. Asbestos is a known carcinogen.
J Do not allow the ventilation slots to become
covered while the device is operating. Do not
insert any objects into the ventilation slots.
Q
Attention! Service lines!
WARNING!
Take steps to ensure that
you do not hit upon any service lines
(electricity, gas, water) when working
with electrical appliances. Check, if need be
with a service line detector, before you start to cut
or bore into a surface.
Q
Original ancillaries / accessories
J Use only the ancillaries and accessories
that are detailed in the operating in-
structions. The use of ancillaries and acces-
sories other than those recommended in the
operating instructions could lead to an increased
risk of personal injury for you.
Q
Preparing for use
Note the mains voltage! The voltage of the
mains socket must match that shown on the rating
plate on the device (Devices marked with 230 V
~
can also be operated at 220 V
~
).
Q
Assembling the Additional
Handgrip
Note: For safety reasons this device may only be
used when the additional handgrip
9
is correctly
assembled (see also Fig. D, E).
j Attach the additional handgrip
9
to the spindle
neck and turn it in an anticlockwise direction
until it is tight.
Q
Depth stop
j Setting the depth stop
10
in the auxiliary han-
dle
9
.
j Set the required drilling depth by sliding the
depth stop
10
.
Q
Inserting / Removing Tools
Inserting a Tool:
j Before inserting the tool, apply a small amount
of grease to the tool holder
1
.
j In order to insert the tool, pull the locking / un-
locking cap
3
to the rear and insert the tool.
j Release the locking / unlocking cap
3
. This
locks the tool holder in place. Pull the tool to
ensure that it is firmly locked in place. The tool
has some radial play inherent in the system.
Removing a Tool:
j In order to remove the tool, pull the locking /
unlocking cap
3
to the rear.
Q
quick action chuck
for round-shank drills
WARNING!
Do not use the round-shank drill
for hammer drilling or chiselling work!
j Set the function selector switch
8
to the drill
symbol
.
E3744_Hammer Drill_Content_LB3.indd 10 16.04.2008 8:26:21 Uhr

11 GB/IE/CY
Preparing for use
Inserting the RÖHM Quick-Action Drill
Chuck for Round-Shank Drills:
j To insert the additional drill chuck for round-
shank drills (see also Fig. A), pull the locking /
unlocking cap
3
towards the rear and insert
the additional drill chuck.
j Release the locking / unlocking cap
3
. This
locks the tool holder in place. Pull the tool to
ensure that it is firmly locked in place.
Removing the RÖHM Quick-Action Drill
Chuck for Round-Shank Drills:
j In order to remove the additional drill chuck,
pull the locking / unlocking cap
3
towards the
rear and take out the additional drill chuck.
Inserting Tools:
WARNING!
DANGER OF INJURY! Before
making any modifications to the device ensure that
it is switched off and that the mains plug has been
removed from the socket.
The RÖHM quick-action drill chuck allows you to
change the tool quickly without any additional
implements.
Releasing the tool holder and inserting
a tool:
j Hold the rear sleeve of the quick-action drill
chuck tightly and turn the front sleeve until it is
wide enough for the tool (e.g. round-shank
drill) to be inserted.
j Then insert the tool.
Clamping the Tool:
j Hold the rear sleeve of the quick-action drill
chuck tightly and turn the front sleeve forcefully
until you hear a repeated clicking noise. The
drill chuck is now locked in place.
j The lock can be released again by turning the
front sleeve in the opposite direction.
Using Assembly Tools for Screws and Nuts:
j Use an appropriate bit holder if you would like
to use screwdriver inserts / bits for screwing.
j You should only use inserts / bits which fit the
screw head.
j Turn the function selector switch
8
to the drill
symbol
.
Q
Selecting the Function with the
Function Selector Switch
Note: The function must only be changed
when the device is switched off, as oth-
erwise it may be damaged. Depending
on the intended use, you can select between four
functions by turning the function selector switch
8
.
j Turn the function selector switch
8
so that the
desired symbol locks into place next to the
arrow mark.
The functions are marked as follows:
Function Symbol
Drilling / screwing
Hammer drilling
Chiselling
Chisel position
adjustment
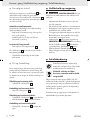
Adjusting the Chisel Position:
This function makes chiselling work
considerably easier by the setting of
individual angle positions for the
chisel. This enables you to turn the
tool for the chiselling work (see
also Fig. C, D) to the required position.
j Turn the function selector switch
8
to the
position
.
j Turn the tool in the tool holder
1
to the re-
quired position.
j For the chiselling work turn the function selector
switch
8
to the position .
E3744_Hammer Drill_Content_LB3.indd 11 16.04.2008 8:26:22 Uhr

12 GB/IE/CY
Preparing for use / Maintenance and Cleaning / Disposal
Q
Selecting the Angle of Rotation
Select the direction of rotation by setting the rotation
direction switch
7
.
WARNING!
Do not use or set the rotation
direction switch
7
unless the device has come to a
standstill.
Q
Pre-selecting the Speed
With the wheel on the speed pre-selector
6
you
can pre-select the operating speed to your individu-
al requirements.
If a low speed has been pre-selected, the ON / OFF
switch
4
is automatically restricted in the extent to
which it can be pulled back (due to the reduced
speed of rotation).
Recommended speed ranges:
(non-binding; if necessary, you should determine
the correct setting by a practical test):
- High-speed: for hammer drilling in concrete or
stone and for chiselling
- Medium speed: for drilling into steel or wood
- Low speed: for screwing
Low speed / high speed:
j Turn the wheel for speed pre-selection
6
.
The ON / OFF switch
4
has a variable speed
control.
j By pressing the switch you can increase the
speed continuously.
Q
Switching ON / OFF
When operating the hammer drill you can choose
between temporary and permanent operation. Use
the temporary operation for small jobs and perma-
nent operation for long jobs. Your desired setting is
operated as follows:
Switching on temporary operation:
j Press the ON / OFF switch
4
.
Switching off temporary operation:
j Release the ON / OFF switch
4
.
Switching on permanent operation:
j Press the ON / OFF switch
4
and lock it in the
on position by means of the locking button
5
.
Switching off permanent operation:
j Press the ON / OFF switch
4
and release it
again.
Q
Maintenance and Cleaning
WARNING!
DANGER OF INJURY!
Always pull the mains plug out of the socket before
doing any work on the device.
j Always keep the device clean, dry and free of
oil or grease.
j No liquids must be allowed to enter the hammer
drill.
j Clean the hammer drill regularly, preferably
always immediately after finishing your work.
j Please use a dry cloth for cleaning the housing.
Under no circumstances should you use petrol,
solvent or cleaning agents which might attack
the plastic.
j Clean the tool holder
1
regularly.
CAUTION! UNDER TENSION! To do so,
pull the locking / unlocking cap
3
towards the
rear and lever off the rubber dust protection
cap
2
. Release the locking / unlocking cap
3
slowly.
j Clean the components with a brush and apply
a small amount of grease to them.
Q
Disposal
The packaging is wholly composed of
environmentally-friendly materials that can
be disposed of at a local recycling centre.
Do not dispose of electrical
power tools with the household
rubbish!
E3744_Hammer Drill_Content_LB3.indd 12 16.04.2008 8:26:22 Uhr

13 GB/IE/CY
Disposal / Information
In accordance with European Directive
2002 / 96 / EC (covering waste electrical and elec-
tronic equipment) and its transposition into national
legislation, worn out electrical power tools must be
collected separately and taken for environmentally
compatible recycling.
Contact your local refuse disposal authority for
more details of how to dispose of your worn out
electrical devices.
Q
Information
Q
Service centre
The service centre for your country is shown in the
warranty documentation.
WARNING!
Have your device repaired
only by qualified specialist personnel
using original manufacturer parts only.
This will ensure that your device remains safe
to use.
WARNING!
If the plug or mains lead
needs to be replaced, always have the
replacement carried out by the manu-
facturer or its service centre. This will
ensure that your device remains safe to use.
Q
Declaration of conformity /
Producer
We, Kompernaß GmbH, Burgstr. 21,
44867 Bochum, Germany, hereby declare that this
product complies with the following EU directives:
Machinery Directive (98 / 37 / EG)
EU Low Voltage Directive (2006 / 95 / EG)
Electromagnetic Compatibility
(2004 / 108 / EG)
Type / Description of product:
Parkside Pneumatic hammer drill with chiselling
action PEBH 1010
Bochum, 30.04.2008
Hans Kompernaß
- Managing Director -
We reserve the right to make technical modifications in the course
of further development.
E3744_Hammer Drill_Content_LB3.indd 13 16.04.2008 8:26:22 Uhr

14
E3744_Hammer Drill_Content_LB3.indd 14 16.04.2008 8:26:22 Uhr

15 FI
Sisällysluettelo
Johdanto
Määräystenmukainen käyttö ....................................................................................Sivu 16
Varustus ......................................................................................................................Sivu 17
Toimituslaajuus ...........................................................................................................Sivu 17
Tekniset tiedot ............................................................................................................Sivu 17
Sähkötyökaluja koskevat yleiset turvaohjeet
1. Työpaikkaturvallisuus ............................................................................................Sivu 18
2. Sähköturvallisuus...................................................................................................Sivu 18
3. Henkilöiden turvallisuus ........................................................................................Sivu 18
4. Sähkötyökalujen huolellinen käsittely ja käyttö ...................................................Sivu 19
Poravasaroiden turvaohjeet ......................................................................................Sivu 19
Huomio johdot! .........................................................................................................Sivu 20
Alkuperäiset tarvikkeet / lisälaitteet ..........................................................................Sivu 20
Käyttöönotto
Lisäkäsikahvan asentaminen .....................................................................................Sivu 20
Syvyysvaste ................................................................................................................Sivu 20
Työkalujen paikoilleen laitto / pois ottaminen ..........................................................Sivu 20
Pyörövarsiporan pikaistukka .....................................................................................Sivu 20
Toiminnon valitseminen toiminnon valintakytkimellä ...............................................Sivu 21
Pyörimissuunnan valinta ............................................................................................Sivu 21
Kierrosluvun esivalinta ...............................................................................................Sivu 21
Päälle- ja irtikytkentä .................................................................................................Sivu 22
Huolto ja puhdistus ............................................................................................... Sivu 22
Hävittäminen .............................................................................................................. Sivu 22
Tietoja
Huolto ........................................................................................................................Sivu 23
Yhdenmukaisuus / Valmistaja ....................................................................................Sivu 23
E3744_Hammer Drill_Content_LB3.indd 15 16.04.2008 8:26:22 Uhr

16 FI
Johdanto
Talttaustoiminnolla varustettu
paineilmakäyttöinen poravasara
PEBH 1010
Q
Johdanto
Perehdy ennen ensimmäistä käyttöönottoa
laitteen toimintoihin ja tutustu sähkötyö-
kalun oikeaan käyttöön. Lue tämän
lisäksi seuraava käyttöohje. Säilytä tämä ohje hyvin.
Siirrä myös kaikki asiakirjat mukana siinä tapauksessa,
että laite toimitetaan kolmannelle osapuolelle.
Q
Määräystenmukainen käyttö
Poravasaralle PEBH 1010 sopiva käyttö:
- Tiilen, betonin ja luonnon kiven
vasaraporaaminen
- Puuhun, muoviin ja metalliin poraaminen
- Puuhun, muoviin ja metalliin ruuvaaminen
- Betonin, kiven ja rappauksen talttaaminen
Kaikki muu käyttö tai muuttaminen on määräystenvas-
taista ja aiheuttaa huomattavan onnettomuusvaaran.
Määräystenvastaisesta käytöstä syntyneistä vaihin-
goista valmistaja ei ota mitään vastuuta.
Laitetta ei ole tarkoitettu ammattikäyttöön.
Tässä käyttöohjeessa / laitteessa käytetään seuraavia kuvakkeita:
Lue käyttöohje! Kytkin laitteen toiminnon valintaa varten
Huomioi varoitus- ja turvaohjeet!
Talttaus
Varo sähköiskua! Hengenvaara!
Vasaraporaus
Räjähdysvaara!
Poraus
Poraistukka, Made In Germany Taltan aseman säätö
W
Watti (Vaikutusteho) Taltan aseman säätäminen
n
0
Mittaus-tyhjäkäyntikierrosluku
Käytä aina laitteella työskennellessäsi
suojalaseja, kuulo- ja hengityssuojaimia
sekä asianmukaisia työkäsineitä.
V
~
Voltti (Vaihtojännite)
Suojaa sähkötyökalua kosteudelta!
Pidä lapset loitolla sähkötyökalusta!
Pidä silmällä, ovatko laite, verkkojohto ja
verkkopistoke moitteettomassa kunnossa!
Suojausluokka II
Hävitä pakkaus ja laite
ympäristöystävällisesti!
E3744_Hammer Drill_Content_LB3.indd 16 16.04.2008 8:26:23 Uhr

17 FI
Johdanto
Q
Varustus
1
Työkalun kiinnitys (Poran istukka)
2
Pölynsuoja- kumivaippa
3
Lukituksen / lukituksesta päästön vaippa
4
PÄÄLLE / POIS -kytkin
5
Lukitusnuppi
6
Asetusratas kierrosluvun esivalintaan
7
Oikealle / vasemmalle pyörimisen kytkin
8
Toiminnon valintakytkin
9
Lisäkäsikahva
10
Metallinen syvyysvaste
Q
Toimituslaajuus
1 poravasara
1 lisäkäsikahva
1
-Pikakiinnitysporan istukka (13 mm)
adapterin kanssa (katso kuva A)
3 poraa (katso kuva B)
1 litteä taltta (katso kuva B)
1 kärkitaltta (katso kuva B)
1 metallinen syvyysvaste
1 rasia voitelurasvaa
1 kantolaukku
1 käyttöohje
1 vihko ”Takuu ja huolto“
Q
Tekniset tiedot
Nimellisottoteho: 1010 W
Nimellisjännite: 230 V
~
, 50 Hz
Joutokäyntinopeus: n
0
0 - 1.100 / min.
Iskutaajuus: 0 - 5.800 / min.
Iskuenergia: 2,2 joulia
Porauksen halkaisija: max. 13 mm teräkseen
max. 32 mm puuhun
max. 26 mm betoniin
max. 82 mm
pistosahan kanssa
Suojausluokka: II / &
Melu- ja tärinätiedot:
Mittausarvot määritetty normin EN 60745 mukaan.
Laitteen A-painotettu äänenpainetaso on tyypillisesti
99,6 dB (A). Epävarmuus K = 3 dB. Melutaso saat-
taa työn aikana ylittää 112,6 dB (A).
Käytä kuulosuojaimia!
Värähtelyn kokonaisarvot (kolmen suunnan vektori-
summa) selvitetty EN 60745:n mukaisesti:
Vasaraporaus
betoniin: Värähtelyn emissioarvo
a
h
= 13,462 m / s
2
,
Epävarmuus K = 1,5 m / s
2
Kaivertaminen: Värähtelyn emissioarvo
a
h
= 12,320 m / s
2
,
Epävarmuus K = 1,5 m / s
2
VAROLTUS!
Näissä ohjeissa ilmoitettu
värähtelytaso on määritetty normissa EN 60745
standardoidulla mittausmenetelmällä ja sitä voidaan
käyttää laitevertailussa.
Värähtelytaso muuttuu sähkötyökalun käytön mukaan
ja se saattaa monesti ylittää tässä ohjeessa mainitun
arvon. Värähtelyrasitusta saatetaan aliarvioida, jos
sähkötyökalua säännöllisesti käytetään tällä tavalla.
Huomio: Liikekuormituksen arvioimiseksi tietyn
työajan kestäessä on huomioitava myös ajat, jolloin
laite on sammutettuna, tai ajat, jolloin laite on
käynnissä, mutta ei työkäytössä. Tämä saattaa
vähentää merkittävästi liikerasitusta kokonaistyös-
kentelyajan kestäessä.
PEBH 1010
230 V
~
50 Hz · 1010 W · n
0
1.100 min
-1
Date of manufacture: 04-2008
KH 3162
Kompernaß GmbH · 44867 Bochum (Germany) · www.kompernass.com
E3744_Hammer Drill_Content_LB3.indd 17 16.04.2008 8:26:23 Uhr

18 FI
Sähkötyökaluja koskevat yleiset turvaohjeet
Sähkötyökaluja koskevat
yleiset turvaohjeet
VAROLTUS!
Lue kaikki turva- ja muut
ohjeet!
Turva- ja muiden ohjeiden laiminlyönti voi aiheuttaa
sähköiskun, tulipalon ja / tai vakavia loukkaantumisia.
SÄILYTÄ KAIKKI TURVA- JA MUUT OHJEET
TULEVAA TARVETTA VARTEN!
1. Työpaikkaturvallisuus
a) Pidä työskentelypaikka puhtaana ja
hyvin valaistuna. Epäjärjestys ja huono
valaistus voivat johtaa tapaturmiin.
b)
Älä käytä laitetta räjähdys-
vaarallisessa ympäristössä,
jossa säilytetään helposti
syttyviä nesteitä, kaasuja tai jossa
kehittyy pölyä. Sähkötyökalut kehittävät
kipinöintiä, joka voi sytyttää pölyn tai höyryn.
c)
Lapsien ja asiattomien henki-
löiden läsnäolo työpaikalla
laitteen ollessa käynnissä ei
ole sallittua. Voit helposti menettää kontrol-
lin laitteeseen.
2. Sähköturvallisuus
Vältä sähköiskun aiheuttamaa
hengenvaaraa:
a) Laitteen pistokkeen pitää sopia pisto-
rasiaan. Pistoketta ei saa muuttaa
millään tavalla. Älä käytä adapteria
yhdessä suojamaadoitettujen laittei-
den kanssa. Alkuperäinen pistoke ja sopivat
pistorasia vähentävät sähköiskuvaaraa.
b) Vältä kosketusta maadoitettuihin pin-
toihin, kuten putkiin, lämpöpatterei-
hin, liesiin sekä jääkaappeihin. Vaarana
on saada sähköisku, jos kehosi on maadoitettu.
c)
Älä pidä laitetta sateessa tai
muussa kosteudessa. Veden pää-
sy laitteeseen lisää sähköisku vaaraa.
d) Älä kanna laitetta riiputta-
malla sitä kaapelista ja vedä
kaapeli irti pistorasiasta
p itämällä kiinni pistokkeesta. Älä jätä
kaapelia kuumaan paikkaan, älä
päästä siihen öljyä, varo teräviä reu-
noja sekä laitteen pyöriviä osia.
Vialliset tai kietoutuneet kaapelit lisäävät riskiä
saada sähköisku.
e) Jos työskentelet ulkotiloissa, käytä
silloin jatkokaapelia, jonka käyttö on
sallittu myös ulkotilaan. Ulkotilaan sovel-
tuva kaapeli vähentää riskiä saada
sähköisku.
f) Jos sähkötyökalua joudutaan käyttä-
mään kosteassa ympäristössä,
on käytettävä vikavirtakytkintä.
Vikavirtakytkimen käyttö pienentää sähköiskun
vaaraa.
3. Henkilöiden turvallisuus
a) Ole aina tarkkaavainen, tarkista
aina, mitä teet ja toimi järkevästi säh-
kölaitteilla työskennellessäsi. Älä
käytä laitetta, jos olet väsynyt, käyt-
tänyt huumeita, alkoholia tai lääkkei-
tä. Epätarkkaavaisuus laitetta käytettäessä voi
aiheuttaa vaikeita loukkaantumisia.
b)
Käytä henkilökohtaisia tur-
vavarusteita ja suojalaseja
aina. Henkilökohtaisten turvavarus-
teiden käyttö, kuten pölynaamari, turvakengät,
kypärä tai kuulosuoja, vähentävät loukkaantu-
misriskiä.
c) Varo käynnistämästä laitetta vahin-
gossa. Varmista, että sähkötyökalu
on kytketty pois päältä, ennen kuin
liität sen pistorasiaan, nostat sen tai
kannat sitä. Tapaturmat ovat mahdollisia,
jos sormesi on laitetta kantaessasi virtakytkimel-
lä tai laite on kytketty päälle.
E3744_Hammer Drill_Content_LB3.indd 18 16.04.2008 8:26:23 Uhr

19 FI
Sähkötyökaluja koskevat yleiset turvaohjeet
d) Poista kaikki työkalut ja ruuviavaimet
paikalta ennen kuin kytket laitteen.
Pyörivässä laiteosassa oleva työkalu tai avain
voi johtaa tapaturmaan.
e) Vältä työskentelemästä epätavalli-
sessa asennossa. Asetu tukevaan
asentoon ja pysyttele koko ajan
tasapainossa. Pystyt silloin hallitsemaan lait-
teen erityisesti yllättävissä tilanteissa.
f) Käytä sopivaa vaatetusta. Älä käytä
löysiä vaatteita äläkä pidä koruja.
Hiukset, vaatteet ja käsineet on pidet-
tävä etäällä liikkuvista osista.
Löysät vaatteet, korut ja avonaiset hiukset voi-
vat jäädä kiinni liikkuviin osiin.
g) Jos laitteeseen asennetaan pölynimu-
ri- ja lastunkeruulaite, varmistu sitä
ennen, että osat on liitetty ja niitä käy-
tetään oikein. Näiden laitteiden liittäminen
vähentää pölystä aiheutuvia vaaroja.
4. Sähkötyökalujen huolellinen
käsittely ja käyttö
a) Älä ylirasita laitetta. Käytä työssäsi
tätä työtä varten tarkoitettua sähkö-
työkalua. Sopivan sähkötyökalun kanssa
työskentelet paremmin ja varmemmin sen teho-
alueella.
b) Älä käytä mitään sähkötyökalua, jon-
ka käynnistyskytkin on viallinen. Säh-
kötyökalu, jota ei voi enää kytkeä päälle tai
päältä, on vaarallinen ja se on korjattava.
c) Irrota pistotulppa pistorasiasta, en-
nen kuin säädät laitetta, vaihdat sen
varusteita tai laitat sen varastoon.
Nämä varotoimenpiteet estävät sen, että laite
käynnistyy vahingossa.
d) Säilytä sähkötyökaluja silloin, kun nii-
tä ei käytetä, lasten ulottumattomis-
sa. Älä anna henkilöiden käyttää lai-
tetta, jos he eivät tunne sitä tai
eivät ole lukeneet näitä käyttöohjeita.
Sähkötyökalut ovat vaarallisia, jos kokemattomat
henkilöt käyttävät niitä.
e) Hoida laitetta huolellisesti. Tarkasta,
toimivatko sen liikkuvat osat moit-
teettomasti ja että ne eivät jumitu;
tarkasta, onko joku osa katkennut tai
murtunut tai vahingoittunut niin, että
se haittaa laitteen toimintaa. Korjau-
ta vialliset osat aina ennen kuin käy-
tät laitetta. Moni tapaturma
johtuu huonosti huolletuista sähkötyökaluista.
f) Pidä terät terävinä ja puhtaina.
Huolella hoidetut leikkuuterät terävine leikkuu-
reunoineen eivät juutu niin helposti kiinni
työkappaleeseen ja ne toimivat kevyemmin.
g) Käytä sähkötyökaluja, lisätarvikkei-
ta, käyttötarvikkeita jne. tässä esitet-
tyjen määräysten mukaisesti ja aina
erityistä tyyppiä vastaavasti.Ota
huomioon työolosuhteet ja työ.Sähkö-
työkalujen käyttö muuhun kuin sille määrättyyn
tarkoitukseen voi aiheuttaa vaarallisia
tilanteita.
Poravasaroiden
turvaohjeet
J Pidä kuulonsuojainta. Melu
voi johtaa kuulon huononemiseen.
J Käytä laitteen mukana toimitettua
kahvaa
9
. Hallinnan menettäminen voi joh-
taa loukkaantumisiin.
J Katkaise sähkötyökalusta välittömästi
virta, jos työkalu lukittuu. Varaudu suuriin
vastamomentteihin, jotka aiheuttavat takaiskun.
J Poravasara PEBH 1010 on turvalli-
suussyistä varustettu ylikuormituskyt-
kimellä. Se saa aikaan käyttölaitteen pysäh-
tymisen automaattisesti, kun poraustyökalu
juuttuu kiinni. Huolehdi siitä huolimatta tukevasta
asennosta, pidä kiinni poravasarasta molemmin
käsin ja käytä aina lisäkahvaa
9
.
J
Käytä suojalaseja ja hengi-
tyssuojainta! MYRKYLLISIÄ
PÖLYJÄ! Haitallisten / myrkyllisten pölyjen
syntyminen vaarantaa laitetta käyttävän henkilön
tai lähellä olevien henkilöiden turvallisuuden.
E3744_Hammer Drill_Content_LB3.indd 19 16.04.2008 8:26:23 Uhr

20 FI
Sähkötyökaluja koskevat yleiset turvaohjeet / Käyttöönotto
J Älä työstä asbestia sisältävää materi-
aalia. Asbesti aiheuttaa syöpää.
J Varmista, että ilmaraot eivät ole tukossa laitteen
käytön aikana. Älä työnnä ilmarakoihin mitään
esineitä.
Q
Huomio johdot!
VAROLTUS!
Varmista, ettet osu sähkö-,
kaasu- tai vesijohtoihin sähkötyökalulla
työskennellessäsi. Tarkasta tarvittaessa johtoil-
maisimella, ennen kuin poraat tai leikkaat seinää.
Q
Alkuperäiset tarvikkeet /
lisälaitteet
J Käytä ainoastaan käyttöohjeessa
ilmoitettuja tarvikkeita ja lisälaitteita.
Muiden kuin käyttöohjeessa suositeltujen käyt-
tötyökalujen tai muiden tarvikkeiden käyttö
saattaa merkitä loukkaantumisvaaraa.
Q
Käyttöönotto
Huomioi syöttöjännite! Jännitteen täytyy
vastata laitteen tyyppikilven tietoja (laitteet, joissa
on merkintä 230 V
~
, voidaan liittää myös 220 V
~
merkinnällä varustettuun jännitteeseen).
Q
Lisäkäsikahvan asentaminen
Huomio: Turvallisuussyistä tätä laitetta saa käyttää
vain asianmukaisesti asennetulla lisäkahvalla
9
(katso myös kuvat D, E).
j Pistä lisäkahva
9
karakavennukseen ja kierrä
tiukkaan vastapäivään.
Q
Syvyysvaste
j Aseta syvyysvaste
10
kahvaan
9
.
j Valitse haluttu poraussyvyys syvyysvastetta
10
siirtämällä.
Q
Työkalujen paikoilleen laitto /
pois ottaminen
Työkalun paikoilleen laitto:
j Voitele ennen työkalun paikoilleen laittoa työka-
lun kiinnitys
1
kevyesti.
j Vedä paikoilleen asentamiseksi lukituksen /
lukituksesta päästön vaippaa
3
taakse ja laita
työkalu sisään.
j Vapauta lukituksen / lukituksesta päästön vaip-
pa
3
. Sillä tavoin vastaanotto lukittuu. Tarkasta
moitteeton lukitus vetämällä työkalua. Työkalulla
on järjestelmästä riippuvainen säteittäinen välys.
Työkalun poistaminen:
j Vedä työkalun poistamiseksi samoin lukituksen /
lukituksesta päästön vaippaa
3
taaksepäin.
Q
-Pyörövarsiporan
pikaistukka
VAROLTUS!
Älä käytä pyörövarsiporaa
vasarapora- tai talttakäytössä!
j Aseta toiminnon valintakytkin
8
poran symbo-
lin
kohdalle.
RÖHM-Pyörövarsiporan pikakiinnityspora-
nistukan asentaminen:
j Vedä pyörövarsiporan lisäporanistukan asenta-
miseksi (katso kuva A) lukituksen / lukituksesta
päästön vaippa
3
taakse ja asenna lisäpora-
nistukka.
j Vapauta lukituksen / lukituksesta päästön vaip-
pa
3
. Sillä tavoin vastaanotto lukittuu. Tarkasta
moitteeton lukitus vetämällä lyökalua.
Pyörövarsiporan RÖHM-pikakiinnityspora-
nistukan poistaminen:
j Vedä lisäporanistukan poistamiseksi lukituksen /
lukituksesta päästön vaippaa
3
taaksepäin ja
poista lisäporanistukka.
Työkalujen asentaminen:
VAROLTUS!
LOUKKAANTUMISVAARA!
E3744_Hammer Drill_Content_LB3.indd 20 16.04.2008 8:26:23 Uhr

21 FI
Käyttöönotto
Varmistu ennen kaikkea laitteen kanssa työskentelyä,
että laite on irtikytkettynä ja pistoke vedettynä pois.
RÖHM-pikakiinnitysporanistukka mahdollistaa no-
pean työkalun vaihdon ilman lisäapuvälineitä.
Työkalukiinnityksen avaaminen ja työka-
lun sisäänpano:
j Pidä pikakiinnitysporanistukan taaemmasta
hylsystä kiinni ja pyöritä etummaista hylsyä niin
kauas, kunnes työkalu (esim. pyörövarsipora)
voidaan laittaa sisään.
j Aseta työkalu sisään.
Työkalun kiinnittäminen:
j Pidä pikakiinnitysporanistukan taaemmasta
hylsystä kiinni ja pyöritä etummaista hylsyä
voimakkaasti, kunnes kuuluu ”click – clack,
clack clack“. Poranistukka on nyt lukittu.
j Avaa lukitus jälleen pyörittämällä etummaista
hylsyä vastakkaissuuntaan.
Ruuvityökalujen käyttäminen:
j Käytä vastaavaa teränpidikettä, kun haluat
käyttää ruuvaamiseen ruuvimeisselisisäkkeitä /
-kärkiä.
j Käytä ainoastaan ruuvinkantaan sopivia sisäk-
keitä / kärkiä.
j Aseta toiminnon valintakytkin
8
porasymboliin .
Q
Toiminnon valitseminen
toiminnon valintakytkimellä
Ohje: Muuta toiminto vasta laitteen
ollessa irtikytkettynä, muuten se voi
vahingoittua. Käyttöalueesta riippuen voit
valita toiminnon neljän toiminnon väliltä valintakyt-
kintä
8
pyörittämällä.
j Pyöritä toiminnon valintakytkintä
8
niin, että
haluttu symboliikka nuolimerkinnässä lukittuu.
Toiminnot on merkitty seuraavasti:
Toiminto Symboli
Poraus / ruuvaus
Vasaraporaus
Talttaus
Taltan sijainnin
säätö
Taltan sijainnin säätö:
Tällä toiminnolla helpotetaan työtä
huomattavasti, kun taltan kulma-
asento voidaan asettaa yksilölli-
sesti. Se mahdollistaa talttauspro-
sessityökalun kääntämisen (katso
myös kuvat C, D) vaadittavaan sijaintipaikkaan.
j Käännä toiminnon valintakytkin
8
asentoon .
j Käännä työkalu työkalunvastaanotossa
1
vaadittavaan asentoon.
j Käännä talttausprosessia varten toiminnon
valintakytkin
8
asentoon .
Q
Pyörimissuunnan valinta
Valitse pyörimissuunta siirtämällä oikean / vasemman
pyörimissuunnan painikkeen
7
asentoa.
VAROLTUS!
Oikean / vasemman pyörimis-
suunnan painiketta
7
saa käyttää / säätää vain
laitteen ollessa pysähdyksissä.
Q
Kierrosluvun esivalinta
Kierrosluvun esivalinnan asetusrattaalla
6
voidaan
valita käyttökierrosluku yksilöllisesti.
Esivalittaessa matalampi kierrosluku voi PÄÄLLE- /
POIS -kytkimen
4
käyttö tapahtua automaattisesti
vain rajallisena (riippuu alennetusta kierrosluvusta).
E3744_Hammer Drill_Content_LB3.indd 21 16.04.2008 8:26:24 Uhr

22 FI
Käyttöönotto / Huolto ja puhdistus / Hävittäminen
Suositellut kierroslukualueet:
(ei-sitova, määritä tarvittaessa oikea asetus käytän-
nön testauksen avulla):
- suuri kierrosluku: vasaraporaamiseen betoniin
tai kiveen, talttaamiseen
- keskisuuri kierrosluku: poraamiseen teräkseen
tai puuhun
- pieni kierrosluku: ruuvaamiseen
Pieni kierroslukul / suuri kierrosluku:
j Pyöritä kierrosluvun esivalinnan asetusratasta
6
.
PÄÄLLE- / POIS -kytkimessä
4
on vaihtelevan
nopeuden säätö.
j Kytkintä painamalla kohotetaan kierroslukua
portaattomasti.
Q
Päälle- ja irtikytkentä
Voit valita poravasaraa käyttäessäsi hetkittäisen ja
jatkuvan käytön välillä. Käytä lyhyempää työskentelyä
varten hetkittäiskäyttö ja kauan kestävää työskentelyä
varten jatkuva käyttö. Halutun asetuksen käyttö toimii
seuraavasti:
Hetkittäiskäytön kytkeminen päälle:
j Paina PÄÄLLE / POIS -kytkintä
4
.
Hetkittäiskäytön irtikytkeminen:
j Vapauta PÄÄLLE- / POIS -kytkin
4
.
Jatkuvan käytön päällekytkeminen:
j Paina PÄÄLLE- / POIS -kytkintä
4
ja lukitse se
pitämällä lukitusnuppi
5
painettuna.
Jatkuvan käytön irtikytkentä:
j Paina PÄÄLLE- / POIS -kytkintä
4
ja vapauta
se jälleen.
Q
Huolto ja puhdistus
VAROLTUS!
LOUKKAANTUMISVAARA!
Ennen kuin teet töitä laitteessa, vedä aina verkko-
pistoke pistorasiasta.
j Laitteen on aina oltava puhdas ja kuiva. Siinä
ei saa olla öljyä tai voitelurasvoja.
j Poravasaran sisään ei saa päästä mitään nesteitä.
j Puhdista poravasara säännöllisesti, mieluiten
aina heti työn loppumisen jälkeen.
j Käytä kotelon puhdistamiseen kuivaa kangasta.
Älä käytä missään tapauksessa bensiiniä, liuo-
tusainetta tai puhdisteita, jotka syövyttävät muovia.
j Puhdista säännöllisesti työkalun vastaanotto
1
.
VARO! ESIJÄNNITE! Vedä lisäksi lukituksen /
lukituksen päästön vaippa
3
taakse ja nosta
pölynsuoja-kumivaippa
2
pois. Vapauta luki-
tuksen / lukituksen päästön vaippa
3
hitaasti.
j Puhdista rakenneosat pensselillä ja rasvaa ne.
Q
Hävittäminen
Pakkaus on valmistettu ympäristöystäväl-
lisistä kierrätettävistä materiaaleista.
Älä heitä sähkötyökaluja
kotitalousjätteen joukkoon!
Eurooppalaisen direktiivin 2002 / 96 / EY mukaan,
joka koskee vanhoja sähkö- ja elektroniikkalaitteita
sekä muutosta kansalliseen oikeuteen, käytetyt
sähkötyökalut täytyy kerätä erilleen ja toimittaa
ympäristöllisesti oikeaan uudellenkäyttöön. Palauta
laite ilmoitettujen keruulaitosten kautta.
Kysy mahdollisuuksia loppuunkäytetyn laitteen
hävittämisestä kuntasi tai kaupunkisi virkailijoilta.
E3744_Hammer Drill_Content_LB3.indd 22 16.04.2008 8:26:24 Uhr
Sidan laddas ...
Sidan laddas ...
Sidan laddas ...
Sidan laddas ...
Sidan laddas ...
Sidan laddas ...
Sidan laddas ...
Sidan laddas ...
Sidan laddas ...
Sidan laddas ...
Sidan laddas ...
Sidan laddas ...
Sidan laddas ...
Sidan laddas ...
Sidan laddas ...
Sidan laddas ...
Sidan laddas ...
Sidan laddas ...
Sidan laddas ...
Sidan laddas ...
Sidan laddas ...
Sidan laddas ...
Sidan laddas ...
Sidan laddas ...
Sidan laddas ...
Sidan laddas ...
Sidan laddas ...
Sidan laddas ...
Sidan laddas ...
Sidan laddas ...
Sidan laddas ...
Sidan laddas ...
Sidan laddas ...
Sidan laddas ...
Sidan laddas ...
Sidan laddas ...
Sidan laddas ...
Sidan laddas ...
Sidan laddas ...
Sidan laddas ...
Sidan laddas ...
Sidan laddas ...
Sidan laddas ...
Sidan laddas ...
Sidan laddas ...
Sidan laddas ...
Sidan laddas ...
Sidan laddas ...
Sidan laddas ...
Sidan laddas ...
Sidan laddas ...
Sidan laddas ...
-
 1
1
-
 2
2
-
 3
3
-
 4
4
-
 5
5
-
 6
6
-
 7
7
-
 8
8
-
 9
9
-
 10
10
-
 11
11
-
 12
12
-
 13
13
-
 14
14
-
 15
15
-
 16
16
-
 17
17
-
 18
18
-
 19
19
-
 20
20
-
 21
21
-
 22
22
-
 23
23
-
 24
24
-
 25
25
-
 26
26
-
 27
27
-
 28
28
-
 29
29
-
 30
30
-
 31
31
-
 32
32
-
 33
33
-
 34
34
-
 35
35
-
 36
36
-
 37
37
-
 38
38
-
 39
39
-
 40
40
-
 41
41
-
 42
42
-
 43
43
-
 44
44
-
 45
45
-
 46
46
-
 47
47
-
 48
48
-
 49
49
-
 50
50
-
 51
51
-
 52
52
-
 53
53
-
 54
54
-
 55
55
-
 56
56
-
 57
57
-
 58
58
-
 59
59
-
 60
60
-
 61
61
-
 62
62
-
 63
63
-
 64
64
-
 65
65
-
 66
66
-
 67
67
-
 68
68
-
 69
69
-
 70
70
-
 71
71
-
 72
72


Parkside PEBH 1010 Operating And Safety Instructions Manual
- Kategori
- Roterande hammare
- Typ
- Operating And Safety Instructions Manual
- Denna manual är också lämplig för
på andra språk
- Deutsch: Parkside PEBH 1010
- English: Parkside PEBH 1010
- dansk: Parkside PEBH 1010
- suomi: Parkside PEBH 1010
Relaterade papper
-
Parkside PBH 1100 A1 Operation and Safety Notes
-
Parkside BMH 1100 Bruksanvisningar
-
-
-
-
-
-
-
-