
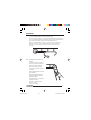
Antennen
http://www.blaupunkt.com
Autofun 7 617 460 024
Einbauanleitung - Scheibenantenne
Installation instructions - Windscreen antenna
Instructions de montage - Antenne de pare-brise
Istruzioni di montaggio - Antenna sul parabrezza
Inbouwinstrukties - Raamantenne
Monteringsanvisning - Framruteantenn
Instrucciones de montaje - Antena de parabrisas
-
EA Autofun, 4.11. 10.11.2003, 12:39 Uhr1

2
AUTOFUN
DEUTSCH
Für unsere innerhalb der Europäischen Uni-
on gekauften Produkte, geben wir eine Her-
stellergarantie. Die Garantiebedingungen
können Sie unter www.blaupunkt.de abru-
fen oder direkt anfordern bei:
Blaupunkt GmbH
Hotline
Robert Bosch Str. 200
D-31139 Hildesheim
Sicherheitshinweise
Antennenkabel sind zur Störsicherheit in ge-
nügendem Abstand von Kabelbäumen zu
verlegen. An scharfkantigen Löchern Kabel-
durchführungen verwenden.
Für die Dauer der Montage und des An-
schlusses ist der Minuspol der Batterie
abzuklemmen.
Hierbei sind die Sicherheitshinweise des Kfz-
Herstellers (Airbag, Alarmanlagen, Bord-
computer, Wegfahrsperren) zu beachten.
Beim Bohren von Löchern darauf achten,
dass keine Fahrzeugteile (Batterie, Kabel,
Sicherungskasten) beschädigt werden.
ENGLISH
We provide a manufacturer guarantee for our
products bought within the European Union.
You can view the guarantee conditions at
www.blaupunkt.de or ask for them directly
at:
Blaupunkt GmbH
Hotline
Robert Bosch Str. 200
D-31139 Hildesheim
Germany
Safety notices
To ensure no interference is caused, antenna
cables must be laid at a sufficient distance
from cable harnesses. Use cable grommets
to protect cables against sharp-edged holes.
The battery’s negative terminal must re-
main disconnected whilst you are install-
ing and connecting the device.
You must observe the vehicle manufactur-
er’s safety notices (airbags, alarm systems,
trip computers, immobilizers) regarding this.
When drilling holes, you must make sure that
none of the vehicle components (e.g. bat-
tery, cables, fuse box) can be damaged in
the process.
FRANÇAIS
Notre garantie s’étend à tous les produits
achetés à l’intérieur de l’Union Européenne.
Vous en trouverez les conditions sur notre site
Internet: www.blaupunkt.de. Vous pourrez
aussi les obtenir en vous adressant à:
Blaupunkt GmbH
Hotline
Robert Bosch Str. 200
D-31139 Hildesheim
Sécurité routière
Poser tous les câbles à bonne distance des
harnais de câbles afin d’éviter tout
parasitage. Utiliser des passe-câbles si les
trous sont coupants au bord.
Pendant le montage et le branchement
de l’amplificateur, le pôle négatif de la
batterie doit être déconnecté.
Effectuer l’installation en observant les con-
signes de sécurité du constructeur du véhi-
cule (air bag, équipement d’alarme, ordina-
teur de bord, dispositif d’antidémarrage).
EA Autofun, 4.11. 10.11.2003, 12:39 Uhr2

3
AUTOFUN
En perçant des trous, il est nécessaire de
faire attention à ne pas endommager des
pièces du véhicule telles que la batterie, les
câbles ou la boîte à fusibles.
ITALIANO
Per i prodotti acquistati nell’ambito dell’Unio-
ne Europea concediamo una garanzia di
produttore. Le condizioni di garanzia potete
richiamarle all’indirizzo Internet
www.blaupunkt.de oppure anche richieder-
le direttamente a noi:
Blaupunkt GmbH
Hotline
Robert Bosch Str. 200
D-31139 Hildesheim
Avvertenze di sicurezza
Al fine di evitare disturbi i cavi di antenna
vanno posati ad una sufficiente distanza dal
gruppo fili. Nel caso di fori con orli taglienti
bisogna inserire passacavi.
Il polo negativo della batteria deve essere
staccato durante le operazioni di montag-
gio e di collegamento dell’amplificatore.
Durante il montaggio si deve tenere conto del-
le istruzioni di sicurezza fornite dal produttore
dell’auto (airbag, allarme, computer di bordo,
dispositivo antiaccensione).
Quando si praticano fori, bisogna prestare
attenzione a non danneggiare parti dell’au-
tomobile come la batteria, i cavi o il conteni-
tore dei fusibili.
NEDERLANDS
Voor onze producten die binnen de Euro-
pese Unie zijn gekocht, bieden wij een
fabrieksgarantie. U kunt de garantie-
voorwaarden oproepen op
www.blaupunkt.de of direct opvragen bij:
Blaupunkt GmbH
Hotline
Robert Bosch Str. 200
D-31139 Hildesheim
Veiligheidsinstructies
Antennekabels moeten ter voorkoming van
storingen met voldoende afstand tot kabel-
bundels worden gelegd. Gebruik bij gaten
met scherpe randen kabeldoorvoeringen.
Voor de duur van de montage en de aan-
sluiting moet de minpool van de accu
worden losgekoppeld.
Hierbij moeten de veiligheidsvoorschriften
van de autofabrikant (airbag, alarminstalla-
ties, boordcomputer, startonderbreking) wor-
den opgevolgd.
Bij het boren van gaten dient u erop te letten
dat er geen onderdelen van de auto (accu,
kabels, zekeringkast) beschadigd raken.
SVENSKA
För produkter köpta inom Europeiska un-
ionen ger vi en tillverkargaranti. Villkoren för
vårt garantiåtagande publiceras på
www.blaupunkt.de och kan beställas på
följande adress.
Blaupunkt GmbH
Hotline
Robert Bosch Str. 200
D-31139 Hildesheim
Tyskland
Säkerhetsanvisningar
För att undvika störningar skall antenn-
ledningar dras långt från befintliga kabel-
EA Autofun, 4.11. 10.11.2003, 12:39 Uhr3

4
AUTOFUN
stammar. I hål med vassa kanter ska led-
ningarna skyddas med kabelgenomföringar.
Under hela monteringen och anslut-
ningen skall batteriets minuspol vara
lossad.
Fordonstillverkarens säkerhetsanvisningar
skall härvid följas (krockkudde, larm, färd-
dator, startspärr).
Se vid borrning av hål till att inga andra
fordonsdetaljer (batteri, kablage, säkrings-
låda) skadas.
ESPAÑOL
Para los productos adquiridos dentro de la
Unión Europea, le ofrecemos una garantía
del fabricante. Las condiciones de esta ga-
rantía pueden consultarse en
www.blaupunkt.de o solicitarse directa-
mente a:
Blaupunkt GmbH
Hotline
Robert Bosch Str. 200
D-31139 Hildesheim
Indicaciones de seguridad
Para que no se produzcan perturbaciones,
tienda los cables de la antena a suficiente
distancia de los arnés de cables. En caso
de tener que introducir los cables en orifi-
cios de bordes cortantes, utilice pasacables.
Para la duración del montaje y de la co-
nexión hay que desconectar el polo ne-
gativo de la batería.
Sírvase de observar siempre el reglamento
de seguridad del fabricante automovilista
(airbag, equipos de alarma, ordenador de a
bordo, inmovilizador electrónico antirrobo).
Al perforar los taladros observar que no se
dañen ningunas piezas del vehículo (bate-
ría, cables, caja para fusibles).
Blaupunkt
.
www.blaupunkt.de
« » Blaupunkt:
Blaupunkt GmbH
Hotline
Robert Bosch Str. 200
D-31139 Hildesheim
.
.
.
,
( ,
, ,
).
( , ,
).
EA Autofun, 4.11. 10.11.2003, 12:39 Uhr4

5
AUTOFUN
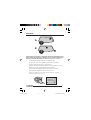
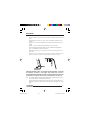
Klebeanleitung / Instructions on adhesive attachment / Règles pour le
collage / Istruzioni per l’incollaggio / Lijmadvies / Instruktion för
fasttejpning / Instrucciones para el pegado /
Mindesttemperatur / Minimum temperature /
Température minimum / Temperatura minima /
Minimumtemperatuur / Lägsta temperatur /
Temperatura mínima /
20
15
C
+18 °C
D
Bei der Montage müssen die Innenseite der Frontscheibe und die aufzukleben-
den Teile eine Mindesttemperatur von 18 °C haben.
Wichtig!
Klebeflächen des Trägerpapiers der beiden Empfangselemente und des Sockels
nach dem Entfernen der Schutzfolie nicht mehr berühren, Klebekraft wird sonst
gemindert!
Die Innenscheibe muss im Montagebereich unbedingt trocken sein!
GB
When carrying out the installation, the inner surface of the windscreen and the
components that are going to be stuck to it must have a temperature of at least
18 °C.
Important!
After you remove the protective foil from the carrier paper of the two reception
elements and from the mounting base, make sure that you do not touch the
adhesive surfaces or else the adhesive strength will diminish!
You must make absolutely sure that the inside surface of the screen where the
antenna will be installed is completely dry!
F
Au moment de montage, il faut que la surface intérieure du pare-brise de même
que tous les éléments à coller aient une température minimum de 18 °C.
Important!
Après avoir retiré la feuille protectrice, ne plus toucher les surfaces auto-
collantes du papier porteur, les éléments récepteurs et le disque de montage,
afin de ne pas déteriorer leur adhésion!
Il faut qu’au lieu de montage, la surface intérieure du pare-brise soit absolument
sèche!
I
Al momento del montaggio la superficie interna del parabrezza e le parti da
incollare devono avere una temperatura minima di 18 °C.
EA Autofun, 4.11. 10.11.2003, 12:39 Uhr5

6
AUTOFUN
Importante!
Dopo aver tolto if foglio di protezione non toccare più le superfici adesive del
foglio di base dei due elementi di ricezione e del disco in modo da mantenere
intatta la loro capacità adesiva.
In prossimità del punto di montaggio la superficie interna del parabrezza deve
essere perfettamente asciutta.
NL
Bij de montage moeten de binnenkant van de voorruit en de te lijmen onderdelen
een minimumtemperatuur hebben van 18° C.
Belangrijk!
De lijmoppervlakken van het draagpapier van de beide ontvangstelementen en
de voet mogen na het verwijderen van de folie niet meer worden aangeraakt. De
kleefkracht neemt anders af!
De binnenkant van de ruit moet op de plaats van montage absoluut droog zijn!
S
Vid monteringen skall insidan av framrutan och monteringsdetaljerna hålla en lägsta
temperatur på +18 °C.
Viktigt!
Vidrör inte den självhäftande ytan sedan skyddsremsan dragits av bärfolien för
de två mottagningselementen och för förstärkadosans sockel, i annat fall
påverkas självhäftningen.
Framrutans insida måste vara helt torr inom monteringsområdet.
E
Para el montaje, la cara interior del parabrisas y las piezas que se van a pegar
han de estar a una temperatura mínima de 18 °C.
Importante!
Después de quitar la lámina protectora, no tocar ya la superficie adhesiva del
papel portador, de los dos elementos receptores ni del zócalo, de lo contrario se
reduce la fuerza adherente.
La cara interior del parabrisas ha de estar absolutamente seca en la zona de
montaje.
RUS
18° C.
!
,
,
-
.
, ,
, !
EA Autofun, 4.11. 10.11.2003, 12:39 Uhr6

7
AUTOFUN
Montageort A oder B wählen / Choose installation position A or B / Choisir
le lieu de
montage A ou B / Scegliere il punto di montaggio A o B / Montageplaats
A of B kiezen /
Välj ut en lämplig plats A eller B för monteringen / Elegir el lugar
de montaje A o B
/
1. Vorher prüfen:
• Platzverhältnisse (siehe Punkt 3)
• Masseanschluss (siehe Punkt 7)
•Verlegung des Antennenkabels (siehe Punkt 6)
Check the following beforehand:
• The amount of space available (see point 3)
• The earth connection (see point 7)
• How the antenna cable will be laid (see point 6)
À vérifier au préalable:
• La place disponible (voir point 3)
• Le raccordement à la masse (voir point 7)
• Le passage du câble d’antenne (voir point 6)
Controllare prima:
• Le condizioni di ingombro (vedere punto 3)
• Il collegamento di massa (vedere punto 7)
•L’installazione del cavo dell’antenna (vedere punto 6)
Controleer van tevoren:
• De beschikbare plaats voor montage (zie punt 3)
• De massa-aansluiting (zie punt 7)
• De plaatsing van de antennekabel (zie punt 6)
Kontrollera dessförinnan:
• Befintligt monteringsutrymme (se punkt 3)
• Stomanslutning (se punkt 7)
• Framdragning av antennkabeln (se punkt 6)
Verificar previamente:
• Las condiciones de lugar (véase el punto 3)
• La conexión a masa (véase el punto 7)
• El tendido del cable de la antena (véase el punto 6)
:
• (. . 3)
• (. . 7)
• (. . 6)
EA Autofun, 4.11. 10.11.2003, 12:39 Uhr7

8
AUTOFUN
A
B
Reinigung der Frontscheibe /
Cleaning the windscreen
/ Nettoyage du pare-
brise /
Pulizia del parabrezza / Reiniging van de voorruit / Rengöring av
framruta / Limpieza del parabrisas /
2. Mit beiliegendem Scheibenreiniger oder mit 98%igem Alkohol.
Use the screen cleaner that is included or alcohol (98% concentration).
A l’aide du chiffon imprégné fourni ou d’alcool de 98 %.
Impiegare il detergente per superfici vetrate accluso alla confezione o alcol a 98°.
Met het meegeleverde reinigingsdoekje of met alcohol (98 %).
Putsa framrutan med bifogad rensduk eller med T-sprit (98 % alkohol).
Utilizar el paño limpiaparabrisas adjunto, o alcohol de 98 %.
,
, 98%- .
Reinigungstuch
Cleaning cloth
Chiffon à nettoyer
EA Autofun, 4.11. 10.11.2003, 12:39 Uhr8

9
AUTOFUN
Sockel ankleben / Attach the adhesive mounting base / Collage du disque
/
Incollaggio del disco /
Voet bevestigen / Fastlimning av sockel / Pegar el
disco de zócalo /
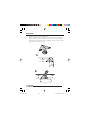
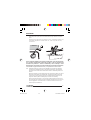
3. Montagehilfe auf Sockel setzen und probeweise an Montageort A oder B halten.
Schutzpapier von Sockel abziehen, Sockel ausrichten und andrücken. Montage-
hilfe vorsichtig abnehmen und Sockel mit Rakel anreiben.
Attach the special mounting tool to the base and hold it in positions A and B to try
out the different installation positions.
Peel off the protective paper from the mounting base, then align the base in the
correct position and press it onto the windscreen. Carefully detach the mounting
tool from the base and rub the base onto the windscreen using the wiper.
Mettre le gabarit de montage sur le disque et l’ensemble, à titre d’essai, au lieu A
ou B.
Retirer la feuille protectrice, mettre le disque en place et le presser contre la vitre.
Retirer le gabarit avec précaution. Frotter le disque contre la vitre à l’aide de la ra-
clette.
Applicare la maschera di montaggio sullo zoccolo e appoggiarla a titolo di prova
sul punto di montaggio A o B.
Togliere il foglio di protezione dal disco, centrare il disco e premerlo sul parabrezza.
Togliere con cautela la maschera di montaggio e raschiare il disco con una lama.
Plaats de montagehulp op de voet en houd deze bij wijze van proef op montage-
plaats A of B.
Trek het beschermende papier van de voet, breng de voet in de juiste stand en
druk deze aan. Verwijder de montagehulp voorzichtig en wrijf de voet vast met de
aandrukstift.
Sätt förstärkardosans sockel in i monteringsmallen och håll mallen på prov mot
framrutan (i monteringsläge A eller B).
Dra bort skyddspappret från sockeln. Placera sockeln i rätt läge och tryck fast mot
framrutan. Ta försiktigt bort monteringsmallen och gnugga sockeln med den rakel
som ingår i monteringssatsen.
Colocar la plantilla de montaje sobre el zócalo y aplicarla a modo de prueba en los
lugares de montaje A o B.
Arrancar el papel protector del zócalo, emplazar éste y presionar sobre él. Quitar
cuidadosamente la plantilla de montaje y frotar el zócalo con la rasqueta.
EA Autofun, 4.11. 10.11.2003, 12:39 Uhr9

10
AUTOFUN
.
,
.
. ,
.
ca.
60
mm
ca.60mm
A
ca.60mm
ca.60mm
B
EA Autofun, 4.11. 10.11.2003, 12:39 Uhr10

11
AUTOFUN
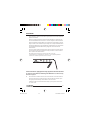
Empfangselemente anbringen / Attaching the reception elements / Collage
des
éléments récepteurs / Applicazione degli elementi di ricezione / Ontvang-
stelementen aanbrengen / Fastejpning av mottagningselement / Instalar los
elementos receptores /
4. Abstandsstreifen 1 dicht an die Frontscheibeneinfassung kleben.
Attach the adhesive spacer strips 1 to the windscreen so that they are positioned
right up against the edge of the windscreen.
Coller les bandes d’écartement 1 tout près de l’entourage du pare-brise.
Incollare perfettamente le strisce distanziali 1 lungo il telaio del parabrezza.
Plak de afstandsstrook 1 dicht tegen het rubber van de voorruit vast.
Tejpa fast distansremsan 1 på framrutans insida kant i kant med tätningsprofilen.
Pegar las tiras distanciadoras 1 haciendo contacto con el enmarcado del
parabrisas.
1
.
A
1
B
1
4.1 Schutzstreifen 2 ca. 5 cm abzie-
hen
Peel off the protective strip 2 by
approx. 5 cm
Retirer la feuille protectrice 2
d’env. 5 cm
Strappare la striscia di protezione
2 per circa 5 cm
Trek de beschermstrook 2
ca. 5 cm los
Dra av skyddsremsan 2 ca 5 cm
från bärfolien
Arrancar aprox. 5 cm la lámina
protectora 2
2 5 .
EA Autofun, 4.11. 10.11.2003, 12:39 Uhr11

12
AUTOFUN
2 Schutzstreifen
Protective strip
Feuille protectrice
Striscia di protezione
Beschermstrook
Skyddsremsa
Lámina protectora
3 Empfangselement
Reception element
Elément récepteur
Elemento di ricezione
Ontvangstelement
Mottagningselement
Elemento receptor
4.2 Empfangselement 3 mit Lochende über Stift des Sockels legen, Klebeseite zur
Scheibe. Trägerpapier so weiterführen, dass Oberkante an Abstandsstreifen 1
anliegt.
Place the hole end of the reception element 3 over the peg protruding from the
mounting base whilst making sure that the adhesive side of the reception element
is facing the windscreen. Continue applying the carrier paper along the windscreen
in such a way that the outer edge of the carrier paper is positioned up against the
ends of the spacer strips 1.
Mettre l’extrémité percée de l’élément récepteur 3 sur le clouet du disque, la face
collante vers la vitre. Continuer la mise en place du papier porteur de telle manière
qu’il se touche avec les bandes d’écartement 1.
Applicare l’estremità forata dell’elemento di ricezione 3 sul perno del disco, con il
lato adesivo rivolto verso il parabrezza. Incollare il foglio portante fino a quando lo
spigolo superiore appoggia contro le strisce distanziali 1.
Leg het ontvangstelement 3 met het doorboorde uiteinde over de pen van de
voet, met de lijmzijde naar de ruit. Spreid het draagpapier zodanig uit dat de bo-
venkant tegen de afstandsstrook 1 ligt.
Trä stiftet på sockeln in i hålet på mottagningselementets 3 ena ända, den själv-
3
2
EA Autofun, 4.11. 10.11.2003, 12:39 Uhr12

13
AUTOFUN
häftande sidan vänd mot rutan. Lägg ut bärfolien kant i kant med distansremsan
1 och dra samtidigt undan för undan bort skyddsremsan.
Colocar el elemento receptor 3 con el extremo perforado sobre la clavija del zó-
calo, con el lado adherente hacia el parabrisas. Aplicar el papel portador de forma
que el canto superior haga contacto con las tiras distanciadoras 1.
3 ,
.
.
3
1 1 1
2
4.3 Empfangselement mit Werkzeug
festreiben.
Use the wiper to rub the reception el-
ement firmly against the windscreen.
Frotter contre la vitre l’élément
récepteur à l’aide de la raclette.
Con una lama raschiare l’elemento
di ricezione.
Wrijf het ontvangstelement vast met
de aandrukstift.
Tejpa fast mottagningselementet
genom att gnugga den mot rutan
med hjälp av rakeln.
Frotar fuertemente con la rasqueta
el elemento receptor.
.
EA Autofun, 4.11. 10.11.2003, 12:39 Uhr13

14
AUTOFUN
4.4 Abstand ca. 50 mm (evtl. Empfangselemente mit Messer kürzen)
Clearance of approx. 50 mm (if necessary, shorten the reception elements using a
knife).
Ecartement 50 mm environ (s’il y a lieu, couper les éléments récepteurs avec un
couteau).
Distanza: circa 50 mm (eventualmente accorciare gli elementi di ricezione con un
coltello).
Afstand ca. 50 mm (kort de ontvangstelementen evt. in met een mes).
Se till att mottagningselementen håller ca 50 mm avstånd från tätningsprofilen
(kapa - om nödvändigt - ändarna med en kniv).
Distancia, aprox. 50 mm (si es necesario, recortar los elementos receptores con
un cuchillo).
, 50
( ).
60
mm
50mm
Empfangselemente sichern / Securing the reception elements / Consolider
les éléments
récepteurs / Bloccaggio degli elementi di ricezione /
Ontvangstelementen vastzetten
/ Fixering av mottagningselement / Asegurar
los elementos receptores /
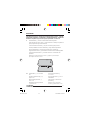
4.5 Durchsichtige Endpunkte auf Werkzeugspritze setzen, auf Anfang und Ende anle-
gen und gut festreiben. Abstandsstreifen abnehmen.
Place the transparent end patches onto the tip of the wiper and apply them to the
beginning and end, and rub them down so they stick securely. Remove the spacer
strips.
EA Autofun, 4.11. 10.11.2003, 12:39 Uhr14

15
AUTOFUN
Mettre les rondelles transparentes sur la pointe de la raclette, les appliquer sur les
deux extémités de l’élément et les frotter soigneusement contre la vitre. Retirer les
bandes d’écartement.
Montare le rosette trasparenti terminali sull’estremità della lama, applicarle sulle
due estremità dell’elemento di ricezione e raschiare. Togliere le strisce distanziali.
Zet de transparante onderlegschijfjes op het uiteinde van de stift, plaats ze aan het
begin en einde van het element en wrijf ze stevig vast. Verwijder de afstandsstrook.
Placera fixpunktbrickorna av genomskinlig tejp på rakelspetsen och tejpa fast dem
över mottagningselementets båda ändar, gnugga efter med rakeln. Ta bort
distansremsan.
Colocar los puntos extremos transparentes sobre la punta de la rasqueta, aplicar-
los sobre los dos extremos del elemento receptor y frotarlos con fuerza contra el
vidrio. Quitar las tiras distanciadoras.
,
. .
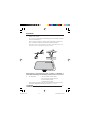
Gehäuse aufsetzen / Applying the housing / Application du boitier / Montare
la carcassa / Huis plaatsen / Montering av förstärkardosa / Colocar la caja
/
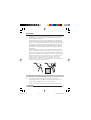
5. Zuerst auf unteren Stift des Sockels, dann oben andrücken. Schraube eindrehen.
First press the housing onto the lower peg of the mounting base and then press
the upper part of the housing onto the base. Screw in the screw.
D’abord le mettre sur le clouet inférieur du disque, puis le presser contre le des-
sus. Serrer la vis.
EA Autofun, 4.11. 10.11.2003, 12:39 Uhr15

16
AUTOFUN
Premere prima sul perno inferiore del disco, quindi premere in alto. Serrare la vite.
Duw het huis eerst op de onderste pen van de voet en vervolgens aan de boven-
kant aan. Draai de schroef erin.
Trä först förstärkardosan över stiftet längst ner på sockeln och tryck sedan fast
dosan på sockeln (upptill). Montera skruven i stiftet och dra åt.
Primero presionar sobre la clavija inferior del zócalo, y luego sobre la parte supe-
rior. Enroscar el tornillo.
,
. .
Antennenkabel verlegen /
Laying the antenna cable
/ Pose du câble
d’antenne
/ Installazione del cavo dell’antenna / Antennekabel leggen /
Framdragning av antennkabel / Tender el cable de la antena /
6. Kabel in Gummidichtung schieben und nach unten führen oder unter Holm-
verkleidung verlegen.
Push the cable into the rubber gasket and lead it down alongside the pillar or
beneath the pillar moulding.
Mettre le câble sous le joint caoutchouc du pare-brise en le faisant suivre vers le
bas ou le mettre sous le revêtement du montant de pare-brise.
Spingere il cavo nella guarnizione di gomma e farlo passare verso il basso o
installario al di sotto del rivestimento del longherone.
EA Autofun, 4.11. 10.11.2003, 12:39 Uhr16

17
AUTOFUN
Schuif de kabel in de rubber afdichting en leg deze naar beneden of onder de be-
kleding van de raamstijl.
För in och dra ner antennkabeln i gummitätningsprofilen runt framrutan alt. bakom
panelen på vindrutestolpen.
Meter el cable por debajo de la junta de goma del parabrisas y pasarlo hacia
abajo, o tenderlo por debajo del revestimiento del montante delantero.
, ,
.
Masseanschluss / Earth connection / Mise à la masse / Collegamento a
massa / Massaaansluiting / Stomanslutning / Conexión a masa /
7. Das Masseband ... ... soll keine größeren Schleifen bilden,
... keinen Zug auf das Gehäuse ausüben,
... darf nicht verlängert werden,
... ist möglichst kurz zu halten.
Keine eloxierten Schrauben verwenden. Auf einwandfreien Massekontakt achten.
Verschiedene Möglichkeiten des Masseanschlusses: 7.1, 7.2, 7.3.
EA Autofun, 4.11. 10.11.2003, 12:39 Uhr17

18
AUTOFUN
The earthing strap ... ... must not form any large loops,
... must not pull on the housing,
... must not be lengthened,
... must be kept as short as possible.
Never use any anodised screws. Make sure that a good earth contact is made.
Various options for establishing an earth connection: 7.1, 7.2, 7.3.
La tresse de masse ... ... ne formera pas un trop grand bouclet,
... n’excercera pas de traction sur le boîtier,
... ne doit pas être prolongée,
... sera tenue le plus courte possible.
Ne pas utiliser des vis anodisées. Veiller à un bon contact de masse.
Possibilités pour la mise à la masse: 7.1, 7.2, 7.3.
La treccia di massa ... ... non deve presentare curvature troppo grandi,
... non deve esercitare alcuna trazione sulla carcassa,
... non deve essere allungata,
... deve essere il più corta possibile.
Non impiegare viti anodizzate. Verificare che ci sia un buon contatto a massa.
Per i diversi collegamenti a massa possibili vedere: 7.1, 7.2, 7.3.
Het massaband... ...mag geen grote lussen vormen,
...geen trekkracht op het huis uitoefenen,
...niet verlengd worden,
...en moet zo kort mogelijk worden gehouden.
Gebruik geen geëloxeerde schroeven. Zorg voor een storingsvrij massacontact.
Verschillende mogelijkheden voor de massa-aansluiting: 7.1, 7.2, 7.3.
Jordflätan ... ... får inte läggas ut i stor slinga,
... får inte utöva dragpåkänning på förstärkardosan,
... får inte förlängas genom skarvning,
... skall vara så kort som möjligt.
Eloxerade skruvar får inte användas. God kontakt till bilens stomme är ett krav.
Alternativa stomanslutningar, se 7.1, 7.2, 7.3.
EA Autofun, 4.11. 10.11.2003, 12:39 Uhr18

19
AUTOFUN
La cinta de masa ... ... no debe formar bucles grandes,
... no debe ejercer tracción sobre la caja,
... no debe prolongarse,
... debe mantenerse lo más corta posible.
No utilizar tornillos anodizados. Procurar un buen contacto de masa.
Diversas posibilidades de la conexión a masa: 7.1, 7.2, 7.3.
... ...
...
...
... .
.
.
. 7.1, 7.2, 7.3.
Sonnenblende oder Rückspiegel / Sun visor or rear-view mirror / Pare-
soleil ou rétroviseur / Aletta parasole o specchietto retrovisore / Zonneklep
of achteruitkijkspiegel / Solskydd eller backspegel / Visera parasol o
retrovisor /
7.1 Halteschraube herausdrehen, Masseband weit unter den Fuß der Halterung schie-
ben, Schraube so eindrehen, dass das Masseband durchbohrt wird.
Undo the retention screw, push the earthing strap well beneath the base of the
holder, then fasten the screw making sure that it pierces the earthing strap.
Desserrer la vis de fixation du support. Pousser une bonne partie de la tresse de
masse sous la base du support. Serrer la vis de telle manière que la tresse de
masse soit percée.
Svitare la vite di bloccaggio. Spingere la treccia di masssa al di sotto della base
del supporto e avvitare la vite in modo da farla passare attraverso la treccia di
massa.
Draai de bevestigingsschroef eruit, schuif het massaband ver onder de voet van
de houder en draai de schroef er zo in dat het massaband doorboord wordt.
Ta bort en av solskyddets eller backspegelns fästskruvar. För jordflätan så långt
det går in under beslaget och sätt tillbaka skruven så att flätan genomborras.
EA Autofun, 4.11. 10.11.2003, 12:39 Uhr19

20
AUTOFUN
Desenroscar el tornillo de fijación, pasar una buena parte de la cinta de masa por
debajo del pie de soporte, enroscar el tornillo de forma que atraviese la cinta de
masa.
,
. ,
.
Unter Fensterholm-Verkleidung / Beneath the moulding that covers the window pillar
/
Sous le joint/le revêtement du montant de pare-brise / Sotto la guarnizione del
montante del parabrezza / Onder de afdichtstrip van de deurstijl / Under
fönsterstolpens panel / Debajo de la junta/revestimiento del montante del parabrisas
/
/
7.2 Verkleidung abziehen, Farbe an der Kontaktstelle des Fensterholms abkratzen
und diese mit Schutzfett bestreichen. Masseband darauf legen. Masseklammer
über Kante des Fensterholms und Masseband schieben. Verkleidung wieder auf-
drücken.
Detach the moulding, scratch off the paint at the contact point at which you want to
attach the earthing strap to the window pillar, and apply protective grease to the
contact point. Place the earthing strap over it. Slide the earthing clamp over the
edge of the window pillar and earthing strap. Re-attach the moulding.
Retirer le joint (le revêtement, le cas échéant), gratter la peinture du point de con-
tact du montant, puis l’enduire de graisse protectrice. Mettre la tresse de masse là-
dessus. Appliquer le crochet de masse sur le bord du montant et la tresse. Re-
monter le joint (le revêtement).
EA Autofun, 4.11. 10.11.2003, 12:39 Uhr20
Sidan laddas...
Sidan laddas...
Sidan laddas...
Sidan laddas...
-
 1
1
-
 2
2
-
 3
3
-
 4
4
-
 5
5
-
 6
6
-
 7
7
-
 8
8
-
 9
9
-
 10
10
-
 11
11
-
 12
12
-
 13
13
-
 14
14
-
 15
15
-
 16
16
-
 17
17
-
 18
18
-
 19
19
-
 20
20
-
 21
21
-
 22
22
-
 23
23
-
 24
24


Blaupunkt AUTOFUN - Bruksanvisning
- Typ
- Bruksanvisning
- Denna manual är också lämplig för
på andra språk
- italiano: Blaupunkt AUTOFUN - Manuale del proprietario
- español: Blaupunkt AUTOFUN - El manual del propietario
- Deutsch: Blaupunkt AUTOFUN - Bedienungsanleitung
- français: Blaupunkt AUTOFUN - Le manuel du propriétaire
- English: Blaupunkt AUTOFUN - Owner's manual
- Nederlands: Blaupunkt AUTOFUN - de handleiding
Relaterade papper
-
Blaupunkt A-RW 05-M Bruksanvisning
-
-
-
-
-
-
-
-
-