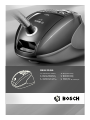
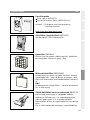
Bosch BSGL31466/03 Användarmanual
- Kategori
- Dammsugare
- Typ
- Användarmanual

BSGL31466
en Instruction manual
fr Notice d'utilisation
nl Gebruiksaanwijzing
it Istruzioni per l'uso
es Instrucciones de uso
da Brugsanvisning
no Bruksanvisning
sv Bruksanvisning
fi Käyttöohje
pt Instruções de utilização

2
fr
nl
it
es
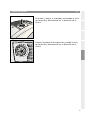
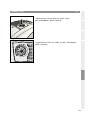
Your vacuum cleaner . . . . . . . . . . . . . . . . . . . . . . . . . . . . . . . . . . . . . . .6
Set up . . . . . . . . . . . . . . . . . . . . . . . . . . . . . . . . . . . . . . . . . . . . . . . . . . .7
Vacuuming . . . . . . . . . . . . . . . . . . . . . . . . . . . . . . . . . . . . . . . . . . . . . .10
After use . . . . . . . . . . . . . . . . . . . . . . . . . . . . . . . . . . . . . . . . . . . . . . . .13
Changing the dust bag . . . . . . . . . . . . . . . . . . . . . . . . . . . . . . . . . . . . .15
Care . . . . . . . . . . . . . . . . . . . . . . . . . . . . . . . . . . . . . . . . . . . . . . . . . . .18
Special accessories/replacement parts . . . . . . . . . . . . . . . . . . . . . . . .19
Warranty . . . . . . . . . . . . . . . . . . . . . . . . . . . . . . . . . . . . . . . . . . . . . . .177
Description de l'appareil . . . . . . . . . . . . . . . . . . . . . . . . . . . . . . . . . . .23
Mise en service . . . . . . . . . . . . . . . . . . . . . . . . . . . . . . . . . . . . . . . . . . .24
Aspiration . . . . . . . . . . . . . . . . . . . . . . . . . . . . . . . . . . . . . . . . . . . . . . .27
Après le travail . . . . . . . . . . . . . . . . . . . . . . . . . . . . . . . . . . . . . . . . . . .30
Changement de filtre . . . . . . . . . . . . . . . . . . . . . . . . . . . . . . . . . . . . . .32
Entretien . . . . . . . . . . . . . . . . . . . . . . . . . . . . . . . . . . . . . . . . . . . . . . . .35
Accessoires spéciaux / Pièces de rechange . . . . . . . . . . . . . . . . . . . . .36
Garantie . . . . . . . . . . . . . . . . . . . . . . . . . . . . . . . . . . . . . . . . . . . . . . .177
Beschrijving van het apparaat . . . . . . . . . . . . . . . . . . . . . . . . . . . . . . .40
De stofzuiger in gebruik nemen . . . . . . . . . . . . . . . . . . . . . . . . . . . . . .41
Zuigen . . . . . . . . . . . . . . . . . . . . . . . . . . . . . . . . . . . . . . . . . . . . . . . . . .44
Na het werk . . . . . . . . . . . . . . . . . . . . . . . . . . . . . . . . . . . . . . . . . . . . . 47
Vervanging filter . . . . . . . . . . . . . . . . . . . . . . . . . . . . . . . . . . . . . . . . . 49
Verzorging . . . . . . . . . . . . . . . . . . . . . . . . . . . . . . . . . . . . . . . . . . . . . . .52
Extra toebehoren / onderdelen . . . . . . . . . . . . . . . . . . . . . . . . . . . . . .53
Garantie . . . . . . . . . . . . . . . . . . . . . . . . . . . . . . . . . . . . . . . . . . . . . . .177
Descrizione dell'apparecchio . . . . . . . . . . . . . . . . . . . . . . . . . . . . . . . .57
Messa in funzione . . . . . . . . . . . . . . . . . . . . . . . . . . . . . . . . . . . . . . . . .58
Aspirazione . . . . . . . . . . . . . . . . . . . . . . . . . . . . . . . . . . . . . . . . . . . . . .61
Dopo aver terminato la pulizia . . . . . . . . . . . . . . . . . . . . . . . . . . . . . . .64
Sostituzione filtro . . . . . . . . . . . . . . . . . . . . . . . . . . . . . . . . . . . . . . . . .66
Manutenzione . . . . . . . . . . . . . . . . . . . . . . . . . . . . . . . . . . . . . . . . . . . .69
Accessori speciali / Parti di ricambio . . . . . . . . . . . . . . . . . . . . . . . . . .70
Condizioni di garanzia . . . . . . . . . . . . . . . . . . . . . . . . . . . . . . . . . . . .177
Descripción del aparato . . . . . . . . . . . . . . . . . . . . . . . . . . . . . . . . . . . .74
Puesta en marcha . . . . . . . . . . . . . . . . . . . . . . . . . . . . . . . . . . . . . . . . .75
Aspirar . . . . . . . . . . . . . . . . . . . . . . . . . . . . . . . . . . . . . . . . . . . . . . . . .78
Tras el trabajo . . . . . . . . . . . . . . . . . . . . . . . . . . . . . . . . . . . . . . . . . . . .81
Cambio de filtro . . . . . . . . . . . . . . . . . . . . . . . . . . . . . . . . . . . . . . . . . .83
Cuidados . . . . . . . . . . . . . . . . . . . . . . . . . . . . . . . . . . . . . . . . . . . . . . .86
Accesorios opcionales / Piezas de repuesto . . . . . . . . . . . . . . . . . . . .87
Garantía . . . . . . . . . . . . . . . . . . . . . . . . . . . . . . . . . . . . . . . . . . . . . . .177
en

3
no
sv
fi
pt
Beskrivelse . . . . . . . . . . . . . . . . . . . . . . . . . . . . . . . . . . . . . . . . . . . . . .91
Ibrugtagning . . . . . . . . . . . . . . . . . . . . . . . . . . . . . . . . . . . . . . . . . . . . .92
Støvsugning . . . . . . . . . . . . . . . . . . . . . . . . . . . . . . . . . . . . . . . . . . . . .95
Efter arbejdets afslutning . . . . . . . . . . . . . . . . . . . . . . . . . . . . . . . . . . .98
Skift af filter . . . . . . . . . . . . . . . . . . . . . . . . . . . . . . . . . . . . . . . . . . . .100
Pleje . . . . . . . . . . . . . . . . . . . . . . . . . . . . . . . . . . . . . . . . . . . . . . . . . .103
Ekstra tilbehør / reservedele . . . . . . . . . . . . . . . . . . . . . . . . . . . . . . .104
Garanti . . . . . . . . . . . . . . . . . . . . . . . . . . . . . . . . . . . . . . . . . . . . . . . .177
Beskrivelse av apparatet . . . . . . . . . . . . . . . . . . . . . . . . . . . . . . . . . . .108
Komme i gang . . . . . . . . . . . . . . . . . . . . . . . . . . . . . . . . . . . . . . . . . . .109
Støvsuging . . . . . . . . . . . . . . . . . . . . . . . . . . . . . . . . . . . . . . . . . . . . .112
Når jobben er gjort . . . . . . . . . . . . . . . . . . . . . . . . . . . . . . . . . . . . . . .115
Bytte av filter . . . . . . . . . . . . . . . . . . . . . . . . . . . . . . . . . . . . . . . . . . .117
Vedlikehold . . . . . . . . . . . . . . . . . . . . . . . . . . . . . . . . . . . . . . . . . . . . .120
Ekstra tilbehør / reservedeler . . . . . . . . . . . . . . . . . . . . . . . . . . . . . .121
Garanti . . . . . . . . . . . . . . . . . . . . . . . . . . . . . . . . . . . . . . . . . . . . . . . .178
Beskrivning av enheten . . . . . . . . . . . . . . . . . . . . . . . . . . . . . . . . . . . .125
Användning . . . . . . . . . . . . . . . . . . . . . . . . . . . . . . . . . . . . . . . . . . . . .126
Dammsuga . . . . . . . . . . . . . . . . . . . . . . . . . . . . . . . . . . . . . . . . . . . . .129
När du är klar . . . . . . . . . . . . . . . . . . . . . . . . . . . . . . . . . . . . . . . . . . .132
Byta dammsugarpåse . . . . . . . . . . . . . . . . . . . . . . . . . . . . . . . . . . . . .134
Skötsel . . . . . . . . . . . . . . . . . . . . . . . . . . . . . . . . . . . . . . . . . . . . . . . .137
Extratillbehör/reservdelar . . . . . . . . . . . . . . . . . . . . . . . . . . . . . . . . .138
Garanti . . . . . . . . . . . . . . . . . . . . . . . . . . . . . . . . . . . . . . . . . . . . . . . .178
Laitteen kuvaus . . . . . . . . . . . . . . . . . . . . . . . . . . . . . . . . . . . . . . . . . .142
Käyttöönotto . . . . . . . . . . . . . . . . . . . . . . . . . . . . . . . . . . . . . . . . . . .143
Imurointi . . . . . . . . . . . . . . . . . . . . . . . . . . . . . . . . . . . . . . . . . . . . . .146
Työn jälkeen . . . . . . . . . . . . . . . . . . . . . . . . . . . . . . . . . . . . . . . . . . . .149
Suodattimen vaihto . . . . . . . . . . . . . . . . . . . . . . . . . . . . . . . . . . . . . .151
Hoito . . . . . . . . . . . . . . . . . . . . . . . . . . . . . . . . . . . . . . . . . . . . . . . . .154
Varaosat ja lisävarusteet . . . . . . . . . . . . . . . . . . . . . . . . . . . . . . . . . .155
Takuu . . . . . . . . . . . . . . . . . . . . . . . . . . . . . . . . . . . . . . . . . . . . . . . . .178
Descrição do aparelho . . . . . . . . . . . . . . . . . . . . . . . . . . . . . . . . . . . .159
Colocação em funcionamento . . . . . . . . . . . . . . . . . . . . . . . . . . . . . .160
Aspirar . . . . . . . . . . . . . . . . . . . . . . . . . . . . . . . . . . . . . . . . . . . . . . . .163
Após o trabalho . . . . . . . . . . . . . . . . . . . . . . . . . . . . . . . . . . . . . . . . .166
Substituição do filtro . . . . . . . . . . . . . . . . . . . . . . . . . . . . . . . . . . . . .168
Limpeza . . . . . . . . . . . . . . . . . . . . . . . . . . . . . . . . . . . . . . . . . . . . . . .171
Acessórios especiais/peças sobresselentes . . . . . . . . . . . . . . . . . . . .172
Condições de garantia . . . . . . . . . . . . . . . . . . . . . . . . . . . . . . . . . . . .178
da

4
Congratulations on your purchase of
a Bosch BSGL3 vacuum cleaner.
This instruction manual describes
various BSGL3 models, which means
that some of the equipment features
and functions described may not be
available on your model.
You should only use original Bosch
accessories, which have been
specially developed for your vacuum
cleaner to achieve the best possible
vacuuming results.
Please keep this instruction manual in
a safe place. If you pass the vacuum
cleaner on to someone else, please
also pass on this instruction manual.
Intended use
This vacuum cleaner is intended for
domestic use only, not for commercial
use.
Only use this vacuum cleaner in
accordance with the instructions in
this instruction manual.
The manufacturer will not accept any
responsibility for damage caused by
improper use or incorrect operation.
Therefore, you must note the
following points.
The vacuum cleaner must only be
operated with:
Manufacturer's original dust bags
Manufacturer's original
replacement parts, accessories or
special accessories
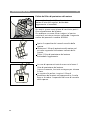
Safety information
This vacuum cleaner complies with
the generally accepted standards of
technology and relevant safety
regulations.
Always observe the information on
the rating plate when using the
vacuum cleaner and connecting to
the power supply.
Never use the vacuum cleaner
without a dust bag fitted.
=> This can damage the appliance.
Only allow children to use the
vacuum cleaner under supervision.
This appliance must not be used by
children or persons with limited
physical, sensory or mental abilities
or with a lack of experience and
knowledge (including children)
unless they have been instructed in
the use of the appliance by a
responsible person.
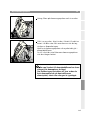
The vacuum cleaner may not be used for:
cleaning persons or animals
vacuuming up:
–hazardous, sharp-edged, hot or
red hot substances.
–damp or liquid substances
–highly flammable or explosive
substances and gases
–ash, soot from tiled stoves and
central heating systems
–toner dust from printers and
copiers.
Keep suction away from your head
when using the handle, nozzles or
pipe.
=> Risk of injury.
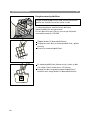
Stand the appliance on a firm,
secure surface when vacuuming.
When vacuuming stairs, the
appliance must always be lower
down than you.
In the following cases, stop using
the appliance immediately and
contact the after-sales
service:
–if the mains connection cable is
damaged.
–if you have accidentally vacuumed
up some liquid or liquid has
entered the inside of the
appliance
en

5
–if the appliance has been
dropped.
Do not use the power cord to carry
the vacuum cleaner.
Fully extend the power cord when
using the vacuum cleaner
continuously for several hours.
When disconnecting the appliance
from the mains, pull on the plug,
not the power cord.
Do not pull the power cord around
sharp corners or allow it to become
trapped.
Unplug the power cord from the
mains before carrying out any work
on the vacuum cleaner or its
accessories.
Do not use the vacuum cleaner if it
is damaged. Unplug the power cord
from the mains if a fault is
detected.
For safety reasons, only authorised
after-sales service personnel are
permitted to carry out repairs and
fit replacement parts to the vacuum
cleaner.
Protect the vacuum cleaner from
outside weather conditions,
moisture and sources of heat.
The vacuum cleaner is not suitable
for use on building sites.
=> Vacuuming up building rubble
could damage the appliance.
Switch off the appliance when it is
not in use.
At the end of its life, the appliance
should be rendered unusable, then
disposed of in an appropriate
manner.
Plastic bags and films must be kept
out of the reach of children before
disposal (risk of suffocation).
do not pour any flammable
substances or substances
containing alcohol onto the filters
(filter bag, motor protective filter,
exhaust filter, etc.).
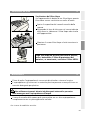
Disposal information
Packaging
The packaging is designed to
protect the vacuum cleaner from
being damaged during
transportation. It is made of
environmentally friendly materials
and can be recycled.
Dispose of packaging that is no
longer required at an appropriate
recycling point.
Used vacuum cleaners
Used vacuum cleaners still contain
many valuable materials. Therefore,
please take your used vacuum
cleaner to your retailer or recycling
centre to be recycled. For current
disposal methods, please enquire at
your retailer or your local council.
Disposal of filters and dust bags
Filters and dust bags are made
from environmentally friendly
materials.
As long as they do not contain
substances that are not permitted
to be disposed of in the household
rubbish, you can dispose of them
with your normal household
rubbish.
Please note
The mains socket must be protected
by at least a 10 amp fuse.
If a fuse should blow when you switch
on the appliance, this may be because
other electrical appliances which have
a high current draw are connected to
the same power circuit.
To prevent the fuse from blowing,
select the lowest power setting
before switching the appliance on,
and increase the power only once it
is running.
en

6
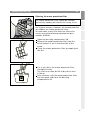
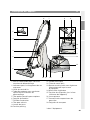
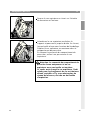
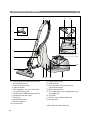
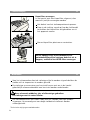
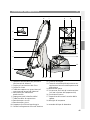
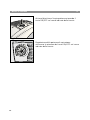
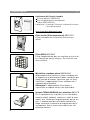
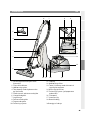
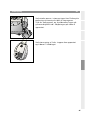
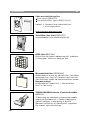
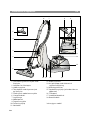
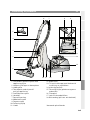
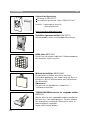
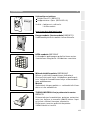
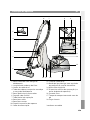
Your vacuum cleaner en
1 Adjustable floor tool with locking
collar
2 Dust bag change indicator
3 Exhaust grille
4 Telescopic tube with adjusting sleeve
and locking collar
5 Professional upholstery nozzle
6 Handle*
7 Flexible tube
8 Upholstery nozzle
9 Crevice nozzle
10 Parking aid
11 Power cord
12 Exhaust filter
13 On/off button with electronic suction
regulator
14 Micro-hygiene filter
15 Storage aid (on underside of unit)
16 Dust bag
17 Dust bag compartment lid
18 Carrying handle
*Depending on equipment
18 17 1516
10
11
1
2
13
14
89
12
5
76*
3
4

7
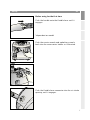
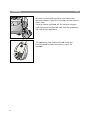
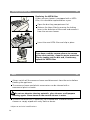
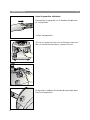
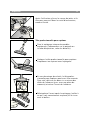
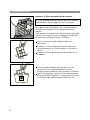
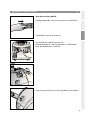
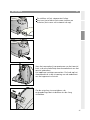
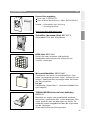
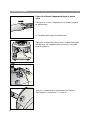
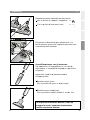
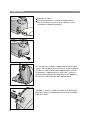
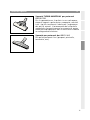
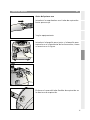
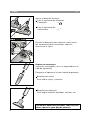
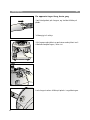
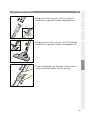
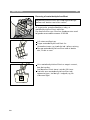
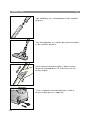
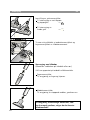
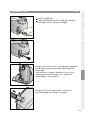
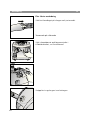
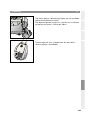
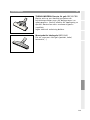
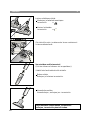
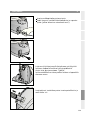
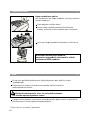
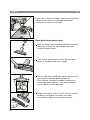
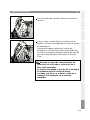
Set up
en
Push the flexible hose connector into the air intake
opening until it engages.
*
Before using for the first time
Push the handle onto the flexible hose until it
engages.
*
dependent on model
CLICK!
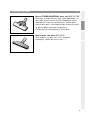
Push the crevice nozzle and upholstery nozzle
back into the accessories holder as illustrated.

8
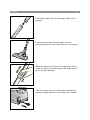
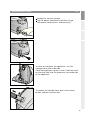
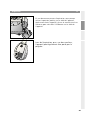
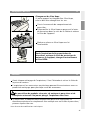
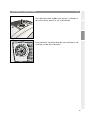
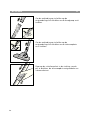
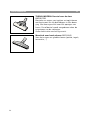
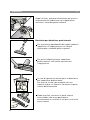
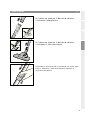
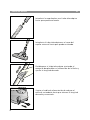
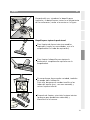
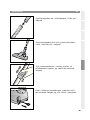
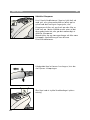
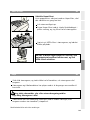
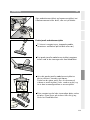
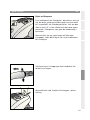
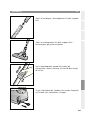
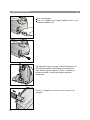
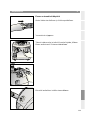
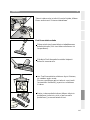
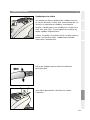
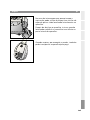
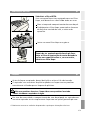
Set up
en
Move the adjusting sleeve in the direction of the
arrow to release the telescopic tube and adjust it
to the length required.
Take the mains plug, pull the power cord to the
required length and insert the plug into a socket.
Push the handle into the telescopic tube until it
engages.
Push the telescopic tube straight into the
connecting piece of the floor tool until it engages.

9
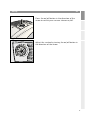
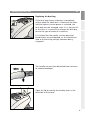
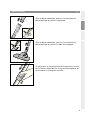
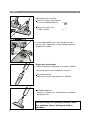
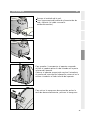
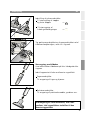
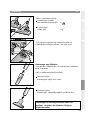
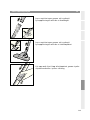
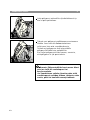
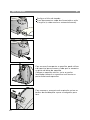
Set up
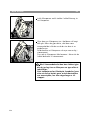
en
Press the on/off button in the direction of the
arrow to switch your vacuum cleaner on/off.
Adjust the suction by turning the on/off button in
the direction of the arrow.

10
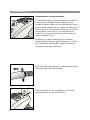
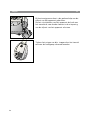
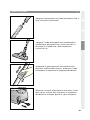
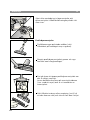
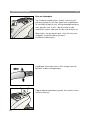
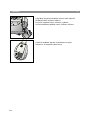
Vacuuming
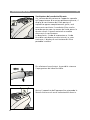
en
Adjusting the floor tool:
For vacuuming rugs
and carpets =>
For vacuuming
hard floors =>
Vacuuming with accessories
(attach to handle or suction tube as required).
Please set your appliance to the medium suction
range.
Crevice nozzle
For cleaning crevices and corners.
Upholstery nozzle
For cleaning upholstered furniture, curtains, etc.
When cleaning delicate materials, such as
curtains, set the power to the lowest suction
range.
Remove the upholstery nozzle and crevice nozzle
from the accessories holder as illustrated.

11
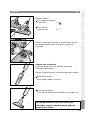
Professional upholstery nozzle
For intensive cleaning of upholstered furniture
(attach to the handle or suction tube as
required).
To clean the professional upholstery nozzle,
simply vacuum it using the handle.
If it is very dirty, the professional upholstery
nozzle can also be opened up.
To do this, turn the two screws on the sides of
the nozzle (e.g. using a coin) and remove the
inner part from the nozzle.
After cleaning, replace the inner part (make sure
it is correctly seated) and screw to the housing.
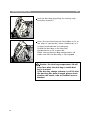
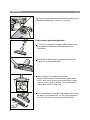
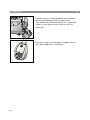
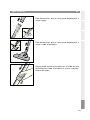
Vacuuming
en
After use, push the crevice nozzle and upholstery
nozzle back into the accessories holder as
indicated.

12
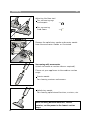
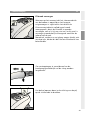
Vacuuming
en
You can use the parking aid on the side of the
vacuum cleaner if you wish to stop vacuuming for a
short time.
Once you have switched off the vacuum cleaner,
slide the catch on the floor tool into the groove on
the side of the appliance.
The appliance can also be carried using the
carrying handle when vacuuming stairs, for
example.

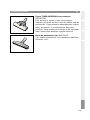
13
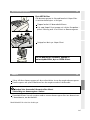
Unplug the vacuum cleaner.
Tug the power cord briefly and then let go
(the power cord retracts automatically).
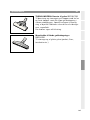
When the work is done
en
To remove the flexible hose, press the release
button and pull the hose out.
To store or transport the appliance, use the
storage aid on the underside.
Stand the appliance up on its end. Slide the catch
on the floor tool into the groove on the underside
of the appliance.

14
To release the connection, push on the locking
collar and pull the handle out.
Push on the locking collar and pull out the
telescopic tube to disconnect.
When the work is done
en
To adjust the length of the telescopic tube, press
the adjusting sleeve in the direction of the arrow
and adjust the tube to the required length.

15
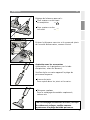
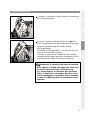
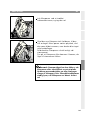
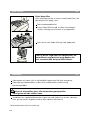
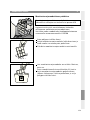
Changing the dust bag
en
Replacing the dust bag
If the dust bag change indicator is completely
yellow when the floor tool is lifted from the floor
and the highest suction power is selected, the
dust bag must be changed, even if it is not yet full.
In this case it is essential to change the dust bag
due to the type of material it contains.
First check that the nozzle, suction pipe and
flexible hose are not blocked, as this would also
lead to the dust bag change indicator being
triggered.
The handle can easily be detached from the hose
to remove blockages.
Open the lid by moving the locking lever in the
direction of the arrow.

16
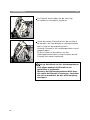
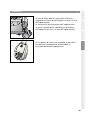
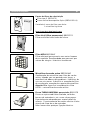
Changing the dust bag
en
Seal the dust bag by pulling the sealing strip
and then remove it.
Insert the new dust bag into the holder as far as
the stop. As you do this, leave it folded up, as it
is when removed from its packaging.
Unfold the dust bag in the dust bag
compartment as far as possible.
When closing the dust bag compartment lid,
make sure that the dust bag is not trapped.
Caution: the dust bag compartment lid will
only close when the dust bag or textile dust
bag is inserted.
If the dust bag change indicator is still lit after
the dust bag has been changed, please check
whether the nozzle, tube or flexible hose are
blocked.

17
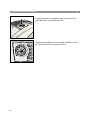
Changing the dust bag
en
Cleaning the motor protection filter
The motor protection filter should be cleaned
regularly by tapping out the dirt or rinsing it out.
For hygiene reasons, however, we recommend that
you replace the motor protection filter.
You can order a new filter from our after-sales
service using the following replacement part
number: 616268
Open the dust bag compartment lid.
Release the motor protection filter from the
catch and pull it out in the direction of the
arrow.
Clean the motor protection filter by tapping out
the dirt.
If it is very dirty, the motor protection filter
should be rinsed.
The filter must then be left to dry for at least
24 hours.
After cleaning, refit the motor protection filter,
clip into place and close the dust bag
compartment lid.

18
Always switch off the vacuum cleaner and disconnect from the mains before
cleaning the appliance.
The vacuum cleaner and plastic accessories can be cleaned with a
commercial plastic cleaner.
Do not use abrasive cleaning materials, glass cleaners or all-purpose
cleaning agents. Never immerse the vacuum cleaner in water.
The dust container can, if necessary, be cleaned with a second vacuum
cleaner or simply wiped with a dry cloth or duster.
Subject to technical modifications.
Care
en
Changing the dust bag
en
Replacing the HEPA filter
If your vacuum cleaner is equipped with a HEPA
filter, this should be replaced once a year.
Open the dust bag compartment lid.
Release the Hepa filter by moving the locking
lever in the direction of the arrow and remove it
from the vacuum cleaner.
Insert the new HEPA filter and clip in place.
If you have used the vacuum cleaner to vacuum
up fine dust particles, clean the motor protection
filter by tapping out the dirt and, if necessary,
replace the HEPA filter.

19
Optional accessories en
Replacement filter pack
Filter type G (BBZ41FG)
For best performance: Gplus (BBZ41GPLUS)
Contents: 4 filter bags with seal
1 micro-hygiene filter
http://
www.dust-bag-bosch.com
Textile dust bag (permanent dust bag) BBZ10TFG
Reusable bag with Velcro fastener.
HEPA filter BBZ153HF
Additional filter for cleaner exhaust air.
Recommended for allergy sufferers.
Replace once a year.
Micro active carbon filter BBZ192MAF
Combination of micro filter and active carbon fil-
ter. Combats unpleasant odours over a long peri-
od. Replace twice a year. Replace carbon filter
frame with micro filter frame.
Please note:
It is not possible to combine a HEPA filter and a
micro active carbon filter.
TURBO-UNIVERSAL
®
brush for upholstery
BBZ42TB
All-in-one brushing and vacuuming of upholstered
furniture, mattresses, car seats, etc. Especially
suitable for picking up pet hair. The brush roller is
driven by the air flow through the vacuum cleaner.
No separate electrical connection is needed.

20
Optional accessories en
TURBO-UNIVERSAL
®
brush for floors BBZ102TBB
All-in-one brushing and vacuuming of shallow-pile
rugs and carpets and all hard floor coverings.
Especially suitable for picking up pet hair. The
brush roller is driven by the air flow through the
vacuum cleaner.
No separate electrical connection is needed.
Hard floor brush BBZ123HD
For vacuuming hard floors (parquet flooring, tiles,
terracotta, etc.)
Sidan laddas...
Sidan laddas...
Sidan laddas...
Sidan laddas...
Sidan laddas...
Sidan laddas...
Sidan laddas...
Sidan laddas...
Sidan laddas...
Sidan laddas...
Sidan laddas...
Sidan laddas...
Sidan laddas...
Sidan laddas...
Sidan laddas...
Sidan laddas...
Sidan laddas...
Sidan laddas...
Sidan laddas...
Sidan laddas...
Sidan laddas...
Sidan laddas...
Sidan laddas...
Sidan laddas...
Sidan laddas...
Sidan laddas...
Sidan laddas...
Sidan laddas...
Sidan laddas...
Sidan laddas...
Sidan laddas...
Sidan laddas...
Sidan laddas...
Sidan laddas...
Sidan laddas...
Sidan laddas...
Sidan laddas...
Sidan laddas...
Sidan laddas...
Sidan laddas...
Sidan laddas...
Sidan laddas...
Sidan laddas...
Sidan laddas...
Sidan laddas...
Sidan laddas...
Sidan laddas...
Sidan laddas...
Sidan laddas...
Sidan laddas...
Sidan laddas...
Sidan laddas...
Sidan laddas...
Sidan laddas...
Sidan laddas...
Sidan laddas...
Sidan laddas...
Sidan laddas...
Sidan laddas...
Sidan laddas...
Sidan laddas...
Sidan laddas...
Sidan laddas...
Sidan laddas...
Sidan laddas...
Sidan laddas...
Sidan laddas...
Sidan laddas...
Sidan laddas...
Sidan laddas...
Sidan laddas...
Sidan laddas...
Sidan laddas...
Sidan laddas...
Sidan laddas...
Sidan laddas...
Sidan laddas...
Sidan laddas...
Sidan laddas...
Sidan laddas...
Sidan laddas...
Sidan laddas...
Sidan laddas...
Sidan laddas...
Sidan laddas...
Sidan laddas...
Sidan laddas...
Sidan laddas...
Sidan laddas...
Sidan laddas...
Sidan laddas...
Sidan laddas...
Sidan laddas...
Sidan laddas...
Sidan laddas...
Sidan laddas...
Sidan laddas...
Sidan laddas...
Sidan laddas...
Sidan laddas...
Sidan laddas...
Sidan laddas...
Sidan laddas...
Sidan laddas...
Sidan laddas...
Sidan laddas...
Sidan laddas...
Sidan laddas...
Sidan laddas...
Sidan laddas...
Sidan laddas...
Sidan laddas...
Sidan laddas...
Sidan laddas...
Sidan laddas...
Sidan laddas...
Sidan laddas...
Sidan laddas...
Sidan laddas...
Sidan laddas...
Sidan laddas...
Sidan laddas...
Sidan laddas...
Sidan laddas...
Sidan laddas...
Sidan laddas...
Sidan laddas...
Sidan laddas...
Sidan laddas...
Sidan laddas...
Sidan laddas...
Sidan laddas...
Sidan laddas...
Sidan laddas...
Sidan laddas...
Sidan laddas...
Sidan laddas...
Sidan laddas...
Sidan laddas...
Sidan laddas...
Sidan laddas...
Sidan laddas...
Sidan laddas...
Sidan laddas...
Sidan laddas...
Sidan laddas...
Sidan laddas...
Sidan laddas...
Sidan laddas...
Sidan laddas...
Sidan laddas...
Sidan laddas...
Sidan laddas...
Sidan laddas...
Sidan laddas...
Sidan laddas...
Sidan laddas...
Sidan laddas...
Sidan laddas...
Sidan laddas...
-
 1
1
-
 2
2
-
 3
3
-
 4
4
-
 5
5
-
 6
6
-
 7
7
-
 8
8
-
 9
9
-
 10
10
-
 11
11
-
 12
12
-
 13
13
-
 14
14
-
 15
15
-
 16
16
-
 17
17
-
 18
18
-
 19
19
-
 20
20
-
 21
21
-
 22
22
-
 23
23
-
 24
24
-
 25
25
-
 26
26
-
 27
27
-
 28
28
-
 29
29
-
 30
30
-
 31
31
-
 32
32
-
 33
33
-
 34
34
-
 35
35
-
 36
36
-
 37
37
-
 38
38
-
 39
39
-
 40
40
-
 41
41
-
 42
42
-
 43
43
-
 44
44
-
 45
45
-
 46
46
-
 47
47
-
 48
48
-
 49
49
-
 50
50
-
 51
51
-
 52
52
-
 53
53
-
 54
54
-
 55
55
-
 56
56
-
 57
57
-
 58
58
-
 59
59
-
 60
60
-
 61
61
-
 62
62
-
 63
63
-
 64
64
-
 65
65
-
 66
66
-
 67
67
-
 68
68
-
 69
69
-
 70
70
-
 71
71
-
 72
72
-
 73
73
-
 74
74
-
 75
75
-
 76
76
-
 77
77
-
 78
78
-
 79
79
-
 80
80
-
 81
81
-
 82
82
-
 83
83
-
 84
84
-
 85
85
-
 86
86
-
 87
87
-
 88
88
-
 89
89
-
 90
90
-
 91
91
-
 92
92
-
 93
93
-
 94
94
-
 95
95
-
 96
96
-
 97
97
-
 98
98
-
 99
99
-
 100
100
-
 101
101
-
 102
102
-
 103
103
-
 104
104
-
 105
105
-
 106
106
-
 107
107
-
 108
108
-
 109
109
-
 110
110
-
 111
111
-
 112
112
-
 113
113
-
 114
114
-
 115
115
-
 116
116
-
 117
117
-
 118
118
-
 119
119
-
 120
120
-
 121
121
-
 122
122
-
 123
123
-
 124
124
-
 125
125
-
 126
126
-
 127
127
-
 128
128
-
 129
129
-
 130
130
-
 131
131
-
 132
132
-
 133
133
-
 134
134
-
 135
135
-
 136
136
-
 137
137
-
 138
138
-
 139
139
-
 140
140
-
 141
141
-
 142
142
-
 143
143
-
 144
144
-
 145
145
-
 146
146
-
 147
147
-
 148
148
-
 149
149
-
 150
150
-
 151
151
-
 152
152
-
 153
153
-
 154
154
-
 155
155
-
 156
156
-
 157
157
-
 158
158
-
 159
159
-
 160
160
-
 161
161
-
 162
162
-
 163
163
-
 164
164
-
 165
165
-
 166
166
-
 167
167
-
 168
168
-
 169
169
-
 170
170
-
 171
171
-
 172
172
-
 173
173
-
 174
174
-
 175
175
-
 176
176
-
 177
177
-
 178
178
-
 179
179
-
 180
180


Bosch BSGL31466/03 Användarmanual
- Kategori
- Dammsugare
- Typ
- Användarmanual
på andra språk
- italiano: Bosch BSGL31466/03 Manuale utente
- eesti: Bosch BSGL31466/03 Kasutusjuhend
- español: Bosch BSGL31466/03 Manual de usuario
- português: Bosch BSGL31466/03 Manual do usuário
- français: Bosch BSGL31466/03 Manuel utilisateur
- dansk: Bosch BSGL31466/03 Brugermanual
- Nederlands: Bosch BSGL31466/03 Handleiding
Relaterade papper
Andra dokument
-
Siemens VSZ31466/03 Användarmanual
-
-
-
-
-
-
Tristar SZ-2173 Användarmanual
-
Siemens VS08GP1269/14 Användarmanual
-
Tristar SZ-2190 Användarmanual
-
Princess 01.337501.01.001 Användarmanual