Medtronic guardian 2 link Användarmanual
- Typ
- Användarmanual

Transmitter
Transmetteur
Transmitter
Transmisor
Zender
Trasmettitore
Sender
Lähetin
Sändare
Sender
Transmissor
Transmissor
MP6025871-12C1 / A
RELEASED

MP6025871-12C1 / A
RELEASED

Contacts:
Africa: Medtronic Africa (Pty) Ltd.
Tel: +27 (0) 11 677 4800
Argentina: Corpomedica S.A.
Tel: +(11) 4 814 1333
Medtronic Directo 24/7: +0800 333 0752
Australia: Medtronic Australasia Pty. Ltd.
Tel: 1800 668 670 (product orders)
Tel: 1800 777 808 (customer help)
Azerbaijan: Isomed
Tel: +994 (12) 464 11 30
Bangladesh: Sonargaon Healthcare Pvt Ltd.
Mobile: (+91)-9903995417
or (+880)-1714217131
Belarus: ОДО “Баджин”
Tel: +375 17 313 0990
België/Belgique: N.V. Medtronic Belgium S.A.
Tel: 0800-90805
Bosnia and Herzegovina: Medimpex d.o.o.
Tel: +387 33 476 444
or +387 33 476 400
Fax: +387 33 476 401
or +387 33 432 241
Brasil: Medtronic Comercial Ltda.
Tel: +(11) 2182-9200
Medtronic Directo 24/7: +0800 773 9200
Bulgaria: RSR Ltd.
Tel: +359 885 428 900
Canada: Medtronic of Canada Ltd.
Tel: 1-800-284-4416 (toll free/sans-frais)
Chile: Medtronic Chile
Tel: +(9) 66 29 7126
Medtronic Directo 24/7: +1 230 020 9750
Medtronic Directo 24/7 (From Santiago): +(2)
595 2942
China: Medtronic (Shanghai) Ltd.
24 Hour Help (Cell): +86 400-820-1981
24 Hour Help (Landline): +86 800-820-1981
Colombia: Medtronic Latin America Inc. Sucursal
Colombia
Tel: +(1) 742 7300
Medtronic Directo 24/7 (Landline): +01 800 710
2170
Medtronic Directo 24/7 (Cellular): +1 381 4902
Croatia: Medtronic Adriatic d.o.o.
Tel: +385 1 488 11 20
Fax: +385 1 484 40 60
Danmark: Medtronic Danmark A/S
Tel: +45 32 48 18 00
Deutschland: Medtronic GmbH
Geschäftsbereich Diabetes
Telefon: +49 2159 8149-370
Telefax: +49 2159 8149-110
24-Stdn-Hotline: 0800 6464633
Eire: Accu-Science LTD.
Tel: +353 45 433000
España: Medtronic Ibérica S.A.
Tel: +34 91 625 05 42
Fax: +34 91 625 03 90
24 horas: +34 900 120 330
Europe: Medtronic Europe S.A. Europe, Middle
East and Africa Headquarters
Tel: +41 (0) 21-802-7000
France: Medtronic France S.A.S.
Tel: +33 (0) 1 55 38 17 00
Hellas: Medtronic Hellas S.A.
Tel: +30 210677-9099
Hong Kong: Medtronic International Ltd.
Tel: +852 2919-1300
To order supplies: +852 2919-1322
24-hour helpline: +852 2919-6441
India: I
ndia Medtronic Pvt. Ltd
Tel: (+91)-
80-22112245 / 32972359
Mobile: (+91)-9611633007
Indonesia: Medtronic International Ltd.
Tel: +65 6436 5090
or +65 6436 5000
MP6025871-12C1 / A
RELEASED

Israel: Agentek
Tel: +972 3649 3111
Italia: Medtronic Italia S.p.A.
Tel: +39 02 24137 261
Fax: +39 02 24138 210
Servizio assistenza tecnica:
Nº verde 24h: 800 20 90 20
Japan: Medtronic Japan Co. Ltd.
Tel: +81-3-6430-2019
24 Hr. Support Line: 0120-56-32-56
Kazakhstan: Medtronic BV in Kazakhstan
Tel: +7 727 311 05 80 (Almaty)
Tel: +7 717 224 48 11 (Astana)
Круглосуточная линия поддержки: 8 800 080
5001
Latin America: Medtronic, Inc.
Tel: 1(305) 500-9328
Fax: 1(786) 709-4244
Latvija: Ravemma Ltd.
Tel: +371 7273780
Macedonia: Alkaloid Kons Dooel
Tel: +389 2 3204 430
Magyarország: Medtronic Hungária Kft.
Tel: +36 1 889 0688
Malaysia: Medtronic International Ltd.
Tel: +603 7946 9000
Middle East and North Africa: Regional Office
Tel: +961-1-370 670
Montenegro: Glosarij
Tel: +382 20 642 495
Fax: +382 20 642 540
México: Medtronic Servicios S. de R. L. de C.V.
Tel (México DF): +(11) 029 058
Tel (Interior): +01 800 000 7867
Medtronic Directo 24/7 (from México DF):
+(55) 36 869 787
Medtronic Directo 24/7: +01 800 681 1845
Nederland, Luxembourg: Medtronic B.V.
Tel: +31 (0) 45-566-8291
Gratis: 0800-3422338
New Zealand: Medica Pacifica
Phone: 64 9 414 0318
Free Phone: 0800 106 100
Norge: Medtronic Norge A/S
Tel: +47 67 10 32 00
Fax: +47 67 10 32 10
Philippines: Medtronic International Ltd.
Tel: +65 6436 5090
or +65 6436 5000
Poccия: ООО «Медтроник»
Tel: +7 495 580 73 77
Круглосуточная линия поддержки: 8 800 200 76
36
Polska: Medtronic Poland Sp. Z.o.o.
Tel: +48 22 465 6934
Portugal: Medtronic Portugal Lda
Tel: +351 21 7245100
Fax: +351 21 7245199
Puerto Rico: Medtronic Puerto Rico
Tel: 787-753-5270
Republic of Korea: Medtronic Korea, Co., Ltd.
Tel: +82.2.3404.3600
Ro
man
ia: Medtronic BV Reprezentanta
Tel: +40 372 188 000
Schweiz: Medtronic (Schweiz) AG
Tel: +41 (0)31 868 0160
24-Stunden-Hotline: 0800 633333
Fax Allgemein: +41 (0)318680199
Serbia: Medtronic B.V. Serbia
Tel: +381 11 2095 900
Singapore: Medtronic International Ltd.
Tel: +65 6436 5090
or +65 6436 5000
Slovenija: Zaloker & Zaloker d.o.o.
brezplačna številka: 080 1880
Tel: +386 1 542 51 11
Slovenská republika: Medtronic Slovakia, s.r.o.
Tel: +421 26820 6942
HelpLine: +421 26820 6986
MP6025871-12C1 / A
RELEASED

Sri Lanka: Swiss Biogenics Ltd.
Mobile: (+91)-9003077499
or (+94)-777256760
Suomi: Medtronic Finland Oy
Tel: +358 20 7281 200
Help line: +358 400 100 313
Sverige: Medtronic AB
Tel: +46 8 568 585 20
Fax: +46 8 568 585 11
Taiwan: Medtronic (Taiwan) Ltd.
Tel: 02-21836000
Toll free: +886-800-005285
Thailand: Medtronic (Thailand) Ltd.
Tel: +662 232 7400
Türkiye: Medtronic Medikal Teknoloji
Ticaret Ltd. Sirketi.
Tel: +90 216 4694330
USA: Medtronic Diabetes Global Headquarters
24 Hour HelpLine: +1-800-646-4633
To order supplies: +1-800-843-6687
Ukraine: Medtronic B.V. Representative office in
Ukraine
Tel: +38 044 392 04 01
Лінія цілодобової підтримки:
0 800 508 300
United Kingdom: Medtronic Ltd.
Tel: +44 1923-205167
Österreich: Medtronic Österreich GmbH
Tel: +43 (0) 1 240 44-0
24 – Stunden – Hotline: 0820 820 190
Česká republika: Medtronic Czechia s.r.o.
Tel: +420 233 059 401
Non-stop helpLine:
+420 233 059 059
MP6025871-12C1 / A
RELEASED

MP6025871-12C1 / A
RELEASED

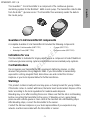
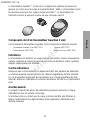
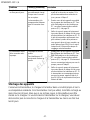
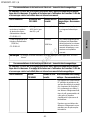
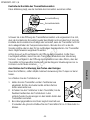
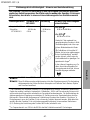
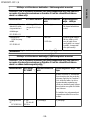
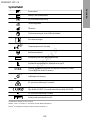
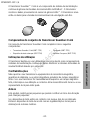
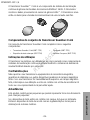
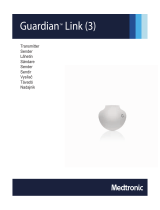
The Guardian™ 2 Link transmitter is a component of the continuous glucose
monitoring system for the MiniMed
™
640G insulin pump. The transmitter collects data
from the Enlite™ glucose sensor. The transmitter then wirelessly sends the data to
the insulin pump.
Guardian 2 Link transmitter kit components
A complete Guardian 2 Link transmitter kit includes the following components:
• Guardian 2 Link transmitter (MMT-7731)
•
Watertight Tester (MMT-7726)
•
Charger (MMT-7715)
•
One-press serter (MMT-7512)
Indications for use
The transmitter is indicated for single-patient use as a component of select Medtronic
continuous glucose sensing systems and MiniMed sensor-enabled pump systems.
Contraindications
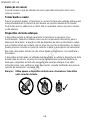
Do not expose your transmitter to MRI equipment, diathermy devices, or other
devices that generate strong magnetic fields. If your transmitter is inadvertently
exposed to a strong magnetic field, discontinue use and contact the 24 Hour
HelpLine or your local representative for further assistance.
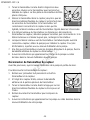
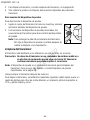
Warnings
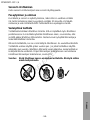
This product contains small parts and may pose a choking hazard for young children.
If the tester comes in contact with blood, the tester must be discarded. Dispose of the
tester according to the local regulations for medical waste disposal.
Bleeding may occur after inserting the sensor. Make sure that the site is not bleeding
before connecting the transmitter to the sensor. If bleeding occurs, apply steady
pressure with a sterile gauze or clean cloth at the insertion site until bleeding stops.
After bleeding stops, connect the transmitter to the sensor.
Contact the 24 Hour HelpLine or your local representative if you experience any
adverse reactions associated with the transmitter or sensor.
-1-
English
MP6025871-12C1 / A
RELEASED

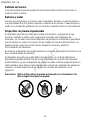
Magnetic fields
Do not expose your transmitter to MRI equipment, diathermy devices, or other devices
that generate strong magnetic fields. If your transmitter is inadvertently exposed to a
strong magnetic field, discontinue use and contact the 24 Hour HelpLine or your local
representative for further assistance.
X-rays, MRIs, diathermy devices, and CT scans
If you are going to have an x-ray, diathermy treatment, CT scan, MRI or other type of
exposure to radiation, remove your sensor and transmitter before entering a room
containing any of these equipment.
Important information about airport security systems, and using your transmitter on an
airplane, can be found on the Emergency Card. Be sure to carry the Emergency Card
provided with your device when you are traveling.
Precautions
Refer to the Enlite Sensor User Guide for all precautions, warnings, and instructions
relating to the sensor.
Always use the tester when cleaning the transmitter. Do not use any other test plug with
the transmitter.
Do not twist the tester or sensor while attached to the transmitter. This will damage the
transmitter.
Do not allow water, or any other liquid, to come in contact with the tester when it is not
connected to the transmitter. A wet tester can cause damage to the transmitter.
Do not allow the transmitter to come in contact with any liquid when not connected to a
sensor or to the tester.
Do not clean the o-rings on the tester, as this can damage the o-rings.
Notice
Caution: Any changes or modifications to the devices not expressly approved by
Medtronic Diabetes could interfere with your ability to operate the
equipment, cause injury, and void your warranty.
Radio Frequency (RF) communication
This device complies with the United States Federal Communications Commission (FCC)
and international standards for electromagnetic compatibility.
-2-
MP6025871-12C1 / A
RELEASED

This device complies with Part 15 of the FCC Rules. Operation is subject to the
following two conditions: (1) This device may not cause harmful interference, and (2)
this device must accept any interference received, including interference that may
cause undesired operation.
These standards are designed to provide reasonable protection against excessive
radio frequency interference, and prevent undesirable operation of the devices from
unwanted electromagnetic interference.
This equipment has been tested and found to comply with the limits for a Class B
digital device, pursuant to Part 15 of the FCC rules. These limits are designed to
provide reasonable protection against harmful interference in a residential
installation. This equipment generates, uses, and can radiate radio frequency energy
and, if not installed and used in accordance with the instructions, may cause harmful
interference to radio communications. However, there is no guarantee that
interference will not occur in a particular installation. If this equipment does cause
harmful interference to radio or television reception, which can be determined by
turning the equipment off and on, the user is encouraged to try to correct the
interference by one or more of the following measures:
• Reorient or relocate the receiving antenna.
• Increase the separation between the equipment and the receiver.
This device can generate, use, and radiate radio frequency energy and, if installed
and used in accordance with the instructions, may cause harmful interference to
radio communications. If the device does cause interference to radio or television
reception, you are encouraged to try to correct the interference by one or more of the
following measures:
• Decrease the distance between the transmitter and the insulin pump to 1.8
meters (6 feet) or less.
• Increase the separation between the transmitter and the device that is receiving/
emitting interference.
If other devices that employ radio frequencies are in use, such as cell phones,
cordless phones, and wireless networks, they may prevent communication between
the transmitter and the insulin pump. This interference does not cause any incorrect
data to be sent and does not cause any harm to your devices. Moving away from, or
turning off, these other devices may enable communication. If you continue to
experience RF interference, please contact your local representative.
Caution: Changes or modifications to the internal RF transmitter or antenna
not expressly approved by Medtronic could void the user's
authority to operate this insulin delivery system.
-3-
English
MP6025871-12C1 / A
RELEASED

For Canada only
This device complies with Industry Canada licence-exempt RSS standard(s).
Operation is subject to the following two conditions: (1) this device may not cause
interference, and (2) this device must accept any interference, including
interference that may cause undesired operation of the device.
Le présent appareil est conforme aux CNR d'Industrie Canada applicables aux
appareils radio exempts de licence. L'exploitation est autorisée aux deux conditions
suivantes : (1) l'appareil ne doit pas produire de brouillage, et (2) l'appareil doit
accepter tout brouillage radioélectrique subi, même si le brouillage est susceptible
d'en compromettre le fonctionnement.
Directive 1999/5/EC
Medtronic declares that this product is in conformity with the essential requirements of
Directive 1999/5/EC on Radio and Telecommunications Terminal Equipment.
For additional information, contact Medtronic MiniMed at the address or phone number
provided on the back cover.
Assistance
Please contact your local representative for assistance. Refer to the Medtronic Diabetes
International Contacts list at the beginning of this user guide for contact information.
Charger
The transmitter contains a non-replaceable, rechargeable battery that you can recharge
as needed with the charger. The charger has a green light that shows the charging status
and a red light that communicates any problems during charging. If you see a red light,
see the Troubleshooting section. The charger needs one AAA alkaline battery.
Note: If the battery is installed incorrectly or is low, the charger will not work. Repeat the
battery installation steps using a new battery.
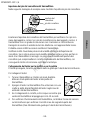
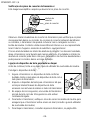
Installing a battery in the charger
To install a battery in the charger:
1
Push the battery cover in and slide it off (as shown in the following illustration).
2
Insert a new alkaline AAA battery. Make sure the + and - symbols on the battery align
with these same symbols shown on the charger.
-4-
MP6025871-12C1 / A
RELEASED

3 Slide the cover back on the charger until it clicks into place.
Charging the transmitter
Caution: Charge the transmitter after each sensor use. A fully charged
transmitter works at least six days without recharging. A depleted
transmitter can take up to one hour to recharge.
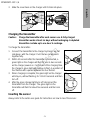
To charge the transmitter:
1
Connect the transmitter to the charger by lining it up, flat
side down, with the charger. Push the two components
together fully.
2
Within 10 seconds after the transmitter is connected, a
green light on the charger will flash for one to two seconds
as the charger powers on. For the rest of the charging time,
the charger’s green light will continue to flash in a pattern of
four flashes with a pause between the four flashes.
3
When charging is complete, the green light on the charger
will stay on, without flashing, for 15 to 20 seconds and then
turn off.
4
After the green charger light turns off, disconnect the
transmitter from the charger. The green light on the
transmitter will flash for about five seconds and then turn
off.
Inserting the sensor
Always refer to the serter user guide for instructions on how to insert the sensor.
-5-
English
MP6025871-12C1 / A
RELEASED

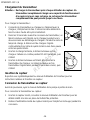
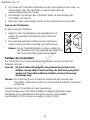
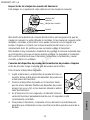
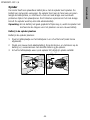
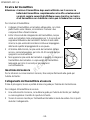
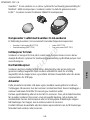
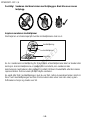
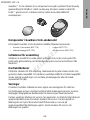
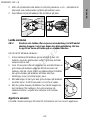
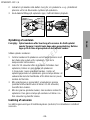
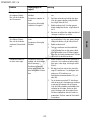
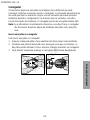
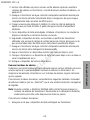
Connecting the transmitter to the sensor
Before proceeding, have your pump user guide available.
To connect the transmitter to the sensor:
1
After the sensor is inserted, consult your serter user guide for details on applying the
required overtape.
2
Hold the rounded end of the inserted sensor to prevent it from moving during
connection.
3
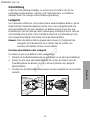
Hold the transmitter as shown. Line up the two notches on the
transmitter with the side arms of the sensor. The flat side of the
transmitter should face the skin.
4
Slide the transmitter onto the sensor until the sensor’s flexible
arms snap into the notches on the transmitter. If the transmitter
is properly connected, and if the sensor has had enough time to
become hydrated, the green light on the transmitter will flash
within 10 seconds.
5
If the transmitter light does not flash, disconnect the transmitter from the sensor, wait
for several seconds and then reconnect. If the transmitter light still does not flash,
charge the transmitter.
6
When the transmitter light flashes green when connected to the sensor, use your
pump to start the sensor. For more instructions, see your pump user guide.
7
After the transmitter successfully sends sensor data to the pump, attach the sensor's
adhesive tab to the transmitter.
8
Follow the instructions that appear on the pump screen or follow the instructions in
your pump user guide.
-6-
MP6025871-12C1 / A
RELEASED

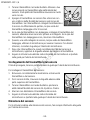
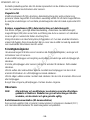
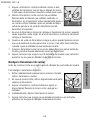
Disconnecting the transmitter from the sensor
Before proceeding, have your pump user guide available.
To disconnect the transmitter from the sensor:
1
Carefully remove any occlusive dressing from the
transmitter and sensor.
2
For the Enlite sensor, remove the adhesive tab from the top
of the transmitter.
3
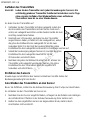
Hold the transmitter as shown, and pinch the flexible side
arms of the sensor between your thumb and forefinger.
4
Gently pull the transmitter away from the sensor.
5
Follow the instructions that appear on the pump or follow
the instructions in your pump user guide.
Removing the sensor
Always refer to the sensor user guide for instructions on how to remove the sensor.
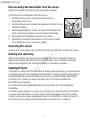
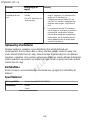
Bathing and swimming
After the transmitter and sensor are connected, they form a waterproof seal to a
depth of 2.4 meters (eight feet) for up to 30 minutes. You can shower and swim
without removing them. No occlusive dressing or overtape is needed.
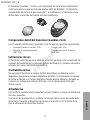
Watertight Tester
The tester is used to test the transmitter to make sure it is working. It is also used as
a required component for cleaning the transmitter. Properly connecting the tester to
the transmitter will ensure that fluids do not come in contact with the transmitter’s
connector pins. Fluids can cause connector pins to corrode and affect the
transmitter’s performance.
Do not twist the tester while attached to the transmitter. This will damage the
transmitter.
The tester can be used for one year. If you continue to use the tester for more than
one year, the transmitter's connector pins could be damaged, because the tester
cannot continue to provide a waterproof seal. For instructions on how to check the
connector pins, see Inspecting the transmitter connector pins, on page 8.
-7-
English
MP6025871-12C1 / A
RELEASED

Caution: Only use the tester with the transmitter. Do not use any other test plug.
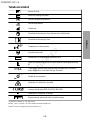
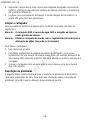
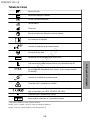
i
✓
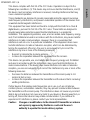
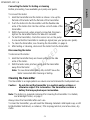
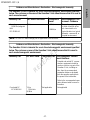
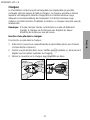
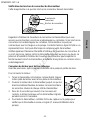
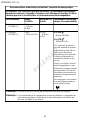
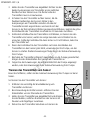
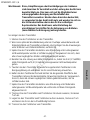
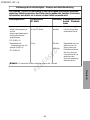
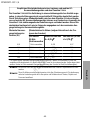
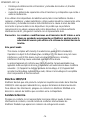
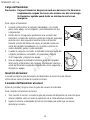
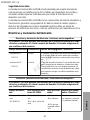
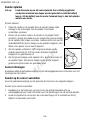
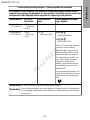
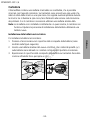
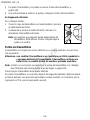
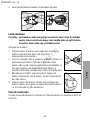
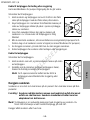
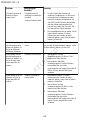
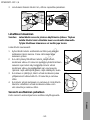
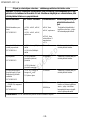
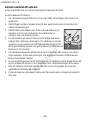
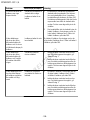
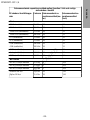
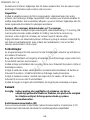
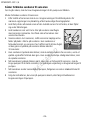
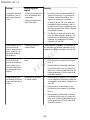
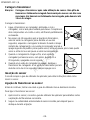
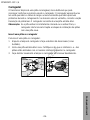
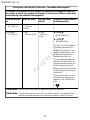
Inspecting the transmitter connector pins
This image is an example of how the connector pins should look.
connector opening
connector pins
housing
Look inside the transmitter’s connector opening to make sure that the connector pins are
not damaged or corroded. If the connector pins are damaged or corroded, the transmitter
cannot communicate with the charger or pump. Contact the 24 Hour HelpLine or your
local representative. It may be time to replace your transmitter.
Also look for moisture inside the connector opening. If you see any moisture, allow the
transmitter to dry for at least one hour. Moisture inside the connector opening could
cause the transmitter to not work properly, and could cause corrosion and damage over
time.
-8-
MP6025871-12C1 / A
RELEASED

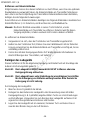
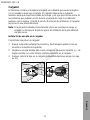
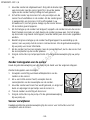
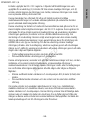
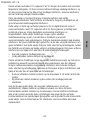
Connecting the tester for testing or cleaning
Before proceeding, have available your pump user guide.
To connect the tester:
1
Hold the transmitter and the tester as shown. Line up the
flat side of the tester with the flat side of the transmitter.
2
Push the tester into the transmitter until the flexible side
arms of the tester click into the notches on both sides of the
transmitter.
3
Within five seconds, when properly connected, the green
light on the transmitter flashes for about 10 seconds.
4
To test the transmitter, check the sensor icon on the pump
to ensure that the transmitter is sending a signal (see your pump user guide).
5
To clean the transmitter, see Cleaning the transmitter, on page 9.
6
After testing or cleaning, disconnect the tester from the transmitter.
Disconnecting the tester
To disconnect the tester:
1
Hold the transmitter body as shown and pinch the side
arms of the tester.
2
With the tester arms pinched, gently pull the transmitter
away from the tester.
Note: To save transmitter battery life, do NOT leave the
tester connected after cleaning or testing.
Cleaning the transmitter
The transmitter is a single-patient use device and not intended for multi-patient use.
Caution: Do not discard the transmitter in a medical waste container or
otherwise subject it to incineration. The transmitter contains a
battery that may explode upon incineration.
Note: The tester is a required component for cleaning the transmitter. For details,
see Watertight Tester, on page 7.
Always clean the transmitter after each use.
To clean the transmitter, you will need the following materials: mild liquid soap, a soft-
bristled toddler toothbrush, a container, 70% isopropyl alcohol, and a few clean, dry
cloths.
-9-
English
MP6025871-12C1 / A
RELEASED

Warning: Cracking, flaking, or damage of the housing are signs of deterioration
and the performance of the device may be compromised. This may
affect the ability to properly clean and disinfect the transmitter. If these
signs are noted, stop using the device and call the 24 Hour HelpLine or
your local representative. The device must be discarded according to
local regulations for battery disposal (non-incineration).
To clean the transmitter:
1
Attach the tester to the transmitter.
2
If optional occlusive dressing or overtape was used and there is adhesive residue on
the transmitter, see Removing adhesive residue, on page 10.
3
Rinse the transmitter under room temperature tap water for at least one minute, and
until visibly clean. Make sure all hard-to-reach areas are rinsed completely.
4
Prepare a mild liquid soap solution using 5 milliliters (1 teaspoon) of liquid soap per
3.8 liters (1 gallon) of room temperature tap water.
5
With tester still attached, submerge the transmitter in the cleaning solution and soak
for one minute.
6
Holding the tester, brush the entire surface of the transmitter using a soft-bristled
toddler toothbrush. Make sure to brush all hard-to-reach areas until visibly clean.
7
Rinse the transmitter under running room temperature tap water for at least one
minute, and until all visible liquid soap is gone.
8
Dry the transmitter and tester with a clean, dry cloth.
9
Place the transmitter and tester on a clean, dry cloth and air dry them completely.
10
Disconnect the tester from the transmitter.
Removing adhesive residue
You may need to perform this procedure only if you have used optional occlusive
dressing, which may leave adhesive residue on the transmitter. If you visually inspect the
transmitter and see adhesive residue on it, follow the instructions below.
To remove adhesive residue, you will need the following materials: medical adhesive
remover (such as Detachol
®
- which is a mineral spirit) and cotton swabs.
Note: During testing, Medtronic MiniMed used Detachol to remove the adhesive residue
from the transmitter. Detachol is recommended for use but may not be available in
all countries.
To remove adhesive residue:
1
Make sure the tester is attached to the transmitter.
-10-
MP6025871-12C1 / A
RELEASED

2 Holding the tester, saturate a cotton swab in the Detachol solution and gently rub
the adhesive residue on the transmitter until it is fully removed.
3
Continue with the cleaning procedure. See Cleaning the transmitter, on page 9
for details.
Cleaning the charger
This procedure is for general cleaning as required, based on physical appearance.
Caution: The charger is NOT waterproof. Do NOT immerse in water or any
other cleaning agent.
Caution: Dispose the charger according to the local regulations for battery
disposal (non-incineration).
To clean the charger:
1
Wash your hands thoroughly.
2
Use a damp cloth with mild cleaning solution, such as a dishwashing detergent,
to clean any dirt or foreign material from the outside of the charger. Never use
organic solvents, such as paint thinner or acetone, to clean the charger.
3
Place the charger on a clean, dry cloth and air dry for two to three minutes.
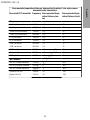
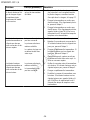
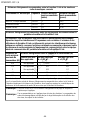
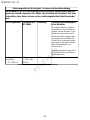
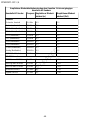
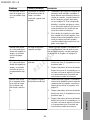
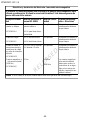
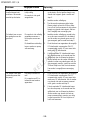
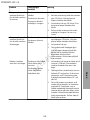
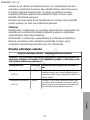
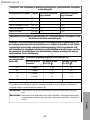
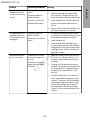
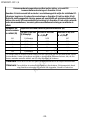
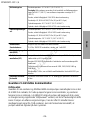
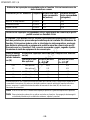
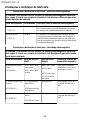
Troubleshooting
The following table contains troubleshooting information for the transmitter, charger,
and tester. For more information about troubleshooting, see your pump user guide.
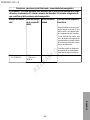
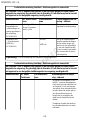
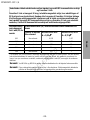
Problem Likely Cause(s) Resolution
You connected the
transmitter to the
charger and no lights
came on.
The transmitter connec-
tor pins are damaged or
corroded.
Your charger battery has
no power.
1 Check the transmitter connector pins for
damage or corrosion. For more informa-
tion about your connector pins, see In-
specting the transmitter connector pins,
on page 8. If the pins are damaged or cor-
roded, contact the 24 Hour HelpLine or
your local representative. It may be time
to replace your transmitter.
2
If there is no damage to the connector
pins, replace the battery in the charger.
For instructions on replacing your charger
battery, see Installing a battery in the
charger, on page 4.
-11-
English
MP6025871-12C1 / A
RELEASED

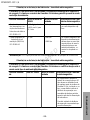
Problem Likely Cause(s) Resolution
During charging, the
flashing green light on
the charger turns off
and you see a flashing
red light on the charg-
er.
Your charger battery is
low on power.
Replace the battery in the charger. For instruc-
tions on replacing your charger battery, see In-
stalling a battery in the charger, on page 4.
During charging, the
flashing green light on
the charger turns off
and you see a series of
quick flashing red lights
on the charger.
Your transmitter is low
on power.
1
Charge the transmitter continuously for
one hour. If flashing does not stop, pro-
ceed to step 2.
2
Charge the transmitter continuously for
eight hours. If flashing does not stop, call
the 24 Hour HelpLine or your local repre-
sentative. It may be time to replace your
transmitter.
During charging, a mix
of quick and long flash-
ing red lights appear
on the charger.
Your charger and your
transmitter are low on
power.
1
Replace the battery in the charger. For in-
structions on replacing your charger bat-
tery, see Installing a battery in the
charger, on page 4.
2
Charge the transmitter continuously for
one hour. If flashing does not stop, pro-
ceed to step 3.
3
Charge the transmitter continuously for
eight hours. If flashing does not stop, call
the 24 Hour HelpLine or your local repre-
sentative. It may be time to replace your
transmitter.
The green light on the
transmitter does not
flash when you con-
nect it to the sensor.
Your transmitter is not
fully connected.
Your transmitter is low
on power.
Your sensor is not prop-
erly inserted into your
body.
1
Disconnect the transmitter from the sen-
sor.
2
Wait for five seconds and reconnect them.
If the green light still does not flash, pro-
ceed to step 3.
3
Fully charge the transmitter. If the green
light still does not flash, proceed to step 4.
4
The sensor may not be properly inserted
into your body. Insert a new sensor.
-12-
MP6025871-12C1 / A
RELEASED

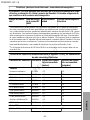
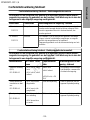
Problem Likely Cause(s) Resolution
The green light on the
transmitter does not
flash when you con-
nect it to the tester.
Your transmitter is low
on power.
Your transmitter is not
fully connected.
1 Check the connection between the trans-
mitter and the tester. If the green light still
does not flash, proceed to step 2.
2
Fully charge the transmitter.
3
Test the transmitter with the tester again.
If you still do not see the green light flash,
call the 24 Hour HelpLine or your local
representative. It may be time to replace
your transmitter.
Your transmitter bat-
tery does not last for
six days.
Your transmitter is not
fully charged when you
connect it to the sensor.
The transmitter and
pump frequently lose
wireless connection.
1
Fully charge the transmitter before con-
necting it to the sensor. If the transmitter
battery still does not last for six days, pro-
ceed to step 2.
2
Move away from any device that can
cause RF interference. For more informa-
tion on RF interference, see Radio Fre-
quency (RF) communication, on page 2.
3
Make sure your pump and your transmitter
are located on the same side of your body
to minimize any RF interference. If your
fully charged transmitter battery continues
to lose power before a full six days, call
the 24 Hour HelpLine or your local repre-
sentative. It may be time to replace your
transmitter.
Your transmitter has
lost connection with
your pump.
Your pump is out of
range.
There is RF interference
from other devices.
1
Move away from any device that can
cause RF interference. For more informa-
tion on RF interference, see Radio Fre-
quency (RF) communication, on page 2. If
your transmitter is still not communicating
with your pump, proceed to step 2.
2
Make sure your pump and your transmitter
are located on the same side of your body
to minimize any RF interference. If your
transmitter is still not communicating with
your pump, call the 24 Hour HelpLine or
your local representative for assistance.
-13-
English
MP6025871-12C1 / A
RELEASED

Storing the devices
Store the transmitter, charger, and tester in a clean, dry location at room temperature. If
the transmitter is not in use, you must charge the transmitter at least once every 60 days.
Although not required, you may store the transmitter on the charger. If you are storing the
transmitter on the charger, you must disconnect and reconnect the charger and the
transmitter at least once every 60 days.
Disposal
Discard the transmitter according to local regulations for battery disposal.
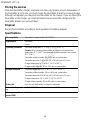
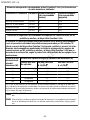
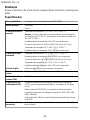
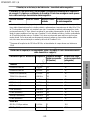
Specifications
Biocompatibility Transmitter: Complies with EN ISO 10993-1
Applied parts Transmitter
Sensor
Operating conditions Transmitter temperature: -5 °C to 45 °C (23 °F to 113 °F)
Caution: When operating the transmitter on a tester in air temperatures
greater than 41 °C (106 °F), the temperature of the transmitter may exceed
43 °C (109 °F)
Transmitter relative humidity: 5% to 95% with no condensation
Transmitter pressure: 61.36 kPa to 106.17 kPa (8.9 psi to 15.4 psi)
Charger temperature: 10 °C to 40 °C (50 °F to 104 °F)
Charger relative humidity: 30% to 75% with no condensation
Storage conditions Transmitter temperature: -25 °C to 55 °C (-13 °F to 131 °F)
Transmitter relative humidity: 10% to 100% with condensation
Transmitter pressure: 61.36 kPa to 106.17 kPa (8.9 psi to 15.4 psi)
Charger temperature: -10 °C to 50 °C (14 °F to 122 °F)
Charger relative humidity: 10% to 95% with no condensation
Battery life Uses one new AAA battery to charge the transmitter.
Transmitter frequen-
cy
2.4 GHz, 2M65G1D modulation, less than 1mW ERP
Maximum output
power (EIRP)
-0.63 dBm
-14-
MP6025871-12C1 / A
RELEASED
Sidan laddas...
Sidan laddas...
Sidan laddas...
Sidan laddas...
Sidan laddas...
Sidan laddas...
Sidan laddas...
Sidan laddas...
Sidan laddas...
Sidan laddas...
Sidan laddas...
Sidan laddas...
Sidan laddas...
Sidan laddas...
Sidan laddas...
Sidan laddas...
Sidan laddas...
Sidan laddas...
Sidan laddas...
Sidan laddas...
Sidan laddas...
Sidan laddas...
Sidan laddas...
Sidan laddas...
Sidan laddas...
Sidan laddas...
Sidan laddas...
Sidan laddas...
Sidan laddas...
Sidan laddas...
Sidan laddas...
Sidan laddas...
Sidan laddas...
Sidan laddas...
Sidan laddas...
Sidan laddas...
Sidan laddas...
Sidan laddas...
Sidan laddas...
Sidan laddas...
Sidan laddas...
Sidan laddas...
Sidan laddas...
Sidan laddas...
Sidan laddas...
Sidan laddas...
Sidan laddas...
Sidan laddas...
Sidan laddas...
Sidan laddas...
Sidan laddas...
Sidan laddas...
Sidan laddas...
Sidan laddas...
Sidan laddas...
Sidan laddas...
Sidan laddas...
Sidan laddas...
Sidan laddas...
Sidan laddas...
Sidan laddas...
Sidan laddas...
Sidan laddas...
Sidan laddas...
Sidan laddas...
Sidan laddas...
Sidan laddas...
Sidan laddas...
Sidan laddas...
Sidan laddas...
Sidan laddas...
Sidan laddas...
Sidan laddas...
Sidan laddas...
Sidan laddas...
Sidan laddas...
Sidan laddas...
Sidan laddas...
Sidan laddas...
Sidan laddas...
Sidan laddas...
Sidan laddas...
Sidan laddas...
Sidan laddas...
Sidan laddas...
Sidan laddas...
Sidan laddas...
Sidan laddas...
Sidan laddas...
Sidan laddas...
Sidan laddas...
Sidan laddas...
Sidan laddas...
Sidan laddas...
Sidan laddas...
Sidan laddas...
Sidan laddas...
Sidan laddas...
Sidan laddas...
Sidan laddas...
Sidan laddas...
Sidan laddas...
Sidan laddas...
Sidan laddas...
Sidan laddas...
Sidan laddas...
Sidan laddas...
Sidan laddas...
Sidan laddas...
Sidan laddas...
Sidan laddas...
Sidan laddas...
Sidan laddas...
Sidan laddas...
Sidan laddas...
Sidan laddas...
Sidan laddas...
Sidan laddas...
Sidan laddas...
Sidan laddas...
Sidan laddas...
Sidan laddas...
Sidan laddas...
Sidan laddas...
Sidan laddas...
Sidan laddas...
Sidan laddas...
Sidan laddas...
Sidan laddas...
Sidan laddas...
Sidan laddas...
Sidan laddas...
Sidan laddas...
Sidan laddas...
Sidan laddas...
Sidan laddas...
Sidan laddas...
Sidan laddas...
Sidan laddas...
Sidan laddas...
Sidan laddas...
Sidan laddas...
Sidan laddas...
Sidan laddas...
Sidan laddas...
Sidan laddas...
Sidan laddas...
Sidan laddas...
Sidan laddas...
Sidan laddas...
Sidan laddas...
Sidan laddas...
Sidan laddas...
Sidan laddas...
Sidan laddas...
Sidan laddas...
Sidan laddas...
Sidan laddas...
Sidan laddas...
Sidan laddas...
Sidan laddas...
Sidan laddas...
Sidan laddas...
Sidan laddas...
Sidan laddas...
Sidan laddas...
Sidan laddas...
Sidan laddas...
Sidan laddas...
Sidan laddas...
Sidan laddas...
Sidan laddas...
Sidan laddas...
Sidan laddas...
Sidan laddas...
Sidan laddas...
Sidan laddas...
Sidan laddas...
Sidan laddas...
Sidan laddas...
Sidan laddas...
Sidan laddas...
Sidan laddas...
Sidan laddas...
Sidan laddas...
Sidan laddas...
Sidan laddas...
Sidan laddas...
Sidan laddas...
Sidan laddas...
Sidan laddas...
Sidan laddas...
Sidan laddas...
Sidan laddas...
Sidan laddas...
Sidan laddas...
Sidan laddas...
Sidan laddas...
Sidan laddas...
Sidan laddas...
Sidan laddas...
Sidan laddas...
Sidan laddas...
Sidan laddas...
Sidan laddas...
Sidan laddas...
Sidan laddas...
Sidan laddas...
Sidan laddas...
Sidan laddas...
Sidan laddas...
Sidan laddas...
Sidan laddas...
Sidan laddas...
Sidan laddas...
Sidan laddas...
Sidan laddas...
Sidan laddas...
Sidan laddas...
Sidan laddas...
Sidan laddas...
Sidan laddas...
Sidan laddas...
Sidan laddas...
Sidan laddas...
Sidan laddas...
Sidan laddas...
Sidan laddas...
Sidan laddas...
Sidan laddas...
Sidan laddas...
Sidan laddas...
Sidan laddas...
Sidan laddas...
Sidan laddas...
Sidan laddas...
Sidan laddas...
Sidan laddas...
Sidan laddas...
Sidan laddas...
Sidan laddas...
Sidan laddas...
Sidan laddas...
Sidan laddas...
Sidan laddas...
Sidan laddas...
Sidan laddas...
Sidan laddas...
Sidan laddas...
Sidan laddas...
Sidan laddas...
Sidan laddas...
Sidan laddas...
Sidan laddas...
Sidan laddas...
Sidan laddas...
Sidan laddas...
Sidan laddas...
Sidan laddas...
Sidan laddas...
Sidan laddas...
Sidan laddas...
-
 1
1
-
 2
2
-
 3
3
-
 4
4
-
 5
5
-
 6
6
-
 7
7
-
 8
8
-
 9
9
-
 10
10
-
 11
11
-
 12
12
-
 13
13
-
 14
14
-
 15
15
-
 16
16
-
 17
17
-
 18
18
-
 19
19
-
 20
20
-
 21
21
-
 22
22
-
 23
23
-
 24
24
-
 25
25
-
 26
26
-
 27
27
-
 28
28
-
 29
29
-
 30
30
-
 31
31
-
 32
32
-
 33
33
-
 34
34
-
 35
35
-
 36
36
-
 37
37
-
 38
38
-
 39
39
-
 40
40
-
 41
41
-
 42
42
-
 43
43
-
 44
44
-
 45
45
-
 46
46
-
 47
47
-
 48
48
-
 49
49
-
 50
50
-
 51
51
-
 52
52
-
 53
53
-
 54
54
-
 55
55
-
 56
56
-
 57
57
-
 58
58
-
 59
59
-
 60
60
-
 61
61
-
 62
62
-
 63
63
-
 64
64
-
 65
65
-
 66
66
-
 67
67
-
 68
68
-
 69
69
-
 70
70
-
 71
71
-
 72
72
-
 73
73
-
 74
74
-
 75
75
-
 76
76
-
 77
77
-
 78
78
-
 79
79
-
 80
80
-
 81
81
-
 82
82
-
 83
83
-
 84
84
-
 85
85
-
 86
86
-
 87
87
-
 88
88
-
 89
89
-
 90
90
-
 91
91
-
 92
92
-
 93
93
-
 94
94
-
 95
95
-
 96
96
-
 97
97
-
 98
98
-
 99
99
-
 100
100
-
 101
101
-
 102
102
-
 103
103
-
 104
104
-
 105
105
-
 106
106
-
 107
107
-
 108
108
-
 109
109
-
 110
110
-
 111
111
-
 112
112
-
 113
113
-
 114
114
-
 115
115
-
 116
116
-
 117
117
-
 118
118
-
 119
119
-
 120
120
-
 121
121
-
 122
122
-
 123
123
-
 124
124
-
 125
125
-
 126
126
-
 127
127
-
 128
128
-
 129
129
-
 130
130
-
 131
131
-
 132
132
-
 133
133
-
 134
134
-
 135
135
-
 136
136
-
 137
137
-
 138
138
-
 139
139
-
 140
140
-
 141
141
-
 142
142
-
 143
143
-
 144
144
-
 145
145
-
 146
146
-
 147
147
-
 148
148
-
 149
149
-
 150
150
-
 151
151
-
 152
152
-
 153
153
-
 154
154
-
 155
155
-
 156
156
-
 157
157
-
 158
158
-
 159
159
-
 160
160
-
 161
161
-
 162
162
-
 163
163
-
 164
164
-
 165
165
-
 166
166
-
 167
167
-
 168
168
-
 169
169
-
 170
170
-
 171
171
-
 172
172
-
 173
173
-
 174
174
-
 175
175
-
 176
176
-
 177
177
-
 178
178
-
 179
179
-
 180
180
-
 181
181
-
 182
182
-
 183
183
-
 184
184
-
 185
185
-
 186
186
-
 187
187
-
 188
188
-
 189
189
-
 190
190
-
 191
191
-
 192
192
-
 193
193
-
 194
194
-
 195
195
-
 196
196
-
 197
197
-
 198
198
-
 199
199
-
 200
200
-
 201
201
-
 202
202
-
 203
203
-
 204
204
-
 205
205
-
 206
206
-
 207
207
-
 208
208
-
 209
209
-
 210
210
-
 211
211
-
 212
212
-
 213
213
-
 214
214
-
 215
215
-
 216
216
-
 217
217
-
 218
218
-
 219
219
-
 220
220
-
 221
221
-
 222
222
-
 223
223
-
 224
224
-
 225
225
-
 226
226
-
 227
227
-
 228
228
-
 229
229
-
 230
230
-
 231
231
-
 232
232
-
 233
233
-
 234
234
-
 235
235
-
 236
236
-
 237
237
-
 238
238
-
 239
239
-
 240
240
-
 241
241
-
 242
242
-
 243
243
-
 244
244
-
 245
245
-
 246
246
-
 247
247
-
 248
248
-
 249
249
-
 250
250
-
 251
251
-
 252
252
-
 253
253
-
 254
254
-
 255
255
-
 256
256
-
 257
257
-
 258
258
-
 259
259
-
 260
260
-
 261
261
-
 262
262
-
 263
263
-
 264
264
-
 265
265
-
 266
266
-
 267
267
-
 268
268
-
 269
269
-
 270
270
-
 271
271
-
 272
272
-
 273
273
-
 274
274
-
 275
275
-
 276
276
-
 277
277
-
 278
278
-
 279
279
-
 280
280
-
 281
281
-
 282
282


Medtronic guardian 2 link Användarmanual
- Typ
- Användarmanual
på andra språk
- italiano: Medtronic guardian 2 link Manuale utente
- español: Medtronic guardian 2 link Manual de usuario
- Deutsch: Medtronic guardian 2 link Benutzerhandbuch
- português: Medtronic guardian 2 link Manual do usuário
- français: Medtronic guardian 2 link Manuel utilisateur
- dansk: Medtronic guardian 2 link Brugermanual
- Nederlands: Medtronic guardian 2 link Handleiding
Relaterade papper
Andra dokument
-
 Medtronic Diabetes Guardian Link (3) Användarmanual
-
Philips SCE2110/27 Användarmanual
-
 Nutricia Flocare Flocare Infinity Instructions For Use Manual
-
Yamaha RX-950 Bruksanvisning
-
-
-
-
-
-

