
3
24.02.11 12:18

3
H4286A
H4286B
INDOOR / OUTDOOR THERMOMETER
Operation and Safety Notes
INOMHUS- / UTOMHUSTERMOMETER
Bruksanvisning och säkerhetsanvisningar
SISÄ- JA ULKOLÄMPÖMITTARI
Käyttö- ja turvallisuusohjeet
INDEN- / UDENDØRS TERMOMETER
Betjenings- og sikkerhetshenvisninger
24.02.11 12:18

GB / IE Operation and Safety Notes Page 4
FI Käyttö- ja turvaohjeet Sivu 22
SE Bruksanvisning och säkerhetsanvisningar Sidan 40
DK Brugs- og sikkerhedsanvisninger Side 57
24.02.11 12:18

24.02.11 12:18

3
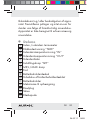
A
1,5V AAA x 1
B
8
13
14
15
9
10
11
12
1
2
3
4
5
6
7
24.02.11 14:55

4 GB/IE
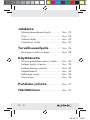
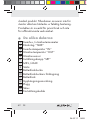
Introduction
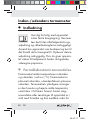
Intended use ...........................................Page 5
Description of parts ................................Page 6
Technical data ........................................Page 7
Scope of supply ......................................Page 7
Safety notes .....................................Page 8
Battery Safety Instructions ......................Page 10
Getting started
Inserting / changing the battery .............Page 12
Positioning / installing the device ...........Page 13
Mounting the device on a wall ..............Page 15
Temperature memory .............................Page 16
Setting the time .......................................Page 17
Troubleshooting ......................................Page 18
Cleaning and Care ......................Page 19
Disposal ................................................Page 19
24.02.11 14:55

5 GB/IE
Indoor / outdoor thermometer
Introduction
Familiarise yourself with the product
before using it for the first time. In
addition please refer carefully to
the operating instructions below and the safety
advice. Use the product only as described
and for the indicated purpose. Keep these
instructions in a safe place. If you pass the
product on to anyone else, please ensure that
you also pass on all the documentation.
Intended use
The thermometer measures the inside and
outside temperature in Celsius (°C). The main
unit is placed indoor, and sensor can be put
outdoor. The thermometer also displays the
highest and lowest measured temperature
and the time in 24-hour format. Other uses or
changes to the device are considered to be
contrary to the intended use and may result
24.02.11 14:55

6 GB/IE
in personal injury and / or damage to the
device. The manufacturer accepts no liability
for damage caused through the use of the
device in contradiction of its intended use.
The device is not intended for commercial use.
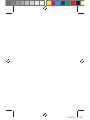
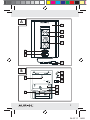
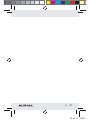
Description of parts
1
In / outdoor thermometer
2
“TIME” display
3
“IN” indoor temperature display
4
“OUT” outdoor temperature display
5
External sensor
6
“SET” button
7
MIN / MAX button
8
Stand
9
Battery compartment cover
10
Extension of battery compartment cover
11
Battery compartment
12
Hanger
13
Dowel
14
Screw
15
Self-adhesive pad
24.02.11 14:55

7 GB/IE
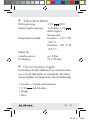
Technical data
Operating voltage: 1.5 V (DC)
Power supply: 1 x 1.5 V
AAA
battery (included)
Temperature range: Indoor: –10 °C to
+40 °C
Outdoor: –40 °C to
+60 °C
External sensor lead: approx. 2.8 m
Liquid crystal display: 21 x 50 mm
Scope of supply
Please check the supplied items immediately
after unpacking the device to ensure that
there is nothing missing and that the product
and all of its parts are in perfect condition.
Do not under any circumstances install the
product if the delivery scope is incomplete.
1 Indoor / outdoor thermometer
1 1.5 V
AAA battery
1 Dowel
1 Screw
24.02.11 14:55

8 GB/IE
1 Self-adhesive pad
1 Operating manual
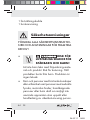
Safety notes
KEEP ALL THE SAFETY ADVICE AND
INSTRUCTIONS IN A SAFE PLACE FOR
FUTURE REFERENCE!
DANGER
OF FATAL INJURY AND
ACCIDENTS FOR INFANTS
AND CHILDREN! Never leave children
unattended with the packaging material,
as it poses a risk of suffocation. Keep the
product out of the reach of children. The
product is not a toy.
Children or anyone who does not have
the knowledge or experience to handle
the device, or anyone whose physical,
sensory or mental capacities are limited,
may only use the device under supervision
24.02.11 14:55

9 GB/IE
or instruction by a person responsible for
their safety. Children must be supervised to
ensure that they do not play with the device.
Never dismantle the product. Improper
repair can cause significant risks to the
user. Repairs must always be carried out
by a specialist only.
Do not use the device if it is damaged.
Damaged devices represent a danger
of death from electric shock!
Do not expose the device to
– extreme temperatures,
– strong vibrations,
– heavy mechanical loads,
– direct sunlight,
– moisture.
Otherwise there is a danger that the
device will be damaged.
Do not expose the device to an extremely
high electromagnetic field. This may impair
the correct functioning of the device.
24.02.11 14:55

10 GB/IE
Please prevent the housing of the device
from rubbing to strongly against textiles.
This may result in static charges and affect
the results of the measurements.
Please note that the guarantee does not
cover damage caused by incorrect hand-
ling, non-compliance with the operating
instructions or interference with the device
by unauthorised individuals.
Install the external sensor
5
outdoors so
that it is not exposed to direct sunlight.
Take care that the mains lead is not
damaged on installation.
Battery Safety Instructions
CAUTION! RISK OF EXPLOSION!
Never recharge the batteries. Have a
spent battery removed from the instrument
immediately. There is an increased risk of
leakage.
Batteries must not be disposed of in
household waste.
24.02.11 14:55

11 GB/IE
Consumers are under a legal obligation
to dispose of batteries in the proper way.
Keep the battery out of the reach of children,
do not dispose of the battery in fire, do
not shortcircuit it, and do not take it apart.
Failure to observe these instructions may
result in the battery discharging beyond
its end voltage, which poses a risk of
leakage. If the battery in your instrument
has leaked, have it removed immediately
to prevent damage to the instrument.
Avoid contact with skin, eyes and mucous
membrane. In the event of contact with
battery acid, rinse the affected area with
plenty of water and / or consult a doctor.
CAUTION! TAKE CARE NOT
TO DAMAGE THE PRODUCT!
Only use the stated type of battery.
Make sure that the polarity is correct.
Check the battery regularly for signs of
leakage.
24.02.11 14:55

12 GB/IE
Remove the battery if the device is not in
use for any length of time.
Do not under any circumstances short-
circuit the terminals.
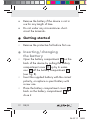
Getting started
Remove the protective foil before first use.
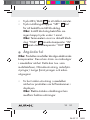
Inserting / changing
the battery
Open the battery compartment
11
on the
back of the device by pulling the battery
compartment cover
9
up by its exten-
sion
10
off the battery compartment
11
(see Fig. B).
Insert the supplied battery with the correct
polarity, or replace a spent battery with
a new one.
Place the battery compartment cover
9
back on the battery compartment
11
to
close it.
24.02.11 14:55

13 GB/IE
Positioning / installing
the device
CAUTION! When choosing a position
for the device, make sure that it is not exposed
to direct sunlight, vibrations, heat, cold damp
or dust. Do not install devices close to heat
sources, e.g. radiators. There is otherwise a
danger that the device will be damaged.
Take care that the device is standing
safely on a stable surface.
Take care that the device is suspended
properly if mounted on a wall. If the device
falls, it could cause injury or damage to
itself or other property.
Place the device on a flat, level surface.
Do not place the device on valuable or sen-
sitive surfaces without suitable protection.
The surfaces may otherwise be damaged.
Stand:
Open the stand
8
on the back of the
device to support the device.
24.02.11 14:55

14 GB/IE
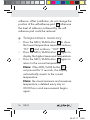
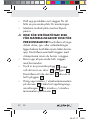
Wall mount:
Note: you will need a drill for this step.
CAUTION! DANGER TO LIFE,
RISK OF INJURY AND DAMAGE TO
PROPERTY! Please read the operating and
safety instructions for your drill carefully.
Hold the device on the wall to find a
suitable position for installation.
Use a pencil if necessary to mark the
required position.
Ꮨ
DANGER OF ELECTRIC SHOCK! DAN-
GER OF DAMAGE TO PROPERTY!
DANGER OF INJURY! Ensure that
you do not strike electrical cables, gas or
water pipes when you are drilling into the
wall. If necessary, check the wall using a
suitable detector before you drill.
Drill a suitable hole in the wall using an
electric drill.
Push a suitable dowel
13
into the hole
and screw a screw
14
into the dowel
13
.
24.02.11 14:55

15 GB/IE
Ensure that the screw
14
is not completely
screwed into the dowel
13
.
Hang the indoor / outdoor thermometer
from the screw
14
. To do this hook the
hanger
12
of the indoor / outdoor ther-
mometer on to the screw
14
.
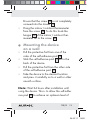
Mounting the device
on a wall
Pull the protective foil from one of the
sides of the self-adhesive pad
15
.
Stick the self-adhesive pad
15
on to the
back of the device.
Pull the protective foil from the other side
of the self-adhesive pad
15
.
Take the device to the desired location
and press it carefully on to a wall or other
smooth surface.
Note: Wait 24 hours after installation until
using the device. This is to allow the self-adhe-
sive pad
15
to achieve an optimum level of
24.02.11 14:55

16 GB/IE
adhesion. After installation, do not change the
position of the self-adhesive pad
15
, otherwise
the level of adhesion achieved by the self-
adhesive pad could be reduced.
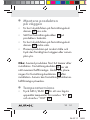
Temperature memory
Press the MIN / MAX button
7
to show
the lowest temperature measured indoors,
“IN”
3
, and outdoors, “OUT”
4
.
Press the MIN / MAX button
7
again to
display the highest measured temperature.
Press the MIN / MAX button
7
again to
return to the current temperature.
Note: if the MIN / MAX button
7
is
not pressed for 5 seconds, the display
automatically reverts to the current
temperature.
Note: the stored minimum and maximum
temperature is deleted every day at
00:00 hours and measurement begins
again.
24.02.11 14:55

17 GB/IE
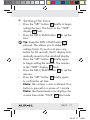
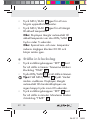
Setting the time
Press the “SET” button
6
briefly to begin
setting the hour. The hours in the “TIME”
display
2
flash.
Press the MIN / MAX button
7
to set the
hour.
Tip: keep the MIN / MAX button
7
pressed. This allows you to make the
settings faster. If you do not press any
button for 60 seconds, the LC display auto-
matically reverts to the standard display.
Press the “SET” button
6
briefly again
to begin setting the minutes. The minutes
in the “TIME” display
2
flash.
Press the MIN / MAX button
7
to set the
minutes.
Press the “SET” button
6
briefly again
to confirm the set time.
Note: the set time is also confirmed if no
button is pressed in a space of 1 minute.
Note: the thermometer now displays the
current time under “TIME”
2
, the inside
24.02.11 14:55

18 GB/IE
temperature “IN”
3
and the outside
temperature “OUT”
4
.
Troubleshooting
Note: the device contains sensitive electronic
components. It is therefore possible that radio
transmission devices in its immediate vicinity
may cause interference. Such devices include
e.g. mobile phones, two-way radios, CB radios,
radio controls / other remote controls and
microwaves.
Remove any such device from the vicinity
of the indoor / outdoor thermometer if
errors occur on the display.
Note: electrostatic discharge may interfere
with operation.
In the event of any malfunction, briefly
remove the battery and replace it as
described under “Inserting / changing the
battery“.
24.02.11 14:55
Sidan laddas ...
Sidan laddas ...
Sidan laddas ...
Sidan laddas ...
Sidan laddas ...
Sidan laddas ...
Sidan laddas ...
Sidan laddas ...
Sidan laddas ...
Sidan laddas ...
Sidan laddas ...
Sidan laddas ...
Sidan laddas ...
Sidan laddas ...
Sidan laddas ...
Sidan laddas ...
Sidan laddas ...
Sidan laddas ...
Sidan laddas ...
Sidan laddas ...
Sidan laddas ...
Sidan laddas ...
Sidan laddas ...
Sidan laddas ...
Sidan laddas ...
Sidan laddas ...
Sidan laddas ...
Sidan laddas ...
Sidan laddas ...
Sidan laddas ...
Sidan laddas ...
Sidan laddas ...
Sidan laddas ...
Sidan laddas ...
Sidan laddas ...
Sidan laddas ...
Sidan laddas ...
Sidan laddas ...
Sidan laddas ...
Sidan laddas ...
Sidan laddas ...
Sidan laddas ...
Sidan laddas ...
Sidan laddas ...
Sidan laddas ...
Sidan laddas ...
Sidan laddas ...
Sidan laddas ...
Sidan laddas ...
Sidan laddas ...
Sidan laddas ...
Sidan laddas ...
Sidan laddas ...
Sidan laddas ...
Sidan laddas ...
-
 1
1
-
 2
2
-
 3
3
-
 4
4
-
 5
5
-
 6
6
-
 7
7
-
 8
8
-
 9
9
-
 10
10
-
 11
11
-
 12
12
-
 13
13
-
 14
14
-
 15
15
-
 16
16
-
 17
17
-
 18
18
-
 19
19
-
 20
20
-
 21
21
-
 22
22
-
 23
23
-
 24
24
-
 25
25
-
 26
26
-
 27
27
-
 28
28
-
 29
29
-
 30
30
-
 31
31
-
 32
32
-
 33
33
-
 34
34
-
 35
35
-
 36
36
-
 37
37
-
 38
38
-
 39
39
-
 40
40
-
 41
41
-
 42
42
-
 43
43
-
 44
44
-
 45
45
-
 46
46
-
 47
47
-
 48
48
-
 49
49
-
 50
50
-
 51
51
-
 52
52
-
 53
53
-
 54
54
-
 55
55
-
 56
56
-
 57
57
-
 58
58
-
 59
59
-
 60
60
-
 61
61
-
 62
62
-
 63
63
-
 64
64
-
 65
65
-
 66
66
-
 67
67
-
 68
68
-
 69
69
-
 70
70
-
 71
71
-
 72
72
-
 73
73
-
 74
74
-
 75
75


Auriol 73810 Operation and Safety Notes
- Typ
- Operation and Safety Notes
på andra språk
- English: Auriol 73810
- dansk: Auriol 73810
- suomi: Auriol 73810
Relaterade papper
-
Auriol 111022 Operation and Safety Notes
-
Auriol Z29962A Bruksanvisning
-
-
Auriol Z29962C - IAN 70340 Bruksanvisning
-
-
-
-
-