
TUPIKE USERMANUAL
WWW.PRIMUS.eu
for more information, inspiration or guidance
Design and Quality
Primus AB Sweden
P.O. Box 6041 SE-171 06 Solna, Sweden
Tel: +46 8 564 842 30
English/Deutsch/Français/Svenska/Suomi/Norsk/Dansk/Nederlands/Español/
Italiano/Hvratski/Český/Slovák/Magyar/Polski/Slovenski/РУССКИЙ
54111/3
FREEDOM TO EXPLORE.

54748
DIN COMBI”
Number explanation in folder / Anzahl Erläuterung der Broschüre / Nombre
Explication à la brochure / Nummerförklaring i häftet / Numero selitykset
kirjanen / Nummerforklaring i heftet / Nummerforklaring i folderen / Nummer
toelichting binnen in de folder / Número Explicación del folleto / Spiegazione dei
numeri nella cartella / Objašnjenje broja u mapi / Vysvětlení číslování ve složce / A katalógusban
szereplő számok magyarázata / Objaśnienie numeracji w folderze / Oštevilčeni deli izdelka so
pojasnjeni v navodilih / Разъяснение номеров в буклете /
54748
DIN COMBI”
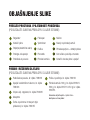
PRODUCT OVERVIEW/PRODUKTÜBERSICHT/PRÉSENTATION DU PRODUIT/PRODUKTÖVERSIKT/
TUOTETIEDOT/PRODUKTOVERSIGT/PRODUKTOVERSIKT/RESUMEN DEL PRODUCTO/PRODUCTOVER-
ZICHT/PANORAMICA DEL PRODOTTO/ PREGLED PROIZVODA / PŘEHLED PRODUKTU/A TERMÉK
ISMERTETÉSE/PRZEGLĄD PRODUKTÓW/ PRIKAZ IZDELKA/ОБЗОР ПРОДУКТА
PRODUCT DETAILS/PRODUKTinformationen/INFORMATIONS DÉTAILLÉES SUR LE PRODUIT/
produktdetaljer/TUOTEKUVAUS/PRODUKTinformasjon/PRODUCTINFORMATIE/DETALLES
DEL PRODUCTO/DETTAGLI DEL PRODOTTO/ POJEDINOSTI PROIZVODA/ POPIS PRODUKTU/A TERMÉK
RÉSZEI/SZCZEGÓŁY PRODUKTU/ PODATKI O IZDELKU/ИНФОРМАЦИЯ О ПРОДУКТЕ
accessories & spare parts ZUBEHÖR & ERSATZTEILE/ACCESSOIRES & PIÈCES DÉTACHÉES/TILLBEHÖR &
RESERVDELAR/LISÄVARUSTEET & VARAOSAT/TILBEHØR & RESERVEDELER/TILBEHØR & RESERVEDELER/ACCESORIOS
& PIEZAS DE REPUESTO/TOEBEHOREN & RESERVEONDERDELEN/ACCESSORI & RICAMBI/ PRIBOR I REZERVNI DIJELOVI/
PŘÍSLUŠENSTVÍ A NÁHRADNÍ DÍLY/TARTOZÉKOK ÉS CSEREALKATRÉSZEK/AKCESORIA I CZĘŚCI ZAMIENNE/ DODATKI IN
REZERVNI DELI/ВСПОМОГАТЕЛЬНЫЕ ПРИНАДЛЕЖНОСТИ & ЗАПАСНЫЕ ЧАСТИ
16.4 oz Propane Cylinder

ČESKÝ
ENGLISH
Deutsch
svenska
suomi
ESPAÑOL
franÇais
Dansk
Nederlands
italiano
norsk
hrvatski
magyar
slovenski
polski
РУССКИЙ
SLOVÁK

Ever since the establishment of Primus in 1892, our Swedish engineers
have been internationally recognised for designing stoves for explorers
and adventurers. It is our genuine passion for adventure and technical
solutions that has been the reason for the success of Primus innovations
for more than 125 years. It is a passion and a calling that we are still on
fire about.
No matter what level of adventure you want to embark on, we want to
equip you with a functional and reliable stove that will be your valued
companion for life. That is why we test every stove, individually, by
hand before it leaves our high-tech factory in Europe. In this way, we
can maintain the high level of quality and functionality that we demand
from our products. So, read this manual carefully and make sure your
cooking is as safe, fun and tasty as it should to be.
Enjoy your food – enjoy life in the outdoors!
Freedom
to
Explore

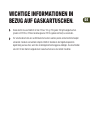
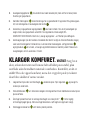
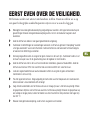
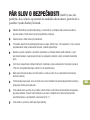
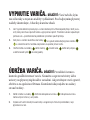
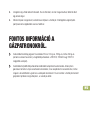
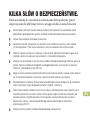
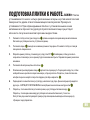
A FEW WORDS ABOUT SAFETY.
Because you’re dealing with highly flammable substances, we’d like to
bring a few important points to your attention before you begin.
Important: Read these instructions for use carefully so as to familiarize yourself with the appliance
before connecting it to its gas container. Keep these instructions for future reference.
Use only in a well ventilated area.
Check the seals and connections every time you use the stove. (see the section, “Before
ignition”). Do not use the appliance if it has damaged or worn seals.
Change the gas container outside and away from people. Checking the gas flows through the
regulator and burners must be done outdoors and away from any naked flame.
Ensure that the stove is not used in the proximity of any combustible material, gas or fluids.
When being used, the distance from any roof must be at least 1250 mm and 500 mm from any
wall.
Never leave a lit stove unattended and always ensure that inflammable material is kept away from
the stove when it is in use.
Do not modify the appliance. Carefully follow the instructions for fitting spare parts that may be
ordered in, if you are going to replace them yourself.
When the stove is going to be stored away, ensure that all its components are clean and dry. The
gas cartridge should never be attached to the stove when in storage. Store the gas cartridge in a
dry and safe place, and out of direct sunlight or temperatures in excess of 50°C.
Save this instruction book so that you can return to it when you need it.
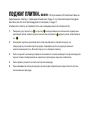
EN

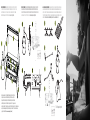
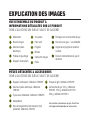
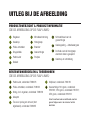
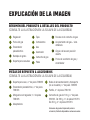
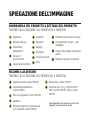
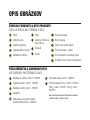
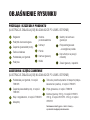
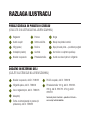
Regulator
Gas knob
Ignition (piezo)
Drip tray
Pot support
Lid
Windshield
Handle
Burner
Gas cartridge
Legs
Threads on gas cartridge
Gas coupling – detailed view
The angle of handle in open
position
Gas supply knob and igniter
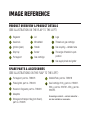
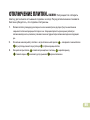
Pot support, part no. 738023
Piezo Igniter, part no. 738024
Hose incl. Regulator, part no. 738026
Adapters
Storage and transport bag (not shown),
part no. 738025
Griddle Plate, part no. 738018
Gas Cartridge 100 g, part no. 220661.
230 g, part no. 220761. 450 g, part no.
220261.
Seasonal gas variants – summer and winter –
are also available as accessories.
IMAGE REFERENCE
SPARE PARTS & ACCESSORIES
(see illustrations on the flap to the left)
PRODUCT OVERVIEW & PRODUCT DETAILS
(see illustration on the flap to the left)

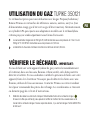
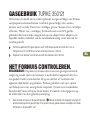
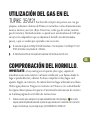
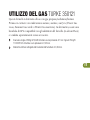
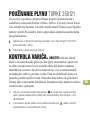
GAS UTILISATION TUPIKE 350121
This stove is intended for use with Primus gas Propane/Isobutane/
Butane in cartridges with designation 2202xx, 2206xx, 2207xx. (Red
Power Gas, green Summer Gas or brown Winter Gas). Alternatively,
an LPG cylinder that fits adapters attached to the stove (in certain
countries), or sold separately as an accessory.
Gas consumption is 250 g/h/3.5 kW butane under pressure of 1 bar. Or 250 g/h/
11,000 BTU/h butane under pressure of 1.45 bar.
The diameter of the bore in the nozzle of the stove’s burner is 0.35 mm.
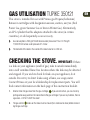
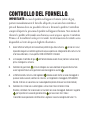
CHECKING THE STOVE. Important: If there
is a leak on your appliance (smell of gas), take it outside immediately
into a well ventilated flame free location where the leak may be detected
and stopped. If you wish to check for leaks on your appliance, do it
outside. Do not try to detect leaks using a flame, use soapy water.
Contact Primus or your local dealership for replacement parts. You will
find contact information on the back page of this instruction booklet.
1. Smell or listen for gas leaks from the gas cartridge. If you are not certain, you can check by
putting some soapy water on the connection to the gas cartridge. If you see any bubbles, there is
a gas leak – DO NOT LIGHT the stove!
2. The gas control knobs on the stove must be closed (turn clockwise to close) before connect-
ing the gas cartridge.
EN

3. Check the seals before connecting a new gas container to the appliance. Do not use the
appliance if it has damaged or worn seals.
4. The threads on both the gas cartridge and the regulator, must be intact if they are damaged
in any way or awry, replace the gas cartridge; or if the regulator is damaged, DO NOT USE the
stove. Order a new hose and regulator – see Accessories on the side flap.
5. Inspect the hose (so that it is neither kinked norsquashed. Avoid twisting the flexible hose) as well
as the connections to the burners that they are not damaged. Lift the pan support and drip
tray to ensure that the hose and connector are properly adjusted. Maximum hose length to
be used: 2000 mm.
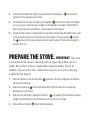
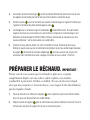
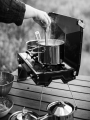
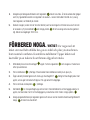
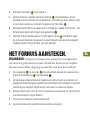
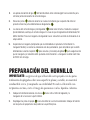
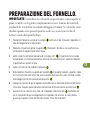
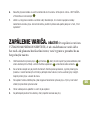
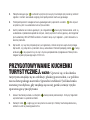
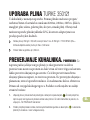
PREPARE THE STOVE. Important: Take care
to ensure that the stove is standing with its legs fully folded out on a
stable, flat surface with no combustible material nearby. Check its
stability! If you tip the stove while there are pots on it, you risk being
scalded by hot liquids.
1. Stand the stove on its side with the handle uppermost. Remove the regulator and hose from
the slot on the underside.
2. Unfold the support legs to their outermost extent. Place the stove with its support legs
downwards on a flat surface.
3. Open the lid on the stove by angling the handle 90°. It is important that the handle is pointing
straight up, otherwise the lid cannot be opened. Lift the lid as far as it will go.
4. Fold out both wind shields to their outermost position.

5. In transportation mode, the pan support is upside down. Turn the pan support so that the
rough sides are uppermost, towards the pot. Ensure that the metal pins on the edges sit in the
holes in the drip tray.
6. Attach the gas cartridge to the regulator by screwing with a definite continuous motion as far as it
will go. Do this manually – DO NOT USE a pair of pliers, or similar.
7. Make sure that the gas cartridge is level with the regulator upwards. Check that no gas is leaking
from the connection between the regulator and the gas cartridge. Use soapy water as discussed
in the section “Before ignition” if you are unsure.
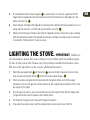
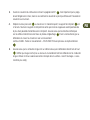
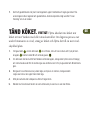
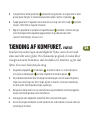
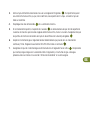
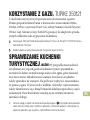
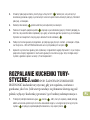
LIGHTING THE STOVE. Important: Under no
circumstances move the stove when it is lit, either with or without pots.
If, due to the wind, the flames are forced down under the burner, turn
the stove off and move it to a more sheltered location.
1. Rotate the gas supply knob for the burner you want to light, about one turn anti-clock-
wise and press the ignition button next to the knob to ignite the gas.
2. If the burner does not ignite after five attempts with the ignition button, turn off the supply
(clockwise as far as it will go) and wait ten seconds for the unignited gas to dissipate. Turn on the
gas supply and try again.
3. Once the gas has been lit, you can adjust the flame and the supply of heat with the supply knob.
The gas should burn directly upwards with a steady flame.
4. Put the pot or frying pan on the stove after the gas has been lit.
5. If you need to use two burners, light the second one the same way that you lit the first.
EN

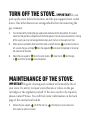
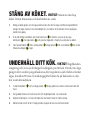
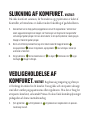
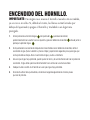
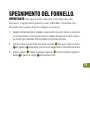
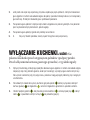
TURN OFF THE STOVE. Important: Do not
pack up the stove before the burners and the pan supports have cooled
down. Check that burners are extinguished before disconnecting the
gas container.
1. Turn the stove off by twisting the gas supply knobs clockwise to the stop position. The valve is
closed and the gas flow is stopped when the flame goes out. Do not use excessive force in turning
off the supply; you may risk having problems when you try to turn on the supply next time.
2. When you have completely finished with the stove, and both burners have been turned are
off, unscrew the gas cartridge from the regulator and place the regulator in the slot on
the underside of the stove.
3. Rotate the pan supports, fold in the wind shields, close the lid, fold the legs
in and tilt the handle back into position.
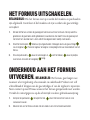
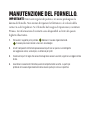
MAINTENANCE OF THE STOVE.
Important: Regular cleaning and overhaul will extend the life of
your stove. Do not try to repair screw threads or valves on the gas
cartridges or the regulator yourself. If the stove needs to be repaired,
please contact Primus. You will find contact information on the back
page of this instruction booklet.
1. Remove the pan support. Lift off the drip tray. The drip tray may be cleaned in a
dish-washer as well as manually.

2. The remainder of the stove should be wiped clean with a cloth and a mild cleanser, e.g.
dish-washing liquid.
3. Examine the wooden parts. If they have been wet and have now dried, give them a lightly
application of oil.
4. Reassemble the stove completely when fully dry. The deepest part of the drip tray should be
closest to the lid.
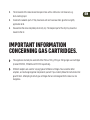
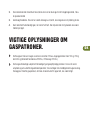
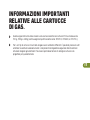
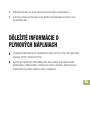
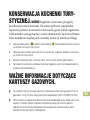
IMPORTANT INFORMATION
CONCERNING GAS CARTRIDGES.
This appliance shall only be used with either Primus 100 g, 230 g or 450 g single-use cartridges
(marked 2202XX, 2206XX and 2207XX respectively).
Different adapters are used for varying types of refillable cartridges. You can obtain other
adapters, and exchange regulator components yourself if you carefully follow the instructions that
go with them. Attempting to attach gas cartridges that are not designed for the stove can be
dangerous.
EN

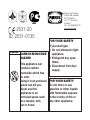
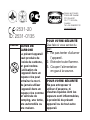
FOR YOUR SAFETY
If you smell gas:
1. Do not attempt to light
appliance.
2. Extinguish any open
flame.
3. Disconnect from fuel
supply.
FOR YOUR SAFETY
Do not store or use
gasoline or other liquids
with flammable vapours
in the vicinity of this or
any other appliance.
CARBON MONOXIDE
HAZARD
This appliance can
produce carbon
monoxide which has
no odor.
Using it in an enclosed
space can kill you.
Never use this
appliance in an
enclosed space such
as a camper, tent,
car or home.
DANGER
-2531-20
ID: 2531-0135
Design and Quality
Primus AB Sweden
P.O. Box 6041
SE-171 06 Solna,
Sweden
Tel: +46 8 564 842 30
www.primus.se


Seit der Gründung von Primus im Jahr 1892 sind unsere schwedischen
Ingenieure für die Konstruktion von Kochern für Entdecker und Abenteurer
international bekannt. Unsere echte Leidenschaft für Abenteuer und
technische Lösungen ist seit über 125 Jahren die Grundlage für den Erfolg
unserer Primus-Innovationen. Es ist eine Leidenschaft und gleichzeitig eine
Berufung für uns. Für unsere Produkte sind wir stets „Feuer und Flamme“.
Egal zu welchem Abenteuer Sie sich aufmachen, wir möchten Sie mit
einem funktionellen und zuverlässigen Campingkocher ausrüsten, der zu
einem geschätzten Begleiter für Sie wird. Darum testen wir auch jeden
einzelnen Campingkocher per Hand, bevor er unseren Hochtechnologiebe-
trieb in Europa verlässt. So können wir die anhaltend hohe Qualität und
Funktionalität, die wir von unseren Produkten verlangen, kontinuierlich
gewährleisten. Lesen Sie also dieses Handbuch sorgfältig durch, und kochen
Sie sicher und mit Freude köstliche Gerichte – so wie es sein soll. Genießen
Sie Ihr Essen – genauso wie Ihre Abenteuer im Freien!
Freiheit für
Ihre Abenteuer
im Freien

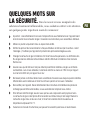
SICHERHEITSHINWEISE. Da Sie bei diesem
Campingkocher mit entflammbaren Substanzen umgehen, möchten wir
Ihnen zunächst einige wichtige Hinweise geben, über die Sie vor dem
Kochen Bescheid wissen müssen.
Wichtiger Hinweis: Lesen Sie diese Gebrauchsanweisung sorgfältig durch, um sich mit dem
Gerät vor dem Anschluss an den Gasbehälter vertraut zu machen. Bewahren Sie diese
Gebrauchsanleitung zum späteren Nachschlagen auf.
Nur in gut belüfteter Umgebung verwenden.
Dichtungen und Anschlüsse vor jeder Verwendung des Kochers überprüfen (siehe Abschnitt
„Vor dem Anzünden“). Gerät bei beschädigten oder verschlissenen Dichtungen nicht verwenden.
Gasbehälter im Freien und abseits von anderen Personen wechseln. Die Gasströme durch
Regler und Brenner nur im Freien überprüfen und von offenen Flammen fernhalten.
Stellen Sie sicher, dass der Kocher nicht in der Nähe von brennbaren Stoffen, Gasen oder
Flüssigkeiten verwendet wird.
Bei der Verwendung des Kochers muss ein Mindestabstand von 1,25m zu Dächern und von
0,5m zu Wänden eingehalten werden.
Lassen Sie den angezündeten Kocher zu keiner Zeit unbeaufsichtigt und stellen Sie jederzeit
sicher, dass entflammbare Stoffe während der Verwendung vom Kocher ferngehalten werden.
Das Gerät darf nicht verändert werden. Befolgen Sie die Anweisungen zum Einbau von Ersatztei-
len genau, wenn Sie selbst Teile auswechseln. Die Ersatzteile sind möglicherweise von Ihnen zu
bestellen.
Stellen Sie vor der Einlagerung des Kochers sicher, dass alle Teile sauber und trocken sind. Die
Gaskartusche darf bei Lagerung niemals am Kocher angeschlossen sein. Die Gaskartusche
muss an einem trockenen und sicheren Ort sowie vor direkter Sonneneinstrahlung oder
Temperaturen von über 50°C geschützt gelagert werden.
Diese Anleitung ist für den späteren Gebrauch sicher aufzubewahren.
De

Regler
Gaszufuhrknopf
Zünder (piezo)
Abtropfschale
Topfhalter
Deckel
Windschutz
Griff
Brenner
Gaskartusche
Füße
Gewinde an der Gaskartusche
Gaskupplung – Detailansicht
Griff in geöffneter Stellung
Gaszufuhrknopf und Anzünder
Topfhalter, Teile-Nr.738023
Piezo-Zünder, Teile-Nr.738024
Schlauch inkl. Regler, Teile-Nr.738026
Adaptern
Lager- und Transporttasche (nicht
abgebildet), Teile-Nr.738025
Grillplatte, Teile-Nr.738018
Gaskartusche 100g, Teile-Nr.220661.
230g, Teile-Nr.220761. 450g,
Teile-Nr.220261.
Gasvarianten je nach Jahreszeit – für Sommer
und Winter – sind ebenfalls als Zubehör erhältlich.
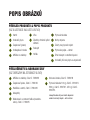
Bilderklärung
ZUBEHÖR & ERSATZTEILE
(siehe Abbildung auf der Klappe links)
PRODUKTÜBERSICHT & PRODUKTINFORMATIONEN
(siehe Abbildung auf der Klappe links)

GASARTEN UND GASVERBRAUCH
BEIM TUPIKE 350121 Dieser Camping-Gaskocher ist
zur Verwendung mit Primus Propan-/Isobutan-/Butan-Gaskartuschen mit
den Produktbezeichnungen 2202xx, 2206xx und 2207xx vorgesehen.
(Power-Gas-Kartusche (rot), Sommer-Gas-Kartusche (grün) oder Winter-
Gas-Kartusche (braun)). Alternativ kann auch ein Zylinder mit flüssigem
Propangas („LPG“), der (in einigen Ländern) mit den am Kocher
angebrachten Adaptern kompatibel ist oder separat als Zubehör erhältli-
chen Adaptern kompatibel ist, verwendet werden.
Der Gasverbrauch beträgt 250g/h/3,5kW bei Butan mit einem Druck von 1Bar beziehungs-
weise 250g/h/11.000 BTU/h bei Butan mit 1,45Bar Druck.
Der Lochdurchmesser der Düsenöffnungen des Brenners beträgt 0,35mm.
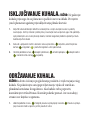
PRÜFUNG DES KOCHERS. Wichtiger
Hinweis: Bringen Sie Ihr Gerät im Falle eines Gaslecks (Gasgeruch) sofort
nach draußen an einen gut belüfteten und nicht feuergefährlichen Ort, an
dem die undichte Stelle lokalisiert und abgedichtet/beseitigt werden kann.
Das Gerät nur im Freien auf Dichtigkeit prüfen. Dichtigkeitsprüfungen nicht
mittels Gasflamme sondern nur anhand von Seifenwasser durchführen. Für
die Bestellung von Ersatzteilen kontaktieren Sie Primus oder Ihren Händler
vor Ort. Die Kontaktinformationen befinden sich auf der Rückseite dieser
Gebrauchsanleitung.
De

1. Feststellen von Gasaustritten an der Gaskartusche anhand von Geruch oder Geräuschen.
Wenn Sie sich nicht sicher sind, ob ein Gasleck vorliegt, prüfen Sie dies, indem Sie die Ver-
bindung zur Gaskartusche mit etwas Seifenwasser benetzen. Beim Auftreten von Blasen liegt ein
Gasleck vor – den Kocher NICHT ANZÜNDEN!
2. Vor dem Anschluss an die Gaskartusche die Gasregler auf Aus-Stellung drehen (im Uhr-
zeigersinn).
3. Dichtungen vor dem Anschluss eines neuen Gasbehälters an das Gerät überprüfen. Gerät bei
beschädigten oder verschlissenen Dichtungen nicht verwenden .
4. Die Gewinde an der Gaskartusche und am Regler müssen intakt sein. Bei Beschädigung
jeglicher Art oder schiefem Gewinde ist die Gaskartusche auszuwechseln; bei Beschädigung des
Reglers den Kocher NICHT VERWENDEN. Neuen Schlauch und Regler bestellen – siehe Zubehör
auf der Seitenklappe.
5. Schlauch überprüfen (Dieser darf nicht geknickt odereingeklemmt sein. Ein Verdrehen des
Schlauchs ist ebenfalls zu vermeiden) und sicherstellen, dass die Anschlüsse zum Brenner nicht
beschädigt sind. Topfhalter und Abtropfschale anheben, um
sicherzustellen, dass Schlauch und Anschluss richtig ausgerichtet sind. Maximal zu verwendende
Schlauchlänge: 2000 mm

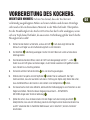
VORBEREITUNG DES KOCHERS.
Wichtiger Hinweis: Achten Sie darauf, dass der Kocher mit
vollständig ausgeklappten Füßen auf einer stabilen und ebenen Unterlage
steht und sich kein brennbares Material in der Nähe befindet. Überprüfen
Sie die Standfestigkeit des Kochers! Der Kocher darf nicht umkippen, wenn
sich ein Topf darauf befindet, da ansonsten Verbrühungsgefahr durch heiße
Flüssigkeiten besteht!
1. Drehen Sie den Kocher auf die Seite, so dass der Griff nach oben zeigt. Nehmen Sie
Schlauch und Regler aus dem Aufbewahrungsfach an der Unterseite.
2. Die Stützfüße vollständig ausklappen. Kocher mit den Füßen nach unten auf eine ebene
Unterlage stellen.
3. Den Deckel des Kochers öffnen, indem der Griff nach oben geklappt wird (90° – siehe ).
Dabei muss der Griff genau nach oben zeigen, da der Deckel ansonsten nicht geöffnet werden
kann. Deckel bis zu Anschlag anheben.
4. Die beiden seitlichen Windschutzteile bis zum Anschlag ausklappen.
5. Während des Transports wird der Topfhalter verkehrt herum aufbewahrt. Den Topf-
halter so drehen, dass die raue Seite nach oben in Richtung des Topfes zeigt. Stellen Sie sicher,
dass die Metallstifte an den Kanten in den Löchern in der Abtropfschale sitzen.
6. Die Gaskartusche durch eine definierte, kontinuierliche Drehbewegung bis zum Festsitzen an den
Regler anschließen. Führen Sie diesen Vorgang manuell durch – VERWENDEN
SIE KEINE Zangen oder ähnliches Werkzeug .
7. Stellen Sie sicher, dass die Gaskartusche mit dem Regler nach oben bündig abschließt .
Überprüfen Sie, dass von der Verbindung zwischen dem Regler und der Gaskartusche kein Gas
austritt. Verwenden Sie im Zweifelsfall Seifenwasser, wie im Abschnitt „Vor dem Anzünden“
beschreiben.
De

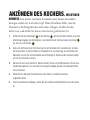
ANZÜNDEN DES KOCHERS. Wichtiger
Hinweis: Den Kocher nach dem Anzünden unter keinen umständen
bewegen, weder mit, noch ohne Topf. Wenn Wind dazu führt, dass die
Flammen in Richtung Brenner nach unten schlagen, schalten Sie den
Kocher aus, und stellen Sie ihn an einen besser geschützten Ort.
1. Drehen Sie den Gaszufuhrknopf für den Brenner , den Sie anzünden möchten, etwa eine
Umdrehung entgegen dem Uhrzeigersinn, und drücken Sie die Zündtaste neben dem Knopf ,
um das Gas zu entzünden.
2. Wenn sich der Brenner nach fünf Versuchen mit der Zündtaste nicht anzünden lässt, schalten
Sie die Gaszufuhr ab (Durch Drehen im Uhrzeigersinn bis zum Anschlag), und warten Sie zehn
Sekunden, bis sich das nicht entzündete Gas verflüchtigt hat. Drehen Sie die Gaszufuhr wieder
auf und versuchen Sie es erneut.
3. Sobald sich das Gas entzündet hat, können Sie die Flamme und die Wärmezufuhr mit dem Gas-
zufuhrknopf regulieren. Das Gas sollte mit einer gleichmäßigen, gerade nach oben gerichteten
Flamme brennen.
4. Stellen Sie den Topf oder die Bratpfanne auf den Kocher, nachdem Sie das Gas
angezündet haben.
5. Falls Sie zwei Brenner benötigen, zünden Sie den zweiten auf dieselbe Weise an wie den ersten
an.
Sidan laddas...
Sidan laddas...
Sidan laddas...
Sidan laddas...
Sidan laddas...
Sidan laddas...
Sidan laddas...
Sidan laddas...
Sidan laddas...
Sidan laddas...
Sidan laddas...
Sidan laddas...
Sidan laddas...
Sidan laddas...
Sidan laddas...
Sidan laddas...
Sidan laddas...
Sidan laddas...
Sidan laddas...
Sidan laddas...
Sidan laddas...
Sidan laddas...
Sidan laddas...
Sidan laddas...
Sidan laddas...
Sidan laddas...
Sidan laddas...
Sidan laddas...
Sidan laddas...
Sidan laddas...
Sidan laddas...
Sidan laddas...
Sidan laddas...
Sidan laddas...
Sidan laddas...
Sidan laddas...
Sidan laddas...
Sidan laddas...
Sidan laddas...
Sidan laddas...
Sidan laddas...
Sidan laddas...
Sidan laddas...
Sidan laddas...
Sidan laddas...
Sidan laddas...
Sidan laddas...
Sidan laddas...
Sidan laddas...
Sidan laddas...
Sidan laddas...
Sidan laddas...
Sidan laddas...
Sidan laddas...
Sidan laddas...
Sidan laddas...
Sidan laddas...
Sidan laddas...
Sidan laddas...
Sidan laddas...
Sidan laddas...
Sidan laddas...
Sidan laddas...
Sidan laddas...
Sidan laddas...
Sidan laddas...
Sidan laddas...
Sidan laddas...
Sidan laddas...
Sidan laddas...
Sidan laddas...
Sidan laddas...
Sidan laddas...
Sidan laddas...
Sidan laddas...
Sidan laddas...
Sidan laddas...
Sidan laddas...
Sidan laddas...
Sidan laddas...
Sidan laddas...
Sidan laddas...
Sidan laddas...
Sidan laddas...
Sidan laddas...
Sidan laddas...
Sidan laddas...
Sidan laddas...
Sidan laddas...
Sidan laddas...
Sidan laddas...
Sidan laddas...
Sidan laddas...
Sidan laddas...
Sidan laddas...
Sidan laddas...
Sidan laddas...
Sidan laddas...
Sidan laddas...
Sidan laddas...
Sidan laddas...
Sidan laddas...
Sidan laddas...
Sidan laddas...
Sidan laddas...
Sidan laddas...
Sidan laddas...
Sidan laddas...
Sidan laddas...
Sidan laddas...
Sidan laddas...
Sidan laddas...
Sidan laddas...
Sidan laddas...
Sidan laddas...
Sidan laddas...
Sidan laddas...
Sidan laddas...
Sidan laddas...
Sidan laddas...
Sidan laddas...
Sidan laddas...
Sidan laddas...
Sidan laddas...
Sidan laddas...
Sidan laddas...
Sidan laddas...
Sidan laddas...
Sidan laddas...
Sidan laddas...
Sidan laddas...
Sidan laddas...
Sidan laddas...
Sidan laddas...
-
 1
1
-
 2
2
-
 3
3
-
 4
4
-
 5
5
-
 6
6
-
 7
7
-
 8
8
-
 9
9
-
 10
10
-
 11
11
-
 12
12
-
 13
13
-
 14
14
-
 15
15
-
 16
16
-
 17
17
-
 18
18
-
 19
19
-
 20
20
-
 21
21
-
 22
22
-
 23
23
-
 24
24
-
 25
25
-
 26
26
-
 27
27
-
 28
28
-
 29
29
-
 30
30
-
 31
31
-
 32
32
-
 33
33
-
 34
34
-
 35
35
-
 36
36
-
 37
37
-
 38
38
-
 39
39
-
 40
40
-
 41
41
-
 42
42
-
 43
43
-
 44
44
-
 45
45
-
 46
46
-
 47
47
-
 48
48
-
 49
49
-
 50
50
-
 51
51
-
 52
52
-
 53
53
-
 54
54
-
 55
55
-
 56
56
-
 57
57
-
 58
58
-
 59
59
-
 60
60
-
 61
61
-
 62
62
-
 63
63
-
 64
64
-
 65
65
-
 66
66
-
 67
67
-
 68
68
-
 69
69
-
 70
70
-
 71
71
-
 72
72
-
 73
73
-
 74
74
-
 75
75
-
 76
76
-
 77
77
-
 78
78
-
 79
79
-
 80
80
-
 81
81
-
 82
82
-
 83
83
-
 84
84
-
 85
85
-
 86
86
-
 87
87
-
 88
88
-
 89
89
-
 90
90
-
 91
91
-
 92
92
-
 93
93
-
 94
94
-
 95
95
-
 96
96
-
 97
97
-
 98
98
-
 99
99
-
 100
100
-
 101
101
-
 102
102
-
 103
103
-
 104
104
-
 105
105
-
 106
106
-
 107
107
-
 108
108
-
 109
109
-
 110
110
-
 111
111
-
 112
112
-
 113
113
-
 114
114
-
 115
115
-
 116
116
-
 117
117
-
 118
118
-
 119
119
-
 120
120
-
 121
121
-
 122
122
-
 123
123
-
 124
124
-
 125
125
-
 126
126
-
 127
127
-
 128
128
-
 129
129
-
 130
130
-
 131
131
-
 132
132
-
 133
133
-
 134
134
-
 135
135
-
 136
136
-
 137
137
-
 138
138
-
 139
139
-
 140
140
-
 141
141
-
 142
142
-
 143
143
-
 144
144
-
 145
145
-
 146
146
-
 147
147
-
 148
148
-
 149
149
-
 150
150
-
 151
151
-
 152
152
-
 153
153
-
 154
154


på andra språk
- italiano: Primus DIN COMBI 54748 Manuale utente
- slovenčina: Primus DIN COMBI 54748 Používateľská príručka
- Deutsch: Primus DIN COMBI 54748 Benutzerhandbuch
- français: Primus DIN COMBI 54748 Manuel utilisateur
- dansk: Primus DIN COMBI 54748 Brugermanual
- Nederlands: Primus DIN COMBI 54748 Handleiding
Relaterade papper
-
Primus DIN COMBI 54748 Användarmanual
-
Primus Gravity EF 3279 Användarmanual
-
-
-
-
-
-
-
-