
1
OWNER’S MANUAL
and installation instructions
State-of-the-Art Wireless SubWoofer
Installs in 5 minutes or less!
NOTE: This SubWoofer can only be used with the ebode wireless LightSpeaker
®
transmitter.
It cannot be used or operated without the LightSpeaker
®
transmitter.
User guide 2
Bedienungsanleitung 18
Gebruiksaanwijzing 34
Användermanual 50
Guide utilisateur 66
Guía del usuario 82
Manual do utilizador 98
Manuale per l’utente 114

2
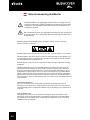
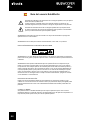
The exclamation point, within an equilateral triangle, is intended to alert the user to the
presence of important operating and maintenance (servicing) instructions in the literature
accompanying the product.
The lightening flash with arrowhead symbol within an equilateral triangle, is intended to
alert the user to the presence of uninsulated “dangerous voltage” within the product’s
enclosure that may be of sufficient magnitude to constitute a risk of electrical shock to
persons.
WARNING: To reduce the risk of fire or electrical shock, do not expose this apparatus to rain or
moisture.
WARNING No naked flame sources - such as candles - should be placed on the product.
WARNING - Do not open! Risk of electrical shock. Voltages in this equipment are hazardous to life. No
user-serviceable parts inside. Refer all servicing to qualified service personnel.
Place the equipment near a main power supply outlet and make sure that you can easily access the
power breaker switch.
WARNING: This product is intended to be operated ONLY from the AC Voltages listed on the back
panel or included power supply of the product. Operation from voltages other than those indicated
may cause irreversible damage to the product and void the product’s warranty. The use of AC Plug
Adapters is cautioned because it can allow the product to be plugged with a detachable power cord.
Use only the type provided with your product or by your local distributor and/or retailer. If you are
unsure of the correct operational voltage, please contact your local distributor and/or retailer.
AMPLIFIER REQUIREMENTS
Due to the high output levels these speakers are capable of reproducing, exercise caution with the
volume control. Excessive volume over long periods of time can permanently damage your hearing.
Overdriving your amplifier could also damage your SubWoofer.
CARE AND CLEANING
Your speakers have a durable finish that should only require dry dusting. Avoid use of abrasive or
solvent-based cleaners and harsh detergents. The brush attachment of your vacuum or a damp cloth
should remove any dust from your speaker grilles.
User Guide SubWoofer

3
IMPORTANT SAFETY INSTRUCTIONS
1. Read these instructions – All the safety and operating instructions should be read before
this product is operated.
2. Keep these instructions – The safety and operating instructions should be retained for
future reference.
3. Heed all warnings – All warnings on the appliance and in the operating instructions
should be adhered to.
4. Follow all instructions – All operating and use instructions should be followed.
5. Do not use this apparatus near water – The appliance should not be used near water
or moisture – for example, in a wet basement or near a swimming pool, and the like.
6. Clean only with dry cloth.
7. Do not block any ventilation openings. Install in accordance with the manufacture’s
instructions.
8. Do not install near any heat sources such as radiators, heat registers, stoves, or other
apparatus (including amplifiers) that produce heat.
9. Do not defeat the safety purpose of the polarized or grounding plug.
10. Protect the power cord from being walked on or pinched particularly at the plugs,
convenience receptacles, and at the point where they exit from the apparatus.
11. Only use attachments/accessories specified by the manufacturer.
12. Unplug the apparatus during lightning storms or when unused for long periods of time.
13. Refer all servicing to qualified personnel. Servicing is required when the apparatus
has been damaged in any way, such as power supply cord or plug is damaged, liquid has
been spilled or objects have fallen into the apparatus has been exposed to rain or moisture,
does not operate normally, or has been dropped.
14. WARNING - to reduce the risk of fire or electric shock, do not expose this apparatus
to rain or moisture. The apparatus shall not be exposed to dripping or splashing and
objects filled with liquids, such as vases, shall not be placed on the apparatus.
15. WARNING: The mains plug/appliance coupler is used as disconnect device, the
disconnect device shall remain readily operable.
16. This equipment is a Class II or double insulated electrical appliance. It has been
designed in such a way that it does not require a safety connection to electrical earth.

4
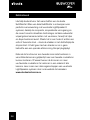
Congratulations
Thank you for your purchase of the ebode SubWoofer!
Everything about this SubWoofer has been designed to
work perfectly with your ebode LightSpeaker
®
system; from
the small, inconspicuous shape to state-of-the-art wireless
technology, this subwoofer will virtually disappear in your room
while delivering rich, deep bass. Place it in a corner or behind
a couch, or favourite chair — plug in to the closest electrical
outlet. There are no wires to run and no special tuning
required. Just plug and play!
Use the second zone capability so that others in different
rooms can listen to a second music source at the same
time. Or switch between the sources to listen to the music
you like best in one room or all rooms. To learn more about
the capabilities of your ebode LightSpeaker system visit us at:
www.ebodeelectronics.eu.

5
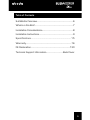
Table of Contents
SubWoofer Overview............................................................................6
What is in this Box?................................................................................7
Installation Considerations................................................................8
Installation Instructions.......................................................................9
Specifications......................................................................15
Warranty...............................................................................................16
CE Declaration...................................................................................130
Technical Support Information...................................Back Cover

6
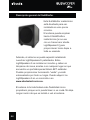
SubWoofer
Overview
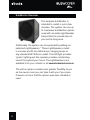
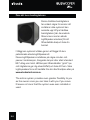
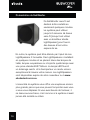
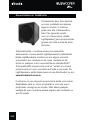
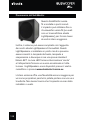
This wireless SubWoofer is
intended to install in just a few
minutes. The system can use up
to 4 wireless SubWoofers (when
used with an
ebode
LightSpeaker
transmitter) to provide bass to
your entire living area.
Additionally, the system can be expanded by adding our
patented LightSpeakers
®
. These LightSpeakers install
in minutes and fit into table lamps, hanging lamps or
any standard E27 Edison socket. The LED light provides
“green” lighting and the speaker provides outstanding
sound throughout your home. The LightSpeakers are
available from your retailer or at
www.ebodeelectronics.eu.
The entire system provides even greater flexibility to you
as the owner since you can take it with you if you move.
It leaves no trace that the system was ever installed or
used.
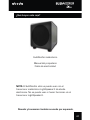
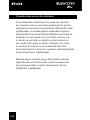
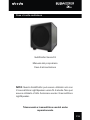
What’s in this Box

7
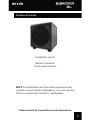
NOTE: This SubWoofer can only be used with the ebode
wireless LightSpeaker transmitter. It cannot be used or
operated without the LightSpeaker transmitter.
What’s in this Box
Wireless SubWoofer
Owner’s Manual
Power Supply
Remote and transmitter also sold separately.

8
Installation Considerations
Your ebode Wireless SubWoofer can be placed in any
area or zone where you would like additional bass to your
existing LightSpeaker distributed audio system. The only
wiring required is to plug it into a standard electrical
outlet. This SubWoofer will perform perfectly adding
rich, deep bass from wherever it is placed in your room,
however, it will provide the most bass if it is placed in or
close to a room corner. Your
ebode
wireless SubWoofer
will operate up to 15 meter (in any direction) away from
your LightSpeaker transmitter.
Please take a few minutes to read this manual. Following
simple setup instructions, will ensure you get the most
from your LightSpeaker SubWoofer.

9
Installation Instructions
Step 1: Please read all safety instructions at the start of this
manual.
Step 2: Decide where you would like to add additional bass
to your LightSpeakers and note the zone in which those
LightSpeakers are located.
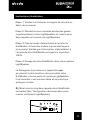
Step 3:
Attach the power cord to the back of your SubWoofer
and plug it into the nearest electrical outlet. Be certain the power
switch on the rear of your SubWoofer is set to the “OFF” position.
Step 4: Pairing your SubWoofer to the LightSpeaker System.
Pairing is the process of “teaching” your transmitter to
recognize your SubWoofer as part of the LightSpeaker system.
It’s essential and only takes a couple of minutes.
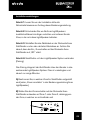
A) Determine which zone your SubWoofer will be placed into
(See “Setting Up Zones” in your LightSpeaker owner’s manual).
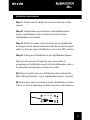
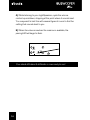
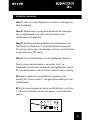
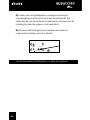
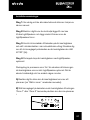
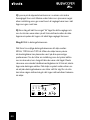
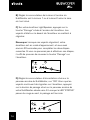
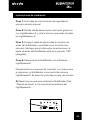
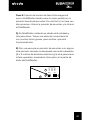
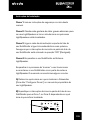
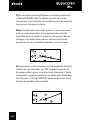
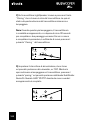
B) Set the zone switch on the back of your SubWoofer to either
Zone 1 or Zone 2 depending on which zone it is to be located in.
+
+
+
+
Low Pass Crossover
80 Hz 100 Hz 120 Hz
Phase Zone
0° 180° 1 2
Volume

10
C) On your LightSpeaker transmitter, find and press the
“PAIRING Button” located on the back of the transmitter. The
status lights on the front of the transmitter will begin to flash.
Note:
When these lights are flashing, your transmitter is in
pairing mode; and you have approximately 30 seconds to
complete the next two steps. If you are unable to complete these
steps, simply push the pairing button on the transmitter again.
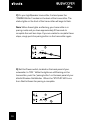
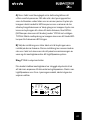
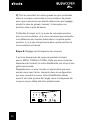
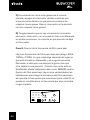
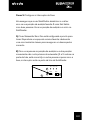
D) Set the Power switch, located on the back panel of your
subwoofer, to “ON”. While the lights are still flashing on the
transmitter, push the “pairing button” on the back panel of your
ebode
Wireless SubWoofer. When the “STATUS” LED turns
from Red to Green the pairing is complete.
+
+
+
+
+
F
ORMS TO
T
D. 1993
IFIED TO
Volume
Pairing
Status
+
+
+
+
+
Volume
Pairing
Status

11
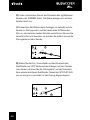
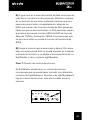
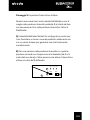
Step 5: Setting the Phase Switch.
This will ensure that your ebode SubWoofer sounds it’s very
best in your favourite listening position. It is easiest to do with
two people: One at the listening position and the other at the
SubWoofer.
A) Your ebode Wireless SubWoofer is set up and ready to play.
Play a favourite piece of music, ideally one with a lot of bass to
ensure it’s functioning properly.
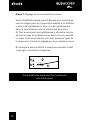
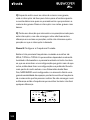
B) With one person at the listening position or some convenient
position not too close to the subwoofer (2 to 3 meter back is
fine) and the other person operating the phase, switch on the
back of the SubWoofer.
+
+
+
+
Low Pass Crossover
80 Hz 100 Hz 120 Hz
Phase Zone
0° 180° 1 2

12
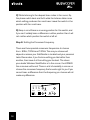
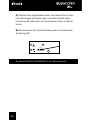
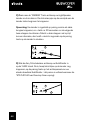
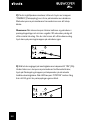
C) While listening to the deepest bass notes in the music, flip
the phase switch back and forth while the listener determines
which setting produces the most bass. Leave the switch in the
position with the most bass.
D) Keep in mind there is no wrong position for this switch, and
if you can’t reliably hear a difference in either position then it will
not matter which position the switch is left at.
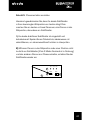
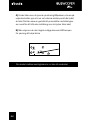
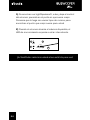
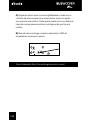
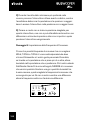
Step 6: Setting the Crossover Frequency.
There are three possible crossover frequencies to choose
from: 80Hz, 100Hz and 120Hz. The one you choose will
depend on where your SubWoofer is located and your personal
taste. Remember, if you find one setting you like better than
another, then leave it at the setting you like best. The closer
your ebode Wireless SubWoofer is to the corner, the LOWER
the crossover will be set. There is a lot of variability in rooms so
choose the crossover frequency that sounds right to you. If you
cannot hear a difference then the frequency you choose will not
make any difference.
Low Pass Crossover
80 Hz 100 Hz 120 Hz
Phase Zone
0° 180° 1 2
Volume
Pairing
Status
+
+
+
+

13
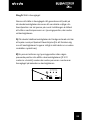
A) As in the case with the phase switch this step is easier to
perform with two people. Sit or stand in your preferred listening
position while another person pushes the button immediately
below the LEDs that mark the three different crossover
frequencies. Each time the button is pushed the crossover will
cycle to the next frequency first 80Hz (LED will light up), then
100Hz, and finally 120Hz. The next push of the button will light
the 80Hz frequency again.
B) Choose the setting that sounds the best and leave the
crossover set to this frequency. This can be changed at any
time in the future and will not affect the operation of either your
SubWoofer or your LightSpeaker system.
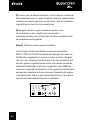
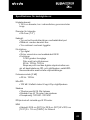
Step 7: Setting the volume control.
Your ebode Wireless SubWoofer has a built in volume control
so it can be matched to different numbers of LightSpeakers.
The more LightSpeakers in the listening area, the higher the
volume should be set.
+
+
+
+
+
+
Low Pass Crossover
80 Hz 100 Hz 120 Hz
Phase Zone
0° 180° 1 2
Volume
Pairing
Status

14
A) While listening to your LightSpeakers, cycle the volume
control up and down, stopping at the point where it sounds best.
You may want to test this with several types of music to find the
setting that sounds best to you.
B) When the volume reaches the maximum available, the
pairing LED will begin to flash.
Your ebode
Wireless SubWoofer is now ready to use!
+
+
+
+
+
Volume
Pairing
Status

15
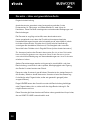
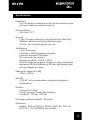
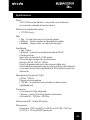
SubWoofer Specifications:
Driver
• 6.5” diameter, microcellulose fiber cone body with natural
rubber surround
Voice Coil Diameter
• 25.4 mm (1.0”)
Enclosure
• Type - Ported; Front-firing driver with Rear-firing port
• Material - Medium Density Fiberboard
• Finish - Matte black, with black cloth grill
Amplifier
• Type - Digital
• Power - 65 W average sine power
• Features
0-180 degree phase switch
Three position variable low pass filter:
Settings at 80 Hz, 100 Hz, 120 Hz
Digitial volume control gain profile precisely matches
subwoofer SPL to LightSpeaker satellite SPL
at all volume settings
Frequency Response (-3 dB)
• 43 Hz - 120 Hz
Max SPL
• 102 dB - Output will match up to four LightSpeakers
Transmitter
• Frequency 2.4 Ghz proprietary
• Range - up to 15 meter from the transmitter
• AC Input - 120 Vac - 230 Vac
RF Remote Range - Up to 30 meter
Dimensions
• Enclosure - 22,9 cm (9.0”) H x 22,9 cm (9.0”) W x 30,5 cm
(12.0”) D + 1.6 cm (0.625”) for feet

16
Warranty - Home and Commercial Audio
Limited Liability
ebode electronics warrants its loudspeaker products to the original
purchaser to be free of manufacturing defects in material and workmanship
for a period of two years from date of purchase. This warranty is subject to
the following additional conditions and limitations.
The warranty is void and inapplicable if ebode electronics deems that the
product has been used or handled other than in accordance with the
instructions provided by the manufacturer, including but not limited to
damage caused by accident, mishandling, improper installation, abuse,
negligence, or normal wear and tear, or any defect caused by repair to the
product by anyone other than ebode electronics.
To obtain warranty service, please visit your dealer. A factory return
authorization number will be sent to you. Do not return any unit without first
receiving written authorization and shipping instructions from your dealer.
There are no other warranties, including without limitation, either express or
implied warranties of merchantability or fitness for a particular purpose, with
respect to the product.
Repair or replacement as provided under this warranty is the exclusive
remedy of the consumer/purchaser. ebode electronics shall not be
responsible for any incidental or consequential damages except to the extent
provided (or prohibited) by applicable law.
Some COUNTRIES do not allow the exclusion or limitation of incidental or
consequential damages, so the above limitation may not apply to you.
This warranty gives you specific legal rights, and you may also have other
rights which vary from COUNTRY TO COUNTRY.

17
Questions? Contact your local dealer!
Have a question about your ebode electronics speakers? Talk to the
people who know them best! We’re waiting to hear from you!
WRITE THE PART NUMBER AND SERIAL NUMBER FROM YOUR
PRODUCT BOX HERE AND RETAIN FOR PRODUCT REGISTRATION
Part Number:______________________________________________
Serial Number:_____________________________________________

18
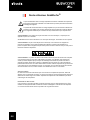
Der Blitz im gleichseitigen Dreieck weist auf gefährliche Hochspannung im Gerät hin, die
zu Stromschlag führen kann.
Das Ausrufungszeichen im gleichseitigen Dreieck weist auf wichtige Bedienungs- und
Wartungsanleitungen hin.
WARNUNG: Zur Vermeidung von Feuer und Stromschlag setzen Sie das Gerät bitte nicht Regen oder
Feuchtigkeit aus.
WARNUNG Stellen Sie keine offenen Flammen (wie brennende Kerzen) auf dem Gerät ab.
WARNUNG – Gerätegehäuse nicht öffnen! Stromschlaggefahr. Die Hochspannung in diesem Gerät ist
lebensgefährlich. Es befinden sich keine vom Verbraucher wartbaren Teile im Gerät. Wenden Sie sich
mit Wartungs- und Reparaturarbeiten stets an einen autorisierten Kundendienst.
Stellen Sie das Gerät in unmittelbarer Nähe einer Steckdose auf und achten Sie darauf, dass der
Hauptschalter jederzeit gut erreichbar ist.
WARNUNG: Dieses Gerät darf NUR mit der Netzspannung betrieben werden, wie auf der
Geräterückseite oder dem mitgelieferten Netzteil aufgedruckt. Andere Netzspannungen können
zu nicht reparablen Schäden führen und sind nicht von der Garantie abgedeckt. Wir warnen vor
der Benutzung eines Steckeradapters, da hierüber das Gerät an einer ungeeigneten Spannung
angeschlossen werden kann. Benutzen Sie nur das mitgelieferte Netzkabel. Ist Ihnen Ihre
Netzspannung nicht bekannt, so wenden Sie sich bitte an Ihren örtlichen Stromversorger oder an
Ihren Fachhändler.
ANFORDERUNGEN VERSTÄRKER
Aufgrund ihres hohen Ausgangspegels sind diese Lautsprecher in der Lage, sehr laute Geräusche
wiederzugeben, seien Sie mit der Lautstärkeeinstellung vorsichtig. Übermäßige Lautstärke über
einen längeren Zeitraum Übermäßige Lautstärke über einen längeren Zeitraum kann zu dauerhaften
Hörschäden führen. Die Übersteuerung Ihres Verstärkers kann ebenfalls zu einer Beschädigung der
SubWoofer führen.
REINIGUNG UND PFLEGE
Ihre Lautsprecher haben ein haltbares Finish, das nur abgestaubt werden muss. Benutzen Sie keine
scheuernden, aggressiven oder lösungsmittelhaltigen Reinigungsmittel. Der Bürstenaufsatz Ihres
Staubsaugers oder ein feuchtes Tuch sind zum Abstauben des Grillgitters völlig ausreichend.
Bedienungsanleitung SubWoofer

19
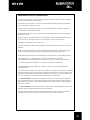
WICHTIGE SICHERHEITSHINWEISE
1. Lesen Sie unbedingt die mitgelieferten Sicherheits- und Bedienungsanleitungen vor der
Inbetriebnahme des Geräts.
2. Bewahren Sie die Sicherheits- und Bedienungsanleitungen für künftiges Nachschlagen auf.
3. Beachten Sie alle Warnhinweise auf dem Gerät und in der Bedienungsanleitung.
4. Bitte benutzen Sie das Gerät ausschließlich wie in den Sicherheits- und
Bedienungsanleitungen beschrieben.
5. Benutzen Sie das Gerät nicht in unmittelbarer Nähe von Wasser oder Feuchtigkeit,
beispielsweise in einem feuchten Kellergeschoss oder in der Nähe eines Schwimmbeckens
und dergleichen.
6. Reinigen Sie das Gerät nur mit einem trockenen Tuch.
7. Blockieren Sie nicht die Lüftungsöffnungen. Installieren Sie das Gerät entsprechend der
Herstellerangaben.
8. Installieren Sie das Gerät nicht in unmittelbarer Nähe von Wärmequellen wie Heizungen,
Heizkörpern, Herden oder sonstigen Wärme erzeugenden Geräten (wie Verstärker).
9. Schützen Sie das Netzkabel, damit es nicht belastet oder eingeklemmt wird, insbesondere
am Stecker und dem Ausgang am Gerät.
10. Benutzen Sie nur vom Hersteller spezifizierte Zubehörteile.
11. Bei Gewitter oder längerer Nichtbenutzung ziehen Sie bitte den Netzstecker.
12. Wenden Sie sich mit Reparaturen stets an einen autorisierten Kundendienst. Eine
Wartung ist nötig, wenn das Gerät, der Stecker oder das Netzkabel beschädigt sind,
wenn Feuchtigkeit oder Fremdkörper in das Gerät eingedrungen sind oder es Regen oder
Feuchtigkeit ausgesetzt war, wenn es nicht wie gewöhnlich funktioniert oder fallen gelassen
wurde.
13. WARNUNG – Zur Vermeidung von Feuer und Stromschlag setzen Sie das Gerät nicht
Regen oder Feuchtigkeit aus. Schützen Sie das Gerät vor Spritzwasser und Tropfwasser und
stellen Sie keine mit Wasser gefüllten Gegenstände (wie Vasen) auf dem Gerät ab.
14. WARNUNG: Der Netzstecker dient dem vollständigen Abtrennen des Geräts vom
Stromnetz und muss jederzeit frei zugänglich sein.
15. Dieses Gerät ist ein Klasse II oder doppelt isoliertes Elektrogerät. Es ist konzipiert, nicht
geerdet werden zu müssen.
16. Dieses Gerät ist ein Klasse II oder doppelt isoliertes Elektrogerät. Es ist konzipiert, nicht
geerdet werden zu müssen. (THIS IS CONFLICTING WITH 9)

20
Herzlichen Glückwunsch
Vielen Dank, dass Sie sich für den ebode SubWoofer
entschieden haben. Dieser SubWoofer wurde konzipiert,
um einwandfrei mit Ihrem ebode LightSpeaker® System
zu arbeiten, von der kleinen, unauffälligen Form bis zur
modernsten Drahtlostechnologie. Dieser SubWoofer passt
sich völlig an Ihren Raum an und liefert gleichzeitig reiche,
tiefe Bässe. Zur Installation werden keine Kabel oder
Einstellungen benötigt. Stellen Sie den SubWoofer in einer
Ecke oder hinter Ihrem Lieblingssessel auf und schließen Sie
ihn an der nächsten Steckdose an. Einfach anschließen und
benutzen.
Benutzen Sie die Einstellmöglichkeit für die zweite Zone, um
in einem zweiten Raum gleichzeitig eine andere Musikquelle
wiederzugeben. Oder schalten Sie zwischen den Quellen um,
um Ihre Lieblingsmusik in einem oder allen Räumen zu hören.
Für weitere Informationen zu den Fähigkeiten Ihres ebode
LightSpeaker Systems besuchen Sie uns im Internet bei:
www.ebodeelectronics.eu.
Sidan laddas...
Sidan laddas...
Sidan laddas...
Sidan laddas...
Sidan laddas...
Sidan laddas...
Sidan laddas...
Sidan laddas...
Sidan laddas...
Sidan laddas...
Sidan laddas...
Sidan laddas...
Sidan laddas...
Sidan laddas...
Sidan laddas...
Sidan laddas...
Sidan laddas...
Sidan laddas...
Sidan laddas...
Sidan laddas...
Sidan laddas...
Sidan laddas...
Sidan laddas...
Sidan laddas...
Sidan laddas...
Sidan laddas...
Sidan laddas...
Sidan laddas...
Sidan laddas...
Sidan laddas...
Sidan laddas...
Sidan laddas...
Sidan laddas...
Sidan laddas...
Sidan laddas...
Sidan laddas...
Sidan laddas...
Sidan laddas...
Sidan laddas...
Sidan laddas...
Sidan laddas...
Sidan laddas...
Sidan laddas...
Sidan laddas...
Sidan laddas...
Sidan laddas...
Sidan laddas...
Sidan laddas...
Sidan laddas...
Sidan laddas...
Sidan laddas...
Sidan laddas...
Sidan laddas...
Sidan laddas...
Sidan laddas...
Sidan laddas...
Sidan laddas...
Sidan laddas...
Sidan laddas...
Sidan laddas...
Sidan laddas...
Sidan laddas...
Sidan laddas...
Sidan laddas...
Sidan laddas...
Sidan laddas...
Sidan laddas...
Sidan laddas...
Sidan laddas...
Sidan laddas...
Sidan laddas...
Sidan laddas...
Sidan laddas...
Sidan laddas...
Sidan laddas...
Sidan laddas...
Sidan laddas...
Sidan laddas...
Sidan laddas...
Sidan laddas...
Sidan laddas...
Sidan laddas...
Sidan laddas...
Sidan laddas...
Sidan laddas...
Sidan laddas...
Sidan laddas...
Sidan laddas...
Sidan laddas...
Sidan laddas...
Sidan laddas...
Sidan laddas...
Sidan laddas...
Sidan laddas...
Sidan laddas...
Sidan laddas...
Sidan laddas...
Sidan laddas...
Sidan laddas...
Sidan laddas...
Sidan laddas...
Sidan laddas...
Sidan laddas...
Sidan laddas...
Sidan laddas...
Sidan laddas...
Sidan laddas...
Sidan laddas...
Sidan laddas...
Sidan laddas...
Sidan laddas...
Sidan laddas...
-
 1
1
-
 2
2
-
 3
3
-
 4
4
-
 5
5
-
 6
6
-
 7
7
-
 8
8
-
 9
9
-
 10
10
-
 11
11
-
 12
12
-
 13
13
-
 14
14
-
 15
15
-
 16
16
-
 17
17
-
 18
18
-
 19
19
-
 20
20
-
 21
21
-
 22
22
-
 23
23
-
 24
24
-
 25
25
-
 26
26
-
 27
27
-
 28
28
-
 29
29
-
 30
30
-
 31
31
-
 32
32
-
 33
33
-
 34
34
-
 35
35
-
 36
36
-
 37
37
-
 38
38
-
 39
39
-
 40
40
-
 41
41
-
 42
42
-
 43
43
-
 44
44
-
 45
45
-
 46
46
-
 47
47
-
 48
48
-
 49
49
-
 50
50
-
 51
51
-
 52
52
-
 53
53
-
 54
54
-
 55
55
-
 56
56
-
 57
57
-
 58
58
-
 59
59
-
 60
60
-
 61
61
-
 62
62
-
 63
63
-
 64
64
-
 65
65
-
 66
66
-
 67
67
-
 68
68
-
 69
69
-
 70
70
-
 71
71
-
 72
72
-
 73
73
-
 74
74
-
 75
75
-
 76
76
-
 77
77
-
 78
78
-
 79
79
-
 80
80
-
 81
81
-
 82
82
-
 83
83
-
 84
84
-
 85
85
-
 86
86
-
 87
87
-
 88
88
-
 89
89
-
 90
90
-
 91
91
-
 92
92
-
 93
93
-
 94
94
-
 95
95
-
 96
96
-
 97
97
-
 98
98
-
 99
99
-
 100
100
-
 101
101
-
 102
102
-
 103
103
-
 104
104
-
 105
105
-
 106
106
-
 107
107
-
 108
108
-
 109
109
-
 110
110
-
 111
111
-
 112
112
-
 113
113
-
 114
114
-
 115
115
-
 116
116
-
 117
117
-
 118
118
-
 119
119
-
 120
120
-
 121
121
-
 122
122
-
 123
123
-
 124
124
-
 125
125
-
 126
126
-
 127
127
-
 128
128
-
 129
129
-
 130
130
-
 131
131
-
 132
132


EDOBE XDOM SUBWOOFER Bruksanvisning
- Typ
- Bruksanvisning
- Denna manual är också lämplig för
på andra språk
- italiano: EDOBE XDOM SUBWOOFER Manuale del proprietario
- español: EDOBE XDOM SUBWOOFER El manual del propietario
- Deutsch: EDOBE XDOM SUBWOOFER Bedienungsanleitung
- português: EDOBE XDOM SUBWOOFER Manual do proprietário
- français: EDOBE XDOM SUBWOOFER Le manuel du propriétaire
- English: EDOBE XDOM SUBWOOFER Owner's manual
- Nederlands: EDOBE XDOM SUBWOOFER de handleiding