Rusta 903014050101 Användarmanual
- Kategori
- Kaffebryggare
- Typ
- Användarmanual

SEENG NO FIDE
Manual/Bruksanvisning/Gebrauchsanweisung/Käyttöohje
Item. No 903014050101
Espresso machine
Espressomaskin / Espressomaschine /
Espressokone
IM_903014050101_Espresso_machine_v2.indd 1 2019-10-03 13:57

2
Thank you for choosing to
purchase a product from Rusta!
Read through the entire manual
before installation and use!
ENG
Espresso machine
SAFETY INSTRUCTIONS
• Read all instructions.
• Before using, check that the voltage of outlet corresponds to the indicated
voltage marked on the rating plate.
• This appliance has been incorporated with a grounded plug. Please ensure
the wall outlet in your house is well earthed.
• To protect against fi re, electric shock and injury to persons do not immerse
main parts of the product, cord, plug, in water or other liquid.
• The appliance must not be immersed.
• Remove plug from wall outlet before cleaning and when not in use.
Allow appliance to cool down completely before taking off , attaching
components or before cleaning.
• Do not operate any appliance with a damaged cord or plug or after
the appliance malfunctions, or is dropped or damaged in any manner
• If the appliance is damaged or the supply cord is damaged, it should be
replaced by the manufacturer, retailer, service agent or similar qualifi ed
person, in order to avoid a hazard. The use of accessory attachments not
recommended by the appliance manufacturer may result in fi re, electric
shock or injury to persons.
• Place appliance on fl at surface or table, do not hang power cord over
the edge of table or counter.
• Ensure the power cord does not touch hot surfaces.
• Do not place the espresso machine on a hot surface or beside a fi re in order
to avoid damage.
• To disconnect, remove plug from wall outlet. Always hold the plug.
But never pull the cord.
• Do not use appliance for other than intended use and place it in a dry environment.
WARNING!
If these instructions are not followed, an accident may
lead to serious personal injury or property damage.
IM_903014050101_Espresso_machine_v2.indd 2 2019-10-03 13:57

3
• Be careful not to get burned by the steam.
• Do not touch the hot surface of appliance (such as steam wand, and
the steel mesh just boiling). Use handle or knobs.
• Do not let the espresso machine operate without water.
• DO NOT remove the portafi lter while brewing coff ee. Please remove
the portafi lter to make additional coff ee after fi nished brewing. Caution
should also be taken while removing the portafi lter since the metal parts
will be hot. Please make sure to hold it by the handle and to use the fi lter
retention clip to dispose the grounds. Caution should be taken when
moving unit with hot liquids.
• Connect plug to wall outlet before using and turn any switch off before
plug is removed from wall outlet.
• This appliance can be used by children aged from 8 years and above if
they have been given supervision or instruction concerning use of the
appliance in a safe way and if they understand the hazards involved.
Cleaning and user maintenance shall not be made by children unless they
are older than 8 and supervised. Keep the appliance and its cord out of
reach of children aged less than 8 years.
• Appliances can be used by persons with reduced physical, sensory or
mental capabilities or lack of experience and knowledge if they have been
given supervision or instruction concerning use of the appliance in a safe
way and understand the hazards involved.
• Children shall not play with the appliance.
• This appliance is intended to be used indoors in a household environment
and is not applicable for commercial use.
• Do not use outdoors.
• Save these instructions
.
IM_903014050101_Espresso_machine_v2.indd 3 2019-10-03 13:57

4
ENG
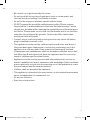
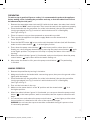
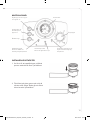
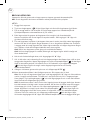
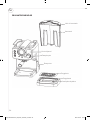
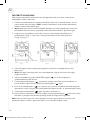
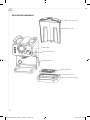
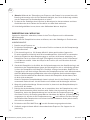
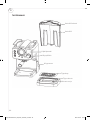
Steam wand
PRODUCT DESCRIPTION
Water tank lid
Control panel
Steam knob
Drip plate
Drip tray
Floot cover
Water tank
IM_903014050101_Espresso_machine_v2.indd 4 2019-10-03 13:57

5
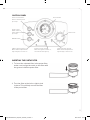
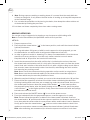
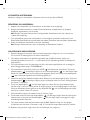
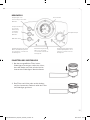
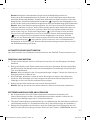
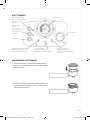
CONTROL PANEL
INSERTING THE PORTAFILTER
1. To insert the selected fi lter in the porta-fi lter,
make sure to align the notch on the fi lter with
the groove inside the porta-fi lter.
2. Turn the fi lter to the left or right to lock
in place. This will help secure the fi lter
in the porta-fi lter.
Steam control button:
down to steaming and
up to stop.
Pump control
button: down to
make co ee and
up to stop.
ON/OFF button
Thermometer
Steam knob
Co ee indicator (green):
When co ee temperature is
high enough, it will turn on.
Power indicator (red):
When the appliance turns on,
the indicator will light up.
Steam indicator (yellow):
When steam temperature is
high enough, it will turn on.
IM_903014050101_Espresso_machine_v2.indd 5 2019-10-03 13:57

6
ENG
BEFORE FIRST USE
To ensure the fi rst cup of coff ee tastes excellent, you should rinse the espresso machine
with warm water as follows:
1. Pull out the water tank of the espresso machine. Pour water into water tank, the water
level should not exceed the “MAX” mark in the tank, then insert it into the espresso
machine.
2. Note: The appliance is supplied with a removable tank for easy cleaning, you can fi ll
the tank with water fi rst, and then insert the tank into the appliance.
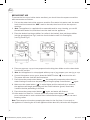
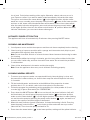
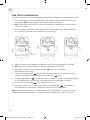
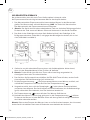
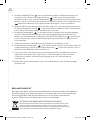
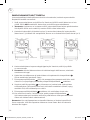
3. Place the basket into the portafi lter (no coff ee in the basket), then put the portafi lter
into the grouphead (see Fig.1) and turn it anticlockwise until it is fi xed tightly
(see Fig.2 and Fig.3).
4. Place an espresso cup you have prepared on the drip plate. Make sure the steam knob
is at the “O” position.
5. Note: As the appliance is not equipped with any cup or jug, prepare your own jug or cup.
6. Connect into power source, press down the ON/OFF button “
” to turn on the unit.
The power indicator (red) will be illuminated.
7. Press down the pump control button “
”, the pump will pump water, when there is
water fl owing out and close the pump by pressing the pump control button “ ” again.
8. Make sure the steam button “
” is at the higher position and wait for a moment,
the appliance will begin preheating until the coff ee indicator (green) illuminates,
it means that the preheating is fi nished.
9. Press down the pump control button “
” again, and water will fl ow out.
10. After water has fl own for 1 minute, press the pump control button “
”, you can
pour out the water in each container then clean them thoroughly, now you can start
brewing coff ee.
Note: There may be noise when pumping the water for the fi rst time, it is normal, as
the appliance is releasing the air in the appliance. After about 20s, the noise will disappear.
Grouphead
Fig. 1 Fig. 2 Fig. 3
IM_903014050101_Espresso_machine_v2.indd 6 2019-10-03 13:57

7
PREHEATING
To make a cup of good hot Espresso coff ee, it is recommended to preheat the appliance
before making coff ee, including the portafi lter and cup, so that the coff ee fl avor will not
be infl uenced by the cold parts.
1. Remove the removable water tank and fi ll it with desired water, the water level should
not exceed the “MAX” mark in the tank. Then insert the tank into the appliance properly.
2. Place the basket into the portafi lter (no coff ee in the basket), then put the portafi lter
into the grouphead (see Fig.1) and turn it anticlockwise until it is fi xed tightly
(see Fig.2 and Fig.3).
3. Place an espresso cup you have prepared on removable cup shelf.
4. Then connect the appliance into power supply. Make sure the steam knob is
at the "O" position.
5. Press the ON/OFF button “
” to turn on the unit, the power indicator (red) will illuminate,
make sure the steam button “ ” is at the higher position.
6. Press down the pump control button “
” to the lower position, when there is water
fl owing out, close the pump immediately by pressing the pump control button “ ” again
to the higher position. The purpose of the step is to pump the water of the tank into the
housing.
7. When the coff ee indicator (green) is illuminated, and you should press down the pump
control button “
” again, there will be hot water fl owing out.
8. After water has fl own for 20s, press the pump control button “
”. The preheating
is fi nished.
MAKING ESPRESSO
1. Remove the portafi lter by turning it clockwise.
2. Add ground coff ee to the basket with a measuring spoon, then press the ground coff ee
tightly with the tamper.
3. Place the basket into the portafi lter (no coff ee in the basket), then put the portafi lter
into the grouphead (see Fig.1) and turn it anticlockwise until it is fi xed tightly
(see Fig.2 and Fig.3).
4. Pour out the hot water in the cup.
5. Make sure the steam knob is at the "O" position and the steam button “
” is at
the higher position.
6. When the coff ee indicator (green) is illuminated, you can press down the pump control
button “
” to the lower position, wait for a moment, then the espresso extraction will
begin.
7. You should press and release the pump control button “
”to the higher position when
desired espresso is obtained or the color of the espresso changes.
WARNING: do not leave the espresso machine unattended during this process since
it is manually operated!
IM_903014050101_Espresso_machine_v2.indd 7 2019-10-03 13:57

8
ENG
8. Note: During espresso making or making steam, it is normal that the ready indicator
is likely to extinguish, it only means that the heater is heating up to keep the temperature
at the standard range.
9. You can take the portafi lter out by turning clockwise, then dump the coff ee residue out
of the basket by holding the press bar.
10. Let them cool down completely, then rinse under running water.
MAKING CAPPUCCINO
You can get a cup of cappuccino by topping a cup of espresso with frothing milk.
Note: to use the Steam Wand, the portafi lter needs to be in position.
METHOD
1. Prepare espresso fi rst.
2. Press down the steam button “
” to the lower position, wait until the steam indicator
(yellow) illuminates.
3. Fill a jug with about 100 grams of milk for each cappuccino to be prepared, you are
recommended to use whole milk at refrigerator temperature (not hot!).
4. In order to get best results in steaming, it is always recommended to clear the steam
wand fi rst of excess moisture, since the early steam contains too much water.
Keep the knob at “O” position and conduct the next step .
5. Insert the steam wand into the milk until the tip is just below the surface, then turn
the steam knob anticlockwise until it is fully open; steam will come out from the steam
wand. Good swirl rotation of the milk should occur, with a slight sucking sound. After a
few seconds, lower the steam tip further into the milk, maintaining the swirl rotation
but removing any sucking sound.
Note: Never touch the steam wand during operation and be careful to not get burnt.
Note: Never turn the steam knob rapidly, as the steam will accumulate rapidly in a
short time which may increase the potential of harm.
6. When the required frothing is reached, you can turn the steam knob to the “O” position.
7. Please follow the operation as below to avoid the steam outlet being blocked after
fi nishing frothing milk each time: put an empty jug under the steam wand, then turn on
the steam knob and press down the pump control button “
” to the lower position,
the pump will pump water, after the water fl owing out for 30 seconds, press the pump
control button “
” to the higher position, fi nally, clean the steam outlet with wet sponge,
but take care not to be burnt!
8. Press and release the ON/OFF button “
” to cut off the power source.
9. Pour the frothed milk into the prepared espresso, now the cappuccino is ready.
Note: Please follow the operation as below if the steam wand is blocked: fi rst turn
the steam knob to “O” position and let the espresso machine cool down for about half an
hour, then poke the steam outlet for several times with a needle about 1mm in diameter,
fi nally, press down the steam button “
” and turn on the steam knob to check if the
appliance can produce steam normally when the steam indicator (yellow) illuminates.
Note: after steaming, we recommend you allow the espresso machine to cool down
IM_903014050101_Espresso_machine_v2.indd 8 2019-10-03 13:57

9
for at least 5 min before making coff ee again. Otherwise a burnt odor may occur in
your Espresso coff ee. If you want to make coff ee immediately, follow the next steps:
First, press and release the steam button “ ” to the higher position; dip the steam
wand into a cup; secondly, press the pump control button “
” down to the lower position
and turn on the steam control knob and there will be water fl ow out from steam wand ;
after the ready indicator extinguishes, press and release the pump control button “
”
to the higher position, then turn the steam control knob to “O” position. When the ready
indicator illuminates, you can start to brew coff ee again.
AUTOMATIC POWER OFF FUNCTION
The appliance will turn off automatically 29 minutes after pressing ON/OFF button.
CLEANING AND MAINTENANCE
1. Cut off power source and let the espresso machine cool down completely before cleaning.
2. Clean housing of espresso machine with a sponge and clean water tank, drip tray and
removable shelf regularly, then dry them.
Note: Do not clean with alcohol or solvent cleanser. Never immerse the housing in water
for cleaning.
3. Detach the portafi lter by turning it clockwise, get rid of any coff ee residue inside, then
you can clean it with soap, and then rinse with clear water. Do not wash the portafi lter
in a dishwasher.
4. Clean all the attachments in the water and dry thoroughly.
Note: Clean the appliance after every use to maintain it working properly.
CLEANING MINERAL DEPOSITS
1. To ensure your espresso maker can operate effi ciently, internal piping is clean and
the removal of coff ee residue, you should clean away the mineral deposits left every
2–3 months.
2. Fill the tank with water and descaler to the MAX level (the proportion of water
and descaler is 5:1, for details, refer to the instructions of the descaler.
3. Follow the program for preheating, put the portafi lter (no coff ee powder in it) and
a carafe (jug) in place. Brew water per “PREHEATING”.
4. Press down the ON/OFF button “
” to turn on the unit, the power indicator (red) will
be illuminated, you should press the pump control button “ ” to the lower position,
make sure the steam button “ ” is at the higher position, when there is water fl owing
out and close the pump by pressing the pump control button “ ” again, and wait for a
moment, the espresso machine begins to be heated.
5. When the ready indicator (green) illuminates, it shows the heating is fi nish. Pressing
down the pump control button “
” to the lower position and make two cups coff ee
(about 60 ml). Then close the pump and wait for 5s.
6. Press down the steam button “
” to the lower position, waiting until the yellow indicator
IM_903014050101_Espresso_machine_v2.indd 9 2019-10-03 13:57

10
ENG
is illuminated. Make steam for 2min, then turn the steam knob to the "O" position
to stop making steam. Press the ON/OFF button “ ” to turn off the unit immediately,
letting the descaler solution sit in the wand at least 15 minutes.
7. Restart the unit and repeat the steps of 4–6 at least 3 times.
8. Then pressing and release the steam button “
” to the higher position, when the
green lamp is illuminated, press down the pump control button “ ” to the lower
position to brew until no descaler is left.
9. Lastly, fi ll the tank with pure tap water to the MAX level, repeat steps 4–6 for 3 times
(it is not necessary to wait 15 minutes now in step 6). Complete this process until no
water is left in the tank.
10. Repeat step 9 at least 3 times to make sure the piping cleaned.
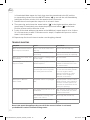
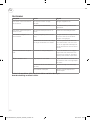
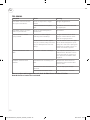
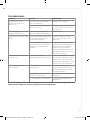
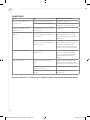
TROUBLE SHOOTING
Symptom Cause Corrections
Water leaks from the bottom
of the espresso machine.
There is too much water in the
drip tray.
Please clean the drip tray.
The espresso machine is mal-
functioning.
Please contact with the authori-
zed service facility for repairing.
Water leaks out of outer side
of portafi lter.
There are excess co ee grounds
on fi lter edge.
Get rid of them.
Acid (vinegar) taste exists in
Espresso co ee.
Improper cleaning after cleaning
mineral deposits.
Clean co ee maker per the
content in “before the fi rst use”
for several times.
The co ee grounds are stored in
a hot, wet place for a long time.
The co ee grounds turn bad.
Please use fresh co ee grounds,
or store unused co ee grounds
in a cool, dry place. After
opening a package of co ee
grounds, reseal it tightly to
maintain its freshness.
The Espresso Machine
doesn’t work.
The power outlet is not plugged
well.
Plug the power cord into a wall
outlet correctly, if the appliance
still does not work, please con-
tact with the authorized service
facility for repairing.
The steam cannot froth. The steam ready indicator is not
illuminated.
Only after the steam ready indi-
cator is illuminated, the steam
can be used to froth.
The container is too big, or the
shape is not correct.
Use a high and narrow cup.
You have used skimmed milk. Use whole milk or half-skimmed
milk.
Do not take apart the appliance by yourself if the cause of failure is not found,
you had better contact certifi ed serving center.
IM_903014050101_Espresso_machine_v2.indd 10 2019-10-03 13:57

11
RIGHT OF COMPLAINT
By law the product must be returned to the place of purchase along with the original
receipt in the event of a complaint. The user is liable for any damage to the product that
is caused by not using the product for its intended purpose or by not following this user
manual correctly. The right of complaint will not apply in these instances.
INFORMATION ABOUT HAZARDOUS WASTE
Used products should be handled separately
from household waste. They should be taken
for recycling in accordance with local rules for
waste management.
IM_903014050101_Espresso_machine_v2.indd 11 2019-10-03 13:57

12
Tack för att du valt att
köpa en produkt från Rusta!
Läs igenom hela bruksanvisningen
innan montering och användning!
SE
Espressomaskin
VARNING!
Om föreskriften inte efterföljs kan en olycka leda till
allvarlig person- eller egendomsskada.
SÄKERHETSINSTRUKTIONER
• Läs alla instruktioner.
• Se till att spänningen i uttaget motsvarar det voltantal som anges
på typskylten.
• Denna apparat har en inbyggd, jordad stickkontakt. Se till att vägguttaget
i ditt hem är ordentligt jordat.
• För att skydda mot brand, elchock och personskada, sänk aldrig ner
produktens huvudkomponenter, elsladd eller stickpropp i vatten eller
annan vätska.
• Produkten får inte täckas av vatten.
• Ta bort stickproppen från vägguttaget före rengöring och när du inte
använder kaff ebryggaren. Låt svalna helt innan du tar bort eller sätter
dit delar eller rengör apparaten.
• Använd inte apparaten om den har en trasig sladd eller stickkontakt,
om den tappats i golvet eller om den blivit skadad.
• Om apparaten eller nätkabeln uppvisar skador bör den bytas av tillverkare,
återförsäljare, servicerepresentant eller annan behörig person för att
undvika risker och skador. Användning av tillbehör som inte rekommenderats
av tillverkaren kan resultera i brand, elstötar eller personskador.
• Placera apparaten på en platt yta eller ett bord. Nätsladden får inte hänga
över bordskant eller disk.
• Nätsladden får inte vidröra heta ytor.
• Placera inte espressomaskinen på varmt underlag eller nära öppen eld,
för att undvika skador.
• För att stänga av strömmen, ta ut stickproppen från vägguttaget.
Dra alltid i stickproppen, inte i sladden.
IM_903014050101_Espresso_machine_v2.indd 12 2019-10-03 13:57

13
• Använd endast espressomaskinen för sitt syfte och placera den i en torr miljö.
• Var försiktig så att du inte bränner dig på ångan.
• Vidrör aldrig heta ytor på apparaten (t.ex. ångstav eller stålnät vid kokning).
Använd alltid vred och reglage.
• Sätt inte på kaff ebryggaren utan vatten.
• Avlägsna ALDRIG portafi ltret medan kaff et bryggs. För att brygga mer
kaff e, avlägsna portafi ltret efter avslutad bryggning. Portafi ltret ska
avlägsnas med försiktighet, då metalldelarna hettas upp. Håll i handtaget
och avlägsna kaff eresterna med fi lterklämman. Iakttag försiktighet när
du fl yttar enheter med varma vätskor.
• Anslut stickproppen till vägguttag före användning och stäng av samtliga
funktioner innan du tar ut stickproppen från vägguttaget.
• Apparaten får användas av barn från 8 år om det sker under överinseende
av en vuxen eller om de fått instruktioner om hur den ska användas på
ett säkert sätt och förstår riskerna. Låt inte barn under 8 år rengöra eller
utföra normalt underhåll på apparaten utan en vuxens överinseende.
Håll apparaten och sladden utom räckhåll för barn under 8 år.
• Apparater får användas av personer med fysiska, sensoriska eller mentala
funktionshinder, eller personer som saknar erfarenhet och kunskaper,
om de använder apparaten under överinseende, eller om de har erhållit
lämplig utbildning i användningen av den för att de ska kunna använda
den på ett säkert sätt och vet vilka risker användningen medför.
• Barn får inte leka med apparaten.
• Apparaten är avsedd för inomhusbruk i hemmiljö och ska inte användas
i kommersiella syften.
• Ej för utomhusbruk.
• Spara dessa instruktioner
.
IM_903014050101_Espresso_machine_v2.indd 13 2019-10-03 13:57

14
SE
PRODUKTBESKRIVNING
Ångstav
Lock vattentank
Kontrollpanel
Ångreglage
Dropplatta
Droppbricka
Fothus
Vattentank
IM_903014050101_Espresso_machine_v2.indd 14 2019-10-03 13:57

15
KONTROLLPANEL
INSTALLERA PORTAFILTER
1. Se först till att upphöjningen på fi ltret
passar med skåran inne i portafi ltret.
2. Fäst fi ltret på plats genom att vrida åt
vänster eller höger. Detta gör att fi ltret
sitter korrekt i portafi ltret.
Ångknapp: ner för ånga på
och upp för av.
Pumpknapp: ner
för ka e på och
upp för av.
PÅ/AV-knapp
Termometer
Ångreglage
Ka elampa (grön):
Tänds när ka et når
tillräckligt hög temperatur.
Strömlampa (röd):
Tänds när apparaten är på.
Ånglampa (gul): Tänds när
ångan når tillräckligt hög
temperatur.
IM_903014050101_Espresso_machine_v2.indd 15 2019-10-03 13:57

16
SE
FÖRE FÖRSTA ANVÄNDNINGEN
För bästa smak på den första kaff ekoppen, skölj espressomaskinen med varmvatten så här:
1. Ta ut vattentanken ur espressomaskinen. Häll vatten i tanken. Vattennivån får inte
överskrida “MAX”-markeringen. Sätt tillbaka tanken i maskinen.
2. Obs! Vattentanken kan tas ut för lättare rengöring. Fyll tanken först och sätt in den
i maskinen sedan.
3. Placera korgen i portafi ltret (utan kaff e inuti), sätt portafi ltret i grupphuvudet (fi g. 1)
och vrid moturs tills det sitter ordentligt (fi g. 2 och fi g. 3).
4. Ställ en färdig espressokopp på dropplattan. Se till att ångreglaget är i “O”-läge.
5. Obs! Kopp eller mugg medföljer ej. Använd egen kopp eller mugg.
6. Anslut till strömkälla och tryck på ON/OFF “
” för att slå på enheten.
Strömlampan (röd) tänds.
7. Tryck ner pumpknappen “
” så att vatten börjar pumpas. Vänta tills det rinner ut
vatten och stäng sedan pumpen genom att trycka på “ ” igen.
8. Se till att ångknappen “
"
är i det övre läget och vänta en stund. Förvärmning påbörjas
nu tills kaff elampan (grön) tänds, vilket betyder att förvärmningen är färdig.
9. Tryck ner pumpknappen “
” igen. Vattnet rinner nu ut.
10. Låt vattnet rinna i 1 minut och tryck sedan på pumpknappen “
”. Töm vattnet ur
alla behållare och diska dem ordentligt. Nu kan du börja brygga kaff e.
Obs! Oväsen från maskinen när vatten pumpas för första gången är normalt och beror
på att luft håller på att tömmas ur systemet. Ljuden upphör efter cirka 20 sekunder.
Grupphuvud
Fig. 1 Fig. 2 Fig. 3
IM_903014050101_Espresso_machine_v2.indd 16 2019-10-03 13:57

17
FÖRVÄRMNING
För bästa möjliga espresso rekommenderas det att maskinen förvärms innan tillredning,
inklusive portafi lter och kopp, så att inte kaff ets smak påverkas av kalla delar.
1. Ta ut den löstagbara vattentanken och fyll den med önskad mängd vatten. Vattennivån
får inte överskrida “MAX”-markeringen. Sätt tillbaka tanken i maskinen ordentligt igen.
2. Placera korgen i portafi ltret (utan kaff e inuti), sätt portafi ltret i grupphuvudet (fi g. 1)
och vrid moturs tills det sitter ordentligt (fi g. 2 och fi g. 3).
3. Ställ en färdig espressokopp på den avtagbara kopphyllan.
4. Anslut sedan maskinen till eluttag. Se till att ångreglaget är i “O”-läge.
5. Tryck på AV/PÅ “
” för att slå på maskinen. Strömlampan (röd) tänds.
Se till att ångknappen “ ” är det övre läget.
6. Tryck ner pumpknappen “
” till det lägre läget. Vänta tills det rinner ut vatten och
stäng sedan pumpen genast genom att trycka upp “ ” till det övre läget igen.
Syftet med detta steg är att pumpa vattnet från tanken in i maskinhuset.
7. När kaff elampan (grön) tänds, tryck ner pumpknappen “
” igen så att hett vatten börjar rinna.
8. Låt vattnet rinna i 20 sekunder och tryck på pumpknappen “
”. Förvärmningen är nu klar.
BRYGGA ESPRESSO
1. Ta ut portafi ltret genom att vrida det medurs.
2. Lägg malet kaff e i korgen med hjälp av doseringssked och packa det hårt
med packverktyget.
3. Placera korgen i portafi ltret (utan kaff e inuti), sätt portafi ltret i grupphuvudet (fi g. 1)
och vrid moturs tills det sitter ordentligt (fi g. 2 och fi g. 3).
4. Töm varmvattnet i koppen.
5. Se till att ångreglaget är i “O”-läge och ångknappen “
” är i det övre läget.
6. När kaff elampan (grön) tänds, tryck ner pumpknappen “
” till det lägre läget och
vänta ett ögonblick tills espresso börjar pressas ut.
7. Tryck upp pumpknappen “
” till det övre läget när du når önskad mängd espresso,
eller när färgen börjar skifta.
VARNING: lämna aldrig espressomaskinen obevakad i det här steget, då manuell
hantering krävs!
8. Obs! Vid bryggning eller ångning händer det ibland att den indikatorlampan slocknar.
Detta är normalt och betyder att maskinen värmer på för att bibehålla tillräckligt hög
temperatur.
9. Ta ut portafi ltret genom att vrida medurs, och töm ut kaff eresterna i korgen medan
du håller i presstaven.
10. Låt svalna helt och skölj sedan i rinnande vatten.
IM_903014050101_Espresso_machine_v2.indd 17 2019-10-03 13:57

18
SE
BRYGGA CAPPUCCINO
Cappuccino tillreds genom att en kopp espresso toppas upp med skummad mjölk.
Obs: för att ångstaven ska kunna användas måste portafi ltret sitta på plats.
METOD
1. Brygg först espresso.
2. Tryck ner ångknappen “
” till det lägre läget och vänta tills ånglampan (gul) tänds.
3. Fyll en mugg med ca 100 ml mjölk för varje kopp cappuccino. Standardmjölk vid
kylskåpstemperatur rekommenderas (ej för varm!).
4. Bäst ångresultat fås genom att ångstaven först rengörs från överskottsfukt.
Annars innehåller den första ångan för mycket vatten. Ställ reglaget i “O”-läge och
gå vidare till nästa steg.
5. För ned ångstaven i mjölken så att toppen sitter precis under ytan. Vrid sedan ångreglaget
moturs tills det är helt öppet. Ångan kommer nu ut ur ångstaven. Mjölken ska virvla bra
i muggen med ett svagt sugande läte. Vänta några sekunder och doppa ångstaven längre
ner i mjölken så att omrörningen bibehålls men utan sugläte.
Obs! Vidrör inte ångstaven under gång och undvik brännskador.
Obs! Vrid inte ångreglaget för snabbt, då det gör att ångan frigörs alltför hastigt och
ökar skaderisken.
6. När du når önskad mängd skum, vrid ångreglaget till “O”-läge.
7. Gör så här efter varje skumning för att inte ångmynningen ska täppas igen: ställ en tom
mugg under ångstaven, öppna ångreglaget och tryck ned pumpknappen “
” till det lägre
läget så att vatten pumpas. Låt vattnet rinna i 30 sekunder, tryck upp pumpknappen
“ ” till det högre läget och rengör sedan ångmynningen med en våt svamp.
Undvik brännskador!
8. Stäng av strömmen genom att trycka ner och släppa upp AV/PÅ “
”.
Häll den skummade mjölken i den färdiga espresson. Din cappuccino är klar!
Obs: Gör så här om ångstaven täpps igen: vrid ångreglaget till “O”-läge och låt maskinen
svalna i ungefär en halvtimme. Ta sedan en 1 mm tjock nål och för in i ångmynningen
fl era gånger. Tryck på ångknappen “
” och vrid ångreglaget för att se om det kommer
ånga normalt när ånglampan (gul) tänds.
Obs: låt maskinen svalna i minst 5 min efter ångning innan du brygger kaff e igen. Annars
kan det komma en bränd smak i espressokaff et. Om du inte vill vänta innan du brygger
nästa kopp, gör så här: Tryck ner och släpp upp ångknappen “ ” till det övre läget;
doppa ångstaven i en kopp; tryck sedan ner pumpknappen “ ” till det lägre läget och
öppna ångreglaget så att det rinner vatten ur ångstaven; vänta tills indikatorlampan
slocknar och tryck sedan ner och släpp upp pumpknappen “ ” till det högre läget.
Vrid sedan ångreglaget till “O”-läget. När indikatorlampan tänds kan du brygga kaff e igen.
IM_903014050101_Espresso_machine_v2.indd 18 2019-10-03 13:57

19
AUTOMATISK AVSTÄNGNING
Maskinen stängs av automatiskt 29 minuter efter att du trycker på PÅ/AV.
RENGÖRING OCH UNDERHÅLL
1. Koppla från strömkälla och låt maskinen svalna helt innan rengöring.
2. Rengör maskinhuset med en svamp. Diska vattentank, droppbricka och avtagbar
kopphylla regelbundet, och låt torka.
Obs! Rengör inte med alkohol eller lösningsmedel. Maskinhuset får inte sänkas ner
i vatten för rengöring.
3. Ta ut portafi ltret genom att vrida medurs, och avlägsna eventuella kaff erester inuti.
Diska sedan fi ltret med tvål och skölj med rent vatten. Portafi ltret ska inte diskas i diskmaskin.
4. Diska alla tillbehör med vatten och torka ordentligt.
Obs! Rengör maskinen efter varje användning för bibehållen funktion.
AVLÄGSNA KALKAVLAGRINGAR
1. Espressobryggaren fungerar bäst om kalkavlagringar avlägsnas var 2:a–3:e månad,
för att rensa rörledningarna och få bort kaff erester.
2. Fyll tanken med vatten och avkalkningsmedel upp till MAX (andelen vatten och
avkalkningsmedel ska vara 5:1 – se instruktioner till avkalkningsmedel för detaljerad
information).
3. Följ instruktionerna för förvärmning och sätt i det tomma portafi ltret och en mugg på
plats. Brygg vatten enligt “FÖRVÄRMNING”.
4. Slå på maskinen genom att trycka ner AV/PÅ “
”. Strömlampan (röd) tänds. Tryck ner
pumpknappen “ ” till det lägre läget och se till att ångknappen “ ” är i det högre läget.
Vänta tills vattnet rinner ut och stäng sedan pumpen genom att trycka på pumpknappen
“ ” igen. Vänta ett ögonblick tills värmning påbörjas.
5. Vänta tills den gröna indikatorlampan tänds. Detta visar att värmningen är klar. Tryck ner
pumpknappen “
” till det lägre läget och gör två koppar kaff e (ca 60 ml). Stäng pumpen
och vänta i 5 sekunder.
6. Tryck ner ångknappen “
” till det lägre läget och vänta tills den gula lampan tänds.
Låt det ånga i 2 min och stäng sedan av ångan genom att vrida ångreglaget till “O”-läge.
Stäng av maskinen genast genom att trycka på AV/PÅ “ ” och låt avkalkningslösningen
vara kvar i staven i minst 15 minuter.
7. Starta maskinen igen och repetera steg 4–6 minst 3 ggr.
8. Tryck sedan ned och släpp upp ångknappen “
” till det högre läget. Vänta tills den gröna
lampan lyser och tryck ner pumpknappen “ ” till det lägre läget och brygg tills inget
avkalkningsmedel återstår.
9. Fyll sedan tanken med rent kranvatten upp till MAX. Repetera steg 4–6 tre gånger
(nu behöver du inte vänta 15 minuter i steg 6). Fortsätt tills inget vatten återstår i tanken.
10. Repetera steg 9 minst 3 ggr så att alla rörledningar har rengjorts.
IM_903014050101_Espresso_machine_v2.indd 19 2019-10-03 13:57

20
SE
FELSÖKNING
Symptom Orsak Åtgärd
Det läcker vatten från botten
av maskinen.
För mycket vatten i dropp-
brickan.
Rengör droppbrickan.
Fel på espressomaskinen. Kontakta behörig verkstad för
reparation.
Det läcker vatten från porta-
fi ltrets utsida.
För mycket ka e på kanten av
fi ltret.
Ta bort det överfl ödiga ka et.
Sur smak (“vinäger”) i es-
pressoka et.
Felaktig rengöring efter avkalk-
ning.
Rengör maskinen enligt instruk-
tionerna “före första använd-
ningen” fl era gånger.
Ka et förvaras varmt och fuktigt
en längre tid. Ka et har skämts.
Använd nymalet ka e eller för-
vara malet ka e svalt och torrt.
Se till att öppnade ka eförpack-
ningar återförsluts för att hållas
färska.
Espressomaskinen fungerar
inte.
Elsladden är dåligt inkopplad. Anslut elsladden till ett väggut-
tag korrekt. Om maskinen fort-
farande inte fungerar, kontakta
behörig verkstad för reparation.
Ångan skummar inte. Ånglampan är inte tänd. Ångan kan endast användas för
att skumma efter att ånglampan
har tänts.
Behållaren är för stor eller har
fel form.
Använd en hög och smal kopp.
Du använder lättmjölk. Använd standardmjölk eller
mellanmjölk.
Ta inte isär maskinen själv om du inte hittar vad felet beror på.
Kontakta behörig verkstad istället.
IM_903014050101_Espresso_machine_v2.indd 20 2019-10-03 13:57
Sidan laddas...
Sidan laddas...
Sidan laddas...
Sidan laddas...
Sidan laddas...
Sidan laddas...
Sidan laddas...
Sidan laddas...
Sidan laddas...
Sidan laddas...
Sidan laddas...
Sidan laddas...
Sidan laddas...
Sidan laddas...
Sidan laddas...
Sidan laddas...
Sidan laddas...
Sidan laddas...
Sidan laddas...
Sidan laddas...
Sidan laddas...
Sidan laddas...
Sidan laddas...
Sidan laddas...
Sidan laddas...
Sidan laddas...
Sidan laddas...
Sidan laddas...
Sidan laddas...
Sidan laddas...
Sidan laddas...
Sidan laddas...
-
 1
1
-
 2
2
-
 3
3
-
 4
4
-
 5
5
-
 6
6
-
 7
7
-
 8
8
-
 9
9
-
 10
10
-
 11
11
-
 12
12
-
 13
13
-
 14
14
-
 15
15
-
 16
16
-
 17
17
-
 18
18
-
 19
19
-
 20
20
-
 21
21
-
 22
22
-
 23
23
-
 24
24
-
 25
25
-
 26
26
-
 27
27
-
 28
28
-
 29
29
-
 30
30
-
 31
31
-
 32
32
-
 33
33
-
 34
34
-
 35
35
-
 36
36
-
 37
37
-
 38
38
-
 39
39
-
 40
40
-
 41
41
-
 42
42
-
 43
43
-
 44
44
-
 45
45
-
 46
46
-
 47
47
-
 48
48
-
 49
49
-
 50
50
-
 51
51
-
 52
52


Rusta 903014050101 Användarmanual
- Kategori
- Kaffebryggare
- Typ
- Användarmanual
på andra språk
- Deutsch: Rusta 903014050101 Benutzerhandbuch
- English: Rusta 903014050101 User manual
- suomi: Rusta 903014050101 Ohjekirja
Relaterade papper
Andra dokument
-
Philips HD5047/01 Product Datasheet
-
Morphy Richards 10-12 CUP FILTER COFFEE MAKER Bruksanvisning
-
 Russell Hobbs 28250-56 Användarmanual
-
Villaware NDVLEM1000 Användarmanual
-
Sage SES500 Användarguide
-
Sage SES920 Användarmanual
-
Silvercrest SEM 1100 A2 Operating Instructions Manual
-
Silvercrest SEM 1100 B3 Operating Instructions Manual
-
-
Tristar KZ-2271 Användarmanual
