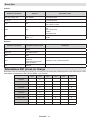
Hitachi MB170 Användarmanual
- Kategori
- TV-apparater
- Typ
- Användarmanual

INSTRUCTION MANUAL

Some features or functions mentioned in this user manual
may vary or may not be available depending on the model
you purchased.

English - 1 -
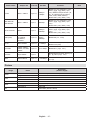
Table of Contents
Introduction ...........................................................4
Stand Installation & Wall Mounting .......................5
Other Connections ................................................ 6
Turning On/Off the TV ........................................... 7
Turning On/Off the TV ........................................... 7
TV Control & Operation .........................................8
TV Control & Operation .........................................9
Initial Setup Wizard ............................................. 13
Accounts & Sign In ..........................................20
Apps ................................................................20
Device Preferences .........................................20
Connecting to the Internet ...................................24
USB Recording ...................................................28
Instant Recording ............................................28
Watching Recorded Programmes ..................28
Timeshift Recording ......................................... 28
Disk Format .....................................................28
Schedule List ...................................................28
CEC.....................................................................29
Google Cast ........................................................29
HBBTV System ...................................................30
Troubleshooting & Tips .......................................30
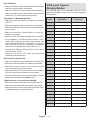
VGA Input Typical Display Modes ....................... 31
AV and HDMI Signal Compatibility ......................32
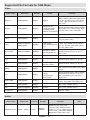
Supported File Formats for USB Mode ............... 33
Video ...............................................................33
Audio ...............................................................33
Picture .............................................................35
Subtitle.............................................................36
Supported DVI Resolutions .................................36
Disposal Information ...........................................37

English - 2 -
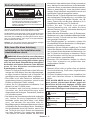
Safety Information
CAUTION
RISK OF ELECTRIC SHOCK
DO NOT OPEN
CAUTION: TO REDUCE THE RISK OF ELECTRIC SHOCK DO
NOT REMOVE COVER (OR BACK).
NO USER-SERVICEABLE PARTS INSIDE. REFER
SERVICING TO QUALIFIED SERVICE PERSONNEL.
Note: Follow the on screen instructions for operating the
related features.
In extreme weather (storms, lightning) and long inactivity
periods (going on holiday) disconnect the TV set from the
mains.
The mains plug is used to disconnect TV set from the mains
and therefore it must remain readily operable. If the TV set is
not disconnected electrically from the mains, the device will
still draw power for all situations even if the TV is in standby
IMPORTANT - Please read these
instructions fully before installing or
operating
WARNING: This device is intended to be
used by persons (including children) who are
capable / experienced of operating such a device
unsupervised, unless they have been given
supervision or instruction concerning the use of
the device by a person responsible for their safety.
Use this TV set at an altitude of less than 2000 meters
above the sea level, in dry locations and in regions
with moderate or tropical climates.
The TV set is intended for household and similar
general use but may also be used in public places.
For ventilation purposes, leave at least 5cm of free
space around the TV.
The ventilation should not be impeded by covering
or blocking the ventilation openings with items, such
as newspapers, table-cloths, curtains, etc.
The power cord plug should be easily accessible. Do
not place the TV, furniture, etc. on the power cord.
you an electric shock. Handle the power cord by the
plug, do not unplug the TV by pulling the power cord.
Never touch the power cord/plug with wet hands as
this could cause a short circuit or electric shock.
Never make a knot in the power cord or tie it with
other cords. When damaged it must be replaced, this
Do not expose the TV to dripping or splashing of
such as vases, cups, etc. on or over the TV (e.g.,
on shelves above the unit).
Do not expose the TV to direct sunlight or do not
or near the TV.
Do not place any heat sources such as electric
heaters, radiators, etc. near the TV set.
Do not place the TV on the floor and inclined
surfaces.
out of the reach of the babies, children and domestic
animals.
Carefully attach the stand to the TV. If the stand is
prevent the TV from tilting. Do not over-tighten the
screws and mount the stand rubbers properly.
Do not dispose of the batteries in fire or with
WARNING
Batteries must not be exposed to excessive heat
Excessive sound pressure from earphones or
headphones can cause hearing loss.
ABOVE ALL - NEVER let anyone, especially
children, push or hit the screen, push anything
into holes, slots or any other openings in the case.
Caution Serious injury or death
risk
Risk of electric shock Dangerous voltage risk
Maintenance Important maintenance
component
Markings on the Product
The following symbols are used on the product as
a marker for restrictions and precautions and safety
instructions.
Note
such information for security reasons.
Class II Equipment: This appliance is
designed in such a way that it does not require
a safety connection to electrical earth.
Hazardous Live Terminal: The marked
terminal(s) is/are hazardous live under normal
operating conditions.
iCaution, See Operating Instructions: The
marked area(s) contain(s) user replaceable
coin or button cell batteries.
CLASS 1
LASER PRODUCT
Class 1 Laser Product: This
product contains Class 1 laser
source that is safe under rea-
sonably foreseeable condi-
tions of operation.

English - 3 -
WARNING
Do not ingest the battery, Chemical Burn Hazard
This product or the accessories supplied with the prod-
uct may contain a coin/button cell battery. If the coin/
button cell battery is swallowed, it can cause severe
internal burns in just 2 hours and can lead to death.
Keep new and used batteries away from children.
If the battery compartment does not close securely,
stop using the product and keep it away from children.
If you think batteries might have been swallowed or
placed inside any part of the body, seek immediate
medical attention.
– – – – – – – – – – – –
A television may fall, causing serious personal injury
or death. Many injuries, particularly to children, can be
avoided by taking simple precautions such as:
ALWAYS use cabinets or stands or mounting
methods recommended by the manufacturer of the
television set.
ALWAYS use furniture that can safely support the
television set.
ALWAYS ensure the television set is not overhanging
the edge of the supporting furniture.
ALWAYS educate children about the dangers of
climbing on furniture to reach the television set or
its controls.
ALWAYS route cords and cables connected to your
television so they cannot be tripped over, pulled or
grabbed.
NEVER place a television set in an unstable location.
NEVER place the television set on tall furniture
(for example, cupboards or bookcases) without
anchoring both the furniture and the television set
to a suitable support.
NEVER place the television set on cloth or other
materials that may be located between the television
set and supporting furniture.
NEVER place items that might tempt children to
climb, such as toys and remote controls, on the top
of the television or furniture on which the television
is placed.
The equipment is only suitable for mounting at
If the existing television set is going to be retained and
relocated, the same considerations as above should
be applied.
– – – – – – – – – – – –
Apparatus connected to the protective earthing of the
building installation through the MAINS connection or
through other apparatus with a connection to protective
earthing – and to a television distribution system using
hazard. Connection to a television distribution system
has therefore to be provided through a device providing
electrical isolation below a certain frequency range
(galvanic isolator)
WALL MOUNTING WARNINGS
Read the instructions before mounting your TV
on the wall.
The wall mount kit is optional. You can obtain from
your local dealer, if not supplied with your TV.
Do not install the TV on a ceiling or on an inclined
wall.
accessories.
the TV from fall. Do not over-tighten the screws.
Figures and illustrations in this user manual are
actual product appearance. Product design and

English - 4 -
Introduction
Thank you for choosing our product. You’ll soon be
enjoying your new TV. Please read these instructions
carefully. They contain important information which will
help you get the best from your TV and ensure safe
and correct installation and operation.
Features
Remote controlled colour TV
AndroidTM operating system
Google Cast
Voice Search
Fully integrated digital terrestrial/cable/satellite TV
(DVB-T-T2/C/S-S2)
HDMI inputs to connect other devices with HDMI
sockets
USB input
Composite inputs for external devices (such as DVD
Players, PVR, video games, etc.)
Stereo sound system
Teletext
Headphone connection
Automatic programming system
Manual tuning
Sleep timer
VGA input
Ethernet (LAN) for Internet connectivity and service
802.11 a/b/g/n/ac built in WLAN Support
HbbTV
Ultra HD (UHD)
known as 4K) which provides resolution of 3840 x
2160 (4K:2K). It equals 4 times the resolution of Full
HD TV by doubling the pixel count of the Full HD TV
both horizontally and vertically. Ultra HD contents are
supported from HDMI, some of the Over-the-Top (OTT)
services, USB inputs and over DVB-T2 and DVB-S2
broadcasts.
High Dynamic Range (HDR) / Hybrid Log-
Gamma (HLG)
Using this feature the TV can reproduce greater
dynamic range of luminosity by capturing and then
promises better picture quality thanks to brighter, more
realistic highlights, more realistic colour and other
intended to achieve, showing the hidden areas of
dark shadows and sunlight with full clarity, colour and
detail. HDR/HLG contents are supported via native
and market applications, HDMI, USB inputs and
over DVB-S broadcasts. When the input source is
set to the related HDMI input press the Menu button
and set the HDMI EDID Version option in the TV
Options>Settings>Device Preferences>Inputs
menu as EDID 2.0 or Auto EDID in order to watch
HDR/HLG content, if the HDR/HLG content is received
through an HDMI input. The source device should also
be at least HDMI 2.0a compatible in this case.
Dolby Vision
Dolby Vision™ delivers a dramatic visual experience,
astonishing brightness, exceptional contrast, and vivid
colour, that brings entertainment to life. It achieves this
stunning image quality by combining HDR and wide
colour gamut imaging technologies. By increasing the
brightness of the original signal and using a higher
dynamic colour and contrast range, Dolby Vision
presents amazing true-to-life images with stunning
detail that other post-processing technologies in the
TV aren’t able to produce. Dolby Vision is supported
via native and market applications, HDMI and USB in-
puts. When the input source is set to the related HDMI
input press the Menu button and set the HDMI EDID
Version option in the TV Options>Settings>Device
Preferences>Inputs menu as EDID 2.0 or Auto EDID
in order to watch HDR/HLG content, if the HDR/HLG
content is received through an HDMI input. The source
device should also be at least HDMI 2.0a compatible in
this case. In the Picture Mode
picture modes will be available if Dolby Vision content
is detected: Dolby Vision Bright and Dolby Vision
Dark. Both allow the user to experience the content
ambient lighting conditions. To change the Picture
Mode setting press the Menu button while watching the
Dolby Vision content and go to Picture menu. While
watching Dolby Vision Content via an application,
will not be able to access the Picture menu and set
the Picture Mode.

English - 5 -
Stand Installation &
Wall Mounting
Assembling / Removing the pedestal
Preparations
Take out the pedestal and the TV from the packing
case and put the pedestal onto a work table or any
other even surface.
can support the weight of the TV.
Do not hold the screen panel part.
Make sure not to scratch or break the TV.
Assembling the pedestal
1. Place the pedestal on the table or similar even
surface.
2. Hold the TV over the pedestal so that it coincides
with the pedestal mounting point and then lower it
to be mounted with its own weight. If the pedestal
latch/es snap/s into place.
Removing the pedestal from the TV
Be sure to remove the pedestal in the following way
when using the wall-hanging bracket or repacking
the TV.
Put the TV onto a work table with the screen panel
down on the clean and soft cloth. Leave the pedestal
protruding over the edge of the surface.
Press the button/s on the rear side of the pedestal
to release the latch/es.
Remove the pedestal by pulling it away from the TV.
When using the wall mount bracket
Your TV is also prepared for a VESA-compliant wall
mount bracket. If it is not supplied with your TV, contact
your local dealer to purchase the recommended wall
mount bracket.
Stand Installation &
Wall Mounting
Assembling / Removing the pedestal
Preparations
Take out the pedestal(s) and the TV from the packing
case and put the TV onto a work table with the screen
panel down on the clean and soft cloth (blanket, etc.)
Do not hold the screen panel part.
Make sure not to scratch or break the TV.
Assembling the pedestal
1. Place the stand(s) on the stand mounting
pattern(s) on the rear side of the TV.
2. Insert the screws provided and tighten them gently
Removing the pedestal from the TV
Be sure to remove the pedestal in the following way
when using the wall-hanging bracket or repacking
the TV.
Put the TV onto a work table with the screen panel
down on the clean and soft cloth. Leave the stand(s)
protruding over the edge of the surface.
Remove the stand(s).
When using the wall mount bracket
Your TV is also prepared for a VESA-compliant wall
mount bracket. If it is not supplied with your TV, contact
your local dealer to purchase the recommended wall-
hanging bracket.
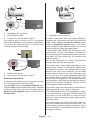
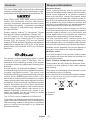
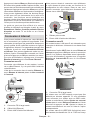
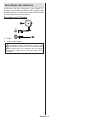
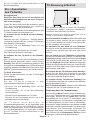
Antenna Connection
Connect the aerial or cable TV plug to the AERIAL
INPUT (ANT) socket or satellite plug to the SATELLITE
INPUT (LNB) socket located on the rear side of the TV.
Rear side of the TV
1
2
LNB
ANT
1. Satellite
2. Aerial or cable
If you want to connect a device to the TV, make
before making any connection. After the connection
is done, you can turn on the units and use them.

English - 6 -
Other Connections
any connection. After the connection is done, you can turn on the units and use them.
Connector Type Cables Device
COMPONENT Component
Video
Connection
(back) VGA to Component Connection Cable
HDMI
Connection
(back&side)
VGA
Connection
(back)
AUDIO IN
VGA/
Component
Audio
Connection
(back) Component/VGA Audio Cable
SPDIF SPDIF
(Optical Out)
Connection
(back)
COMPOSITE Composite
(Audio/Video)
Connection
(back) Audio Video Cable
HEADPHONE Headphone
Connection
(side)
USB
Connection
(side)
CI
Connection
(side)
CAM
module
LAN Ethernet
Connection
(back) LAN / Ethernet Cable
To enable VGA/Component audio,
you will need to use the back audio
inputs with a VGA/Component audio
cable for audio connection. When
using the wall mounting kit (contact
your dealer to purchase one, if not
supplied), we recommend that you
plug all your cables into the back of
the TV before mounting on the wall.
Insert or remove the CI module only
when the TV is SWITCHED OFF. You
should refer to the module instruction
manual for details of the settings. The
USB inputs on the TV support devices
up to 500mA. Connecting devices that
have current value above 500mA may
damage your TV. When connecting
equipment using a HDMI cable to your
TV, to guarantee sucient immunity
against parasitic frequency radiation
and trouble-free transmission of high
denition signals, such as 4K content,
you have to use a high speed shielded
(high grade) HDMI cable with ferrites.

English - 7 -
Connect power
IMPORTANT: The TV set is designed to operate on
220-240V AC, 50 Hz socket.
After unpacking, allow the TV set to reach the ambient
room temperature before you connect the set to the
mains.
Plug the power cable to the mains socket outlet. The
TV will switch on automatically.
To switch on the TV from standby
If the TV is in standby mode the standby LED lights
up. To switch on the TV from standby mode either:
Press the Standby button on the remote control.
Press the centre of the joystick on the TV in.
To switch the TV into standby
The TV cannot be switched into standby mode via
joystick. Press and hold the Standby button on the
remote control. dialogue will appear on the
screen. Highlight OK and press the OK button. The
TV will switch into standby mode.
To power down the TV completely, unplug the power
cord from the mains socket.
Quick standby mode
In order to switch the TV into quick standby mode
either;
Press the Standby button on the remote.
Press again to go back to operating mode.
Press and hold the center of the joystick on the TV.
Press again to go back to operating mode.
Your TV continues to operate in the quick standby
mode state, as it regularly checks for updates. This is
not a malfunction, it meets the requirements for energy
consumption. In order to minimize energy consumption
switch your TV into standby mode as explained above.
Turning On/Off the TV
Connect power
IMPORTANT: The TV set is designed to operate on
220-240V AC, 50 Hz socket.
After unpacking, allow the TV set to reach the ambient
room temperature before you connect the set to the
mains.
Plug the power cable to the mains socket outlet. The
TV will switch on automatically.
To switch on the TV from standby
If the TV is in standby mode the standby LED lights
up. To switch on the TV from standby mode either:
Press the Standby button on the remote control.
Press the centre of the control switch on the TV in.
The TV will then switch on.
To switch the TV into standby
The TV cannot be switched into standby mode via
control switch. Press and hold the Standby button on
the remote control. dialogue will appear on
the screen. Highlight OK and press the OK button. The
TV will switch into standby mode.
To power down the TV completely, unplug the power
cord from the mains socket.
Quick Standby Mode
In order to switch the TV into quick standby mode
either;
Press the Standby button on the remote.
Press again to go back to operating mode.
Press the centre of the control switch on the TV in
and hold it down for a few seconds.
Press again to go back to operating mode.
Your TV continues to operate in the quick standby
mode state, as it regularly checks for updates. This is
not a malfunction, it meets the requirements for energy
consumption. In order to minimize energy consumption
switch your TV into standby mode as explained above.
Turning On/Off the TV
Connect power
IMPORTANT: The TV set is designed to operate on
220-240V AC, 50 Hz socket.
After unpacking, allow the TV set to reach the ambient
room temperature before you connect the set to the
mains.
Plug the power cable to the mains socket outlet. The
TV will switch on automatically.
To switch on the TV from standby
If the TV is in standby mode the standby LED lights
up. To switch on the TV from standby mode either:
Press the Standby button on the remote control.
Press the control button on the TV.
The TV will then switch on.
To switch the TV into standby
The TV cannot be switched into standby mode via
control button. Press and hold the Standby button on
the remote control. dialogue will appear on
the screen. Highlight OK and press the OK button. The
TV will switch into standby mode.

English - 8 -
To power down the TV completely, unplug the power
cord from the mains socket.
Quick Standby Mode
In order to switch the TV into quick standby mode
either;
Press the Standby button on the remote.
Press again to go back to operating mode.
Press the control button on the TV.
Press the control button again to go back to operating
mode.
Your TV continues to operate in the quick standby
mode state, as it regularly checks for updates. This is
not a malfunction, it meets the requirements for energy
consumption. In order to minimize energy consumption
switch your TV into standby mode as explained above.
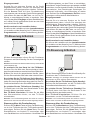
TV Control & Operation
P+
V+ V-
P-
The joystick allows you to control the Volume /
Programme / Source and Quick Standby-On functions
of the TV.
Note: The position of the joystick may dier depending on
the model.
To change volume: With the back of the TV facing
you, push the joystick left to increase the volume and
push it right to decrease the volume.
To change channel in Live TV mode: Scroll through
the stored channels by pushing the joystick up or down.
To change source in Live TV mode: Press the
centre of the joystick in, the TV options menu will
be displayed. Highlight Source option and press
the centre of the joystick in again, the Inputs list will
appear on the screen. Select the desired source by
pushing the joystick up or down and press the centre
of the joystick in.
Press the centre
of the joystick in and hold it down for a few seconds,
the TV will turn into quick standby mode.
The TV cannot be
switched into standby mode via joystick.
To turn on the TV: Press the centre of the joystick in,
the TV will turn on.
Operation with the Remote Control
Press the Menu button on your remote control to
display Live TV settings menu when in Live TV mode.
Press Home button to display or return to the Home
Screen of the Android TV. Use the directional buttons
to move the focus, proceed, adjust some settings and
press OK to make selections in order to make changes,
set your preferences, enter a sub-menu, launch an
application etc. Press Return/Back to return to the
previous menu screen.
Input Selection
Once you have connected external systems to your
Source button on your remote control consecutively
or use the directional buttons and then press the OK
mode. Or enter the Inputs menu on the Home Screen,
select the desired source from the list and press OK.
Changing Channels and Volume
You can adjust the volume by using the Volume
+/- buttons and change the channel in Live TV mode
by using the Programme +/- buttons on the remote.
TV Control & Operation
The control switch allows you to control the Programme
and Quick Standby-On functions of the TV.
Note: The position of the control switch may dier depending
on the model.
To change channel in Live TV mode: Press the
centre of the control switch in, the information banner
will appear on the screen. Scroll through the stored
channels by pushing the control switch up or down.
Press the centre
of the control switch in and hold it down for a few
seconds, the TV will turn into quick standby mode.
The TV cannot be
switched into standby mode via control switch.
To turn on the TV: Press the centre of the control
switch in, the TV will turn on.
Note: Live TV settings menu OSD in Live TV mode cannot be
displayed via control switch.
Operation with the Remote Control
Press the Menu button on your remote control to
display Live TV settings menu when in Live TV mode.

English - 9 -
Press Home button to display or return to the Home
Screen of the Android TV. Use the directional buttons
to move the focus, proceed, adjust some settings and
press OK to make selections in order to make changes,
set your preferences, enter a sub-menu, launch an
application etc. Press Return/Back to return to the
previous menu screen.
Input Selection
Once you have connected external systems to your
Source button on your remote control consecutively
or use the directional buttons and then press the OK
mode. Or enter the Inputs menu on the Home Screen,
select the desired source from the list and press OK.
Changing Channels and Volume
You can adjust the volume by using the Volume
+/- buttons and change the channel in Live TV mode
by using the Programme +/- buttons on the remote.
TV Control & Operation
The control button allows you to control the Quick
Standby-On functions of the TV.
Note: The position of the control button may dier depending
on the model.
Press the control
button to turn the TV into quick standby mode.
The TV cannot be
switched into standby mode via control button.
To turn on the TV: Press the control button, the TV
will turn on.
Note: Live TV settings menu OSD in Live TV mode cannot be
displayed via the control button.
Operation with the Remote Control
Press the Menu button on your remote control to
display Live TV settings menu when in Live TV mode.
Press Home button to display or return to the Home
Screen of the Android TV. Use the directional buttons
to move the focus, proceed, adjust some settings and
press OK to make selections in order to make changes,
set your preferences, enter a sub-menu, launch an
application etc. Press Return/Back to return to the
previous menu screen.
Input Selection
Once you have connected external systems to your
Source button on your remote control consecutively
or use the directional buttons and then press the OK
mode. Or enter the Inputs menu on the Home Screen,
select the desired source from the list and press OK.
Changing Channels and Volume
You can adjust the volume by using the Volume
+/- buttons and change the channel in Live TV mode
by using the Programme +/- buttons on the remote.

English - 10 -
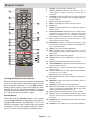
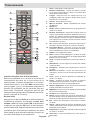
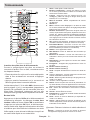
Remote Control
1
2
3
4
5
6
8
9
10
12
13
14
15
16
17
18
19
20
21
22
23
24
25
26
11
7
Inserting the Batteries into the Remote
Remove the screw that secure the battery compartment
the cover gently. Insert two 1.5V - size AAA batteries.
Make sure the (+) and (-) signs match (observe correct
polarity). Do not mix old and new batteries. Replace
only with same or equivalent type. Place the cover back
on. Then screw the cover back on again.
Standby Button
Press and hold the Standby button on the remote
control. dialogue will appear on the screen.
Highlight OK and press the OK button. The TV will
to switch the TV into quick standby mode or to switch
on the TV when in quick standby or standby mode.
1. Standby: Quick Standby / Standby / On
2. Numeric buttons: Switches the channel in Live TV
mode, enters a number or a letter in the text box on
the screen
3. Language: Switches among sound modes (analogue
TV), displays and changes audio language (digital TV,
where available)
4. Home: Opens the Home Screen
5. Mute:
6. Volume +/-
7. Guide: Displays the electronic programme guide in
Live TV mode
8. Directional buttons: Navigates menus, setting options,
moves the focus or cursor etc., sets record time and
displays the subpages in Live TV-Teletext mode when
pressed Right or Left. Follow the on-screen instructions.
9. OK: Confirms selections, enters sub-menus, views
channel list (in Live TV mode)
10. Back/Return: Returns to previous menu screen, goes
one step back, closes open windows, closes teletext (in
Live TV-Teletext mode)
11.
12. Menu: Displays Live TV Settings menu in Live TV
mode, displays available setting options such as sound
and picture
13. Stop: Stops the media being played
14. Rewind: Moves frames backwards in media such as
movies
15. Record: Records programmes in Live TV mode
16. Coloured Buttons: Follow the on-screen instructions for
coloured button functions
17. Text: Opens and closes teletext (where available in
Live TV mode)
18. Pause: Pauses the media being played, starts timeshift
recording in Live TV mode
Play: Starts to play selected media
19. Fast forward: Moves frames forward in media such
as movies
20. MyButton1: Opens the picture mode setting menu on
available sources
21. YouTube: Launches the YouTube application
22. Exit: Closes and exits from displayed Live TV Settings
menus, closes running applications and/or the Home
Screen and switches to last set source
23. Info: Displays information about on-screen content
24. Source: Shows all available broadcast and content
sources, closes the Home Screen and switches to last
set source
25. Programme +/-: Increases/Decreases channel number
in Live TV mode
26. Subtitles:

English - 11 -
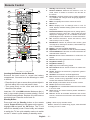
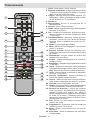
Remote Control
4
1
3
6
7
9
11
13
14
15
5
26
25
24
23
19
18
17
16
8
2
21
22
10 20
12
Inserting the Batteries into the Remote
Remove the back cover to reveal the battery
compartment. You need to do the followings in order
to do that:
Place the tip of a pen or some other pointed object in
the hole above the cover and press it down.
direction of the arrow.
Insert two 1.5V - size AAA batteries. Make sure the (+)
and (-) signs match (observe correct polarity). Do not
mix old and new batteries. Replace only with same or
equivalent type. Place the cover back on.
Standby Button
Press and hold the Standby button on the remote
control. dialogue will appear on the screen.
Highlight OK and press the OK button. The TV will
to switch the TV into quick standby mode or to switch
on the TV when in quick standby or standby mode.
1. Standby: Quick Standby / Standby / On
2. Numeric buttons: Switches the channel in Live TV
mode, enters a number or a letter in the text box on
the screen
3. Language: Switches among sound modes (analogue
TV), displays and changes audio language (digital TV,
where available)
4. Mute:
5. Volume +/-
6. Menu: Displays Live TV Settings menu in Live TV
mode, displays available setting options such as sound
and picture
7. Directional buttons: Navigates menus, setting options,
moves the focus or cursor etc., sets record time and
displays the subpages in Live TV-Teletext mode when
pressed Right or Left. Follow the on-screen instructions.
8. OK: Confirms selections, enters sub-menus, views
channel list (in Live TV mode)
9. Back/Return: Returns to previous menu screen, goes
one step back, closes open windows, closes teletext (in
Live TV-Teletext mode)
10.
11. MyButton1:
12. Coloured Buttons: Follow the on-screen instructions for
coloured button functions
13. Rewind: Moves frames backwards in media such as
movies
14. Record: Records programmes in Live TV mode
15. Play/Pause button (*)
16. Play/Pause button (*)
17. Stop: Stops the media being played
18. Fast forward: Moves frames forward in media such
as movies
19. Guide: Displays the electronic programme guide in
Live TV mode
20. YouTube: Launches the YouTube application
21. Exit: Closes and exits from displayed Live TV Settings
menus, closes running applications and/or the Home
Screen and switches to last set source
22. Info: Displays information about on-screen content
23. Home: Opens the Home Screen
24. Programme +/-: Increases/Decreases channel number
in Live TV mode
25. Text: Opens and closes teletext (where available in
Live TV mode)
26. Source: Shows all available broadcast and content
sources, closes the Home Screen and switches to last
set source
(*) Play - Starts to play selected media
Pause - Pauses the media being played, starts timeshift
recording in Live TV mode

English - 12 -
Remote Control
1
2
3
4
5
6
7
8
9
10
11
12
13
14
15 16
17
18
19
20
21
22
23
24
25
26
1. Standby: Quick Standby / Stanby / On
2. Numeric buttons: Switches the channel in Live
TV mode, enters a number or a letter in the text
box on the screen
3. Language: Switches among sound modes
(analogue TV), displays and changes audio
language (digital TV, where available)
4. Volume +/-
5. Microphone: Activates the microphone on the
remote
6. Home: Opens the Home Screen
7. Guide: Displays the electronic programme guide
in Live TV mode
8. OK:
views channel list (in Live TV mode)
9. Back/Return: Returns to previous menu screen,
goes one step back, closes open windows, closes
teletext (in Live TV-Teletext mode)
10.
11. Menu: Displays Live TV Settings menu in Live
TV mode
12. Coloured Buttons: Follow the on-screen
instructions for coloured button functions
13. Rewind: Moves frames backwards in media such
as movies
14. Stop: Stops the media being played
15. Record: Records programmes in Live TV mode
16. Pause: Pauses the media being played,
starts timeshift recording in Live TV mode
Play: Starts to play selected media
17. Text: Opens and closes teletext (where available
in Live TV mode)
18. Fast forward: Moves frames forward in media
such as movies
19. Source: Shows all available broadcast and
content sources in Live TV mode
20. YouTube: Launches the YouTube application
21. Exit: Closes and exits from displayed Live TV
Settings menus, closes the Home Screen
22. Directional buttons: Navigates menus, setting
options, moves the focus or cursor etc., sets
record time and displays the subpages in Live
TV-Teletext mode when pressed Right or Left.
Follow the on-screen instructions.
23. Info: Displays information about on-screen
content
24. Programme +/-: Increases/Decreases channel
number in Live TV mode
25. Mute:
26. Subtitles: Turns subtitles on and off (where
available)

English - 13 -
Standby Button
Press and hold the Standby button on the remote
control. dialogue will appear on the screen.
Highlight OK and press the OK button. The TV will
to switch the TV into quick standby mode or to switch
on the TV when in quick standby or standby mode.
Inserting the Batteries into the Remote
Remove the screw that secure the battery compartment
the cover gently. Insert two 1.5V - size AAA batteries.
Make sure the (+) and (-) signs match (observe correct
polarity). Do not mix old and new batteries. Replace
only with same or equivalent type. Place the cover back
on. Then screw the cover back on again.
To pair remote with the TV
accessories will be performed before the initial setup
starts. You will need to pair your remote control with
your TV at this point.
Press and hold the Source button on the remote for
about 5 seconds, the LED on the remote will light up.
Then release the Source button, the LED will start
to blink. That means the remote is in pairing mode.
name of your remote and press OK when it appears
on the TV screen.
When the paring process was successful, the LED
the remote will enter to sleep mode after 30 seconds.
Initial Setup Wizard
Note: Follow the on-screen instructions to complete the initial
setup process. Use the directional buttons and the OK button
on the remote to select, set, conrm and proceed.
-
sories will be performed before the initial setup starts.
Follow the on-screen instructions to pair your remote
control (depends on the model of the remote control)
and other wireless accessories with your TV. Press
Back/Return button to end adding accessories and
start the setup.
1. Welcome Message and Language Selection
“Welcome” message will be displayed along with
the language selection options listed on the screen.
Select the desired language from the list and press
OK to continue.
2. Quick Setup
If you didn’t priorly connect your TV to the internet via
Ethernet a screen will be displayed where you can
transfer your Android phone’s WLAN network and
Google Account to your TV. Highlight Continue and
press OK to proceed. Follow the on-screen instructions
on your TV and your phone to complete the process.
You can also skip this step by selecting Skip option.
Some steps may be skipped depending on the settings
made in this step.
If you did priorly connect your TV to the internet via
Ethernet a message will be displayed stating that you
are connected. You can choose to continue with wired
connection or change the network. Highlight Change
network and press OK if you want to use wireless
connection instead of wired connection.
3. Network Connection
You will be directed to the next step automatically, if you
connect your TV to internet via Ethernet at this point. If
not, available wireless networks will be searched and
listed on the next screen. Select your WLAN network
from the list and press OK to connect. Enter the
password using the virtual keyboard if the network is
password protected. Select the Other network option
from the list, if the network that you want to connect
has hidden SSID.
If you prefer not to connect to the internet at this point
you can skip this step by selecting Skip option. You
can connect to internet later using the Network &
Internet menu options in the Settings menu from
the Home Screen or from the TV options menu in
Live TV mode.
This step will be skipped if internet connection has
been established in the previous step.
4. Sign in to your Google account
If connection succeeds, you can sign in to your Google
account on the next screen. You need to be signed in
to a Google account in order to use Google services.
This step will be skipped if no internet connection has
been established in the previous step or if you already
signed in to your Google account in Quick Setup step.
By signing in, you will be able to discover new
apps for videos, music and games on Google Play;
get personalised recommendations from apps like
YouTube; buy or rent the newest movies and shows on
Google Play Movies & TV; access your entertainment
and control your media. Highlight Sign In and press
OK to proceed. Sign-in options are as following:
Use your phone or computer: You can use a
browser on your phone or computer to sign in.
Highlight this option and press OK button. A code
will be displayed on the TV screen. Make sure your
phone or computer is on the same network as your
TV. Open the given website (androidtv.com/setup,
follow on-screen instructions for the up-to-date
website url) in your phone’s or computer’s browser
and enter the code you see on your TV screen into
on your device and complete the process.
Use your remote: Using this option you can sign in to
your Google account by entering your e-mail address
or phone number and your password.

English - 14 -
If you prefer not to sign in to your Google account at this
point you can skip this step by selecting Skip option.
5. Terms of Service
Terms of Service screen will be displayed next. By
continuing, you will agree to the Google Terms of
Service, the Google Privacy Policy and the Google
Play Terms of Service. Highlight Accept and press
OK
also view Terms of Service, Privacy Policy and
Play Terms of Service on this screen. To display the
content an internet connection is needed. A message
will be displayed mentioning the web site address on
which this information can also be viewed, in case
internet access is not available.
6. Location
On the next screen, you can allow or disallow Google
and third party apps to use your TV’s location informa-
tion. Select YesOK. To skip this
No and proceed by
pressing the OK button. You can change this setting
later using the Settings>Device Preferences>Loca-
tion menu on the Home Screen.
7. Help improve Android
Automatically send diagnostic information to Google,
like crash reports and usage data from your device
and apps. This information won't be used to identify
you. Select YesOK. To skip this
No and proceed by
pressing the OK button. You can change this setting
later using the Settings>Device Preferences>Usage
& Diagnostics menu on the Home Screen.
Information on Google services and some features of
your TV will be displayed next. You can turn on person-
al results for Assistant by choosing the related option
when prompted. Press OK consecutively to proceed.
8. Country
In the next step select your Country from the list and
press OK to continue.
9. Password
Depending on the country selection you made in the
(PIN) at this point. Press OK to proceed. The selected
PIN cannot be 0000. This PIN will be required in order
to access some menus, contents or to release locked
channels, sources etc. You will have to enter it if you
are asked to enter a PIN for any menu operation later.
10. Select TV Mode
In the following step of the initial setup, you can set
the TV’s operation mode either as Home or as Store.
Store
environment. This option is intended only for store
use. It is recommended to select Home for home use.
11. Chromecast built-in always available
Select your chromecast availability preference. If set as
On your TV will be detected as a Google Cast device
and allow Google Assistant and other services to wake
your TV up to respond to Cast commands, even when
12. Tuner Mode
Note: If you don’t want to perform a tuner scan, select one of
the available options anyway. You can skip the scan at some
later stage of the installation wizard. If you skip this step you
can perform a channel search later using the related Channels
menu options.
The next step is the selection of the tuner mode. Select
your tuner preference to install channels for Live TV
function. Antenna, Cable and Satellite options are
available. Highlight the option that corresponds to
your environment and press OK or Right directional
button to proceed.
Antenna
If Antenna option is selected, the TV will search for
digital terrestrial and analogue broadcasts. On the next
screen highlight Scan option and press OK to start
the search or select Skip Scan to continue without
performing a search.
Cable
If Cable option is selected, the TV will search for
digital cable and analogue broadcasts. If any, available
operator options will be listed on the Select Operator
screen. Otherwise this step will be skipped. You
can select only one operator from the list. Highlight
the desired operator and press OK or the Right
directional button to proceed. On the next screen
select Scan option to start a search or select Skip
Scan to continue without performing a search. If Scan
next. Scan Mode, Frequency(KHz), Modulation,
Symbol Rate(Ksym/s), Network ID options may need
to be set. To perform a full scan set the Scan Mode as
Full/Advance if available. Depending on the selected
operator and/or Scan Mode some options may not be
available to be set.
Once you are done with setting available options,
press the Right directional button to proceed. The TV
will start to search available broadcasts.
Satellite
If Satellite option is selected, Satellite Type screen
will be displayed next. Preferred Satellite and General
Satellite options will be available. Select one and press
OK to proceed.
Note: Preferred Satellite and General Satellite options may
not be available depending on the selected country. In this case
the DVBS Conguration Setting screen will be displayed
after selecting the tuner mode as Satellite.
If Preferred Satellite option is selected, next screen
will be Select Operator screen. You can select only

English - 15 -
one operator from the list. Highlight the desired
operator and press OK or the Right directional button
to proceed. Some of the following options may be
preset depending on the selected operator in this
step. Check the parameters before proceeding and
adjust if necessary.
screen will be displayed
next. First Antenna type(*) should be set. Universal,
Single Cable and Jess Singlecable options are
available. Set the Antenna Type as Universal for
Direct and DiSEqC satellite systems. If you set the
antenna type as Universal, press the Right directional
button to proceed to the next step. If the antenna
type is set as Single Cable or Jess Singlecable,
there will be three more additional options on the
screen: Tuner, Band
frequency and . option
will be available if the Band frequency is set as User
. Set these options if available and press the
Right directional button to proceed.
(*) This option may be named as Satellite type depending on
the country selection.
After the parameters on the
Setting screen are configured according to your
environment the next step may be Select Satellite
depending on the selected antenna type and operator
in the previous steps. Highlight the desired satellite
option and press OK to set the parameters(*). The
Satellite Status
set as On
satellite and to enable scan this option should be set
as OnBack button and select next satellite
changes, press the Right directional button to proceed.
(*) If you have a Direct satellite system, DiSEqC Set option
should be set as DiSEqC A.
Channel Scan screen will be displayed next. Select
Scan and press OK or the Right directional button
Skip Scan to proceed without performing a scan and
complete the initial setup.
screen will be displayed next
if Scan option is selected. Following options will be
available: Scan Mode and Channels. You can choose
to perform a full scan or a network scan. Set the
Scan Mode accordingly. If you are going to perfrom a
network scan, make sure that you have adjusted the
Frequency, Symbol Rate (Ksym/s) and Polarization
parameters under the Transponder option accurately
on the Select Satellite screen. You may not be able
to change the Scan mode setting depending on the
previous selections. If the Channels option is set
as Free encrypted channels will not be installed.
Additional options may also be available depending
according to your preferences. Once you are done
with setting the available options, press the Right
directional button to start scan while Scan Mode or
Channels is highlighted. While the search continues
you can press the Back button to cancel the search.
The channels that have already been found will be
stored in the channel list.
When the initial setup is completed “Complete”
message will be displayed. Press OK
setup.
A disclaimer of liability will be displayed on the screen.
You can use Up and Down directional buttons to scroll
through and read the entire text. Highlight Accept and
press OK to proceed.
Home Screen will be displayed. You can highlight Live
TV app and press OK to switch to Live TV mode and
watch TV channels.
Home Screen
be connected to the Internet. Connect the TV to a
home network with a high-speed Internet connection.
You can connect your TV wirelessly or wired to your
modem/router. Refer to the Network & Internet
and Connecting to the Internet sections for further
information on how to connect your TV to the internet.
The Home menu is the centre of your TV. Press the
Home button to display Home Screen. From the
Home menu you can start any application, switch to a
TV channel, watch a movie or switch to a connected
device. Depending on your TV setup and your country
selection in the initial setup the Home menu may
The available options of the Home Screen are posi-
tioned in rows. To navigate through the Home Screen
options use the directional buttons on the remote.
Apps, YouTube, Google Play Movies & TV, Google
Play Music and Google Play related rows and rows of
the applications you have installed might be available.
Select a row then move the focus to the desired item
in the row. Press OK button to make a selection or to
enter a sub-menu.
On the upper left of the screen, search tools will be
located. You can choose either to type a word to start
a search via the virtual keyboard or try voice search
option if your remote has a built-in microphone.
Move the focus to the desired option and press OK
to proceed.
On the upper right of the screen, , Inputs,
Network & Internet (will be named as Connected or
Not Connected according to the current connection
status), Settings and the current time will be displayed.
using the Date & time menu options from the
Settings>Device Preferences menu.

English - 16 -
First row will be the Apps row. Live TV and Multi
Media Player apps will be available alongside with
other apps. Highlight Live TV and press OK to switch
to Live TV mode. If the source was set to an option
other than TV previously, press the Source button and
set as TV in order to watch live TV channels. Highlight
Multi Media Player and press OK to browse the
connected USB devices or media servers and play/
display the installed media content on the TV. The
TV or through the speaker systems connected to the
from the Speakers option in the Settings>Device
Preferences>Sound menu.
Live TV Mode Menu Content
the Menu button on the remote to see Live TV menu
options. To switch to Live TV mode you can either press
the Exit button or highlight the Live TV app from the
Apps row and press OK on the Home Screen.
Channels
Add to My Favorites: Add the channel that is currently
being watched to the previously selected favourite list.
Program Guide: Open the electronic programme
guide. Refer to the Programme Guide section for
detailed information.
New Channels Available: Start a search for new
channels. Select the channel source application
or tuner. Then make the settings according to your
environment and preferences if necessary. You
can use the Channel menu options to search for
broadcast channels. Refer to the Channel section
for more information. When complete highlight Done
and press OK.
TV Options
Source: Display the list of input sources. Select the
desired one and press OK to switch to that source.
Picture Mode: Set the picture mode to suit your
preference or requirements. Picture mode can be
set to one of these options: User, Standard, Vivid,
Sport, Movie and Game. You can use User mode to
create customised settings. Go to Settings>Device
Preferences>Picture for detailed setting options.
Display Mode: Set the aspect ratio of the screen.
your preference.
Speakers: To hear the TV audio from the connected
compatible audio device set as External Audio
System. Set as TV Speakers to use the speakers of
your TV for sound output.
Power
Sleep Timer:
want your TV to enter sleep mode automatically.
OK to
or on the TV to turn the screen on again. Note that
you can not turn the screen on via the Volume +/-,
Mute and Standby buttons. These buttons will
function normally.
to disable.
Set the behaviour of
the TV, when no signal is detected from the currently
set input source.
to disable.
CI Card: Display available menu options of the CI card
in use. This item may not be available depending on
the input source setting.
Advanced Options
Audio Language: Set your language preference for
audio. This item may not be available depending on
the input source setting.
Blue Mute:
your preference. When turned on, blue background
will be displayed on the screen when no signal is
available.
Default Channel: Set your default startup channel
preference. When the Select Mode is set as
User Select, Show Channels option will become
available. Highlight and press OK to see channel
list. Highlight a channel and press OK to make a
selection. Selected channel will be displayed, every
time the TV is turned back on from quick standby
mode. If the Select Mode is set as Last Status, the
last watched channel will be displayed.
Interaction Channel: Turn the Interaction Channel
MHEG PIN Protection: Turn the MHEG PIN
disables access some of the MHEG applications.
Disabled applications can be released by entering
the right PIN.
HBBTV Settings
HBBTV Support: Turn the HBBTV function on
Do Not Track: Set your preference regarding the
tracking behaviour for HBBTV services.
Cookie Settings: Set your cookie setting
preference for HBBTV services.
Persistent Storage: Turn the Persistent Storage
On cookies will be

English - 17 -
stored with an expiry date in the persistent
memory of the TV.
Block Tracking Sites: Turn the Block Tracking
Device ID:
Reset Device ID: Reset the device ID for HBBTV
on dialogue will be displayed.
Press OK to proceed, Back to cancel.
Subtitle
Subtitle Tracks: Set your subtitle track preference,
if any available.
Analog Subtitle: Set this option as , On or
Mute. If Mute option is selected, the analogue
subtitle will be displayed on the screen but the
speakers will be muted simultaneously.
Digital Subtitle Language: Set one of the listed
preference.
2nd Digital Subtitle Language: Set one of the
listed language options as second digital subtitle
language preference. If the selected language
in the Digital Subtitle Language option is not
available, the subtitles will be displayed in this
language.
Subtitle Type: Set this option as Normal or
Hearing Impaired. If Hearing Impaired option
is selected, it provides subtitle services to deaf
and hard of hearing viewers with additional
descriptions.
Teletext
Digital Teletext Language: Set the teletext
language for digital broadcasts.
Decoding Page Language: Set the decoding
page language for teletext display.
BISS Key: “Click To Add Biss Key” message will
be displayed. Press OK button to add a biss key.
Frequency, Symbol Rate (KSym/s), Polarization,
Program ID and CW Key parameters will be
available to be set. Once you are done with the
settings highlight Save Key and press OK to
save and add the biss key. This option will not be
available if the Channel Installation Mode under
the Settings>Channel menu is not set as Preferred
Satellite, General Satellite or Satellite. Available
selected country
during the initial setup process.
Auto Sleep:
want your TV to enter sleep mode automatically. 4
Hours, 6 Hours and 8 Hours options are available.
Set as Never to disable.
System Information: Display detailed system
information on the current channel such as Signal
Level, Signal Quality, Frequency etc.
Version Info: Display system information such as
Model Name, Version and Serial Number.
Settings: Refer to Settings section for detailed
information.
Record
Record List: The recordings will be displayed if any
available. Highlight a recording of your choice and
press the Yellow button to delete it or press the Blue
button to view detailed information. You can use Red
and Green buttons to scroll the page up and down.
Device Info: Connected USB storage devices will
be displayed. Highlight the device of your choice and
press OK to see available options.
Set TimeShift: Tag the selected USB storage
device or a partition on it for time shift recording.
Set PVR: Tag the selected USB storage device or
a partition on it for PVR.
Format: Format the selected USB storage
device. Refer to USB Recording section for more
information
Speed Test: Start a speed test for the selected USB
storage device. The test result will be displayed
when completed.
Schedule List: Add reminders or record timers using
the Schedule List menu.
Time Shift Mode: Enable or disable timeshift recording
feature. Refer to USB Recording section for more
information.
Settings
You can access the Settings menu from the Home
Screen or from the TV options menu in Live TV mode.
Network & Internet
the options of this menu. You can also highlight the
Connected/Not Connected icon on the Home screen
and press OK to access this menu.
Wi-Fi: Turn the wireless LAN (WLAN) function on
Available networks
When the WLAN function is turned on, available
wireless networks will be listed. Highlight See all and
press OK to see all networks. Select one and press OK
to connect. You may be asked to enter a password to
connect to the selected network, in case the network
is password protected. Additionally you can add new
networks by using the related options.
Other options
Add new network: Add networks with hidden SSID’s.

English - 18 -
Scanning always available: You can let the location
service and other apps scan for networks, even when
OK to turn it on
Wow:
This function allows you to turn on or awaken your
TV via network.
Wol:
function allows you to turn on or awaken your TV via
wireless network.
Ethernet
Connected/Not connected: Displays the status of
the internet connection via Ethernet, IP and MAC
addresses.
Proxy settings: Set a HTTP proxy for browser manu-
ally. This proxy may not be used by other apps.
IP settings:
Channel
Channels
Options of this menu may change or become inac-
tive depending on the Channel Installation Mode
selection.
Channel Installation Mode - Antenna
Channel Scan: Start a scan for analogue and digital
channels. You can press the Back button to cancel the
scan. The channels that have already been found will
be stored in the channel list.
Update Scan: Search for updates. Previously added
channels will not be deleted, but any newly found
channels will be stored in the channel list.
Analog Manual Scan: Start a manual scan for ana-
logue channels. Enter the Start Frequency and then
select Scan Up or Scan Down. When a channel is
found the scan will be completed and the found channel
will be stored in the channel list.
Single RF Scan: Select the RF Channel by using
the Right/Left directional buttons. Signal Level and
Signal Quality of the selected channel will be shown.
Press OK to start scan on the selected RF channel.
The found channels will be stored in the channel list.
Manual Service Update: Start a service update
manually.
LCN: Set your preference for LCN. LCN is the Logical
Channel Number system that organizes available
broadcasts in accordance with a recognizable channel
number sequence (if available).
Channel Scan Type: Set your scan type preference.
Channel Store Type: Set your store type preference.
Favorite Network Select: Select your favourite net-
work. This menu option will be active, if more than only
one network is available.
Channel Skip: Set channels to be skipped when
switching the channels via Programme +/- buttons
on the remote. Highlight the desired channel/s on the
list and press OK to select/unselect.
Channel Sort: Replace the positions of the two
selected channels in the channel list. Highlight the
desired channels on the list and press OK to select.
When the second channel is selected, the position of
this channel will be replaced with the position of the
Channel Move: Move a channel to the position of
another channel. Highlight the channel you want to
move and press OK to select. Then do the same for a
second channel. When the second channel is selected,
of that channel.
Channel Edit: Edit channels in the channel list. Edit
the name and channel number of the selected channel
and display Network Name, Frequency, Color Sys-
tem and Sound System informations related to that
channel if available. Depending on the channel other
options may also be editable. You can press the Blue
button to delete the highlighted channel.
Analog Channel Fine-tune: Fine-tune an analogue
channel. A list of available analogue channels will be
displayed. Select the desired one from the list and
press OK button. Then change the frequency of the
channel by pressing Left/Right directional buttons.
Press OK to store the new frequency for that channel.
Press Back to cancel. This item may not be visible,
depending on whether or not the last watched channel
was analogue.
Clear Channel List: Delete all channels stored in the
channel list of the selected channel installation mode.
OK and press OK button to proceed. Highlight Cancel
and press OK to cancel.
Channel Installation Mode - Cable
Channel Scan: Start a scan for analogue and digital
cable channels. If available, operator options will be
listed. Select the desired one and press OK. Scan
Mode, Channel Scan Type, Frequency and Network
ID options may be available. The options may vary
depending on the operator and the Scan Mode se-
lections. Set the Scan Mode as Full if you don’t know
how to set up other options. Highlight Scan and press
OK to start the scan. You can press the Back button to
cancel the scan. The channels that have already been
found will be stored in the channel list.
Single RF Scan: Enter the Frequency value. Signal
Level and Signal Quality of the selected Frequency
will be shown. Highlight the Scan option and press
OK to start scan. The found channels will be stored
in the channel list.
Sidan laddas ...
Sidan laddas ...
Sidan laddas ...
Sidan laddas ...
Sidan laddas ...
Sidan laddas ...
Sidan laddas ...
Sidan laddas ...
Sidan laddas ...
Sidan laddas ...
Sidan laddas ...
Sidan laddas ...
Sidan laddas ...
Sidan laddas ...
Sidan laddas ...
Sidan laddas ...
Sidan laddas ...
Sidan laddas ...
Sidan laddas ...
Sidan laddas ...
Sidan laddas ...
Sidan laddas ...
Sidan laddas ...
Sidan laddas ...
Sidan laddas ...
Sidan laddas ...
Sidan laddas ...
Sidan laddas ...
Sidan laddas ...
Sidan laddas ...
Sidan laddas ...
Sidan laddas ...
Sidan laddas ...
Sidan laddas ...
Sidan laddas ...
Sidan laddas ...
Sidan laddas ...
Sidan laddas ...
Sidan laddas ...
Sidan laddas ...
Sidan laddas ...
Sidan laddas ...
Sidan laddas ...
Sidan laddas ...
Sidan laddas ...
Sidan laddas ...
Sidan laddas ...
Sidan laddas ...
Sidan laddas ...
Sidan laddas ...
Sidan laddas ...
Sidan laddas ...
Sidan laddas ...
Sidan laddas ...
Sidan laddas ...
Sidan laddas ...
Sidan laddas ...
Sidan laddas ...
Sidan laddas ...
Sidan laddas ...
Sidan laddas ...
Sidan laddas ...
Sidan laddas ...
Sidan laddas ...
Sidan laddas ...
Sidan laddas ...
Sidan laddas ...
Sidan laddas ...
Sidan laddas ...
Sidan laddas ...
Sidan laddas ...
Sidan laddas ...
Sidan laddas ...
Sidan laddas ...
Sidan laddas ...
Sidan laddas ...
Sidan laddas ...
Sidan laddas ...
Sidan laddas ...
Sidan laddas ...
Sidan laddas ...
Sidan laddas ...
Sidan laddas ...
Sidan laddas ...
Sidan laddas ...
Sidan laddas ...
Sidan laddas ...
Sidan laddas ...
Sidan laddas ...
Sidan laddas ...
Sidan laddas ...
Sidan laddas ...
Sidan laddas ...
Sidan laddas ...
Sidan laddas ...
Sidan laddas ...
Sidan laddas ...
Sidan laddas ...
Sidan laddas ...
Sidan laddas ...
Sidan laddas ...
Sidan laddas ...
Sidan laddas ...
Sidan laddas ...
Sidan laddas ...
Sidan laddas ...
Sidan laddas ...
Sidan laddas ...
Sidan laddas ...
Sidan laddas ...
Sidan laddas ...
Sidan laddas ...
Sidan laddas ...
Sidan laddas ...
Sidan laddas ...
Sidan laddas ...
Sidan laddas ...
Sidan laddas ...
Sidan laddas ...
Sidan laddas ...
Sidan laddas ...
Sidan laddas ...
Sidan laddas ...
Sidan laddas ...
Sidan laddas ...
Sidan laddas ...
Sidan laddas ...
Sidan laddas ...
Sidan laddas ...
Sidan laddas ...
Sidan laddas ...
Sidan laddas ...
Sidan laddas ...
Sidan laddas ...
Sidan laddas ...
Sidan laddas ...
Sidan laddas ...
Sidan laddas ...
Sidan laddas ...
Sidan laddas ...
Sidan laddas ...
Sidan laddas ...
Sidan laddas ...
Sidan laddas ...
Sidan laddas ...
Sidan laddas ...
Sidan laddas ...
Sidan laddas ...
Sidan laddas ...
Sidan laddas ...
Sidan laddas ...
Sidan laddas ...
Sidan laddas ...
Sidan laddas ...
Sidan laddas ...
Sidan laddas ...
Sidan laddas ...
Sidan laddas ...
Sidan laddas ...
Sidan laddas ...
Sidan laddas ...
Sidan laddas ...
Sidan laddas ...
Sidan laddas ...
Sidan laddas ...
Sidan laddas ...
Sidan laddas ...
Sidan laddas ...
Sidan laddas ...
Sidan laddas ...
Sidan laddas ...
Sidan laddas ...
Sidan laddas ...
Sidan laddas ...
Sidan laddas ...
Sidan laddas ...
Sidan laddas ...
Sidan laddas ...
Sidan laddas ...
Sidan laddas ...
Sidan laddas ...
Sidan laddas ...
Sidan laddas ...
Sidan laddas ...
Sidan laddas ...
Sidan laddas ...
Sidan laddas ...
Sidan laddas ...
Sidan laddas ...
Sidan laddas ...
Sidan laddas ...
Sidan laddas ...
Sidan laddas ...
Sidan laddas ...
Sidan laddas ...
Sidan laddas ...
Sidan laddas ...
Sidan laddas ...
Sidan laddas ...
Sidan laddas ...
Sidan laddas ...
Sidan laddas ...
Sidan laddas ...
Sidan laddas ...
Sidan laddas ...
Sidan laddas ...
Sidan laddas ...
Sidan laddas ...
Sidan laddas ...
Sidan laddas ...
Sidan laddas ...
Sidan laddas ...
Sidan laddas ...
Sidan laddas ...
Sidan laddas ...
Sidan laddas ...
Sidan laddas ...
Sidan laddas ...
Sidan laddas ...
Sidan laddas ...
Sidan laddas ...
Sidan laddas ...
Sidan laddas ...
Sidan laddas ...
Sidan laddas ...
Sidan laddas ...
Sidan laddas ...
Sidan laddas ...
Sidan laddas ...
Sidan laddas ...
Sidan laddas ...
Sidan laddas ...
Sidan laddas ...
Sidan laddas ...
Sidan laddas ...
Sidan laddas ...
Sidan laddas ...
Sidan laddas ...
Sidan laddas ...
Sidan laddas ...
Sidan laddas ...
Sidan laddas ...
Sidan laddas ...
Sidan laddas ...
Sidan laddas ...
Sidan laddas ...
Sidan laddas ...
Sidan laddas ...
Sidan laddas ...
Sidan laddas ...
Sidan laddas ...
Sidan laddas ...
Sidan laddas ...
Sidan laddas ...
Sidan laddas ...
Sidan laddas ...
Sidan laddas ...
Sidan laddas ...
Sidan laddas ...
Sidan laddas ...
Sidan laddas ...
Sidan laddas ...
Sidan laddas ...
Sidan laddas ...
Sidan laddas ...
Sidan laddas ...
Sidan laddas ...
Sidan laddas ...
Sidan laddas ...
Sidan laddas ...
Sidan laddas ...
Sidan laddas ...
Sidan laddas ...
Sidan laddas ...
Sidan laddas ...
Sidan laddas ...
Sidan laddas ...
Sidan laddas ...
Sidan laddas ...
Sidan laddas ...
Sidan laddas ...
Sidan laddas ...
Sidan laddas ...
Sidan laddas ...
Sidan laddas ...
Sidan laddas ...
Sidan laddas ...
Sidan laddas ...
Sidan laddas ...
Sidan laddas ...
Sidan laddas ...
Sidan laddas ...
Sidan laddas ...
Sidan laddas ...
Sidan laddas ...
Sidan laddas ...
Sidan laddas ...
Sidan laddas ...
Sidan laddas ...
Sidan laddas ...
Sidan laddas ...
Sidan laddas ...
Sidan laddas ...
Sidan laddas ...
Sidan laddas ...
Sidan laddas ...
Sidan laddas ...
Sidan laddas ...
Sidan laddas ...
Sidan laddas ...
Sidan laddas ...
Sidan laddas ...
Sidan laddas ...
Sidan laddas ...
Sidan laddas ...
Sidan laddas ...
Sidan laddas ...
Sidan laddas ...
Sidan laddas ...
Sidan laddas ...
Sidan laddas ...
Sidan laddas ...
Sidan laddas ...
Sidan laddas ...
Sidan laddas ...
Sidan laddas ...
Sidan laddas ...
Sidan laddas ...
Sidan laddas ...
Sidan laddas ...
Sidan laddas ...
Sidan laddas ...
Sidan laddas ...
Sidan laddas ...
Sidan laddas ...
Sidan laddas ...
Sidan laddas ...
Sidan laddas ...
Sidan laddas ...
Sidan laddas ...
Sidan laddas ...
Sidan laddas ...
Sidan laddas ...
Sidan laddas ...
Sidan laddas ...
Sidan laddas ...
Sidan laddas ...
Sidan laddas ...
Sidan laddas ...
Sidan laddas ...
Sidan laddas ...
Sidan laddas ...
Sidan laddas ...
Sidan laddas ...
Sidan laddas ...
Sidan laddas ...
Sidan laddas ...
Sidan laddas ...
Sidan laddas ...
-
 1
1
-
 2
2
-
 3
3
-
 4
4
-
 5
5
-
 6
6
-
 7
7
-
 8
8
-
 9
9
-
 10
10
-
 11
11
-
 12
12
-
 13
13
-
 14
14
-
 15
15
-
 16
16
-
 17
17
-
 18
18
-
 19
19
-
 20
20
-
 21
21
-
 22
22
-
 23
23
-
 24
24
-
 25
25
-
 26
26
-
 27
27
-
 28
28
-
 29
29
-
 30
30
-
 31
31
-
 32
32
-
 33
33
-
 34
34
-
 35
35
-
 36
36
-
 37
37
-
 38
38
-
 39
39
-
 40
40
-
 41
41
-
 42
42
-
 43
43
-
 44
44
-
 45
45
-
 46
46
-
 47
47
-
 48
48
-
 49
49
-
 50
50
-
 51
51
-
 52
52
-
 53
53
-
 54
54
-
 55
55
-
 56
56
-
 57
57
-
 58
58
-
 59
59
-
 60
60
-
 61
61
-
 62
62
-
 63
63
-
 64
64
-
 65
65
-
 66
66
-
 67
67
-
 68
68
-
 69
69
-
 70
70
-
 71
71
-
 72
72
-
 73
73
-
 74
74
-
 75
75
-
 76
76
-
 77
77
-
 78
78
-
 79
79
-
 80
80
-
 81
81
-
 82
82
-
 83
83
-
 84
84
-
 85
85
-
 86
86
-
 87
87
-
 88
88
-
 89
89
-
 90
90
-
 91
91
-
 92
92
-
 93
93
-
 94
94
-
 95
95
-
 96
96
-
 97
97
-
 98
98
-
 99
99
-
 100
100
-
 101
101
-
 102
102
-
 103
103
-
 104
104
-
 105
105
-
 106
106
-
 107
107
-
 108
108
-
 109
109
-
 110
110
-
 111
111
-
 112
112
-
 113
113
-
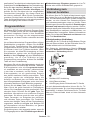 114
114
-
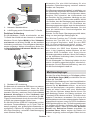 115
115
-
 116
116
-
 117
117
-
 118
118
-
 119
119
-
 120
120
-
 121
121
-
 122
122
-
 123
123
-
 124
124
-
 125
125
-
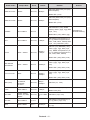 126
126
-
 127
127
-
 128
128
-
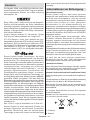 129
129
-
 130
130
-
 131
131
-
 132
132
-
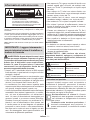 133
133
-
 134
134
-
 135
135
-
 136
136
-
 137
137
-
 138
138
-
 139
139
-
 140
140
-
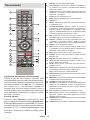 141
141
-
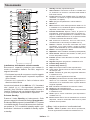 142
142
-
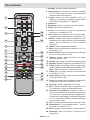 143
143
-
 144
144
-
 145
145
-
 146
146
-
 147
147
-
 148
148
-
 149
149
-
 150
150
-
 151
151
-
 152
152
-
 153
153
-
 154
154
-
 155
155
-
 156
156
-
 157
157
-
 158
158
-
 159
159
-
 160
160
-
 161
161
-
 162
162
-
 163
163
-
 164
164
-
 165
165
-
 166
166
-
 167
167
-
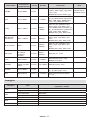 168
168
-
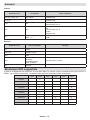 169
169
-
 170
170
-
 171
171
-
 172
172
-
 173
173
-
 174
174
-
 175
175
-
 176
176
-
 177
177
-
 178
178
-
 179
179
-
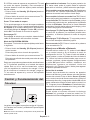 180
180
-
 181
181
-
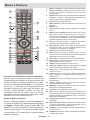 182
182
-
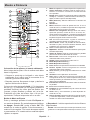 183
183
-
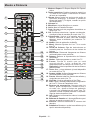 184
184
-
 185
185
-
 186
186
-
 187
187
-
 188
188
-
 189
189
-
 190
190
-
 191
191
-
 192
192
-
 193
193
-
 194
194
-
 195
195
-
 196
196
-
 197
197
-
 198
198
-
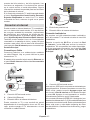 199
199
-
 200
200
-
 201
201
-
 202
202
-
 203
203
-
 204
204
-
 205
205
-
 206
206
-
 207
207
-
 208
208
-
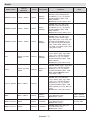 209
209
-
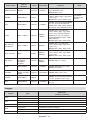 210
210
-
 211
211
-
 212
212
-
 213
213
-
 214
214
-
 215
215
-
 216
216
-
 217
217
-
 218
218
-
 219
219
-
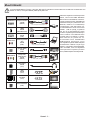 220
220
-
 221
221
-
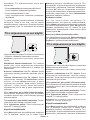 222
222
-
 223
223
-
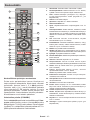 224
224
-
 225
225
-
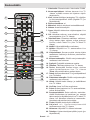 226
226
-
 227
227
-
 228
228
-
 229
229
-
 230
230
-
 231
231
-
 232
232
-
 233
233
-
 234
234
-
 235
235
-
 236
236
-
 237
237
-
 238
238
-
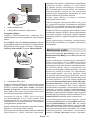 239
239
-
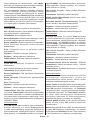 240
240
-
 241
241
-
 242
242
-
 243
243
-
 244
244
-
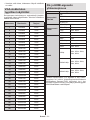 245
245
-
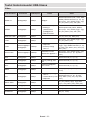 246
246
-
 247
247
-
 248
248
-
 249
249
-
 250
250
-
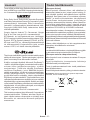 251
251
-
 252
252
-
 253
253
-
 254
254
-
 255
255
-
 256
256
-
 257
257
-
 258
258
-
 259
259
-
 260
260
-
 261
261
-
 262
262
-
 263
263
-
 264
264
-
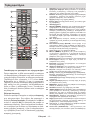 265
265
-
 266
266
-
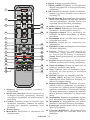 267
267
-
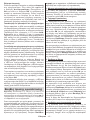 268
268
-
 269
269
-
 270
270
-
 271
271
-
 272
272
-
 273
273
-
 274
274
-
 275
275
-
 276
276
-
 277
277
-
 278
278
-
 279
279
-
 280
280
-
 281
281
-
 282
282
-
 283
283
-
 284
284
-
 285
285
-
 286
286
-
 287
287
-
 288
288
-
 289
289
-
 290
290
-
 291
291
-
 292
292
-
 293
293
-
 294
294
-
 295
295
-
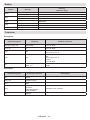 296
296
-
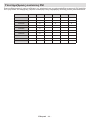 297
297
-
 298
298
-
 299
299
-
 300
300
-
 301
301
-
 302
302
-
 303
303
-
 304
304
-
 305
305
-
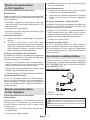 306
306
-
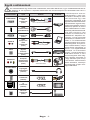 307
307
-
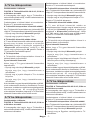 308
308
-
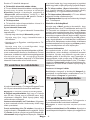 309
309
-
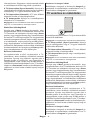 310
310
-
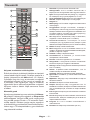 311
311
-
 312
312
-
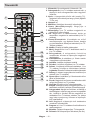 313
313
-
 314
314
-
 315
315
-
 316
316
-
 317
317
-
 318
318
-
 319
319
-
 320
320
-
 321
321
-
 322
322
-
 323
323
-
 324
324
-
 325
325
-
 326
326
-
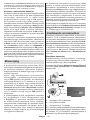 327
327
-
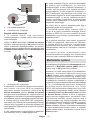 328
328
-
 329
329
-
 330
330
-
 331
331
-
 332
332
-
 333
333
-
 334
334
-
 335
335
-
 336
336
-
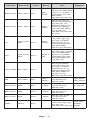 337
337
-
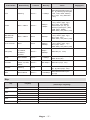 338
338
-
 339
339
-
 340
340
-
 341
341
-
 342
342
-
 343
343
-
 344
344
-
 345
345
-
 346
346
-
 347
347
-
 348
348
-
 349
349
-
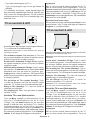 350
350
-
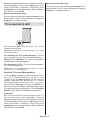 351
351
-
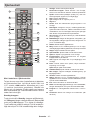 352
352
-
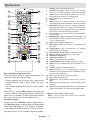 353
353
-
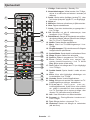 354
354
-
 355
355
-
 356
356
-
 357
357
-
 358
358
-
 359
359
-
 360
360
-
 361
361
-
 362
362
-
 363
363
-
 364
364
-
 365
365
-
 366
366
-
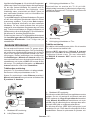 367
367
-
 368
368
-
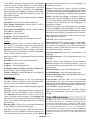 369
369
-
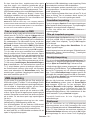 370
370
-
 371
371
-
 372
372
-
 373
373
-
 374
374
-
 375
375
-
 376
376
-
 377
377
-
 378
378
-
 379
379


Hitachi MB170 Användarmanual
- Kategori
- TV-apparater
- Typ
- Användarmanual
på andra språk
- italiano: Hitachi MB170 Manuale utente
- Deutsch: Hitachi MB170 Benutzerhandbuch
- français: Hitachi MB170 Manuel utilisateur
Andra dokument
-
Panasonic TX42MZ800E Snabbstartsguide
-
-
-
-
-
Panasonic TX40EXW604 Snabbstartsguide
-
-
-
-
Yamaha DPX-1100 Bruksanvisning