Stadler Form EVA LITTLE LUFTFUKTER Användarmanual
- Kategori
- Luftfuktare
- Typ
- Användarmanual
Denna manual är också lämplig för

Eva
Operating instructions
Gebrauchsanweisung
Mode d‘emploi
Istruzioni per l‘uso
Manual de instrucciones
Gebruiksaanwijzing
Brugsanvisning
Käyttöohje
Bruksanvisning
Bruksanvisning
Инструкция по эксплуатации
little
A
D
A
P
T
I
V
E
H
U
M
I
D
I
T
Y
T
M

11
10
13
Eva
little
14
9876 19
15
1

2
3
4
2
J
A
H
R
E
G
A
R
A
N
T
I
E
•
2
Y
E
A
R
S
W
A
R
R
A
N
T
Y
•
2
A
N
N
É
E
S
D
E
G
A
R
A
N
T
I
E
•
17
16
12
5
18
16
Water
Cube
20

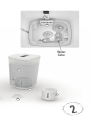
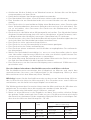
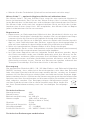
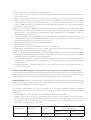
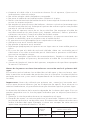
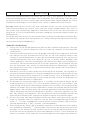
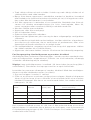
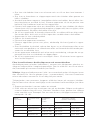
Setting up
1
24 h
4
3
2
SOAK CARTRDIGE / KARTUSCHE EINWEICHEN / TREMPER LA CARTOUCHE
7
5OK! 6

OK!
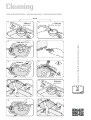
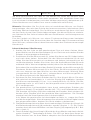
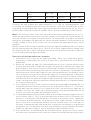
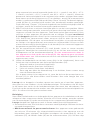
Cleaning
DECALCIFICATION / ENTKALKUNG / DÉCALCIFICATION
mix
1100 ml
WATER
2+ 100 ml
DECALCIFIER
4
6
8200 ml
WATER
9
Clean once a month / Einmal pro Monat reinigen / Nettoyer une fois par mois
Mt
530 min30 min
3200 ml 200 ml MAX. MAX.
10
OK!
77

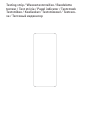
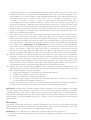
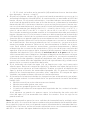
Testing strip / Wasserteststreifen / Bandelette
testeur / Test stricia / Papel indicator / Teststrook
Teststriben / Koeliuskat / Teststrimmel / Testrem-
sa / Тестовый индикатор

EN ADAPTIVE HUMIDITY™™ technology automatically
adapts the humidification output in Auto Mode in order
to reach and keep the desired humidity level quietly and
efficiently
DE ADAPTIVE HUMIDITY™™ Technologie adaptiert im
Auto Modus die Befeuchtungsstufe automatisch, um
Ziel‐Luftfeuchtigkeit leise und energieeffizient zu
erreichen und beizubehalten
FR La technologie ADAPTIVE HUMIDITY™™ permet
d’adapter automatiquement la sortie d’humidification
en Mode Auto de façon à atteindre et à maintenir le
niveau d’humidité désiré sans bruit et avec efficacité
A
D
A
P
T
I
V
E
H
U
M
I
D
I
T
Y
T
M
•
E
N
E
R
G
Y
-
E
F
F
I
C
I
E
N
T
H
U
M
I
D
I
F
I
C
A
T
I
O
N
•


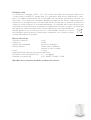
Stadler Form Aktiengesellschaft, Chamerstrasse 174, 6300 Zug, Switzerland
Phone +41 41 720 48 48, Fax +41 41 720 48 44, www.stadlerform.com/contact
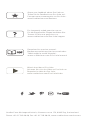
Share your feedback about Eva little on:
Teilen Sie Ihr Feedback von Eva little auf:
Partagez votre commentaire sur Eva little :
www.stadlerform.com/Reviews
Download instruction manual:
Bedienungsanleitung hier herunterladen:
Téléchargez le mode d’emploi :
www.stadlerform.com/Eva-little/manual
For frequently asked questions go to:
Für häufig gestellte Fragen besuchen Sie:
Trouvez la foire aux questions sur :
www.stadlerform.com/Eva-little/support
Watch the video of Eva little:
Schauen Sie sich das Video zu Eva little an:
Regardez la vidéo du Eva little :
www.stadlerform.com/Eva-little/video


English
Congratulations! You have just acquired the exceptional EVA little air humidi-
fier. It will give you great pleasure and improve the indoor air for you.
As with all domestic electrical appliances, particular care is also needed with
this model in order to avoid injury, fire damage or damage to the appliance.
Please study these operating instructions carefully before using this appli-
ance for the first time and follow the safety advice on the appliance itself.
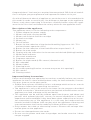
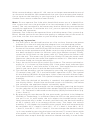
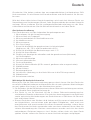
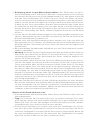
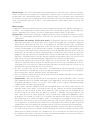
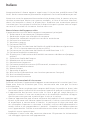
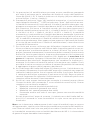
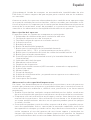
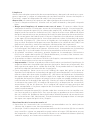
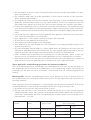
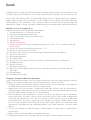
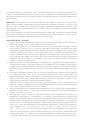
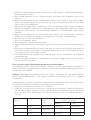
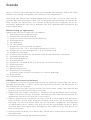
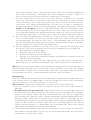
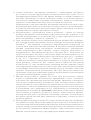
Description of the appliance
The appliance consists of the following main components:
1. Power adapter for power supply
2. Water tank with carrying handle
3. Water tank lid with anticalc cartridge
4. Anticalc cartridge
5. Water tray
6. On/off button
7. Button for the selection of the desired humidity (hygrostat: 30 – 75 %
and continuous operation «CO»)
8. Button for the selection of the humidification output level 1 – 5
9. Button for auto mode
10. Display with the indication for the current and desired (blinking) humidity
11. Water level indicator
12. Ultrasonic membrane
13. Fragrance container
14. Button for night mode (LEDs normal, dimmed or off)
15. Mist chamber
16. Water CubeTM
17. Cleaning br ush
18. Air outlet opening (Caution: no water may enter this opening!)
19. Mist outlet
20. Floating switch
Important Safety Instructions
Please read through the operating instructions carefully before you use the
appliance for the first time and keep them safely for later reference; if neces-
sary pass them on to the next owner.
• Stadler Form refuses all liability for loss or damage which arises as a result
of failure to follow these operating instructions.
• The appliance is only to be used in the home for the purposes described
in these instructions. Unauthorised use and technical modifications to the
appliance can lead to danger to life and health.
• This appliance can be used by children aged from 8 years and above and
persons with reduced physical, sensory or mental capabilities or lack of
experience and knowledge if they have been given supervision or instruc-
tion concerning use of the appliance in a safe way and understand the
hazards involved. Children shall not play with the appliance. Cleaning and
user maintenance shall not be made by children without supervision.
• Only connect the cable to alternating current. Observe the voltage infor-
mation given on the appliance.
• Do not use damaged extension cords.
• Do not run the power cord over sharp edges and make sure that it does
not get trapped.

• Do not pull the plug from the socket with wet hands or by holding on to
the power cord.
• Do not use the appliance in immediate vicinity of a bath tub, a shower or a
swimming pool (observe a minimum distance of 3 m). Place the appliance
such that a person in the bath tub cannot touch the appliance.
• Do not place the appliance near a heat source. Do not subject the power
cord to direct heat (such as a heated hotplate, open flames, hot iron sole
plates or heaters for example). Protect power cords from oil.
• See to it that the appliance is properly positioned to ensure a high stability
during its operation and make sure that no one can trip over the power
cord.
• The appliance is not splash-proof.
• For indoor use only.
• Do not store the appliance outdoors.
• Store the appliance in a dry place inaccessible to children (pack the ap-
pliance).
• If the power cord is damaged, it must be replaced by the manufacturer
or a repair shop authorized by the manufacturer or by similarly qualified
persons in order to avoid a hazard.
• Prior to any maintenance, cleaning and after each use, switch off the appli-
ance and unplug the mains cable from the socket.
• Prior to cleaning the interior of the appliance, make sure the appliance has
been off for at least 15 minutes!
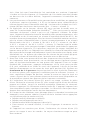
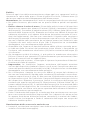
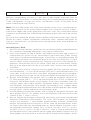
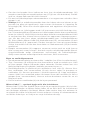
Before setup: Anticalc cartridge and water hardness
The anticalc cartridge reduces the limescale in the water and the undesirable
emission of limescale particles into the surroundings. Effective for one to
three months, depending on water hardness (see table).
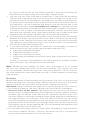
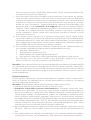
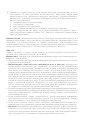
Important: Soak the anticalc cartridge in a water bath for 24 hours before
the first use (not in the water tank!). The resin has to absorb water to reach
high performance.
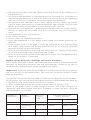
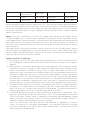
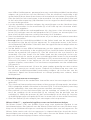
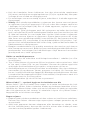
The period of time that the cartridge is effective for depends on the hardness
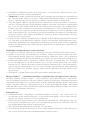
of the water. This can be tested using the testing strip provided (see page 6).
1. Dip the testing strips into the water for a second.
2. After around one minute the results can be seen on the test strip.
Some of the green fields change colour into pink. The water hardness is
shown by how many boxes turn pink. Example: If three are pink, then the
water hardness is >14 °dH.
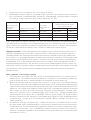
Number of
pink boxes Water
hardness Degree of
hardness
(°dH)
Cartridge will last for
(with 3 liter/day)
Days Liter
0/1 Soft From 4 °dH 120 days approx. 360 L
2Moderately
hard From 7 °dH 60 days approx. 180 L
3Hard From 14 °dH 40 days approx. 120 L
4 Very hard From 21 °dH 20 days approx. 60 L

With a water hardness above 21 °dH, we can no longer recommend the use of
an ultrasonic humidifier. We recommend that you use an evaporative humidi-
fier to increase the humidity in your house (e.g. an Oskar humidifier made by
Stadler Form: www.stadlerform.com/Oskar).
Note: Do not operate Eva little with decalcified water out of a decalcifica-
tion system that uses the principle of an ion exchanger (salt is added to the
water). The salt contained in the water may lead to white dust accumulation
around the appliance. To minimize this risk, you can operate Eva using a mix
of distilled and tap water.
However, Eva little may be operated from a drinking water filter system (e.g.
Brita). Should you be unsure about the quality or composition of the water in
your area, contact the caretaker or your drinking water provider.
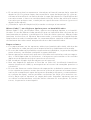
Setting up / operation
1. Put Eva little in the desired location on a flat surface. Connect the power
adapter (1) to the unit and plug the adapter into a suitable plug socket.
2. Remove the water tank (2) by holding it by the handle and pulling it up.
Screw off the water tank lid (3) and fill the water tank with clean, cold tap
water up to the maximum mark. Make sure that the anticalc cartridge (4)
has been soaked in water for 24 hours prior (see «Before setup»). Finally,
screw the lid (3) back on the water tank (2). Then place the water tank
(2) in the unit. The water tray (5) will now slowly fill from the water tank.
Important: please do not move the appliance when it is filled with water.
The water could run into the electronics.
3. Press the on/off button (6) to switch Eva little on. The current relative hu-
midity in % is shown on the display (10). If the water level indicator light
(11) is red, there is too little water in the unit. The humidification output
level is pre-set to level 3 and the desired humidity at 45 %.
4. The desired humidity can be changed by pressing the hygrostat button
(7) several times (30 – 75 % and continuous operation «CO»). The symbol
on the display (10) blinks during input. After a few seconds without input,
the selected value is saved. The symbol changes to the current measured
humidity.
Info: Once the desired air humidity is reached, the appliance stops and
the display blinks. Should the measured current air humidity fall below
the set value, the appliance begins to humidify again.
5. The humidification performance can be changed by pressing the button
for the selection of the humidification output level (8) several times (lev-
els 1 – 5). The level is indicated on the display (10) by horizontal bars (e.g.
1 bar = level 1).
6. By pressing the auto button (9), the auto mode, and with it the Adaptive
HumidityTM Technology, is activated. Now the LED on the auto button on
the unit is on. In auto mode, the unit adapts the humidification output
level automatically in order to reach and maintain the desired humidity
of 45 % quietly and in an energy-efficient way. The lower the current
humidity is, the higher the humidification output level will automatically
be set (under 33 % = level 4, from 34 % – 37 % = level 3, from 38 % – 41 %
= level 2, from 42 % – 45 % = level 1). You can change the desired humid-
ity in auto mode by pressing the hygrostat button (7) several times while
auto mode is active (the LED on the auto button on the unit is on). The
humidification output level (8) cannot be altered manually in auto mode.

As soon as the button for the output level (8) is pressed to change the
humidification output level, the auto mode is deactivated.
7. You can use Eva little to disperse fragrances in the room. Be extremely
sparing with fragrances because an excessive dosage can result in the
malfunctioning of, and damage to, the appliance. In order to use fragranc-
es, briefly press and release the fragrance container (13) and pull it out of
the appliance. Let the fragrance drip directly onto the cotton pad in the
fragrance container. Add a maximum of 1–2 drops of fragrance into the
fragrance container! Push the container back again and press and release
it to lock it. Tip: in order to change the fragrance, remove the cotton pad
and clean the container with soap. Now you may insert a new cotton pad
(commercially available) and add drops of the desired fragrance.
8. If the water level indicator (11) changes to red, the water must be refilled.
Remove the water tank (2) and fill it with clean, cold tap water up to the
maximum mark. Replace the water tank and press the on/off button (6).
The appliance will resume operation after a few seconds. The water tank
can also be refilled during operation.
9. If you find the lamps too bright (in a bedroom, for example), you may re-
duce the light intensity by pressing the night mode key (14):
• Normal mode (default mode)
• Dimmed mode (push once)
• Lights-out mode (push twice)
• By pushing the dimmer button once more, you can go back into normal
mode.
If there is no water in the appliance, the red water level symbol (11) lights
up in all modes. The red light cannot be dimmed.
Note: Should you see droplets (or other signs of dampness) on or around
the unit, this condensed water is from the humidifier. This means that the
air can no longer absorb the moisture from the humidifier. Please activate
the auto mode with a desired humidity of 45 %. Water droplets should then
stop forming.
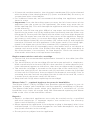
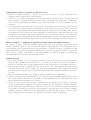
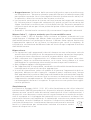
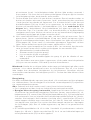
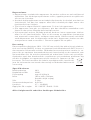
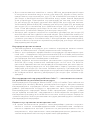
Cleaning
Before each piece of maintenance and after every use, turn off the unit and
remove the plug from the plug socket. Before you clean Eva little, the power
adapter (1) must be separated from the power adapter connection.
Attention: Never submerge the appliance in water (danger of short-circuit).
• For external cleaning, rub with a damp cloth and then dry thoroughly.
•Clean at least 1x per month. The appliance must be off for at least 15
minutes prior to internal cleaning! Then remove the water tank (2), the mist
chamber (15), the Water Cube (16) and the fragrance container (13). Fill a
cup with 200 ml of tap water mixed with descaling agent (mix according to
the manufacturer’s instructions). Pour the liquid carefully into the water
tray (5) by holding the cup directly over the water tray (see page 5). Do not
pour the liquid into the water tray from high above the tray! Be sure that no
liquid enters the air outlet opening (18). This will damage the appliance and
will void any claim to the warranty.
• Let the descaling agent allow to take effect according to manufacturer’s
instructions (approx. 30 min.). Check in the water tray (5) if the limescale
on the ultrasonic membrane (12) has dissolved.

• If limescale residue remains, the ultrasonic membrane (12) can be cleaned
with the help of the cleaning brush (17) (front- and backside). Do not try to
scrape them with a hard object.
• For stubborn limescale, we recommend descaling the appliance several
times in a row.
•Important: Pour the descaling agent out over the left front corner of the
appliance (see the arrow on the appliance). No water may enter the air
outlet opening (18). This will damage the appliance and will void any claim
to the warranty.
• To rinse, now fill the cup with 200 ml of tap water and carefully pour the
liquid into the water tray (5) by holding the cup directly over the water tray
(see page 5). Do not pour the liquid into the water tray from high above the
tray! Pour the water out over the left front corner of the appliance. Repeat
the process until there is no more descaling agent in the water tray (5).
Place the Water Cube (16), mist chamber (15), water tank (2) and fragrance
container (13) back into the appliance. If the water tank is not sitting right,
check if the upper part of the mist chamber (15) is properly mounted.
• Clean the water tank (2) thoroughly every two weeks with a soft brush or
sponge and warm water. Use diluted descaling agent (mix according to
the manufacturer’s instructions) for lime deposits. Rinse the water tank
afterwards with clean, cold tap water thoroughly.
Replacement of the anticalc cartridge
• Please find the recommended replacement interval in the table (see «Be-
fore setup»).
• Tip: the efficiency of the cartridge (4) can be inspected with a simple test.
Hold a small mirror in the mist (19) for a few seconds. If white deposits (cal-
cium carbonate) appear on the mirror, then the cartridge needs changing.
• The anticalc cartridge is located on the inner side of the tank lid (3). First,
screw the tank lid (3) off the water tank (2) and then screw the cartridge
off the tank lid. Dispose of the cartridge in the domestic waste (4). Prior to
screwing the new anticalc cartridge into the inside of the tank lid, soak it
in water (not in the water tank!) for 24 hours.
• Keep the tank lid (3) when replacing the cartridge!
Water Cube™ – optimal hygiene for your air humidifier
The Water Cube™ (16) by Stadler Form provides optimal hygiene in your air
humidifier. It keeps your humidifier running smoothly, extending its lifespan.
The Water Cube even works when your appliance is switched off, so the
humidifier stays fresh all season long. We recommend replacing the Water
Cube at the start of the humidifier season.
Repairs
• Repairs to electrical appliances must only be carried out by a qualified
electrical technician. If improper repairs are carried out, the warranty
lapses and all liability is refused.
• Never operate the appliance if the adaptor or plug is damaged, after it has
malfunctioned, if it has been dropped or has been damaged in any other
way (cracks/breaks in the casing).
• Do not push any object into the appliance.

• If the appliance is beyond repair, make it unusable immediately by cutting
through the cable and hand it in at the collection point provided for the
purpose.
• In the event of a repair, the following points must be observed before the
appliance is shipped or taken to the dealer: completely empty the water in
the appliance (water tray and any water tank), remove any filter cassettes
and/or anti-limescale cartridges and allow the appliance to dry completely.
Appliances containing residual water may be damaged during transport,
invalidating the warranty.
Disposal
The European directive 2012 / 19 / CE on Waste Electrical and Electronic
Equipment (WEEE), requires that old household electrical appliances must
not be disposed in the normal unsorted municipal waste stream. Old appli-
ances must be collected separately in order to optimize the recovery and re-
cycling of the materials they contain and reduce the impact on human health
and the environment. The crossed out «wheeled bin» symbol on the product
reminds you of your obligation, that when you dispose of the appli-
ance it must be separately collected. Consumers should contact
their local authority or retailer for information concerning the cor-
rect disposal of their old appliance.
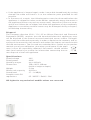
Specifications
Rated voltage 24 V
Rated power 26 W
Humidity output up to 320 g/h
Dimensions 160 x 365 x 160 mm
(width x height x depth)
Weight 2.2 kg
Water tank capacity 4.0 litres
Sound level 27 – 32 dB(A)
Complies with EU
regulations CE / WEEE / RoHS / EAC
All rights for any technical modifications are reserved

Deutsch
Gratulation! Sie haben soeben den aussergewöhnlichen Luftbefeuchter EVA
little erworben. Er wird Ihnen viel Freude machen und die Raumluft für Sie ver-
bessern.
Wie bei allen elektrischen Haushaltsgeräten wird auch bei diesem Gerät zur
Vermeidung von Verletzungen, Brand- oder Geräteschäden besondere Sorgfalt
verlangt. Bitte studieren Sie die vorliegende Betriebsanleitung vor der Inbe-
triebnahme und beachten Sie die Sicherheitshinweise auf dem Gerät.
Gerätebeschreibung
Das Gerät besteht aus den folgenden Hauptkomponenten:
1. Netzadapter für die Stromversorgung
2. Wassertank mit Tragegriff
3. Wassertankdeckel mit Antikalkkartusche
4. Antikalkkartusche
5. Wasserwanne
6. Ein-/Aus-Knopf
7. Knopf für die Wahl der gewünschten Luftfeuchtigkeit
(Hygrostat: 30 – 75 % und Dauerbetrieb «CO»)
8. Knopf für die Wahl der Befeuchtungsstufe 1–5
9. Knopf für Auto-Modus
10. Display mit Anzeige der aktuellen und der gewünschten (blinkend)
Luftfeuchtigkeit
11. Wasserstandanzeige
12. Ultras c h allme m b r a n e
13. Duft s to f f b ehälter
14. Knopf für Nacht-Modus (LEDs normal, gedimmt oder ausgeschaltet)
15. Nebelkammer
16. Wate r CubeTM
17. Reinigungsbürste
18. Luftauslass (Achtung, es darf kein Wasser in die Öffnung treten!)
19. Ne belau slas s
20. Schwimmerschalter
Wichtige Sicherheitshinweise
Bitte lesen Sie die Gebrauchsanleitung genau durch, bevor Sie das Gerät das
erste Mal in Betrieb nehmen und bewahren Sie sie zum späteren Nachschlagen
gut auf, geben Sie sie ggf. an den Nachbesitzer weiter.
• Für Schäden, die durch Nichtbeachten dieser Gebrauchsanleitung entstehen,
lehnt Stadler Form jegliche Haftung ab.
• Das Gerät ist nur im Haushalt für die in dieser Gebrauchsanweisung be-
schriebenen Zwecke zu benutzen. Ein nicht bestimmungsgemässer Gebrauch
sowie technische Veränderungen am Gerät können zu Gefahren für Gesund-
heit und Leben führen.
• Dieses Gerät kann von Kindern ab 8 Jahren und Personen mit eingeschränk-
ten körperlichen, sensorischen oder geistigen Fähigkeiten, aber auch von
unerfahrenen und unwissenden Personen verwendet werden, sofern diese
das Gerät unter Aufsicht verwenden oder von einer anderen Person über die
sichere Verwendung des Gerätes unterwiesen wurden und sich der damit
verbundenen Gefahren bewusst sind. Kinder sollten nicht mit dem Gerät
spielen. Kinder sollten das Gerät nur unter Aufsicht reinigen und pflegen.

• Schliessen Sie das Kabel nur an Wechselstrom an. Achten Sie auf die Span-
nungsangaben auf dem Gerät.
• Keine beschädigten Verlängerungskabel verwenden.
• Das Netzkabel nicht über scharfe Kanten ziehen oder einklemmen.
• Den Stecker nie am Netzkabel oder mit nassen Händen aus der Steckdose
ziehen.
• Das Gerät nicht in unmittelbarer Nähe einer Badewanne, einer Dusche oder
eines Schwimmbeckens benutzen (Mindestabstand von 3 m einhalten). Ge-
rät so aufstellen, dass Personen das Gerät von der Badewanne aus nicht
berühren können.
• Gerät nicht in der Nähe einer Wärmequelle aufstellen. Das Netzkabel keiner
direkten Hitzeeinwirkung (wie z.B. heisse Herdplatte, offene Flammen, heis-
se Bügelsohle oder Heizöfen) aussetzen. Netzkabel vor Öl schützen.
• Darauf achten, dass das Gerät beim Betrieb eine gute Standfestigkeit besitzt
und nicht über das Netzkabel gestolpert werden kann.
• Das Gerät ist nicht spritzwassergeschützt.
• Das Gerät ist nur zur Verwendung in Innenräumen geeignet.
• Das Gerät nicht im Freien aufbewahren.
• Das Gerät an einem trockenen und für Kinder unzugänglichen Ort aufbewah-
ren (einpacken).
• Wenn das Netzkabel beschädigt ist, muss es vom Hersteller oder in einer
vom Hersteller zugelassenen Werkstatt oder von ähnlich qualifizierten Per-
sonen ersetzt werden, um Gefahren zu vermeiden.
• Vor jeder Wartung, Reinigung und nach jedem Gebrauch das Gerät ausschal-
ten und das Netzkabel von der Steckdose trennen.
• Das Gerät muss vor der internen Reinigung zuerst während 15 Minuten aus-
geschaltet sein!
Vor der Inbetriebnahme: Antikalkkartusche und Wasserhärte
Die Antikalkkartusche vermindert den Kalkgehalt im Wasser und somit den
unerwünschten Ausstoss von Kalkpartikeln in die Umgebung. Wirkt je nach
Wasserhärte ein bis drei Monate (siehe Tabelle).
Wichtig: Legen Sie die Antikalkkartusche vor der ersten Verwendung 24 Stun-
den in Wasser ein (nicht im Wassertank!). Das Granulat muss zuerst Wasser
aufnehmen, um die volle Leistungsfähigkeit zu erreichen.
Die Wirkungsdauer der Kartusche hängt von der Wasserhärte ab. Mit dem mit-
gelieferten Teststreifen kann diese getestet werden (siehe Seite 6).
1. Teststreifen eine Sekunde lang ins Wasser tauchen.
2. Nach ca. einer Minute ist das Ergebnis auf dem Teststreifen sichtbar.Einige
der grünen Felder wechseln ihre Farbe zu rosa. Die Wasserhärte wird durch
die Anzahl rosafarbener Felder angezeigt. Beispiel: Bei drei rosafarbigen Fel-
dern hat das Wasser den Härtegrad > 14 °dH.
Rosa Felder Wasserhärte Härtegrad
(°dH) Kartusche reicht für
(bei 3 Liter/Tag)
Tage Liter
0/1 Weich Ab 4 °dH 120 Tage ca. 360 L
2Mittelhart Ab 7 °dH 60 Tage ca. 180 L
3 Eher hart Ab 14 °dH 40 Tage ca. 120 L

4Sehr hart Ab 21 °dH 20 Tage ca. 60 L
Ab einer Wasserhärte von über 21 °dH können wir Ihnen den Betrieb eines
Ultraschall Luftbefeuchters nicht mehr empfehlen. Wir empfehlen Ihnen Ihre
Luft mit einem Luftbefeuchter nach dem Verdunsterprinzip zu befeuchten (z.B.
Oskar Verdunster von Stadler Form: www.stadlerform.com/Oskar).
Hinweis: Betreiben Sie Eva little nicht mit entkalktem Wasser aus Entkal-
kungsanlagen, die nach dem Prinzip des Ionenaustausches funktionieren (Salz
wird dem Wasser beigefügt). Das im Wasser enthaltene Salz kann sich rund
um das Gerät als weissen Staub niederschlagen. Um dieses Risiko zu minimie-
ren, können Sie Eva little mit einem Mix aus destilliertem- und Leitungswasser
betreiben.
Eva darf jedoch mit Wasser aus einem Tischwasserfiltersystem betrieben
werden (z.B. Brita). Sind Sie unsicher über die Qualität oder Zusammenstellung
Ihres Wassers, nehmen Sie mit dem Hauswart oder dem Trinkwasserversorger
Kontakt auf.
Inbetriebnahme / Bedienung
1. Stellen Sie Eva little an den gewünschten Platz auf einen flachen Unter-
grund.Schliessen Sie den Netzadapter (1) ans Gerät an und stecken Sie den
Adapter in eine geeignete Steckdose.
2. Entnehmen Sie den Wassertank (2), indem Sie diesen am Griff oben halten
und nach oben ziehen. Schrauben Sie den Wassertankdeckel (3) ab und
füllen Sie den Wassertank mit sauberem und kaltem Leitungswasser bis
zur Maximalmarke. Stellen Sie sicher, dass die Antikalkkartusche (4) vorab
während 24 h in Wasser eingelegt wurde (siehe «Vor der Inbetriebnahme»).
Schrauben Sie anschliessend den Deckel (3) wieder an den Wassertank (2).
Platzieren Sie den Wassertank (2) in das Gerät. Die Wasserwanne (5) füllt
sich nun langsam mit dem Wasser aus dem Wassertank. Wichtig: Bitte
transportieren Sie das Gerät nicht, solange dieses mit Wasser gefüllt ist.
Das Wasser könnte in die Elektronik laufen.
3. Schalten Sie Eva little durch Drücken des Ein-/Aus-Knopfs (6) ein. Die aktu-
elle relative Luftfeuchtigkeit in % wird im Display (10) angezeigt. Leuchtet
die Wasserstandanzeige (11) rot, ist zu wenig Wasser im Gerät. Die Be-
feuchtungsstufe ist auf Stufe 3 und die gewünschte Luftfeuchtigkeit auf
45 % voreingestellt.
4. Die gewünschte Luftfeuchtigkeit kann durch mehrmaliges Drücken des
Hygrostat-Knopfs (7) verändert werden (30 – 75 % und Dauerbetrieb «CO»).
Die Anzeige im Display (10) blinkt während der Eingabe. Nach einigen Se-
kunden ohne Eingabe wird der gewählte Wert gespeichert. Die Anzeige
wechselt auf die aktuell gemessene Luftfeuchtigkeit.
Info: Wenn die gewünschte Luftfeuchtigkeit erreicht ist, stoppt das Gerät
und die Anzeige blinkt. Sinkt die gemessene aktuelle Luftfeuchtigkeit unter
den eingestellten Wert, beginnt das Gerät wieder zu befeuchten.
5. Die Befeuchtungsleistung kann durch mehrmaliges Drücken des Knopfs für
die Befeuchtungsleistung (8) verändert werden (Stufen 1 – 5). Die Stufen
werden durch horizontale Balken auf dem Display (10) angezeigt (z.B. 1 Bal-
ken = Stufe 1).
6. Durch Drücken des Auto-Knopfs (9) wird der Auto-Modus und damit die Ad-
aptive HumidityTM Technologie aktiviert. Die LED auf dem Auto-Knopf am
Gerät leuchtet nun. Im Auto-Modus adaptiert das Gerät die Befeuchtungs-

stufe automatisch, um die gewünschte Luftfeuchtigkeit von 45 % leise und
energieeffizient zu erreichen und beizubehalten. Je tiefer die aktuelle Luft-
feuchtigkeit ist, desto höher wird die Befeuchtungsstufe automatisch ein-
gestellt (unter 33 % = Stufe 4, von 34 % – 37 % = Stufe 3, von 38 % – 41 %
= Stufe 2, von 42 % – 45 % = Stufe 1). Sie können die gewünschte Luft-
feuchtigkeit im Auto-Modus ändern, indem Sie den Hygrostat-Knopf (3)
mehrmals drücken, während der Auto-Modus aktiviert ist (die LED auf dem
Auto-Knopf am Gerät leuchtet). Die Befeuchtungsstufe (8) kann im Auto-
Modus nicht manuell verändert werden. Sobald der Knopf für die Befeuch-
tungsstufe (8) zur Veränderung der Befeuchtungsstufe gedrückt wird, ist
der Auto-Modus deaktiviert.
7. Sie können mit Eva little Duftstoffe im Raum verteilen. Seien Sie im Um-
gang mit Duftstoffen äusserst sparsam, da eine zu grosse Dosierung zu
Fehlfunktionen und zu Schäden am Gerät führen kann. Zur Verwendung von
Duftstoffen drücken Sie kurz auf den Duftstoffbehälter (13) und ziehen ihn
aus dem Gerät. Träufeln Sie die Duftstoffe direkt auf die Watte im Behäl-
ter. Geben Sie maximal 1–2 Tropfen des Duftstoffes in den Behälter!
Schieben Sie den Behälter wieder zurück und drücken Sie kurz darauf, um
ihn zu arretieren. Tipp: Um den Duftstoff zu wechseln, entfernen Sie die
Watte und reinigen Sie den Behälter mit Seife. Sie können nun ein neues
Watte-Pad (handelsübliche Watte) einsetzen und mit Duftstoff beträufeln.
8. Wenn die Wasserstandanzeige (11) rot leuchtet, muss Wasser nachgefüllt
werden. Entfernen Sie dafür den Wassertank (2) und füllen Sie diesen mit
sauberem und kaltem Leitungswasser bis zur Maximalmarke. Setzen Sie
den Wassertank wieder ein und drücken Sie den Ein-/Aus-Knopf (6). Das
Gerät nimmt nach ein paar Sekunden seinen Betrieb wieder auf. Der Was-
sertank kann auch während dem Betrieb nachgefüllt werden.
9. Wenn Sie sich durch die Helligkeit der Lämpchen gestört fühlen (z.B. im
Schlafzimmer), können Sie die Leuchtintensität durch Drücken der Taste für
den Nacht-Modus (14) reduzieren:
• Normaler Modus (standardmässig eingeschaltet)
• Gedimmter Modus (einmal drücken)
• Licht-aus Modus (zweimal drücken)
• Durch nochmaliges Drücken des Dimmer-Schalters können Sie wieder
in den Normalen Modus wechseln.
Wenn kein Wasser im Gerät ist, leuchtet die rote Wasserstandanzeige (11)
in allen Dimm-Modi. Das rote Licht kann nicht gedimmt werden.
Hinweis: Sollten Sie Tropfen (oder andere Spuren von Feuchtigkeit) auf oder
um das Gerät feststellen, handelt es sich um kondensiertes Wasser aus dem
Luftbefeuchter. Das heisst, dass die Luft die Feuchtigkeit vom Luftbefeuchter
nicht mehr aufnehmen kann. Bitte aktivieren Sie den Auto-Modus mit einer ge-
wünschten Luftfeuchtigkeit von 45 %. Damit sollten sich keine Wassertropfen
mehr bilden.
Reinigung
Vor jeder Wartung und nach jedem Gebrauch das Gerät ausschalten und den
Netzadapter von der Steckdose trennen. Bevor Sie Eva little reinigen, muss der
Netzadapter (1) am Anschluss ausgesteckt werden.
Achtung: Das Gerät nie ins Wasser tauchen (Kurzschlussgefahr).
• Zur äusseren Reinigung mit einem feuchten Lappen abreiben und danach gut
trocknen.
Sidan laddas...
Sidan laddas...
Sidan laddas...
Sidan laddas...
Sidan laddas...
Sidan laddas...
Sidan laddas...
Sidan laddas...
Sidan laddas...
Sidan laddas...
Sidan laddas...
Sidan laddas...
Sidan laddas...
Sidan laddas...
Sidan laddas...
Sidan laddas...
Sidan laddas...
Sidan laddas...
Sidan laddas...
Sidan laddas...
Sidan laddas...
Sidan laddas...
Sidan laddas...
Sidan laddas...
Sidan laddas...
Sidan laddas...
Sidan laddas...
Sidan laddas...
Sidan laddas...
Sidan laddas...
Sidan laddas...
Sidan laddas...
Sidan laddas...
Sidan laddas...
Sidan laddas...
Sidan laddas...
Sidan laddas...
Sidan laddas...
Sidan laddas...
Sidan laddas...
Sidan laddas...
Sidan laddas...
Sidan laddas...
Sidan laddas...
Sidan laddas...
Sidan laddas...
Sidan laddas...
Sidan laddas...
Sidan laddas...
Sidan laddas...
Sidan laddas...
Sidan laddas...
Sidan laddas...
Sidan laddas...
Sidan laddas...
Sidan laddas...
Sidan laddas...
Sidan laddas...
Sidan laddas...
Sidan laddas...
Sidan laddas...
Sidan laddas...
Sidan laddas...
Sidan laddas...
-
 1
1
-
 2
2
-
 3
3
-
 4
4
-
 5
5
-
 6
6
-
 7
7
-
 8
8
-
 9
9
-
 10
10
-
 11
11
-
 12
12
-
 13
13
-
 14
14
-
 15
15
-
 16
16
-
 17
17
-
 18
18
-
 19
19
-
 20
20
-
 21
21
-
 22
22
-
 23
23
-
 24
24
-
 25
25
-
 26
26
-
 27
27
-
 28
28
-
 29
29
-
 30
30
-
 31
31
-
 32
32
-
 33
33
-
 34
34
-
 35
35
-
 36
36
-
 37
37
-
 38
38
-
 39
39
-
 40
40
-
 41
41
-
 42
42
-
 43
43
-
 44
44
-
 45
45
-
 46
46
-
 47
47
-
 48
48
-
 49
49
-
 50
50
-
 51
51
-
 52
52
-
 53
53
-
 54
54
-
 55
55
-
 56
56
-
 57
57
-
 58
58
-
 59
59
-
 60
60
-
 61
61
-
 62
62
-
 63
63
-
 64
64
-
 65
65
-
 66
66
-
 67
67
-
 68
68
-
 69
69
-
 70
70
-
 71
71
-
 72
72
-
 73
73
-
 74
74
-
 75
75
-
 76
76
-
 77
77
-
 78
78
-
 79
79
-
 80
80
-
 81
81
-
 82
82
-
 83
83
-
 84
84


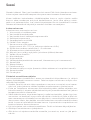
Stadler Form EVA LITTLE LUFTFUKTER Användarmanual
- Kategori
- Luftfuktare
- Typ
- Användarmanual
- Denna manual är också lämplig för
på andra språk
Relaterade papper
-
Stadler Form 2227142 Användarmanual
-
Stadler Form Eva Operating Instructions Manual
-
-
-
-
Stadler Form George Air washer Användarmanual
-
Stadler Form George Bruksanvisning
-
Stadler Form Robert Bruksanvisning
