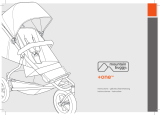
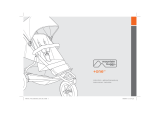
Mountain Buggy Breeze Användarmanual
- Kategori
- Barnvagnar
- Typ
- Användarmanual
Denna manual är också lämplig för

The Mountain Buggy Range
Stroller Instructions
P
P
A
A
S
S
S
S
E
E
D
D
S
S
A
A
F
F
E
E
T
T
Y
Y
P
A
S
S
E
D
S
A
F
E
T
Y

English 1-12
Designed and made in New Zealand by Mountain Buggy Ltd. Manufactured by Tritec Manufacturing Ltd,
an ISO 9001 certi ed company. Models made to BS 7409:1996, AS/NZS 2088:2000.
Français 13-24
Conçu et fabriqué en Nouvelle-Zélande par Mountain Buggy Ltd. Fabriqué par Tritec Manufacturing Ltd,
une société certi ée ISO 9001. Modèles conformes à la BS 7409:1996, AS/NZS 2088:2000.
Deutsch 25-36
Entwickelt und hergestellt in Neuseeland durch Mountain Buggy Ltd und produziert von Tritec
Manufacturing Ltd., einem nach ISO 9001 zerti zierten Unternehmen. Modelle nach BS 7409:1996, AS/NZS
2088:2000.
Italiano 37-48
Ideato e fatto in Nuova Zelanda da Mountain Buggy Ltd. Prodotto da Tritec Manufacturing Ltd, una ditta
certi cata con ISO 9001. Modelli sono conformi alla BS 7409:1996, AS/NZS 2088:2000.
Español 49-60
Proyectado y fabricado en Nueva Zelanda por Mountain Buggy Ltd. Producido por Tritec Manufacturing Ltd,
una empresa certi cada con ISO 9001. Modelos se conforman a la BS 7409:1996, AS/NZS 2088:2000.
Nederlands 61-72
Ontworpen en gefabriceerd in Nieuw Zeeland door Mountain Buggy Ltd en geproduceerd door Tritec
Manufacturing Ltd. een ISO 9001 gecerti ceerde onderneming. Modellen gemaakt volgens de BS 7409:1996,
AS/NZS 2088:2000.
Svenska 73-84
Design och framställning i Nya Zeeland av Mountain Buggy Ltd. Tillverkad av Tritec Manufacturing Ltd, ett
företag met ISO 9001 certi kat. Modeller ar tillverkade enligt BS 7409:1996, AS/NZS 2088:2000.
Instruction booklet for all Mountain Buggy® models:

ENGLISH
1
Welcome
Congratulations on your purchase of a Mountain Buggy.
We know how precious and inspiring a new little person can be in your
world. It’s so important to be able to show your baby to the world and
just as important to show the world to your baby.
At Mountain Buggy you and your baby matter to us. That’s why we
have spent years researching and developing a product that is safe,
comfortable and in tune with modern parents’ needs. We want you to be
able to live your new family lifestyle with all the freedom and satisfaction
you have always experienced.
We also know that many parents use strollers incorrectly and as a result
may put their children at risk. Please take the time to read through this
manual carefully. Your Mountain Buggy will provide you with optimum
safety if you follow the instructions as detailed.
If you have any concerns, questions or comments about your Mountain
Buggy or how to use it, please do not hesitate to contact us. We’d love to
hear from you.

2
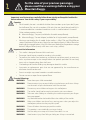
Important: read instructions carefully, follow them strictly and keep this booklet for
future reference. Your child’s safety is your responsibility.
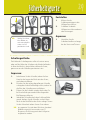
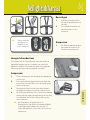
Capacity
• For all models, the seat is suitable for children from newborn up to 4 years old (3 years
for the Breeze). For use with a newborn (0-6 mths) the seat should be reclined fully. It
is recommended that a newborn headrest or similar is used for babies 0-3 months.
Other newborn options include:
1. Mountain Buggy® Carrycot (available for all models except Breeze)
2. Mountain Buggy® Carseat Adapter (available for all single models, except Breeze).
• Maximum seat loading for all model Single strollers is 35kg/77lb, and 25kg/55lb per
seat on Double and Triple versions. Maximum seat height capacity is 100cm. Maximum
loading for the storage basket is 5kg/11lb. Maximum loading for the pocket on storage
basket is 300gm/10.5oz (ie only small items such as keys, wallets).
Important Use Information
• This stroller is designed for one child in each seat.
• Passenger should remain seated (no standing in the stroller).
• To prevent the stroller from becoming unstable, do not place parcels or accessory
items anywhere except in the storage basket and pockets provided. Do not hang
items such as shopping bags from the frame.
• Overloading and incorrect folding may damage or break this stroller.
• Accessories or replacement parts that are not approved by the manufacturer or
distributor should not be used.
• Excessive weight may create hazardous unstable conditions.
• Do not use near an open re or exposed ame.
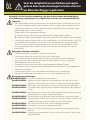
Essential Warnings
WARNING: Never leave your child unattended.
WARNING: Prevent serious injury to your child by using the harness at all times. Always
use the crotch strap in combination with the waist belt.
WARNING: Do not carry extra children or bags on this stroller/pram.
WARNING: The stroller should not be used unassisted on stairs or escalators.
WARNING: Take care when folding or unfolding the stroller to prevent your ngers
being entrapped.
WARNING: Any load attached to the handle a ects the stability of the stroller.
WARNING: Make sure children are clear of any moving parts when you adjust this
stroller/pram, otherwise they may be injured.
WARNING: Put on all brakes whenever you park the stroller.
WARNING: This product is not suitable for running or skating.
WARNING: Use the safety wrist strap at ALL times the stroller is in use.
WARNING: Avoid serious injury from falling or sliding out. Always use seat belt.
For the sake of your precious passenger,
please read these warnings before using your
Mountain Buggy.

ENGLISH
3
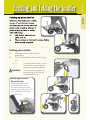
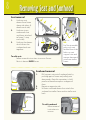
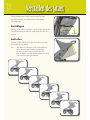
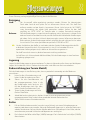
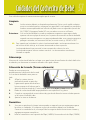
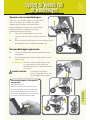
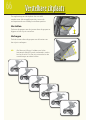
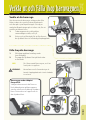
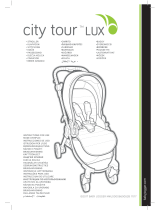
Erecting and Folding the Stroller
Strollers purchased in
Europe/UK only:
Please note there is a lock
guard mechanism on the
left hand side of the stroller
protecting the sliding lock. This
must be icked out to access
the sliding lock.
Folding your stroller
1. Fold adjustable handle under (if
applicable).
2. Pull up sliding lock on both sides of heel
rest.
NOTE: On Urban model strollers, ensure
front wheels are unlocked and
rotated forward before folding.
WARNING: Check that all locking devices
engage correctly and are not
damaged before use.

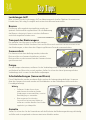
4
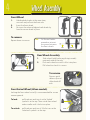
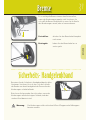
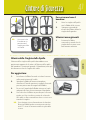
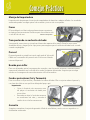
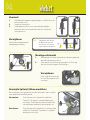
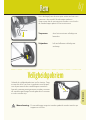
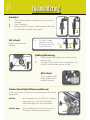
Front Wheel
1. Holding both knobs at the same time,
unscrew and pull out the front axle.
2. Insert the front wheel.
3. Re-insert the axle and tighten both knobs by
hand to secure wheel in place.
To remove
Repeat above in reverse.
Front Swivel Wheel (Urban models)
Locking the front wheel swivel(s) is recommended for use on
uneven ground.
To lock: pull knob out and turn it so the ‘locked’
symbol is at the top. Then swivel front wheel
under stroller until it locks into place.
To unlock: pull knob out and turn it 1/4 of a turn so the
‘unlocked’ symbol is at the top.
Rear Wheel Assembly
1. Slide wheel (with brake cog facing inwards)
onto each end of the axle.
2. Push each wheel on until it clicks into place.
Pull wheel to check it is secure.
knob
Wheel Assembly
axle
spaceraxle
axle
brake cog
To remove
Depress quick
release clip and
slide wheel o
axle.
NB: On Terrain Double
remember to insert
the spacer between
the front wheels.

5
ENGLISH
1
2
3
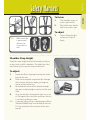
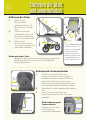
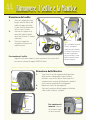
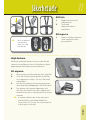
Safety Harness
To fasten
1. Clip shoulder straps to
waist strap buckles.
2. Push both waist buckle
ends into crotch strap.
To adjust
1. Adjust sliding buckles
so harness straps t
r m l y .
Shoulder Strap Height
Shoulder strap height should be located just below
or level with a child’s shoulders. The older the child,
the further up the seat the straps need to be.
To adjust:
1. Locate buckle by slipping hand up the inside
back of the seat.
2. Push the rectangular shaped buckle through
the insertion slot on an angle, pushing the
corner of the buckle rst.
3. Re-thread the corner of the buckle through
the most suitable height insertion slot for your
child.
4. Once the buckle is through the slot, twist it so
it is at against the seat back and then check it
is secure by pulling on strap.
NB: a separate safety harness conforming to British
Standard BS6684 may be attached to the two
‘D’ rings located at the insertion of the waist
harness.
NB: Make sure baby
is positioned
down as far
as possible in
seat.

6
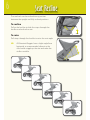
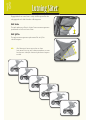
Seat Recline
The seat back can be reclined to any position
between the upright and fully reclined positions.
To recline
Pull on the buckles to slide the straps through the
buckles and recline the seat.
To raise
Pull straps through the buckles to raise the seat angle.
NB: All Mountain Buggies have a slight angle from
horizontal as recommended, otherwise the
child could wriggle up the seat and make the
stroller unstable.
buckles
strap

7
ENGLISH
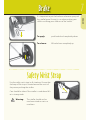
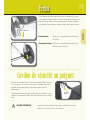
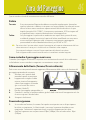
It is important to put the brake on whenever you park
the stroller/pram. Ensure it is on when putting your
child in or taking your child out of the stroller.
Brake
Safety Wrist Strap
Use the safety wrist strap in all situations. Ensure that
the loop of the strap is located around the wrist of
the person pushing the stroller.
Care should be taken if the stroller is used down hills
or in strong winds.
To release: lift brake lever completely up.
To apply: push brake level completely down.
wrist strap
brake lever
Warning: The stroller should not be
used unassisted on stairs or
escalators.

8
Seat removal
1. Unfasten seat
domes from frame
along side tubes (4
domes each side).
2. Unfasten straps
underneath seat
and those attached
to frame (1 strap
each side).
3. Unfasten the domes
which fasten the
sunhood and seat
together.
Removing Seat and Sunhood
Sunhood removal
1. Pull support wire out of sunhood joint by
pushing against frame and pulling wire
downwards.
Note:
this operation is child
proof and therefore requires a degree of
force.
2. Repeat on opposite side.
3. Unfasten sunhood domes that attach the
sunhood to stroller frame and to stroller seat
back.
sunhood
support wire
plastic joint
For Terrain models
only, push seat
forward then slide
fabric up seat
support wire and
remove hammock
wire from stroller
frame.
NB:
To re t seat:
follow removal instructions in reverse. Ensure
fabric is domed OVER frame.
To re t sunhood:
follow removal
instructions in
reverse.

9
ENGLISH
This vehicle requires regular maintenance by the user.
Cleaning
Fabric: The outdoor fabric should be cleaned regularly. Brush o any excessive
dirt or sand and rinse with lukewarm water. Fabric can be removed and
washed by hand using a mild natural soap solution in lukewarm water
(no more than 38°C/100°F). Rinse thoroughly. DO NOT tumble dry or dry
in strong sunlight.
Frame: If the buggy is used in exposed environments such as salt water, salt spray
or beach sand, wash any steel parts of the stroller by hosing the stroller or
use warm soapy water, dry thoroughly and protect by spraying with light
aerosol can oil, eg WD40® or CRC®.
NB: To avoid fabric fading, cover the stroller if it is exposed to direct sunlight through glass,
eg in a car or if stored in exposed areas.
Fabric may fade due to intense exposure to direct sunlight.
Fabric may develop mould or mildew if stored in humid or damp conditions.
Storage
Store stroller inside in a dry place but away from central heating units/radiators and do
not store in airing or hotwater cupboards.
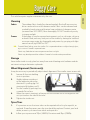
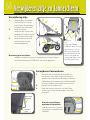
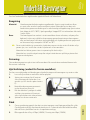
Wheel Alignment (Terrain only)
It may be necessary to periodically adjust wheel alignment if the stroller steers to one side.
1. Loosen all four nuts holding
struts in position.
2. Slightly tighten outside nut
on the opposite side to the
direction it is pulling (eg if it’s
steering to left tighten nut D).
3. Test the stroller by pushing it on
a smooth at surface.
4. When the correct steering is achieved, turn the outside nut on the opposite side
so it just touches the side of the tube.
5. Tighten the inside nuts.
Tyres/Tires
1. If a puncture occurs the inner tube can be repaired with a bicycle repair kit, or
replaced. If tread becomes worn the tyre should be replaced. Contact your local
dealer, or most cycle stores have tubes and repair kits.
2. In ate tyres to pressure of 20psi (140KPa). Do not exceed 30psi (210KPa).
A
B
D
C
Buggy Care

10
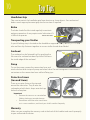
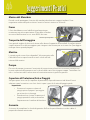
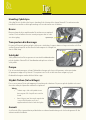
Handlebar Grip
Take care to protect the handlebar grip from abrasion or sharp objects. Your authorised
dealer can arrange replacement grips and instructions if required.
Brake
The brake should be lubricated regularly to maintain
optimum operation. It may require extra lubrication if it
is di cult to operate.
Transporting your Stroller
A special locking strap is located on the handlebar support bar. Wrap this strap around the
axle and then clip fasteners together to secure stroller closed when folded.
Sunhood
The sunhood can be fastened back by applying the
Velcro on the sunhood window ap to the Velcro on
the inside edge of the sunhood.
Pump
To use the pump, remove the connection hose and
attach relevant ends to top of pump and wheel valve. Do not overtighten. Ensure there is
no tension on the connection hose while in ating tyre.
Protective Covers
(Sun and Storm)
These accessories fasten at the top and
around the side tubes. They t over the
sunhood and with elastic loops onto the lugs
below the footplate.
Important
• Remove the storm or sun cover before
folding the buggy to avoid damage.
• Remember not to leave the storm cover
on in warm conditions, and check your child’s comfort frequently.
Warranty
Make sure you complete the warranty card at the back of this booklet and send it promptly
to your authorised distributor.
Top Tips
lubricate this surface
velcro
lug lug

11
ENGLISH
This warranty covers defects in workmanship and materials for one year from the
date of purchase. The distributor undertakes to repair or, at their option, replace
any part which is found to be defective within the warranty period.
The warranty does not cover:
• pick up, delivery or service calls.
• temporary replacement while the stroller is being repaired or assessed.
• damage to tyres and handlebar grips.
• instruction or assistance with wheel assembly or setup of stroller.
• corrosion or fabric damage if stroller has been used or stored in extreme
environmental conditions, eg high humidity, salt spray.
• deterioration due to lack of maintenance and cleaning as speci ed in
manufacturer’s instructions.
• normal wear and tear or damage to product caused by accident, misuse
or act of nature.
• repairs when product has been dismantled, repaired, modi ed or
serviced by other than an authorised agent.
• repairs when stroller has not been used for normal use and in accordance
with manufacturer’s instructions.
If the product fails within the warranty period: Return it to the authorised dealer
where the product was purchased. The dealer will arrange for assessment and
appropriate remedy during normal business hours.
NB: If the product is not returned to the dealer in the location of purchase any
repairs may incur charges.
Repairs and replacement parts: If the stroller requires repair, contact your
authorised dealer or distributor to obtain information and spare parts.
NB: If you are in a di erent country from the one where you purchased the
product, please contact the distributor for the country in which you
purchased, as extra charges may apply.
Please make sure the product is clean. Unacceptably dirty products will not be
handled.
Warranty Conditions

12
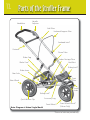
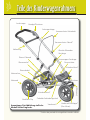
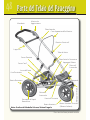
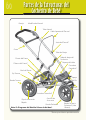
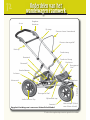
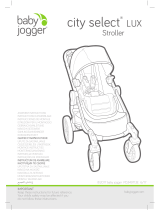
Parts of the Stroller Frame
Handlebar
Handle
Adjuster
Sunhood Support Wire
Side Tube
Sunhood Joint*
Down Tube
Under-Carriage Tube
Heel Rest
Sliding Lock*
Sliding Lock*
Accessory Lug
Front Wheel
Front Wheel Swivel*
(Urban Only)
Foot
Plate
Swivel
Knob
Brake Lever
Brake Cog
Brake Cam*
Rear Axle
Quick Release Clip
Rear Wheel
Fastener
Note: Diagram is Urban Single Model
*Points to lubricate periodically

13
FRANÇAIS
Bienvenue
Congratulation sur l’achat de votre Mountain Buggy (Poussette pou Bébé)
Nous savons l’importance de votre nouveau né et combien il est précieux dans
votre univers. Il est très important de pouvoir le montrer au monde mais aussi
de lui faire voir le monde.
A Mountain Buggy vous et votre bébé ont beaucoup ď importance, et c’est
pour cette raison que nous avons passé des années dans nos recherches à
développer un model qui soit sans danger, confortable et en accordance avec
tous les besoins de parents modernes. Nous voulons pouvoir donner à votre
famille toute la liberté et, satisfaction dont vous êtes accoutumé.
Nous savons aussi que les parents se servent incorrectement des Buggys et les
enfants courent le risque d’un accident.
Le vous prie de prendre votre temps de lire les instructions avec soin.
Votre Mountain Buggy vous donnera la sécurité totale si vous suivez les
instructions à la lettre.
Si vous avez des inquiétudes, questions, critiques à propos de votre Mountain
Buggy ou comment vous en servir je vous prie de ne pas hésiter à nous
contacter.

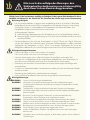
14
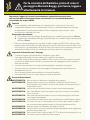
Important: Lisez soigneusement les instructions, suivez-les strictement et gardez
précieusement ce manuel. La sûreté de votre enfant est de votre responsabilité.
Capacité
• Pour tous les modèles, le siège convient pour des enfants de 0 à 4 ans (3 ans pour le modèle Breeze).
Pour une utilisation avec un nouveau-né (de 0 à 6 mois) le siège devra être incliné complètement à
l’horizontale. Il est recommande d’employer un appui-tête pour bébé ou similaire pour des bébés
âgés de 0 a 3 mois.
Les options nouveau-né sont :
1. porte-bébé Mountain Buggy® (disponible pour tout les modèles excepté Breeze)
2. siège de voiture Mountain Buggy® (disponible pour tout les modèles simples excepté le
modèle Breeze).
• Le poids maximum par siège pour toutes les poussettes simples est de 35kg et de 25kg par siège
pour les versions Double et Triple. La taille maximum est de 100cm. Le chargement maximum
pour le panier de stockage est de 5kg. Le chargement maximum pour la poche sur le panier de
stockage est de 300g (par exemple petits objets tels que clés, portefeuille).
Information importante pour l’utilisation
• Cette poussette est conçue pour un enfant dans chaque siège.
• Le passager devra rester assis (ne pas être debout dans la poussette).
• Pour empêcher la poussette de devenir instable ne placez pas des colis ou article n’importe
ou excepté dans le panier de stockage fournis. N’accrochez pas des articles tels que des sacs à
provisions sur l’armature.
• La surcharge et le pliage incorrect peuvent endommager ou casser cette poussette.
• Des accessoires ou pièces detachesqui ne sont pas approuvés par le fabricant ne doivent pas
être utilisés.
• Un poids excessif peut créer des conditions instables et dangereuses.
• Ne l’utilisez pas près d’un feu ou exposé à une amme.
Essentiels Avertissements
AVERTISSEMENT: Ne laissez pas votre enfant sans surveillance.
AVERTISSEMENT: Empêchez les dommages sérieux à votre enfant en utilisant le harnais à tout
moment. Employez toujours la courroie du milieu en combination avec la
ceinture de taille.
AVERTISSEMENT: Ne portez pas d’enfants suplementaires ou de sacs suplementaires sur cette
poussette.
AVERTISSEMENT: La poussette ne devrait pas être utilisée sans aide dans des escaliers ou des
escalators.
AVERTISSEMENT: N’importe quelle charge xée à la poignée a ecte la stabilité de la poussette.
AVERTISSEMENT: Faites attention en pliant ou en dépliant la poussette a n d’éviter de la refermer
sur vos doigts.
AVERTISSEMENT: Assurez vous que les enfants sont bien dégages de toutes les pièces mobiles
lorsque vous ajustez cette poussette, autrement ils pourraient être blesses.
AVERTISSEMENT: Mettre les freins en action à chaque fois que vous garez la poussette.
AVERTISSEMENT: Cette poussette n’est pas appropriée pour courir ou patiner.
AVERTISSEMENT: Utilisez la courroie de sécurité DES QUE la poussette est utilisée.
AVERTISSEMENT: Évitez la blessure sérieuse de tomber ou coulisser. Utilisez toujours la ceinture.
A n de protéger votre précieux passager,
veuillez lire les avertissements ci-dessous
avant d’utiliser votre Mountain buggy.

15
FRANÇAIS
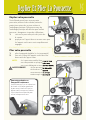
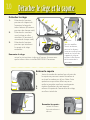
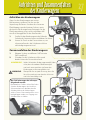
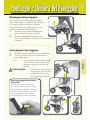
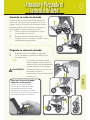
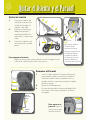
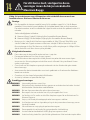
Déplier votre poussette
Tout d’abord quand vous recevez votre
poussette, enlevez-la de sa boite, hottez les
protections noires des essieux arrières et
l’emballage plastique. Débarrassez-vous de
l’emballage plastique a n d’éviter que l’enfant
joue avec - dangereux: risque de su ocation -.
1. saisissez la poussette près des joints de
la capote.
2. appuyez sur l’appui talon et assurez-vous que
les loquets coulissants sont complètement
engagés.
Plier votre poussette
1. pliez la poignée réglable (si c’est approprié).
2. tirez vers le haut les loquets coulissants des
deux cotés de l’appui talon.
NOTE: Sur la poussette modèle Urban, assurez vous
avant de procéder au pliage que les roues
avant sont débloquées et tournées vers l’avant.
AVERTISSEMENT: véri ez que tous les dispositifs
de fermeture s’engagent
correctement et ne sont pas
endommagés avant emploi.
Deplier Et Plier La Poussette
Poussette achetées en
Europe/UK seulement:
Veuillez noter qu’il y a un mécanisme
de sûreté sur le loquet gauche de
la poussette, évitant ainsi que les
loquets coulissent par eux-mêmes.
Celui-ci doit être enclenché pour
utiliser le loquet coulissant.

16
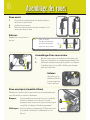
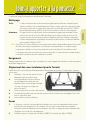
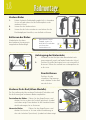
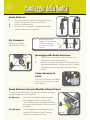
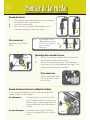
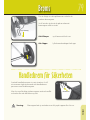
Roue avant
1. En tenant en même temps les deux boutons,
dévissez et retirez l’axe.
2. Insérez la roue avant.
3. Réinsérez l’axe et serrez les deux boutons à la
main pour xer la roue.
Enlever:
Répétez les instructions ci-
dessus.
Roue avant pivot (modèle Urban)
Bloquer le(s) pivot(s) de la roue avant est recommandé pour
une utilisation sur terrain caillouteux.
Bloquer: Tirez le bouton et tournez-le ainsi le symbole
‘locked’ (=fermé) est au-dessus. Ensuite
pivotez la roue avant sous la poussette jusqu’à
ce qu’elle se bloque à l’endroit approprié.
Débloquer: tirez le bouton et tournez-le d’1/4 de tour ainsi
le symbole ‘unlocked’ (= débloqué) est au-
dessus.
Assemblage d’une roue arrière
1. glissez la roue (avec le revêtement des dents de
frein vers l’intérieur) sur chaque extrémité de l’axe.
2. Enfoncez chaque roue jusqu’à qu’elles se cliquent
à l’endroit prévu à cet e et. Véri ez que chaque
roue est bien xée.
Bouton
Assemblage des roues
Axe
EntretoiseAxe
Axe
Dents de
frein
Enlever:
Appuyez sur les
boutons libérant
la roue et glissez-
la hors de l’axe.
NB: Pour le Terrain
Double n’oubliez pas
d’insérer l’entretoise
entre les roues avant.

17
FRANÇAIS
1
2
3
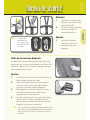
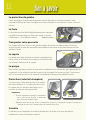
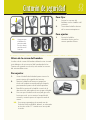
Harnais de sécurité
Attacher
1. Attachez les ceintures des
épaules aux boucles de la
courroie de taille.
2. Glissez les deux extrémités
de la boucle dans la
courroie du milieu.
Ajustez
1. Ajustez les boucles
coulissantes, ainsi les
courroies sont bien
adaptées.
Taille de la courroie d’épaule
La taille de la courroie d’épaule doit être situé juste
en dessous ou au niveau des épaules de l’enfant. Plus
l’enfant est âgé, plus les courroies d’épaule doivent
être remonté dans le siège.
Ajuster:
1. Localisez la boucle en glissant la main dans le
haut du dos intérieur du siège.
2. Poussez la boucle de forme rectangulaire
à travers la fente d’insertion dans l’angle,
poussez le coin de la boucle d’abord.
3. Réintroduisez le coin de la boucle à travers
la fente d’insertion pour la taille la plus
appropriée pour votre enfant.
4. Une fois que la boucle est passée par la fente
tournez-la, ainsi elle est plaquée contre le
dos du siège et véri ez alors qu’elle est bien
bloquée en tirant sur la courroie.
NB: Un harnais de sécurité séparé conformément à la
norme britannique BS6684 peut être attaché aux
deux anneaux ‘D’ situés à l’insertion du harnais
de taille.
NB: Assurez-vous
que bébé est
assis autant que
possible au fond
du siège.

18
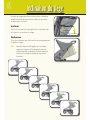
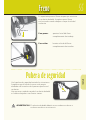
Inclinaison du siège
Le dos du siège peut être incliné dans n’importe
quelle position entre position droite et position
entièrement inclinée.
Incliner
Tirez sur les boucles pour glisser les courroies par
les boucles et incliner le siège.
Redresser
Tirez les courroies par les boucles pour augmenter
l’angle du siège.
NB: tout les Mountain Buggies ont un léger
angle par rapport à l’horizontal comme
recommandé, autrement l’enfant pourrait
balancer le siège et rendre la poussette
instable.
les boucles
les courroies
Sidan laddas ...
Sidan laddas ...
Sidan laddas ...
Sidan laddas ...
Sidan laddas ...
Sidan laddas ...
Sidan laddas ...
Sidan laddas ...
Sidan laddas ...
Sidan laddas ...
Sidan laddas ...
Sidan laddas ...
Sidan laddas ...
Sidan laddas ...
Sidan laddas ...
Sidan laddas ...
Sidan laddas ...
Sidan laddas ...
Sidan laddas ...
Sidan laddas ...
Sidan laddas ...
Sidan laddas ...
Sidan laddas ...
Sidan laddas ...
Sidan laddas ...
Sidan laddas ...
Sidan laddas ...
Sidan laddas ...
Sidan laddas ...
Sidan laddas ...
Sidan laddas ...
Sidan laddas ...
Sidan laddas ...
Sidan laddas ...
Sidan laddas ...
Sidan laddas ...
Sidan laddas ...
Sidan laddas ...
Sidan laddas ...
Sidan laddas ...
Sidan laddas ...
Sidan laddas ...
Sidan laddas ...
Sidan laddas ...
Sidan laddas ...
Sidan laddas ...
Sidan laddas ...
Sidan laddas ...
Sidan laddas ...
Sidan laddas ...
Sidan laddas ...
Sidan laddas ...
Sidan laddas ...
Sidan laddas ...
Sidan laddas ...
Sidan laddas ...
Sidan laddas ...
Sidan laddas ...
Sidan laddas ...
Sidan laddas ...
Sidan laddas ...
Sidan laddas ...
Sidan laddas ...
Sidan laddas ...
Sidan laddas ...
Sidan laddas ...
Sidan laddas ...
Sidan laddas ...
Sidan laddas ...
-
 1
1
-
 2
2
-
 3
3
-
 4
4
-
 5
5
-
 6
6
-
 7
7
-
 8
8
-
 9
9
-
 10
10
-
 11
11
-
 12
12
-
 13
13
-
 14
14
-
 15
15
-
 16
16
-
 17
17
-
 18
18
-
 19
19
-
 20
20
-
 21
21
-
 22
22
-
 23
23
-
 24
24
-
 25
25
-
 26
26
-
 27
27
-
 28
28
-
 29
29
-
 30
30
-
 31
31
-
 32
32
-
 33
33
-
 34
34
-
 35
35
-
 36
36
-
 37
37
-
 38
38
-
 39
39
-
 40
40
-
 41
41
-
 42
42
-
 43
43
-
 44
44
-
 45
45
-
 46
46
-
 47
47
-
 48
48
-
 49
49
-
 50
50
-
 51
51
-
 52
52
-
 53
53
-
 54
54
-
 55
55
-
 56
56
-
 57
57
-
 58
58
-
 59
59
-
 60
60
-
 61
61
-
 62
62
-
 63
63
-
 64
64
-
 65
65
-
 66
66
-
 67
67
-
 68
68
-
 69
69
-
 70
70
-
 71
71
-
 72
72
-
 73
73
-
 74
74
-
 75
75
-
 76
76
-
 77
77
-
 78
78
-
 79
79
-
 80
80
-
 81
81
-
 82
82
-
 83
83
-
 84
84
-
 85
85
-
 86
86
-
 87
87
-
 88
88
-
 89
89


Mountain Buggy Breeze Användarmanual
- Kategori
- Barnvagnar
- Typ
- Användarmanual
- Denna manual är också lämplig för
på andra språk
- italiano: Mountain Buggy Breeze Manuale utente
- español: Mountain Buggy Breeze Manual de usuario
- Deutsch: Mountain Buggy Breeze Benutzerhandbuch
- français: Mountain Buggy Breeze Manuel utilisateur
- English: Mountain Buggy Breeze User manual
- Nederlands: Mountain Buggy Breeze Handleiding
Relaterade papper
-
 Mountain Buggy Buggy Range Outside Cover Användarmanual
-
 Mountain Buggy Buggy Range Outside Cover Användarmanual
-
 Mountain Buggy CARRYCOT Användarmanual
-
 Mountain Buggy +one Instructions Manual
-
 Mountain Buggy +one pre-2015 Bruksanvisningar
-
 Mountain Buggy +one buggy Bruksanvisningar
-
 Mountain Buggy CARRYCOT Användarmanual


Andra dokument
-
Baby Jogger SUMMIT X3 Bruksanvisning
-
Baby Jogger city mini GT Assembly Instructions Manual
-
Baby Jogger city ELITE Assembly Instructions Manual
-
BOB REVOLUTION PRO DUALLIE User Instructions
-
Puky 3020 - PUKYLINO BUNDLE Bruksanvisning
-
Maclaren Volo Bruksanvisning
-
 Baby Jogger City Tour LUX Bruksanvisningar
-
 Baby Jogger city select lux Assembly Instructions Manual
-
-
Jane PACK TRIDER MATRIX LIGHT Bruksanvisning

