
DOUBLE BENCH GRINDER PDOS 200 A1
DOBBELTSLIBEMASKINE
Brugs- og sikkerhedsanvisninger
Oversættelse af den originale driftsvejledning
DOUBLE BENCH GRINDER
Operation and Safety Notes
Translation of original operation manual
BÄNKSLIP
Bruksanvisning och säkerhetsanvisningar
Översättning av bruksanvisning i original
KAKSOISHIOMAKONE
Käyttö- ja turvaohjeet
Alkuperäisen käyttöohjeen käännös
DOPPELSCHLEIFMASCHINE
Bedienungs- und Sicherheitshinweise
Originalbetriebsanleitung
3

GB / IE Operation and Safety Notes Page 5
FI Käyttö- ja turvaohjeet Sivu 13
SE Bruksanvisning och säkerhetsanvisningar Sidan 21
DK Brugs- og sikkerhedsanvisninger Side 29
DE / AT / CH Bedienungs- und Sicherheitshinweise Seite 37
Before reading, unfold both pages containing illustrations and familiarise yourself with all functions of the
device.
Käännä ennen lukemista molemmat kuvalliset sivut esiin ja tutustu seuraavaksi laitteen kaikkiin toimintoihin.
Vik ut båda bildsidorna och ha den till hands när du läser igenom anvisningarna och gör dig bekant med
apparatens / maskinens funktioner.
Før du læser, vend begge sidene med billeder frem og bliv bekendt med alle apparatets funktioner.
Klappen Sie vor dem Lesen die beiden Seiten mit den Abbildungen aus und machen Sie sich anschließend
mit allen Funktionen des Gerätes vertraut.

A B
E F
C D
11 10
12
13
1
2
3
5
4
8
9
14
6
7

N
G H
I K
2
2
M
7
L
5
7
14
2 2
33
6 5 6
O
7

5 GB/IE
Table of contents
Introduction
Proper use ......................................................................................................................Page 6
Features and equipment ...............................................................................................Page 6
Included items ...............................................................................................................Page 6
Technical information ....................................................................................................Page 7
General safety advice
Working safely ..............................................................................................................Page 7
Safety advice relating specifically to bench grinders .................................................Page 8
Before use
Assembly........................................................................................................................Page 9
Positioning the workpiece / tool rests and eye guard mounts ....................................Page 10
Preparing for first use
Switching on and off .....................................................................................................Page 10
Grinding a workpiece ...................................................................................................Page 10
Replacing a grinding wheel .........................................................................................Page 10
Original accessories / Attachments ..............................................................................Page 11
Maintenance and cleaning .........................................................................Page 11
Service .........................................................................................................................Page 11
Warranty ................................................................................................................... Page 11
Disposal ......................................................................................................................Page 12
Declaration of Conformity / Manufacturer..................................Page 12

6 GB/IE
Introduction
Double bench grinder PDOS 200 A1
For grinding and sharpening metal tools
Introduction
Please make sure you familiarise your-
self fully with the way the device works
before you use it for the first time and
that you understand how to handle electrical power
tools correctly. To help you do this please read the
accompanying operating instructions. Keep these
instructions in a safe place. If you pass the device
on to anyone else, please ensure that you also pass
on all the documentation.
Proper use
The double grinding machine is intended for grind-
ing and sharpening metal tools such as drills, chisels
etc. and metal items. The device is not intended for
commercial use. Any other use or modification to
the device shall be considered as improper use
and could give rise to considerable dangers.
The manufacturer will not accept liability for loss or
damage arising from improper use.
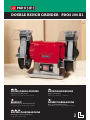
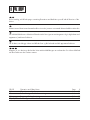
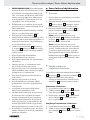
Features and equipment
1
Magnifying glass
2
Eye guard mount
3
Eye guard
4
Grinding wheel
5
Workpiece / tool rest
6
Adjuster screw for workpiece / tool rest
7
Wheel guard cover
8
Mounting holes
9
ON / OFF switch
10
Machine-side flange
11
Left-hand thread
12
Outside flange
13
Nut
14
Fastening screw
Included items
Check that all the items and accessories
are present immediately after unpacking
the device:
1 Double bench grinder PDOS 200 A1 with
- 2 x eye guard mounts / eye guards
- 2 x workpiece / tool rests / adjuster screws
1 Operating instructions
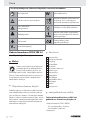
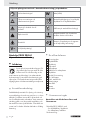
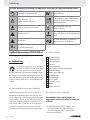
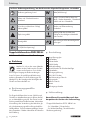
The following pictograms are used in these operating instructions / on the device:
Read instruction manual!
W
Watts (effective power)
Observe caution and safety notes!
Wear hearing protection, dust
protection mask, protective glasses
and protective gloves.
Caution – electric shock!
Danger to life!
Keep children away from electrical
power tools!
Risk of explosion!
Risk of loss of life by electric shock from
damaged mains lead or mains plug!
Risk of fire!
Dispose packaging and appliance in
an environmentally-friendly way!
V
~
Volt (AC)

7 GB/IE
Introduction / General safety advice
Technical information
Rated voltage: 230 V
~
50 Hz
Duty cycle: S2 short-term
operation 30 min
Nom. power input: 200 W
No load speed: n
0
2950 min
-1
Grinding wheel diameter: 150 mm
Grinding wheel width: 20 mm
Grinding wheel bore: 20 mm
Circumferential speed max.: 23.2 m / s
Weight including
removable parts: 7.5 kg
Noise data:
Refers to A-weighted sound level.
Sound pressure level: 75.30 dB (A)
Sound level: 85.00 dB (A)
Values determined in accordance with EN 61029.
General safety advice
CAUTION! In order to protect yourself from
the danger of electric shock, injury or fire when
using electrical power tools, please observe
the following basic safety precautions. Read all
these requirements before you use the electrical
power tool, and keep the safety advice in a
safe place.
Working safely
1. K
eep your working area clean and tid
y.
A disorderly working area can lead to accidents.
2. Be aware of the effects of the
environment.
Do not leave electrical power tools out in the rain.
Do not use electrical power tools in moist or
wet surroundings.
Ensure that your working area is well lit.
Do not use electrical power tools in
areas where there is risk of fire or
explosion.
3.
Protect yourself from electric
shock.
Avoid touching earthed objects such as pipes,
heating radiators, ovens or refrigerators with
parts of your body.
4. Keep other people at a safe distance.
Do not allow other people, in partic-
ular children, to touch the electrical
power tool or the mains lead.
Keep them away from your working area.
5. Store currently unused electrical pow-
er tools in a safe place.
When not being used electrical power tools
should be stored in dry conditions in a high or
enclosed place, out of reach of children.
6. Do not overload your electrical power
tool.
By keeping within the specified working range
of the tool you will work more safely and
achieve a better result.
7. Use the right electrical power tool for
the task.
Do not use low-output devices for heavy tasks.
Do not use an electrical power tool for purposes
for which it was not intended. For example, do
not use a hand operated circular saw for trim-
ming tree branches or cutting logs.
8. Wear suitable clothing.
Do not wear loose-fitting clothing or jewellery.
They could become caught on moving parts.
We recommend that you wear anti-slip footwear
when working outdoors.
If you have long hair, wear a hair net.
9.
Use personal protective
equipment.
Wear protective glasses.
Wear a dust mask if your work generates dust.
10. Attaching the vacuum dust extraction
device.
Where there are connection points provided
for vacuum dust extraction please ensure that
the connections are made and used properly.
11.
Do not use the mains lead
for purposes for which it was
not intended.

8 GB/IE
General safety advice
Do not use the mains lead to pull the plug out
of the mains socket. Protect the mains lead
from heat, oil and sharp edges.
12. Securely support the workpiece.
Use clamps or a vice to grip the workpiece
firmly. This is much safer than holding it with
your hand.
13. Avoid placing your body in an
unnatural position.
Keep proper footing and balance at all times.
14. Look after your tools carefully.
Keep cutting tools sharp and clean. This way
you will work more safely and achieve better
results.
Follow the advice on tool lubrication and con-
sumables replacement.
Check the condition of the mains lead on your
electrical power tool regularly and have any
damage repaired by a competent specialist.
Check the condition of extension leads regular-
ly and replace them if they are damaged.
Keep handles and hand grips clean, dry and
free of oil and grease.
15. Pull the mains plug out of the mains
socket.
Do this if the electrical power tool is not being
used, before carrying out maintenance tasks
on the electrical power tool and whenever you
are changing inserted tools, e.g. saw blades,
drills or router bits.
16. Make sure that no spanners, keys etc.
are left attached.
Check before switching on that all spanners,
keys and setting tools have been removed.
17. Avoid unintentionally starting up the
device.
Check that the switch is set to OFF on the de-
vice when the mains plug is inserted into the
mains socket.
18. Using an extension lead for working
outdoors.
When working outside, always use an approved
and appropriately labelled extension lead.
19. Remain alert.
Watch what you are doing. Proceed with cau-
tion. Do not use electrical power tools if you
cannot concentrate.
20. Check the electrical power tool for
damage.
Before the electrical power tool is used, carefully
check the safety equipment and any slightly
damaged parts to see that they are still work-
ing properly.
Check that all moving parts on the tool are
working properly, can move freely and are not
damaged. All parts must be correctly attached
and fulfil all the requirements necessary to allow
the electrical power tool to operate properly.
Damaged safety equipment and components
must be properly repaired or replaced at a
competent electrical equipment repair centre
unless otherwise indicated in the operating in-
structions.
Damaged switches must be replaced at a
Customer Service Centre.
Never use an electrical power tool that cannot
be switched on and off properly.
21. CAUTION!
The use of inserted tools and accessories other
than those recommended by the manufacturer
could lead to you being injured.
22. Have your electrical power tool
repaired at an electrical equipment
repair specialist.
This electrical power tool complies with the
relevant safety regulations. Repairs may only
be carried out by a specialist electrical repair
centre using original spare parts, otherwise
injury could occur to the user.
Safety advice relating spe-
cifically to bench grinders
Do not touch the mains lead if it becomes damaged
or cut through while you are using the device.
Pull the plug out of the mains socket immediately
and have the device repaired by a suitably
qualified person or at your service centre.
Do not operate the device if it is damp and do
not use it in a damp environment.
If you use the device outdoors, always connect
it through a residual current device (RCD) with
a maximum trip current of 30 mA.

9 GB/IE
General safety advice / Before use
If using an extension lead, always use one that
is approved for outdoor use.
If a dangerous situation arises, pull the mains
plug immediately out of the mains socket.
Always work with the mains lead leading
away from the rear of the device.
DANGER OF FIRE FROM FLY-
ING SPARKS! Grinding metal
creates flying sparks. For this reason,
always make sure that nobody is placed in any
danger and that there are no inflammable ma-
terials near the working area.
WARNING!
NOXIOUS FUMES! Working
with harmful / noxious dusts represents a risk to
the health of the person operating the device
and to anyone near the work area.
Wear protective glasses, hearing
protection, dust protection mask and
protective gloves.
DANGER OF BURNS! The workpiece gets
hot during grinding. Never touch the part you
are grinding. Allow the workpiece to cool suffi-
ciently first. When grinding for longer periods,
stop grinding from time to time and allow the
workpiece to cool before continuing. Do not
operate the device for continuous periods ex-
ceeding 30 minutes.
The double grinding machine is intended for
dry grinding of the surfaces of metal objects.
The device may only be used for dry grinding.
Do not grind materials containing asbestos.
Asbestos is a known carcinogen.
Do not use damaged grinding wheels
4
.
Only use grinding wheels with details that cor-
respond with those given on the device rating
plate. The circumferential speed should be
equal to or greater than the value given on the
device rating plate.
Adjust the eye guard mounts
2
(spark deflectors)
and the eye guards
3
periodically so that wear
on the grinding wheels can be evened out.
Keep the gap as small as possible.
Avoid contact with the moving grinding wheel.
Never leave the device working unattended.
Never use the device for a purpose for which it
was not intended.
Before you insert the mains plug into the sock-
et, always check that the device is switched off.
Always switch the device on before bringing
the workpiece into contact with the grinding
wheel. After grinding, lift off the workpiece
before switching the device off.
Hold the workpiece firmly with both hands at
all times when working.
Always keep proper footing and balance.
After you have finished grinding metal, allow
the grinding wheel(s) to come to a standstill.
When taking a break from your work, before
carrying out any tasks on the device itself and
when you are not using the device, always pull
the mains plug out of the mains socket.
Handle the device carefully and treat it with re-
spect. Always keep the device clean, dry and
free of oil or grease.
Remain alert at all times! Always watch what
you are doing and proceed with caution. Do
not use the device if you cannot concentrate or
you are feeling unwell.
Store grinding wheels in such a way that they
are not subject to mechanical loads or damag-
ing environmental influences.
Before use
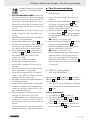
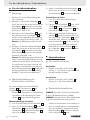
Assembly
Before using the device for the first time make
sure that you have fitted all its parts.
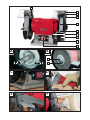
1) Attach the two eye guard mounts
2
to the in-
side of the wheel guard covers
7
, one each
on the left and right sides. Use the illustrated
fixings in the arrangement shown (see Figs. G, H).
2) Attach the eye guards
3
to the eye guard
mounts
2
, one each on the left and right
sides. Use the illustrated fixings in the arrange-
ment shown (see Figs. I, K).
Note: The illustrations show the left side.
3) Attach the two workpiece / tool rests
5
to the
inside of the wheel guard covers
7
, one each
on the left and right sides. Use the illustrated
fixings in the arrangement shown (see Figs. L, M).
Note: The illustrations show the left side.
Mount the double grinding machine on a firm,
level surface, if at all possible on a fixed sup-
port, e.g. working surface, workbench. Use the

10 GB/IE
Before use / Preparing for first use
four mounting holes
8
and suitable fixings
(not supplied). Refer to Figure C.
Positioning the workpiece / tool
rests and eye guard mounts
To ensure safe working, the workpiece / tool rests
5
,
the eye guards
3
and the eye guard mounts
2
must be correctly positioned.
Check and correct the settings at frequent intervals
to ensure even wear on the grinding wheels
4
.
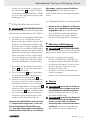
Adjusting the workpiece / tool rests:
1) To adjust the setting, first loosen the adjuster
screw
6
.
2) Bring the workpiece / tool rest
5
close up to
the grinding wheel
4
, the distance between
the grinding wheel
4
and the workpiece /
tool rest
5
must be no more than 2 mm.
3) Retighten the adjuster screw
6
and check
using your hand that the grinding wheel
4
movement is true and free.
Adjusting the eye guard mounts:
1) To adjust the setting, first loosen the fastening
screw
14
.
2) Bring the eye guard mount
2
close up to the
grinding wheel
4
, the distance between the
grinding wheel
4
and the eye guard mount
2
must be no more than 2 mm.
3) Retighten the fastening screw
14
and check
using your hand that the grinding wheel
4
movement is true and free. A worn out grinding
wheel
4
needs to be replaced. This is necessary
when the specified gap cannot be achieved even
after readjusting the positions of the workpiece /
tool rest
5
and / or the eye guard mount
2
.
Preparing for first use
Switching on and off
Switching on:
Press the ON / OFF switch
9
into the “1“
position to switch the device on and run it
at a constant speed.
Switching off:
Press the ON / OFF switch
9
into the “0“
position to switch the device off.
Grinding a workpiece
NOTE: Use the fine grinding wheel for precise
grinding tasks (grade “A80M”).
NOTE: Use the coarse grinding wheel for rough
grinding tasks (grade “A36M”).
Switch on the machine as described above.
To grind metal tools or metal items, place the
workpiece on the workpiece / tool rest
5
and
slowly bring it up to the grinding wheel
4
.
Press the workpiece carefully against the grind-
ing wheel
4
. Pressing too hard can overload
the device. When grinding always use the
circumferential end face (not the sides) of the
grinding wheel only (See Figures D, E, F).
Replacing a grinding wheel
WARNING!
RISK OF INJURY!
Before
carrying out any tasks on the device itself and
when you are not using the device, always pull the
mains plug out of the mains socket.
Do not use damaged grinding wheels.
Only use grinding wheels with details that cor-
respond with those given on the device rating
plate. The circumferential speed should be
equal to or greater than the value given on the
device rating plate.
Only grinding wheels with markings indicating
the manufacturer, the type of adhesive, dimen-
sions and permitted circumferential speed are
to be used. If you install new grinding wheels
carry out a ringing test before use. Grinding
wheels in good condition give a clear ringing
noise when struck lightly with a plastic hammer.
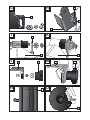
1) Take off the outer part of the wheel guard cov-
er
7
by unscrewing the 3 threaded fixings
(see Figs. N, O).

11 GB/IE
Preparing for first use / Maintenance and cleaning / Service / Warranty
2) Release the nut
13
by preventing the nut on the
opposite side from rotating and then remove the
outside flange
12
.
3) Now replace the grinding wheel and reassem-
ble all the components in the reverse order.
Take note that the left-hand side of the double
grinding machine has a left-hand thread
11
and
the right-hand side has a right-hand thread. This
ensures that the nuts
13
can only be screwed
off in the direction of rotation of the spindle.
Use only the supplied flanges to mount the
grinding wheels.
Note: The grinding wheels are fitted with
a ½“ adapter so that they can be used
with grinding wheels purchased later with
either a ½“, or a 20 mm bore. Grinding
wheels are available in various grit grades
and hardnesses. The central fixing holes in
grinding wheels must not be redrilled.
Original accessories /
Attachments
Use only the accessories and attach-
ments detailed in the operating instruc-
tions. The use of inserted tools or accessories
other than those recommended in the operating
instructions could lead to you suffering an injury.
Maintenance and cleaning
WARNING!
RISK OF INJURY! Before
carrying out any tasks on the device itself and when
you are not using the device, always pull the mains
plug out of the mains socket.
The device is largely maintenance-free.
Clean the device frequently. For best results,
clean the double grinding machine immediate-
ly after you have finished using it.
Do not allow any liquids to enter the device.
Use a dry cloth to clean the device.
Do not under any circumstances use petrol or
strong solvents.
Store the device in a dry room.
Service
WARNING!
Have your device
repaired at the service centre or by
qualified specialist personnel using
original manufacturer parts only. This
will ensure that your device remains safe to use.
WARNING!
If the plug or lead needs
to be replaced, always have the
replacement carried out by the manu-
facturer or its service centre. This will
ensure that your device remains safe to use.
Warranty
The warranty for this appliance is for 3
years from the date of purchase. The ap-
pliance has been manufactured with care
and meticulously examined before deliv-
ery. Please retain your receipt as proof
of purchase. In the event of a warranty
claim, please make contact by telephone
with our Service Department. Only in this
way can a post-free despatch for your
goods be assured.
The warranty covers only claims for material and
maufacturing defects, but not for transport damage,
for wearing parts or for damage to fragile compo-
nents, e.g. buttons or batteries. This product is for
private use only and is not intended for commercial
use.
The warranty is void in the case of abusive and im-
proper handling, use of force and internal tamper-
ing not carried out by our authorized service branch.
Your statutory rights are not restricted in any way
by this warranty.
The warranty period will not be extended by repairs
made unter warranty. This applies also to replaced
and repaired parts. Any damage and defects extant
on purchase must be reported immediately after
unpacking the appliance, at the latest, two days after
the purchase date. Repairs made after the expiration
of the warranty period are subject to payment.

12 GB/IE
Warranty / Disposal / Declaration of Conformity / Manufacturer
GB
DES UK LTD
Tel.: 0871 5000 700 (£ 0.10 / minute)
e-mail: [email protected]
IE
Kompernass Service Ireland
Tel: 1850 930 412 (0,082 EUR/Min.)
Standard call rates apply.
Mobile operators may vary.
e-mail: [email protected]
Disposal
The packaging is wholly composed of
environmentally-friendly materials that
can be disposed of at a local recycling
centre.
Do not dispose of electrical
power tools with the household
rubbish!
In accordance with European Directive 2002 / 96 / E
C
(covering waste electrical and electronic equipment)
and its transposition into national legislation, worn
out electrical power tools must be collected separately
and taken for environmentally compatible recycling.
Contact your local refuse disposal authority for
more details of how to dispose of your worn out
electrical devices.
Declaration of Conformity /
Manufacturer
We, Kompernaß GmbH, the person responsible for
documents: Mr Felix Becker, Burgstr. 21, D-44867
Bochum, Germany, hereby declare that this product
complies with the following standards, normative
documents and EU directives:
Machinery Directive
(2006 / 42 / EC)
EU Low Voltage Directive
(2006 / 95 / EC)
Electromagnetic Compatibility
(2004 / 108 / EC)
Applicable harmonized standards
EN 55014-2:1997+A1
EN 55014-1:2000+A1+A2
EN 55014-1:2000/A1:2001, EN 55014-1:2006
EN 61000-3-2:2006, EN 61000-3-2:2000+A2
EN 61000-3-3:1995+A1+A2
EN 61000-3-3:1995/A1:2001
EN 61029-1:2000+A11+A12
EN 61029-2-4:2003+A1
IEC 61029-2-4:1993+A1:2001
IEC 61029-1:1990
Type / Device description:
Double bench grinder PDOS 200 A1
Date of manufacture (DOM): 09 - 2010
Serial number: IAN 56956
Bochum, 30.09.2010
Hans Kompernaß
- Managing Director -
We reserve the right to make technical modifica-
tions in the course of further development.

13 FI
Sisällysluettelo
Aluksi
Ohjeidenmukainen käyttö .............................................................................................Sivu 14
Varusteet .........................................................................................................................Sivu 14
Laitepakkauksen sisältö .................................................................................................Sivu 14
Tekniset tiedot .................................................................................................................Sivu 15
Yleiset turvallisuusohjeet
Turvallinen työskentely ...................................................................................................Sivu 15
Penkkihiomakoneen laitekohtaiset turvallisuusohjeet ...................................................Sivu 16
Ennen laitteen käyttöönottoa
Asennus ..........................................................................................................................Sivu 17
Säädä työtaso ja suojalevyn kannatin .........................................................................Sivu 17
Käyttöönotto
Käynnistys ja sammuttaminen........................................................................................Sivu 18
Työkappaleiden työstäminen ........................................................................................Sivu 18
Hiomalaikan vaihto ........................................................................................................Sivu 18
Alkuperäisvarusteet ja -varaosat ...................................................................................Sivu 18
Huolto ja puhdistus ............................................................................................Sivu 18
Huolto............................................................................................................................Sivu 19
Takuu .............................................................................................................................Sivu 19
Hävittäminen ..........................................................................................................Sivu 19
Vaatimustenmukaisuusvakuutus / Valmistaja ...........................Sivu 20

14 FI
Yleistä
Kaksoishiomakone PDOS 200 A1
Metallityökalujen hionta ja teroitus
Aluksi
Tutustu ennen käyttöönottoa laitteeseen,
sen käyttöohjeisiin ja sähkölaitteita kos-
keviin yleisiin turvallisuusohjeisiin. Lue
tämä käyttöopas huolella. Säilytä käyttöopas huo-
lellisesti. Saatat myöhemmin tarvita sen tietoja. Jos
luovut laitteesta, anna uudelle omistajalle myös
kaikki laitteen asiakirjat.
Ohjeidenmukainen käyttö
Penkkihiomakone on tarkoitettu metallien hiontaan
sekä metallityökalujen kuten poranterien, talttojen
yms. teroitukseen. Laitetta ei ole tarkoitettu ammatti-
käyttöön. Laitteen ohjeidenvastainen käyttö, samoin
kuin muuntelu, saattaa kasvattaa tapaturmien riskiä.
Valmistaja ei vastaa ohjeidenvastaisesta käytöstä
aiheutuneista vahingoista.
Varusteet
1
Suurennuslasi
2
Suojalevyn kannatin
3
Suojalevy
4
Hiomalaikka
5
Hiontatuki
6
Hiontatuen säätöruuvi
7
Laikan suojus
8
Kiinnitysreikä
9
Käyttökytkin
10
Akselilaippa
11
Vasenkätinen kierre
12
Ulkolaippa
13
Mutteri
14
Kiinnitysruuvi
Laitepakkauksen sisältö
Tarkasta laitepakkauksen sisältö heti
pakkauksen avaamisen yhteydessä.
1 kaksoishiomakone PDOS 200 A1
- 2 x suojuksen pidike / suojalevy
- 2 x hiomatuki / säätöruuvi
1 käyttöopas
Tässä käyttöohjeessa / laitteessa käytetään seuraavia kuvakkeita:
Lue käyttöohje!
W
Watti (vaikutusteho)
Huomioi varoitus- ja turvaohjeet!
Käytä aina laitteella työskennellessäsi
suojalaseja, kuulo- ja hengityssuo-
jaimia sekä asianmukaisia työkäsineitä.
Varo sähköiskua!
Hengenvaara!
Pidä lapset loitolla sähkötyökalusta!
Räjähdysvaara!
Viallisen verkkojohdon tai pistokkeen
käyttöön liittyvän sähköiskun aiheutta-
ma hengenvaara!
Palonvaara!
Hävitä pakkaus ja laite
ympäristöystävällisesti!
V
~
Voltti (Vaihtojännite)

15 FI
Yleistä / Yleiset turvallisuusohjeet
Tekniset tiedot
Nimellisjännite: 230 V
~
50 Hz
Käyttötapa: S2-lyhytaikaiskäyttö
30 min
Nimellisteho: 200 W
Pyörintänopeus k
uormittamattomana: 2950 r/min
Hiomalaikan halkaisija: 150 mm
Hiomalaikan leveys: 20 mm
Hiomalaikan reiän halkaisija: 20 mm
Laikan kehänopeus, max.: 23,2 m / s
Paino yhdessä irrotettavien
osien kanssa: 7,5 kg
Äänenvoimakkuutta koskevat tiedot:
Melutason mittaustapa A.
Äänenpaine, max.: 75,30 dB (A)
Melutaso, max.: 85,00 dB (A)
Mittaustulokset ilmoitettu normin EN 61029
mukaisesti.
Yleiset turvallisuusohjeet
VARO! Sähkötyökalujen käytössä on nouda-
tettava seuraavia varotoimenpiteitä, jotta louk-
kaantumis- ja tulipalonvaara vältettäisiin. Lue
turvaohjeet ennen laitteen käyttöä, noudata
niitä ja säilytä niitä hyvin.
Turvallinen työskentely
1. Pidä työskentelyalue järjestyksessä.
Epäjärjestys työskentelyalueella voi johtaa
tapaturmiin.
2. Huomioi ympäristön vaikutukset.
Älä altista sähkötyökaluja sateelle.
Älä käytä sähkötyökaluja kosteassa tai märässä
ympäristössä.
Huolehdi työskentelyalueen hyvästä valaistuk-
sesta.
Älä käytä sähkötyökaluja paikoissa,
joissa on tulipalon ja räjähdyksen
vaara.
3.
Suojaudu sähköiskulta.
Vältä koskettamasta maadoitettuja osia (esim.
putkia, lämpöpattereita, sähköliesiä, jäähdytys-
laitteita).
4. Pidä muut ihmiset loitolla.
Älä anna muiden ihmisten, erityisesti
lasten, koskettaa sähkötyökalua tai
johtoa. Älä päästä heitä työskentely-
alueelle.
5. Säilytä sähkötyökaluja turvallisessa
paikassa.
Säilytä sähkötyökaluja kuivassa, korkeassa tai
lukitussa tilassa lasten ulottumattomissa.
6. Älä kuormita sähkötyökalua liikaa.
Työskentely on parempaa ja turvallisempaa,
kun käytät annettua tehoaluetta.
7. Käytä oikeaa sähkötyökalua.
Älä käytä vaativissa töissä pienitehoisia
koneita.
Älä käytä sähkötyökalua tarkoituksissa, joissa
niitä ei ole tarkoitettu käytettävän. Älä esimerkiksi
käytä käsipyörösahaa puunoksien tai halkojen
sahaamiseen.
8. Käytä tarkoitukseen soveltuvia vaat-
teita.
Älä käytä väljiä vaatteita tai koruja, sillä ne
voivat jäädä kiinni koneen liikkuviin osiin.
Ulkona työskenneltäessä kannattaa käyttää
luistamattomia kenkiä.
Suojaa pitkät hiukset hiusverkolla.
9.
Käytä suojavarusteita.
Käytä suojalaseja.
Käytä pölyävissä töissä hengityssuojainta.
10. Liitä pölynimulaite.
Mikäli käytettävissä on liitäntöjä pölyimua
varten, varmista, että ne on liitetty ja että niitä
käytetään oikein.
11.
Älä käytä johtoa väärin.
Älä irrota pistotulppaa pistorasiasta johdosta
vetämällä. Suojaa johtoa kuumuudelta, öljyltä
ja teräviltä reunoilta.
12. Kiinnitä työstökappale.

16 FI
Yleiset turvallisuusohjeet
Käytä työstökappaleen kiinnityksessä kiinnitys-
laitteita tai ruuvipuristinta. Työstökappale pysyy sil-
loin varmemmin paikoillaan kuin käsin pideltynä.
13. Älä työskentele epänormaaleissa
asennoissa.
Asetu tukevaan asentoon ja pysyttele koko
ajan tasapainossa.
14. Hoida työkalujasi huolellisesti.
Pidä katkaisutyökalut terävinä ja puhtaina,
jolloin työskentely on nopeampaa ja turvalli-
sempaa.
Noudata voitelua ja työkalujen vaihtoa koskevia
ohjeita!
T
arkasta sähkötyökalun liitäntäjohto huolellisesti, ja
anna alan ammattilaisen vaihtaa viallinen johto.
Tarkasta jatkojohdot säännöllisesti ja vaihda
vialliset johdot uusiin.
Pidä kahvat kuivina ja puhtaina. Niissä ei saa
olla öljyä ja rasvaa.
15. Vedä pistotulppa pois pistorasiasta:
Kun sähkötyökalu ei ole käytössä, ennen sen
huoltoa ja työkalujen (esim. sahanterä, poran-
terä, jyrsin) vaihdon yhteydessä.
16. Älä jätä työkaluavaimia paikoilleen.
Tarkista ennen laitteen käynnistämistä, että
avaimet ja säätötyökalut on otettu pois.
17. Vältä tahatonta käynnistymistä.
Varmista, että virtakytkintä ei ole kytketty
päälle, kun pistät pistotulpan pistorasiaan.
18. Käytä ulkona vain ulkokäyttöön tar-
koitettua jatkojohtoa.
Käytä ulkona vain ulkokäyttöön sallittua ja
vastaavalla tavalla merkittyä jatkojohtoa.
19. Ole tarkkaavainen.
Tarkkaile työskentelyäsi. Työskentele järkevästi.
Älä käytä sähkötyökalua, jos et pysty keskitty-
mään.
20. Tarkasta sähkötyökalu mahdollisten
vaurioiden varalta.
Ennen kuin käytät sähkötyökalua uudelleen,
tarkista suojusten tai hieman viallisten osien
moitteeton ja käyttötarkoituksen mukainen toi-
minta.
Tarkista, toimivatko liikkuvat osat moitteettomasti
ja jumittumatta. Varmista, ettei niissä ole vikoja.
Kaikki osat on asennettava oikein paikoilleen ja
niiden on täytettävä kaikki sähkölaitteiden tur-
vallista käyttöä koskevat edellytykset.
Vialliset suojukset ja osat on annettava hyväksy-
tyn korjaamon korjattavaksi tai vaihdettavaksi,
mikäli käyttöohjeessa ei toisin mainita.
Valmistajan valtuuttaman korjaamon on vaih-
dettava vialliset kytkimet.
Älä käytä sähkölaitetta, jonka virtakytkintä ei
voi kytkeä päälle tai pois päältä.
21. VARO!
Muiden kuin laitteen omien työkalujen tai
muiden lisävarusteiden käyttö voi merkitä louk-
kaantumisvaaraa.
22. Anna sähkötyökalu sähkömiehen
korjattavaksi.
Tämä sähkötyökalu on voimassa olevien turva-
määräysten mukainen. Ainoastaan sähkömies
saa tehdä mahdollisesti tarvittavat korjaukset.
Vialliset osat on vaihdettava alkuperäisiin vara-
osiin; laitteen käyttö saattaa muuten johtaa on-
nettomuuksiin.
Penkkihiomakoneen laite-
kohtaiset turvallisuusohjeet
Älä koske vahingoittuneeseen tai katkenneeseen
virtajohtoon. Irrota tällöin välittömästi pistoke
pistorasiasta ja anna osaavan ammattihenkilön
tai huoltoyrityksen korjata vika.
Älä käytä laitetta, jos se on märkä. Älä käytä
laitetta märässä ympäristössä.
Jos työskentelet ulkona, käytä max. 30 mA
vikasuojakytkintä. Käytä ainoastaan ulkokäyt-
töön tarkoitettua jatkojohtoa.
Irrota vaaratilanteessa pistoke välittömästi
pistorasiasta.
Vie virtajohto laitteelle aina takakautta.
KIPINÖINTI AIHEUTTAA TULI-
PALONVAARAN! Metallien hion-
nassa syntyy usein kipinöitä.
Varmista henkilöturvallisuus ja huolehdi siitä,
että työym
päristön läheisyydessä ei ole palavia
materiaaleja.
VAROLTUS!
MYRKYLLISIÄ HÖYRYJÄ!
Hiontatyössä syntyvät pölyt saattavat olla
vaarallisia terveydelle.
Käytä aina laitteella työskennellessäsi
suojalaseja, kuulo- ja hengityssuojaimia
sekä asianmukaisia työkäsineitä.

17 FI
Yleiset turvallisuusohjeet / Ennen laitteen käyttöönottoa
PALOVAMMAVAARA! Työstettävä kappale
kuumenee hiottaessa. Älä koskaan tartu suoraan
työstökohtaan. Anna kappaleen jäähtyä riittä-
västi. Jos hiontatyö kestää kauan, pidä v älillä
taukoja ja anna työkappaleen jäähtyä ennen
hionnan jatkamista. Työskentelyn kesto ei saa
olla yhtäjaksoisesti yli 30 minuuttia.
Penkkihiomakone on tarkoitettu kuivien metalli-
pintojen hiomiseen. Laitetta saa käyttää ainoas-
taan kuivahiontaan.
Asbestipitoisten materiaalien käsittely on kielletty.
Asbestin on todettu aiheuttavan syöpää.
Älä käytä viallisia hiomalaikkoja
4
.
Käytä ainoastaan sellaisia hiomalaikkoja, joiden
tiedot ovat yhteensopivat laitteen tyyppikilvessä
annettujen tietojen kanssa. Laikan kehänopeus
ei saa ylittää sallittuja arvoja.
Säädä suojalevyn kannatin
2
(kipinäsuojus)
ja suojalevy
3
aika ajoin hiontalaikkojen kulu-
misen kompensoimiseksi. Pidä etäisyys mahdolli-
simman pienenä.
Älä koske pyörivään hiomalaikkaan.
Älä käytä laitetta ilman valvontaa.
Älä koskaan käytä laitetta sille sopimattomaan
tarkoitukseen.
Varmista, että laite on sammutettuna ennen
kuin työnnät pistokkeen pistorasiaan.
Käynnistä ensin laite ja vie vasta sitten työkap-
pale hiomalaikkaa vasten. Nosta työstön jälkeen
työkappale pois ja sammuta laite.
Pidä aina työkappaleesta kiinni tukevasti mo-
lemmin käsin.
Varmista, että työasentosi on tukeva.
Anna hiomalaikkojen työskentelyn jälkeen
pysähtyä täysin ennen kuin ryhdyt mihinkään
toimenpiteisiin.
Irrota pistoke pistorasiasta, mikäli laitteen
käyttöön tulee pitkäaikainen tauko.
Noudata laitteen käsittelyssä varovaisuutta ja
huolellisuutta. Laite on pidettävä puhtaana,
kuivana sekä vapaana öljystä ja vaseliinista.
Noudata laitetta käyttäessäsi huolellisuutta!
Keskity työskentelyyn ja toimi maltillisesti. Älä
koskaan käytä laitetta, mikäli et pysty keskitty-
mään työskentelyyn tai jos tunnet olosi huonoksi.
Hiomalaikkoja on säilytettävä siten, että niitä ei
altisteta mekaanisille vioittumisille ja haitallisille
ympäristön vaikutteille.
Ennen laitteen käyttöönottoa
Asennus
Asenna laitteeseen ennen käyttöönottoa kaikki
siihen kuuluvat osat.
1) Kiinnitä molemmille puolille suojalevyn kannatin
2
laikan suojuksen
7
sisäreunaan. Asenna
kiinnittimet kuvissa G ja H osoitetulla tavalla.
2) Kiinnitä molemmille puolille suojalevy
3
suo-
jalevyn kannattimeen
2
. Asenna kiinnittimet
kuvissa I ja K osoitetulla tavalla.
Huom.: Kuvissa näkyvissä vasen puoli.
3) Kiinnitä hiontatuki
5
molemmille puolille laikan
suojuksen
7
sisäreunaan. Asenna kiinnittimet
kuvissa L ja M osoitetulla tavalla.
Huom.: Kuvissa näkyvissä vasen puoli.
Aseta penkkihiomakone tasaiselle ja tukevalle
alustalle. Penkkihiomakoneen asennusalustan
on mieluiten oltava kiinteä (esim. työpöytä).
Kiinnitä penkkihiomakone asennusalustalleen
kahdeksan kiinnitysreiän
8
avulla sopivia ruu-
veja käyttäen (eivät sisälly toimitukseen). Katso
kuva C.
Säädä työtaso ja
suojalevyn kannatin
Työskentelyn turvallisuuden takaamiseksi hiontatukien
5
, suojalevyjen
3
ja suojalevyjen kannattimien
2
on oltava paikallaan oikein asennettuina.
Tarkasta ja säädä asetukset säännöllisesti hio-
malaikkojen
4
kulumisen kompensoimiseksi.
Hiomatuen säätäminen:
1) Löysää säätöä varten säätöruuvi
6
.
2) Säädä hiontatuki
5
siten, että se on enintään
2 mm etäisyydellä hiomalaikasta
4
.
3) Kiristä lopuksi säätöruuvi
6
ja varmista käsin,
että hiomalaikka
4
on suorassa ja että se
pyörii ongelmitta.
Suojalevyn kannattimen säätäminen:
1) Löysää säätöä varten kiinnitysruuvi
14
.
2) Säädä suojalevyn kannatin
2
siten, että sen
ja hiomalaikan
4
välinen etäisyys on enintään
2 mm.

18 FI
Ennen laitteen käyttöönottoa / Käyttöönotto / Huolto ja puhdistus
3) Kiristä kiinnitysruuvi
14
ja varmista, että hioma-
laikka
4
on suorassa ja että se pyörii ongel-
mitta. Vaihda kulunut hiomalaikka
4
uuteen.
Hiomalaikan vaihto on ajankohtainen, kun edellä
mainitut välykset eivät hiontatuen
5
tai suoja-
levyn kannattimenkaan
2
säätämisen jälkeen
ole saavutettavissa.
Käyttöönotto
Käynnistys ja sammuttaminen
Laitteen käynnistäminen:
Paina käyttökytkin
9
asentoon ”I” = laite on
käynnistetty ja se käy tasaisella nopeudella.
Laitteen sammuttaminen:
Paina käyttökytkin
9
asentoon ”0” = laite
sammuu.
Työkappaleiden työstäminen
HUOMATUS: Käytä hienoa hiomalaikkaa hieno-
hiontaan (jyväisyys „A80M“).
HUOMATUS: Käytä karkeaa hiomalaikkaa kar-
keahiontaan (jyväisyys „A36M“).
Käynnistä laite edellä kuvatulla tavalla.
Aseta työstettävä metallikappale hiontatuelle
5
ja vie kappaletta hitaasti kohti hiomalaikkaa
4
.
Paina työkappaletta varovasti hiomalaikkaa
4
vasten. Liian voimakas paine saattaa ylikuormit-
taa laitetta. Työstä ainoastaan hiomalaikan ulottu-
vuudelle sopivia työkappaleita (ks. kuvat D, E, F).
Hiomalaikan vaihto
VAROLTUS!
LOUKKAANTUMISVAARA!
Irrota laitteen pistoke pistorasiasta huoltotöiden tai
pitkäaikaisen käyttötauon ajaksi.
Älä käytä viallisia hiomalaikkoja.
Käytä ainoastaan sellaisia hiomalaikkoja, joiden
tiedot ovat yhteensopivat laitteen tyyppikilvessä
annettujen tietojen kanssa. Laikan kehänopeus
ei saa ylittää sallittuja arvoja.
Käytä ainoastaan sellaisia hiomalaikkoja, joissa
on ilmoitettu valmistajatiedot, kiinnitystyyppi,
mitat ja sallittu pyörimisnopeus. Tee uusille hio-
malaikoille kaikutesti. Kopauta hiomalaikkaa
muovivasaralla. Jos laikka on moitteettomassa
kunnossa, siitä lähtevä kaiku on kirkas ja ehjä.
1) Avaa laikan suojuksen
7
kiinnitysruuvit ja irro-
ta suojuksen ulkosivun osat (ks. kuvat N ja O).
2) Löysää mutterit
13
– vastakkaisia muttereita
kiinni pitämällä - ja poista tämän jälkeen ulko-
puolinen laippa
12
.
3) Vaihda hiomalaikka ja asenna osat takaisin
päinvastaisessa järjestyksessä. Huomaa, että
penkkihiomakoneen vasemmalla puolella
11
on
vasenkätinen kierre ja oikealla oikeankätinen.
Mutterit
13
aukeavat vain karan pyörimissuun-
taan.
Käytä hiomalaikan kiristämiseen vain laitepak-
kaukseen kuuluvaa laippaa.
Huom! Hiomalaikka on varustettu ½”
sovittimella. Hiomalaikkojen reikäkoko
voi olla ½” tai 20 mm. Hiomakiviä on
saatavana eri karkeuksina ja kovuuksina.
Hiomakivien kiinnitysreikää ei saa jälkeenpäin
suurentaa.
Alkuperäisvarusteet
ja -varaosat
Käytä ainoastaan käyttöoppaassa
mainittuja varusteita ja lisälaitteita.
Muiden kuin käyttöoppaassa mainittujen työka-
lujen tai varusteiden käyttö saattaa heikentää
laitteen käyttöturvallisuutta.
Huolto ja puhdistus
VAROLTUS!
LOUKKAANTUMISVAARA!
Irrota laitteen pistoke pistorasiasta huoltotöiden tai
pitkäaikaisen käyttötauon ajaksi.

19 FI
Huolto ja puhdistus / Huolto / Takuu / Hävittäminen
Laite on pääosin huoltovapaa.
Puhdista laite säännöllisesti, mieluiten heti työs-
kentelyn päätyttyä.
Laitteen sisälle ei missään tapauksessa joutua
nesteitä. Käytä puhdistamiseen kuivaa liinaa.
Älä koskaan käytä puhdistamiseen bensiiniä tai
vahvoja liuottimia.
Säilytä laitetta kuivissa tiloissa.
Huolto
VAROLTUS!
Anna laitteet huoltoliikkee
n
tai sähköliikkeen korjattavaksi.
Korjauksissa saa käyttää vain alku-
peräisiä varaosia. Laitteesi säilyy näin
turvallisena.
VAROLTUS!
Laitteen pistokkeen tai
verkkojohdon saa vaihtaa vain lait-
teen valmistaja tai sen valtuuttama
huoltoliike. Laitteesi säilyy näin turvallisena.
Takuu
Laitteen takuu on 3 vuotta ostopäivästä.
Laite on valmistettu huolellisesti ja tarkis-
tettu tarkasti ennen toimitusta. Säilytä
ostokuitti todisteeksi takuun voimassaolos-
ta. Ota takuutapauksessa puhelimitse
yhteyttä huoltopisteeseesi. Vain näin voi-
daan taata tuotteesi maksuton lähettä-
minen huoltoon.
Takuu koskee ainoastaan materiaali- ja valmistusvir-
heitä, ei kuitenkaan kuljetusvaurioita, kuluvia osia
tai herkästi vaurioituvien osien, esim. kytkinten tai
akkujen vaurioita. Tuote on tarkoitettu ainoastaan
yksityiseen, ei kaupalliseen käyttöön.
Väärä tai asiaton käyttö, väkivallan käyttö ja muiden
kuin valtuutetun huoltopisteen suorittamat korjauk-
set aiheuttavat takuun raukeamisen. Tämä takuu ei
rajoita kuluttajan lakisääteisiä oikeuksia.
Takuukorjaus ei pidennä takuuaikaa. Tämä koskee
myös vaihdettuja ja korjattuja osia. Mahdollisista jo
ostettaessa olemassa olevista vahingoista ja puut-
teista on ilmoitettava välittömästi pakkauksesta pur-
kamisen jälkeen, kuitenkin viimeistään kaksi päivää
ostopäiväyksen jälkeen. Takuuajan jälkeen suorite-
tut korjaukset ovat maksullisia.
FI
Kompernass Service Suomi
Tel.: 010 30 935 80 (Soittamisen hinta
lankaliittymästä: 8,21 snt / puh +
5,9 snt / min / Matkapuhelimesta:
8,21 snt / puh + 16,90 snt / min)
e-mail: support.fi@kompernass.com
Hävittäminen
Pakkaus on valmistettu ympäristöystäväl-
lisistä kierrätettävistä materiaaleista.
Älä hävitä sähkötyökaluja
talousjätteiden mukana!
Sähkölaitteiden hävittämistä koskevan EU-normin
2002 / 96 / EC mukaan käytöstä poistettuja sähkö-
laitteita hävitettäessä on huolehdittava materiaalien
erottelusta ja kierrätyksestä.
Lisätietoja antavat mm. paikalliset ympäristöviran-
omaiset.

20 FI
Vaatimustenmukaisuusvakuutus / Valmistaja
Vaatimustenmukaisuus-
vakuutus / Valmistaja
Me, Kompernaß GmbH, dokumentoinnista vastaava:
herra Felix Becker, Burgstr. 21, D-44867 Bochum,
Saksa, vakuutamme täten, että tämä tuote vastaa
seuraavia standardeja, normatiivisia dokumentteja
ja EY-direktiivejä:
Konedirektiivi
(2006 / 42 / EC)
Pienjännitedirektiivi
(2006 / 95 / EC)
Elektromagneettista yhteensopivuutta
koskevat direktiivit
(2004 / 108 / EC)
Sovelletut harmonisoidut normit
EN 55014-2:1997+A1
EN 55014-1:2000+A1+A2
EN 55014-1:2000/A1:2001, EN 55014-1:2006
EN 61000-3-2:2006, EN 61000-3-2:2000+A2
EN 61000-3-3:1995+A1+A2
EN 61000-3-3:1995/A1:2001
EN 61029-1:2000+A11+A12
EN 61029-2-4:2003+A1
IEC 61029-2-4:1993+A1:2001
IEC 61029-1:1990
Tyyppi / Laitekuvaus:
Kaksoishiomakone PDOS 200 A1
Date of manufacture (DOM): 09 - 2010
Sarjanumero: IAN 56956
Bochum, 30.09.2010
Hans Kompernaß
- Toimitusjohtaja -
Pidätämme oikeuden muutoksiin.
Sidan laddas...
Sidan laddas...
Sidan laddas...
Sidan laddas...
Sidan laddas...
Sidan laddas...
Sidan laddas...
Sidan laddas...
Sidan laddas...
Sidan laddas...
Sidan laddas...
Sidan laddas...
Sidan laddas...
Sidan laddas...
Sidan laddas...
Sidan laddas...
Sidan laddas...
Sidan laddas...
Sidan laddas...
Sidan laddas...
Sidan laddas...
Sidan laddas...
Sidan laddas...
Sidan laddas...
Sidan laddas...
Sidan laddas...
-
 1
1
-
 2
2
-
 3
3
-
 4
4
-
 5
5
-
 6
6
-
 7
7
-
 8
8
-
 9
9
-
 10
10
-
 11
11
-
 12
12
-
 13
13
-
 14
14
-
 15
15
-
 16
16
-
 17
17
-
 18
18
-
 19
19
-
 20
20
-
 21
21
-
 22
22
-
 23
23
-
 24
24
-
 25
25
-
 26
26
-
 27
27
-
 28
28
-
 29
29
-
 30
30
-
 31
31
-
 32
32
-
 33
33
-
 34
34
-
 35
35
-
 36
36
-
 37
37
-
 38
38
-
 39
39
-
 40
40
-
 41
41
-
 42
42
-
 43
43
-
 44
44
-
 45
45
-
 46
46


Parkside PDOS 200 A1 - 3 Bruksanvisning
- Typ
- Bruksanvisning
- Denna manual är också lämplig för
på andra språk
Relaterade papper
-
Parkside PDS 200 A Användarmanual
-
-
Parkside PWS 125 A1 Operation and Safety Notes
-
Parkside PWS 1010 Användarmanual
-
-
Parkside PMGS 12 A1 Operation and Safety Notes
-
Parkside PFBS 9.6 A1 Operation and Safety Notes
-
Parkside PWS 230 A1 Operation and Safety Notes
-
-
Andra dokument
-
Scheppach 4903106901 Användarmanual
-
Scheppach 4903104901 Användarmanual
-
Pattfield Doppelschleifer 150 W Bruksanvisning
-
Scheppach HG34 Användarmanual
-
Rothenberger ROPOWER 50 R Användarmanual
-
-
-
Metabo DS 200 Bruksanvisningar
-
EINHELL TH-US 240 - Stand-Bandschleifer Bruksanvisningar
-
ATIKA KSG 220 A - Bruksanvisning