
English
Acer LCD Monitor Quick Start Guide (QSG)
Important safety instructions
Please read the following instructions carefully.
1. To clean the LCD monitor screen: Be sure that your monitor is electrically rated to operate with the AC power available in your
location.
• Turn off the LCD monitor and unplug the power cord.
• Spray a non-solvent cleaning solution onto a rag and clean the screen gently.
• NEVER SPRAY OR POUR ANY LIQUID DIRECTLY ONTO THE SCREEN OR CASE.
• PLEASE DO NOT USE ANY AMMONIA OR ALCOHOL-BASED CLEANERS ON THE LCD DISPLAY SCREEN OR CASE.
• Acer will not be liable for damage resulting from use of any ammonia or alcohol-based cleaners.
2. Do not place the LCD monitor near a window. Exposing the monitor to rain, moisture or sunlight can severely damage it.
3. Do not apply pressure to the LCD screen. Excessive pressure may cause permanent damage to the display.
4. Do not remove the cover or attempt to service this unit yourself. An authorized technician should perform servicing of any
nature.
5. Store the LCD monitor in a room with a temperature of -20° to 60° C (-4° to 140° F). Storing the LCD monitor outside this range
may result in permanent damage.
6. Immediately unplug your monitor and call an authorized technician if any of the following circumstances occur:
• Monitor-to-PC signal cable is frayed or damaged.
• Liquid spills onto the LCD monitor or the monitor is exposed to rain.
• The LCD monitor or case is damaged.
Attaching the monitor to the base
1. Remove the monitor from the packaging.
2. Attach the footstand to the base. (for selected models)
3. Turn clockwise to lock. Ensure that the base in locked onto the stand. (for selected models)
4. Secure the base to the stand by turning the screw using the integrated tab or a suitable coin. (for selected models)
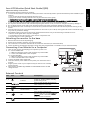
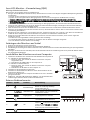
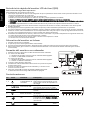
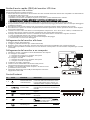
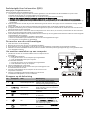
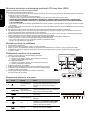
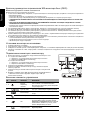
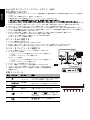
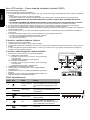
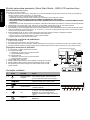
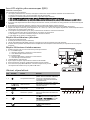
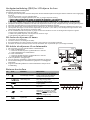
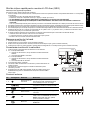
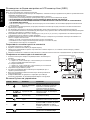
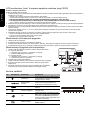
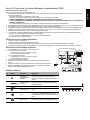
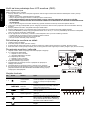
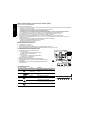
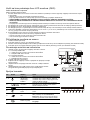
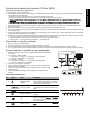
Connecting Your Monitor to a Computer
1. Turn off your monitor and unplug your computer’s power cord.
2. 2-1 Connect HDMI Cable
a. Make sure both the monitor and computer are powered-OFF.
b. Connect the HDMI cable to the computer.
2-2 Connect DP Cable
a. Make sure both the monitor and computer are powered-OFF.
b. Connect the DP cable to the computer.
3. Connect the Audio Cable. (Optional)
4. Insert the monitor power cable into the power port at the back of the
monitor.
5. Plug the power cords of your computer and your monitor into a nearby
electrical outlet.
6. Select Power-off USB charge ON/OFF to enable/disable Power-off USB
charge function.
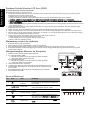
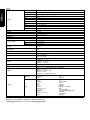
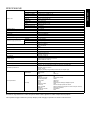
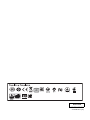
External Controls
No. Icon Item Description
1, 2
Power button/
indicator
Turns the monitor on/off. Blue indicates
power on. Amber indicates standby/
power saving mode.
3 OSD functions
Press to view the OSD. Press again to
enter a selection in the OSD.
4
Input
Input button Press to toggle input sources.
5 Volume button
Press to activate the volume sliding
scale.
6OD
Press the key to activate the OD
function and set it to either Normal or
Extreme mode. If the OSD is active,
press it to enter a selection.
7 Game mode
Press to trigger the Game mode
control.
DP
HDMI
POWER
HDMI
DP
1234567

English
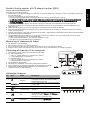
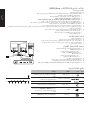
Adjusting the OSD settings
NOTE: The following content is for general reference only. Actual product specifications may vary.
The OSD (on-screen display) can be used to adjust the settings of your LCD monitor. Press the MENU key to open the OSD. You can
use the OSD to adjust the picture quality, OSD position and general settings. For advanced settings, please refer to the following
pages:
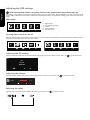
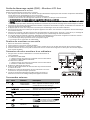
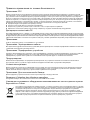
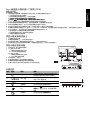
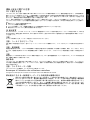
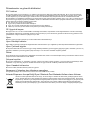
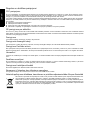
Main page
Turning Game mode on or off
Open the Game mode control and turn Game mode on or off using the arrows (OFF/ON), and select which user-defined profile to
use (please see the OSD section for more information).
Adjusting the OD setting
Open the OD control and select your preferred OD setting using the arrows. When you are done, use to go back one level.
Adjusting the volume
Open the Volume control and set the Volume using the arrows. When you are done, use to go back one level.
Selecting the input
Open the Input control and select HDMI or DP. When you are done, use to go back one level.
1. Game mode
2. OD (overdrive) options
3. Volume
4. Input selection
5. Function menu
PE
Extreme
Normal
Off
Volum
7e
1

English
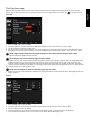
The Function page
Open the Function page to select Picture, Color, OSD or Setting functions, and adjust the settings which you want using the
arrows. You can also view your monitor’s system information from this page. When you are done, use to go back one level.
Picture
1. Press the MENU key to open the OSD.
2. Using the ▲ / ▼ keys, select Picture from the OSD.Then navigate to the picture element you wish to adjust.
3. Use the / keys to adjust the sliding scales.
4. The Picture menu can be used to adjust the Acer eColor, Brightness, Contrast, Blue Light, Dark boost and Adaptive contrast.
5. Blue Light: Filters out blue light to protect your eyes by adjusting how much blue light is shown -- 80%, 70%, 60%, or 50%.
NOTE: Higher values allow more blue light through. For the best protection select a lower value.
6. Brightness: Adjust the brightness from 0 to 100.
NOTE: Adjusts the balance between light and dark shades.
7. Adaptive Contrast: This method usually increases the global contrast of many images, especially when the usable data of the
image is represented by close contrast values. This allows for areas of lower local contrast to gain a higher contrast. The
method is useful in images with backgrounds and foregrounds that are both bright or both dark. In particular, the method
can lead to better views of bone structure in x-ray images, and to better detail in photographs that are over or under-exposed.
8. Contrast: Adjust the contrast from 0 to 100.
NOTE: Sets the degree of difference between light and dark areas.
9. Dark boost: This boosts the amplitude of the dark color levels of the display– blacks will be less black. The higher the level, the
higher the boost.
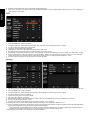
Color
1. Press the MENU key to open the OSD.
2. Using the ▲ / ▼ keys, select Color from the OSD. Then navigate to the picture element you wish to adjust.
3. Use the / keys to select the setting.
4. Gamma mode allows you to adjust the luminance tone.The default value is 2.2 (standard value for Windows).
5. Color temperature: Default is warm. You can choose Cool, Warm, Normal, Bluelight or User.

English
6. Saturate: Color brightness can be changed by 0~200 adjustment.
7. 6-axis color: Chroma of red, green, blue, cyan, yellow and magenta can be independently adjusted from 0~155, changing the
color quality of the image.
OSD
1. Press the MENU key to open the OSD.
2. Using the ▲ / ▼ keys, select OSD from the OSD. Then navigate to the setting you wish to change.
3. Use the / keys to adjust any sliding scales.
4. Language: Set the OSD menu language.
5. OSD timeout: Adjust the delay before turning off the OSD menu.
6. Refresh rate num: Display the panel’s current refresh rate on the screen.
7. Transparency: Select the transparency when using gaming mode. The transparency can be 0% (OFF), 20%, 40%, 60%, or 80%.
8. Game mode: There are three user-defined profiles available. When you have decided what settings suit you, save them and
system will be able to recall the settings in the future when you turn on gaming mode and press 1, 2 or 3.
9. Aim point: Show an Aim point on the screen for shooting games.
Setting
1. The Setting menu can be used to select the screen menu language and other important settings, including input and OD level.
2. Press the MENU key to open the OSD.
3. Using the ▲ / ▼ keys, select Setting from the OSD. Then navigate to the setting yo wish to adjust.
4. Use the / keys to select the setting.
5. Input: Select the source from DP In, HDMI.
6. OD: Select Off, Normal, or Extreme.
7. DTS (selective models): Turn DTS Sound On or Off. DTS Sound is stratified and creates a remarkable sonic flow.
8. Power-off USB charge: Turn On or Off.
9. Ambient light (selective models): Adjust the lighting effects, color, and style.
10. Wide mode: You can select which screen aspect you are using. The options are Aspect and 1:1.
11. Over Clock (selective models): The monitor can be overclocked (at the end user’s risk) to a higher refresh rate than advertised
by the panel specification. This functions that allows this behavior
* After rebooting, use the NVIDIA Control Panel to set the maximum refresh rate. If nothing is displayed, disconnect the Dis-
playPort™ cable and use the monitor’s on-screen display to select a default refresh rate.
12. Reset: Resets the custom color settings to the factory defaults.

English
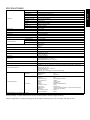
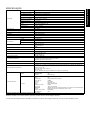
Product information
1. Press the MENU key to open the OSD.
2. Using the ▲ / ▼ keys, select Information to view the basic information for your monitor and current input.
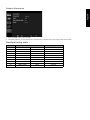
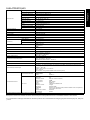
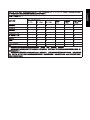
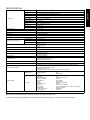
Standard timing table
*Only for DP mode, not for HDMI mode.
Mode Resolution Remark
1 640 x 480 60 Hz
2 720 x 480 60 Hz
3 1280 x 720 60 Hz
4 720 x 576 50 Hz
5 1280 x 720 50 Hz
6 1920 x 1080 60 Hz
7 800 x 600 60 Hz
8 1024 x 768 60 Hz
9 3840 x 2160 24 Hz
10 3840 x 2160* 60 Hz default

English
Regulations and safety notices
FCC notice
This device has been tested and found to comply with the limits for a Class B digital device pursuant to Part 15 of the FCC rules.
These limits are designed to provide reasonable protection against harmful interference in a residential installation. This device
generates, uses, and can radiate radio frequency energy and, if not installed and used in accordance with the instructions, may
cause harmful interference to radio communications.
However, there is no guarantee that interference will not occur in a particular installation. If this device does cause harmful
interference to radio or television reception, which can be determined by turning the device off and on, the user is encouraged to
try to correct the interference by one or more of the following measures:
Reorient or relocate the receiving antenna.
Increase the separation between the device and receiver.
Connect the device into an outlet on a circuit different from that to which the receiver is connected.
Consult the dealer or an experienced radio/television technician for help.
CE declaration of Conformity
Hereby, Acer Inc., declares that this LCD monitor is in compliance with the essential requirements and other relevant provisions of
EMC Directive 2004/108/EC, Low Voltage Directive 2006/95/EC, and RoHS Directive 2011/65/EU and Directive 2009/125/EC with
regard to establishing a framework for the setting of ecodesign requirements for energy-related product.
Notice:
In order to prevent damage to the monitor, do not lift the monitor by its base.
Notice: Shielded cables
All connections to other computing devices must be made using shielded cables to maintain compliance with EMC regulations.
Notice: Peripheral devices
Only peripherals (input/output devices, terminals, printers, etc.) certified to comply with the Class B limits may be attached to this
equipment. Operation with non-certified peripherals is likely to result in interference to radio and TV reception.
Caution
Changes or modifications not expressly approved by the manufacturer could void the user authority, which is granted by the
Federal Communications Commission, to operate this product.
Operation conditions
This device complies with Part 15 of the FCC Rules. Operation is subject to the following two conditions: (1) this device may not
cause harmful interference, and (2) this device must accept any interference received, including interference that may cause
undesired operation.
Notice: Canadian users
This Class B digital apparatus complies with Canadian ICES-003.
Remarque à l'intention des utilisateurs canadiens
Cet appareil numérique de la classe B est conforme à la norme NMB-003 du Canada.
Disposal of Waste Equipment by Users in Private Household in the European Union
This symbol on the product or on its packaging indicates that this product must not be disposed of with your other
household waste. Instead, it is your responsibility to dispose of your waste equipment by handing it over to a
designated collection point for the recycling of waste electrical and electronic equipment. The separate collection
and recycling of your waste equipment at the time of disposal will help to conserve natural resources and ensure
that it is recycled in a manner that protects human health and the environment. For more information about
where you can drop off your waste equipment for recycling, please contact your local city office, your household
waste disposal service or the shop where you purchased the product.

English
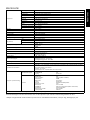
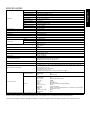
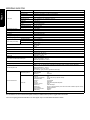
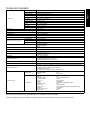
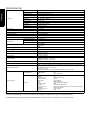
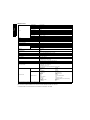
SPECIFICATION
Find manuals and other documents for your Acer product on the official Acer support website.
*Annual energy consumption is calculated using the typical power consumption 4 hours per day, 365 days per year.
LCD Panel
Driving System TFT Color LCD
Size 27”W (69 cm)
Pixel Pitch 0.1552 mm (H) x 0.1552 mm (V)
Brightness
300 cd/m
2
(Typical)
Contrast 1000:1
Viewable Angle 178° (H) 178° (V) (CR=10)
Response Time 4 ms (G to G)
Panel Type In-Plane Switching (IPS)
Video R, G, B Analog Interface
H-Frequency 31 kHz - 135 kHz
V-Frequency 24 - 75 Hz
Display Colors 1.07 billion
Dot Clock 594 MHz
Maximum Resolution 3840 x 2160 @ 60 Hz
Plug & Play VESA DDCCI/DDC2B
Energy Efficiency Class C
*Annual Energy Consumption 74 (kWh) (for HDMI-input Model)
Power Consumption (at 200 nits)
On Mode 71.5 W (Typical)
Sleep Mode 0.42 W (Typical)
Off Mode 0.39 W (Typical)
Input Connector
HDMI 19 pins
DP 20 pins
Input Video Signal
HDMI
DP
Speakers 2 W x 2 (Only Audio-Input Model) (Optional)
USB USB 3.0 x 4
Maximum Screen Size
Horizontal: 596.16 mm
Vertical: 335.34 mm
Power Source 100-240 V, 50/60 Hz
Environmental Considerations
Operating Temp: 5° to 35°C
Storage Temp: -20° to 60°C
Operating Humidity: 10% to 85%
Dimensions 614.0 (W) x 401.4 ~ 551.4 (H) x 268.4 (D) mm
Weight (N. W.) 7.0 kg (net)
Mechanism Specifications
Tilt: -5° to +35° (Only at the highest point can 35 degrees of recline be offered for the angle
of elevation)
Swivel: -30° to +30°
Height adjustment: 0 mm to 150 mm
Pivot: -90° to 90°
Detachable foot stand: Yes (Detachable foot stand with screw release)
External Controls
Switch/Buttons
Power Button
MENU/ENTER
Input
Volume
OD
Game mode
Functions
Contrast
Brightness
6-axis Saturate
Color Temperature
Blue Light
eColor
Gamma
Adaptive contrast
Dark boost
sRGB Mode
Saturate
Refresh rate number
Transparency
Aim point
OD
DTS (selective models)
ULMB
Quick Start
Game mode
Power-Off USB Charge
Language
OSD Timeout
Input Signal Selection (only Dual input model)
Display Information
Reset
Exit
All specifications are subject to change without notice.

Bahasa Indonesia
Panduan Praktis Monitor LCD Acer (QSG)
Petunjuk penting untuk keselamatan
Baca petunjuk berikut ini dengan saksama.
1. Untuk membersihkan layar monitor LCD: Pastikan monitor Anda memiliki daya kelistrikan yang sesuai untuk beroperasi
dengan daya AC yang ada di lokasi Anda.
• Matikan monitor LCD dan cabut kabel daya.
• Semprotkan bahan pembersih yang tidak mudah larut ke kain lap dan bersihkan layar secara perlahan.
• JANGAN LANGSUNG SEMBURKAN ATAU TUMPAHKAN CAIRAN APA PUN KE LAYAR ATAU TABUNGNYA.
• HARAP JANGAN GUNAKAN PEMBERSIH BERBASIS AMONIA ATAU ALKOHOL APA PUN PADA LAYAR TAMPILAN LCD
ATAU TABUNGNYA.
• Acer tidak akan bertanggung jawab terhadap kerusakan yang dihasilkan karena menggunakan pembersih berbasis amonia
atau alkohol apa pun.
2. Jangan meletakkan monitor LCD di dekat jendela. Monitor yang terkena hujan, kelembapan, atau sinar matahari dapat
mengalami kerusakan fatal.
3. Jangan menekan layar LCD. Menekan terlalu kuat dapat menyebabkan kerusakan permanen pada layar.
4. Jangan melepas penutup atau mencoba memperbaiki unit ini sendiri. Setiap perbaikan harus dilakukan oleh teknisi resmi.
5. Simpan monitor LCD di ruangan dengan suhu antara -20° s/d 60° C (-4° s/d 140° F). Menyimpan monitor LCD di luar rentang
suhu ini dapat menyebabkan kerusakan permanen.
6. Segera cabut monitor dan hubungi teknisi resmi bila terjadi situasi berikut ini:
• Kabel sinyal dari monitor ke PC terkoyak atau rusak.
• Cairan tumpah di monitor LCD atau monitor terkena hujan.
• Monitor LCD atau tabungnya rusak.
Memasang monitor ke dudukan
1. Keluarkan monitor dari kemasannya.
2. Pasang kaki penyangga pada dudukan. (untuk model tertentu)
3. Putar searah jarum jam untuk mengunci. Pastikan dudukan terkunci pada penyangga. (untuk model tertentu)
4. Kencangkan dudukan pada penyangga dengan memutar sekrup menggunakan tab yang tersedia atau koin yang sesuai.
(untuk model tertentu)
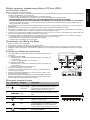
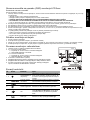
Menghubungkan Monitor ke Komputer
1. Matikan monitor dan cabut kabel daya komputer.
2. 2-1 Hubungkan Kabel HDMI
a. Pastikan daya pada monitor dan komputer sudah dimatikan.
b. Hubungkan kabel HDMI ke komputer.
2-2 Hubungkan Kabel DP
a. Pastikan daya pada monitor dan komputer sudah dimatikan.
b. Hubungkan kabel DP ke komputer.
3. Hubungkan Kabel Audio. (Opsional)
4. Colokkan kabel daya monitor ke port daya di bagian belakang monitor.
5. Colokkan kabel daya komputer dan monitor Anda ke stopkontak listrik
yang terdekat.
6. Pilih ON/OFF Matikan daya USB untuk mengaktifkan/menonaktifkan
fungsi Matikan daya USB.
Kontrol Eksternal
No. Ikon Item Deskripsi
1, 2
Tombol daya/
indikator
Menghidupkan dan mematikan monitor. Biru
berarti menyala. Kuning berarti siaga/mode
hemat daya.
3 Fungsi OSD
Tekan untuk menampilkan OSD. Tekan lagi
untuk memasukkan pilihan di OSD.
4
Input
Tombol Input Tekan untuk beralih sumber input.
5Tombol Volume
Tekan untuk mengaktifkan skala geser
volume.
6OD
Tekan tombol untuk mengaktifkan fungsi OD
dan setel ke mode Normal atau Ekstrem. Jika
OSD aktif, tekan untuk memasukkan pilihan.
7 Game mode
Tekan untuk mengaktifkan kontrol Game
mode.
DP
HDMI
POWER
HDMI
DP
1234567

Bahasa Indonesia
Pemberitahuan Peraturan dan keselamatan
Pemberitahuan FCC
Perangkat ini telah diuji dan memenuhi batasan perangkat digital Kelas B sesuai dengan Pasal 15 dalam peraturan FCC. Batasan
ini dirancang untuk memberi perlindungan yang memadai dari interferensi berbahaya pada pemasangan di perumahan.
Perangkat ini menghasilkan, menggunakan, dan memancarkan energi frekuensi radio, dan jika tidak dipasang dan digunakan
sesuai dengan petunjuk, dapat menimbulkan interferensi berbahaya pada komunikasi radio.
Akan tetapi, tidak ada jaminan bahwa interferensi tidak akan terjadi pada pemasangan tertentu. Jika perangkat ini menimbulkan
interferensi yang berbahaya terhadap penerimaan radio atau televisi, yang dapat ditentukan dengan cara mematikan dan
menghidupkan perangkat, pengguna dianjurkan untuk mencoba mengatasi interferensi dengan satu atau beberapa tindakan berikut:
Mengubah arah atau memindahkan lokasi antena penerima.
Menambah jarak pemisahan antara perangkat dan penerima.
Menghubungkan perangkat ke stopkontak yang berbeda dari stopkontak untuk penerima.
Meminta bantuan dari dealer atau teknisi radio/televisi yang berpengalaman.
Pernyataan Kesesuaian CE
Dengan ini, Acer Inc., menyatakan bahwa monitor LCD ini memenuhi ketentuan yang diperlukan dan persyaratan yang relevan
lainnya dalam EMC Directive 2004/108/EC, Low Voltage Directive 2006/95/EC, dan RoHS Directive 2011/65/EU, dan Directive 2009/
125/EC terkait dengan pelaksanaan kerangka kerja untuk menetapkan persyaratan ecodesign untuk produk yang terkait dengan
energi.
Perhatian:
Untuk mencegah kerusakan pada monitor, jangan mengangkat monitor pada dasarnya.
Perhatian: Kabel berpelindung
Semua sambungan ke perangkat komputasi lain harus menggunakan kabel berpelindung untuk mematuhi peraturan EMC.
Perhatian: Perangkat periferal
Hanya perangkat periferal (perangkat input/output, terminal, printer, dsb) bersertifikasi yang memenuhi batasan Kelas B yang boleh
dipasang pada peralatan ini. Pengoperasian dengan perangkat periferal yang tidak bersertifikasi mungkin dapat menimbulkan
interferensi pada penerimaan radio dan televisi.
Perhatian
Mengubah atau memodifikasi yang secara tegas dilarang oleh pabrikan dapat menimbulkan izin pengguna yang dijamin oleh
Federal Communications Commission untuk pengoperasian produk ini menjadi tidak berlaku.
Kondisi pengoperasian
Perangkat ini telah sesuai dengan Pasal 15 dalam Peraturan FCC. Pengoperasian harus mematuhi ketentuan berikut: (1) perangkat
ini tidak boleh menimbulkan interferensi yang berbahaya, dan (2) perangkat ini harus menerima interferensi yang dapat diterima,
termasuk interferensi yang menimbulkan operasi yang tidak diinginkan.
Perhatian: Pengguna di Kanada
Peralatan digital Kelas B ini telah mematuhi ICES-003 Kanada.
Remarque à l'intention des utilisateurs canadiens
Cet appareil numérique de la classe B est conforme à la norme NMB-003 du Canada.
Pembuangan Limbah Peralatan oleh Pengguna di Tempat Pembuangan Sampah Pribadi
di Uni Eropa
Simbol ini, yang tertera di produk atau di kemasannya, menunjukkan bahwa produk ini tidak boleh dibuang bersama
limbah rumah tangga lainnya. Anda bertanggung jawab untuk membuang limbah peralatan Anda dengan
menyerahkannya ke pusat pengumpulan yang ditunjuk untuk mendaur ulang limbah peralatan listrik dan
elektronik. Pengumpulan secara terpisah dan daur ulang limbah peralatan pada saat pembuangan turut
membantu menjaga kelestarian sumber daya alam dan memastikan limbah tersebut didaur-ulang dengan cara
yang melindungi kesehatan manusia dan lingkungan. Untuk informasi selengkapnya tentang tempat penyerahan
untuk daur ulang, silakan menghubungi kantor setempat di kota Anda, layanan pembuangan limbah rumah
tangga, atau toko tempat Anda membeli produk.

Bahasa Indonesia
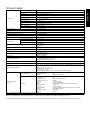
SPESIFIKASI
Temukan manual dan dokumen lainnya untuk produk Acer di situs web dukungan Acer resmi.
*Konsumsi energi tahunan dihitung menggunakan konsumsi daya umum 4 jam per hari, 365 hari per tahun.
Panel LCD
Sistem Penggerak LCD Berwarna TFT
Ukuran 27”W (69 cm)
Tingkat Piksel 0,1552 mm (H) x 0,1552 mm (V)
Kecerahan
300 cd/m
2
(Tipikal)
Kontras 1000:1
Sudut yang dapat dilihat 178° (H) 178° (V) (CR=10)
Waktu Respons 4 ms (G ke G)
Tipe Panel In-Plane Switching (IPS)
Video Antarmuka Analog R, G, B
Frekuensi H 31 kHz - 135 kHz
Frekuensi V 24 - 75 Hz
Warna Layar 1,07 miliar
Dot Clock 594 MHz
Resolusi Maksimum 3840 x 2160 @ 60 Hz
Plug & Play VESA DDCCI/DDC2B
Kelas Efisiensi Energi C
*Konsumsi Energi Tahunan 74 (kWh) (untuk Model input HDMI)
Konsumsi Daya
(pada 200 nits)
Mode On 71,5 W (Tipikal)
Mode Tidur 0,42 W (Tipikal)
Mode Off 0,39 W (Tipikal)
Konektor Input
HDMI 19 pin
DP 20 pin
Sinyal Video Input
HDMI
DP
Speaker 2 W x 2 (Hanya Model Input Audio) (Opsional)
USB USB 3.0 x 4
Ukuran Layar Maksimum
Horizontal: 596,16 mm
Vertikal: 335,34 mm
Sumber Daya 100-240 V, 50/60 Hz
Pertimbangan Lingkungan
Suhu Pengoperasian: 5° s/d 35°C
Suhu Penyimpanan: -20° s/d 60°C
Kelembapan pengoperasian: 10% s/d 85%
Dimensi 614,0 (P) x 401,4 ~ 551,4 (L) x 268,4 (T) mm
Berat (N. W.) 7,0 kg (net)
Spesifikasi Mekanis
Kemiringan: -5° s/d +35° (Hanya pada titik tertinggi sudut kemiringan dapat dimiringkan
35 derajat)
Pemutaran: -30° s/d +30°
Penyesuaian ketinggian: 0 mm s/d 150 mm
Pivot: -90° s/d 90°
Kaki penyangga lepas-pasang: Ya (Kaki penyangga dapat dilepas dengan membuka sekrup)
Kontrol Eksternal
Tombol
Tombol Daya
MENU/ENTER
Input
Volume
OD
Game mode
Fungsi
Kontras
Kecerahan
Saturasi 6-sumbu
Suhu Warna
Lampu Biru
eColor
Gamma
Adaptive contrast
Dark boost
Mode sRGB
Saturasi
Refresh rate number
Transparansi
Titik pengarahan
OD
DTS (mode selektif)
ULMB
Mulai Cepat
Mode game
Matikan Daya USB
Bahasa
Waktu Mati OSD
Pilihan Sinyal Input (hanya mode input Ganda)
Informasi Display
Reset
Keluar
Semua spesifikasi dapat berubah sewaktu-waktu tanpa pemberitahuan.

Deutsch
Acer-LCD-Monitor – Kurzanleitung (QSG)
Wichtige Sicherheitshinweise
Bitte lesen Sie die folgenden Hinweise sorgfältig durch.
1. Reinigen des LCD-Bildschirms: Stellen Sie sicher, dass der Monitor mit der in Ihrer Region verfügbaren Netzspannung betrieben
werden kann.
• Schalten Sie den LCD-Monitor aus und ziehen Sie das Netzkabel ab.
• Sprühen Sie ein lösungsmittelfreies Reinigungsmittel auf ein Tuch und reinigen Sie den Bildschirm vorsichtig.
• NIEMALS FLÜSSIGKEITEN DIREKT AUF DEN MONITOR ODER DAS GEHÄUSE SPRÜHEN ODER AUSSCHÜTTEN.
• BITTE KEINE AUF AMMONIAK ODER ALKOHOL BASIERENDEN REINIGUNGSMITTEL AUF DEM LCD-BILDSCHIRM ODER
GEHÄUSE VERWENDEN.
• Acer haftet nicht für Schäden durch die Anwendung von Reinigungsmitteln, die auf Ammoniak oder Alkohol basieren.
2. Stellen Sie den LCD-Monitor nicht an einem Fenster auf. Wenn der Monitor Regen, Feuchtigkeit oder Sonneneinstrahlung
ausgesetzt ist, kann er schwer beschädigt werden.
3. Üben Sie keinen Druck auf den LCD-Bildschirm aus. Zu starker Druck kann zu bleibenden Schäden am Bildschirm führen.
4. Entfernen Sie die Abdeckung nicht und versuchen Sie nicht, das Gerät selbst zu warten. Nur ein autorisierter Techniker sollte
eine Wartung durchführen.
5. Bewahren Sie den LCD-Monitor in einem Raum mit einer Temperatur zwischen -20 °C und 60 °C auf. Wenn der LCD-Monitor
außerhalb dieses Temperaturbereichs aufbewahrt wird, kann dies zu dauerhaften Schäden führen.
6. Ziehen Sie sofort den Netzstecker des Monitors und rufen Sie einen autorisierten Techniker, wenn eine der folgenden
Situationen eintritt:
• Das Monitor-zu-PC-Signalkabel ist durchgescheuert oder beschädigt.
• Es wurde Flüssigkeit auf dem LCD-Monitor verschüttet oder der Monitor war Regen ausgesetzt.
• Der LCD-Monitor oder das Gehäuse ist beschädigt.
Anbringen des Monitors am Sockel
1. Nehmen Sie den Monitor aus der Verpackung.
2. Bringen Sie den Standfuß am Sockel an. (bei ausgewählten Modellen)
3. Zum Befestigen im Uhrzeigersinn drehen. Stellen Sie sicher, dass der Sockel sicher auf dem Standfuß befestigt ist. (bei ausgewählten
Modellen)
4. Befestigen Sie den Sockel am Standfuß, indem Sie die Schraube mithilfe eines Werkzeugs oder einer passenden Münze drehen.
(bei ausgewählten Modellen)
Anschließen des Monitors an einen Computer
1. Schalten Sie den Monitor aus und ziehen Sie das Netzkabel des Computers ab.
2. 2-1 Schließen Sie das HDMI-Kabel an
a. Stellen Sie sicher, dass sowohl der Monitor als auch der Computer
ausgeschaltet sind.
b. Schließen Sie das HDMI-Kabel an den Computer an.
2-2 Schließen Sie das DP-Kabel an
a. Stellen Sie sicher, dass sowohl der Monitor als auch der Computer
ausgeschaltet sind.
b. Schließen Sie das DP-Kabel an den Computer an.
3. Schließen Sie das Audiokabel an. (Optional)
4. Schließen Sie das Netzkabel des Monitors an den Stromanschluss auf der
Rückseite des Monitors an.
5. Stecken Sie die Netzkabel von Computer und Monitor in eine in der Nähe
gelegene Steckdose.
6. Wählen Sie „Abschalt-USB-Ladefunktion EIN/AUS“, um das Aufladen über
USB bei ausgeschaltetem Gerät zu aktivieren/deaktivieren.
Externe Bedienelemente
Nummer Symbol Funktion Beschreibung
1, 2
Ein-/Aus-Taste/
Betriebsanzeige
Ein/Aus des Monitors. Blau zeigt
Betrieb an. Gelb zeigt Standby-/
Energiesparmodus an.
3 OSD-Funktionen
Drücken, um das OSD-Menü anzuzeigen.
Erneut drücken, um eine Auswahl im
OSD-Menü zu treffen.
4
Input
Eingangstaste
Drücken, um zwischen den
Eingangsquellen zu wechseln.
5 Lautstärketaste
Drücken, um die Skala zur
Lautstärkeauswahl zu aktivieren.
6OD
Drücken Sie diese Taste, um die
Funktion OD zu aktivieren. Zur Auswahl
stehen die Modi Normal oder Extrem.
Drücken Sie bei aktivem OSD-Menü
diese Taste, um eine Auswahl zu treffen.
7 Spielmodus
Drücken zum Starten der Steuerung für
den Spielmodus.
DP
HDMI
POWER
HDMI
DP
1234567

Deutsch
Vorschriften und Sicherheitshinweise
FCC-Hinweis
Dieses Gerät wurde getestet und erfüllt die Grenzwerte für ein digitales Gerät der Klasse B gemäß Teil 15 der FCC-Vorschriften.
Diese Grenzwerte sollen einen angemessenen Schutz gegen Interferenzen bei der Installation in einem Wohngebiet bieten. Dieses
Gerät erzeugt, verwendet und gibt möglicherweise Funkfrequenzenergie ab und kann, wenn es nicht gemäß den Anweisungen
installiert und verwendet wird, Störungen des Funkverkehrs verursachen.
Es gibt jedoch keine Garantie dafür, dass bei einer bestimmten Installation keine Störungen auftreten. Wenn dieses Gerät Störungen
des Radio- oder Fernsehempfangs verursacht, was sich durch Aus- und Einschalten des Geräts feststellen lässt, kann der Benutzer
versuchen, die Störungen durch eine oder mehrere der folgenden Maßnahmen zu beseitigen:
Neuausrichtung oder Versetzen der Empfangsantenne
Vergrößern des Abstands zwischen dem Gerät und dem Receiver
Anschließen des Geräts an eine Steckdose eines anderen Stromkreises als den, an dem der Receiver angeschlossen ist
Zu Rate ziehen des Händlers oder eines erfahrenen Radio-/Fernsehtechnikers
CE-Konformitätserklärung
Acer Inc. erklärt hiermit, dass dieser LCD-Monitor den grundlegenden Anforderungen und anderen relevanten Bestimmungen
der EMV-Richtlinie 2004/108/EG, der Niederspannungsrichtlinie 2006/95/EG und der RoHS-Richtlinie 2011/65/EU sowie der
Richtlinie 2009/125/EG zur Schaffung eines Rahmens für die Festlegung von Anforderungen an die umweltgerechte Gestaltung
energieverbrauchsrelevanter Produkte entspricht.
Hinweis:
Heben Sie den Monitor nicht an der Unterseite an, um Schäden am Monitor zu vermeiden.
Hinweis: Abgeschirmte Kabel
Alle Verbindungen zu anderen Computing-Geräten müssen über abgeschirmte Kabel erfolgen, um die Einhaltung der EMV-Richtlinien
sicherzustellen.
Hinweis: Peripheriegeräte
Nur Peripheriegeräte (Eingabe-/Ausgabegeräte, Terminals, Drucker usw.), die die Grenzwerte der Klasse B erfüllen, dürfen an
dieses Gerät angeschlossen werden. Der Anschluss von Peripheriegeräten, die diese Grenzwerte nicht erfüllen, kann Störungen
des Radio- und Fernsehempfangs hervorrufen.
Vorsicht
Änderungen oder Modifikationen, die nicht ausdrücklich durch den Hersteller genehmigt wurden, können dazu führen, dass die
Betriebserlaubnis, die dem Benutzer von der Federal Communications Commission für dieses Produkt erteilt wurde, erlischt.
Betriebsbedingungen
Dieses Gerät entspricht Teil 15 der FCC-Vorschriften. Der Betrieb unterliegt folgenden zwei Bedingungen: (1) Dieses Gerät darf
keine schädlichen Interferenzen verursachen und (2) dieses Gerät muss alle empfangenen Interferenzen annehmen, einschließlich
Interferenzen, die zu einem unerwünschten Betrieb führen können.
Hinweis: Benutzer in Kanada
Dieses digitale Gerät der Klasse B entspricht der kanadischen Norm ICES-003.
Remarque à l'intention des utilisateurs canadiens
Cet appareil numérique de la classe B est conforme à la norme NMB-003 du Canada.
Entsorgung von Elektrogeräten durch Benutzer in Privathaushalten in der EU
Dieses Symbol auf dem Produkt oder seiner Verpackung weist darauf hin, dass dieses Produkt nicht über den
normalen Hausmüll entsorgt werden darf. Es liegt in Ihrer Verantwortung, Ihre Altgeräte zur Entsorgung an einer
Rücknahmestelle für das Recycling und die Entsorgung von elektrischen und elektronischen Geräten abzugeben.
Die getrennte Sammlung und das Recycling von Altgeräten nach Ablauf der Lebensdauer tragen zur Erhaltung der
natürlichen Ressourcen bei und garantieren eine Wiederverwertung, die die Gesundheit der Menschen und die
Umwelt schont. Weitere Informationen dazu, wo sich Rücknahmestellen für Ihre Altgeräte befinden, erhalten Sie
bei Ihrer Stadtverwaltung, den örtlichen Müllentsorgungsbetrieben oder im Geschäft, in dem Sie das Produkt
erworben haben.

Deutsch
TECHNISCHE DATEN
Handbücher und andere Dokumente für Ihr Acer-Produkt finden Sie auf der offiziellen Acer-Support-Website.
*Der jährliche Energieverbrauch berechnet sich anhand des typischen Stromverbrauchs von 4 Stunden pro Tag, 365 Tage im Jahr.
LCD-Bildschirm
System TFT-LCD-Farbbildschirm
Größe 27”W (69 cm)
Pixelabstand 0,1552 mm (H) x 0,1552 mm (V)
Helligkeit
300 cd/m
2
(typisch)
Kontrast 1000:1
Einsehbarer Winkel 178° (H) 178° (V) (CR = 10)
Reaktionszeit 4 ms (G zu G)
Bildschirmtyp In-Plane Switching (IPS)
Video R, G, B analoge Schnittstelle
H-Frequenz 31 - 135 kHz
V-Frequenz 24 - 75 Hz
Displayfarben 1,07 Milliarden
Pixelfrequenz 594 MHz
Maximale Auflösung 3840 x 2160 bei 60 Hz
Plug & Play VESA DDCCI/DDC2B
Energieeffizienzklasse C
*Jährlicher Energieverbrauch 74 (kWh) (für Modelle mit HDMI-Eingang)
Stromverbrauch (bei 200 cd/m²)
Eingeschaltet 71,5 W (typisch)
Ruhemodus 0,42 W (typisch)
Ausgeschaltet 0,39 W (typisch)
Eingangsbuchse
HDMI 19-polig
DP 20-polig
Eingangsvideosignal
HDMI
DP
Lautsprecher 2 W x 2 (nur Modelle mit Audioeingang) (optional)
USB USB 3.0 x 4
Maximale Bildschirmgröße
Horizontal: 596,16 mm
Vertikal: 335,34 mm
Stromquelle 100 - 240 V, 50/60 Hz
Umgebungsbedingungen
Betriebstemperatur: 5 bis 35 °C
Lagertemperatur: -20 bis 60 °C
Luftfeuchtigkeit bei Betrieb: 10 % bis 85 %
Abmessungen 614,0 (B) x 401,4 bis 551,4 (H) x 268,4 (T) mm
Gewicht (netto) 7,0 kg (netto)
Daten zur Mechanik
Neigung: -5° bis +35° (nur am höchsten Punkt können 35 Grad Rückwärtsneigung des
Höhenwinkels erzielt werden)
Schwenken: -30° bis +30°
Höheneinstellung: 0 mm bis 150 mm
Drehgelenk: -90° bis 90°
Abnehmbarer Standfuß: Ja (abnehmbar Standfuß mit Feststellschraube)
Externe Bedienelemente
Schalter/Tasten
Ein-/Aus-Taste
MENÜ/EINGABE
Eingang
Lautstärke
OD
Spielmodus
Funktionen
Kontrast
Helligkeit
6-Achs.-Sättig,
Farbtemp.
Blaues Licht
eColor
Gamma
Adaptive contrast
Dark boost
sRGB Mode
Sättigung
Refresh rate number
Transparenz
Zielpunkt
OD
DTS (ausgewählte Modelle)
ULMB
Schnellstart
Spielmodus
Abschalt-USB-Ladefunktion
Sprache
OSD-Dauer
Auswahl des Eingangssignals (nur Modelle mit Dualeingang)
Displayinformationen
Rücksetzen
Beenden
Alle technischen Daten können sich ohne Vorankündigung ändern.

Español
Guía de inicio rápido del monitor LCD de Acer (QSG)
Instrucciones de seguridad importantes
Lea detenidamente las siguientes instrucciones.
1. Para limpiar la pantalla del monitor LCD: Asegúrese de que los parámetros eléctricos del monitor permiten utilizarlo con la
corriente de CA disponible en su ubicación.
• Apague el monitor LCD y desconecte el cable de alimentación.
• Pulverice una solución de limpieza no soluble en un paño y limpie la pantalla con cuidado.
• NUNCA PULVERICE NI ROCÍE NINGÚN LÍQUIDO DIRECTAMENTE SOBRE LA PANTALLA O CARCASA.
• POR FAVOR, NO UTILICE NINGÚN PRODUCTO DE LIMPIEZA CON AMONÍACO O ALCOHOL EN LA PANTALLA LCD O EN LA
CARCASA.
• Acer no se responsabilizará de los daños resultantes del uso de productos de limpieza a base de amoníaco o alcohol.
2. No coloque el monitor LCD cerca de una ventana. La exposición del monitor a la lluvia, la humedad o la luz del sol podría
dañarlo seriamente.
3. No aplique presión sobre la pantalla LCD. El exceso de presión podría causar daños permanentes en la pantalla.
4. No retire la cubierta ni intente reparar la unidad por sí mismo. Cualquier reparación debe correr a cargo de un técnico autorizado.
5. Guarde el monitor LCD en una habitación con una temperatura entre -20º y 60º C (de -4° a 140° F). Si guarda el monitor LCD en
un lugar con una temperatura superior o inferior podría sufrir daños permanentes.
6. Desenchufe inmediatamente el monitor y llame a un técnico autorizado si se produce cualquiera de las siguientes situaciones:
• El cable de señal del monitor al PC está desgastado o dañado.
• Se ha vertido líquido sobre el monitor LCD o el monitor se ha expuesto a la lluvia.
• El monitor LCD o la carcasa están dañados.
Colocación del monitor en la base
1. Extraiga el monitor de su embalaje.
2. Acople el soporte a la base (para modelos seleccionados).
3. Gire hacia la derecha para bloquearlo. Asegúrese de que la base está sujeta al soporte (para modelos seleccionados).
4. Para sujetar la base, gire el tornillo con una herramienta adecuada o una moneda del tamaño adecuado (para modelos
seleccionados).
Conexión del monitor a un ordenador
1. Apague el monitor y desconecte el cable de alimentación del ordenador.
2. 2-1 Conecte el cable HDMI
a. Asegúrese de que tanto el monitor como el ordenador están apagados.
b. Conecte el cable HDMI al ordenador.
2-2 Conecte el cable DP
a. Asegúrese de que tanto el monitor como el ordenador están apagados.
b. Conecte el cable DP al ordenador.
3. Conecte el cable de audio. (Opcional)
4. Introduzca el cable de alimentación del monitor en el puerto de la parte
posterior del monitor.
5. Conecte los cables de alimentación del ordenador y el monitor a una
toma de corriente cercana.
6. Seleccione Carga USB en estado de apagado ON/OFF para activar
o desactivar la función de Carga USB en estado de apagado.
Controles externos
N.º Icono Elemento Descripción
1, 2
Indicador/Botón de
encendido
Apaga o enciende el monitor. El color
azul indica que está encendido. El color
ámbar indica el modo de espera/ahorro
de energía.
3 Funciones de OSD
Pulse para ver el OSD. Vuelva a pulsar
para realizar una selección en el OSD.
4
Input
Botón de entrada
Pulse para cambiar entre las fuentes de
entrada.
5 Botón de volumen
Pulse para activar la escala desplazable
de volumen.
6OD
Pulse la tecla para activar la función OD
y ajustarla en modo Normal o Extremo.
Si el OSD está activo, pulse para introducir
una selección.
7 Modo Juego
Pulse para activar el control del Modo
Juego.
DP
HDMI
POWER
HDMI
DP
1234567

Español
Normativa y avisos de seguridad
Aviso de la FCC
Este dispositivo se ha probado y comprobado que cumple con los límites para un dispositivo digital de Clase B conforme a la Parte 15
de las normas de la FCC. Estos límites están diseñados para proporcionar una protección razonable frente a interferencias dañinas
en una instalación residencial. Este dispositivo genera, utiliza y puede irradiar energía de radiofrecuencia y, si no se instala ni
utiliza conforme a las instrucciones, podría causar interferencias dañinas en las comunicaciones de radio.
No obstante, no puede garantizarse que las interferencias no se produzcan en instalaciones concretas. Si este dispositivo causa
interferencias dañinas en la recepción de radio o televisión, lo que puede determinarse apagando y encendiendo el dispositivo,
el usuario puede intentar solucionar las interferencias de las siguientes maneras:
Cambiar la orientación de la antena receptora o colocarla en otro lugar.
Aumentar la separación entre el dispositivo y el receptor.
Conectar el dispositivo a una toma de corriente en un circuito distinto al que se ha conectado el receptor.
Consulte con el distribuidor o un técnico especializado en radio y televisión para recibir asistencia.
Declaración de conformidad CE
Por la presente, Acer Inc. declara que este monitor LCD cumple con los requisitos y otras provisiones relevantes de la directiva EMC
2004/108/EC, la directiva de bajo voltaje 2006/95/EC, la directiva RoHS 2011/65/EU y la directiva 2009/125/EC relacionadas con la
creación de un marco para el establecimiento de requisitos de ecodiseño para productos relacionados con la energía.
Aviso:
Para evitar daños en el monitor, no lo levante sujetándolo por la base.
Aviso: Cables blindados
Las conexiones a otros dispositivos informáticos deben realizarse con cables blindados, a fin de cumplir con las normativas de la EMC.
Aviso: Dispositivos periféricos
Solo deben conectarse a este equipo aquellos periféricos (dispositivos de entrada/salida, terminales, impresoras, etc.) certificados
que cumplan con los límites de la Clase B. Si se utiliza con periféricos sin certificación, es posible que se produzcan interferencias en
la recepción de radio y televisión.
Precaución
Cualquier cambio o modificación no aprobado expresamente por el fabricante podría anular la autoridad del usuario, concedida
por la Comisión Federal de Comunicaciones, para utilizar el producto.
Condiciones de funcionamiento
Este dispositivo cumple con la Parte 15 de las normas de la FCC. El funcionamiento está sujeto a las siguientes condiciones: (1) este
dispositivo no puede causar interferencias dañinas y (2) este dispositivo debe aceptar cualquier interferencia recibida, incluidas
aquellas que puedan provocar un funcionamiento no deseado.
Aviso: Usuarios de Canadá
Este aparato digital de Clase B cumple con la normativa canadiense ICES-003.
Remarque à l'intention des utilisateurs canadiens
Cet appareil numérique de la classe B est conforme à la norme NMB-003 du Canada.
Eliminación de equipo obsoleto por parte de los usuarios en una vivienda privada en la
Unión Europea
La aparición de este símbolo en el producto o su embalaje indica que no es posible eliminarlo con el resto de residuos
domésticos. En su lugar, el usuario es responsable de eliminar el equipo obsoleto llevándolo a un punto de recogida
designado para el reciclaje de equipo eléctrico y electrónico. El reciclaje y la recogida por separado del equipo
obsoleto en el momento de su eliminación ayudarán a conservar los recursos naturales y garantizar que se recicla
de una forma que proteja la salud humana y el medio ambiente. Para obtener más información sobre dónde puede
llevar su equipo obsoleto para reciclarlo, póngase en contacto con el ayuntamiento de su localidad, el servicio de
eliminación de residuos o el establecimiento donde compró el producto.

Español
ESPECIFICACIONES
Puede encontrar manuales y otros documentos para su producto de Acer en el sitio web oficial de asistencia de Acer.
*El consumo de energía anual se calcula a partir del consumo de energía típico de 4 horas al día, los 365 días del año.
Panel LCD
Sistema de conducción Pantalla LCD TFT en color
Tamaño 27”W (69 cm)
Distancia entre píxeles 0,1552 mm (horizontal) x 0,1552 mm (vertical)
Brillo
300 cd/m
2
(típico)
Contraste 1000:1
Ángulo de visión 178° (horizontal) 178° (vertical) (CR=10)
Tiempo de respuesta 4 ms (G a G)
Tipo de panel In-Plane Switching (IPS)
Vídeo Interfaz analógica R, G, B
Frecuencia H 31 kHz - 135 kHz
Frecuencia V 24 - 75 Hz
Colores de la pantalla 1,07 billones
Reloj de punto 594 MHz
Resolución máxima 3840 x 2160 a 60 Hz
Plug & Play VESA DDCCI/DDC2B
Clase de eficiencia energética C
*Consumo de energía anual 74 (kWh) (para el modelo de entrada HDMI)
Consumo de energía
(a 200 unidades)
Modo encendido 71,5 W (típico)
Modo de suspensión 0,42 W (típico)
Modo apagado 0,39 W (típico)
Conector de entrada
HDMI de 19 clavijas
DP de 20 clavijas
Señal de entrada de vídeo
HDMI
DP
Altavoces 2 W x 2 (Solo modelo de entrada de audio) (Opcional)
USB USB 3.0 x 4
Tamaño máximo de pantalla
Horizontal: 596,16 mm
Vertical: 335,34 mm
Fuente de alimentación 100-240 V, 50/60 Hz
Consideraciones ambientales
Temperatura de funcionamiento: de 5° a 35°C
Temperatura de almacenamiento: de -20° a 60°C
Humedad de funcionamiento: entre el 10% y el 85%
Dimensiones 614,0 (ancho) x 401,4 ~ 551,4 (alto) x 268,4 (diagonal) mm
Peso (peso neto) 7,0 kg (neto)
Especificaciones de funcionamiento
Inclinación: de -5% a +35% (el grado de inclinación máximo en el punto más alto es de 35
grados)
Giro: de -30° a +30°
Ajuste de altura: de 0 mm a 150 mm
Pivote: de -90° a 90°
Soporte extraíble: Sí (soporte extraíble con tornillo)
Controles externos
Interrruptor/Botones
Botón de encendido
MENÚ/INTRODUCIR
Entrada
Volumen
OD
Modo Juego
Funciones
Contraste
Brillo
Satur. 6 ejes
Temp. Color
Luz azul
eColor
Gamma
Adaptive contrast
Dark boost
sRGB Mode
Saturar
Refresh rate number
Transparencia
Punto de mira
OD
DTS (determinados modelos)
ULMB
Inicio rápi.
Modo Juego
Carga USB en estado de apagado
Idioma
T. de espera OSD
Selección de la señal de entrada (solo en modelos con entrada dual)
Información de la pantalla
Reiniciar
Salida
Todas las especificaciones están sujetas a cambios sin aviso previo.

Français
Guide de démarrage rapide (QSG) – Moniteur LCD Acer
Instructions importantes de sécurité
Veuillez lire attentivement les instructions ci-dessous.
1. Pour nettoyer l'écran du moniteur LCD : Assurez-vous que l'alimentation requise pour votre moniteur correspond à l'alimentation
secteur dans la zone géographique où vous vous trouvez.
• Éteignez le moniteur LCD et débranchez le cordon d'alimentation.
• Pulvérisez une solution de nettoyage sans solvant sur un chiffon et nettoyez l'écran doucement.
• NE VAPORISEZ OU NE VERSEZ JAMAIS DE LIQUIDE SUR L’ÉCRAN OU LE BOÎTIER.
• VEUILLEZ NE PAS UTILISER DE PRODUITS DE NETTOYAGE À BASE D’AMMONIAC OU D’ALCOOL SUR L’ÉCRAN LCD OU LE
BOÎTIER.
• Acer ne sera pas responsable de dommages résultant de l'utilisation de produits de nettoyage à base d’ammoniaque ou d’alcool.
2. Ne placez pas le moniteur LCD à proximité d'une fenêtre. L'exposition du moniteur à la pluie, à l'humidité ou à la lumière du
soleil peut gravement l'endommager.
3. N'appuyez pas sur l'écran LCD. Une pression excessive peut endommager l'écran de manière définitive.
4. Ne retirez pas le boîtier et ne tentez pas de réparer l'appareil vous-même. Tout entretien ou réparation doit être effectué par
un technicien autorisé.
5. Entreposez le moniteur LCD dans une pièce dont la température est comprise entre -20 et 60 °C (-4 et 140 °F). Le stockage du
moniteur LCD à des températures inférieures ou supérieures peut l'endommager de manière définitive.
6. Si l'une des situations suivantes se présente, débranchez immédiatement votre moniteur et appelez un technicien autorisé :
• Le câble de signal entre le moniteur et le PC est effiloché ou endommagé.
• Le moniteur reçoit des projections d'eau ou est exposé à la pluie.
• Le moniteur LCD ou son boîtier est endommagé.
Fixation du moniteur sur son socle
1. Retirez le moniteur de l'emballage.
2. Fixez le pied sur le socle. (Pour certains modèles)
3. Faites-pivoter le pied dans le sens horaire pour le fixer. Vérifiez que le socle est bien fixé au pied. (Pour certains modèles)
4. Assurez la fixation du socle sur le pied en faisant tourner la vis à l'aide d'une languette ou d'une pièce de monnaie adaptée.
(Pour certains modèles)
Connexion de votre moniteur à un ordinateur
1. Éteignez votre moniteur et débranchez le cordon d'alimentation de
votre ordinateur.
2. 2-1 Branchez le câble HDMI.
a. Assurez-vous que le moniteur et l'ordinateur sont tous deux éteints.
b. Branchez le câble HDMI à l'ordinateur.
2-2 Branchez le câble DP.
a. Assurez-vous que le moniteur et l'ordinateur sont tous deux éteints.
b. Branchez le câble DP à l'ordinateur.
3. Branchez le câble audio (en option).
4. Insérez le câble d'alimentation du moniteur dans le port d'alimentation
à l'arrière de l'écran.
5. Branchez les cordons d'alimentation de votre ordinateur et de votre
moniteur sur une prise électrique à proximité.
6. Utilisez le commutateur Chargement USB à l'arrêt pour activer et
désactiver la fonction de recharge USB quand l'appareil est éteint.
Commandes externes
No Icône Élément Description
1, 2
Bouton/voyant
d'alimentation
Permet d'allumer et d'éteindre le moniteur.
Bleu : l'appareil est allumé. Orange : mode
veille/mode d'économie d'énergie.
3
Fonctions du
menu à l'écran
Appuyez pour afficher le menu à l'écran.
Appuyez à nouveau pour effectuer une
sélection dans le menu à l'écran.
4
Input
Bouton Entrée Appuyez pour changer de source d'entrée.
5 Bouton Volume
Appuyez pour activer la barre de réglage
du volume.
6OD
Appuyez sur cette touche pour activer la
fonction OD et la définir sur le mode Normal
ou Extrême. Si le menu à l'écran est actif,
appuyez pour effectuer une sélection.
7 Mode Jeu
Appuyez pour activer les commandes du
Mode jeu.
DP
HDMI
POWER
HDMI
DP
1234567

Français
Réglementation et consignes de sécurité
Avis FCC
Cet appareil a été testé et les résultats de ces tests ont révélé qu'il respecte les limites d'un appareil numérique de classe B,
en conformité avec la réglementation de la section 15 de la FCC. Ces limites sont conçues pour offrir une protection raisonnable
contre les interférences nuisibles dans une installation résidentielle. Cet appareil produit, utilise et peut émettre un rayonnement
électromagnétique et, s'il n'est pas installé et utilisé conformément à aux instructions, peut provoquer des interférences nuisibles
aux communications radio.
Cependant, il est impossible de garantir qu'aucune interférence ne se produira dans certaines installations. Si cet appareil provoque
des interférences qui affectent la réception d'un poste de radio ou de télévision, ce que vous pouvez déterminer en éteignant puis
en allumant l'appareil, nous vous encourageons à essayer de les corriger en employant au moins l'une des méthodes suivantes :
Réorientez ou déplacez l'antenne de réception.
Éloignez l'appareil du récepteur.
Branchez l'appareil sur une prise située sur un circuit différent de celui sur lequel le récepteur est branché.
Consultez le revendeur ou un technicien en radio et télévision expérimenté pour obtenir une assistance.
Déclaration de conformité CE
Acer, Inc. déclare par la présente que cet appareil est conforme aux obligations essentielles et autres clauses pertinentes de la
directive CEM 2004/108/CE, de la directive sur les faibles voltages 2006/95/CE, de la directive RoHS 2011/65/UE et de la directive
2009/125/CE concernant l'établissement d'un cadre fixant des exigences d'écoconception pour les produits liés à l'énergie.
Avis :
Afin d’éviter d’endommager le moniteur, ne soulevez pas le moniteur par sa base.
Avis : Câbles blindés
Toutes les connexions vers d'autres appareils informatiques doivent être établies à l'aide de câbles blindés afin d'assurer la conformité
aux réglementations EMC.
Avis : Périphériques
Seuls des périphériques (appareils d'entrée/sortie, terminaux, imprimantes, etc.) certifiés conformes aux limites de la classe B doivent
être connectés à cet appareil. Toute utilisation avec des périphériques non certifiés est susceptible d'entraîner des perturbations
de la réception radio ou télévision.
Attention
Les changements ou modifications qui ne seraient pas expressément approuvés par le fabricant peuvent rendre nul le droit de
l'utilisateur à faire fonctionner ce produit, droit qui lui est accordé par la Federal Communications Commission.
Conditions de fonctionnement
Cet appareil est conforme à la partie 15 de la réglementation de la FCC. Il peut être utilisé sous les deux conditions suivantes :
(1) cet appareil ne doit pas causer d'interférences nuisibles, et (2) cet appareil doit accepter toute interférence reçue, notamment
celles susceptibles de causer un fonctionnement indésirable.
Avis : Utilisateurs canadiens
Cet appareil numérique de classe B est conforme à la norme canadienne ICES-003.
Remarque à l'intention des utilisateurs canadiens
Cet appareil numérique de la classe B est conforme à la norme NMB-003 du Canada.
Mise au rebut des équipements usagés par les utilisateurs faisant partie de ménages
privés dans l'Union européenne
Ce symbole sur le produit ou sur son emballage indique que le produit ne doit pas être jeté avec les autres ordures
ménagères. Il relève donc de votre responsabilité de recycler ce déchet d'équipement électronique en le remettant
à un point de collecte prévu pour les déchets électriques et électroniques. Le tri, l'élimination et le recyclage séparés
de vos équipements usagés permettent de préserver les ressources naturelles et de s'assurer que ces équipements
sont recyclés dans le respect de la santé humaine et de l'environnement. Pour plus d'informations quant aux lieux
d'élimination des déchets d'équipements électriques, vous pouvez contacter votre mairie, le service local de traitement
des ordures ménagères ou le commerçant auprès duquel vous avez acheté le produit.

Français
CARACTÉRISTIQUES
Vous pouvez trouver les manuels et autres documents pour votre produit Acer sur le site Web d'assistance Acer officiel.
* La consommation d'énergie annuelle est calculée à partir d'une consommation d'énergie typique de 4 heures par jour, 365 jours
par an.
Panneau LCD
Technologie TFT-LCD couleur
Taille 27”W (69 cm)
Espacement des pixels 0,1552 mm (H) x 0,1552 mm (V)
Luminosité
300 cd/m
2
(typique)
Contraste 1000:1
Angle de vision 178° (H) 178° (V) (CR = 10)
Temps de réponse 4 ms (gris à gris)
Type de panneau In-Plane Switching (IPS)
Vidéo Interface Analogique R, V, B
Fréquence horizontale 31 kHz à 135 kHz
Fréquence verticale 24 à 75 Hz
Couleurs affichées 1,07 milliards
Fréquence 594 MHz
Résolution maximale 3840 x 2160 à 60 Hz
Plug-and-Play VESA DDCCI/DDC2B
Classe d'efficacité énergétique C
*Consommation annuelle d'énergie 74 (kWh) (pour le modèle à entrée HDMI)
Consommation électrique
(à 200 nits)
Mode Marche 71,5 W (typique)
Mode Veille 0,42 W (typique)
Mode Arrêt 0,39 W (typique)
Connecteur d'entrée
HDMI 19 broches
DP 20 broches
Signal vidéo d'entrée
HDMI
DP
Haut-parleurs 2 W x 2 (modèle à entrée audio uniquement) (en option)
USB USB 3.0 x 4
Taille maximale de l'écran
Horizontalement : 596,16 mm
Verticalement : 335,34 mm
Source d'alimentation 100 à 240 V, 50/60 Hz
Conditions environnementales
Temp. de fonctionnement : 5 à 35 °C
Temp. de stockage : -20 à 60 °C
Humidité de fonctionnement : 10 à 85 %
Dimensions 614,0 (L) x 401,4 ~ 551,4 (H) x 268,4 (P) mm
Poids (net) 7,0 kg (net)
Caractéristiques mécaniques
Inclinaison : -5 à +35° (l'inclinaison de 35 degrés est possible uniquement au plus haut point
pour l'angle d'élévation)
Rotation : -30 à +30°
Réglage de la hauteur : 0 à 150 mm
Pivot : -90 à 90°
Pied amovible : Oui (pied détachable avec maintien par vis)
Commandes externes
Commutateur/boutons
Bouton d'alimentation
MENU/ENTRÉE
Entrée
Volume
OD
Mode Jeu
Fonctions
Contraste
Luminosité
Saturation 6 axes
Temp. Couleur
Lumière bleue
eColor
Gamma
Adaptive contrast
Dark boost
sRGB Mode
Saturé
Refresh rate number
Transparence
Point de visée
OD
DTS (sur certains modèles)
ULMB
Dém. rapide
Mode Jeu
Chargement USB à l'arrêt
Langue
Délai de l'OSD
Sélection du signal d'entrée (modèle à double entrée uniquement)
Informations sur l'écran
Restaurer
Quitter
Les caractéristiques peuvent faire l'objet de modifications sans préavis.

Italiano
Guida di avvio rapido (QSG) del monitor LCD Acer
Istruzioni importanti sulla sicurezza
Leggere attentamente le seguenti istruzioni.
1. Pulizia dello schermo del monitor LCD: Accertarsi che i valori nominali elettrici del monitor siano compatibili con l'alimentazione
CA disponibile nella propria sede.
• Spegnere il monitor LCD e scollegare la presa di alimentazione.
• Spruzzare una soluzione insolubile per la pulizia su un panno e pulire delicatamente lo schermo.
• NON SPRUZZARE O VERSARE LIQUIDI DIRETTAMENTE SULLO SCHERMO O SUL CASE.
• NON USARE SOLVENTI A BASE DI AMMONIACA O ALCOOL SULLO SCHERMO LCD O SUL CASE.
• Acer non sarà responsabile per danni causati dall'uso di qualsiasi solvente a base di ammoniaca o alcool.
2. Non posizionare il monitor LCD vicino a una finestra. L'esposizione alla pioggia, all'umidità o alla luce solare può danneggiare
gravemente il monitor.
3. Non applicare pressione sullo schermo LCD. Una pressione eccessiva può causare danni permanenti allo schermo.
4. Non rimuovere il coperchio né tentare di riparare autonomamente questa unità. Tutte le riparazioni devono essere eseguite
da un tecnico autorizzato.
5. Installare il monitor LCD in una stanza con una temperatura compresa tra i -20° e i 60 °C (da -4° a 140 °F). L'installazione del
monitor LCD al di fuori di questo intervallo di temperature può causare danni permanenti.
6. Scollegare immediatamente il monitor e contattare un tecnico autorizzato se si verificano le seguenti condizioni:
• Il cavo di segnale dal monitor al PC è usurato o danneggiato.
• Del liquido penetra nel monitor LCD o il monitor viene esposto alla pioggia.
• Il monitor LCD o la scocca sono danneggiati.
Collegamento del monitor alla base
1. Estrarre il monitor dalla confezione.
2. Collegare il piedistallo alla base (per i modelli selezionati).
3. Ruotare in senso orario per bloccare. Accertarsi che la base sia bloccata sul piedistallo (per i modelli selezionati).
4. Fissare la base al piedistallo ruotando la vite con uno strumento a testa piatta o con una monetina compatibile (per i modelli
selezionati).
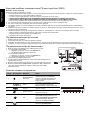
Collegamento del monitor a un computer
1. Spegnere il monitor e scollegare il cavo di alimentazione del computer.
2. 2-1 Collegare il cavo HDMI
a. Accertarsi che il monitor e il computer siano spenti.
b. Collegare il cavo HDMI al computer.
2-2 Collegare il cavo DP
a. Accertarsi che il monitor e il computer siano spenti.
b. Collegare il cavo DP al computer.
3. Collegare il cavo audio. (Opzionale)
4. Inserire il cavo di alimentazione del monitor nella porta di
alimentazione nella parte posteriore del monitor.
5. Collegare i cavi di alimentazione del computer e del monitor a una
presa elettrica nelle vicinanze.
6. Selezionare Spegnimento carica USB per Attiva/Spento la funzione
Spegnimento carica USB.
Controlli esterni
N. Icona Elemento Descrizione
1, 2
Pulsante/indicatore
di alimentazione
Consente di accendere/spegnere il monitor.
Il colore blu indica che il monitor è acceso.
Il colore ambra indica che il monitor è in
standby/modalità di risparmio energetico.
3 Funzioni OSD
Premere per visualizzare l'OSD. Premere
nuovamente per immettere una selezione
nell'OSD.
4
Input
Pulsante Input
Premere per scorrere Ie diverse opzioni di
ingresso.
5 Pulsante Volume
Premere per attivare la scala di scorrimento
del volume.
6OD
Premere il tasto per attivare la funzione
OD e impostarla sulla modalità Normale
o Estremo. Se l'OSD è attivo, premere per
immettere una selezione.
7 Modalità gioco
Premere per attivare il comando Modalità
gioco.
DP
HDMI
POWER
HDMI
DP
1234567
Sidan laddas ...
Sidan laddas ...
Sidan laddas ...
Sidan laddas ...
Sidan laddas ...
Sidan laddas ...
Sidan laddas ...
Sidan laddas ...
Sidan laddas ...
Sidan laddas ...
Sidan laddas ...
Sidan laddas ...
Sidan laddas ...
Sidan laddas ...
Sidan laddas ...
Sidan laddas ...
Sidan laddas ...
Sidan laddas ...
Sidan laddas ...
Sidan laddas ...
Sidan laddas ...
Sidan laddas ...
Sidan laddas ...
Sidan laddas ...
Sidan laddas ...
Sidan laddas ...
Sidan laddas ...
Sidan laddas ...
Sidan laddas ...
Sidan laddas ...
Sidan laddas ...
Sidan laddas ...
Sidan laddas ...
Sidan laddas ...
Sidan laddas ...
Sidan laddas ...
Sidan laddas ...
Sidan laddas ...
Sidan laddas ...
Sidan laddas ...
Sidan laddas ...
Sidan laddas ...
Sidan laddas ...
Sidan laddas ...
Sidan laddas ...
Sidan laddas ...
Sidan laddas ...
Sidan laddas ...
Sidan laddas ...
Sidan laddas ...
Sidan laddas ...
Sidan laddas ...
Sidan laddas ...
Sidan laddas ...
Sidan laddas ...
Sidan laddas ...
Sidan laddas ...
Sidan laddas ...
Sidan laddas ...
Sidan laddas ...
Sidan laddas ...
Sidan laddas ...
Sidan laddas ...
Sidan laddas ...
Sidan laddas ...
Sidan laddas ...
Sidan laddas ...
Sidan laddas ...
Sidan laddas ...
Sidan laddas ...
Sidan laddas ...
Sidan laddas ...
Sidan laddas ...
Sidan laddas ...
Sidan laddas ...
Sidan laddas ...
Sidan laddas ...
Sidan laddas ...
Sidan laddas ...
Sidan laddas ...
Sidan laddas ...
Sidan laddas ...
Sidan laddas ...
Sidan laddas ...
Sidan laddas ...
Sidan laddas ...
Sidan laddas ...
Sidan laddas ...
Sidan laddas ...
Sidan laddas ...
Sidan laddas ...
Sidan laddas ...
Sidan laddas ...
Sidan laddas ...
Sidan laddas ...
Sidan laddas ...
Sidan laddas ...
-
 1
1
-
 2
2
-
 3
3
-
 4
4
-
 5
5
-
 6
6
-
 7
7
-
 8
8
-
 9
9
-
 10
10
-
 11
11
-
 12
12
-
 13
13
-
 14
14
-
 15
15
-
 16
16
-
 17
17
-
 18
18
-
 19
19
-
 20
20
-
 21
21
-
 22
22
-
 23
23
-
 24
24
-
 25
25
-
 26
26
-
 27
27
-
 28
28
-
 29
29
-
 30
30
-
 31
31
-
 32
32
-
 33
33
-
 34
34
-
 35
35
-
 36
36
-
 37
37
-
 38
38
-
 39
39
-
 40
40
-
 41
41
-
 42
42
-
 43
43
-
 44
44
-
 45
45
-
 46
46
-
 47
47
-
 48
48
-
 49
49
-
 50
50
-
 51
51
-
 52
52
-
 53
53
-
 54
54
-
 55
55
-
 56
56
-
 57
57
-
 58
58
-
 59
59
-
 60
60
-
 61
61
-
 62
62
-
 63
63
-
 64
64
-
 65
65
-
 66
66
-
 67
67
-
 68
68
-
 69
69
-
 70
70
-
 71
71
-
 72
72
-
 73
73
-
 74
74
-
 75
75
-
 76
76
-
 77
77
-
 78
78
-
 79
79
-
 80
80
-
 81
81
-
 82
82
-
 83
83
-
 84
84
-
 85
85
-
 86
86
-
 87
87
-
 88
88
-
 89
89
-
 90
90
-
 91
91
-
 92
92
-
 93
93
-
 94
94
-
 95
95
-
 96
96
-
 97
97
-
 98
98
-
 99
99
-
 100
100
-
 101
101
-
 102
102
-
 103
103
-
 104
104
-
 105
105
-
 106
106
-
 107
107
-
 108
108
-
 109
109
-
 110
110
-
 111
111
-
 112
112
-
 113
113
-
 114
114
-
 115
115
-
 116
116
-
 117
117


på andra språk
- italiano: Acer XB271HK Manuale del proprietario
- čeština: Acer XB271HK Návod k obsluze
- slovenčina: Acer XB271HK Návod na obsluhu
- eesti: Acer XB271HK Omaniku manuaal
- español: Acer XB271HK El manual del propietario
- Deutsch: Acer XB271HK Bedienungsanleitung
- polski: Acer XB271HK Instrukcja obsługi
- português: Acer XB271HK Manual do proprietário
- français: Acer XB271HK Le manuel du propriétaire
- 日本語: Acer XB271HK 取扱説明書
- Türkçe: Acer XB271HK El kitabı
- English: Acer XB271HK Owner's manual
- dansk: Acer XB271HK Brugervejledning
- русский: Acer XB271HK Инструкция по применению
- suomi: Acer XB271HK Omistajan opas
- Nederlands: Acer XB271HK de handleiding
- română: Acer XB271HK Manualul proprietarului