


emtypageinsideco
ver


English
6English
Introduction
Thanks for buying this Philips product! To fully benefit from the support that Philips offers, register your
product at www.philips.com/register-speedpro-aqua
Important safety information
Read this important information carefully before you use the appliance and its accessories and save it for
future reference. The accessories supplied may vary for different products.
Danger
-Never vacuum up water or any other liquid. Never vacuum up flammable substances and do not vacuum
up ashes until they are cold.
-Never immerse the appliance or the adapter in water or any other liquid, nor rinse it under the tap.
Warning
-Check if the voltage indicated on the adapter corresponds to the local mains voltage before you connect
the appliance.
-Always check the appliance before you use it. Do not use the appliance or the adapter if it is damaged.
Always replace a damaged part with one of the original type.
-The adapter contains a transformer. Do not cut off the adapter to replace it with another plug, as this
causes a hazardous situation.
-This appliance can be used by children aged from 8 years and above and persons with reduced physical,
sensory or mental capabilities or lack of experience and knowledge if they have been given supervision
or instruction concerning use of the appliance in a safe way and understand the hazards involved.
Children shall not play with the appliance. Cleaning and user maintenance shall not be made by children
without supervision.
-Always keep the magnetic charging disc away from very small children.
-The plug must be removed from the socket-outlet before cleaning or maintaining the appliance.
-Unplug the adapter if you are not going to use the appliance for some time.
-When storing the appliance for more than a month (without usage or charging), make sure that the
battery is charged to at least 50%. Storing the appliance with an empty battery may lead to irreversible
damage to the battery.
-Also make sure that the adapter is unplugged when the appliance is stored.
-Do not let the motorized brush move over the mains cords of other appliances or other cables as this
may cause a hazard.
-Keep loose clothing, hair and body parts away from the motorized brushes.
-Do not cover or block the ventilation openings when the appliance is operating.
-This vacuum cleaner is designed for household use only. Do not use this vacuum cleaner to vacuum up
building waste, cement dust, ashes, fine sand, lime and similar substances. Never use the vacuum cleaner
without any of the filters. This could damage the motor and shorten the life of the vacuum cleaner.
Always clean all parts of the vacuum cleaner as shown in the user manual. Do not clean any parts with
water and/or cleaning agents if this is not specifically shown in the user manual.
-Only charge the appliance with the adapter supplied. Only use 25V adapter ZD12D250050 or 29V
adapter ZD12D290050. The corresponding adapter number can be found on the adapter.
-Charge, use and store the product at a temperature between 5°C and 40°C.
-Do not open, modify, pierce, damage or dismantle the product or battery to prevent batteries from
heating up or releasing toxic or hazardous substances. Do not short-circuit, overcharge or reverse charge
batteries.

7
English
-Keep product and batteries away from fire and do not expose them to direct sunlight or high
temperatures.
-If the product becomes abnormally hot or smelly, changes color or if charging takes longer than usual,
stop using and charging the product and contact Philips.
-Do not place products and their batteries in microwave ovens or on induction cookers.
-If batteries are damaged or leaking, avoid contact with the skin or eyes. If this occurs, immediately rinse
well with water and seek medical care.
-This product contains a rechargeable battery. The battery may only be replaced by a qualified service
engineer.
-Take the appliance to an authorized Philips service center when you can no longer recharge it or when it
runs out of power quickly.
Caution
-During charging, the adapter becomes warm to the touch. This is normal.
-Do not plug in, unplug or operate the appliance with wet hands.
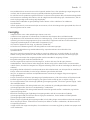
-Do not remove the adapter from the wall socket by pulling at the cord (Fig. 1). When you do not use the
charging station for charging, always unplug the appliance by first detaching the magnetic charging disc
from the underside of the appliance (Fig. 2).
-Always switch off the appliance after use and before you charge it.
-Never block the exhaust air openings during vacuuming.
-Do not clean the dust container and the dust container lid in the dishwasher. They are not dishwasher-
proof.
-Make sure to wash the filter at least once every two weeks by hand only, to ensure best performance.
Squeeze until the water is clean. Let the filter dry for 24 hours before reuse.
-Do not clean the filter with scouring pads or abrasive cleaning agents.
-Always use the vacuum cleaner with the filter assembled.
-If you clean the filter with water, make sure that it is completely dry before you put it back into the dust
container. Do not dry the filter in direct sunlight, on the radiator or in the tumble dryer.
-Replace the filter if it can no longer be cleaned properly or if it is damaged (see 'Ordering accessories').
-Never use any accessories or parts from other manufacturers or that Philips does not specifically
recommend. If you use such accessories or parts, your warranty becomes invalid.
-Make sure that the appliance is installed with the charging station attached to the wall according to the
instructions in the user manual.
-Be careful when you drill holes in the wall to attach the charging station, to avoid the risk of electric
shock.
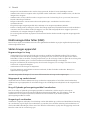
-As this appliance uses water to clean, the floor may remain wet and slippery for a while (Fig. 3).
-To prevent damage, do not use liquid floor cleaners that are not transparent or even milky.
-To prevent damage, never put wax, oil, floor maintenance products or liquid floor cleaners that are not
water-dilutable in the water tank.
-To prevent damage, never put ethereal oils or similar substances in the water tank or let the appliance
pick them up.
-Do not mix different types of liquid floor cleaner. When you have used one liquid floor cleaner, first
empty and rinse the water tank before you add another liquid floor cleaner to the water in the water
tank.
-Never exceed the maximum quantities mentioned on the bottle when you use a liquid floor cleaner. Do
not add more than a few drops to the water in the water tank, as this tank has a capacity of 200ml.
-Do not lift or tilt the nozzle when the water tank is assembled and full, as water may spray out of the
water tank.

8English
-Do not clean the metal wetting strip with a sharp object, as this may damage the strip. Only clean the
wetting strip by rinsing it under the tap. Replace the wetting strip when you can no longer clean it.
-Replace the wetting strip only with an original strip. For ordering a new strip, see chapter 'Ordering
accessories'.
-Clean the water tank according to the instructions. The water tank is not dishwasher-proof.
-Do not use aggressive cleaning agents or tools to clean the Aqua Boost pedal.
-After mopping the floors, do not store the appliance with the water tank attached on the charging
station. If you do this, the wet mopping pad will touch the wall and this may damage the wall. Always
remove the water tank before you store the appliance.
-To guarantee good cleaning results and proper functioning of the appliance and water tank, always use
original Philips cleaning pads.
Electromagnetic fields (EMF)
This Philips appliance complies with all applicable standards and regulations regarding exposure to
electromagnetic fields.
Using the appliance
Usage restrictions
-Only use the water tank on hard floors with a water-resistant top coat (such as linoleum, enameled tiles
and varnished parquet) and stone floors (such as marble). If your floor has not been treated to make it
water-resistant, check with the manufacturer if you can use water to clean it. Do not use the water tank
on hard floors of which the water-resistant top coat is damaged.
-Only use the water tank on linoleum floors that are properly affixed to prevent linoleum from being
drawn into the mopping nozzle.
-Do not use the water tank to clean carpets.
-Do not move the appliance with water tank assembled sideways, as this leaves water traces. Only move
forwards and backwards.
Note: The operating time depends on the power level used during cleaning.
Mopping pad and wetting strip
The appliance comes with one wetting strip and two identical microfiber mopping pads. With the water
tank, wetting strip and microfiber mopping pad attached to the standard floor nozzle, you can clean hard
floors.
Using liquid floor cleaner in the water tank
If you want to add a liquid floor cleaner to the water in the water tank, make sure that you use a low-
foaming or non-foaming liquid floor cleaner that can be diluted in water. As the water tank has a capacity
of 200ml, you only have to add a few drops of liquid floor cleaner to the water.
Cleaning the water tank
To clean the water tank, mix one part vinegar with three parts water. Pour this mixture into the water tank
and close the cap. Shake the water tank and put the water tank on a water-resistant surface. Leave the
water-vinegar mixture in the water tank overnight. Then empty the water tank, rinse it thoroughly with
fresh water, and use it normally again.
Caution: Water will leak from the water tank during cleaning, with and without the wetting strip
attached to the nozzle.

9
English
To empty the water tank, hold the water tank over a sink, remove the cap and tilt the water tank to the side
of the filling hole. Then turn the water tank over to let the water flow into the sink. To remove the
remaining water from the water tank, turn the water tank on its long side with the filling hole pointing
towards the sink. Then tilt the water tank forwards to let the remaining water flow out of the water tank.
Note: Always store the water tank with the cap removed from the filling hole.
Ordering accessories
To buy accessories or spare parts, visit www.philips.com/parts-and-accessories or go to your Philips
dealer. You can also contact the Philips Consumer Care Center in your country (see the international
warranty leaflet for contact details).
Warranty and support
If you need information or support, please visit www.philips.com/support or read the international
warranty leaflet.
Recycling
-This symbol means that electrical products and batteries shall not be disposed of with normal household
waste (Fig. 4).
-Follow your country’s rules for the separate collection of electrical products and batteries.
Removal of built-in rechargeable battery
The built-in rechargeable battery must only be removed by a qualified professional when the appliance is
discarded. Before removing the battery, make sure that the appliance is disconnected from the wall socket
and that the battery is completely empty.
Take any necessary safety precautions when you handle tools to open the appliance and
when you dispose of the rechargeable battery.
When you handle batteries, make sure that your hands, the product and the batteries are
dry.
To avoid accidental short-circuiting of batteries after removal, do not let battery terminals
come into contact with metal objects (e.g. coins, hairpins, rings). Do not wrap batteries in
aluminum foil. Tape battery terminals or put batteries in a plastic bag before you discard
them.
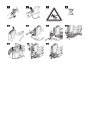
1Disconnect the appliance from the wall socket and let it run until the motor stops.
2Remove the dust container from the appliance.
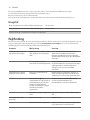
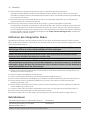
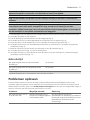
3Pull the display cover from the top of the handgrip (Fig. 5).
4Undo the screw of the handle cover and pull the handle cover off the appliance (Fig. 6).
5Undo the bottom cover screw (1) and then remove the side panels. (Fig. 7)
6Remove the bottom cover screws on the left and right side (1). Then remove the bottom cover (2) (Fig. 8).
7Disconnect the battery connector and the display connector from the printed circuit board (Fig. 9).
8Undo the battery frame screws (Fig. 10).

10 English
9Remove the battery from the appliance and dispose of it according to the rules (Fig. 11).
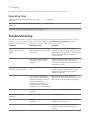
Operating time
Using the appliance with Turbo power mode
(Setting 2)
22 minutes*
Using the appliance with regular power mode
(Setting 1)
50 minutes*
* Based on use of the appliance with the Aqua Nozzle
Troubleshooting
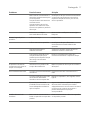
This chapter summarizes the most common problems you could encounter with the appliance. If you are
unable to solve the problem with the information below, visit www.philips.com/support for a list of
frequently asked questions or contact the Consumer Care Center in your country.
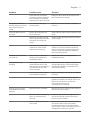
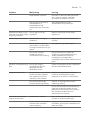
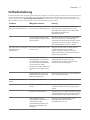
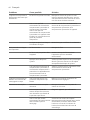
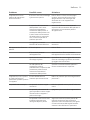
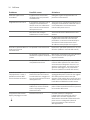
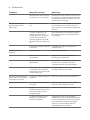
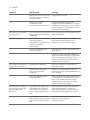
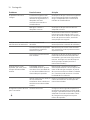
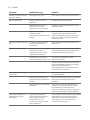
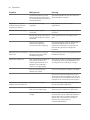
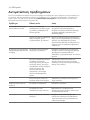
Problem Possible cause Solution
The appliance does not
work when I push the
button.
When the battery is empty,the
bottom segment of the display
flashes red.
To charge the battery, connect the
appliance to the charging station or attach
the magnetic charging disc of the charging
station directly to the the handheld
vacuum cleaner.
You have to push the slider
forward to switch on the
appliance.
Push the slider forward to setting 1 to
switch on. Increase the suction power
further by pushing the slider to setting 2 to
clean dirty surfaces.
The appliance has a lower
suction power than usual.
The filter and the cyclone are
dirty.
Clean the filter and the cyclone. Make sure
that you wash the sponge filter at least
once every two weeks if you use the
appliance regularly.
You have not attached the
dust container lid properly to
the dust container. You have
not attached the dust
container to the appliance
properly. In both cases, there
will be a loss of suction power.
Make sure that you attach the dust
container lid to the dust container and the
dust container to the appliance properly.
An object may be stuck inside
the tube.
Remove the tube and check for blockages.
Dust escapes from the
appliance.
The filter is dirty. Clean the filter.
The filter is not present in the
appliance.
Make sure that the filter is in the appliance
and assembled correctly.
Something blocks the cyclone. Check the cyclone for objects stuck in it
and remove any object that blocks the
cyclone.

11
English
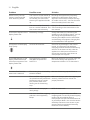
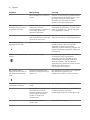
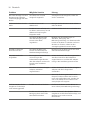
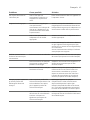
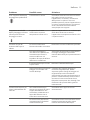
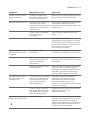
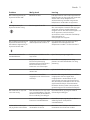
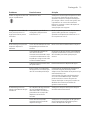
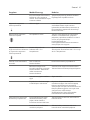
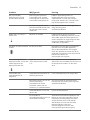
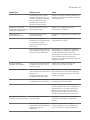
Problem Possible cause Solution
If dust falls out of the dust
container, the dust container
lid is probably not attached
properly to the dust container.
Empty the dust container and attach the
dust container lid correctly.
The appliance does not
move smoothly across the
floor when cleaning a
carpet.
You selected a too high
suction power.
Reduce the suction power by choosing
setting 1.
The brush does not turn
anymore.
The brush encounters too
much resistance.
Clean the brush with a pair of scissors or by
hand.
The brush may stop turning
when it encounters too much
resistance from high-pile
carpet.
Switch off the appliance and then switch it
back on again.
You have not installed the
roller brush in the nozzle
properly after cleaning.
Follow the instructions in the cleaning
chapter of the user manual to slide the
roller brush into the nozzle properly and
secure it inside the nozzle by snapping
home the locking lever.
The LEDs in the nozzle do
not come on.
You have not attached the
nozzle to the appliance or
handheld properly.
Attach the nozzle to the appliance or
handheld properly.
The appliance is not
charging.
The magnetic connector is not
connected correctly to the
charging disk or the adapter is
not inserted into the wall
socket properly.
Make sure that the magnetic connector is
connected properly to the charging disk
and that the adapter is inserted into the
wall socket properly.
You have not connected the
correct adapter and cord.
Make sure that you use the correct adapter
and cord.
If you have checked the above and the
appliance still does not charge, take it to a
Philips service center or contact the
Consumer Care Center via
www.philips.com/support.
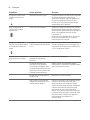
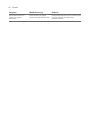
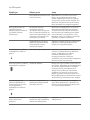
FC6729: The mini turbo
brush does not function
properly.
The roller brush is blocked. Remove hairs from the brush with a pair of
scissors (see user manual).
The roller brush is blocked by
fabric or surfaces during
cleaning.
Keep the mini turbo brush aligned with
the surface and do not push the turbo
brush into soft surfaces.
The mini turbo brush is not
fully closed.
Make sure that the top and bottom parts
of the mini turbo brush are properly
connected and there is no gap between
the two parts. Check if the locking ring is in
closed position (see user manual).

12 English
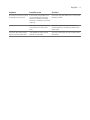
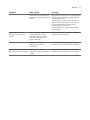
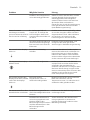
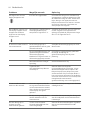
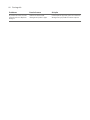
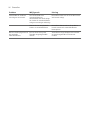
Problem Possible cause Solution
When I use my vacuum
cleaner I sometimes feel
static electricity shocks.
Your vacuum cleaner builds up
static electricity. The lower the
air humidity, the more static
electricity the appliance builds
up.
Discharge the appliance by frequently
holding the tube against other metal
objects in the room (for example the legs
of a table or chair, etc.). You can also raise
the air humidity level in the room.
You vacuumed up fine sand,
lime or a similar substance. This
also causes static electricity.
Empty the dust container and clean the
filter according to the instructions in the
user manual.
The bottom segment of the
display flashes red.
The battery is empty. Charge the battery by connecting the
appliance to the charging station. You can
also charge the appliance directly by
inserting the adapter into the wall socket
and attaching the magnetic charging disc
to the underside of the appliance.
All segments of the display
flash quickly.
An error has occurred. Check for any blockages in the tube or
nozzle. Try recharging the appliance,
emptying the dust container and cleaning
the filter. If this does not help, take the
appliance to a Philips service center or
contact the Consumer Care Center via
www.philips.com/support.
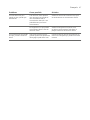
The middle segment of the
display flashes white and
the bottom segment of the
display flashes red.
The appliance is stored or
charged at temperatures
below 5 °C.
Move the appliance to a warmer room. Do
not store or charge the appliance at
temperatures below 5 °C or above 40 °C.
The water flow from the
water tank is reduced.
The wetting strip is blocked by
excessive residue.
Remove the wetting strip and clean it.
The microfiber mopping pad is
not placed correctly and blocks
the wetting strip as a result.
This prevents water from
flowing out of the wetting
strip.
Make sure that you place the mopping pad
correctly. Check the user manual for
proper placement.
The water tank is empty or
nearly empty.
Refill the water tank.
You use a microfiber mopping
pad that is not supplied by
Philips.
Only use an original Philips microfiber
mopping pad. You can buy these mopping
pads in the online Philips shop at
www.philips.com/parts-and-accessories or
at your Philips dealer. You can also contact
the Philips Consumer Care Center in your
country (see the international warranty
leaflet for contact details).

13
English
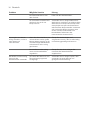
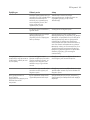
Problem Possible cause Solution
The output of water is faster
and larger than normal.
If the water tank produces an
uncontrolled and too large
amount of water, the cap of
the tank is probably not closed
properly.
Check the cap and make sure it is fully and
properly closed.
The strip is not placed properly
in the bottom of the water
tank.
Check the strip and make sure that it is
fitted properly in the bottom plate of the
water tank.
The floor dries with stripes
when I use the water tank.
You added too much liquid
cleaner to the water.
Use only a few drops or use a cleaner that
foams less.

Dansk
14 Dansk
Introduktion
Tak, fordi du har købt denne Philips-produkt! For at få fuldt udbytte af den support, Philips tilbyder, skal du
registrere dit produkt på www.philips.com/register-speedpro-aqua
Vigtige sikkerhedsoplysninger
Læs disse vigtige oplysninger omhyggeligt igennem, inden apparatet og tilbehøret tages i brug, og gem
dem til eventuel senere brug. Det medfølgende tilbehør kan variere for forskellige produkter.
Fare
-Støvsug aldrig vand eller andre væsker op. Sug aldrig brandbare stoffer op, og sug ikke aske op, før
denne er helt kold.
-Apparatet og adapteren må aldrig kommes ned i vand eller andre væsker eller skylles under vandhanen.
Advarsel
-Kontrollér, om den angivne netspænding på adapteren svarer til den lokale netspænding, før du slutter
strøm til opladeren.
-Kontrollér altid apparatet, indendu anvender det. Brug ikke apparatet eller adapteren,hvis en af delene
er beskadiget. Udskift altid en beskadiget del med en tilsvarende original type.
-Adapteren indeholder en transformator. Klip ikke adapteren af for at udskifte den med et andet stik, da
dette vil føre til farlige situationer.
-Dette apparat må bruges af børn fra 8 år og opefter og personer med reducerede fysiske, sensoriske eller
mentale evner eller manglende erfaring og viden, hvis de er blevet instrueret i sikker brug af apparatet
og forstår de medfølgende risici. Lad ikke børn lege med apparatet. Rengøring og vedligeholdelse må
ikke foretages af børn uden opsyn.
-Hold altid den magnetiske opladningsdisk væk fra meget små børn.
-Stikket skal tages ud af stikkontakten før rengøring og vedligeholdelse af apparatet.
-Frakobl adapteren, hvis du ikke skal bruge apparatet i et stykke tid.
-Når apparatet skal opbevares i mere end en måned (uden brug eller opladning), skal det sikres, at
batteriet er ladt mindst 50 % op. Hvis apparatet opbevares med tomt batteri, kan det medføre
uoprettelig skade på batteriet.
-Sørg også for, at adapteren er trukket ud af stikket, når apparatet opbevares.
-Lad ikke den motordrevne børste bevæge sig hen over netledninger til andre apparater eller andre
kabler, da det kan udgøre en risiko.
-Hold løst tøj, hår og kropsdele væk fra de motordrevne børster.
-Dæk eller bloker ikke ventilationsåbningerne, når apparatet er i brug.
-Denne støvsuger er kun designet til husholdningsbrug. Brug ikke denne støvsuger til at opsuge
byggeaffald, cementstøv, aske, fint sand, kalk og lignende. Brug aldrig støvsugeren uden et af filtrene.
Det kan beskadige motoren og forkorte støvsugerens levetid. Rengør altid alle støvsugerens dele som
vist i brugervejledningen. Rengør ikke hverken dele eller tilbehør med vand og/eller rengøringsmidler,
medmindre dette specifikt er vist i brugervejledningen.
-Brug kun den medfølgende adapter ved opladning af apparatet. Brug kun 25 V-adapter ZD12D250050
eller 29 V-adapter ZD12D290050. Nummeret på den tilsvarende adapter findes på adapteren.
-Brug, oplad og opbevar altid produktet ved en temperatur mellem 5° C og 40° C.
-For at forhindre, at batterierne overophedes eller afgiver giftstoffer eller farlige substanser, må du ikke
åbne, ændre eller slå hul på, beskadige eller skille produktet eller batteriet ad. Batterierne må ikke
kortsluttes, overoplades eller udsættes for omvendt elektrisk ladning.
-Hold produktet og batterierne væk fra ild, og udsæt dem ikke for direkte sollys eller høje temperaturer.

15
Dansk
-Hvis produktet bliver unormalt varmt eller lugtende, ændrer farve, eller opladningen tager længere end
normalt, skal du ophøre med at bruge og oplade produktet og kontakte Philips.
-Du må ikke komme produkter og deres batterier i mikroovne eller placere dem på induktionskogeplader.
-Hvis batterierne er ødelagt eller lækker, skal du undgå kontakt med hud og øjne. Hvis dette sker, skal du
straks skylle grundigt med vand og søge lægehjælp.
-Detteprodukt indeholder et genopladeligt batteri. Batteri må kun udskiftes af en uddannet
servicetekniker.
-Aflever apparatet til et autoriseret Philips-servicecenter, når du ikke længere kan genoplade det, eller når
det hurtigt løber tør for strøm.
Forsigtig
-Adapteren blive varm under opladningen. Dette er normalt.
-Undlad at slutte apparatet til stikkontakten, frakoble det eller betjene det med våde hænder.
-Tag adapteren ud af stikkontakten ved at hive i ledningen (fig. 1). Når du ikke bruger opladerstationen til
opladning, skal du altid tage apparatets fjerne strømmen fra apparatet ved først at afmontere den
magnetiske opladningsdisk fra undersiden af apparatet (fig. 2).
-Sluk altid for apparatet efter brug, og inden du oplader det.
-Lufthullerne til udblæsningsluften må aldrig blokeres under støvsugningen.
-Kom ikke støvbeholderen og støvbeholderens låg i opvaskemaskinen. Disse dele tåler ikke
opvaskemaskine.
-Sørg for at vaske skumgummifilteret mindst en gang hver anden uge, og altid i hånden, for at få den
bedste virkning. Klem på filteret, indtil vandet er rent. Lad filteret tørre i 24 timer, før det bruges igen.
-Brug ikke skuresvampe eller rengøringsmidler med skuremiddel til rengøring af filtere.
-Brug altid støvsugeren med det samlede filer på.
-Hvis du rengør filteret med vand, skal du sørge for, at det er helt tørt, før det igen placeres i
støvbeholderen. Tør ikke filteret ved at lægge det i direkte sollys, på en radiator eller i en tørretumbler.
-Udskift filteret, hvis det ikke længere kan rengøres ordentligt, eller hvis det er beskadiget (se 'Bestilling af
tilbehør').
-Brug aldrig tilbehør eller dele fra andre producenter eller tilbehør/dele, som ikkespecifikt er anbefalet af
Philips. Garantien bortfalder, hvis du bruger sådanne typer tilbehør eller dele.
-Sørg for, at apparatet installeres med opladerstationen monteret på væggen ifølge anvisningerne i
brugervejledningen.
-Pas på, når du borer hullerne til ophængning af opladerstationen, så du ikke risikerer at få elektrisk stød.
-Da dette apparat bruger vand til rengøring, kan gulvet forblive vådt og glat i et stykke tid (fig. 3).
-For at undgå skader må du ikke bruge flydende gulvrengøringsmidler, som ikke er gennemsigtige - heller
ikke mælkede væsker.
-For at undgå skader må du aldrig hælde voks, olie, produkter til gulvvedligeholdelse eller flydende
gulvrengøringsmidler, der ikke er vandopløselige, i vandtanken.
-For at undgå skader må du aldrighælde æteriske oliereller lignende stoffer i vandtanken, og lad ikke
apparatet opsuge disse.
-Bland ikke forskellige typer flydende gulvrengøringsmidler. Når du har anvendt et flydende
gulvrengøringsmiddel, skal du først tømme og skylle vandtanken, før du hælder et andet flydende
gulvrengøringsmiddel i vandtanken.
-Når du bruger et flydende gulvrengøringsmiddel, må du aldrig bruge mere end den maksimale mængde,
der er angivet på flasken. Tilsæt ikke mere end et par dråber til vandet i vandtanken, da denne tank har
en kapacitet på 200ml.
-Undgå at løfte eller vippe mundstykket, når vandtanken er monteret og fyldt op, da der kan sprøjte vand
ud af vandtanken.

16 Dansk
-Rengør ikke metalvædestrimlen med en skarp genstand, da det vil kunne beskadige strimlen.
Vædestrimlen skal kun rengøres ved at skylle den under vandhanen. Udskift vædestrimlen, når den ikke
længere kan rengøres.
-Vædestrimlen må kun udskiftes med en original strimmel. For bestilling af en ny strimmel, henvises til
kapitlet "Bestilling af tilbehør".
-Rengør vandtanken i overensstemmelse med vejledningen. Vandtanken kan ikke vaskes i
opvaskemaskinen.
-Brug ikke skrappe rengøringsmidler eller værktøjer til at rengøre Aqua Boost-pedalen.
-Når du er færdig med at vaske gulv, må du ikke hænge apparatet på opladerstationen med vandtanken
monteret. Det kan medføre skader på væggen, hvis den våde moppepude rører væggen. Fjern altid
vandtanken, når moppen hænges til opbevaring.
-For at sikre gode resultater og optimal funktionsevne bør der altid anvendes originale rengøringspuder
fra Philips.
Elektromagnetiske felter (EMF)
Dette Philips-apparat overholder alle branchens gældende standarder og regler angående eksponering for
elektromagnetiske felter.
Sådan bruges apparatet
Begrænsninger for brug
-Vandtanken må kun bruges på hårde gulve med en vandfast overfladebehandling (f.eks. linoleum,
emaljerede klinker eller lakeret parketgulv) og stengulve (f.eks. marmor). Hvis dit gulv ikke er blevet
behandlet, så det er vandfast, så spørg producenten, om du må bruge vand til at gøre det rent. Brug ikke
vandtanken på hårde gulve, hvor den vandfaste overfladebehandling er beskadiget.
-Brug kun vandtanken på linoleumsgulve, der er korrekt fastgjorte, for at undgå, at linoleum bliver
trukket ind i moppemundstykket.
-Vandtanken må ikke bruges til tæpperens.
-Flyt ikke apparatet med sidelæns monteret vandtank, da det efterlader vandstriber. Bevæg kun
apparatet frem og tilbage.
Bemærk: Brugstiden afhænger af, hvor stort effektniveau der er brugt under rengøringen.
Moppepude og vædestrimmel
Apparatet leveres med én vædestrimmel og to identiske moppepuder af mikrofiber. Med vandtanken,
vædestrimlen og moppepuden af mikrofiber fastgjort til standardgulvmundstykket kan du rengøre hårde
gulve.
Brug af flydende gulvrengøringsmiddel i vandtanken
Hvis du vil tilføje et flydende gulvrengøringsmiddel til vandtanken, skal du sørge for at bruge et
lavtskummende eller ikke-skummende flydende gulvrengøringsmiddel, som kan opløses i vand. Da
vandtanken har en kapacitet på 200 ml, behøver du kun at tilsætte et par dråber flydende
gulvrengøringsmiddel til vandet.
Rengøring afvandtanken
Vandtanken rengøres ved hjælp af en blanding med en del eddike og tre dele vand. Hæld denne blanding
op i vandtanken, og luk låget. Ryst vandtanken, og sæt den på et vandfast underlag. Lad vandtanken stå
med vand/eddike-blandingen natten over. Tøm derefter vandtanken, og skyl den omhyggeligt med vand.
Derefter er den klar til normal brug igen.

17
Dansk
Forsigtig: Vand vil lække fra vandtanken under rengøring både med og uden vædestrimlen sat på
mundstykket.
For at tømme vandtanken skal du holde vandtanken over en vask, fjerne dækslet og vippe vandbeholderen
til siden med påfyldningshullet. Vend derefter bunden i vejret på vandtanken og lad vandet løbe ned i
vasken. For at tømme det resterende vand ud af vandtanken, skal du vende vandtanken på langs med
påfyldningshullet rettet mod vasken. Vip derefter vandtanken fremad for at lade det resterende vand flyde
ud af vandtanken.
Bemærk: Opbevar vandtanken med dækslet taget af påfyldningshullet.
Bestilling af tilbehør
Du kan købe tilbehør og reservedele på www.philips.com/parts-and-accessories eller hos din Philips-
forhandler. Du kan også kontakte det lokale Philips-kundecenter (du kan finde kontaktoplysninger i den
internationale garantifolder).
Reklamationsret og support
Hvis du har brug for hjælp eller support, bedes du besøge www.philips.com/support eller læse i folderen
om international garanti.
Genanvendelse
-Dette symbol betyder, at elektriske produkter og batterier ikke må bortskaffes sammen med almindeligt
husholdningsaffald (fig. 4).
-Følg den nationale lovgivning om særskilt indsamling af elektriske produkter og batterier.
Fjernelse af indbygget genopladeligt batteri
Det indbyggede genopladelige batteri skal kun fjernes af en kvalificeret fagmand, når apparatet kasseres.
Før batteriet fjernes, skal du sørge for, at apparatet er taget ud af stikkontakten, og at batteriet er
fuldstændigt afladet.
Overhold de nødvendige sikkerhedsforanstaltninger, når du anvender værktøj til at åbne
apparatet, og når du bortskaffer det genopladelige batteri.
Når du håndterer batterier, skal du sørge for, at dine hænder, produktet og batterierne er
tørre.
For at undgå en utilsigtet kortslutning af batterierne efter fjernelse, må du ikke lade
batteripolerne komme i kontakt med metalgenstande (f.eks. mønter, hårnåle, ringe).
Batterierne må ikke pakkes ind i aluminiumsfolie. Sæt tape på batteripolerne, eller læg
batterierne i en plastikpose, før du kasserer dem.
1Tag apparatets stik ud af stikkontakten, og lad det køre, indtil motoren stopper af sig selv.
2Tag støvbeholderen ud af apparatet.
3Træk displaycoveret fra den øverste del af håndgrebet (fig. 5).
4Løsn skruen på håndgrebets cover, og træk det af apparatet (fig. 6).
5Løsn skruen i bunden af håndgrebets dæksel (1), og fjern sidepanelerne. (fig. 7)

18 Dansk
6Fjern bunddækslets skruer i venstre og højre side (1). Fjern derefter bunddækslet (2) (fig. 8).
7Kobl batteristikket og displaystikket fra printpladen (fig. 9).
8Løsn skruerne (fig. 10) til batterirammen.
9Tag batteriet ud af apparatet, og bortskaf det i overensstemmelse med de lokale regler (fig. 11).
Brugstid
Brug af apparatet med Turbo-effekt (indstilling 2) 22 minutter*
Brug af apparatet med normal effekt (indstilling 1) 50 minutter*
* Baseret på brug af apparatet med Aqua-mundstykket
Fejlfinding
Dette afsnit opsummerer de mest almindelige problemer, der kan forekomme ved brug af apparatet. Har du
brug for yderligere hjælp og vejledning, så besøg www.philips.com/support for at se en liste med ofte
stillede spørgsmål, eller kontakt dit lokale Philips Kundecenter.
Problem Mulig årsag Løsning
Apparatet virker ikke, når
jeg trykker på knappen.
Når batteriet er afladet, blinker
den nederste del af displayet
rødt.
For at oplade batteriet skal du slutte
apparatet til opladerstationen eller
fastgøre opladerstationens magnetiske
opladningsdisk direkte på den håndholdte
støvsuger.
Du skal skubbe skyderen
fremad for at tænde apparatet.
Du skal skubbe skyderen til indstilling 1 for
at tænde apparatet. Sugestyrken kan øges
yderligere ved at skubbe skyderen til
indstilling 2 for at rense snavsede
overflader.
Apparatet har en lavere
sugestyrke end normalt.
Filteret og cyklonfilteret er
snavsede.
Rengør filteret og cyklonen. Sørg for at
vaske skumgummifilteret mindst en hver
anden uge, hvis du bruger apparatet ofte.
Du har ikke fastgjort
støvbeholderens låg korrekt til
støvbeholderen. Du har ikke
fastgjort støvbeholderen
korrekt til apparatet. I begge
tilfælde formindskes
sugestyrken.
Sørg for at sætte støvbeholderens låg
korrekt på støvbeholderen og
støvbeholderen korrekt på apparatet.
Der sidder muligvis noget fast i
røret.
Tag røret af, og se, om der sidder noget
fast.
Der slipper støv ud af
apparatet.
Filteret er snavset. Rengør filteret.
Filteret sidder ikke i apparatet. Sørg for, at filteret er placeret i apparatet,
og at apparatet er samlet korrekt.

19
Dansk
Problem Mulig årsag Løsning
Noget blokerer cyklonen. Kontrollér, at der ikke sidder genstande
fast i cyklonen, og fjern eventuelle
genstande, der blokerer cyklonen.
Hvis der kommer støv ud af
støvbeholderen, er
støvbeholderens låg
sandsynligvis ikke sat korrekt
på.
Tøm støvbeholderen, og sæt
støvbeholderens låg korrekt på.
Apparatet bevæger sig ikke
jævnt hen over gulvet under
rengøring af tæpper.
Du har valgt en for høj
sugestyrke.
Reducer sugestyrken ved at vælge
indstilling 1.
Børsten drejer ikke længere. Børsten møder for megen
modstand.
Rengør børsten med en saks eller med
fingrene.
Børsten holder muligvis op
med at dreje, hvis den møder
for meget modstand fra et tykt
tæppe.
Sluk apparatet, og tænd det igen.
Du har ikke monteret
rullebørsten korrekt i
mundstykket efter rengøring.
Følg instruktionerne i kapitlet om
rengøring i brugervejledningen for at
skubbe rullebørsten korrekt ind i
mundstykket og fastgøre den i
mundstykket ved at klikke låseklemmen på
plads.
LED'erne i mundstykket lyser
ikke.
Du har ikke fastgjort
mundstykket korrekt til
apparatet eller den
håndholdte enhed.
Fastgør mundstykket korrekt til apparatet
eller den håndholdte enhed.
Apparatet oplader ikke. Magnetstikket er ikke tilsluttet
korrekt til opladningsdisken,
eller adapteren er ikke sat
ordentligt i stikkontakten.
Sørg for, at magnetstikket er tilsluttet
korrekt til opladningsdisken, og at
adapteren er sat korrekt i stikkontakten.
Du har ikke tilsluttet den
korrekte adapter og ledning.
Sørg for, at du bruger den korrekte
adapter og ledning.
Hvis du har kontrolleret ovenstående, og
apparatet stadig ikke oplader, skal du
indlevere det hos et Philips-servicecenter
eller kontakte kundecenteret via
www.philips.com/support.
FC6729: Miniturbobørsten
fungerer ikke korrekt.
Rullebørsten er blokeret. Fjern hår fra børsten med en saks eller med
fingrene (se brugervejledningen).
Rullebørsten bliver blokeret af
stofrester eller urenheder
under rengøring.
Sørg for, at miniturbobørsten flugter med
overfladen, og brug ikke turbobørsten på
bløde overflader.

20 Dansk
Problem Mulig årsag Løsning
Miniturbobørsten er ikke helt
lukket.
Sørg for, at den øverste og nederste del af
miniturbobørsten er samlet korrekt, og at
der ikke er luft mellem de to dele.
Kontrollér, om låseringen er i lukket
position (se brugervejledningen).
Når jeg bruger min
støvsuger, får jeg af og til
statisk elektrisk stød.
Din støvsuger genererer statisk
elektricitet. Jo lavere
luftfugtigheden er i rummet, jo
mere statisk elektricitet
genererer apparatet.
Aflad jævnligt apparatet ved at holde røret
mod andre metalobjekter i rummet (f.eks.
bord- og stoleben osv.). Du kan også øge
luftfugtigheden i rummet.
Du har støvsuget fint sand, kalk
eller lignende. Dette forårsager
også statisk elektricitet.
Tøm støvbeholderen, og rengør filteret
ifølge anvisningerne i brugervejledningen.
Den nederste del af
displayet blinker rødt.
Batteriet er tomt. Lad batteriet op ved at slutte apparatet til
opladerstationen. Du kan også lade
apparatet op direkte ved at sætte
adapteren i stikkontakten og fastgøre den
magnetiske opladningsdisk på undersiden
af apparatet.
Alle dele af displayet blinker
hurtigt.
Der er opstået en fejl. Kontrollér, om noget blokerer røret eller
mundstykket. Prøv at genoplade
apparatet, mens du samtidig tømmer
støvbeholderen og rengør filtret. Hvis
dette ikke hjælper, skal du indlevere
apparatet hos et Philips-servicecenter eller
kontakte kundecenteret via
www.philips.com/support.
Den midterste del af
displayet blinker hvidt, og
den nederste del blinker
rødt.
Apparatet opbevares eller
oplades ved temperaturer på
under 5 °C.
Flyt apparatet til et varmere rum. Opbevar
eller oplad ikke apparatet ved
temperaturer under 5 °C eller over 40 °C.
Vandudstrømningen fra
vandtanken reduceres.
Vædestrimlen blokeres af store
rester.
Tag vædestrimlen ud, og rengør den.
Moppepuden af mikrofiber er
ikke placeret korrekt og
blokerer vædestrimlen som
resultat. Dette forhindrer
vandet i at flyde ud af
vædestrimlen.
Sørg for, atmoppepuden af mikrofiberen
er placeret korrekt. Kontroller
brugervejledningen for korrekt placering.
Vandtanken er tom eller
næsten tom.
Fyld vandtanken op igen.
Sidan laddas...
Sidan laddas...
Sidan laddas...
Sidan laddas...
Sidan laddas...
Sidan laddas...
Sidan laddas...
Sidan laddas...
Sidan laddas...
Sidan laddas...
Sidan laddas...
Sidan laddas...
Sidan laddas...
Sidan laddas...
Sidan laddas...
Sidan laddas...
Sidan laddas...
Sidan laddas...
Sidan laddas...
Sidan laddas...
Sidan laddas...
Sidan laddas...
Sidan laddas...
Sidan laddas...
Sidan laddas...
Sidan laddas...
Sidan laddas...
Sidan laddas...
Sidan laddas...
Sidan laddas...
Sidan laddas...
Sidan laddas...
Sidan laddas...
Sidan laddas...
Sidan laddas...
Sidan laddas...
Sidan laddas...
Sidan laddas...
Sidan laddas...
Sidan laddas...
Sidan laddas...
Sidan laddas...
Sidan laddas...
Sidan laddas...
Sidan laddas...
Sidan laddas...
Sidan laddas...
Sidan laddas...
Sidan laddas...
Sidan laddas...
Sidan laddas...
Sidan laddas...
Sidan laddas...
Sidan laddas...
Sidan laddas...
Sidan laddas...
Sidan laddas...
Sidan laddas...
Sidan laddas...
Sidan laddas...
Sidan laddas...
Sidan laddas...
Sidan laddas...
Sidan laddas...
Sidan laddas...
Sidan laddas...
Sidan laddas...
Sidan laddas...
Sidan laddas...
Sidan laddas...
Sidan laddas...
Sidan laddas...
Sidan laddas...
Sidan laddas...
Sidan laddas...
Sidan laddas...
Sidan laddas...
Sidan laddas...
Sidan laddas...
Sidan laddas...
Sidan laddas...
Sidan laddas...
Sidan laddas...
Sidan laddas...
Sidan laddas...
Sidan laddas...
Sidan laddas...
Sidan laddas...
Sidan laddas...
Sidan laddas...
-
 1
1
-
 2
2
-
 3
3
-
 4
4
-
 5
5
-
 6
6
-
 7
7
-
 8
8
-
 9
9
-
 10
10
-
 11
11
-
 12
12
-
 13
13
-
 14
14
-
 15
15
-
 16
16
-
 17
17
-
 18
18
-
 19
19
-
 20
20
-
 21
21
-
 22
22
-
 23
23
-
 24
24
-
 25
25
-
 26
26
-
 27
27
-
 28
28
-
 29
29
-
 30
30
-
 31
31
-
 32
32
-
 33
33
-
 34
34
-
 35
35
-
 36
36
-
 37
37
-
 38
38
-
 39
39
-
 40
40
-
 41
41
-
 42
42
-
 43
43
-
 44
44
-
 45
45
-
 46
46
-
 47
47
-
 48
48
-
 49
49
-
 50
50
-
 51
51
-
 52
52
-
 53
53
-
 54
54
-
 55
55
-
 56
56
-
 57
57
-
 58
58
-
 59
59
-
 60
60
-
 61
61
-
 62
62
-
 63
63
-
 64
64
-
 65
65
-
 66
66
-
 67
67
-
 68
68
-
 69
69
-
 70
70
-
 71
71
-
 72
72
-
 73
73
-
 74
74
-
 75
75
-
 76
76
-
 77
77
-
 78
78
-
 79
79
-
 80
80
-
 81
81
-
 82
82
-
 83
83
-
 84
84
-
 85
85
-
 86
86
-
 87
87
-
 88
88
-
 89
89
-
 90
90
-
 91
91
-
 92
92
-
 93
93
-
 94
94
-
 95
95
-
 96
96
-
 97
97
-
 98
98
-
 99
99
-
 100
100
-
 101
101
-
 102
102
-
 103
103
-
 104
104
-
 105
105
-
 106
106
-
 107
107
-
 108
108
-
 109
109
-
 110
110


på andra språk
- italiano: Philips FC6719 Guida utente
- español: Philips FC6719 Guía del usuario
- Deutsch: Philips FC6719 Benutzerhandbuch
- português: Philips FC6719 Guia de usuario
- français: Philips FC6719 Mode d'emploi
- dansk: Philips FC6719 Brugervejledning
Relaterade papper
-
Philips FC6404/01 Bruksanvisning
-
Philips FC6901/01 Viktig information
-
Philips FC6402 - PowerPro Aqua Bruksanvisning
-
Philips FC7070/11 Användarmanual
-
-
-
-
Philips FC6822/01R1 Viktig information