
ELECTRONIC HEARING PROTECTOR
with
CALIBER

Table of Contents
ENGLISH (EN)
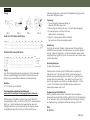
Location of Controls � � � � � � � � � � � � � � � � � � � �3
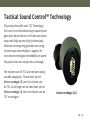
Tactical Sound Control™ Technology � � � � � �4
Charging the Earbuds � � � � � � � � � � � � � � � � � � �5
Charging the Case � � � � � � � � � � � � � � � � � � � � � �6
Power On/O � � � � � � � � � � � � � � � � � � � � � � � � � �7
Bluetooth Pairing � � � � � � � � � � � � � � � � � � � � � � �8
Music � � � � � � � � � � � � � � � � � � � � � � � � � � � � � � � � �9
Phone Calls � � � � � � � � � � � � � � � � � � � � � � � � � � �10
Troubleshooting � � � � � � � � � � � � � � � � � � � � � � �11
Legalities � � � � � � � � � � � � � � � � � � � � � � � � � � � � �12
DANSK (DA)
Placering af betjeningselementer � � � � � � � �16
Tactical Sound Control™ Technology � � � � �17
Opladning af ørepropper � � � � � � � � � � � � � � �18
Opladning af etui � � � � � � � � � � � � � � � � � � � � � �19
Tænd/sluk � � � � � � � � � � � � � � � � � � � � � � � � � � � �20
Bluetooth-parring � � � � � � � � � � � � � � � � � � � � �21
Musik � � � � � � � � � � � � � � � � � � � � � � � � � � � � � � � �22
Telefonopkald � � � � � � � � � � � � � � � � � � � � � � � � �23
Fejlnding � � � � � � � � � � � � � � � � � � � � � � � � � � � �24
Legalities � � � � � � � � � � � � � � � � � � � � � � � � � � � � �25
DEUTSCH (DE)
Position der Bedienelemente � � � � � � � � � � �29
Tactical Sound Control™ Technology � � � � �30
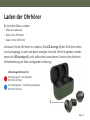
Laden der Ohrhörer � � � � � � � � � � � � � � � � � � �31
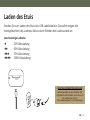
Laden des Etuis � � � � � � � � � � � � � � � � � � � � � � �32
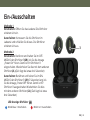
Ein-/Ausschalten � � � � � � � � � � � � � � � � � � � � � �33
Bluetooth-Kopplung � � � � � � � � � � � � � � � � � � �34
Musik � � � � � � � � � � � � � � � � � � � � � � � � � � � � � � � �35
Anrufe � � � � � � � � � � � � � � � � � � � � � � � � � � � � � � �36
Fehlerbehebung � � � � � � � � � � � � � � � � � � � � � �37
Legalities � � � � � � � � � � � � � � � � � � � � � � � � � � � � �38
ESPAÑOL (ES)
Localizaci n de los controles � � � � � � � � � � � �42
Tactical Sound Control™ Technology � � � � �43
Carga de los auriculares � � � � � � � � � � � � � � � �44
Carga del estuche � � � � � � � � � � � � � � � � � � � � �45
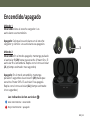
Encendido/apagado � � � � � � � � � � � � � � � � � � �46
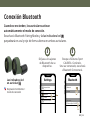
Conexión Bluetooth � � � � � � � � � � � � � � � � � � �47
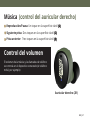
Música � � � � � � � � � � � � � � � � � � � � � � � � � � � � � � �48
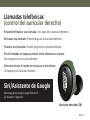
Llamadas telefónicas � � � � � � � � � � � � � � � � � � �49
Resoluci n de problemas � � � � � � � � � � � � � � �50
Legalities � � � � � � � � � � � � � � � � � � � � � � � � � � � � �51
SUOMI (FI)
Säätimien sijainti � � � � � � � � � � � � � � � � � � � � � �55
Tactical Sound Control™ Technology � � � � �56
Korvanappien lataaminen � � � � � � � � � � � � � �57
Kotelon lataaminen � � � � � � � � � � � � � � � � � � � �58
Virta päälle/pois � � � � � � � � � � � � � � � � � � � � � � �59
Bluetooth-pariliitos � � � � � � � � � � � � � � � � � � � �60
Musiikki � � � � � � � � � � � � � � � � � � � � � � � � � � � � � �61
Puhelujen soittaminen � � � � � � � � � � � � � � � � �62
Vianetsintä � � � � � � � � � � � � � � � � � � � � � � � � � � �63
Legalities � � � � � � � � � � � � � � � � � � � � � � � � � � � � �64
FRANÇAIS (FR)
Emplacement des commandes � � � � � � � � � �68
Tactical Sound Control™ Technology � � � � �69
Charger les écouteurs � � � � � � � � � � � � � � � � � �70
Charger l’étui � � � � � � � � � � � � � � � � � � � � � � � � � �71
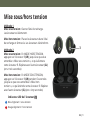
Mise sous/hors tension � � � � � � � � � � � � � � � �72
Couplage Bluetooth � � � � � � � � � � � � � � � � � � �73
Musique � � � � � � � � � � � � � � � � � � � � � � � � � � � � � �74
Appels téléphoniques � � � � � � � � � � � � � � � � � �75
Dépannage � � � � � � � � � � � � � � � � � � � � � � � � � � �76
Legalities � � � � � � � � � � � � � � � � � � � � � � � � � � � � �77
ITALIANO (IT)
Posizione dei comandi � � � � � � � � � � � � � � � � �81
Tactical Sound Control™ Technology � � � � �82
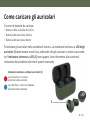
Come caricare gli auricolari � � � � � � � � � � � � �83
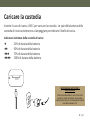
Caricare la custodia � � � � � � � � � � � � � � � � � � � �84
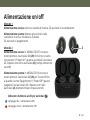
Alimentazione on/o � � � � � � � � � � � � � � � � � � �85
Associazione Bluetooth � � � � � � � � � � � � � � � �86
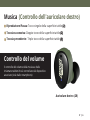
Musica � � � � � � � � � � � � � � � � � � � � � � � � � � � � � � �87
Chiamate telefoniche � � � � � � � � � � � � � � � � � �88
Risoluzione dei problemi � � � � � � � � � � � � � � �89
Legalities � � � � � � � � � � � � � � � � � � � � � � � � � � � � �90
NEDERLANDS (NL)
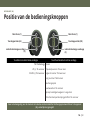
Positie van de bedieningsknoppen � � � � � � �94
Tactical Sound Control™ Technology � � � � �95
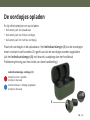
De oordopjes opladen � � � � � � � � � � � � � � � � �96
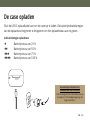
De case opladen� � � � � � � � � � � � � � � � � � � � � � �97
In-/uitschakelen � � � � � � � � � � � � � � � � � � � � � � �98
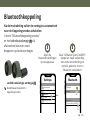
Bluetoothkoppeling � � � � � � � � � � � � � � � � � � � �99
Muziek � � � � � � � � � � � � � � � � � � � � � � � � � � � � � 100
Telefoongesprekken � � � � � � � � � � � � � � � � � 101
Probleemoplossing � � � � � � � � � � � � � � � � � � 102
Legalities � � � � � � � � � � � � � � � � � � � � � � � � � � � 103
NORSK (NO)
Kontrollenes plassering � � � � � � � � � � � � � � 107
Tactical Sound Control™ Technology � � � 108
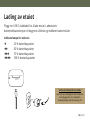
Lading av øretelefonene � � � � � � � � � � � � � � 109
Lading av etuiet � � � � � � � � � � � � � � � � � � � � � 110
Slå på/av � � � � � � � � � � � � � � � � � � � � � � � � � � � 111
Bluetooth-paring � � � � � � � � � � � � � � � � � � � � 112
Musikk � � � � � � � � � � � � � � � � � � � � � � � � � � � � � 113
Telefonsamtaler � � � � � � � � � � � � � � � � � � � � � 114
Feilsøking � � � � � � � � � � � � � � � � � � � � � � � � � � � 115
Legalities � � � � � � � � � � � � � � � � � � � � � � � � � � � 116
SVENSKA (SV)
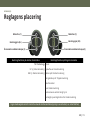
Reglagens placering � � � � � � � � � � � � � � � � � � 120
Tactical Sound Control™ Technology � � � 121
Laddning av öronsnäckorna � � � � � � � � � � 122
Laddning av fodralet � � � � � � � � � � � � � � � � � 123
Ström på/av � � � � � � � � � � � � � � � � � � � � � � � � � 124
Parkoppling Bluetooth � � � � � � � � � � � � � � � 125
Musik � � � � � � � � � � � � � � � � � � � � � � � � � � � � � � 126
Telefonsamtal � � � � � � � � � � � � � � � � � � � � � � � 127
Felsökning � � � � � � � � � � � � � � � � � � � � � � � � � � 128
Legalities � � � � � � � � � � � � � � � � � � � � � � � � � � � 129
TABLE OF CONTENTS

EN | 3
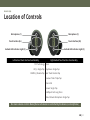
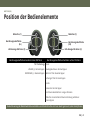
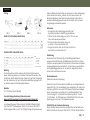
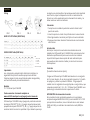
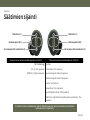
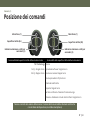
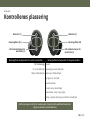
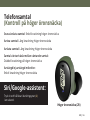
Location of Controls
ENGLISH (EN)
Left Earbud Touch Surface Functionality Right Earbud Touch Surface Functionality
TSC Technology Music
UP (+): Single Tap Play/Pause: Single Tap
DOWN (-): Double Tap Next Track: Double Tap
Previous Track: Triple Tap
Phone Call
Answer: Single Tap
End/Reject Call: Long Press
Mute/Unmute Microphone: Single Tap
Microphone (1) Microphone (1)
Touch Surface (2L) Touch Surface (2R)
Earbud LED Indicator Light (3) Earbud LED Indicator Light (3)
No music volume control. Music/phone call volume is controlled by the device (ie. smartphone)

EN | 4
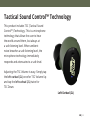
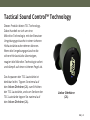
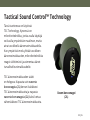
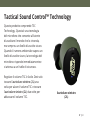
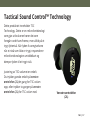
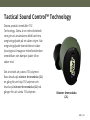
This product includes TSC (Tactical Sound
Control™) Technology. This is a microphone
technology that allows the user to hear
the world around them, but always at
a safe listening level. When ambient
noise breaches a safe listening level, the
microphone technology immediately
responds and attenuates to a safe level.
Adjusting the TSC Volume is easy. Simply tap
the left earbud (2L) once for TSC Volume Up
and tap the left earbud (2L) twice for
TSC Down.
Left Earbud (2L)
Tactical Sound Control™ Technology

EN | 5
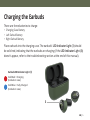
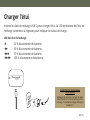
Charging the Earbuds
There are three batteries to charge:
• Charging Case Battery
• Left Earbud Battery
• Right Earbud Battery
Place earbuds into the charging case. The earbuds’ LED Indicator Light (3) should
be solid red, indicating that the earbuds are charging (if the LED Indicator Light (3))
doesn’t appear, refer to the troubleshooting section at the end of this manual).
Earbud LED Indicator Light (3)
Solid Red = Charging
(Earbuds in case)
Solid Blue = Fully Charged
(Earbuds in case)
3

EN | 6
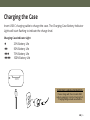
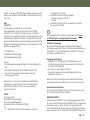
Charging the Case
Insert USB C charging cable to charge the case. The Charging Case Battery Indicator
Lights will start ashing to indicate the charge level.
IMPORTANT CHARGING INFORMATION
Please charge with the included USB C
cable by plugging it into the Charging Port.
*Charging voltage should not exceed 5v.
Charging Case Indicator Light
l25% Battery Life
ll 50% Battery Life
lll 75% Battery Life
llll 100% Battery Life

EN | 7
Power On/O
Method 1
Power On: Open the charging case. The earbuds
will power on.
Power O: Place the earbuds into the charging
case and close the case. The earbuds will power o.
Method 2
Power On: In OFF MODE, touch and hold R earbud
(2R) until you hear “Power On” this will turn on your
R earbud. Repeat with other earbud (2L) (est. time
three seconds)
Power O: In ON MODE, touch and hold R earbud
(2R) for 5 seconds until you hear “Power O” this
will turn o your R earbud. Repeat with other ear-
bud (2L) (est. time ve seconds)
Earbud LED Indicator Light (3)(3)
Blue Flash = Power ON
Red Flash = Power OFF
3

EN | 8
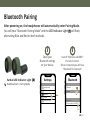
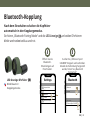
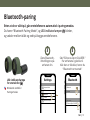
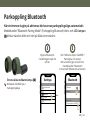
Bluetooth Pairing
Open your
Bluetooth settings
on your device.
AB
Search “ISOtunes CALIBER.”
Pair and connect.
Once connected you will hear
“Bluetooth Connected.”
After powering on, the headphones will automatically enter Pairing Mode.
You will hear “Bluetooth Pairing Mode” and the LED Indicator Light (3)(3) will ash,
alternating Blue and Red on both earbuds.
Bluetooth
Bluetooth
MY DEVICES
OTHER DEVICES
ISOtunes Sport CALIBER
2
3
Settings
Airplane Mode
Wifi
Bluetooth
Cellular
Personal Hotspot
OFF
1
Earbud LED Indicator Light (3)(3)
Red/Blue Flash = Pairing Mode

EN | 9
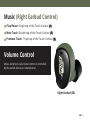
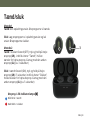
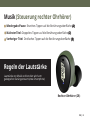
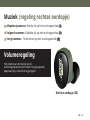
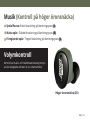
Music
Play/Pause: Single tap of the Touch Surface (2)(2)
Next Track: Double tap of the Touch Surface (2)(2)
Previous Track: Triple tap of the Touch Surface (2)(2)
Right Earbud (2R)
Volume Control
Music and phone call volume control is controlled
by the paired device (ie. smartphone)
(Right Earbud Control)

EN | 10
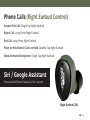
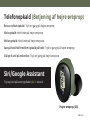
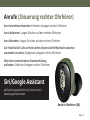
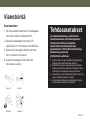
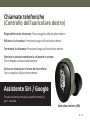
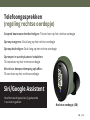
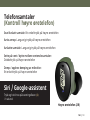
Phone Calls
Answer/End Call: Single Tap Right Earbud
Reject Call: Long Press Right Earbud
End Call: Long Press Right Earbud
Place on Hold/Switch Calls on Hold: Double Tap Right Earbud
Mute/Unmute Microphone: Single Tap Right Earbud
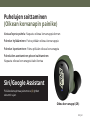
Siri / Google Assistant
Press and hold Touch Surface (2) for 1 second.
Right Earbud (2R)
(Right Earbud Control)

EN | 11
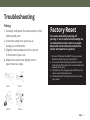
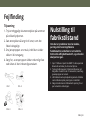
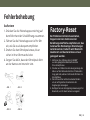
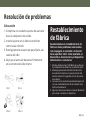
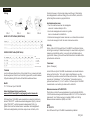
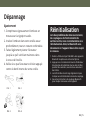
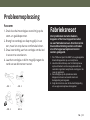
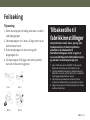
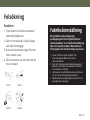
Troubleshooting
FIG. 1
FIG. 3
FIG. 2
FIG. 4
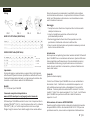
Fitting
1. Carefully compress the foam eartip on the
stem/sound port.
2. Insert the eartip into your ear as
deeply as comfortable.
3. Slightly rotate earbud until it is secure
in the bowl of your ear.
4. Make the earbud rest tightly next to
your inner ear edge.
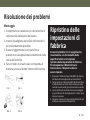
Factory Reset
For issues with with powering off,
pairing, or touch surface functionality we
recommend a factory reset. As a result,
Bluetooth will be disconnected and the
device will need to be repaired.
1. Remove “ISOtunes CALIBER” from your paired
Bluetooth devices in your smartphone.
2. Press and hold the battery life indicator button
on the back of the case for ten seconds with both
earbuds in the case.
3. LED lights on the charging case will ash to indi-
cate a successful pairing reset.
4. Follow Bluetooth Pairing Instructions to re-pair
your device.

EN | 12
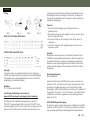
Fitting
ANSI S3.19-1974 Table (NRR Table)
EN352-2:2002 Table (SNR Table)
Models
IT-17 CALIBER
Important
Please read, understand, and follow all safety information.
This product is designed to protect against harmful noise.
Fitting
ISOtunes® CALIBER comes with a pair of One-Size-Fits-All
TRILOGY™ Triple Flange eartips and 6 sets of foam eartips tall
and short (S,M,L). Choose the size that ts the most snug in
your ear canal. Remember, the snugger the t, the better
the noise reduction.
ISOtunes® TRILOGY™ foam eartips have a threaded core, and the
sound port of the earbud is also threaded.
1. Carefully compress the foam eartip on the stem/sound port.
2. Insert the eartip into your ear as deeply as comfortable
3. Slightly rotate earbud until it is secure in the bowl of your ear.
4. Make the earbud rest tightly next to your inner ear edge.
Hint: To open your ear canal wider, lift the top of your ear up and
away from your head, as shown in FIG 4.
Please Note: should the included Triple Flange eartips not t
your ears, all ISOtunes® TRILOGY™ eartips t this product.
Eartips other than the ISOtunes® TRILOGY™ silicone eartips size
are not NRR/SNR rated for ISOtunes CALIBER, but should oer
reasonable attenuation and performance.
Introduction
Thank you for purchasing ISOtunes® CALIBER True Wireless
Noise-Isolating Earbuds. These earbuds have been specically
designed for use in noisy environments – allowing you to block
out much of the surrounding noise so that you can listen to your
music or talk on the phone with less interruption.
Power ON/OFF
Method 1
Power ON: Open charging case
Power OFF: Place earbuds into charging case and close the lid.
Method 2
Power ON: In OFF mode, press and hold MFB for 3 seconds.
Power OFF: In ON mode, press and hold MFB for 3 seconds.
Bluetooth Pairing
After powering on, the earbuds will automatically enter Bluetooth
Pairing Mode. Look for quick red and blue ashes from the
earbud as a conrmation. Open the Bluetooth settings on your
device. Search for “ISOtunes CALIBER”. Pair and connect. You will
hear “Bluetooth Connected” once connected.
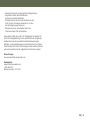
Charging
FIG. 1 FIG. 3FIG. 2 FIG. 4
B5:
SNR: 36 dB
H= 37 dB
M= 34 dB
L= 29 dB
APVf=MF-SF9 (dB)
Legalities

EN | 13
There are three batteries to charge:
1. Charging Case Battery
2. Left Earbud Battery
3. Right Earbud Battery
Charging the Case
Insert USB type C charging cable to charge the case. The
charging case battery indicator light will start ashing to
indicate charge level.
Charging the Earbuds
Place earbuds into the charging case. The earbuds’ red indicator
light should be solid red, indicating that the earbuds are charging.
Only charge your ISOtunes CALIBER with a Maximum 5 Volt
charger. Using a charger higher than 5 Volts could be dangerous
and may damage your ISOtunes product. Be especially careful
with “quick charge” or “turbo charge” chargers, which often
supply 9, 12, or 15 Volts. Your ISOtunes CALIBER cannot be
charged at voltage levels above 5 volts.
Battery Capacity
ISOtunes® CALIBER supports Bluetooth® battery level indicator.
This means that when connected to iOS devices, the battery
power status can be seen in the upper right corner of the screen.
Please use this as guideline - there are many factors to battery
level accuracy that inuence this measurement. (For example -
although the battery power status may show 30% battery power
remaining, this may actually only be 5-10% on your ISOtunes®.)
Noise Attenuation
This product has been tested to the European Safety Standard
EN352-2:2020 and the ANSI S3.19-1974 standard for a hearing
protector, with a Single Number Rating (SNR) of 32 dB and a Noise
Reduction Rating (NRR) of 25 dB. Full testing details are available
in the Noise Attenuation section of this booklet.
ANSI S3.19-1974
The level of noise entering a person’s ear, when ISOtunes®
CALIBER headphones are worn as directed, is closely
approximated by the dierence between the A-weighted
environmental noise level and the Noise Reduction Rating (NRR).
Improper t of this device will reduce its eectiveness
in attenuating noise. Consult the enclosed instructions for
proper tting.
A1: Frequency (Hz)
A2: Mean Attenuation (dB)
A3: Standard Deviation (dB)
Example:
1. The surrounding noise level measured at the ear is 100 dB.
2. The NRR of ISOtunes® CALIBER is 26 dB.
3. The noise level entering the ear is approximately equal to 74dB.
Please note that the NRR is based on the attenuation of
continuous noise and may not be an accurate indicator of the
protection attainable against impulsive noise, such as gunre.
EN 352
B1: Frequency (Hz)
B2: Mean Attenuation (dB)
B3: Standard Deviation (dB)
B4: Assumed Protection Value (APV) (dB)
B5:
H = Hearing protection estimation for high
frequency sounds (f ≥ 2000Hz)
M = Hearing protection estimation for medium
frequency sounds (500 Hz < f < 2000Hz)
L = Hearing protection estimation for low
frequency sounds (f ≤ 500Hz)
The EU declaration of conformity for IT-17 can be accessed at
www.uk.ISOtunesSport.com/pages/product-manuals
The products will be certied to the Product standard EN 352-

EN | 14
2:2002 and the PPE Regulation 2016/425
SafeMax™ Technology
ISOtunes® CALIBER incorporates SafeMax™ Technology, therefore
its volume output has been limited to 85 decibels (IT-17), or 79
decibels (IT-18) . ISOtunes® devices with SafeMax™ Technology
are OSHA, and ANSI compliant.
Cleaning and Maintenance
• Clean your ISOtunes CALIBER by gently wiping them with a
clean, damp cloth with mild soap.
• Do not immerse the earbuds in water.
• Do not use abrasive cleaning solvents to clean the earbuds.
If the earbuds get wet from sweat or rain, please discontinue use
and allow them to dry.
Trilogy foam eartips are disposable. To ensure peak performance,
we recommend replacing TRILOGY™ Foam Tips every three
months or when they become soiled. In order to purchase
additional tips, please go to www.ISOtunes.com or
www.ISOtunes.co.uk
Clean your ISOtunes® CALIBER by gently wiping them with a
clean damp cloth. Mild soap can be applied to the cloth.
Do not use abrasive cleaning solvents to clean the headset. Avoid
scratching the headset with sharp objects, as this may cause
damage. Keep the headset away from high temperature areas.
The TRILOGY™ foam eartips should be regularly inspected for
deterioration, cracking, or other damage. The eartips can be
cleaned in between uses with a damp cloth and water. Overtime,
the eartips should be replaced.
WARNINGS
ISOtunes® CALIBER does an excellent job of blocking outside
noise. As such, ISOtunes® CALIBER should NOT be used in
environments where users need to be fully aware of their
surroundings for personal safety reasons. For example, do NOT
use them while driving a car or riding a motorcycle. Similarly, do
NOT use them when riding a bicycle outside. The user is solely
responsible for ensuring that ISOtunes® CALIBER is used ONLY in
safe environments.
This product may be adversely aected by certain
chemical substances. Further information may be
sought from the manufacturer.
These earplugs should not be used in situations where there is a
risk that the connecting cord could be caught up during use.
Recommendations
The wearer should ensure that the product is properly cleaned
and dry before and after use. Storage should be in a clean and
dry location between -20 °C and 50 °C.
The battery should not be fully discharged
before long term storage.
The wearer should ensure that:
• The hearing protector is tted, adjusted, and
maintained in accordance with the
manufacturer’s instructions.
• The hearing protector is worn at all times in
noisy surroundings.
• The hearing protector is regularly inspected
for serviceability.
If these recommendations are not adhered to, the protection
aorded by the hearing protector maybe severely impaired.
Additional Notes
ISOtunes® CALIBER is compliant with Bluetooth® V5. We do not
guarantee compatibility of all functions on every Bluetooth®-
enabled device. Please check your device’s user manual for

EN | 15
compatibility and functionality.
For additional information or questions about ISOtunes® products
or spares and accessories, please contact our support team.
Weight: 15g (both earbuds), 50g (case)
Date of Obsolescence: 3 years from purchase date
Not to be used in Explosive Atmospheres
FCC
This device complies with Part 15 of the FCC Rules. Operation is
subject to the following two conditions:
1. This device may not cause harmful interference, and
2. This device must accept any interference received, including
interference that may cause undesired operation.
Warning: Changes or modications not expressly approved by the
party responsible for compliance could void the user’s authority
to operate the equipment.
NOTE: This equipment has been tested and found to comply
with the limits for a Class B digital device, pursuant to Part 15 of
the FCC Rules. These limits are designed to provide reasonable
protection against harmful interference in a residential
installation. This equipment generates uses and can radiate radio
frequency energy and, if not installed and used in accordance
with the instructions, may cause harmful interference to
radio communications. However, there is no guarantee that
interference will not occur in a particular installation. If this
equipment does cause harmful interference to radio or television
reception, which can be determined by turning the equipment o
and on, the user is encouraged to try to correct the interference
by one or more of the following measures:
• Reorient or relocate the receiving antenna.
• Increase the separation between the equipment
and receiver.
• Connect the equipment into an outlet on a
circuit dierent from that to which the receiver
is connected.
• Consult the dealer or an experienced radio/TV
technician for help.
RF warning statement: The device has been evaluated to meet
general RF exposure requirements. The device can be used in
portable exposure conditions without restriction.
UK & Europe
uk-eurosupport@isotunesaudio.com
North America
support@isotunesaudio.com
1-844-396-3737
Monday-Friday 9-5 ET
EU Importeur
Haven Technologies UK LTD
Winterhuder Weg 29
22075 Hamburg
Germany

DA | 16
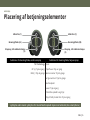
Placering af betjeningselementer
DANSK (DA)
Funktioner for berøringsade, venstre øreprop Funktioner for berøringsade, højre øreprop
TSC Technology Musik
OP (+): Tryk en gang Afspil/Pause: Tryk en gang
NED (-): Tryk to gange Næste nummer: Tryk to gange
Forrige nummer: Tryk tre gange
Telefonopkald
Besvar: Tryk en gang
Afslut/Afvis opkald: Langt tryk
Slå lyd fra/til på mikrofon: Tryk en gang
Mikrofon (1) Mikrofon (1)
Berøringsade (2L) Berøringsade (2R)
Øreprop, LED-indikatorlampe
(3) Øreprop, LED-indikatorlampe
(3)
Lydstyrke uden musik. Lydstyrke for musik/telefonopkald styres med enheden (dvs. smartphone)

DA | 17
Tactical Sound Control™ Technology
Dette produkt indeholder
TSC Technology. Det er en
mikrofonteknologi, som gør det muligt
for brugeren, at høre verden omkring
sig, men altid på et sikkert lytteniveau.
Når omgivende støj overstiger
et sikkert lytteniveau, reagerer
mikrofonteknologien straks og dæmper
den til et sikkert niveau.
Det er let at justere lydniveauet for TSC.
Tryk blot en gang på venstre øreprop
(2L) for at øge TSC-lydstyrken, og tryk
to gange på venstre øreprop (2L) for at
sænke TSC-lydstyrken.
Venstre øreprop
(2L)

DA | 18
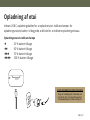
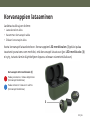
Opladning af ørepropper
Der er tre batterier, som skal oplades:
• Opladning af opladningsetuiets batteri
• Batteri i venstre øreprop
• Batteri i højre øreprop
Læg ørepropperne i opladningsetuiet. Øreproppernes LED-indikatorlampe (3) skal
lyse rødt, hvilket indikerer, at ørepropperne oplader (hvis LED-indikatorlampen (3))
ikke lyser, se afsnittet om fejlnding til sidst i denne manual).
Øreprop, LED-indikatorlampe (3)
Konstant rød = oplader
(Ørepropper i etui)
Konstant blå = fuldt opladet
(Ørepropper i etui)
3

DA | 19
Opladning af etui
Indsæt USB C-opladningskablet for at oplade etuiet. Indikatorlamper for
opladningsetuiets batteri vil begynde at blinke for at indikere opladningsniveau.
VIGTIG INFORMATION OM OPLADNING
Brug det medfølgende USB-kabel ved
at forbinde det med opladningsporten.
*Ladespændingen må ikke overstige 5V.
Opladningsetuiets indikatorlampe
l25 % batteri tilbage
ll 50 % batteri tilbage
lll 75 % batteri tilbage
llll 100 % batteri tilbage

DA | 20
Tænd/sluk
Metode 1
Tænd: Åbn opladningsetuiet. Ørepropperne vil tænde.
Sluk: Læg ørepropperne i opladningsetuiet og luk
etuiet. Ørepropperne slukker.
Metode 2
Tænd: I slukket tilstand (OFF), tryk og hold på højre
øreprop (2R), indtil du hører "Tændt", hvilket
tænder for højre øreprop. Gentag med den anden
øreprop (2L) (ca. 3 sekunder)
Sluk: I tændt tilstand (ON), tryk og hold på højre
øreprop (2R) i 5 sekunder, indtil du hører "Slukket",
hvilket slukker for højre øreprop. Gentag med den
anden øreprop (2L) (ca. 5 sekunder)
Øreprop, LED-indikatorlampe (3)(3)
Blåt blink = tændt
Rødt blink = slukket
3
Sidan laddas...
Sidan laddas...
Sidan laddas...
Sidan laddas...
Sidan laddas...
Sidan laddas...
Sidan laddas...
Sidan laddas...
Sidan laddas...
Sidan laddas...
Sidan laddas...
Sidan laddas...
Sidan laddas...
Sidan laddas...
Sidan laddas...
Sidan laddas...
Sidan laddas...
Sidan laddas...
Sidan laddas...
Sidan laddas...
Sidan laddas...
Sidan laddas...
Sidan laddas...
Sidan laddas...
Sidan laddas...
Sidan laddas...
Sidan laddas...
Sidan laddas...
Sidan laddas...
Sidan laddas...
Sidan laddas...
Sidan laddas...
Sidan laddas...
Sidan laddas...
Sidan laddas...
Sidan laddas...
Sidan laddas...
Sidan laddas...
Sidan laddas...
Sidan laddas...
Sidan laddas...
Sidan laddas...
Sidan laddas...
Sidan laddas...
Sidan laddas...
Sidan laddas...
Sidan laddas...
Sidan laddas...
Sidan laddas...
Sidan laddas...
Sidan laddas...
Sidan laddas...
Sidan laddas...
Sidan laddas...
Sidan laddas...
Sidan laddas...
Sidan laddas...
Sidan laddas...
Sidan laddas...
Sidan laddas...
Sidan laddas...
Sidan laddas...
Sidan laddas...
Sidan laddas...
Sidan laddas...
Sidan laddas...
Sidan laddas...
Sidan laddas...
Sidan laddas...
Sidan laddas...
Sidan laddas...
Sidan laddas...
Sidan laddas...
Sidan laddas...
Sidan laddas...
Sidan laddas...
Sidan laddas...
Sidan laddas...
Sidan laddas...
Sidan laddas...
Sidan laddas...
Sidan laddas...
Sidan laddas...
Sidan laddas...
Sidan laddas...
Sidan laddas...
Sidan laddas...
Sidan laddas...
Sidan laddas...
Sidan laddas...
Sidan laddas...
Sidan laddas...
Sidan laddas...
Sidan laddas...
Sidan laddas...
Sidan laddas...
Sidan laddas...
Sidan laddas...
Sidan laddas...
Sidan laddas...
Sidan laddas...
Sidan laddas...
Sidan laddas...
Sidan laddas...
Sidan laddas...
Sidan laddas...
Sidan laddas...
Sidan laddas...
Sidan laddas...
Sidan laddas...
-
 1
1
-
 2
2
-
 3
3
-
 4
4
-
 5
5
-
 6
6
-
 7
7
-
 8
8
-
 9
9
-
 10
10
-
 11
11
-
 12
12
-
 13
13
-
 14
14
-
 15
15
-
 16
16
-
 17
17
-
 18
18
-
 19
19
-
 20
20
-
 21
21
-
 22
22
-
 23
23
-
 24
24
-
 25
25
-
 26
26
-
 27
27
-
 28
28
-
 29
29
-
 30
30
-
 31
31
-
 32
32
-
 33
33
-
 34
34
-
 35
35
-
 36
36
-
 37
37
-
 38
38
-
 39
39
-
 40
40
-
 41
41
-
 42
42
-
 43
43
-
 44
44
-
 45
45
-
 46
46
-
 47
47
-
 48
48
-
 49
49
-
 50
50
-
 51
51
-
 52
52
-
 53
53
-
 54
54
-
 55
55
-
 56
56
-
 57
57
-
 58
58
-
 59
59
-
 60
60
-
 61
61
-
 62
62
-
 63
63
-
 64
64
-
 65
65
-
 66
66
-
 67
67
-
 68
68
-
 69
69
-
 70
70
-
 71
71
-
 72
72
-
 73
73
-
 74
74
-
 75
75
-
 76
76
-
 77
77
-
 78
78
-
 79
79
-
 80
80
-
 81
81
-
 82
82
-
 83
83
-
 84
84
-
 85
85
-
 86
86
-
 87
87
-
 88
88
-
 89
89
-
 90
90
-
 91
91
-
 92
92
-
 93
93
-
 94
94
-
 95
95
-
 96
96
-
 97
97
-
 98
98
-
 99
99
-
 100
100
-
 101
101
-
 102
102
-
 103
103
-
 104
104
-
 105
105
-
 106
106
-
 107
107
-
 108
108
-
 109
109
-
 110
110
-
 111
111
-
 112
112
-
 113
113
-
 114
114
-
 115
115
-
 116
116
-
 117
117
-
 118
118
-
 119
119
-
 120
120
-
 121
121
-
 122
122
-
 123
123
-
 124
124
-
 125
125
-
 126
126
-
 127
127
-
 128
128
-
 129
129
-
 130
130


på andra språk
- italiano: ISOtunes IT-17 Manuale utente
- eesti: ISOtunes IT-17 Kasutusjuhend
- español: ISOtunes IT-17 Manual de usuario
- Deutsch: ISOtunes IT-17 Benutzerhandbuch
- français: ISOtunes IT-17 Manuel utilisateur
- dansk: ISOtunes IT-17 Brugermanual
- Nederlands: ISOtunes IT-17 Handleiding
Relaterade papper


Andra dokument
-
P. Lindberg 9068525 Bruksanvisning
-
Yamaha TW-E3C Användarguide
-
Yamaha TW-EF3A Användarguide
-
TSC CPX4 Series User's Setup Guide
-
-
Behringer T-BUDS Snabbstartsguide
-
 MIXX StreamBuds Custom 3 User Guides
-
 ISOtunes SPORT DEFY SLIM Användarmanual
-
LG HBS-FN4 Bruksanvisning
-
Soundcore Liberty Air Användarmanual

