
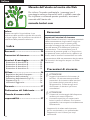
www�tunturi�com
- Please read this assembly manual carefully prior to assembling this product�
- Lesen Sie sich vor der Montage des Produkts diese Montageanleitung sorgfältig durch.
- Veuillez lire attentivement le présent manuel d’assemblage avant de monter ce produit.
- Lees deze montagehandleiding zorgvuldig voordat u dit product in elkaar gaat zetten.
- Leggere attentamente questo manuale di montaggio prima di montare il prodotto.
- Antes de montar este producto, lea atentamente este manual de montaje.
- Läs den här monteringshandboken noggrant före användning av den här produkten.
- Lue tämä asennusohje huolellisesti ennen tämän tuotteen asennusta.
Attention, Achtung, Attention, Attentie, Attenzione, Atención, Giv akt, Huomio
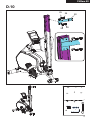
GB Assembly manual
DE Montageanleitung
FR Manuel d’assemblage
NL Montagehandleiding
IT Manuale di montaggio
ES Manual de montaje
SV Monteringshandbok
SU Asennusohje
GET YOUR
USER MANUAL
ONLINE
http://manuals.tunturi.com
WWW
IMPORTANT
ES Manual de montaje
SV Monteringshandbok
SU Asennusohje
http://manuals.tunturi.com
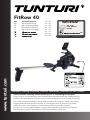
FitRow 40
19 - 22
23 - 25
26 - 29
30 - 33
34 - 37
38 - 41
42 - 45
46 - 48


3
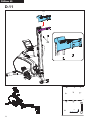
FitRow 40
A

NO.26
NO.1
NO.3
NO.11
NO.27
NO.17
NO.28
NO.15 & 61
NO.9
i
4
FitRow 40
B

100 cm
100 cm
100 cm
100 cm
8* Ø20mm
6
2X
M8
34
2X
2
2X
M8*75mm
19
M8*45mm
2X
22
4X
M8*20mm
23
4X
1X
M8*16mm
24
25
12X
14x
Ø8*Ø17mm
Ø8mm
7
2X
6mm
1X
5
FitRow 40
C
D

2
7
6
3
1
8* Ø20mm
6
2X
M8
34
2X
2
2X
M8*75mm
19
M8*45mm
2X
22
4X
M8*20mm
23
4X
1X
M8*16mm
24
25
12X
14x
Ø8*Ø17mm
Ø8mm
7
2X
6mm
1X
6
FitRow 40
D-1

24
25
24
25
21
15
61
1
1
8* Ø20mm
6
2X
M8
34
2X
2
2X
M8*75mm
19
M8*45mm
2X
22
4X
M8*20mm
23
4X
1X
M8*16mm
24
25
12X
14x
Ø8*Ø17mm
Ø8mm
7
2X
6mm
1X
7
FitRow 40
D-2

34
25
19
17
1
8* Ø20mm
6
2X
M8
34
2X
2
2X
M8*75mm
19
M8*45mm
2X
22
4X
M8*20mm
23
4X
1X
M8*16mm
24
25
12X
14x
Ø8*Ø17mm
Ø8mm
7
2X
6mm
1X
8
FitRow 40
D-3

10
9
15
Preassembled
Vormontiert
Pré assemblé
Voorgemonteerd
Pre-assemblato
Pre ensamblado
Förmonterad
Esikoottu
#10
8* Ø20mm
6
2X
M8
34
2X
2
2X
M8*75mm
19
M8*45mm
2X
22
4X
M8*20mm
23
4X
1X
M8*16mm
24
25
12X
14x
Ø8*Ø17mm
Ø8mm
7
2X
6mm
1X
9
FitRow 40
D-4

58
1
26
25
24
24
25
8* Ø20mm
6
2X
M8
34
2X
2
2X
M8*75mm
19
M8*45mm
2X
22
4X
M8*20mm
23
4X
1X
M8*16mm
24
25
12X
14x
Ø8*Ø17mm
Ø8mm
7
2X
6mm
1X
10
FitRow 40
D-5

55
8* Ø20mm
6
2X
M8
34
2X
2
2X
M8*75mm
19
M8*45mm
2X
22
4X
M8*20mm
23
4X
1X
M8*16mm
24
25
12X
14x
Ø8*Ø17mm
Ø8mm
7
2X
6mm
1X
11
FitRow 40
D-6

8* Ø20mm
6
2X
M8
34
2X
2
2X
M8*75mm
19
M8*45mm
2X
22
4X
M8*20mm
23
4X
1X
M8*16mm
24
25
12X
14x
Ø8*Ø17mm
Ø8mm
7
2X
6mm
1X
22
23
23
22
12
FitRow 40
D-7

8* Ø20mm
6
2X
M8
34
2X
2
2X
M8*75mm
19
M8*45mm
2X
22
4X
M8*20mm
23
4X
1X
M8*16mm
24
25
12X
14x
Ø8*Ø17mm
Ø8mm
7
2X
6mm
1X
11
13
FitRow 40
D-8

8* Ø20mm
6
2X
M8
34
2X
2
2X
M8*75mm
19
M8*45mm
2X
22
4X
M8*20mm
23
4X
1X
M8*16mm
24
25
12X
14x
Ø8*Ø17mm
Ø8mm
7
2X
6mm
1X
22
23
22
23
14
FitRow 40
D-9

8* Ø20mm
6
2X
M8
34
2X
2
2X
M8*75mm
19
M8*45mm
2X
22
4X
M8*20mm
23
4X
1X
M8*16mm
24
25
12X
14x
Ø8*Ø17mm
Ø8mm
7
2X
6mm
1X
24
25
25
24
28
15
FitRow 40
D-10

8* Ø20mm
6
2X
M8
34
2X
2
2X
M8*75mm
19
M8*45mm
2X
22
4X
M8*20mm
23
4X
1X
M8*16mm
24
25
12X
14x
Ø8*Ø17mm
Ø8mm
7
2X
6mm
1X
27
45
16
FitRow 40
D-11

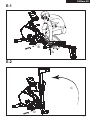
C
D
A
B
17
FitRow 40
E-1
E-2

+
_
+
_
AA
AA
+
_
+
_
AA
AA
18
FitRow 40
F-2

19
English
USER MANUAL ON OUR WEBSITE
To reduce the impact on the environment, you will only
find the assembly steps in this manual.
To learn how to use this product, please download the
user manual from:
manuals.tunturi.com
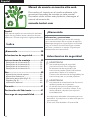
Welcome
Important Safety Instructions
This Owner’s Manual is an essential part of your
training equipment: reading all instructions in this
manual before you start using this appliance. The
following precautions must always be followed:
Index
Welcome ����������������������������������������� 19
Safety warnings ������������������������������ 19
Assembly instructions ��������������������� 20
Description illustration A �������������������������������20
Description illustration B ������������������������������� 20
Description illustration C �������������������������������20
Description illustration D �������������������������������20
Use�������������������������������������������������� 20
Adjusting the support feet ����������������������������20
Adjusting resistance ��������������������������������������21
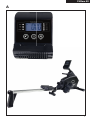
Replacing the batteries (Fig F-2 ) ������������������ 21
Folding (Fig� E) ����������������������������������������������21
Additional information ����������������������������������21
Warranty ����������������������������������������� 21
Declaration of the manufacturer ���� 21
Disclaimer ��������������������������������������� 21
Safety warnings
⚠ WARNING
• Read the safety warnings and the
instructions. Failure to follow the safety
warnings and the instructions can cause
personal injury or damage to the equipment.
Keep the safety warnings and the
instructions for future reference.
⚠ WARNING
• Heart rate monitoring systems may be
inaccurate.
• Over exercise may result in serious injury
or death. If you feel faint stop exercising
immediately.
- The equipment is suitable for domestic
use only. The equipment is not suitable for
commercial use.
- Max. usage is limited to 2 hrs a day.
- The use of this equipment by children or
persons with a physical, sensory, mental
or motorial disability, or lack of experience
and knowledge can give cause to hazards.
Persons responsible for their safety must give
explicit instructions or supervise the use of the
equipment.
- Before starting your workout, consult a
physician to check your health.
- If you experience nausea, dizziness or other
abnormal symptoms, immediately stop your
workout and consult a physician.
- To avoid muscular pain and strain, start each
workout by warming up and finish each workout
by cooling down. Remember to stretch at the
end of the workout.
- The equipment is suitable for indoor use only.
The equipment is not suitable for outdoor use.

20
English
- Only use the equipment in environments
with adequate ventilation. Do not use the
equipment in draughty environments in order
not to catch a cold.
- Only use the equipment in environments with
ambient temperatures between 10°C~35°C /
59°F~95°F.
Only store the equipment in environments with
ambient temperatures between 5°C~45°C /
41°F~113°F.
- Do not use or store the equipment in humid
surroundings. The air humidity must never be
more than 80%.
- Only use the equipment for its intended
purpose. Do not use the equipment for other
purposes than described in the manual.
- Do not use the equipment if any part is
damaged or defective. If a part is damaged or
defective, contact your dealer.
- Keep your hands, feet and other body parts
away from the moving parts.
- Keep your hair away from the moving parts.
- Wear appropriate clothing and shoes.
- Keep clothing, jewellery and other objects away
from the moving parts.
- Make sure that only one person uses the
equipment at a Time. The equipment must not
be used by persons weighing more than 120 kg
(265 lbs).
- Do not open equipment without consulting
your dealer.
Assembly instructions
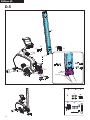
Description illustration A
The illustration shows what the trainer will looks
like after the assembly is completed.
You can use this as a reference during your
assembly, but do follow the assembly steps
always in the correct sequence as showed in the
illustrations.
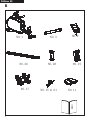
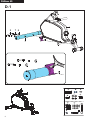
Description illustration B
The illustration shows what components and parts
you should find when un-boxing your product.
‼ NOTE
• Small parts can be hidden/ packed in hollow
spaces in the Styrofoam product protection
• If a part is missing, contact your dealer.
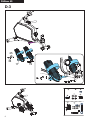
Description illustration C
The illustration shows the hardware kit that comes
with your product.
The hardware kit contains bolts, washers, screws
, nuts etc. and the required tools to properly fit
your trainer.
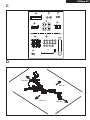
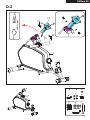
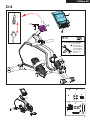
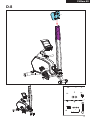
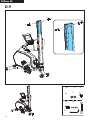
Description illustration D
The illustrations shows you in the correct following
order how to assembly your trainer best.
‼ NOTE
• Part numbers shown in the assembly steps
are commencing with the spare part drawing
that can be found in the online version user
manual.
⚠ WARNING
• Assemble the equipment in the given order.
• Carry and move the equipment with at least
two persons.
⚠ CAUTION
• Place the equipment on a firm, level surface.
• Place the equipment on a protective base to
prevent damage to the floor surface.
• Allow at least 100 cm of clearance around
the equipment.
• Refer to the illustrations for the correct
assembly of the equipment.
‼ NOTE
• Save the tools provided with this product,
after you completed the product assembly,
for future service purposes.
Use
Adjusting the support feet
The equipment is equipped with 2 support feet. If
the equipment is not stable, the support feet can
be adjusted.
- Turn the support feet as required to put the
equipment in a stable position.
Sidan laddas ...
Sidan laddas ...
Sidan laddas ...
Sidan laddas ...
Sidan laddas ...
Sidan laddas ...
Sidan laddas ...
Sidan laddas ...
Sidan laddas ...
Sidan laddas ...
Sidan laddas ...
Sidan laddas ...
Sidan laddas ...
Sidan laddas ...
Sidan laddas ...
Sidan laddas ...
Sidan laddas ...
Sidan laddas ...
Sidan laddas ...
Sidan laddas ...
Sidan laddas ...
Sidan laddas ...
Sidan laddas ...
Sidan laddas ...
Sidan laddas ...
Sidan laddas ...
Sidan laddas ...
Sidan laddas ...
Sidan laddas ...
Sidan laddas ...
Sidan laddas ...
Sidan laddas ...
-
 1
1
-
 2
2
-
 3
3
-
 4
4
-
 5
5
-
 6
6
-
 7
7
-
 8
8
-
 9
9
-
 10
10
-
 11
11
-
 12
12
-
 13
13
-
 14
14
-
 15
15
-
 16
16
-
 17
17
-
 18
18
-
 19
19
-
 20
20
-
 21
21
-
 22
22
-
 23
23
-
 24
24
-
 25
25
-
 26
26
-
 27
27
-
 28
28
-
 29
29
-
 30
30
-
 31
31
-
 32
32
-
 33
33
-
 34
34
-
 35
35
-
 36
36
-
 37
37
-
 38
38
-
 39
39
-
 40
40
-
 41
41
-
 42
42
-
 43
43
-
 44
44
-
 45
45
-
 46
46
-
 47
47
-
 48
48
-
 49
49
-
 50
50
-
 51
51
-
 52
52


Tunturi FitRow 40 Rower Manual Concise
- Typ
- Manual Concise
- Denna manual är också lämplig för
på andra språk
- italiano: Tunturi FitRow 40 Rower
- español: Tunturi FitRow 40 Rower
- Deutsch: Tunturi FitRow 40 Rower
- français: Tunturi FitRow 40 Rower
- English: Tunturi FitRow 40 Rower
- suomi: Tunturi FitRow 40 Rower
- Nederlands: Tunturi FitRow 40 Rower
Relaterade papper
-
Tunturi FitRow 40 Rower Bruksanvisning
-
-
-
-
-
-
-
-
-