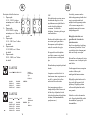
Zanussi ZME2002V Användarmanual
- Kategori
- Kokplattor
- Typ
- Användarmanual
Denna manual är också lämplig för

1
Bedienungs- und Einbauanleitung für Einbau-Kochmulden
Operating and Assembly Instructions for Built-in Hobs
Notice d'utilisation et de montage des tables de cuisson
encastrables
Istruzioni per I'uso il montaggio de piani di cottura
Gebruiksaanwijzing en inbouwinstructies voor inbouw-
kookplaaten
Bruksanvisning för inbyggnadshällar
Kalusteisiin asennettavan keittotason käyttö- ja
asennusohjeet
Zanussi
48
325 87-8600 Rev. 11-038
Sidan laddas...
Sidan laddas...
Sidan laddas...
Sidan laddas...
Sidan laddas...
Sidan laddas...

8
Achtung!
Die Kochstellen sind mit einer
Schutzschicht überzorgen, die durch
Aufheizen vor der ersten Benutzung
entfernt werden muss. Hierfür die
Kochplatten 3 Min. auf Höchststufe
einschalten.
Schützen Sie Ihre Kochplatten vor
Feuchtigkeit, wegen Rostgefahr
stellen Sie auf Ihre Platten nur Töpfe,
deren Boden trocken ist.
Die Oberflächen an Kochgeräten
werden bei Betrieb heiß, daher
besondere Vorsicht walten lassen.
Kleinkinder grundsätzlich fernhalten.
Da sich überhitzte Fette und Öle
entzünden können, dürfen Speisen mit
Fetten und Ölen (z.B. Pommes frites)
nur unter Aufsicht zubereitet werden.
Bewahren Sie in Schubladen oder
Fächern, die sich direkt unter dem
Einbaukochgerät befinden, keine
temperaturempfindlichen und
feuergefährlichen Stoffe auf.
(Reinigungsmittel, Spraydosen usw.).
Vorsicht beim Arbeiten mit anderen
Elektrogeräten, deren
Anschlußleitung in eine Steckdose in
Gerätenähe eingesteckt ist. Diese
Anschlußleitungen dürfen die heiße
Kochfläche nicht berühren.
DE
Wichtiger Hinweis für emaillierte
Einbau-Kochmulden.
Email ist ein glasähnlich harter
Überzug und daher sehr empfindlich.
Vorsicht beim Umgang mit harten und
kantigen Gegenständen.
Bei einem Schlag oder durch Fallen-
lassen schwerer Gegenstände kann
Email abplatzen.
Obstsäfte abwaschen, da sonst
Flecken auf der Oberfläche entstehen
können.
Durch den täglichen Umgang in
Haushalt treten im Laufe der Zeit
Kratzer oder matte Stellen auf.
Verständlicherweise liegen diese
aufgezählten Mängel außerhalb
unsere Gewährleistung.
Zur Reinigung verwenden Sie bitte
nur milde, im Haushalt übliche
Spühlmittel, auf keinen Fall
Scheuermittel.
41
Obs!
Plattorna är försedda med en
skyddsfilm som ska tas bort med hjälp
av värme innan plattorna används
första gången. Värm upp plattorna på
högsta inställningsläget under 3
minuter.
Skydda plattorna mot fukt för att
undvika att de rostar. Ställ aldrig våta
kokkärl på plattorna.
Kokkärl blir heta på hällen, så var
försiktig.
Håll barn på säkert avstånd medan
hällen används.
Förvara inte värmekänsliga eller
brännbara material i lådor direkt
under hällen. Det gäller till exempel
rengöringsmedel och sprayflaskor.
Var försiktig när du använder andra
elektriska köksapparater i närheten av
hällen. Sladdarna får aldrig komma i
närheten av de heta kokplattorna.
Viktig information om emaljerade
hällar
Emaljerade ytor är lika hårda som
glasytor och kräver speciell skötsel.
Hårda och skarpa förmål kan skada
emaljen.
Emaljerade ytor kan spricka om tunga
förmål faller ner på dem.
Fruktsaft bör torkas av genast efter-
som det annars kan bli fläckar som
inte går bort.
Det dagliga arbetet i ett kök
förorsakar repor och matta fläckar i
emaljen. Sådana skador täcks inte av
vår garanti.
Använd vanligt, milt rengöringsmedel
för att rengöra hällen. Använd aldrig
repande skurmedel.
SE
Sidan laddas...

10
Bei zu kleinem Geschirr geht
unnötig Energie verloren.
Überlaufendes Kochgut kann auf
die Kochplatte fließen.
Handelt es sich um eine Platte aus
rostfreiem Stahl, kann sich diese
verfärben. Die verfärbung läßt sich
mit "Sidol" entfernen.
Ebenfalls lassen sich Fettschmutz
kalk und Wasser- flecken an
sowohl Plattenoberflächen als auch
an den rostfreien Kanten der
Kochplatten mit "Sidol" entfernen.
Deshalb: Benutzen Sie künftig nur
"Sidol" als Wartungsmittel.
Wärmeverlust mit schlechtem oder zu kleinem
Kochgeschirr:
18 cm Kochplatte 2000 W
14,5 cm Kochplatte blitz 1500 W
Verlust 500 W
Nur Töpfe in ausreichender Größe verwenden.
Wärme
Energie
Wärme
Energie
39
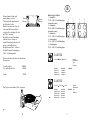
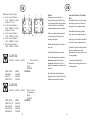
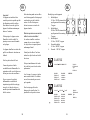
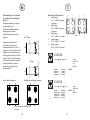
Beskrivning av hällarna
1 = Snabbplatta
145 Ø 1500 W, 7 inställningslägen
Automatisk styrning
2 = Snabbplatta
180 Ø 2000 W, 7 inställningslägen
Automatisk styrning
3 = Snabbplatta
145 Ø 1500 W, 7 inställningslägen
4 = Standardplatta
145 Ø 1000 W, 7 inställningslägen
5 = Standardplatta
180 Ø 1500 W, 7 inställningslägen
SE
1 2
2 1
4 5
5 3
ZANUSSI
230/400 V . 50Hz. 2N . 5500 W
MODEL PROD.NR. SERIENR.
ZME 2002 V 941628121
ZMF 2102 V 941628122
ZMFW 2302 V 941628123
230/400 V . 50 Hz. 2N . 7000W
MODEL PROD.NR. SERIENR.
ZMFW 2305W 941628118
ZMF 2105VD 941628119
ZMS 2205VD 941628120
ZME 2005VD 941628125
ZANUSSI
Made by:
EV-Denmark
Type:
HOM 430
Made by:
EV-Denmark
Type:
HOM 440

11
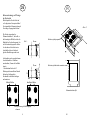
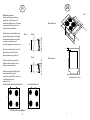
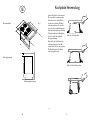
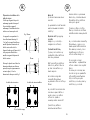
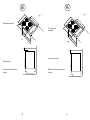
Installing the Hob
Check the hob for transport damage. Do
not install the hob if it shows signs of
damage. Be careful at the installation.
The Built-In-Hob correspond to heat
insulation class Y. In other words, a
kitchen unit taller than the hob unit may
be positioned on one side of it, but not on
both sides. On at least one side, there
must be no unit taller than the hob unit
itself.
Cut the tabletop according to the pre-
scribed dimensions or template (cut
exactly in the lines).
- The cutting measures are shown on fig.
2.
Check that the gasket is placed cor-rectly
and in continuity. Place the hob in the
cutout, properly centered.
Use a screwdriver, possibly for cross-
recessed screws, for tightening the
fastening screws, starting at the middle
and proceding with the screw diagonally
opposite, tightening evenly until the edge
of the hob is held firmly against the
tabletop. Fig. 1.
GB
40
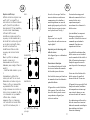
28
Fig. 1 40 mm
28 mm
X: The placement of the fastenings
screws.
Stainless steel hobs Enamelled hobs
38
SE
Obs!
Dra inte åt skruvarna mer än
nödvändigt!
Använd inte elverktyg utan
slirkoppling!
Demontering av hällen
Gör hällen strömlös före demonterin-
gen (t.ex. genom att ta ur
säkringarna).
Elinstallation
Anslutningen av hällen till
kontrollenheten får endast utföras av
en elektriker.
Se till att huvudströmmen till hällen
och kontrollenheten är avstängd under
installationen.
Om hällen ansluts med hjälp av
stickkontakt och uttag måste man
kontrollera att de har rätt dimensioner.
Om hällen installeras tillsammans med
en ugn måste även anvisningarna för
installation av ugnens kontrollenhet
följas noggrant.
Vid installationen ska elektrikern se till
att det inte går att vidröra
strömförande delar. Om hällen styrs
av en kontrollenhet ska en
avskärmning installeras!
Avståndet från hällens underdel till
underliggande köksinredning får inte
vara mindre än 110 mm.
Om hällen inte ansluts med stick-
kontakt och uttag ska anslutningen till
nätet utföras med en frånskiljare som
bryter alla faser med ett
kontaktavstånd på minst 3 mm.
De olika kombinationerna med häll/
inbyggnadsugn/kontrollenhet visas i
den bifogade tabellen.
De olika möjligheterna för att
kombinera en häll med en ugn/
kontrollenhet måste kontrolleras enligt
installations- och bruksanvisningarna
innan apparaten installeras.

12
GB
Attention!
Do not tighten more than necessary!
Do not use power tools without an
adjustable slipping clutch!
Important when dismantling the
Hob
Isolate the hob (for instance by
removing the fuses).
Electrical Installation
Connecting the hob with the special
control unit must be carried out by an
eletrician.
Hob and control unit shall be
disconnected from mains during the
installation
If the hob is connected by means of a
plug and socket, use always the
proper size.
If the hob is installed in combination
with an oven, the instructions for
connecting the oven control unit must
also be carefully followed.
The installation must ensure that live
parts cannot be touched incidentally.
If the hob is controlled by means of a
control unit, a partition should be
installed!
The distance between the bottom of
the hob and the carpentry below
should not be less than 110 mm.
If the hob is not connected with plug
and socket, the connection to the
supply shall be effected by means of
an isolating switch which breaks all
the phases with a minimum of 3 mm
contact gap.
The combinations between hobs/
build-in ovens/control units are shown
on the table annexed to the present
instructions.
The possibilities of conbining a hob
with oven/control unit should be
checked on the basis of the relevant
instructions for installation and use
before the apparatus is installed.
37
SE
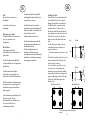
Installation av hällen
Kontrollera att hällen är oskadad vid
leveransen. Installera inte hällen om
den uppvisar tecken på skada. Var
försiktig under installationen.
Inbyggnadshällen ingår i
värmeisoleringsklass Y, dvs att
köksinredning som är högre än hällen
får placeras vid hällens ena sida, men
inte på båda. På minst en sida ska det
finnas ett kökselement som inte är
högre än själva hällen.
Såga ut köksbänken enligt de
föreskrivna dimensionerna eller enligt
mallen (såga exakt i linjerna).
-Utskärningsmåtten anges i fig. 2.
Kontrollera att packningen är rätt
placerad. Placera hällen i hålet och se
till att den är exakt centrerad.
Använd en skruvmejsel, eventuellt en
stjärnmejsel, för att dra åt
fästskruvarna. Börja i mitten och dra
sedan åt skruven som ligger diagonalt
mittemot. Dra åt skruvarna lika
mycket tills hällens kant ligger tätt
mot köksbänken. Fig. 1.
Häll av rostfritt stål Emaljerad häll
X: Fästskruvarnas placering
40
28
Fig. 1 40 mm
28 mm
Sidan laddas...
Sidan laddas...
Sidan laddas...
Sidan laddas...
Sidan laddas...
Sidan laddas...
Sidan laddas...
Sidan laddas...
Sidan laddas...
Sidan laddas...
Sidan laddas...
Sidan laddas...
-
 1
1
-
 2
2
-
 3
3
-
 4
4
-
 5
5
-
 6
6
-
 7
7
-
 8
8
-
 9
9
-
 10
10
-
 11
11
-
 12
12
-
 13
13
-
 14
14
-
 15
15
-
 16
16
-
 17
17
-
 18
18
-
 19
19
-
 20
20
-
 21
21
-
 22
22
-
 23
23
-
 24
24


Zanussi ZME2002V Användarmanual
- Kategori
- Kokplattor
- Typ
- Användarmanual
- Denna manual är också lämplig för
på andra språk
- italiano: Zanussi ZME2002V Manuale utente
- Deutsch: Zanussi ZME2002V Benutzerhandbuch
- français: Zanussi ZME2002V Manuel utilisateur
- English: Zanussi ZME2002V User manual
- suomi: Zanussi ZME2002V Ohjekirja
- Nederlands: Zanussi ZME2002V Handleiding