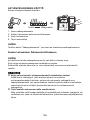
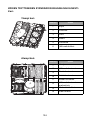
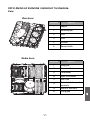
POINT 5-SERIES PODW56042I OPPVASKMASKIN Bruksanvisning
- Kategori
- Mixer / matberedare tillbehör
- Typ
- Bruksanvisning

Dishwasher
PODW56042I
User Manual

Thank you for purchasing your new POINT Upright Fridge. These
operating instructions will help you use it properly and safely. We
recommend that you spend some time reading this instruction manual
Read all the safety instructions carefully before use and keep this
instruction manual for future reference.
Takk for at du kjøpte ditt nye POINT stående kjøleskap. Denne
bruksanvisningen vil hjelpe deg med å bruke den på en trygg og riktig
måte. Vi anbefaler at du tar deg tid til å lese gjennom hele
bruksanvisningen for å bli fortrolig med alle funksjonene som tilbys.
Les alle sikkerhetsanvisningene nøye før bruk, og oppbevar
bruksanvisningen for fremtidig referanse.
Kiitos, kun valitsit uuden POINT-jääkaappi. Nämä käyttöohjeet
opastavat sinua käyttämään laitetta oikein ja turvallisesti. On
suositeltavaa käyttää aikaa tämän käyttöoppaan lukemiseen, jotta
ymmärrät täysin, mitä toiminnallisia ominaisuuksia tuote tarjoaa. Lue
kaikki turvallisuusohjeet huolellisesti ennen laitteen käyttöä ja säilytä
käyttöopas myöhempää käyttöä varten.
Tak for købet af dit nye køleskab fra POINT. Disse brugervejledninger
hjælper dig med at bruge dette apparat rigtigt og sikkert. Vi anbefaler,
at du læser denne brugervejledning, så du får en fuld forståelse af
hvordan alle funktionerne virker. Læs sikkerhedsforskrifterne grundigt
inden brug, og gem denne brugervejledning til senere brug.
Tack för att du har köpt ditt nya stående kylskåp från POINT. Denna
bruksanvisning hjälper dig att använda den på ett säkert och korrekt
sätt. Vi rekommenderar att du tar dig tid att läsa igenom denna
bruksanvisning för att till fullo förstå alla driftfunktioner som den
erbjuder. Läs noga igenom alla säkerhetsinstruktioner före användning
och spara bruksanvisningen för framtida bruk.
Thank you for purchasing your new POINT dishwasher. These
operating instructions will help you use it properly and safely. We
recommend that you spend some time reading this instruction manual
in order that you fully understand all the operational features it o ers.
Read all the safety instructions carefully before use and keep this
instruction manual for future reference.
Takk for at du kjøpte din nye oppvaskmaskinen fra POINT.
Denne bruksanvisningen vil hjelpe deg med å bruke den på en trygg
og riktig måte. Vi anbefaler at du tar deg tid til å lese gjennom
hele bruksanvisningen for å bli fortrolig med alle funksjonene som
tilbys. Les alle sikkerhetsanvisningene nøye før bruk, og oppbevar
bruksanvisningen for fremtidig referanse.
Kiitos, kun valitsit uuden POINT-Astianpesukoneen.
Nämä käyttöohjeet opastavat sinua käyttämään laitetta oikein ja
turvallisesti. On suositeltavaa käyttää aikaa tämän käyttöoppaan
lukemiseen, jotta ymmärrät täysin, mitä toiminnallisia ominaisuuksia
tuote tarjoaa. Lue kaikki turvallisuusohjeet huolellisesti ennen laitteen
käyttöä ja säilytä käyttöopas myöhempää käyttöä varten.
Tak for købet af din nye opvaskemaskine fra POINT. Disse
brugervejledninger hjælper dig med at bruge dette apparat rigtigt
og sikkert. Vi anbefaler, at du læser denne brugervejledning,
så du får en fuld forståelse af hvordan alle funktionerne virker.
Læs sikkerhedsforskrifterne grundigt inden brug, og gem denne
brugervejledning til senere brug.
Tack för att du har köpt en ny diskmaskinen från POINT. Denna
bruksanvisning hjälper dig att använda den på ett säkert och korrekt
sätt. Vi rekommenderar att du tar dig tid att läsa igenom denna
bruksanvisning för att till fullo förstå alla driftfunktioner som den
erbjuder. Läs noga igenom alla säkerhetsinstruktioner före användning
och spara bruksanvisningen för framtida bruk.
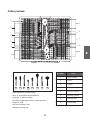
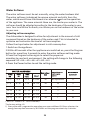
2

4
51
98
145
192
-
-
-
-
- 50
97
144
191
238
3

5
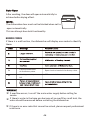
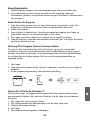
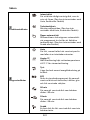
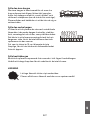
SAFETY INFORMATION
WARNING
When using your dishwasher, follow the precautions
listed below:
•Installation and repair can only be carried out by a
qualified technician.
•This appliance is intended to be used in household and
similar applications such as:
-staff kitchen areas in shops, offices and other
working environments;
-farm houses;
-by clients in hotels, motels and other residential
type environments;
-bed and breakfast type environments.
•This appliance can be used by children aged from 8
years and above and persons with reduced physical,
sensory or mental capabilities or lack of experience
and knowledge if they have been given supervision or
instruction concerning use of the appliance in a safe
way and understand the hazards involved.
•Children shall not play with the appliance. Cleaning
and user maintenance shall not be done by children
without supervision (For EN60335-1). This appliance is
not intended for use by persons (including children)
with reduced physical, sensory or mental capabilities,
or lack of experience and knowledge, unless they have
been given supervision or instruction concerning use
4

of the appliance by a person responsible for their
safety (For IEC60335-1).
•Packaging material could be dangerous for children!
•This appliance is for indoor household use only. To
protect against the risk of electrical shock, do not
immerse the unit, mains power cable or plug in water
or other liquid.
•Unplug before cleaning and performing maintenance
on the appliance.
•Use a soft cloth moistened with mild soap, and then
use a dry cloth to wipe it again.
Earthing Instructions
•This appliance must be earthed. In the event of a
malfunction or breakdown, earthing will reduce the
risk of an electric shock by providing a path of least
resistance of electric current. This appliance is
equipped with an earthing conductor plug.
•The plug must be plugged into an appropriate mains
power outlet that is installed and earthed in
accordance with all local codes and ordinances.
•Improper connection of the equipment-earthing
conductor can result in the risk of an electric shock.
•Check with a qualified electrician or service
representative if you are in doubt whether the
appliance is properly grounded.
•Do not modify the plug provided with the appliance if
it does not fit the outlet.
5

7
•Have a proper mains power outlet installed by a
qualified electrician.
•Do not abuse, sit on, or stand on the door or dish rack
of the dishwasher.
•Do not operate your dishwasher unless all enclosure
panels are properly in place.
•Open the door very carefully if the dishwasher is
operating, there is a risk of water squirting out.
•Do not place any heavy objects on or stand on the door
when it is open. The appliance could tip forward.
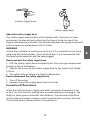
•When loading items to be washed:
1. Locate sharp items well so that they are not likely to
damage the door seal;
2. Warning: Knives and other utensils with sharp points
must be loaded in the basket with their points
facing down or placed in a horizontal position.
•Some dishwasher detergents are strongly alkaline.
They can be extremely dangerous if swallowed. Avoid
contact with the skin and eyes and keep children away
from the dishwasher when the door is open.
•Check that the detergent powder is empty after
completion of the wash cycle.
•Do not wash plastic items unless they are marked
"dishwasher safe" or the equivalent.
•For unmarked plastic items, check the manufacturer's
recommendations.
•Use only detergent and rinse agents recommended for
use in an automatic dishwasher.
6

•Never use soap, laundry detergent, or hand washing
detergent in your dishwasher.
•The door should not be left open, since this could
increase the risk of tripping.
•If the mains power cable is damaged, it must be
replaced by the manufacturer or its service agent or a
similarly qualified person in order to avoid a hazard.
•During installation, the power supply must not be
excessively or dangerously bent or flattened.
•Do not tamper with controls.
•The appliance needs to be connected to the main
water valve using new hose sets. Old sets should not
be reused.
•To save energy, in standby mode, the appliance will
switch off automatically while there is no any
operation in 15 minutes.
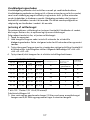
The maximum number of place settings to be washed
is 15.
The maximum permissible inlet water pressure is
1MPa.
The minimum permissible inlet water pressure is
0.04MPa.
Disposal
•For disposing of packaging and the appliance go to a
recycling center, cut off the power supply cable and
make the door closing device unusable.
•Cardboard packaging is manufactured from recycled
7

9
paper and should be disposed of in the waste paper
collection for recycling.
•By ensuring this product is disposed of correctly, you
will help prevent potential negative consequences for
the environment and human health, which could
otherwise be caused by inappropriate waste handling
of this product.
•For more detailed information about recycling of this
product, contact your local city office and your
household waste disposal service.
•DISPOSAL: Do not dispose this product as unsorted
municipal waste. Collection of such waste separately
for special treatment is necessary.
8

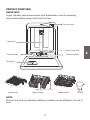
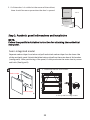
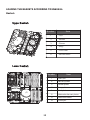
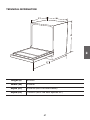
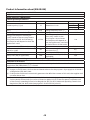
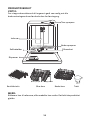
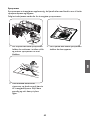
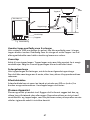
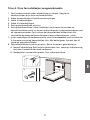
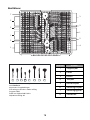
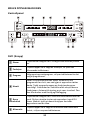
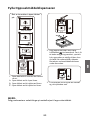
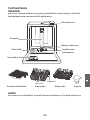
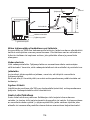
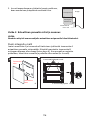
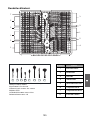
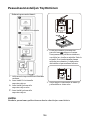
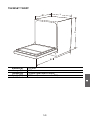
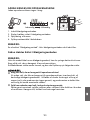
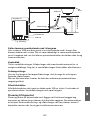
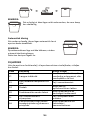
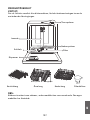
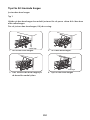
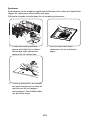
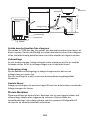
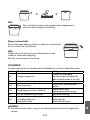
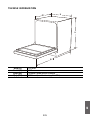
PRODUCT OVERVIEW
IMPORTANT:
To get the best performance from your dishwasher, read all operating
instructions before using it for the first time.
NOTE:
Pictures are only for reference, dierent models may be dierent. Prevail in
kind.
Funnel
Top spray arm
Dispenser
Salt container
Lower spray arm
Filter assembly
Inner pipe
Cutlery rack Lower basket
Upper spray arm Cup rack
Upper basket
9

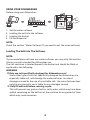
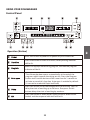
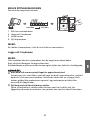
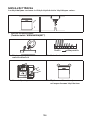
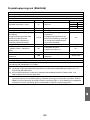
USING YOUR DISHWASHER
Before using your dishwasher:
Inside Outside
1. Set the water softener
2. Loading the salt into the softener
3. Loading the basket
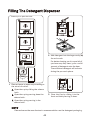
4. Fill the dispenser
NOTE:
Check the section “Water Softener”If you need to set the water softener.
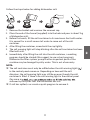
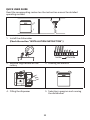
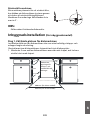
Loading The Salt Into The Softener
NOTE:
If your model does not have any water softener, you may skip this section.
Always use salt intended for dishwasher use.
The salt container is located beneath the basket and should be filled as
explained in the following:
WARNING
Only use salt specifically designed for dishwashers use!
Every other type of salt not specifically designed for dishwasher use,
especially table salt, will damage the water softener. In case of
damages caused by the use of unsuitable salt, the manufacturer does
not give any warranty nor is liable for any damages caused.
Only fill with salt before running a cycle.
This will prevent any grains of salt or salty water, which may have been
spilled, remaining on the bottom of the machine for any period of time,
which may cause corrosion.
10

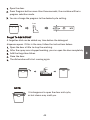
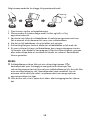
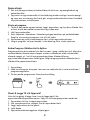
Follow the steps below for adding dishwasher salt:
1. Remove the basket and unscrew the reservoir cap.
2. Place the end of the funnel (supplied) into the hole and pour in about 1kg
of dishwasher salt.
3. Before first wash, fill the salt container to its maximum limit with water.
It is normal for a small amount of water to come out of the salt
container.
4. After filling the container, screw back the cap tightly.
5. The salt warning light will stop blinking after the salt container has been
filled with salt.
6. Immediately after filling the salt into the salt container, a washing
program should be started (We suggest to use a short program).
Otherwise the filter system, pump or other important parts of the
machine may be damaged by salty water. This is out of warranty.
The salt container must only be refilled when the salt warning light ( )
in the control panel comes on. Depending on how well the salt
dissolves, the salt warning light may still be on even though the salt
container is filled. If there is no salt warning light in the control panel
(for some m
softener by the cycles that the dishwasher has run.
If salt has spilled, run a soak or quick program to remove it.
NOTE:
11

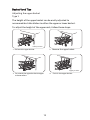
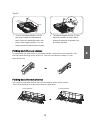
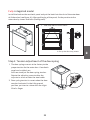
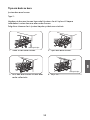
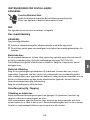
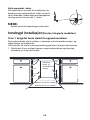
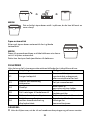
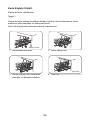
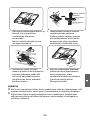
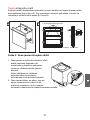
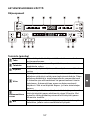
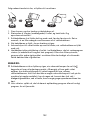
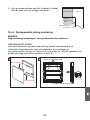
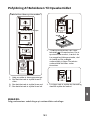
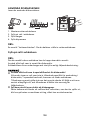
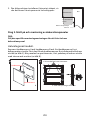
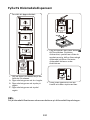
Adjusting the upper basket
Type 1:
The height of the upper basket can be easily adjusted to
accommodate taller dishes in either the upper or lower basket.
To adjust the height of the upper rack, follow these steps:
4
1
lower position
2Remove the upper basket.
3Re-attach the upper basket to upper
or lower rollers.
upper position
Basket Used Tips
Push in the upper basket.
Pull out the upper basket.
12

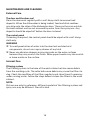
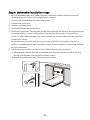
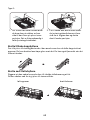
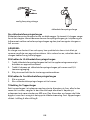
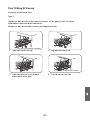
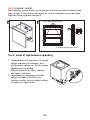
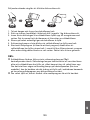
Folding back the cup shelves
To make room for taller items in the upper basket, raise the cup rack upwards. You
can then lean the tall glasses against it. You can also remove it when it is not
required for use.
Folding back the rack shelves
The spikes of the lower basket are used for holding plates and a platter.
They can be lowered to make more room for large items.
raise upwards fold backwards
1To raise the upper basket, just lift
the upper basket at the center of
each side until the basket locks into
place in the upper position. It is not
necessary to lift the adjuster handle.
2To lower the upper basket, lift the
adjuster handles on each side to
release the basket and lower it to
the lower position.
Type 2:
13

13
MAINTENANCE AND CLEANING
External Care
The door and the door seal
Clean the door seals regularly with a soft damp cloth to remove food
deposits. When the dishwasher is being loaded, food and drink residues
may drip onto the sides of the dishwasher door. These surfaces are outside
the wash cabinet and are not accessed by water from the spray arm. Any
deposits should be wiped off before the door is closed.
The control panel
If cleaning is required, the control panel should be wiped with a soft damp
cloth only.
WARNING
To avoid penetration of water into the door lock and electrical
components, do not use a spray cleaner of any kind.
Never use abrasive cleaners or scouring pads on the outer surfaces
because they may scratch the finish. Some paper towels may also scratch
or leave marks on the surface.
Internal Care
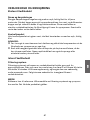
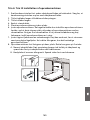
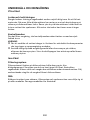
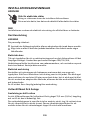
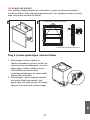
Filtering system
The filtering system in the base of the wash cabinet retains coarse debris
from the washing cycle. The collected coarse debris may cause the filters to
clog. Check the condition of the filters regularly and clean them if necessary
under running water. Follow the steps below to clean the filters in the wash
cabinet.
NOTE:
Pictures are only for reference, different models of the filtering system and
spray arm may be different. Prevail in kind.
14

WARNING
Do not over tighten the filters. Put the filters back in sequence securely,
otherwise coarse debris could get into the system and cause a blockage.
Never use the dishwasher without filters in place. Improper replacement
of the filter may reduce the performance level of the appliance and
damage dishes and utensils.
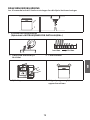
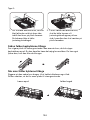
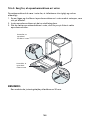
1 2
Hold the coarse filter and rotate it
anticlockwise to unlock the filter.
Lift the filter upwards and out of
the dishwasher.
The fine filter can be pulled off the
bottom of the filter assembly. The
coarse filter can be detached from
the main filter by gently squeezing
the tabs at the top and pulling it
away.
3 4
Larger food remnants can be
cleaned by rinsing the filter under
running water.
For a more thorough clean, use a
soft cleaning brush.
Reassemble the filters in the reverse
order of the disassembly, replace the
filter insert, and rotate clockwise to
the close arrow.
Main filterMain filter
Coarse filterCoarse filter
Fine filter
OpenOpen
15

15
Wash the arms in soapy and warm
water and use a soft brush to clean
the jets. Replace them after rinsing
them thoroughly.
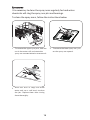
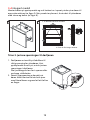
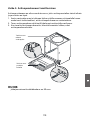
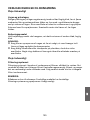
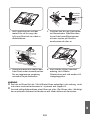
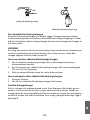
Spray arms
It is necessary to clean the spray arms regularly for hard water
chemicals will clog the spray arm jets and bearings.
To clean the spray arms, follow the instructions below:
2
3
To remove the lower spray arm, pull
out the spray arm upward.
1To remove the upper spray arm, hold the
nut in the center still and rotate the
spray arm counterclockwise to remove it.
16

After every wash
After every wash, turn off the water supply to the appliance and leave the
door slightly open so that moisture and odors are not trapped inside.
Remove the plug
Before cleaning or performing maintenance, always remove the plug from
the mains power socket.
No solvents or abrasive cleaning
To clean the exterior and rubber parts of the dishwasher, do not use
solvents or abrasive cleaning products. Only use a cloth with warm soapy
water. To remove spots or stains from the surface of the interior, use a
cloth dampened with water with a little vinegar, or a cleaning product
made specifically for dishwashers.
When not in use for a long time
It is recommended that you run a wash cycle with the dishwasher empty
and then remove the plug from the mains power socket, turn off the water
supply and leave the door of appliance slightly open. This will help the door
seals to last longer and prevent odors from forming within the appliance.
Moving the appliance
If the appliance must be moved, try to keep it in the vertical position. If
absolutely necessary, it can be positioned on its back.
Seals
One of the factors that cause odours to form in the dishwasher is food that
remains trapped in the seals. Periodic cleaning with a damp sponge will
prevent this from occurring.
Caring For The Dishwasher
Frost precaution
Take frost protection measures on the dishwasher in winter. After every
washing cycle, operate as follows:
1. Cut off the electrical power to the dishwasher at the supply source.
2. Turn off the water supply and disconnect the water inlet pipe from the
water valve.
3. Drain the water from the inlet pipe and water valve. (Use a pan to gather
the water)
4. Reconnect the water inlet pipe to the water valve.
5. Remove the filter at the bottom of the tub and use a sponge to soak up
water in the sump.
17

17
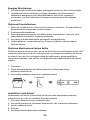
INSTALLATION INSTRUCTION
WARNING
Electrical Shock Hazard
Disconnect electrical power before installing dishwasher.
Failure to do so could result in death or electrical shock.
Attention
The installation of the pipes and electrical equipments should be done by
professionals.
About Power Connection
WARNING
For personal safety:
Do not use an extension cord or an adapter plug with this appliance.
Do not, under any circumstances, cut or remove the earthing connection
from the cable.
Electrical requirements
Look at the rating label to know the rating voltage and connect the
dishwasher to the appropriate power supply. Use the required fuse
10A/13A/16A, time delay fuse or circuit breaker recommended and provide
separate circuit serving only this appliance.
Electrical connection
Ensure the voltage and frequency of the power being corresponds to those
on the rating plate. Only insert the plug into an electrical socket which is
earthed properly. If the electrical socket to which the appliance must be
connected is not appropriate for the plug, replace the socket, rather than
using a adaptor or the like as they could cause overheating and burns.
Ensure that proper earthing exists before use.
Water Supply And Drain
Cold water connection
Connect the cold water supply hose to a threaded 3/4(inch) connector and
make sure that it is fastened tightly in place.
If the water pipes are new or have not been used for an extended period of
time, let the water run to make sure that the water is clear. This precaution
is needed to avoid the risk of the water inlet to be blocked and damage the
appliance.
18

ordinary supply hose
safety supply hose
About the safety supply hose
The safety supply hose consists of the double walls. The hose's system
guarantees its intervention by blocking the flow of water in case of the
supply hose breaking and when the air space between the supply hose itself
and the outer corrugated hose is full of water.
WARNING
A hose that attaches to a sink spray can burst if it is installed on the same
water line as the dishwasher. If your sink has one, it is recommended that
the hose be disconnected and the hole plugged.
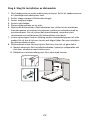
How to connect the safety supply hose
1. Pull the safety supply hoses completely out from storage compartment
located at rear of dishwasher.
2. Tighten the screws of the safety supply hose to the faucet with thread
3/4inch.
3. Turn water fully on before starting the dishwasher.
How to disconnect the safety supply hose
1. Turn o the water.
2. Unscrew the safety supply hose from the faucet.
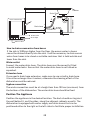
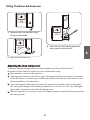
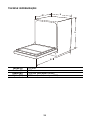
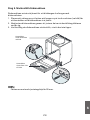
Connection Of Drain Hoses
Insert the drain hose into a drain pipe with a minimum diameter of 4 cm,
or let it run into the sink, making sure to avoid bending or crimping it. The
height of drain pipe must be less than 600mm. The free end of the hose
must not be immersed in water to avoid any back flow occurring. Securely
fix the drain hose in either position A or position B.
19

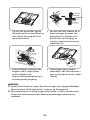
19
B
A
MAX 1000mm
Counter
Drain hose
Back of dishwasher
Water Inlet
Drain Pipe
Mains Cable
How to drain excess water from hoses
If the sink is 1000mm higher from the floor, the excess water in hoses
cannot be drained directly into the sink. It will be necessary to drain excess
water from hoses into a bowl or suitable container that is held outside and
lower than the sink.
Water outlet
Connect the water drain hose. The drain hose must be correctly fitted
to avoid water leaks. Ensure that the water drain hose is not kinked or
squashed.
Extension hose
If you need a drain hose extension, make sure to use a similar drain hose.
It must be no longer than 4 meters; otherwise the cleaning eect of the
dishwasher could be reduced.
Syphon connection
The waste connection must be at a height less than 100 cm (maximum) from
the bottom of the dishwasher. The water drain hose should be fixed.
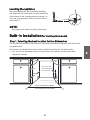
Position The Appliance
Position the appliance in the desired location. The back should rest against
the wall behind it, and the sides, along the adjacent cabinets or walls. The
dishwasher is equipped with water supply and drain hoses that can be
positioned either to the right or the left sides to facilitate proper installation.
Drain Pipe
40mm
20
Sidan laddas...
Sidan laddas...
Sidan laddas...
Sidan laddas...
Sidan laddas...
Sidan laddas...
Sidan laddas...
Sidan laddas...
Sidan laddas...
Sidan laddas...
Sidan laddas...
Sidan laddas...
Sidan laddas...
Sidan laddas...
Sidan laddas...
Sidan laddas...
Sidan laddas...
Sidan laddas...
Sidan laddas...
Sidan laddas...
Sidan laddas...
Sidan laddas...
Sidan laddas...
Sidan laddas...
Sidan laddas...
Sidan laddas...
Sidan laddas...
Sidan laddas...
Sidan laddas...
Sidan laddas...
Sidan laddas...
Sidan laddas...
Sidan laddas...
Sidan laddas...
Sidan laddas...
Sidan laddas...
Sidan laddas...
Sidan laddas...
Sidan laddas...
Sidan laddas...
Sidan laddas...
Sidan laddas...
Sidan laddas...
Sidan laddas...
Sidan laddas...
Sidan laddas...
Sidan laddas...
Sidan laddas...
Sidan laddas...
Sidan laddas...
Sidan laddas...
Sidan laddas...
Sidan laddas...
Sidan laddas...
Sidan laddas...
Sidan laddas...
Sidan laddas...
Sidan laddas...
Sidan laddas...
Sidan laddas...
Sidan laddas...
Sidan laddas...
Sidan laddas...
Sidan laddas...
Sidan laddas...
Sidan laddas...
Sidan laddas...
Sidan laddas...
Sidan laddas...
Sidan laddas...
Sidan laddas...
Sidan laddas...
Sidan laddas...
Sidan laddas...
Sidan laddas...
Sidan laddas...
Sidan laddas...
Sidan laddas...
Sidan laddas...
Sidan laddas...
Sidan laddas...
Sidan laddas...
Sidan laddas...
Sidan laddas...
Sidan laddas...
Sidan laddas...
Sidan laddas...
Sidan laddas...
Sidan laddas...
Sidan laddas...
Sidan laddas...
Sidan laddas...
Sidan laddas...
Sidan laddas...
Sidan laddas...
Sidan laddas...
Sidan laddas...
Sidan laddas...
Sidan laddas...
Sidan laddas...
Sidan laddas...
Sidan laddas...
Sidan laddas...
Sidan laddas...
Sidan laddas...
Sidan laddas...
Sidan laddas...
Sidan laddas...
Sidan laddas...
Sidan laddas...
Sidan laddas...
Sidan laddas...
Sidan laddas...
Sidan laddas...
Sidan laddas...
Sidan laddas...
Sidan laddas...
Sidan laddas...
Sidan laddas...
Sidan laddas...
Sidan laddas...
Sidan laddas...
Sidan laddas...
Sidan laddas...
Sidan laddas...
Sidan laddas...
Sidan laddas...
Sidan laddas...
Sidan laddas...
Sidan laddas...
Sidan laddas...
Sidan laddas...
Sidan laddas...
Sidan laddas...
Sidan laddas...
Sidan laddas...
Sidan laddas...
Sidan laddas...
Sidan laddas...
Sidan laddas...
Sidan laddas...
Sidan laddas...
Sidan laddas...
Sidan laddas...
Sidan laddas...
Sidan laddas...
Sidan laddas...
Sidan laddas...
Sidan laddas...
Sidan laddas...
Sidan laddas...
Sidan laddas...
Sidan laddas...
Sidan laddas...
Sidan laddas...
Sidan laddas...
Sidan laddas...
Sidan laddas...
Sidan laddas...
Sidan laddas...
Sidan laddas...
Sidan laddas...
Sidan laddas...
Sidan laddas...
Sidan laddas...
Sidan laddas...
Sidan laddas...
Sidan laddas...
Sidan laddas...
Sidan laddas...
Sidan laddas...
Sidan laddas...
Sidan laddas...
Sidan laddas...
Sidan laddas...
Sidan laddas...
Sidan laddas...
Sidan laddas...
Sidan laddas...
Sidan laddas...
Sidan laddas...
Sidan laddas...
Sidan laddas...
Sidan laddas...
Sidan laddas...
Sidan laddas...
Sidan laddas...
Sidan laddas...
Sidan laddas...
Sidan laddas...
Sidan laddas...
Sidan laddas...
Sidan laddas...
Sidan laddas...
Sidan laddas...
Sidan laddas...
Sidan laddas...
Sidan laddas...
Sidan laddas...
Sidan laddas...
Sidan laddas...
Sidan laddas...
Sidan laddas...
Sidan laddas...
Sidan laddas...
Sidan laddas...
Sidan laddas...
Sidan laddas...
Sidan laddas...
Sidan laddas...
Sidan laddas...
Sidan laddas...
Sidan laddas...
Sidan laddas...
Sidan laddas...
Sidan laddas...
Sidan laddas...
Sidan laddas...
Sidan laddas...
-
 1
1
-
 2
2
-
 3
3
-
 4
4
-
 5
5
-
 6
6
-
 7
7
-
 8
8
-
 9
9
-
 10
10
-
 11
11
-
 12
12
-
 13
13
-
 14
14
-
 15
15
-
 16
16
-
 17
17
-
 18
18
-
 19
19
-
 20
20
-
 21
21
-
 22
22
-
 23
23
-
 24
24
-
 25
25
-
 26
26
-
 27
27
-
 28
28
-
 29
29
-
 30
30
-
 31
31
-
 32
32
-
 33
33
-
 34
34
-
 35
35
-
 36
36
-
 37
37
-
 38
38
-
 39
39
-
 40
40
-
 41
41
-
 42
42
-
 43
43
-
 44
44
-
 45
45
-
 46
46
-
 47
47
-
 48
48
-
 49
49
-
 50
50
-
 51
51
-
 52
52
-
 53
53
-
 54
54
-
 55
55
-
 56
56
-
 57
57
-
 58
58
-
 59
59
-
 60
60
-
 61
61
-
 62
62
-
 63
63
-
 64
64
-
 65
65
-
 66
66
-
 67
67
-
 68
68
-
 69
69
-
 70
70
-
 71
71
-
 72
72
-
 73
73
-
 74
74
-
 75
75
-
 76
76
-
 77
77
-
 78
78
-
 79
79
-
 80
80
-
 81
81
-
 82
82
-
 83
83
-
 84
84
-
 85
85
-
 86
86
-
 87
87
-
 88
88
-
 89
89
-
 90
90
-
 91
91
-
 92
92
-
 93
93
-
 94
94
-
 95
95
-
 96
96
-
 97
97
-
 98
98
-
 99
99
-
 100
100
-
 101
101
-
 102
102
-
 103
103
-
 104
104
-
 105
105
-
 106
106
-
 107
107
-
 108
108
-
 109
109
-
 110
110
-
 111
111
-
 112
112
-
 113
113
-
 114
114
-
 115
115
-
 116
116
-
 117
117
-
 118
118
-
 119
119
-
 120
120
-
 121
121
-
 122
122
-
 123
123
-
 124
124
-
 125
125
-
 126
126
-
 127
127
-
 128
128
-
 129
129
-
 130
130
-
 131
131
-
 132
132
-
 133
133
-
 134
134
-
 135
135
-
 136
136
-
 137
137
-
 138
138
-
 139
139
-
 140
140
-
 141
141
-
 142
142
-
 143
143
-
 144
144
-
 145
145
-
 146
146
-
 147
147
-
 148
148
-
 149
149
-
 150
150
-
 151
151
-
 152
152
-
 153
153
-
 154
154
-
 155
155
-
 156
156
-
 157
157
-
 158
158
-
 159
159
-
 160
160
-
 161
161
-
 162
162
-
 163
163
-
 164
164
-
 165
165
-
 166
166
-
 167
167
-
 168
168
-
 169
169
-
 170
170
-
 171
171
-
 172
172
-
 173
173
-
 174
174
-
 175
175
-
 176
176
-
 177
177
-
 178
178
-
 179
179
-
 180
180
-
 181
181
-
 182
182
-
 183
183
-
 184
184
-
 185
185
-
 186
186
-
 187
187
-
 188
188
-
 189
189
-
 190
190
-
 191
191
-
 192
192
-
 193
193
-
 194
194
-
 195
195
-
 196
196
-
 197
197
-
 198
198
-
 199
199
-
 200
200
-
 201
201
-
 202
202
-
 203
203
-
 204
204
-
 205
205
-
 206
206
-
 207
207
-
 208
208
-
 209
209
-
 210
210
-
 211
211
-
 212
212
-
 213
213
-
 214
214
-
 215
215
-
 216
216
-
 217
217
-
 218
218
-
 219
219
-
 220
220
-
 221
221
-
 222
222
-
 223
223
-
 224
224
-
 225
225
-
 226
226
-
 227
227
-
 228
228
-
 229
229
-
 230
230
-
 231
231
-
 232
232
-
 233
233
-
 234
234
-
 235
235
-
 236
236
-
 237
237
-
 238
238
-
 239
239


POINT 5-SERIES PODW56042I OPPVASKMASKIN Bruksanvisning
- Kategori
- Mixer / matberedare tillbehör
- Typ
- Bruksanvisning
på andra språk
Relaterade papper
Andra dokument
-
 SENZ SD5011 OPPVASKMASKIN Bruksanvisning
-
Whirlpool ADPU 3004 Bruksanvisning
-
-
-
 SENZ STD52W20 OPPVASKMASKIN Bruksanvisning
-
Samsung DW60M6040UW Användarmanual
-
Samsung DW60M6070IB Användarmanual
-
Electrolux ESI45010X Användarmanual
-
-
 MUUT-TUOTEMERKIT ATV16 Användarmanual


