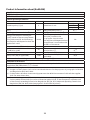
POINT PTDW1 OPPVASKMASKIN Bruksanvisning
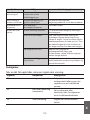
- Kategori
- Mixer / matberedare tillbehör
- Typ
- Bruksanvisning

1
Dishwasher
PTDW1
User Manual

Thank you for purchasing your new POINT Upright Fridge. These
operating instructions will help you use it properly and safely. We
recommend that you spend some time reading this instruction manual
Read all the safety instructions carefully before use and keep this
instruction manual for future reference.
Takk for at du kjøpte ditt nye POINT stående kjøleskap. Denne
bruksanvisningen vil hjelpe deg med å bruke den på en trygg og riktig
måte. Vi anbefaler at du tar deg tid til å lese gjennom hele
bruksanvisningen for å bli fortrolig med alle funksjonene som tilbys.
Les alle sikkerhetsanvisningene nøye før bruk, og oppbevar
bruksanvisningen for fremtidig referanse.
Kiitos, kun valitsit uuden POINT-jääkaappi. Nämä käyttöohjeet
opastavat sinua käyttämään laitetta oikein ja turvallisesti. On
suositeltavaa käyttää aikaa tämän käyttöoppaan lukemiseen, jotta
ymmärrät täysin, mitä toiminnallisia ominaisuuksia tuote tarjoaa. Lue
kaikki turvallisuusohjeet huolellisesti ennen laitteen käyttöä ja säilytä
käyttöopas myöhempää käyttöä varten.
Tak for købet af dit nye køleskab fra POINT. Disse brugervejledninger
hjælper dig med at bruge dette apparat rigtigt og sikkert. Vi anbefaler,
at du læser denne brugervejledning, så du får en fuld forståelse af
hvordan alle funktionerne virker. Læs sikkerhedsforskrifterne grundigt
inden brug, og gem denne brugervejledning til senere brug.
Tack för att du har köpt ditt nya stående kylskåp från POINT. Denna
bruksanvisning hjälper dig att använda den på ett säkert och korrekt
sätt. Vi rekommenderar att du tar dig tid att läsa igenom denna
bruksanvisning för att till fullo förstå alla driftfunktioner som den
erbjuder. Läs noga igenom alla säkerhetsinstruktioner före användning
och spara bruksanvisningen för framtida bruk.
Thank you for purchasing your new POINT dishwasher. These
operating instructions will help you use it properly and safely. We
recommend that you spend some time reading this instruction manual
in order that you fully understand all the operational features it o ers.
Read all the safety instructions carefully before use and keep this
instruction manual for future reference.
Takk for at du kjøpte din nye oppvaskmaskinen fra POINT.
Denne bruksanvisningen vil hjelpe deg med å bruke den på en trygg
og riktig måte. Vi anbefaler at du tar deg tid til å lese gjennom
hele bruksanvisningen for å bli fortrolig med alle funksjonene som
tilbys. Les alle sikkerhetsanvisningene nøye før bruk, og oppbevar
bruksanvisningen for fremtidig referanse.
Kiitos, kun valitsit uuden POINT-Astianpesukoneen.
Nämä käyttöohjeet opastavat sinua käyttämään laitetta oikein ja
turvallisesti. On suositeltavaa käyttää aikaa tämän käyttöoppaan
lukemiseen, jotta ymmärrät täysin, mitä toiminnallisia ominaisuuksia
tuote tarjoaa. Lue kaikki turvallisuusohjeet huolellisesti ennen laitteen
käyttöä ja säilytä käyttöopas myöhempää käyttöä varten.
Tak for købet af din nye opvaskemaskine fra POINT. Disse
brugervejledninger hjælper dig med at bruge dette apparat rigtigt
og sikkert. Vi anbefaler, at du læser denne brugervejledning,
så du får en fuld forståelse af hvordan alle funktionerne virker.
Læs sikkerhedsforskrifterne grundigt inden brug, og gem denne
brugervejledning til senere brug.
Tack för att du har köpt en ny diskmaskinen från POINT. Denna
bruksanvisning hjälper dig att använda den på ett säkert och korrekt
sätt. Vi rekommenderar att du tar dig tid att läsa igenom denna
bruksanvisning för att till fullo förstå alla driftfunktioner som den
erbjuder. Läs noga igenom alla säkerhetsinstruktioner före användning
och spara bruksanvisningen för framtida bruk.
2

4
1
1
38
73
108
143
1 87
-
39 -
74 -
09 -
-44
3

5
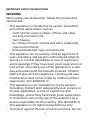
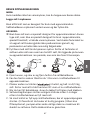
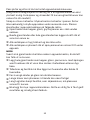
IMPORTANT SAFETY INSTRUCTIONS
WARNING
When using your dishwasher, follow the precautions
listed below:
• This appliance is intended to be used in household
and similar applications such as:
- staff kitchen areas in shops, offices and other
working environments;
-farm houses;
- by clients in hotels, motels and other residential
type environments;
- bed and breakfast type environments.
•This appliance can be used by children aged from 8
years and above and persons with reduced physical,
sensory or mental capabilities or lack of experience
and knowledge if they have been given supervision or
instruction concerning use of the appliance in a safe
way and understand the hazards involved. Children
shall not play with the appliance. Cleaning and user
maintenance shall not be made by children without
supervision. (For EN60335-1)
•This appliance is not intended for use by persons
(including children) with reduced physical, sensory or
mental capabilities, or lack of experience and
knowledge, unless they have been given supervision
or instruction concerning use of the appliance by a
person responsible for their safety. (For IEC60335-1)
• This appliance is for indoor household use only.
•To protect against the risk of electrical shock, do not
4

immerse the appliance, mains power cable or plug in
water or other liquid.
•Unplug before cleaning and maintaining the appliance.
•Use a soft cloth moisten with mild soap, and then use
a dry cloth to wipe it again.
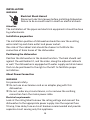
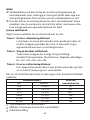
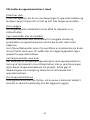
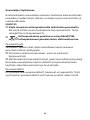
Earthing Instructions
•This appliance must be earthed. In the event of a
malfunction or breakdown, earthing will reduce the
risk of an electric shock by providing a path of least
resistance of electric current. This appliance is
equipped with a mains power cable having an
equipment-earthing conductor and an earthing plug.
•The plug must be plugged into an appropriate mains
power outlet that is installed and earthed in
accordance with all local codes and ordinances.
• Do not modify the plug provided with the appliance; If
it does not fit the mains power outlet. Have a proper
mains power outlet installed by a qualified electrician.
•Improper connection of the equipment-earthing
conductor can result in the risk of an electric shock.
Check with a qualified electrician or service
representative if you are in doubt whether the
appliance is properly earthed.
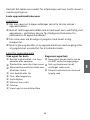
General use
• Do not abuse, sit on, or stand on the door or dish rack
of the dishwasher.
• Do not operate your appliance unless all enclosure
panels are properly in place.
•Open the door very carefully if the appliance is
5

7
operating, there is a risk of water squirting out.
• Do not place any heavy objects on or stand on the
door when it is open. The appliance could tip forward.
•When loading items to be washed:
-Locate sharp items so that they are not likely to
damage the door seal;
-Warning: Knives and other utensils with sharp
points must be loaded in the basket with their
points down or placed in a horizontal position.
•Check that the detergent powder is empty after
completion of the wash cycle.
• Do not wash plastic items unless they are marked
dishwasher safe or the equivalent. For plastic items
without mark, check the manufacturer's
recommendations.
•Use only detergent additives designed for an
automatic dishwasher.
•Never use soap, laundry detergent, or hand washing
detergent in your appliance.
•Children should be supervised to ensure that they do
not play with the appliance.
•The door should not be left open, since this could
increase the risk of tripping.
• If the supply cord is damaged, it must be replaced by
the manufacturer or its service agent or a similarly
qualified person in order to avoid a hazard.
•During installation, the power supply must not be
excessively or dangerously bent or flattened.
• Do not tamper with controls.
6

•The appliance is to be connected to the water mains
using new hose sets and that old hose-sets should
not be reused.
•The maximum permissible inlet water pressure is
1MPa.
•The minimum permissible inlet water pressure is
0.04MPa.
Disposal
•For disposing of package and the appliance go to a
recycling center. Cut off the mains power cable and
make the door closing device unusable.
•Cardboard packaging is manufactured from recycled
paper and should be disposed in the waste paper
collection for recycling.
• By ensuring this product is disposed of correctly, you
will help prevent potential negative consequences for
the environment and human health, which could
otherwise be caused by inappropriate waste handling
of this product.
•For more detailed information about recycling of this
product, contact your local city office and your
household waste disposal service.
•DISPOSAL: Do not dispose this product as unsorted
municipal waste. Collection of such waste separately
for special treatment is necessary.
7

9
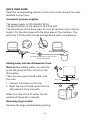
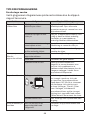
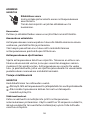
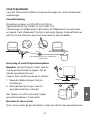
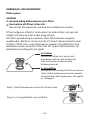
QUICK USER GUIDE
Read the corresponding content on the instruction manual for more
detailed instructions.
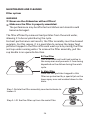
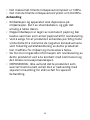
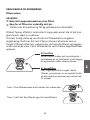
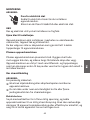
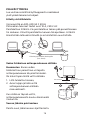
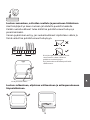
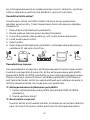
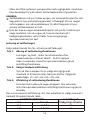
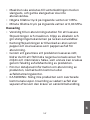
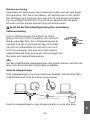
Connected to power supplies
The power supply is 220-240VAC 50 Hz
The specification of the socket is 10 A 250 VAC
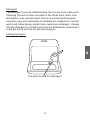
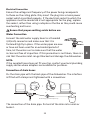
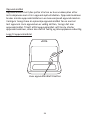
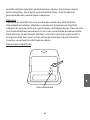
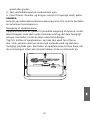
The connection of the drain pipe: Put end of the drain into a sink or
bucket. Fix the drain pipe with the back pipe of the machine. The
interface is fitted with clamps and tightened with a screwdriver.
Rubber
Or
Fix the drainage pipe to the suction
cup (In the figure)
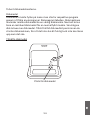
Adding water into the dishwasher’s tank
Note: Before adding water, you need to
press the power button to turn on the
dishwasher
There are two ways to add water into
the tank:
1. Connect inlet hose to the tap;
2. Open the cap and add water into the
dishwasher’s tank manually
When the tank is full of water, the dis
washer will beep for 3 seconds.
Removing large residue
Remove the large residue before placing.
Drain Pipe Power cord
Water Inlet
or
8

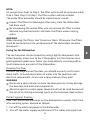
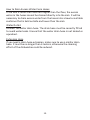
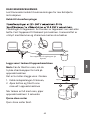
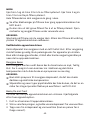
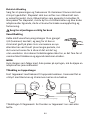
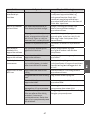
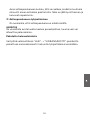
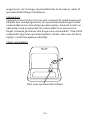
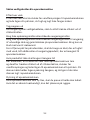
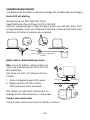
Opening the door, placing the dishes and adding detergent
Placing order by size and from the two sides to the middle. All cutlery
should be tilted to improve cleaning performance.
The arm will be blocked with the improper placement of the cutlery
and this will affect the cleaning performance.
Do not place the items to be cleaned
in the wrong direction as this may
affect the cleaning performance.
Try to leave the dirty face towards the
spray arm.
Insert detergent here.
RightLeft
Closing the door, selecting the program and starting the dishwasher
9

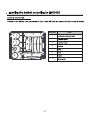
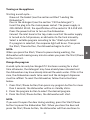
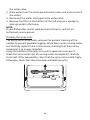
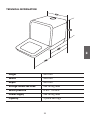
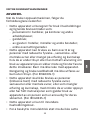
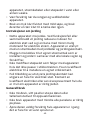
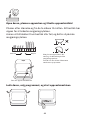
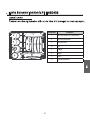
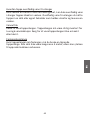
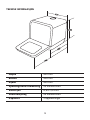
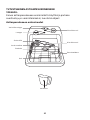
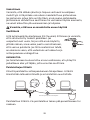
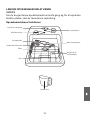
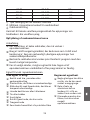
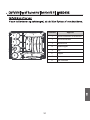
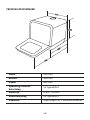
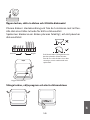
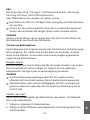
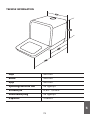
GETTING TO KNOW YOUR DISHWASHER
IMPORTANT:
Before using this dishwasher for the first time and to get the best
performance, read these instructions.
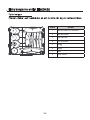
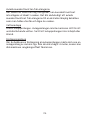
Dishwasher features
Water inlet
Upper spray arm
Lower spray arm
Detergent
compartment
Water bottle
Light bulb
Salt container
Tableware rack
Filter
Basket
10

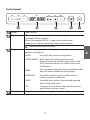
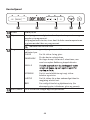
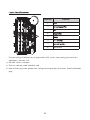
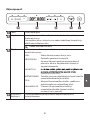
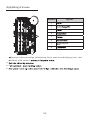
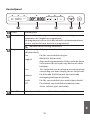
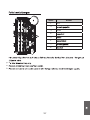
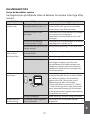
Control panel
Power Power on/off
Display When a program is selected, it shows the highest temperature
and length of the program.
When the program starts, it shows the actual water
temperature and the remaining time of the program.
Water insufficient indicator
Program Select the appropriate washing program and corresponding
indicator will light up.
GLASS For slight dirty dishes and glasses.
STEAM WASH With the best washing performance.
High temperature steam is generated in the
first 5 minutes which can soften stains and
kill bacteria.
RINSE To rinse dishes that you plan to wash later that
day, and also suitable for rinsing fruits.
INTENSIVE For dishes with oil stains and heavy dirty
cooking utensils and dishes.
RAPID For slight dirty dishes, the required cleaning
time is relatively short.
ECO For general dirty dishes and utensils (such as
pots, plates, glasses, pans).
Start / Pause To start or pause the washing process of the dishwasher.
11
RINSE
RINSE

13
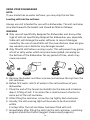
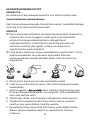
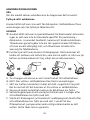
USING YOUR DISHWASHER
NOTE:
If your model has no water softener, you may skip this section.
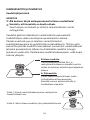
Loading salt into the softener
Always use salt intended for use with a dishwasher. The salt container
is located beneath the basket and should be filled as follows:
WARNING
zOnly use salt specifically designed for dishwasher use! Every other
type of salt not specifically designed for dishwasher use, especially
table salt, will damage the water softener. In case of damages
caused by the use of unsuitable salt the manufacturer does not give
any warranty nor is liable for any damages caused.
zOnly fill with salt before running a cycle. This will prevent any grains
of salt or salty water, which may have been spilled, remaining on
the bottom of the dishwasher for any period of time, which may
cause corrosion.
A. Remove the basket and then unscrew and remove the cap from the
salt container.
B. Before first wash, add 1L of water in the salt container of your
dishwasher.
C. Place the end of the funnel (excluded) into the hole and introduce
about, 0.13kg of salt. It is normal for a small amount of water to
come out of the salt container.
D. After filling the container, screw the cap tightly back clockwise.
E. Usually, the salt warning light will be cease to be illuminated
within
2-6 days after the salt container has been filled with salt.
F. Immediately after filling the salt into the salt container, a washing
program should be started (suggest choose rapid program).
12

Otherwise filter system, pump or other important parts of the
machine may be damaged by salty water. It is out of warranty.
NOTE:
zThe salt container must only be refilled when the salt warning light
on the control panel comes on. Depending on how fully the salt
dissolves, the salt warning light may still be on even though the salt
container is filled.
zIf there is no salt warning light on the control panel (for some
models), you can judge when to load the salt into the softener by
the cycles that the dishwasher has run.
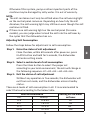
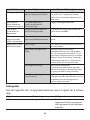
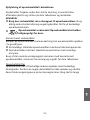
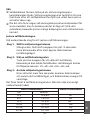
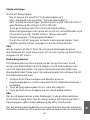
Adjusting Salt Consumption
Follow the steps below for adjustment in salt consumption.
Step 1: Enter the status of salt adjustment
Close the door, within 60 seconds after power on, press
GLASS button and hold for 5 seconds, the dishwasher
will enter setting mode.
Step 2: Select a certain level of salt consumption
Press the Glass button to select the proper set
according to your local environment, the sets will change in
the following sequence: H1->H2->H3->H4->H5->H6.
Step 3: Exit the status of salt adjustment
Without any operation in five seconds, the dishwasher will
exit from set mode, and the dishwasher enters standby
status.
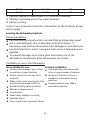
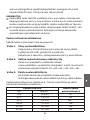
There are 6 levels of salt consumption in all. It is recommended to
select the level according to the below table:
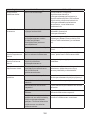
WATER HARDNESS Setting on the water
softener
°dH 1) Mmol/l 2)
0-5 0-0.94 H1
6-11 1.0-2.0 H2
12-17 2.1-3.0 H3 3)
18-22 3.1-4.0 H4
13

15
23-34 4.1-6.0 H5
35-55 6.1-9.8 H6
1) German degree of measurement for the water hardness
2) Millimol, internationel unit for water hardness
3) Factory setting
Contact your local water board for information on the hardness of your
water supply.
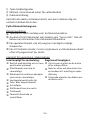
Loading the dishwasher baskets
Recommendation
zConsider buying utensils which are identified as dishwasher-proof.
zUse a mild detergent that is described as 'kind to dishes'. If
necessary, seek further information from detergent manufacturers.
zFor particular items, select a program with as low a temperature as
possible.
zTo prevent damage, do not take glass and cutlery out of the
dishwasher immediately after the program has ended.
Suitability of use in the dishwasher
Not suitable for use: Limited suitability:
zCutlery with wooden, horn, china
or mother-of-pearl handles
zPlastic items that are not heat
resistant
zOlder cutlery with glued parts that
are not temperature resistant
zBonded cutlery items or dishes
zPewter or copper items
zCrystal glass
zSteel items subject to rusting
zWooden items
zItems made from synthetic fibres
zSome glasses can become dull
after a large number of washes.
zSilver and aluminium have a
tendency to discolour during
washing.
zGlazed patterns may fade if
washed frequently.
14

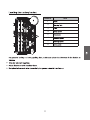
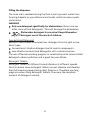
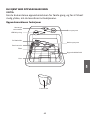
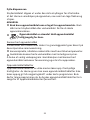
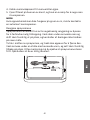
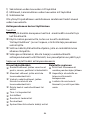
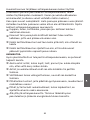
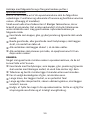
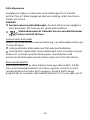
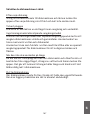
Attention before or after loading the dishwasher baskets
(For the best performance of the dishwasher, follow these loading
guidelines. Features and appearance of baskets and cutlery baskets
may vary from your model.)
Scrape off any large food particles. Soften remnants of burnt food in
pans. It is not necessary to rinse the dishes under running water. Place
objects in the dishwasher in following way:
zItems such as cups, glasses, pots/pans, etc. are face downwards.
zCurved items, or those with recesses, should be loaded at aslant so
that water can run off.
zAll utensils are stacked securely and can not tip over
zAll utensils are placed in the way that the spray arms can rotated
freely during washing.
NOTE:
Very small items should not be washed in the dishwasher as they could
easily fall out of the basket.
zLoad hollow items such as cups, glasses, pans etc. with the opening
facing downwards so that water cannot collect in the container or a
deep base.
zDishes and items of cutlery must not lie inside one another, or cover
each other.
zTo avoid damage to glasses, they must not be touched.
zLong bladed knives stored in an upright position are a potential
hazard!
zLong and/or sharp items of cutlery such as carving knives must be
positioned horizontally in the basket.
zDo not overload your dishwasher. This is important for good results
and for reasonable energy consumption.
15

Number Item
1
2
3
4
5
6
7
8
16

Number Item
1
2
3
4
5
6
7
8
17

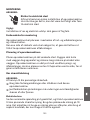
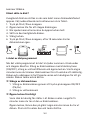
Filling the dispenser
The rinse aid is released during the final rinse to prevent water from
forming droplets on your dishes and utensils, which can leave spots
and streaks.
WARNING
Only use detergent specifically for dishwashers. Never use any
other rinse aid and detergents. This will damage the dishwasher.
Dishwasher detergent is corrosive! Keep dishwasher
detergent out of the reach of children.
Concentrated Detergent
Based on their chemical composition, detergents can be split in two
basic types:
Conventional, alkaline detergents with caustic components.
Low alkaline concentrated detergents with natural enzymes.
The use of Normal washing program in combination with concentrated
detergent reduces pollution and is good for your dishes.
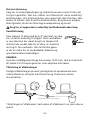
Detergent Tablets
Detergent tablets of dierent brands dissolve at dierent speeds.
For this reason some detergent tablets cannot dissolve and develop
their full cleaning power during short Programs. Therefore use long
programs when using detergent tablets, to ensure the complete
removal of detergent residue.
18

Detergent
The detergent must be refilled before the start of each wash cycle
following the instructions provided in the Wash Cycle Table. Your
dishwasher uses less detergent then a conventional dishwasher.
Generally, only one tablespoon of detergent is needed for a normal
wash load. More heavily soiled items need more detergent. Always
add the detergent just before starting the dishwasher, otherwise it
could get damp and will not dissolve properly.
Adding detergent
The place to add the detergent
19

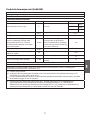
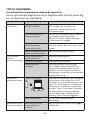
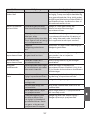
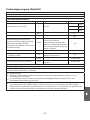
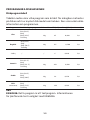
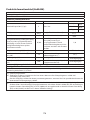
PROGRAMMING THE DISHWASHER
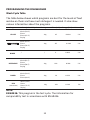
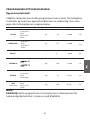
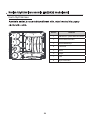
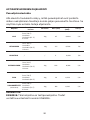
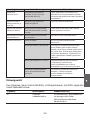
Wash Cycle Table
The table below shows which programs are best for the levels of food
residue on them and how much detergent is needed. It also show
various information about the programs.
Program Description Of Cycle Detergent Time (min) Energy (Kwh) Water (L)
GLASS
Wash (50°C)
Rinse
5 )C°6( esniR
Drying
10g 85 0.400 5.0
STEAM WASH 10g1250.5005.0
/ 6 0.010 5.0
INTENSIVE
Wash(62°C)
Rinse
Rinse(70°C)
Drying
10g 160 0.500 5.0
RAPID
Wash (50°C)
Rinse
Rinse (60°C)
10g 29 0.350 5.0
ECO
(*EN 60436)
Wash (50°C)
Rinse
Rinse (72°C)
Drying
10g 160 0.396 5.0
NOTE:
6346 :0 NE This program is the test cycle. The information for
.63460 NE htiw ecnadrocca ni tset ytilibarapmoc
Wash (69°C)
Rinse
Rinse (70°C)
Drying
/
20
RINSE
Sidan laddas...
Sidan laddas...
Sidan laddas...
Sidan laddas...
Sidan laddas...
Sidan laddas...
Sidan laddas...
Sidan laddas...
Sidan laddas...
Sidan laddas...
Sidan laddas...
Sidan laddas...
Sidan laddas...
Sidan laddas...
Sidan laddas...
Sidan laddas...
Sidan laddas...
Sidan laddas...
Sidan laddas...
Sidan laddas...
Sidan laddas...
Sidan laddas...
Sidan laddas...
Sidan laddas...
Sidan laddas...
Sidan laddas...
Sidan laddas...
Sidan laddas...
Sidan laddas...
Sidan laddas...
Sidan laddas...
Sidan laddas...
Sidan laddas...
Sidan laddas...
Sidan laddas...
Sidan laddas...
Sidan laddas...
Sidan laddas...
Sidan laddas...
Sidan laddas...
Sidan laddas...
Sidan laddas...
Sidan laddas...
Sidan laddas...
Sidan laddas...
Sidan laddas...
Sidan laddas...
Sidan laddas...
Sidan laddas...
Sidan laddas...
Sidan laddas...
Sidan laddas...
Sidan laddas...
Sidan laddas...
Sidan laddas...
Sidan laddas...
Sidan laddas...
Sidan laddas...
Sidan laddas...
Sidan laddas...
Sidan laddas...
Sidan laddas...
Sidan laddas...
Sidan laddas...
Sidan laddas...
Sidan laddas...
Sidan laddas...
Sidan laddas...
Sidan laddas...
Sidan laddas...
Sidan laddas...
Sidan laddas...
Sidan laddas...
Sidan laddas...
Sidan laddas...
Sidan laddas...
Sidan laddas...
Sidan laddas...
Sidan laddas...
Sidan laddas...
Sidan laddas...
Sidan laddas...
Sidan laddas...
Sidan laddas...
Sidan laddas...
Sidan laddas...
Sidan laddas...
Sidan laddas...
Sidan laddas...
Sidan laddas...
Sidan laddas...
Sidan laddas...
Sidan laddas...
Sidan laddas...
Sidan laddas...
Sidan laddas...
Sidan laddas...
Sidan laddas...
Sidan laddas...
Sidan laddas...
Sidan laddas...
Sidan laddas...
Sidan laddas...
Sidan laddas...
Sidan laddas...
Sidan laddas...
Sidan laddas...
Sidan laddas...
Sidan laddas...
Sidan laddas...
Sidan laddas...
Sidan laddas...
Sidan laddas...
Sidan laddas...
Sidan laddas...
Sidan laddas...
Sidan laddas...
Sidan laddas...
Sidan laddas...
Sidan laddas...
Sidan laddas...
Sidan laddas...
Sidan laddas...
Sidan laddas...
Sidan laddas...
Sidan laddas...
Sidan laddas...
Sidan laddas...
Sidan laddas...
Sidan laddas...
Sidan laddas...
Sidan laddas...
Sidan laddas...
Sidan laddas...
Sidan laddas...
Sidan laddas...
Sidan laddas...
Sidan laddas...
Sidan laddas...
Sidan laddas...
Sidan laddas...
Sidan laddas...
Sidan laddas...
Sidan laddas...
Sidan laddas...
Sidan laddas...
Sidan laddas...
Sidan laddas...
Sidan laddas...
Sidan laddas...
Sidan laddas...
Sidan laddas...
Sidan laddas...
Sidan laddas...
Sidan laddas...
Sidan laddas...
Sidan laddas...
Sidan laddas...
Sidan laddas...
Sidan laddas...
-
 1
1
-
 2
2
-
 3
3
-
 4
4
-
 5
5
-
 6
6
-
 7
7
-
 8
8
-
 9
9
-
 10
10
-
 11
11
-
 12
12
-
 13
13
-
 14
14
-
 15
15
-
 16
16
-
 17
17
-
 18
18
-
 19
19
-
 20
20
-
 21
21
-
 22
22
-
 23
23
-
 24
24
-
 25
25
-
 26
26
-
 27
27
-
 28
28
-
 29
29
-
 30
30
-
 31
31
-
 32
32
-
 33
33
-
 34
34
-
 35
35
-
 36
36
-
 37
37
-
 38
38
-
 39
39
-
 40
40
-
 41
41
-
 42
42
-
 43
43
-
 44
44
-
 45
45
-
 46
46
-
 47
47
-
 48
48
-
 49
49
-
 50
50
-
 51
51
-
 52
52
-
 53
53
-
 54
54
-
 55
55
-
 56
56
-
 57
57
-
 58
58
-
 59
59
-
 60
60
-
 61
61
-
 62
62
-
 63
63
-
 64
64
-
 65
65
-
 66
66
-
 67
67
-
 68
68
-
 69
69
-
 70
70
-
 71
71
-
 72
72
-
 73
73
-
 74
74
-
 75
75
-
 76
76
-
 77
77
-
 78
78
-
 79
79
-
 80
80
-
 81
81
-
 82
82
-
 83
83
-
 84
84
-
 85
85
-
 86
86
-
 87
87
-
 88
88
-
 89
89
-
 90
90
-
 91
91
-
 92
92
-
 93
93
-
 94
94
-
 95
95
-
 96
96
-
 97
97
-
 98
98
-
 99
99
-
 100
100
-
 101
101
-
 102
102
-
 103
103
-
 104
104
-
 105
105
-
 106
106
-
 107
107
-
 108
108
-
 109
109
-
 110
110
-
 111
111
-
 112
112
-
 113
113
-
 114
114
-
 115
115
-
 116
116
-
 117
117
-
 118
118
-
 119
119
-
 120
120
-
 121
121
-
 122
122
-
 123
123
-
 124
124
-
 125
125
-
 126
126
-
 127
127
-
 128
128
-
 129
129
-
 130
130
-
 131
131
-
 132
132
-
 133
133
-
 134
134
-
 135
135
-
 136
136
-
 137
137
-
 138
138
-
 139
139
-
 140
140
-
 141
141
-
 142
142
-
 143
143
-
 144
144
-
 145
145
-
 146
146
-
 147
147
-
 148
148
-
 149
149
-
 150
150
-
 151
151
-
 152
152
-
 153
153
-
 154
154
-
 155
155
-
 156
156
-
 157
157
-
 158
158
-
 159
159
-
 160
160
-
 161
161
-
 162
162
-
 163
163
-
 164
164
-
 165
165
-
 166
166
-
 167
167
-
 168
168
-
 169
169
-
 170
170
-
 171
171
-
 172
172
-
 173
173
-
 174
174
-
 175
175
-
 176
176
-
 177
177
-
 178
178
-
 179
179
-
 180
180


POINT PTDW1 OPPVASKMASKIN Bruksanvisning
- Kategori
- Mixer / matberedare tillbehör
- Typ
- Bruksanvisning
på andra språk
Relaterade papper

Andra dokument
-
 SENZ STD52W20 OPPVASKMASKIN Bruksanvisning
-
Whirlpool ADPU 1004 WH Användarguide
-
-
-
 SENZ SD5011 OPPVASKMASKIN Bruksanvisning
-
Electrolux ESI45010X Användarmanual
-
Samsung DW60M6070IB Användarmanual
-

