

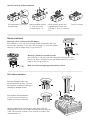
Converge the arms to the
centre and fix the arms to the
bottom of the projector plate
by using M6 screws (7), and
washers (11) and (16).
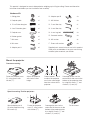
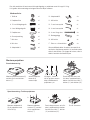
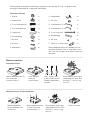
Hardware Kit:
1. Ceiling plate x1
2. Projector plate x1
3. 15 cm Extension pipes x1
4. 8 cm Extension pipes x1
5. Projector arm x3
6. Rubber gasket x1
7. M6 screw x4
8. M4 screw x4
9. Adapter part A x2
10. Adapter part B x3
11. M6 Washer x3
12. 5 mm Allen key x1
13. 4 mm Allen key x1
14. 6 mm Lag bolt x3
15. Concrete anchor x3
16. M6 washer x6
17. Screw with washer x3
Supplied parts are exclusive for use in this product.
Other parts are forbidden. If any parts are missing
or defect, please contact your retailer.
1
2
3
4
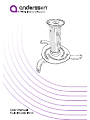
This product is designed to mount video projector weighing up to 10kg to ceiling. Please read the entire
instruction sheet before you start installation and assembly.
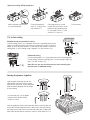
Fasten the projector arms
(5), using screws with
washer (17).
Adjust the projector
arms to the same
height.
Choose mode 1, 2 or 3
to adjust the projector
arm to the same height
from the surface of the
projector.
Mount the projector
Common mounting
Special mounting: Toshiba projectors
Fix the screws.
Attach adapter part A
(9) to the projector using
M4 screws (8).
Fasten the projector
arms (5), using screws
with washer (17).
Converge the arms to the
centre and fix the arms to the
bottom of the projector plate
by using M6 screws (7), and
washers (11) and (16).

1
(10)
2
!!
(17)
3
(7)
4
(15)
(14)
(14)
Special mounting: Philips projectors
Fix the screws.
Attach adapter part B
(10) to the projector.
Fasten the projector
arms (5), using screws
with washer (17).
Converge the arms to the
centre and fix the arms to the
bottom of the projector plate
by using M6 screws (7), and
washers (11) and (16).
Solid brick and concrete block ceiling
Use the ceiling plate (1) as a template and mark 3 mounting holes on the
ceiling. Pre-drill these holes with an 8mm masonry bit to a least 50mm in
depth. Insert a concrete anchor (15) into each of these holes. Attach the
ceiling plate (1) to the ceiling using 3 lag bolts (14) and washers (16).
Hardwood ceiling
Use the ceiling plate (1) as a template and mark 3 mounting holes
on the ceiling. Attach the ceiling plate (1) to the ceiling using 3 lag
bolts (14) and washers (16).
Note: Do not use any concrete anchors when mounting the
bracket onto a hardwood ceiling.
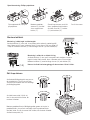
Fix to the ceiling
Joining the pieces together
Join the plate extension pipe to the
ceiling plate and push the two upper
bolts at the same time. Which extension
pipe to choose depends on the height
of your ceiling.
Use the Allen key (13) to tighten
the bolts from the outside for
maximum safety.
Join the projector plate to the extension pipe by pressing the two
lower bolts on the projector mount, and at the same time sliding
the upper part of the bracket into the extension pipe. Tighten the
bolts from the outside for maximum safety, use the Allen key (13).
1.
2.

Copyright
This manual is the copyright of NetOnNet AB.
No part of this manual may be revised, copied or transmitted
in any way without written permission from NetOnNet.
Statement
This manual does not provide any warranty or related declarations.
All information in this manual including the product specification, pictures
and literatures is just for reference, NetOnNet reserves the rights to update
contents of this manual without further notice.
WARNING:
The included hardware is for mounting on solid brick, concrete or hard wood ceiling.
Mounting onto plasterboard or paneled ceiling is forbidden. If you are uncertain about the
nature of your ceiling, consult an expert.
For mounting to other types of ceiling, please consult an installation professional. The supplied
hardware is not fit for steel.
This product contains small items that could be a choking hazard if swallowed. Keep these
items away from young children
Make sure these instructions are read and completely understood before attempting
installation. If you are unsure of any part of this installation, contact a professional installer
for assistance.
Make sure there are no missing or defective parts. Never use defective parts.
Improper installation may cause damage or serious injury.
Adjustment
Tilt the bracket as desired by working on the
central part of the assembly swivel.
Maintenance
Once you have mounted the bracket and the projector, check that they are sufficiently secure and
safe to use. You should check whether screws are fixed well each two months. If you have any
questions regarding the installation, please contact your retailer.

10. Adapterdel B x3
11. M6 bricka x3
12. 5 mm insexnyckel x1
13. 4 mm insexnyckel x1
14. 6 mm Lång skruv x3
15. Betongplugg x3
16. M6 bricka x6
17. Skruv m. distansbricka x3
Alla medföljande delar är endast ämnade för att
användas med denna produkt. Att använda andra
delar är inte tilllåtet. Om någon del saknas, eller är
defekt, kontakta din återförsäljare.
Samla ihop armarna, och
fäst dem i projektorfästets
botten. Använd skruv M6 (7),
brickor (11) och brickor (16).
Hårdvarulista:
1. Takfäste x1
2. Projektorfäste x1
3. 15 cm förlängningsrör x1
4. 8 cm förlängningsrör x1
5. Projektorarm x3
6. Gummipackning x1
7. M6 skruv x4
8. M4 skruv x4
9. Adapterdel A x2
1
2
3
4
Den här produkten är konstruerad för upphängning av projektorer med vikt upp till 10 kg.
Läs igenom hela monteringsavisningen innan du börjar montera.
Montera projektorarmarna (5),
använd skruv med distans-
bricka (17).
Justera projektor-
armarna till
samma höjd,
Välj läge 1, 2 eller 3
för att ge dem samma
höjd i förhållande till
projektorns yta.
Montera projektorn
Standardmontering
Specialmontering: Toshiba-projektorer
Dra åt skruvarna.
Montera adapterdel A
(9) på projektorn med
skruv M4 (8).
Montera projektor-
armarna (5), använd
skruv med distans-
bricka (17).
Samla ihop armarna, och fäst
dem i projektorfästets botten.
Använd skruv M6 (7), brickor
(11) och brickor (16).

1
(10)
2
!!
(17)
3
(7)
4
(15)
(14)
(14)
Specialmontering: Philips-projektorer
Dra åt skruvarna.
Fäst adapterdel B (10)
på projektorn.
Montera projektor-
armarna (5), använd
skruv med distans-
bricka (17).
Samla ihop armarna, och fäst
dem i projektorfästets botten.
Använd skruv M6 (7), brickor
(11) och brickor (16).
Montering i solida tegel- och betongtak
Använd takfästet (1) som mall, ta en penna och markera 3 monteringshål i
taket. Borra tre hål, 8mm i diameter minst 50 mm djupa. Sätt i en plugg (15)
i varje hål. Montera takfästet (1) med tre långa skruvar (14) och brickor (16).
Montering i solida tak av hårda träslag
Använd takfästet (1) som mall, ta en penna och markera 3 monter-
ingshål i taket. Borra tre hål, 8mm i diameter minst 50 mm djupa.
Montera takfästet (1) med tre långa skruvar (14) och brickor (16).
Notera: Använd inte betongplugg när du monterar fästet i trätak.
Montera takfästet
Sätt ihop delarna
Använd det förlängningsrör som passar
din takhöjd bäst. Tryck in de två övre
skruvarna på takfästet och trä samtidigt
på förlängningsröret.
Använd insexnyckel (13) för att
dra åt skruvarna från utsidan, för
maximal säkerhet.
Montera projektorfästet på förlägningsröret genom att trycka in
projektorfästets skruvar och samtidigt skjuta in projektorfästets
övre del i röret. Dra åt skruvarna från utsidan, för maximal säkerhet.
Använd insexnyckel (13).
1.
2.

Copyright
NetOnNet AB äger upphovsrätten till den här handboken.
Inga delar av handboken får ändras, kopieras eller överföras
utan skriftligt tillstånd från NetOnNet.
Meddelande
Den här handboken innehåller inga garantier eller andra typer av utfästelser. All
information i handboken, inklusive tekniska data, bilder och texter, är
endast exempel och används i referenssyfte. NetOnNet förbehåller sig
rätten att uppdatera innehållet i handboken utan föregående meddelande.
VARNING:
Starta inte installationen innan du har läst och förstått dessa instruktioner och varningar. Om du
har några frågor, kontakta din lokala återförsäljare.
Försäkra dig om att monteringsytan klarar att bära den sammanlagda vikten hos produkt och
hårdvara. Överskrid aldrig max. viktkapacitet
Medföljande hårdvara är lämpad för montering i tak av fast tegel, betong eller av hårda träslag.
Montering i tak av gipsskivor eller panel är förbjuden. Om du är osäker på vad ditt tak består av,
ta hjälp av en expert.
För montering i andra tak av andra typer, konsultera en professionell installatör. Medföljande
hårdvara är t.ex. inte lämplig för stål.
Produkten innehåller små delar som kan utgöra en kvävningsrisk vid förtäring. Håll dessa objekt
borta från små barn.
Justering
Ställ in den vinkel du önskar genom att
röra på fästets mittendel.
Skötsel
När du monterat fäste och projektor, kontrollera att de sitter säkert fast. Varannan månad bör du
kontrollera om skruvarna behöver efterdras. Om du har några frågor om installationen, kontakta
din återförsäljare för mer information.

10. Adapterdel B x3
11. M6 skive x3
12. Unbrakonøkkel, 5 mm x1
13. Unbrakonøkkel, 4 mm x1
14. 6 mm Lang skrue x3
15. Betongplugg x3
16. M6 skive x6
17. Skrue m. avstandsstykke x3
Alle medfølgende deler er kun beregnet for bruk
med dette produktet. Bruk av andre deler er ikke
tillatt. Hvis noe mangler, eller er defekt, kontakt din
forhandler.
Samle armene, og fest dem
i projektorfestets bunn. Bruk
skrue M6 (7), skive (11) og
skive (16).
Liste over utstyret:
1. Takfeste x1
2. Projektorfeste x1
3. 15 cm Forlengelsesrør x1
4. 8 cm Forlengelsesrør x1
5. Projektorarm x3
6. Gummipakning x1
7. M6 skrue x4
8. M4 skrue x4
9. Adapterdel A x2
1
2
3
4
Dette produktet er beregnet for montering av projektorer som veier opp til 10 kg. Les gjennom hele
installasjonsveiledningen før du begynner monteringen.
Monter projektorarmene (5),
bruk skrue med
avstandsstykke (17).
Juster projektor-
armene til
samme høyde.
Velg 1, 2 eller 3 for å
gi dem samme høyde i
forhold til projektorens
overflate.
Montere projektor
Standard montasje
Spesiell montasje: Toshiba-projektorer
Stram til skruene.Monter adapterdel A
(9) på projektoren med
skrue M4 (8).
Monter projektorarmene
(5), bruk skrue med
avstandsstykke (17).
Samle armene, og fest dem
i projektorfestets bunn. Bruk
skrue M6 (7), skive (11) og
skive (16).

1
(10)
2
!!
(17)
3
(7)
4
(15)
(14)
(14)
Spesiell montasje: Philips-projektorer
Stram til skruene.
Fest adapterdel B (10)
på projektoren.
Monter projektorarmene
(5), bruk skrue med
avstandsstykke (17).
Samle armene, og fest dem
i projektorfestets bunn. Bruk
skrue M6 (7), skive (11) og skive
(16).
Montasje i tak av solid murstein eller betong
Bruk takfestet (1) som mal, ta en penn og marker tre festehull i taket. Bor
tre hull, 8mm i diameter, 50 mm dyp. Sett i en plugg (15) i hvert hull. Monter
takfestet (1) med tre lange skruer (14) og skiver (16).
Montasje i solide tak av harde tresorter
Bruk takfestet (1) som mal, ta en penn og marker tre festehull i taket.
Bor tre hull, 8mm i diameter, 50 mm dyp. Monter takfestet (1) med tre
lange skruer (14) og skiver (16).
Merk: Ikke bruk betongplugg ved montering i tretak.
Montere takfestet
Sett delene sammen
Bruk det forlengelsesrøret som
passer takhøyden din best. Trykk på
de to øverste skruene på festet og tre
samtidig på forlengelsesrøret.
Bruk deretter unbrakonøkkelen
(13) for å stramme skruene fra
utsiden, for maksimal sikkerhet.
Monter projektorfestet på forlengelsesrøret ved å trykke på
projektorfestets skruer når du setter inn projektorfestets øvre del
i røret. For maksimal sikkerhet, stram skruene fra utsiden. Bruk
unbrakonøkkel (13).
1.
2.

Opphavsrett
NetOnNet AB har opphavsretten til denne håndboken.
Ingen deler av denne håndboken skal revideres, kopieres eller
overføres på noen måte uten skriftlig samtykke fra NetOnNet.
Erklæring
Denne håndboken gir ingen garanti eller tilhørende forsikringer.
All informasjon i denne håndboken, inklusiv produktspesifikasjon, bilder og
tekst, er bare ment som referanse. NetOnNet forbeholder seg retten
til å oppdatere innholdet i denne håndboken uten forvarsel.
VARNING:
Starta inte installationen innan du har läst och förstått dessa instruktioner och varningar. Om du
har några frågor, kontakta din lokala återförsäljare.
Försäkra dig om att monteringsytan klarar att bära den sammanlagda vikten hos produkt och
hårdvara. Överskrid aldrig max. viktkapacitet
Medföljande hårdvara är lämpad för montering i tak av fast tegel, betong eller av hårda träslag.
Montering i tak av gipsskivor eller panel är förbjuden. Om du är osäker på vad ditt tak består av,
ta hjälp av en expert.
För montering i andra tak av andra typer, konsultera en professionell installatör. Medföljande
hårdvara är t.ex. inte lämplig för stål.
Produkten innehåller små delar som kan utgöra en kvävningsrisk vid förtäring. Håll dessa objekt
borta från små barn.
Justere
Still inn vinkelen du ønsker ved å skyve
på midten av festet.
Vedlikehold
Når du har montert festet og projektoren, sjekk at de er sikret. Annenhver måned bør du sjekke
om skruene må strammes. Hvis du har spørsmål om installasjon, kontakt din forhandler for mer
informasjon.
-
 1
1
-
 2
2
-
 3
3
-
 4
4
-
 5
5
-
 6
6
-
 7
7
-
 8
8
-
 9
9
-
 10
10


på andra språk
- English: Andersson PCM 2.0 User manual
Andra dokument
-
Deltaco ARM-500L Användarmanual
-
Sanus Systems VisionMount VMPR1 Användarmanual
-
Sanus VMPR1 Bruksanvisning
-
-
Cabstone BeamerFlex Användarguide
-
-
Invacare EC-Track Installation & Technical Description
-
-
König TVS-KN-FSB500 Bruksanvisning
-
König TVS-KN-FSB106S Användarmanual