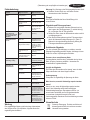
BLACK+DECKER GKC1825L20 Användarmanual
- Kategori
- Sladdlösa motorsågar
- Typ
- Användarmanual
Denna manual är också lämplig för

www.blackanddecker.co.uk
®
12
4
6
7
8
1 2 3
11
10 9
5
GKC1825

23
English (original instructions) 7
Deutsch (übersetzt von den originalanweisungen) 17
Français (traduction de la notice d’instructions originale) 29
Italiano (tradotto dalle istruzioni originali) 40
Nederlands (vertaald vanuit de originele instructies) 52
Español (traducido de las instrucciones originales) 63
Português (traduzido das instruções originais) 74
Svenska (översatt från de ursprungliga instruktionerna) 86
Norsk (oversatt fra de originale instruksjonene) 95
Dansk (oversat fra original brugsvejledning) 105
Suomi (käännetty alkuperäisestä käyttöohjeesta) 115
Ελληνικά (μετάφραση από τις πρωτότυπες οδηγίες) 125

23
A
10
9
B
10
C
10
513
D
6
7
21 21
E
A6225CS-XJ

45
14
15
F G
10
H
9
I
9
180°
J5K

45
9
L
16 12
M
121918
N
17
3
11
2
1
O
P Q

67
R
20
S
20
T
20
U
V

7
ENGLISH
(Original instructions)
67
Intended use
Your BLACK+DECKERTM GKC1825 Chainsaw has been
designed for light duty cutting and pruning. This tool is
intended for consumer use only.
Safety instructions
General power tool safety warnings
Warning! Read all safety warnings,
instructions, illustrations and specications
provided with power tool. Failure to follow all
instructions listed below may result in electric
shock, re and/or serious injury.
Save all warnings and instructions for future reference.
The term "power tool" in all of the warnings listed below
refers to your mains operated (corded) power tool or battery
operated (cordless) power tool.
1. Work area safety
a. Keep work area clean and well lit. Cluttered or dark
areas invite accidents.
b. Do not operate power tools in explosive atmospheres,
such as in the presence of ammable liquids, gases
or dust. Power tools create sparks which may ignite the
dust or fumes.
c. Keep children and bystanders away while operating a
power tool. Distractions can cause you to lose control.
2. Electrical safety
a. Power tool plugs must match the outlet. Never modify
the plug in any way. Do not use any adapter plugs
with earthed (grounded) power tools. Unmodied plugs
and matching outlets will reduce risk of electric shock.
b. Avoid body contact with earthed or grounded
surfaces such as pipes, radiators, ranges and
refrigerators. There is an increased risk of electric shock
if your body is earthed or grounded.
c. Do not expose power tools to rain or wet conditions.
Water entering a power tool will increase the risk of
electric shock.
d. Do not abuse the cord. Never use the cord for
carrying, pulling or unplugging the power tool. Keep
cord away from heat, oil, sharp edges or moving
parts. Damaged or entangled cords increase the risk of
electric shock.
e. When operating a power tool outdoors, use an
extension cord suitable for outdoor use. Use of a cord
suitable for outdoor use reduces the risk of electric shock.
f. If operating a power tool in a damp location is
unavoidable, use a residual current device (RCD)
protected supply. Use of an RCD reduces the risk of
electric shock.
3. Personal safety
a. Stay alert, watch what you are doing and use common
sense when operating a power tool. Do not use a
power tool while you are tired or under the inuence
of drugs, alcohol or medication. A moment of inattention
while operating power tools may result in serious personal
injury.
b. Use personal protective equipment. Always wear eye
protection. Protective equipment such as dust mask,
non-skid safety shoes, hard hat, or hearing protection
used for appropriate conditions will reduce personal
injuries.
c. Prevent unintentional starting. Ensure the switch is in
the off-position before connecting to power source
and/or battery pack, picking up or carrying the tool.
Carrying power tools with your nger on the switch or
energising power tools that have the switch on invites
accidents.
d. Remove any adjusting key or wrench before turning
the power tool on. A wrench or a key left attached to a
rotating part of the power tool may result in personal injury.
e. Do not overreach. Keep proper footing and balance at
all times. This enables better control of the power tool in
unexpected situations.
f. Dress properly. Do not wear loose clothing or
jewellery. Keep your hair, clothing and gloves away
from moving parts. Loose clothes, jewellery or long hair
can be caught in moving parts.
g. If devices are provided for the connection of dust
extraction and collection facilities, ensure these are
connected and properly used. Use of dust collection can
reduce dust-related hazards.
h. Do not let familiarity gained from frequent use of tools
allow you to become complacent and ignore tool
safety principles. A careless action can cause severe
injury within a fraction of a second.
4. Power tool use and care
a. Do not force the power tool. Use the correct power
tool for your application. The correct power tool will do
the job better and safer at the rate for which it was
designed.
b. Do not use the power tool if the switch does not turn it
on and off. Any power tool that cannot be controlled with
the switch is dangerous and must be repaired.
c. Disconnect the plug from the power source and/or the
battery pack from the power tool before making any
adjustments, changing accessories, or storing power
tools. Such preventive safety measures reduce the risk of
starting the power tool accidentally.
d. Store idle power tools out of the reach of children and
do not allow persons unfamiliar with the power tool or
these instructions to operate the power tool.

8
ENGLISH (Original instructions)
Power tools are dangerous in the hands of untrained
users.
e. Maintain power tools. Check for misalignment or
binding of moving parts, breakage of parts and any
other condition that may affect the power tools
operation. If damaged, have the power tool repaired
before use. Many accidents are caused by poorly
maintained power tools.
f. Keep cutting tools sharp and clean. Properly
maintained cutting tools with sharp cutting edges are less
likely to bind and are easier to control.
g. Use the power tool, accessories and tool bits etc. in
accordance with these instructions, taking into
account the working conditions and the work to be
performed. Use of the power tool for operations different
from those intended could result in a hazardous situation.
h. Keep handles and grasping surfaces dry, clean and
free from oil and grease. Slippery handles and grasing
surfaces do not allow for safe handling and control of the
tool in unexpected situations.
5. Battery tool use and care
a. Recharge only with the charger specied by the
manufacturer. A charger that is suitable for one type of
battery pack may create a risk of re when used with
another battery pack.
b. Use power tools only with specically designated
battery packs. Use of any other battery packs may create
a risk of injury and re.
c. When battery pack is not in use, keep it away from
other metal objects, like paper clips, coins, keys,
nails, screws, or other small metal objects, that can
make a connection from one terminal to another.
Shorting the battery terminals together may cause burns
or a re.
d. Under abusive conditions, liquid may be ejected from
the battery; avoid contact. If contact accidentally
occurs, ush with water. If liquid contacts eyes,
additionally seek medical help. Liquid ejected from the
battery may cause irritation or burns.
e. Do not use a battery pack or tool that is damaged or
modied. Damaged or modied batteries may exhibit
unpredictable behaviour resulting in re, explosion or risk
of injury.
f. Do not expose a battery pack or tool to re or
excessive temperature. Exposure to re or temperature
above 130°C may cause explosion. NOTE: The
temperature „130 °C“ can be replaced by the temperature
„265 °F“.
g. Follow all charging instructions and do not charge the
battery pack or tool outside the temperature range
specied in the instructions.
Charging improperly or at temperatures outside the
specied range may damage the battery and increase the
risk of re.
6. Service
a. Have your power tool serviced by a qualied repair
person using only identical replacement parts. This
will ensure that the safety of the power tool is maintained.
b. Never service damaged battery packs. Service of
battery packs should only be performed by the
manufacturer or authorised service providers.
General chain saw safety warnings
Warning! Additional safety warnings for
chainsaws
uKeep all parts of the body away from the saw chain
when the chainsaw is operating. Before you start the
chainsaw, make sure the saw chain is not contacting
anything. A moment of inattention while operating chain
saws may cause entanglement of your clothing or body
with the chain saw.
uAlways hold the chainsaw with your right hand on the
rear handle and your left hand on the front handle.
Holding the chainsaw with a reversed hand conguration
increases the risk of personal injury and should never be
done.
uHold the chain saw by insulated gripping surfaces
only, because the saw chain may contact hidden
wiring. Saw chains contacting a "live" wire may make
exposed metal parts of the chain saw "live'" and could give
the operator an electric shock.
uWear eye protection. Further protective equipment for
hearing, head, hands, legs and feet is recommended.
Adequate protective equipment will reduce personal injury
from ying debris or accidental contact with the saw chain.
uDo not operate a chain saw in a tree, on a ladder, from
a rooftop, or any unstable support. Operation of a chain
saw in this manner could result in serious personal injury.
uAlways keep proper footing and operate the chain saw
only when standing on xed, secure and level surface.
Slippery or unstable surfaces such as ladders may cause
a loss of balance or control of the chainsaw.
uWhen cutting a limb that is under tension be alert
for spring back. When the tension in the wood bres is
released the spring loaded limb may strike the operator
and/or throw the chain saw out of control.
uUse extreme caution when cutting brush and saplings.
The slender material may catch the saw chain and be
whipped toward you or pull you off balance.
uCarry the chain saw by the front handle with the chain
saw switched off and away from your body.

9
ENGLISH
(Original instructions)
When transporting or storing the chainsaw always t
the guide bar cover. Proper handling of the chain saw
will reduce the likelihood of accidental contact with the
moving saw chain.
uFollow instructions for lubricating, chain tensioning
and changing accessories. Improperly tensioned or
lubricated chain may either break or increase the chance
for kickback
uCut wood only. Do not use chainsaw for purposes
not intended. For example: do not use the chainsaw
for cutting plastic, masonry or non-wood building
materials.
Use of the chainsaw for operations different than intended
could result in a hazardous situation.
uDo not attempt to fell a tree until you have an
understanding of the risks and how to avoid them.
Serious injury could occur to the operator or bystanders
while felling a tree.
uFollow all instructions when clearing jammed
material, storing or servicing the chain saw. Make
sure the switch is off and the battery pack is removed.
Unexpected actuation of the chain saw while clearing
jammed material or servicing may result in serious
personal injury.
Additional power tool safety warnings
Warning! Additional safety warnings for compact
chainsaws.
The intended use is described in this instruction manual. Do
not use the tool for purposes not intended; for example do
not use the tool to fell trees. The use of any accessory or
attachment or performance of any operation with this tool
other than those recommended in this instruction manual may
present a risk of personal injury.
uWear close tting and protective clothing including a
safety helmet with visor/goggles, ear protectors, non- skid
safety footwear, protective bib trousers and strong leather
gloves.
uAlways position yourself out of the path of falling
branches.
uThe safe distance between a branch to be felled and
bystanders, buildings and other objects is at least 2 1/2
times the length of the branch. Any bystander, building or
object within this distance is at risk from being struck by
the falling branch.
uPre-plan a safe exit from falling branches. Ensure the exit
route is clear of obstacles that would prevent or hinder
movement. Remember wet grass and freshly cut bark is
slippery.
uEnsure someone is nearby (but at a safe distance) in case
of an accident.
uDo not use the tool while standing in a tree, on a ladder or
on any other unstable surface.
uKeep proper footing and balance at all times.
uHold the tool rmly with both hands when the motor is
running.
uDo not let the moving chain contact any object at the tip of
the guide bar.
uStart cutting only with the chain moving at full speed.
uDo not attempt to enter a previous cut. Always make a
fresh cut.
uWatch for shifting branches or other forces that could
close a cut and pinch or fall into the chain.
uDo not attempt to cut a branch when the diameter of the
branch exceeds the cutting length of the tool.
uAlways remove the battery from the tool and place the
chain cover assembly over the chain when storing or
transporting the tool.
uKeep the saw chain sharp and properly tensioned. Check
the tension at regular intervals.
uSwitch the tool off, allow the chain to stop and remove the
battery from the tool before carrying out any adjustment,
servicing or maintenance.
uOnly use genuine replacement parts and accessories.
uKeep handles dry, clean, and free from oil and grease.
Greasy, oily handles are slippery causing loss of control.
uThe spiked bumper may become sharp during the life of
the product. Handle with care.
uWhen handling the product the chain bar may become
hot, handle with care.
Causes and operator prevention of kickback
Kickback may occur when the nose or tip of the guide bar
touches an object, or when the wood closes in and pinches
the saw chain in the cut.
Tip contact in some cases may cause a sudden reverse
reaction, kicking the guide bar up and back towards the
operator.
Pinching the saw chain along the top of the guide bar may
push the guide bar rapidly back towards the operator.
Either of these reactions may cause you to lose control of
the chainsaw which could result in serious personal injury.
Do not rely exclusively upon the safety devices built into your
chainsaw. As a chainsaw user, you should take several steps
to keep your cutting jobs free from accident or injury.
Kickback is the result of tool misuse and / or incorrect
operating procedures or conditions and can be avoided by
taking proper precautions as given below:
uMaintain a rm grip, with thumbs and ngers
encircling the chainsaw handles. With both hands on
the chainsaw, position your body and arm to allow
you to resist kickback forces. Kickback forces can be
controlled by the operator, if proper precautions are taken.
Do not let go of the chainsaw.

10
ENGLISH (Original instructions)
uDo not overreach and do not cut above shoulder
height. This helps prevent unintended tip contact and
enables better control of the chainsaw in unexpected
situations.
uOnly use replacement guide bars and chains specied
by the manufacturer. Incorrect replacement guide bars
and chains may cause chain breakage and/ or kickback.
uFollow the manufacturer's sharpening and
maintenance instructions for the saw chain.
Decreasing the depth gauge height can lead to increased
kickback.
Safety recommendations for the chainsaw
uWe strongly recommend that rst time users obtain
practical instruction in the use of the chainsaw and
protective equipment from an experienced user.
Initial practice should be completed sawing logs on a saw
horse or cradle.
uWe recommend that when carrying the chainsaw that you
remove the battery and make sure that the saw chain is
facing backwards.
uMaintain your chainsaw when not in use. Do not store your
chainsaw for any length of time without rst removing the
saw chain and guide bar which should be kept immersed
in oil. Store all parts of your chainsaw in a dry, secure
place out of reach of children.
uWe recommend you drain the oil reservoir prior to storage.
uBe sure of your footing and pre-plan a safe exit from a
falling tree or branches.
uUse wedges to help control felling and prevent binding the
guide bar and saw chain in the cut.
uSaw chain care. Keep the saw chain sharp and snug on
the guide bar. Ensure the saw chain and guide bar are
clean and well oiled. Keep handles dry, clean and free
from oil and grease.
Kickback can be caused by:
uStriking branches or other objects accidentally with a tip of
the saw while the saw chain is moving.
uStriking metal, cement or any other hard material near the
wood, or buried in the wood.
uA dull or loose chain.
uCutting above shoulder height.
uLack of attention when holding or guiding the chainsaw
while cutting.
uOver-reaching. Keep proper footing and balance at all
times and do not overreach.
uDo not try to insert into a previous cut. As this could cause
kickback. Make a fresh cut every time.
uWe strongly recommend you do not attempt to operate
your chainsaw while in a tree, on a ladder or on any other
unstable surface. If you decide to do so, be advised that
these positions are extremely dangerous.
uWhen cutting a branch that is under tension, be alert for
spring back so that you will not be struck when the tension
is released.
Avoid cutting:
uPrepared timber.
uInto the ground.
uInto wire fences, nails. etc.
uInto small sized brush and saplings because slender
material may catch the saw chain and be whipped towards
you, or pull you off balance.
uDo not use your chainsaw above shoulder height.
uEnsure someone is nearby (but at a safe distance) in case
of an accident.
uIf for any reason you have to touch the saw chain, make
sure your chainsaw is disconnected from the mains.
uThe noise from this product can exceed 80 dB(A). We
therefore recommend you take appropriate measures for
the protection of hearing
Residual risks
Additional residual risks may arise when using the tool which
may not be included in the enclosed safety warnings. These
risks can arise from misuse, prolonged use etc.
Even with the application of the relevant safety regulations
and the implementation of safety devices, certain residual
risks can not be avoided. These include:
uInjuries caused by touching any rotating/moving parts.
uInjuries caused when changing any parts, blades or
accessories.
uInjuries caused by prolonged use of a tool. When using
any tool for prolonged periods ensure you take regular
breaks.
uImpairment of hearing.
uHealth hazards caused by breathing dust developed when
using your tool (example:- working with wood, especially
oak, beech and MDF.)
Vibration
The declared vibration emission values and the declared
noise emission value(s) stated in the technical data and the
declaration of conformity have been measured in accordance
with a standard test method provided by EN 62841 and may
be used for comparing one tool with another. The declared
vibration emission value and the declared noise emission
value(s) may also be used in a preliminary assessment of
exposure.
Warning! The vibration and noise emission value during
actual use of the power tool can differ from the declared value
depending on the ways in which the tool is used. The vibration
level may increase above the level stated.

11
ENGLISH
(Original instructions)
When assessing vibration exposure to determine safety
measures required by 2002/44/EC to protect persons regularly
using power tools in employment, an estimation of vibration
exposure should consider, the actual conditions of use and the
way the tool is used, including taking account of all parts of the
operating cycle such as the times when the tool is switched off
and when it is running idle in addition to the trigger time.
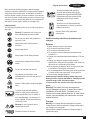
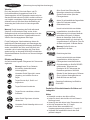
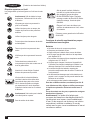
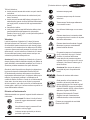
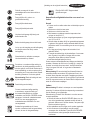
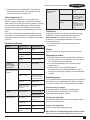
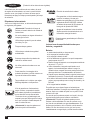
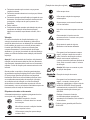
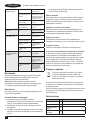
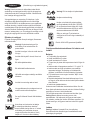
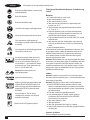
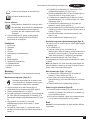
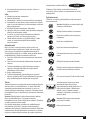
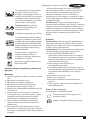
Labels on tool
The following pictograms are shown on the tool along with the
date code:
Warning! To reduce the risk of injury, the
user must read the instruction manual.
Do not use your saw in wet conditions or
expose it to rain.
Always wear head, hearing and eye
protection.
Always wear gloves.
Always wear non-slip safety footwear.
Always hold a chainsaw rmly with both
hands.
Do not use chainsaw one handed.
Pay attention to the kickback of the
chainsaw and avoid contact with the tip of
the chain bar.
Beware of falling objects. Keep bystanders
away
To ensure continued safe operation,
check the chain tension as described
in this manual after every 10 minutes of
use, and adjust back to a clearance of 3
mm as required. Oil the chain after every
10 minutes of use.
Warning! Do not touch chain at the
chipping ejection point
Direction of rotation of the chain.
To ensure continued safe operation,
the chain and guide bar must only be
replaced with original BLACK+DECKER.
Replacement chain part number A6158
replacement guide bar part number
90619609.
Switch the tool off. Before performing
any maintenance on the tool, remove the
battery from the tool.
93
Directive 2000/14/EC guaranteed
sound power.
Additional safety instructions for batteries and
chargers
Batteries
uNever attempt to open for any reason.
uDo not expose the battery to water.
uDo not expose the battery to heat.
uDo not store in locations where the temperature may
exceed 40°C.
uCharge only at ambient temperatures between 10°C and
40°C.
uCharge only using the charger provided with the
appliance/tool. Using the wrong charger could result in an
electric shock or overheating of the battery.
uWhen disposing of batteries, follow the instructions given
in the section “Protecting the environment”.
uDo not damage/deform the battery pack either by puncture
or impact, as this may create a risk of injury and re.
uDo not charge damaged batteries.
Under extreme conditions, battery leakage may occur.
When you notice liquid on the batteries, carefully wipe the
liquid off using a cloth. Avoid skin contact.
In case of skin or eye contact, follow the instructions
below.
Warning! The battery uid may cause personal
injury or damage to property. In case of skin contact,
immediately rinse with water. If redness, pain or
irritation occurs seek medical attention. In case of eye
contact, rinse immediately with clean water and seek
medical attention.
Chargers
Warning! Your charger has been designed for a specic
voltage. Always check that the mains voltage corresponds to
the voltage on the rating plate.
Warning! Never attempt to replace the charger unit with a
regular mains plug.

12
ENGLISH (Original instructions)
uUse your BLACK+DECKER charger only to charge the
battery in the appliance/tool with which it was supplied.
Other batteries could burst, causing personal injury and
damage.
uNever attempt to charge non-rechargeable batteries.
uIf the supply cord is damaged, it must be replaced by the
manufacturer or an authorised BLACK+DECKER Service
Centre in order to avoid a hazard.
uDo not expose the charger to water.
uDo not open the charger.
uDo not probe the charger.
uThe charger must be placed in a well ventilated area when
charging.
Labels on the charger
The following symbols are found on your charger:
The charger is intended for indoor use only.
Read the instruction manual before use.
Electrical safety
Your charger is double insulated; therefore no
earth wire is required. Always check that the
mains voltage corresponds to the voltage on the
rating plate. Never attempt to replace the charger
unit with a regular mains plug.
uIf the supply cord is damaged, it must be replaced by the
manufacturer or an authorised BLACK+DECKER Service
Centre in order to avoid a hazard.
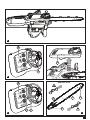
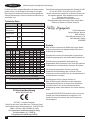
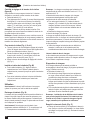
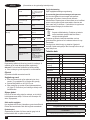
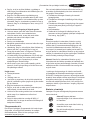
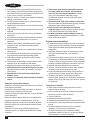
Features
1. On/off switch
2. Lock-off button
3. Oil cap
4. Front guard
5. Chain tension adjustment ring
6. Chain
7. Guide bar
8. Chain sheath
9. Chain adjust locking knob
10.Chain cover assembly
11. Oil level indicator
12. Battery
Assembly
Warning! Before assembly, remove the battery (12) from the
tool.
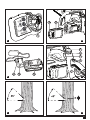
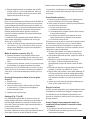
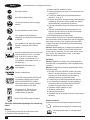
Fitting the guide bar and chain. (g. A - L)
Always wear protective gloves when installing
or removing the saw chain (6). The saw chain is
sharp and can cut you when it is not running.
uPlace the chainsaw onto a stable surface (g. A).
uFully loosen the chain adjust locking knob (9) (g. B).
uRemove the chain cover assembly (10) (g. C).
uTurn the tension adjust ring (5) anti-clockwise as far as it
will go so the arrow on the tension adjust ring (5) lines up
with the marker on the chain cover assembly (13) (g. D).
uPlace the chain (6) over the guide bar (7) making sure that
the saw chain cutters on the upper part of the guide bar
(7) face towards the front (g. E).
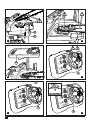
uGuide the chain (6) around the guide bar (7) and pull it to
create a loop to one side at the rear end of the guide bar
(7).
uGuide the chain (6) around the drive sprocket (14). Place
the guide bar (7) onto the bar location studs (15) (g. F &
G).
uPlace the chain cover assembly (10) onto the chainsaw
(g. H) making sure the arrows are aligned (g. I).
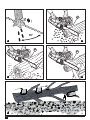
uTurn the chain adjust locking knob (9) clockwise to attach
the chain cover assembly (10) and lightly tighten (g. I). to
release the tension (g J).
uTurn the chain adjust locking knob (9) 180 degrees
anticlockwise to release the tension (g J).
uTurn the chain tension adjust ring (5) clockwise until the
chain (6) is tight. Make sure that the chain (6) is snug
around the guide bar (7) (g. K).
uCheck the tension as described below. Do not overtighten.
uTighten the chain adjust locking knob (9) (L).
Checking and adjusting the chain tension (g. K)
Before use and after every 10 minutes of use, you must check
the chain tension.
uRemove the battery (12).
uLightly pull on the chain (6) as shown (inset g. K). The
tension is correct when the chain (6) snaps back after
being pulled 3 mm away from the guide bar (7). There
should be no "sag" between the guide bar (7) and the
chain (6) on the underside.
Note: Do not over-tension the chain as this will lead to
excessive wear and will reduce the life of the guide bar and
the chain.
Note: When the chain is new, check the tension frequently
(after disconnecting from the mains) during the rst 2 hours of
use because a new chain stretches slightly.
To increase the tension (g. J, K & L)
uTurn the chain adjust locking knob (9) 180 degrees
anticlockwise to release the tension. (g. J).

13
ENGLISH
(Original instructions)
uTension the chain using the chain tension adjusting ring
(5), turn clockwise to tighten (g K).
uTighten the chain adjust locking knob (9) (g. L).
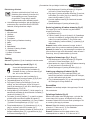
Fitting and removing the battery (g. M)
uTo t the battery (12), line it up with the receptacle on the
tool. Slide the battery into the receptacle and push until
the battery snaps into place.
uTo remove the battery, push the release buttons (16) while
at the same time pulling the battery out of the receptacle.
Use
Warning! Let the tool work at its own pace. Do not overload.
Charging the battery (g. N)
The battery needs to be charged before rst use and
whenever it fails to produce sufcient power on jobs that were
easily done before. The battery may become warm while
charging; this is normal and does not indicate a problem.
Warning! Do not charge the battery at ambient temperatures
below 10 °C or above 40 °C. Recommended charging
temperature: approx. 24 °C.
Note: The charger will not charge a battery if the cell
temperature is below approximately 10 °C or above 40 °C.
The battery should be left in the charger and the
charger will begin to charge automatically when the cell
temperature warms up or cools down.
uTo charge the battery (12), insert it into the charger (19).
The battery will only t into the charger in one way. Do
not force. Be sure that the battery is fully seated in the
charger.
uPlug in the charger and switch on at the mains.
The charging indicator (18) will blink.
The charge is complete when the charging indicator (18)
switches to continuously on. The charger and the battery
can be left connected indenitely. The charging indicator will
switch on as the charger occasionally tops up the battery
charge.
uCharge discharged batteries within 1 week. Battery life will
be greatly diminished if stored in a discharged state.
Leaving the battery in the charger
The charger and battery pack can be left connected with the
charger indicator glowing indenitely. The charger will keep
the battery pack fresh and fully charged.
Charger diagnostics
If the charger detects a weak or damaged battery, the
charging indicator (18) will ash red at a fast rate. Proceed as
follows:
uRe-insert the battery (12).
uIf the charging indicators continues ashing red at a fast
rate, use a different battery to determine if the charging
process works properly.
uIf the replaced battery charges correctly, the original
battery is defective and should be returned to a service
centre for recycling.
uIf the new battery gives the same indication as the original
battery, take the charger to be tested at an authorised
services centre.
Note: It may take as long as 30 minutes to determine that
the battery is defective. If the battery is too hot or too
cold, the charger indicator will alternately blink red, fast
and slow, one ash at each speed and repeat.
Filling the oil reservoir (g. O)
uRemove the oil cap (3) and ll the reservoir with the
recommended chain oil. You can see the oil level in the oil
level indicator (11). Ret the oil cap (3).
uPeriodically switch off and check the oil level indicator
(11); if it is less than a quarter full, remove the battery from
the chainsaw and rell with the correct oil.
Oiling the chain
We recommend that you use only Black & Decker oil during
the lifetime of your chainsaw because mixtures of different oils
could lead to the oil becoming degraded, which can drastically
shorten the lifetime of the saw chain and create additional
risks.
Never use waste oil, thick oil or very thin sewing machine oil.
These may damage your chainsaw.
The saw chain (6) must be oiled before each use and after
cleaning using only the correct grade of oil (cat. no. A6023-
QZ).
uLubricate the saw chain (6) by slowly pressing the bulb
(17) (g. O) on the oil cap (3) four time before making
each cut. Hold the bulb down for 1 second each time.
Switching on (g. O)
uGrip your chainsaw rmly with both hands. Pull the lock-off
button (2) with your thumb and then push the on/off switch
(1) to start.
uWhen the motor starts, remove your thumb from the
lockoff button (2) and grip the handle rmly.
Do not force the tool, allow the tool to do the work. It will do
a better and safer job at the speed for which it is designed.
Excessive force will stretch the saw chain (6).
If the saw chain (6) or guide bar (7) becomes
jammed
uSwitch the tool off.
uRemove the battery (12).
uOpen the cut with wedges to relieve the strain on the
guide bar (7). Do not try to wrench the chainsaw free.

14
ENGLISH (Original instructions)
uStart a fresh cut.
Felling (g. P, Q & R)
Inexperienced users should not attempt to fell trees. The user
may suffer injury or cause damage to property as a result of
failure to control the direction of fall, the tree may splinter or
damaged/dead branches may fall during cutting:
The safe distance between a tree to be felled and bystanders,
buildings and other objects is at least 2 1/2 times the height of
the tree. Any bystander, building or object within this distance
is at risk from being struck by the tree when felled.
Before attempting to fell a tree:
uMake sure that there are no local by-laws or regulations
that would prohibit or control the felling of the tree.
uConsider all conditions that may affect the direction of fall,
including:
uThe intended direction of fall.
uThe natural lean of the tree:
uAny unusual heavy limb structure or decay.
uSurrounding trees and obstacles including overhead
lines and underground drains.
uThe wind speed and direction.
Pre-plan a safe exit from falling trees or branches. Make sure
that the exit route is clear of obstacles that would prevent or
hinder movement. Remember that wet grass and freshly cut
bark is slippery.
uDo not attempt to fell trees where the tree diameter is
greater than the cutting length of the chainsaw:
uCut a direction notch to determine the direction of fall.
uMake a horizontal cut to a depth of between 1/5th and
1/3rd of the diameter of the tree, perpendicular to the line
of fall at the base of the tree (g. P).
uMake a second cut from above to intersect with the rst
and make a notch of about 45°.
uMake a single horizontal felling cut from the other side 25
mm to 50 mm above the centre of the direction notch. (g.
Q). Do not cut through to the direction notch, you could
lose control of the direction of fall.
uDrive a wedge or wedges into the felling cut to open it and
drop the tree (g. R).
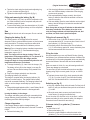
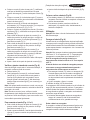
Pruning trees
Make sure that there are no local by-laws or regulations that
would prohibit or control the pruning of the tree limbs. Pruning
should only be undertaken by experienced users there is an
increased risk of the saw chain pinching and kick back.
Before pruning consideration should be given to
conditions affecting the direction of fall including:
uThe length and weight of the branch to be cut.
uAny unusual heavy limb structure or decay.
uSurrounding trees and obstacles including overhead.
uThe wind speed and direction:
uThe branch being intertwined with other branches.
The operator should consider access to the tree limb and the
direction of fall. The tree branch is liable to swing towards
the tree trunk. In addition to the user bystanders, objects and
property below the branch will be at risk.
uTo avoid splintering, make the rst cut in an upward
direction to a maximum depth of one third the diameter of
the branch.
uMake the second cut downwards to meet the rst.
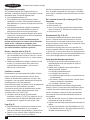
Logging (g. S, T & U)
How you should cut depends on how the log is supported.
Use a saw horse whenever possible.
Always start a cut with the saw chain running and the spiked
bumper (20) in contact with the wood (g. S). To complete
the cut use a pivoting action of the spiked bumper against the
wood.
When supported along its whole length:
uMake a downward cut, but avoid cutting the earth as this
will blunt your saw chain quickly.
When supported at both ends:
uFirst, cut one third down to avoid splintering and second,
cut up to meet the rst cut.
When supported at one end:
uFirst cut one third up to avoid splintering and second, cut
down to prevent splintering.
When on a slope:
uAlways stand on the uphill side.
When attempting to cut a log on the ground (g. T):
uSecure the workpiece using chocks or wedges. The user
or a bystander should not steady the log by sitting or
standing on it. Make sure that the saw chain does not
contact the ground.
When using a saw horse (g. U):
This is strongly recommended whenever possible.
uPosition the log in a stable position. Always cut on the
outside of the saw horse arms. Use clamps or straps to
secure the workpiece.
Limbing (g. V)
Removing the branches from a fallen tree. When limbing,
leave larger lower limbs to support the log off the ground.
Remove the small limbs in one cut. Branches under tension
should be cut from the bottom of the branch towards the top to
avoid binding the chain saw.

15
ENGLISH
(Original instructions)
Trim limbs from opposite side keeping tree stem between you
and saw. Never make cuts with saw between your legs or
straddle the limb to be cut.
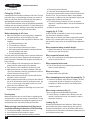
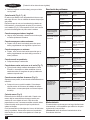
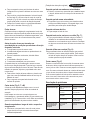
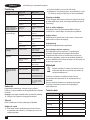
Troubleshooting
Problem Possible cause Possible solution
Tool will not start Lock button not
pressed Press the lock button
Battery not tted Fit the battery
Battery not charged Charge the battery
Battery not tted
correctly Remove then re-t the
battery
Chain does not stop
within 2 seconds
when the tool is
switched off
Chain tension is too
slack Check chain tension
Bar/chain appear hot/
smoking Oil tank empty Check oil tank level
Oil hole blocked on
chain bar Clean oil holes (21 - g.
E) and clear the groove
around the edge of the
chainbar.
Chain tension is too
tight Check chain tension
Guide bar sprocket
nose needs greasing Oil the guide bar
sprocket nose
Chainsaw does not
cut wellChain on backwards Check/modify chain
direction
Sharpen
Chainsaw not using
oil Debris in tank Empty oil from tank and
replace
Oil hole in cap blocked Remove debris from
hole
Debris in chain bar Remove debris and
clean the chain bar
Debris in oil outlet Remove debris
Chainsaw stops
suddnely during use Battery depleted Re-charge battery if
required
Battery too hot Leave the battery to
cool for atleast 30
minutes before
proceeding or charging
Voltage limit protection Restart the chainsaw.
Let the tool work at its
own pace. Do not
overload
Maintenance
Regular maintenance ensures a long effective life for the tool.
We recommend you make the following checks on a regular
basis.
Warning! Before performing any maintenance on power tools:
uSwitch off and disconnect the tool from the mains supply.
Oil level
The level in the reservoir should not be allowed to fall below
a quarter full.
Saw chain and guide bar
uAfter every few hours of use and before storage, remove
the guide bar (7) and the saw chain (6) and clean them
thoroughly.
uMake sure that the guard is clean and free from debris.
uOil sprocket nose and chain bar via the sprocket
lubrication holes (21) (g. E). This ensures an even
distribution of wear around the guide bar rails.
Saw chain sharpening
If you are to get the best possible performance from the
tool it is important to keep the teeth of the saw chain sharp.
Guidance for this procedure is found on the sharpener
package.
Replacing worn out saw chains
Replacement saw chains are available through retailers or
Black & Decker service agents. Always use genuine spare
parts.
Saw chain sharpness
The saw chain cutters will blunt immediately if they touch the
ground or a nail while cutting.
Saw chain tension
Regularly check the saw chain tension.
What to do if your chainsaw needs repair.
What to do if your chainsaw needs repair. Your chainsaw
is manufactured in accordance with the relevant safety
requirements. Repairs should only be carried out by a
qualied person using original spare parts otherwise this may
result in considerable danger to the user. We recommend you
keep this user manual in a safe place.
Protecting the environment
ZSeparate collection. Products and batteries
marked with this symbol must not be disposed of
with normal household waste
Products and batteries contain materials that can be
recovered or recycled reducing the demand for raw materials.
Please recycle electrical products and batteries according
to local provisions. Further information is available at
www.2helpU.com

16
ENGLISH (Original instructions)
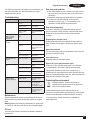
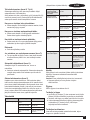
Technical data
GKC1825 Type 2
Voltage
VDC 18
Bar length mm 250
Max bar length mm 250
Chain speed (No-load) m/sm 3.5
Max cutting length mm 250
Oil capacity ml 55
Weight
kg 2.35
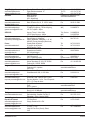
Batteries Charger (minutes)
Cat# Vdc Ah Weight
Kg
Cat# 90590287* N517388* BDC1A BDC2A BDC2A36
Amps 400mA 1A 1A 2A 1.35A
BL1518 18 1.5 0.38 BL1518 225 90 90 25 X
BL1518ST 18 1.5 0.38 BL1518ST 225 90 90 45 X
BL2018 18 2.0 0.39 BL2018 300 120 120 60 X
BL2018ST 18 2.0 0.39 BL2018ST 300 120 120 60 X
BL2518 18 2.5 0.43 BL2518 380 150 150 75 X
BL4018 18 4.0 0.64 BL4018 600 240 240 120 X
BL5018 18 5.0 0.7 BL5018 750 300 300 135 X
BL20362 36 2.0 0.64 BL20362 X X X X 90
BL2536 36 2.5 0.68 BL2536 X X X X 110
BL1554 18/54 1.5 1.08 BL1554 225 90 90 45 X
BL2554 18/54 2.5 1.2 BL2554 380 150 150 75 X
*Not sold as an accessory
Guaranteed sound pressure level measured according to EN62841:
LpA (sound pressure) 84 dB(A), uncertainty (K) 3 dB(A)
LwA (sound power) 91 dB(A), uncertainty (K) 1.8 dB(A)
Vibration total values (triax vector sum) according to EN 602841:
Vibration emission value (a
h
)= 5.9 m/s², uncertainty (K) = 1.5 m/s²
Supply of Machinery (Safety)
Regulations 2008
GKC1825 – Compact Chainsaw
Black & Decker declares that these products described under
“technical data” are in compliance with:
The Supply of Machinery (Safety) Regulations, 2008, S.I.
2008/1597 (as amended),
EN 62841-1:2015+A11:2022, EN 62841-4-1:2020.
The Noise Emission in the Environment by Equipment for use
Outdoors Regulations 2001, S.I. 2001/1701 (as amended).
Schedule 8.
LWA (measured sound power level) 91 dB(A), uncertainty (K)
= 1.8 dB (A),
LWA (guaranteed sound power) 93 dB(A).
These products conform to the following UK Regulations:
Electromagnetic Compatibility Regulations, 2016,
S.I.2016/1091 (as amended).
The Restriction of the Use of Certain Hazardous Substances
in Electrical and Electronic Equipment Regulations 2012, S.I.
2012/3032 (as amended).
For more information, please contact Black & Decker at the
following address or refer to the back of the manual.
The undersigned is responsible for compilation of the technical
le and makes this declaration on behalf of
Black & Decker
Paul Featherstone
Product Director - Outdoor Products Group
Black & Decker UK, 270 Bath Road, Slough
Berkshire, SL1 4DX
United Kingdom
25/08/2022
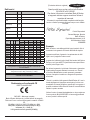
EC declaration of conformity
MACHINERY DIRECTIVE
%
GKC1825 – Compact Chainsaw
Black & Decker declares that these products described under
"technical data" are in compliance with: 2006/42/EC,
EN 62841-1:2015+A11:2022, EN 62841-4-1:2020
LWA (measured sound power level) 91 dB(A), uncertainty (K)
= 1.8 dB (A),
LWA (guaranteed sound power) 93 dB(A)
These products also comply with Directive
2014/30/EU and 2011/65/EU.
For more information, please contact Black & Decker at the
following address or refer to the back of the manual.
The undersigned is responsible for compilation of the
technical le and makes this declaration on behalf of
Black & Decker.
Patrick Diepenbach
General Manager, Benelux
Black & Decker,
Egide Walschaertsstraat 14-18
2800 Mechelen, Belgium
25/08/2022

17
ENGLISH (Original instructions)
(Übersetzung der ursprünglichen
Anweisungen)
DEUTSCH
Verwendungszweck
Ihre BLACK+DECKERTM GKC1825 Kettensäge ist für leichte
Säge- und Gehölzschnittaufgaben vorgesehen. Dieses Gerät
ist nicht für den gewerblichen Einsatz vorgesehen.
Sicherheitshinweise
Allgemeine Sicherheitswarnungen für das Gerät
Warnung! Beachten Sie alle
Sicherheitshinweise, Anweisungen,
Darstellungen und Daten, die Sie mit dem
Gerät erhalten. Wenn Sie die folgenden
Anweisungen nicht beachten, kann es zu
elektrischem Schlag, Feuer und/oder schweren
Verletzungen kommen.
Bewahren Sie alle Warnhinweise und alle Anweisungen
gut auf. Der nachfolgend verwendete Begriff „Gerät“ bezieht
sich auf netzbetriebene Geräte (mit Netzkabel) und auf
akkubetriebene Geräte (ohne Netzkabel).
1. Sicherheit im Arbeitsbereich
a. Halten Sie Ihren Arbeitsbereich sauber und gut
ausgeleuchtet. Unaufgeräumte oder dunkle Bereiche
begünstigen Unfälle.
b. Betreiben Sie das Gerät nicht in Umgebungen, in
denen Explosionsgefahr z. B. aufgrund von
brennbaren Flüssigkeiten, Gasen oder Staub besteht.
Geräte erzeugen Funken, die den Staub oder die Dämpfe
entzünden können.
c. Halten Sie Kinder und andere Personen während der
Benutzung eines Geräts fern. Bei Ablenkung können Sie
die Kontrolle verlieren.
2. Elektrische Sicherheit
a. Der Netzstecker des Geräts muss in die Steckdose
passen. Ändern Sie niemals den Stecker in
irgendeiner Form. Verwenden Sie keinerlei
Adapterstecker an geerdeten Elektrogeräten.
Unveränderte Stecker und passende Steckdosen mindern
die Gefahr eines elektrischen Schlages.
b. Vermeiden Sie Körperkontakt mit geerdeten
Oberächen von Rohren, Heizungen, Herden und
Kühlschränken. Es besteht eine erhöhte Gefahr für einen
elektrischen Schlag, wenn Ihr Körper geerdet ist.
c. Halten Sie Geräte von Regen und Nässe fern. Das
Eindringen von Wasser in ein Gerät erhöht das Risiko
eines elektrischen Schlags.
d. Verwenden Sie das Kabel ordnungsgemäß.
Verwenden Sie es niemals zum Tragen. Trennen Sie
das Gerät nicht durch Ziehen am Kabel vom Netz.
Halten Sie das Kabel fern von Hitze, Öl, scharfen
Kanten oder beweglichen Teilen. Beschädigte oder
verhedderte Kabel erhöhen die Gefahr eines elektrischen
Schlages.
e. Verwenden Sie nur für den Außenbereich zugelassene
Verlängerungskabel, wenn Sie mit dem Gerät im
Freien arbeiten. Die Verwendung eines für den
Außenbereich geeigneten Verlängerungskabels verringert
das Risiko eines elektrischen Schlags.
f. Wenn das Gerät in einer feuchten Umgebung
verwendet werden muss, schließen Sie es unbedingt
an eine Steckdose mit Fehlerstromschutzschalter
(FI-Schalter) an. Ein Fehlerstromschutzschalter verringert
das Risiko eines elektrischen Schlags.
3. Sicherheit von Personen
a. Seien Sie aufmerksam, achten Sie darauf, was Sie tun,
und gehen Sie sachgerecht mit einem Gerät um.
Benutzen Sie kein Gerät, wenn Sie müde sind oder
unter dem Einuss von Drogen, Alkohol oder
Medikamenten stehen. Ein Moment der Unachtsamkeit
beim Betrieb eines Geräts kann zu schweren
Verletzungen führen.
b. Verwenden Sie eine geeignete Schutzausrüstung.
Tragen Sie immer einen Augenschutz. Das Tragen
persönlicher Schutzausrüstung, wie Staubmaske,
rutschfeste Sicherheitsschuhe, Schutzhelm oder
Gehörschutz, je nach Art und Einsatz des Geräts,
verringert das Risiko von Verletzungen.
c. Vermeiden Sie eine unbeabsichtigte Inbetriebnahme.
Guarantee
Black & Decker is condent of the quality of its products and
offers consumers a 24 month guarantee from the date
of purchase. This guarantee is in addition to and in no way
prejudices your statutory rights.
The guarantee is valid within the territories of the Member
States of the European Union with European Free Trade Area
and the United Kingdom.
To claim on the guarantee, the claim must be in accordance
with Black & Decker Terms and Conditions and you will need
to submit proof of purchase to the seller or an authorised
repair agent. Terms and conditions of the Black & Decker 2
year guarantee and the location of your nearest authorised
repair agent can be obtained on the Internet at www.2helpU.
com, or by contacting your local Black & Decker ofce at the
address indicated in this manual.
Please visit our website www.blackanddecker.co.uk to register
your new BLACK+DECKER product and receive updates on
new products and special offers.

18
(Übersetzung der ursprünglichen Anweisungen)
DEUTSCH
Vergewissern Sie sich, dass das Gerät ausgeschaltet
ist, bevor Sie es an eine Steckdose oder einen Akku
anschließen, es hochheben oder tragen. Wenn Sie
beim Tragen des Geräts den Finger am Schalter haben
oder das Gerät eingeschaltet an die Stromversorgung
anschließen, kann dies zu Unfällen führen.
d. Entfernen Sie Einstell- oder Schraubenschlüssel,
bevor Sie das Gerät einschalten. Werkzeuge oder
Schlüssel, die an rotierenden Teilen des Geräts
angebracht sind, können zu Verletzungen führen.
e. Beugen Sie sich nicht zu weit nach vorne. Sorgen Sie
für einen sicheren Stand und halten Sie jederzeit das
Gleichgewicht. Dadurch können Sie das Gerät in
unerwarteten Situationen besser kontrollieren.
f. Tragen Sie geeignete Kleidung. Tragen Sie keine weite
Kleidung und keinen Schmuck. Halten Sie Ihre Haare,
Kleidung und Handschuhe von beweglichen Teilen
fern. Lose sitzende Kleidung, Schmuck oder lange Haare
können sich in den beweglichen Teilen verfangen.
g. Falls Vorrichtungen zum Absaugen oder Auffangen
von Staub vorhanden sind, vergewissern Sie sich,
dass diese angeschlossen sind und richtig verwendet
werden. Das Verwenden einer Staubauffangvorrichtung
verringert Gefährdungen durch Staub.
h. Vermeiden Sie, dass Sie durch häuge Verwendung
von Werkzeugen unachtsam werden und die
Prinzipien der Werkzeugsicherheit ignorieren. Eine
unachtsame Aktion kann im Bruchteil einer Sekunde zu
schweren Verletzungen führen.
4. Gebrauch und Pege von Geräten
a. Überlasten Sie das Gerät nicht. Verwenden Sie das für
Ihre Arbeit passende Gerät. Das richtige Gerät wird die
Aufgabe besser und sicherer erledigen, wenn es
bestimmungsgemäß verwendet wird.
b. Verwenden Sie das Gerät nicht, wenn der Ein-/
Ausschalter nicht funktioniert. Ein Gerät, das sich nicht
mehr ein- oder ausschalten lässt, ist gefährlich und muss
repariert werden.
c. Ziehen Sie den Stecker aus der Steckdose, oder
trennen Sie das Gerät vom Akku, bevor Sie
Einstellungen vornehmen, Zubehörteile wechseln
oder das Gerät lagern. Diese Vorbeugemaßnahmen
mindern die Gefahr, dass das Elektrogerät unbeabsichtigt
startet.
d. Bewahren Sie unbenutzte Geräte außerhalb der
Reichweite von Kindern auf. Lassen Sie Geräte nicht
von Personen benutzen, die damit nicht vertraut sind
oder diese Anweisungen nicht gelesen haben.
Geräte sind in den Händen nicht geschulter Personen
gefährlich.
e. Halten Sie das Gerät in einem einwandfreien Zustand.
Kontrollieren Sie, ob bewegliche Teile falsch
ausgerichtet sind oder klemmen und ob Teile
gebrochen oder so beschädigt sind, dass die Funktion
des Geräts beeinträchtigt ist. Bei Beschädigungen
lassen Sie das Gerät reparieren, bevor Sie es
verwenden. Viele Unfälle entstehen wegen mangelnder
Wartung der Geräte.
f. Halten Sie Schneidgeräte scharf und sauber. Richtig
gewartete Schneidwerkzeuge mit scharfen Klingen
blockieren seltener und sind leichter unter Kontrolle zu
halten.
g. Benutzen Sie Elektrowerkzeuge, Zubehör,
Werkzeugspitzen und Ähnliches in Übereinstimmung
mit diesen Anweisungen und auf die für das jeweilige
Elektrowerkzeug bestimmungsgemäße Weise und
beachten Sie dabei die jeweiligen Arbeitsbedingungen
und die Art der auszuführenden Arbeiten. Der
Gebrauch von Geräten für andere als die vorgesehenen
Zwecke kann zu gefährlichen Situationen führen.
h. Halten Sie die Griffe trocken, sauber und frei von Öl
und Fett. Rutschige Griffe und Oberächen unterbinden
die sichere Bedienbarkeit und Kontrolle über das
Werkzeug in unerwarteten Situationen.
5. Gebrauch und Pege von Akkuwerkzeugen
a. Laden Sie den Akku nur mit dem vom Hersteller
vorgesehenen Ladegerät auf. Für ein Ladegerät, das
nur für eine bestimmte Akkuart geeignet ist, besteht
Brandgefahr, wenn es mit anderen Akkus verwendet wird.
b. Verwenden Sie nur die für das jeweilige Gerät
vorgesehenen Akkus. Die Verwendung anderer Akkus
kann zu Verletzungen oder Bränden führen.
c. Bewahren Sie den Akku bei Nichtbenutzung nicht in
der Nähe metallischer Objekte wie Büroklammern,
Münzen, Schlüsseln, Nägeln oder Schrauben auf, da
diese eine Verbindung zwischen beiden Polen des
Akkus herstellen können. Durch den dadurch
entstehenden Kurzschluss kann der Akku in Brand
geraten.
d. Bei falscher Anwendung kann Flüssigkeit aus dem
Akku austreten. Vermeiden Sie den Kontakt damit. Bei
unbeabsichtigtem Kontakt mit Wasser abspülen.
Gelangt die Flüssigkeit in die Augen, ziehen Sie
außerdem ärztliche Hilfe hinzu. Austretende
Akkuüssigkeit kann zu Hautreizungen oder
Verbrennungen führen.
e. Verwenden Sie keine Akkus oder Werkzeuge, die
beschädigt sind oder modiziert wurden. Beschädigte
oder modizierte Akkus können sich unvorhersehbar
verhalten und stellen ein Risiko von Feuer, Explosionen
oder Verletzungen dar.
f. Setzen Sie Akkus und Werkzeuge keinem Feuer oder
extremen Temperaturen aus.

19
(Übersetzung der ursprünglichen Anweisungen) DEUTSCH
Die Einwirkung von Feuer oder Temperaturen über 130°C
kann zu Explosionen führen. HINWEIS: Die
Temperaturangabe „130 °C“ kann durch die
Temperaturangabe „265 °F“ ersetzt werden.
g. Befolgen Sie alle Anweisungen zum Auaden und
laden Sie den Akku oder das Werkzeug nicht jenseits
des in der Anleitung angegebenen
Temperaturbereichs auf.
Das falsche Auaden oder das Auaden bei Temperaturen
jenseits des angegebenen Bereichs kann den Akku
beschädigen und das Brandrisiko erhöhen.
6. Service
a. Lassen Sie Ihr Elektrowerkzeug nur von qualiziertem
Fachpersonal und nur mit Original-Ersatzteilen
reparieren. Damit wird sichergestellt, dass die Sicherheit
des Geräts erhalten bleibt.
b. Führen Sie an beschädigten Akkus niemals
Wartungsarbeiten durch. Die Wartung von Akkus darf
nur vom Hersteller oder von autorisierten Dienstleistern
durchgeführt werden.
Allgemeine Sicherheitshinweise für Kettensägen
Warnung! Zusätzliche Sicherheitswarnungen für
Kettensägen
uHalten Sie alle Körperteile von der Kette fern, wenn
das Gerät in Betrieb ist. Vergewissern Sie sich vor
dem Starten der Kettensäge, dass die Kette keine
Gegenstände berührt. Ein Moment der Unachtsamkeit
während des Betriebs kann dazu führen, dass die Kette
Körper- oder Kleidungsteile berührt.
uHalten Sie die Kettensäge immer mit der rechten Hand
am hinteren und mit der linken Hand am vorderen
Griff. Wenn Sie das Gerät anders halten, besteht erhöhte
Verletzungsgefahr.
uHalten Sie die Kettensäge ausschließlich an den
isolierten Griffächen, da die Kette mit verdeckten
Kabeln in Berührung kommen könnte. Der Kontakt
der Sägekette mit stromführenden Leitungen kann auch
offenliegende Metallteile an der Kettensäge unter Strom
setzen und zu einem Stromschlag führen.
uTragen Sie Augenschutz. Außerdem empehlt sich
das Tragen zusätzlicher Schutzausrüstung für
Ohren, Kopf, Hände, Beine und Füße. Geeignete
Schutzausrüstung verringert das Risiko von Verletzungen
durch weggeschleuderte Schnittabfälle oder durch
unabsichtlichen Kontakt mit der Kette.
uBedienen Sie die Säge nicht, wenn Sie sich in einem
Baum, auf einer Leiter, einem Dach oder auf einer
anderen instabilen Fläche benden. Der Betrieb
einer Kettensäge auf diese Weise kann zu schweren
Verletzungen führen.
uAchten Sie jederzeit auf einen sicheren Stand, und
benutzen Sie die Kettensäge nur auf festem, ebenen
Boden. Auf rutschigen und instabilen Oberächen oder
auf Leitern ist kein sicherer Stand gewährleistet. Es
besteht die Gefahr, dass Sie das Gleichgewicht und die
Kontrolle über die Kettensäge verlieren.
uBeim Durchschneiden eines Astes, der unter
Spannung steht, kann dieser zurückschnellen. Wenn
die Spannung in den Holzfasern freigesetzt wird, kann der
Ast den Bediener treffen und/oder gegen die Kettensäge
schlagen und diese außer Kontrolle bringen.
uArbeiten Sie beim Sägen von Büschen und
Jungbäumen mit größter Vorsicht. Es besteht die
Gefahr, dass sich das nachgiebige Material in der Kette
verfängt, in Ihre Richtung gedrückt wird und Sie aus dem
Gleichgewicht bringt.
uTragen Sie die Kettensäge am vorderen Handgriff. Das
Gerät muss ausgeschaltet sein und sollte den Körper
nicht berühren.
Bringen Sie den Kettenschutz an, bevor Sie das Gerät
transportieren oder lagern. Durch einen sachgemäßen
Umgang mit der Kettensäge verhindern Sie einen
unabsichtlichen Kontakt mit der sich bewegenden Kette.
uBefolgen Sie die Anweisungen zum Ölen und Spannen
der Kette und zum Wechseln von Zubehörteilen.
Bei einer unzureichend gespannten oder geölten Kette
besteht Riss- und erhöhte Rückschlaggefahr.
uSchneiden Sie nur in Holz. Verwenden Sie die
Kettensäge nicht zweckentfremdet. Zum Beispiel:
keinen Kunststoff, kein Mauerwerk und keine
Baumaterialien, die nicht aus Holz sind.
Der Gebrauch der Kettensäge für andere als die
vorgesehenen Zwecke kann zu gefährlichen Situationen
führen.
uVersuchen Sie nicht, einen Baum zu fällen, bevor Sie
die zugehörigen Risiken kennen und wissen, wie Sie
diese vermeiden können. Beim Fällen eines Baumes
kann es zu schweren Verletzungen des Bedieners oder
umstehender Personen kommen.
uBefolgen Sie beim Entfernen von feststeckendem
Material, beim Lagern oder bei der Wartung alle
Anweisungen. Vergewissern Sie sich, dass der
Schalter ausgeschaltet und der Akku entfernt wurde.
Unerwartete Bewegungen der Kettensäge beim Entfernen
von feststeckendem Material oder bei der Wartung können
zu schweren Verletzungen führen.
Zusätzliche Sicherheitshinweise für
Elektrowerkzeuge
Warnung! Zusätzliche Sicherheitshinweise für
Kompakt-Kettensägen.

20
(Übersetzung der ursprünglichen Anweisungen)
DEUTSCH
Die bestimmungsgemäße Verwendung ist in dieser
Betriebsanleitung beschrieben. Verwenden Sie das Gerät
nicht zweckentfremdet, z. B. zum Fällen von Bäumen. Bei
Verwendung von Zubehör oder Anbauteilen, die nicht in
dieser Anleitung empfohlen sind, sowie bei der Bedienung
des Geräts in Abweichung von den in dieser Anleitung
beschriebenen Verfahren besteht Verletzungsgefahr.
uTragen Sie eng anliegende Schutzkleidung, inklusive
eines Schutzhelms mit Schirm/Schutzbrille, Gehörschutz,
rutschfestes, sicheres Schuhwerk, Schutzlatzhosen und
feste Lederhandschuhe.
uStellen Sie sich immer so auf, dass Sie nicht von
herabfallenden Ästen getroffen werden können.
uDer Sicherheitsabstand zwischen dem zu schneidenden
Ast und Zuschauern, Gebäuden und anderen
Gegenständen beträgt mindestens das 2,5-fache der
Astlänge. Für Gegenstände, Gebäude und Zuschauer
innerhalb dieses Abstandsbereichs besteht die Gefahr,
von dem herabfallenden Ast getroffen zu werden.
uPlanen Sie einen sicheren Fluchtweg vor herabfallenden
Ästen. Achten Sie darauf, dass der Fluchtweg frei von
Hindernissen ist, die Ihre Bewegungsfreiheit stören
könnten. Berücksichtigen Sie, dass feuchtes Gras und
frisch geschnittene Baumrinde rutschig sind.
uStellen Sie sicher, dass sich für den Fall eines Unfalls
jemand in der Nähe bendet (jedoch in ausreichendem
Sicherheitsabstand).
uVerwenden Sie die Säge nicht, wenn Sie sich auf einem
Baum, auf einer Leiter oder auf einer anderen instabilen
Fläche benden.
uSorgen Sie für einen sicheren Stand und halten Sie
jederzeit das Gleichgewicht.
uHalten Sie das Gerät fest mit beiden Händen, während
der Motor läuft.
uBei laufender Kette darf die Spitze des Führungsschwerts
nicht mit einem Gegenstand in Kontakt kommen.
uZu Beginn des Schnitts muss die Kette immer mit voller
Geschwindigkeit laufen.
uVersuchen Sie nicht, die Säge in einen vorhandenen
Schnittspalt einzuführen. Führen Sie stets einen neuen
Schnitt durch.
uAchten Sie auf die Bewegung des geschnittenen Astes
und auf andere Kräfte, die dazu führen könnten, dass sich
der Schnittspalt schließt und die Kette einklemmt oder
dass Holz in die laufende Kette fällt.
uVersuchen Sie nicht, einen Ast zu schneiden, dessen
Durchmesser die Schnittlänge der Kettensäge
überschreitet.
uEntfernen Sie immer den Akku vom Gerät, und bringen
Sie die Kettenabdeckung an, wenn das Gerät aufbewahrt
oder transportiert werden soll.
uHalten Sie die Kette scharf und richtig gespannt.
Überprüfen Sie die Spannung regelmäßig.
uSchalten Sie das Gerät vor Anpassungen oder
Wartungsarbeiten aus, warten Sie, bis die Kette zum
Stillstand gekommen ist, und entfernen Sie den Akku.
uVerwenden Sie nur Originalersatzteile und -zubehör.
uHalten Sie die Griffe trocken, sauber und öl- und fettfrei.
Schmierige, ölige Griffe sind rutschig. Dadurch ist die
Kontrolle über das Gerät nicht mehr gewährleistet.
uDie Anschlagkralle kann mit der Zeit scharf werden.
Gehen Sie daher vorsichtig damit um.
uVorsicht: Das Führungsschwert kann sich beim Betrieb
erhitzen.
Ursachen für Rückschlag und Gegenmaßnahmen seitens
des Bedieners
Rückschlag kann auftreten, wenn die Spitze des
Führungsschwerts einen Gegenstand berührt, oder wenn Holz
einknickt und die Kette im Schneidspalt einklemmt.
Kontakt an der Spitze kann in einigen Fällen eine blitzschnelle
Rückschlagwirkung erzeugen, die die Führungsschiene nach
oben und zurück in Richtung Bediener schnellen lässt.
Wenn die Kette an der Oberseite des Führungsschwerts
eingeklemmt wird, kann dies das Schwert schnell nach hinten
in Richtung Bediener drücken.
Diese Reaktionen können zum Verlust der Kontrolle über
die Kettensäge und damit zu schweren Verletzungen führen.
Verlassen Sie sich nicht nur auf die Sicherheitsvorrichtungen
der Kettensäge. Als Bediener einer Kettensäge müssen Sie
verschiedene Vorkehrungen treffen, um Sägearbeiten ohne
Unfälle und Verletzungen durchführen zu können.
Ein Rückschlag ist das Resultat eines Missbrauchs und/
oder einer falschen Bedienung der Kettensäge oder falscher
Arbeitsbedingungen. Er kann durch die entsprechenden unten
angegebenen Vorsichtsmaßnahmen vermieden werden.
uHalten Sie die Säge mit den Daumen auf einer Seite
und den Fingern auf der anderen Seite an den Griffen
fest. Durch einen festen Griff mit beiden Händen,
einen ausgestreckten linken Arm und einen stabilen
Stand lässt sich das Zurückschlagen vermeiden.
Die Rückschlagkräfte können vom Bediener mittels
entsprechender Vorsichtsmaßnahmen unter Kontrolle
gehalten werden. Lassen Sie die Kettensäge nicht los.
uStrecken Sie sich nicht zu weit nach vorne, und
schneiden Sie nicht oberhalb der Schulterhöhe.
Dadurch vermeiden Sie einen versehentlichen Kontakt
der Spitze, und die Kettensäge lässt sich in unerwarteten
Situationen besser unter Kontrolle halten.
uAls Ersatzteile dürfen nur die vom Hersteller
bezeichneten Führungsschwerter und Ketten
verwendet werden. Bei Verwendung falscher Ersatzteile
besteht die Gefahr eines Kettenrisses und/oder erhöhte
Rückschlaggefahr.
Sidan laddas...
Sidan laddas...
Sidan laddas...
Sidan laddas...
Sidan laddas...
Sidan laddas...
Sidan laddas...
Sidan laddas...
Sidan laddas...
Sidan laddas...
Sidan laddas...
Sidan laddas...
Sidan laddas...
Sidan laddas...
Sidan laddas...
Sidan laddas...
Sidan laddas...
Sidan laddas...
Sidan laddas...
Sidan laddas...
Sidan laddas...
Sidan laddas...
Sidan laddas...
Sidan laddas...
Sidan laddas...
Sidan laddas...
Sidan laddas...
Sidan laddas...
Sidan laddas...
Sidan laddas...
Sidan laddas...
Sidan laddas...
Sidan laddas...
Sidan laddas...
Sidan laddas...
Sidan laddas...
Sidan laddas...
Sidan laddas...
Sidan laddas...
Sidan laddas...
Sidan laddas...
Sidan laddas...
Sidan laddas...
Sidan laddas...
Sidan laddas...
Sidan laddas...
Sidan laddas...
Sidan laddas...
Sidan laddas...
Sidan laddas...
Sidan laddas...
Sidan laddas...
Sidan laddas...
Sidan laddas...
Sidan laddas...
Sidan laddas...
Sidan laddas...
Sidan laddas...
Sidan laddas...
Sidan laddas...
Sidan laddas...
Sidan laddas...
Sidan laddas...
Sidan laddas...
Sidan laddas...
Sidan laddas...
Sidan laddas...
Sidan laddas...
Sidan laddas...
Sidan laddas...
Sidan laddas...
Sidan laddas...
Sidan laddas...
Sidan laddas...
Sidan laddas...
Sidan laddas...
Sidan laddas...
Sidan laddas...
Sidan laddas...
Sidan laddas...
Sidan laddas...
Sidan laddas...
Sidan laddas...
Sidan laddas...
Sidan laddas...
Sidan laddas...
Sidan laddas...
Sidan laddas...
Sidan laddas...
Sidan laddas...
Sidan laddas...
Sidan laddas...
Sidan laddas...
Sidan laddas...
Sidan laddas...
Sidan laddas...
Sidan laddas...
Sidan laddas...
Sidan laddas...
Sidan laddas...
Sidan laddas...
Sidan laddas...
Sidan laddas...
Sidan laddas...
Sidan laddas...
Sidan laddas...
Sidan laddas...
Sidan laddas...
Sidan laddas...
Sidan laddas...
Sidan laddas...
Sidan laddas...
Sidan laddas...
Sidan laddas...
Sidan laddas...
Sidan laddas...
Sidan laddas...
Sidan laddas...
Sidan laddas...
Sidan laddas...
-
 1
1
-
 2
2
-
 3
3
-
 4
4
-
 5
5
-
 6
6
-
 7
7
-
 8
8
-
 9
9
-
 10
10
-
 11
11
-
 12
12
-
 13
13
-
 14
14
-
 15
15
-
 16
16
-
 17
17
-
 18
18
-
 19
19
-
 20
20
-
 21
21
-
 22
22
-
 23
23
-
 24
24
-
 25
25
-
 26
26
-
 27
27
-
 28
28
-
 29
29
-
 30
30
-
 31
31
-
 32
32
-
 33
33
-
 34
34
-
 35
35
-
 36
36
-
 37
37
-
 38
38
-
 39
39
-
 40
40
-
 41
41
-
 42
42
-
 43
43
-
 44
44
-
 45
45
-
 46
46
-
 47
47
-
 48
48
-
 49
49
-
 50
50
-
 51
51
-
 52
52
-
 53
53
-
 54
54
-
 55
55
-
 56
56
-
 57
57
-
 58
58
-
 59
59
-
 60
60
-
 61
61
-
 62
62
-
 63
63
-
 64
64
-
 65
65
-
 66
66
-
 67
67
-
 68
68
-
 69
69
-
 70
70
-
 71
71
-
 72
72
-
 73
73
-
 74
74
-
 75
75
-
 76
76
-
 77
77
-
 78
78
-
 79
79
-
 80
80
-
 81
81
-
 82
82
-
 83
83
-
 84
84
-
 85
85
-
 86
86
-
 87
87
-
 88
88
-
 89
89
-
 90
90
-
 91
91
-
 92
92
-
 93
93
-
 94
94
-
 95
95
-
 96
96
-
 97
97
-
 98
98
-
 99
99
-
 100
100
-
 101
101
-
 102
102
-
 103
103
-
 104
104
-
 105
105
-
 106
106
-
 107
107
-
 108
108
-
 109
109
-
 110
110
-
 111
111
-
 112
112
-
 113
113
-
 114
114
-
 115
115
-
 116
116
-
 117
117
-
 118
118
-
 119
119
-
 120
120
-
 121
121
-
 122
122
-
 123
123
-
 124
124
-
 125
125
-
 126
126
-
 127
127
-
 128
128
-
 129
129
-
 130
130
-
 131
131
-
 132
132
-
 133
133
-
 134
134
-
 135
135
-
 136
136
-
 137
137
-
 138
138
-
 139
139
-
 140
140


BLACK+DECKER GKC1825L20 Användarmanual
- Kategori
- Sladdlösa motorsågar
- Typ
- Användarmanual
- Denna manual är också lämplig för
på andra språk
- italiano: BLACK+DECKER GKC1825L20 Manuale utente
- español: BLACK+DECKER GKC1825L20 Manual de usuario
- Deutsch: BLACK+DECKER GKC1825L20 Benutzerhandbuch
- português: BLACK+DECKER GKC1825L20 Manual do usuário
- français: BLACK+DECKER GKC1825L20 Manuel utilisateur
- dansk: BLACK+DECKER GKC1825L20 Brugermanual
- Nederlands: BLACK+DECKER GKC1825L20 Handleiding