
3
MODE
BEAT
NOTE
QT-2
QUARTZ METRONOME
HOUR MINUTE
MUTE
QT-2
w
!0
QT-2
QUARTZ METRONOME
OWNER’S MANUAL / MODE D’EMPLOI
BEDIENUNGSANLEITUNG /
q
w
e
t y
r
u i
PHONESINPUT
OFF
POWER
ON
VOLUME
BATTERY 9V 6F22/CR2025
MODEL QT-2
MADE IN CHINA
N89
!0
o
!1
!2 !3
# #
PHONESINPUT
OFF
POWER
ON
VOLUME
BATTERY 9V 6F22/CR2025
MODEL QT-2
MADE IN CHINA
N89

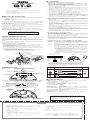
■ BATTERY REPLACEMENT
A lithium battery for the clock(CR2025), and a 9V dry cell battery for the metronome/note
function 6F22 (006P) are supplied with the QT-2.
When the battery weakens, the tempo lamps w grow dim and overall volume decreases.
Replace the battery with a new one (6F22 (006P) 9V) as soon as possible.
Also, when the clock display fades, replace the lithium battery with a new one (CR2025)
as soon as possible.
◆ Replacement Procedure
6F22 (006P) 9V Battery: Remove the old battery from the battery connector, and
replace it with a new one. Make sure the +/- polarities on the connector, and the
battery, are properly aligned before connecting the battery.
Lithium Battery (CR2025): Remove the screw and the battery holder. Use the end of
a pair of narrow tweezers to remove the battery. Insert the new battery with its “+” pole
facing up. Re-attach the battery holder with the screw.
* Always replace batteries with the QT-2’s power turned off.
Replacing the lithium battery with the power turned on, may result in loss of the
metronome/note’s display and tone.
Thank you for purchasing the YAMAHA QT-2 Quartz Metronome.
Please read this manual thoroughly and keep it in a safe place for future reference.
QT-2
QT-2
Printed in Hong Kong 9611 R1
FCC INFORMATION (U.S.A.)
1.IMPORTANT NOTICE: DO NOT MODIFY THIS UNIT!
This product, when installed as indicated in the instructions contained in this manual, meets
FCC requirements. Modifications not expressly approved by Yamaha may void your author-
ity, granted by the FCC, to use the product.
2.IMPORTANT: When connecting this product to accessories and/or another product use
only high quality shielded cables. Cable/s supplied with this product MUST be used. Follow
all installation instructions. Failure to follow instructions could void your FCC authorization to
use this product in the USA.
3.NOTE: This product has been tested and found to comply with the requirements listed in
FCC Regulations, Part 15 for Class ”B” digital devices. Compliance with these requirements
provides a reasonable level of assurance that your use of this product in a residential
environment will not result in harmful interference with other electronic devices. This equip-
ment generates/uses radio frequencies and, if not installed and used according to the in-
structions found in the users manual, may cause interference harmful to the operation of
other electronic devices. Compliance with FCC regulations does not guarantee that interfer-
ence will not occur in all installations. If this product is found to be the source of interfer-
ence, which can be determined by turning the unit ”OFF” and ”ON”, please try to eliminate
the problem by using one of the following measures:
Relocate either this product or the device that is being affected by the interference.
Utilize power outlets that are on different branch (circuit breaker or fuse) circuits or install
AC line filter/s.
In the case of radio or TV interference, relocate/reorient the antenna. If the antenna lead-in
is 300 ohm ribbon lead, change the lead-in to co-axial type cable.
If these corrective measures do not produce satisfactory results, please contact the local
retailer authorized to distribute this type of product. If you can not locate the appropriate,
please contact Yamaha Corporation of America, Electronic Service Division, 6600 Orangethorpe
Ave, Buena Park, CA 90620
The above statements apply ONLY to those products distributed by Yamaha Cor-
porations of America or its subsidiaries.
Bij dit produkt zijn batterijen geleverd.
Wanneer deze leeg zijn, moet u ze niet
weggooien maar inleveren als KCA.
THIS DIGITAL APPARATUS DOES NOT EXCEED THE “CLASS B”
LIMITS FOR RADIO NOISE EMISSIONS FROM DIGITAL APPARA-
TUS SET OUT IN THE RADIO INTERFERENCE REGULATION OF
THE CANADIAN DEPARTMENT OF COMMUNICATIONS.
QUARTZ METRONOME
OWNER’S MANUAL
3
MODE
BEAT
NOTE
QT-2
QUARTZ METRONOME
HOUR MINUTE
MUTE
PHONESINPUT
OFF
POWER
ON
VOLUME
BATTERY 9V 6F22/CR2025
MODEL QT-2
MADE IN CHINA
N89
PHONESINPUT
OFF
POWER
ON
VOLUME
BATTERY 9V 6F22/CR2025
MODEL QT-2
MADE IN CHINA
N89
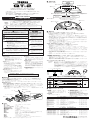
■ COMPONENTS
q Mute switch
w Tempo indicator
e LCD display
t Mode Select Switch
(Metronome <-> Note Function)
y Beat Set Switch (Metronome Mode)
Note Set Switch (Note Function Mode)
r Speaker
u Time (Hour)
Set Switch
i Time (Minute)
Set Switch
!0 Power switch
o Tempo Dial (Metronome Mode)
Pitch Dial (Note Function Mode)
● Front Panel
● Rear Panel
!1 Volume
!2 Input jack !3 Phones jack
■ OPERATION
● Using the Metronome (Metronome mode).
The beat can be set from 0 to 9 beats per measure or to a triplet feel. The
tempo can be set from 30 to 250 beats per minute.
1. Press the POWER switch and the metronome will start. Press the MODE switch to
switch between the Note Function mode and the Metronome Function mode.
2. Press the BEAT/NOTE switch to set the beat. Press the switch once to change the
value by one. The value is shown on the LCD display (0-1-2...-9-triplet-0).
3. Rotate the Tempo dial to set the tempo. The tempo value (beats per minute) is
shown on the LCD display (30-250).
4. The tempo lamps scan in time with the set tempo. The lamps on the far left and right
sides indicate strong beats.
5. Rotate the VOLUME dial to set the volume to a desired level.
6. Press the MUTE switch to use the metronome without sound. Press the switch once
to mute the metronome, press again to hear the metronome. The MUTE switch can
be used to start and stop the metronome while practicing.
● Selecting the note and setting the standard pitch (Note Function Mode).
The note can be set to any tone or half-tone within a one octave range of C to B.
1. Press the POWER switch and the metronome will start. Press the MODE switch to
change the mode from Metronome Function to Note Function.
2. Press the BEAT/NOTE switch to set the desired note. Every time the switch is
pressed, the note will increase in half-steps and be shown on the LCD display (C -
C# - D ... - A# - B - C).
3. Rotate the Pitch dial to set the standard pitch (A=438 – 445). The pitch setting will be
shown on the LCD display.
4. Rotate the VOLUME dial to set the volume to a desired level.
5. Press the MUTE switch to silence the Note Function’s tone. Press the switch once to
mute the tone, press again to hear the tone.
* The standard pitch (438 – 445) will always be set for the note A.
● Clock Function: To set the time.
When the POWER switch is set to “OFF”, the time will be shown on the LCD display.
To set the time, switch the POWER “OFF”. Then use the hour and minute switches,
located underneath the unit, to set the time.
Each time the hour or minute switch is pressed, the corresponding value will increase
by one. When the button is kept pressed, the value will increase continuously. When
the minute switch is released, the seconds value will be reset to “0”.
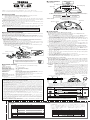
● Using the PHONES and INPUT jacks
• PHONES This connector is a stereo mini jack. The internal speaker will be shut off
when a pair of headphones is connected to this jack. The MUTE switch
can be used to switch the sound off and on.
• INPUT This connector is a stereo mini jack. The internal speaker will be shut off
when the INPUT jack is used. As shown in the diagram below, connect
an external sound source’s (Clavinova, Silent Piano, Silent Brass, etc.,)
headphone jack to the QT-2. Both the sound source and the metronome
can be heard through headphones connected to the QT-2 without
disturbing others.
• The volume of the external sound source is not controlled by the QT-
2’s VOLUME dial. Adjust the volume with the volume control on the
external sound source.
• When a monaural connector is used with the INPUT jack, the
PHONES jack’s output will be monaural.
Headphones
QT-2
External Sound Source with
Headphone Jack
INPUT PHONES
Headphone
Jack
• Refer to the diagram below to choose the type of connecting cord according to the
external sound source’s headphone jack. If the external sound source’s headphone
jack is monaural, use a connecting cord with monaural connectors at both ends.
Connecting Cord *
External Sound
Source’s
Headphone Jack
Connecting Cord Type
QT-2
INPUT Jack
Stereo
Standard
Type
Stereo Mini
Type
Stereo Mini
Type
Stereo Mini Stereo Mini
Stereo Mini Stereo Mini
Stereo Standard Type
Adaptor Plug
Stereo Standard Type
Stereo Mini
6F22 or 006P
9V dry cell battery
Lithium battery
(CR-2025)
Battery connector
Battery holder
■ PRECAUTIONS
◆ To prevent damage, do not use the metronome in the following locations:
• places where the unit will be in direct sunlight;
• places subject to temperature and humidity extremes;
• places that are sandy or dusty.
◆ Power is supplied to the QT-2 by a 6F22 (006P) 9V dry cell battery and a CR2025
lithium battery. The 9V battery powers the metronome/note functions, and the lithium
battery powers the clock.
◆ Switch the power off when the metronome/note function is not used.
◆ If the QT-2 will not be used for a long amount of time, disconnect the 9V battery from
the unit. Doing so will prevent battery leakage.
◆ Do not subject the metronome to strong physical shock or vibration. Do not use
excessive force on any of the controls.
◆ Never use solvents such as benzene or thinner to clean the metronome. Wipe clean
with a soft, dry cloth.
◆ After reading the owner's manual, keep it in a safe place for future reference.
Never dispose of used batteries by burning them.
Also make sure to keep batteries away from children.
■ SPECIFICATIONS
Tempo : 30 – 250 beats/minutes (1 beat/minutes steps)
Tempo accuracy : ±0.2%
Metronome beats :0 – 9 beats, triplets
Note setting range : C4 – B4 (in half-tone steps)
Standard pitch setting range
: 438 – 445 Hz (1 Hz steps)
Standard pitch accuracy : ±1 cent
Clock Functions : 12-hour clock
Indicators : Liquid Crystal Display, Tempo Lamp (LEDx10)
Power Source :
Metronome/Note Function: 9V Dry Cell Battery (006P or 6F22) x1.
Clock: Lithium Battery (CR2025) x1.
Battery Life : Metronome/Note Function: about 3 hours of continuos use.
Clock: About 1 year.
Dimensions (W x H x D) : 175 x 79 x 52 mm (6.9" x 3.1" x 2.0")
Weight (including batteries) : 240 g (8.5 oz)
Accessories :
Lithium battery (CR-2025) x 1, 9V dry cell battery (6F22) x 1
* Specifications and design subject to change without notice.
Screw
Battery cover

QT-2
QT-2
METRONOME A QUARTZ
MODE D’EMPLOI
LE PRESENT APPAREIL NUMERIQUE N'EMET PAS DE BRUITS
RADIOELECTRIQUES DEPASSANT LES LIMITES APPLICABLES AUX
APPAREILS NUMERIQUES DE LA "CLASSE B" PRESCRITES DANS LE
REGLEMENT SUR LE BROUILLAGE RADIOELECTRIQUE EDICTE PAR
LE MINISTERE DES COMMUNICATIONS DU CANADA.
Nous vous remercions d’avoir porté votre choix sur le métronome
à quartz YAMAHA QT-2.
Veuillez lire attentivement ce mode d’emploi et conservez-le en un
lieu sûr pour future référence.
■ REMPLACEMENT DE LA PILE
Une pile au lithium (CR2025) pour l’horloge et une pile sèche de 9V pour le métronome/
fonction de note 6F22 (006P) sont fournies avec le QT-2.
Quand la puissance de pile faiblit, les indicateurs de tempo w s’effacent et le volume
principal diminue. Remplacez la pile par une neuve (6F22 (006P) de 9V ), le plus tôt
possible.
De même, quand l’affichage d’horloge s’efface, remplacez la pile au lithium par une
neuve (CR2025) le plus tôt possible.
◆ Marche à suivre pour le remplacement
Pile de 9V 6F22 (006P) : Retirer la pile usée du connecteur de pile et la remplacer
par une neuve. Vérifiez que les polarités du connecteur et celles de la pile sont
correctement alignées avant de raccorder la pile.
Pile au lithium (CR2025) : Retirer la vis et le support de pile. Avec le bout d’une pince
fine à épiler, retirez la pile. Insérez une pile neuve, son pôle positif orienté vers vous.
Remontez le support de pile avec la vis.
* Remplacez toujours les piles quand le QT-2 est hors tension.
Le remplacement de la pile au lithium quand l’appareil est sous tension peut
provoquer une perte de sonorité et d’affichage du métronome/note.
■ MESURES DE PRECAUTION
◆ Afin de ne pas endommager le métronome ne l’utilisez pas dans des endroits soumis
aux conditions suivantes :
• plein soleil,
• humidité ou températures excessives,
• sable ou poussière.
◆ Le QT-2 est alimenté par une pile sèche 6F22 (006P) de 9V et une pile au lithium
CR2025. La pile de 9V alimente le métronome/fonction de note et celle au lithium
alimente l’horloge.
◆ Quand le métronome/fonction de note n’est pas utilisé, mettez hors tension.
◆ Si vous pensez ne pas utiliser le QT-2 pendant une longue période, débranchez la pile
de 9V de l’unité. Ceci évitera la fuite de la pile.
◆ Ne soumettez pas le métronome à des chocs ou à des vibrations importantes. Ne le
manipuler jamais avec une force excessive.
◆ N’utilisez jamais de solvants, tels que benzine ou diluant, pour nettoyer le métronome.
Essuyez-le avec un chiffon doux et sec.
◆ Après avoir lu ce mode d’emploi, conservez-le en un lieu sûr pour future référence.
■ FICHE TECHNIQUE
Tempo : 30 – 250 temps par minute (1 battement/pas d’une minute)
Précision de tempo : ±0,2%
Temps de métronome :0 à 9 temps, triolets
Plage de réglage de note
: C4 – B4 (par paliers de un demi-ton)
Plage de réglage de hauteur standard
: 438 – 445 Hz (par incréments d’1 Hz)
Précision de la hauteur standard
: ±1 centième
Fonction d’horloge : format 12 heures
Indicateurs :
Indicateurs de tempo (DEL x 10), affichage à cristaux liquides
Source d’alimentation :
Métronome/fonction de note : Pile sèche de 9V (006P ou 6F22) x 1
Horloge : Pile au lithium (CR2025) x 1
Durée de vie de la pile :
Fonction métronome/note : Environ 3 heures d’utilisation continue.
Horloge : Environ 1 an.
Dimensions (L x H x P) : 175 x 79 x 52 mm
Poids (piles incluses) : 240 g
Accessoires : Pile au lithium (CR-2025) x 1, Pile sèche de 9V (6F22) x 1
* Les spécifications et l'aspect externe peuvent être modifiés sans aucun avis.
Ne jetez jamais les piles au feu et conservez-les
toujours hors de portée des enfants.
PHONESINPUT
OFF
POWER
ON
VOLUME
BATTERY 9V 6F22/CR2025
MODEL QT-2
MADE IN CHINA
N89
■ UTILISATION
● Utilisation du métronome (mode métronome).
Le temps peut être réglé entre 0 et 9 temps par mesure ou par triolet. Le tempo
peut être réglé de 30 à 250 battements par minute.
1. Appuyez sur l’interrupteur d’alimentation POWER pour lancer le métronome.
Appuyez sur le sélecteur de MODE pour passer du mode de fonction de note au
mode de métronome et vice-versa.
2. Appuyez sur BEAT/NOTE pour régler le temps. Appuyez sur la touche une fois pour
changer la valeur d’une unite. La valeur est indiquée sur l’affichage (0 - 1 - 2...- 9 -
triolet - 0).
3. Tournez la molette de tempo pour fixer le tempo. La valeur de tempo (battements
par minute) est indiquée sur l’affichage (30 - 250).
4. Les indicateurs de tempo balayent en rythme avec le tempo fixé. Les indicateurs à
l’extrême gauche et l’extrême droite indiquent les battements forts.
5. Tournez la molette VOLUME pour régler le volume au niveau désiré.
6. Appuyez sur la touche d’assourdissement MUTE pour utiliser le métronome sans
son. Appuyez sur la touche une fois pour assourdir le métronome, appuyez à
nouveau pour entendre le métronome. La touche d’assourdissement MUTE sert
pour lancer ou arrêter le métronome pendant les exercices.
●
Sélection d’une note et réglage de la hauteur standard (mode de fonction de note).
La note peut être fixée à n’importe quel ton ou demi-ton dans la gamme d’une
octave de C à B.
1. Appuyez sur l’interrupteur d’alimentation POWER pour lancer le métronome.
Appuyez sur le sélecteur de MODE pour passer du mode de métronome au mode
de fonction de note.
2. Appuyez sur BEAT/NOTE pour régler la note désirée. Chaque fois que vous
appuyez sur la touche, la note augmente d’un demi-pas et est indiquée sur
l’affichage (C - C# - D ... - A# - B - C).
3. Tournez la molette de hauteur pour fixer la hauteur standard (A=438 – 445). Le
réglage de la hauter est indiquée sur l’affichage.
4. Tournez la molette VOLUME pour régler le volume au niveau désiré.
5. Appuyez sur la touche d’assourdissement MUTE pour étouffer la sonorité de la
fonction de note. Appuyez sur la touche une fois pour assourdir la sonorité, appuyez
sur la touche à nouveau pour entendre la sonorité.
* La hauteur standard (438 – 445) est toujours fixée pour la note A.
● Fonction d’horloge : Pour régler l’heure.
Lorsque l’interrupteur d’alimentation POWER est spécifié sur “OFF” (hors
tension) l’heure apparaît sur l’affichage.
Pour régler l’heure, mettre l’interrupteur d’alimentation sur “OFF” (hors tension). Puis
utiliser les touches heures et minutes situées au bas de l’unité.
Chaque fois que le bouton des heures ou celui des minutes est pressé, la valeur
correspondante augmente d’une unité. Lorsque vous gardez le bouton enfoncé, la
valeur augmente continuellement. Lorsque vous relâchez le bouton des minutes, la
valeur des secondes est réinitialisée à “0”.
● Utilisation des prises de casque PHONES et d’entrée INPUT
• PHONES Ce connecteur est une mini-prise stéréo. Le son au haut-parleur interne
est coupé lorsque vous raccordez un casque d’écoute sur cette prise. La
touche d’assourdissement MUTE peut être utilisée pour couper ou
rétablir le son.
• INPUT Ce connecteur est une mini-prise stéréo. Le haut-parleur interne est
coupé lorsque la prise INPUT est utilisée. Comme illustré sur le
diagramme ci-dessous, raccordez la prise de casque d’une source
sonore externe (Clavinova, Silent Piano, Silent Brass, etc...) au QT-2. Le
son de la source et le métronome sortiront par le casque d’écoute
raccordé au QT-2 sans gêner les autres.
• Le volume de la source sonore externe n’est pas contrôlé par la molette
de VOLUME du QT-2. Réglez le volume avec la commande de
volume sur la source sonore externe.
• Quand un connecteur monophonique est utilisé avec la prise d’entrée
INPUT, la sortie à la prise de casque PHONES est monophonique.
Casque d’écoute
QT-2
Source sonore externe avec
prise de casque d’écoute
INPUT PHONES
Prise de
casque
d’écoute
• Référez-vous au diagramme ci-dessous pour choisir le type de cordon de
raccordement en fonction de la prise de casque d’écoute de la source sonore
externe. Si la prise de casque d’écoute de la source sonore externe est
monophonique, utilisez un cordon de raccordement équipé de connecteurs
monophoniques à ses deux extrémités.
Cordon de raccordement *
Prise de casque
de source sonore
externe
Types de cordon de raccordement
Prise d’entrée
QT-2
Type standard
stéréo
Type mini-
prise stéréo
Type mini-
prise stéréo
Mini-prise stéréo Mini-prise stéréo
Mini-prise stéréo Mini-prise stéréo
Prise d’adaptateur pour
type standard stéréo
Type standard stéréo
Mini-prise stéréo
Pile 6F22 ou 006P de 9 volts
Pile au lithium
(CR-2025)
Connecteur de pile
Support de pile
Vis
Couvercle de pile
3
MODE
BEAT
NOTE
QT-2
QUARTZ METRONOME
HOUR MINUTE
MUTE
■ NOMENCLATURE
PHONESINPUT
OFF
POWER
ON
VOLUME
BATTERY 9V 6F22/CR2025
MODEL QT-2
MADE IN CHINA
N89
q Touche d’assourdissement (MUTE)
w Indicateur de tempo
e Affichage à
cristaux liquides
t
Touche de sélecteur de mode (MODE)
(Métronome <-> fonction de note)
y
Sélecteur de réglage de battement (BEAT)
(mode métronome)
Sélecteur de réglage de note (NOTE)
(mode fonction de note)
r Haut-parleur
u Heure (heures)
Bouton de réglage
i Heure (minutes)
Bouton de réglage
!0 Interrupteur
d’alimentation
(POWER)
o Molette de tempo (mode métronome)
Molette de hauteur (mode fonction de note)
● Face avant
● Face arrière
!1 Volume
!2 Prise d’entrée
(INPUT)
!3 Prise de casque
d’écoute (PHONES)

PHONESINPUT
OFF
POWER
ON
VOLUME
BATTERY 9V 6F22/CR2025
MODEL QT-2
MADE IN CHINA
N89
Vielen Dank für den Kauf des YAMAHA Quarzmetronoms QT-2.
Lesen Sie diese Bedienungsanleitung bitte aufmerksam durch, und
bewahren Sie sie danach für später anfallende Fragen gut auf.
QT-2
QT-2
QUARTZ METRONOME
BEDIENUNGSANLEITUNG
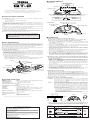
■ BEDIENELEMENTE
■ VORSICHTSMASSREGELN
◆ Verwenden Sie das Metronom nicht an Orten, wo es den folgenden schädlichen Einflüssen
ausgesetzt ist:
• Direktes Sonnenlicht
• Extreme Temperaturen und hohe Luftfeuchtigkeit
• Sand oder Staub
◆ Das QT-2 wird von einer 9-V-Trockenzellenbatterie (6F22 oder 006P) und einer
Lithiumbatterie (CR2025) mit Strom versorgt. Die 9-V-Batterie speist die Metronom-/
Stimmfunktion, die Lithiumbatterie die Uhr.
◆ Schalten Sie das Gerät aus, wenn die Metronom- oder Stimmfunktion nicht gebraucht
wird.
◆ Wenn das QT-2 voraussichtlich längere Zeit nicht gebraucht wird, trennen Sie den
Stecker von der 9-V-Batterie ab, um ein Auslaufen zu verhüten.
◆ Schützen Sie das Metronom vor starken Schlägen und Erschütterungen. Wenden Sie beim
Betätigen der Bedienelemente nicht zu viel Kraft auf.
◆ Verwenden Sie zum Säubern des Metronoms keine Lösungsmittel wie Benzin oder
Verdünner. Entfernen Sie Staub und Schmutz mit einem weichen, trockenen Tuch.
◆ Bewahren Sie diese Anleitung nach dem Durchlesen gut auf.
■ TECHNISCHE DATEN
Tempo :
30 bis 250 Schläge/Minute (1-Schlag/Minute-Einstellschritte)
Tempogenauigkeit : ±0,2%
Taktschlagmuster : 0 Schlag bis 9 Schläge, Triolen
Noteneinstellbereich : C4 bis B4 (in Halbtonschritten)
Standardtonhöhen-Einstellbereich
: 438 bis 445 Hz (in Schritten zu 1 Hz)
Standardtonhöhen-Genauigkeit
: ±1 Cent
Uhrfunktion : 12-Stunden-Anzeigeformat
Anzeigen :Flüssigkristallanzeige, Tempo-Anzeigelampen (10 LEDs)
Stromquelle : Metronom-/Stimmfunktion: 9-V-Trockenzellenbatterie
(006P oder 6F22) x 1
Uhr: Lithiumbatterie (CR2025) x 1
Batterie-Lebensdauer : Metronom-/Stimmfunktion: ca. 3 Stunden Dauerbetrieb
Uhr: ca. 1 Jahr
Abmessungen (B x H x T) : 175 x 79 x 52 mm
Gewicht (einschließlich Batterien)
: 240 g
Zubehör : Lithiumbatterie (CR-2025) x 1,
9V Trockenzelle (6F22) x 1
* Änderungen der technischen Daten und des Designs vorbehalten.
Bescheinigung des Importeurs
Hiermit wird bescheinigt, daß der / die / das
QUARTZ METRONOME Typ : QT-2
(Gerät, Typ, Bezeichnung)
in Übereinstimmung mit den Bestimmungen der
VERFÜGUNG 1046/84
(Amtsblattverfügung)
funkentstört ist.
Der Deutschen Bundespost wurde das Inverkehrbringen dieses Gerätes
angezeigt und die Berechtigung zur Überprüfung der Serie auf
Einhaltung der Bestimmungen eingeräumt.
YAMAHA Europa GmbH
Name des Importeurs
Achten Sie bitte auf korrekte Entsorgung verbrauchter
Batterien. Batterien dürfen nicht verbrannt werden!
Achten Sie bitte auch darauf, daß Batterien nicht in
Kinderhände geraten.
3
MODE
BEAT
NOTE
QT-2
QUARTZ METRONOME
HOUR MINUTE
MUTE
PHONESINPUT
OFF
POWER
ON
VOLUME
BATTERY 9V 6F22/CR2025
MODEL QT-2
MADE IN CHINA
N89
q Stummschalter
w Tempoanzeige
e Display
t Betriebsart-Wahlschalter
(Metronom <-> Stimmfunktion)
y Taktart-Wahlschalter (Metronombetrieb)
Noten-Wahlschalter (Stimmbetrieb)
r Lautsprecher
u Stunden-
Einstellschalter
(Uhrzeit)
i Minuten-
Einstellschalter
(Uhrzeit)
!0 Betriebsschaler
(POWER)
o Temporegler (Metronombetrieb)
Tonhöhenregler (Stimmbetrieb)
● Frontplatte
● Rückwand
!1 Lautstärkeregler
!2 Eingangsbuchse
(INPUT)
!3 Kopfhörerbuchse
(PHONES)
■ BEDIENUNG
● Gebrauch des Metronoms (Metronomfunktion)
Sie können für die Taktart 0 bis 9 Schläge pro Takt oder Triolen wählen. Das
Tempo ist zwischen 30 und 250 Schläge pro Minute frei einstellbar.
1. Drücken Sie den POWER-Schalter, um die Metronomfunktion zu aktivieren. Mit
dem MODE-Schalter können Sie dann zwischen Stimmbetrieb und
Metronombetrieb umschalten.
2. Drücken Sie den BEAT/NOTE-Schalter, um die Taktart einzustellen. Bei jedem
Antippen des Schalters nimmt die Zahl der Schläge pro Takt um 1 zu. Der jeweilige
Wert wird auf dem Display angezeigt (0, 1, 2 ... 9, Triolen, 0).
3. Stellen Sie mit dem Temporegler das gewünschte Tempo ein. Die aktuelle
Tempoeinstellung (Schläge pro Minute) wird auf dem Display angezeigt
(Einstellbereich: 30 bis 250).
4. Die Tempo-Anzeigelampen leuchten im eingestellten Tempo nacheinander auf. Die
beiden Lampen am linken und rechten Ende zeigen betonte Taktschläge an.
5. Stellen Sie mit dem VOLUME-Regler die gewünschte Lautstärke ein.
6. Mit dem MUTE-Schalter können Sie zwischen Metronombetrieb mit oder ohne Ton
umschalten. Bei der ersten Schalterbetätigung wird der Ton stummgeschaltet, bei
der nächsten wieder eingeschaltet. Der MUTE-Schalter kann beim Einüben elegant
verwendet werden, um das Metronom beliebig zu stoppen und wieder zu starten.
● Auswählen der Note und Einstellen der Standardtonhöhe (Stimmfunktion)
Als Note kann ein beliebiger Ganz- oder Halbton innerhalb des Oktavenumfangs
von C bis B gewählt werden.
1. Drücken Sie den POWER-Schalter, um die Metronomfunktion zu aktivieren. Mit dem
MODE-Schalter schalten Sie dann von Metronombetrieb auf Stimmfunktion um.
2. Drücken Sie den BEAT/NOTE-Schalter, um die gewünschte Note einzustellen. Bei
jedem Antippen des Schalters wird in Halbtonschritten zur jeweils nächsthöheren
Note weitergeschaltet, und die eingestellte Note wird auf dem Display angezeigt (C,
C#, D ... A#, B, C).
3. Stellen Sie mit dem Tonhöhenregler die gewünschte Standardtonhöhe ein (A = 438
bis 445 Hz). Die Tonhöheneinstellung wird auf dem Display angezeigt.
4. Stellen Sie mit dem VOLUME-Regler die gewünschte Lautstärke ein.
5. Mit dem MUTE-Schalter können Sie den Stimmton bei Bedarf stummschalten. Bei
erneutem Drücken des Schalters ist der Ton dann wieder zu hören.
* Die Standardtonhöhe (438 bis 445 Hz) wird stets für die Note A eingestellt.
● Uhrfunktion: Stellen der Uhr
Die Uhrzeit wird bei ausgeschaltetem Gerät auf dem Display angezeigt.
Zum Stellen der Uhr schalten Sie das Gerät mit dem POWER-Schalter aus (OFF). Stellen
Sie dann mit den Schaltern HOUR (Stunde) und MINUTE die aktuelle Uhrzeit ein.
Bei jeder Betätigung des HOUR-bzw. MINUTE-Schalters nimmt der betreffende
Stellenwert um 1 zu. Bei gedrückt gehaltenem Schalter wird übergangslos schnell
weitergeschaltet. Beim Loslassen des MINUTE-Schalters werden die
Sekundenstellen auf “00” rückgesetzt.
● Gebrauch der Buchsen PHONES und INPUT
• PHONES Dieser Anschluß ist als Mini-Klinkenbuchse (Stereo) ausgeführt. Beim
Anschließen eines Kopfhörers wird der interne Lautsprecher
stummgeschaltet. Der MUTE-Schalter dient dabei zum Ein- und
Ausschalten des Kopfhörertons.
• INPUT Dieser Anschluß ist als Mini-Klinkenbuchse (Stereo) ausgeführt. Beim
Beschalten der Buchse wird der interne Lautsprecher stummgeschaltet.
Wie im untenstehenden Diagramm veranschaulicht, können Sie diese
Buchse mit der Kopfhörerbuchse einer externen Tonquelle verbinden
(z.B. Clavinova, Silent Piano, Silent Brass usw.). Der Ton der Tonquelle
wird dann zusammen mit dem Metronomton über die am QT-2
angeschlossenen Kopfhörer wiedergegeben, so daß Sie “stumm” üben
können, ohne andere zu stören.
• Die Lautstärke der externen Tonquelle wird vom VOLUME-Regler
des QT-2 nicht beeinflußt und muß daher mit dem Lautstärkeregler
der Tonquelle eingestellt werden.
• Wenn die INPUT-Buchse mit einem Mono-Stecker beschaltet ist, liegt
an der PHONES-Buchse ebenfalls ein Mono-Signal an.
Kopfhörer
QT-2
Externe Tonquelle mit
Kopfhörerbuchse
INPUT PHONES
Kopfhörer-
buchse
• Richten Sie sich bei der Auswahl eines zur Tonquelle passenden Verbindungskabels nach
der folgenden Tabelle. Wenn die externe Tonquelle mit einer Mono-Kopfhörerbuchse
ausgestattet ist, verwenden Sie ein Kabel mit Mono-Steckern an beiden Enden.
Verbindungskabel *
Kopfhörerbuchse
der externen
Tonquelle
Verbindungkabel
INPUT-
Buchse des
QT-2
Standard-
Klinkenbuchse
(Stereo)
Mini-
Klinkenbuchse
(Stereo)
Mini-
Klinken-
buchse
(Stereo)
Mini-Klinkenstecker
(Stereo)
Mini-Klinkenstecker
(Stereo)
Mini-Klinkenstecker
(Stereo)
Mini-Klinkenstecker
(Stereo)
Mini-Standard-
Klinkensteckeradapter
(Stereo)
Standard-Klinkenbuchse (Stereo)
Mini-Klinkenstecker
(Stereo)
Batterie
6F22 oder 006P, 9V
Lithiumbatterie
(CR-2025)
Batteriestecker
Batteriehalter
Schraube
Batteriefachdeckel
■ BATTERIEWECHSEL
Das QT-2 wird mit einer Lithiumbatterie (CR2025) für die Uhr und einer 9-V-
Trockenzellenbatterie (6F22 oder 006P) für die Metronom-/Stimmfunktion geliefert.
Wenn die 9-V-Batterie schwächer wird, werden die Tempo-Anzeigelampen w immer
dunkler, während die Lautstärke proportional abnimmt. Ersetzen Sie die Baterie in
diesem Fall so bald wie möglich durch eine neue (6F22 bzw. 006P, 9 V).
Wenn die Uhrzeitanzeige schwächer wird, muß die Lithiumbatterie (CR2025) bei
nächster Gelegenheit durch eine frische ersetzt werden.
◆ Auswechseln der Batterie
9-V-Batterie (6F22 oder 006P): Trennen Sie die alte Batterie vom Batteriestecker ab,
um danach die neue anzuschließen. Achten Sie beim Anschließen auf korrekte
Ausrichtung der Batterie- und Steckerpole (+ und –).
Lithiumbatterie (CR2025): Entfernen Sie die Schraube und den Batteriehalter.
Heben Sie die Batterie mit einer kleinen Pinzette an, um sie dann herauszunehmen.
Legen Sie die neue Batterie mit dem Pluspol (+) nach oben ein. Schrauben Sie
abschließend den Batteriehalter wieder fest.
* Schalten Sie das QT-2 vor dem Batteriewechsel aus.
Wenn die Lithiumbatterie bei eingeschaltetem Gerät ausgewechselt wird, gehen die
Metronom-/Stimmnotenanzeige und der Ton unter Umständen verloren.
-
 1
1
-
 2
2
-
 3
3
-
 4
4


Yamaha 175x Bruksanvisning
- Typ
- Bruksanvisning
- Denna manual är också lämplig för
på andra språk
- italiano: Yamaha 175x Manuale del proprietario
- čeština: Yamaha 175x Návod k obsluze
- español: Yamaha 175x El manual del propietario
- Deutsch: Yamaha 175x Bedienungsanleitung
- polski: Yamaha 175x Instrukcja obsługi
- português: Yamaha 175x Manual do proprietário
- français: Yamaha 175x Le manuel du propriétaire
- 日本語: Yamaha 175x 取扱説明書
- Türkçe: Yamaha 175x El kitabı
- English: Yamaha 175x Owner's manual
- dansk: Yamaha 175x Brugervejledning
- русский: Yamaha 175x Инструкция по применению
- suomi: Yamaha 175x Omistajan opas
- Nederlands: Yamaha 175x de handleiding
- română: Yamaha 175x Manualul proprietarului