
Manual | Brugsanvisning | Instruktionsbok | Ohjeet
Table soccer
Bordfodbold
Bordsfotboll
Pöytäjalkapallo
Art. no. 809-040
EAN 5705858718040
Size: 136 x 65 x 86 cm Imported by / Importeret af
NSH NORDIC A/S
Virkefeltet 4
8740 Braedstrup
Denmark
Made in PRC

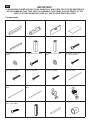
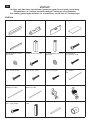
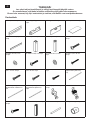
GB IMPORTANT!
PLEASE READ THESE INSTRUCT/ONS CAREFULLY AND KEEP FOR FUTURE REFERENCE
WE RECOMMEND THAT TWO ADULTS ASSEMBLE THIS GAME. PLEASE REFER TO THE
PARTS LIST BELOW AND BE SURE ALL PARTS HAVE BEEN INCLUDED.
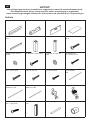
1 Side board 2EA 2 Goal end board 2EA 3 End board 2EA 4 Soccer playeld 1EA
5 Support brace 2EA 6 Left leg 2EA 7 Right leg 2EA 8 Leg bolt 8 x 30mm 16EA
9 Washer 22 x 8,5 mm
16EA
10 Bolt 6 x 6,5 mm 8EA 11 Washer 18 x 6,5 mm
8EA
12 Washer head scew
3,5 x 35 mm12EA
13 Flat head screw
3,5 x 14 mm 10EA
14 Flat head screw
3,5 x 16 mm 4EA
15 Washer head screw
3,5 x 21 mm 8EA
16 1 (3) Player rod
(965 mm) 4EA
17 2 Player rod (1080 mm)
2EA
18 5 Player rod (895 mm)
2EA
19 Player (white) 11EA 20 Player (blue) 11EA
21 Round head screw
3,5 x 7 mm 52EA
22 Apron corner 4EA 23 Chrome bar 2EA 24 Stop ring 4EA
Components

GB
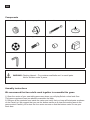
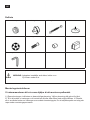
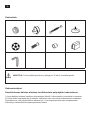
25 Rubber bumper 16EA 26 Ball entry cup 2EA 27 Scorer 2EA 28 Leg leveler 4EA
29 Soccer ball 2EA 30 Hand grip 8EA 31 End cap 8EA 32 Goal box 2EA
33 Allen wrench 1EA
Components
WARNING: Choking Hazard -- Toy contains small balls and / or small parts.
Not for children under 6 years.
Assmbly instructions
We recommend that two adults work together to assemble this game.
1) Open the carton of your new table game near where you will play.Select a clear level oor.
This game requires at least two adults to assemble the table.
2) Remove all the contents from inside the carton and verify that you have all listed parts as shown
on the Parts List. We suggest that you use the bottom carton as a clean at working area to the
game protect.Carefully cut or tear the four carton corners so that the bottom carton is now your
work area.

GB
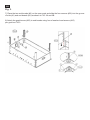
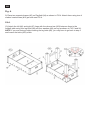
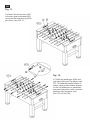
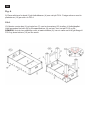
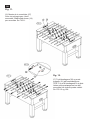
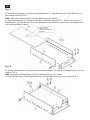
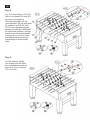
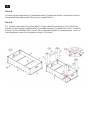
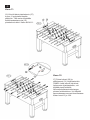
Fig. 1.
3) Attach one goal end board (#2) between the side boards ( #1) using two bolts ( #10) and two
washers (#11) per side as shown in FIG 1 .
NOTE: Do not tighten the screws too fast now, in a later step you will have to do so.
4) Slide the playeld (#4) with graphics facing down as shown in FIG.1. lf the eld does not slide
smoothly, check to be sure you have not over tightened any screws or the playled is not caught
by the slot.
CAUTION: Do not hold
the playeld by the
corners, it may break o.
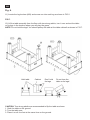
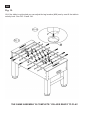
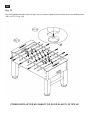
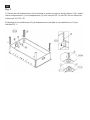
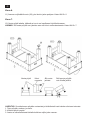
Fig. 2.
5) Repeat the step to attach the other goal end board (#2) to side boards (#1) as shown in FIG 2.
NOTE: Be sure that two side boards (#1) and goal end boards (#2) are square.
6) Fix the Soccer Playeld (#4) on the goal end boards (#2) using eight washer head screws (#12)
as shown in FIG.2.

GB
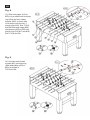
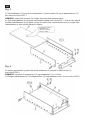
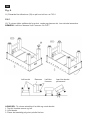
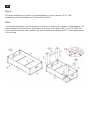
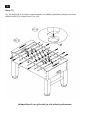
Fig. 3.
7) Place the two end boards (#3) on the open ends and slide the four corners (#22) into the groove
of side (#1) and end boards (#3) as shown in FIG. 3A and 3B.
8) Attach the goals boxes (#32) to end boards using four of washer head screws (#15)
per goal box FIG.3.

GB
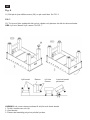
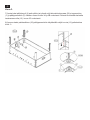
Fig. 4.
9) Place two supports braces (#5) on Playeld (#4) as shown in FIG.4. Attach them using two of
washer head screws (#12) per side see FIG.4.
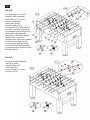
FIG.5.
10) Attach the left (#6) and right (#7) Legs with the chrome bar (#23) between them to the
football table using four leg bolts (#8) and four washers (#9) per leg as shown in FIG 5 and 5A.
NOTE: If you are having trouble inserting the leg bolts (#8), you may have to go back to step 3
and loosen the bolts (#10) a little.

GB
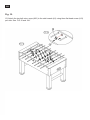
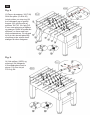
Fig. 6.
11) Locate the leg levelers (#28) and screw one into each leg as shown in FIG 6.
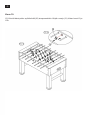
FIG.7.
12) Lift the table assembly from the oor with two strong adults, turn it over and set the table
on its legs in the location where you will play the game.
NOTE: Do not hold the legs! You should pickup the table at the table cabinet! as shown in FIG 7.
Hold table Cabinet Don´t hold
the legs
Do not lean the
table on its legs!
CAUTION: Two strong adults are recommended to ip the table as shown.
1. Grab the table on the ground.
2. Turn the table over.
3. Place it on all four feet at the same time on the ground.

GB
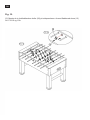
Fig. 8.
13) Slide one player (#19 or
#20) in the middle and one stop
ring (#24) and one rubber
bumper (#25) on each side
of he player onto the two 1
player rods (#16). See. FIG.8
and 8A.Slide stop rings (#25)
and players (#19 or #20) onto
player rods (#16,#17 and #18)
See. FIG.8 and 8A.
Fig. 9.
14) Use two round head
screws (#21) per stop ring
(#24) and player (#19 or
#20) as shown in
FIG 9 and 9A.

GB
Fig. 10.
15) Attach the two ball return cups (#26) to the side boards (#1) using three at head screw (#13)
per side. See. FIG.10 and 10A.

GB
Fig. 12.
17) Slide the hand grips (#30) and
end caps (#31) onto the player rods.
TIP: To make the handles easier to
attach, spray a little window cleaner
on the rod ends prior to installation
and gently hammer it with a wooden
hammer onto the player rods.
See. FIG.12 and 12A.
Fig. 11.
16) Attach the two scorers (#27)
to the two goal end boards (#2)
using two at head screws (#14)
per scorer. See FIG.11.

GB
THE GAME ASSEMBLY IS COMPLETE. YOU ARE READY TO PLAY.
Fig. 13.
18) lf the table is not leveled you can adjust the leg levelers (#28) one by one till the table is
exactly level. See FIG.13 and 13A.

DK VIGTIGT!
Venligst nøje læs disse instruktioner igennem og gem for eventuelt senere brug.
Det anbefales, at 2 voksne personer deltager i samlingen af spillebordet.
Før samling gennemgås dellisten, for at kontrollere, at alle dele er i forpakningen.
1 Sidepanel 2 stk. 2 Mål og endepanel 2 stk. 3 Endepanel 2 stk. 4 Fodboldbane 1 stk.
5 Afstiver for bund 2 stk. 6 Venstre ben 2 stk. 7 Højre ben 2 stk. 8 Ben bolte 8 x 30mm 16
stk.
9 Spændeskive 22 x 8,5
mm 16 stk.
10 Bolt 6 x 6,5 mm 8 stk. 11 Spændeskive 18 x 6,5
mm 8 stk.
12 Pladeskrue
3,5 x 35 mm 12 stk.
13 Flad hoveskrue
3,5 x 14 mm 10 stk.
14 Flad hovedskrue
3,5 x 16 mm 4 stk.
15 Pladeskrue
3,5 x 21 mm 8 stk.
16 Kromstang for målmand
og 3 spillere
(965 mm) 4 stk.
17 Kromstang for 2 spillere
(1080 mm) 2 stk.
18 Kromstang for 5 spillere
(895 mm) 2 stk.
19 Spiller (hvid) 11 stk. 20 Spiller (blå) 11 stk.
21 Maskinskrue
3,5 x 7 mm 52 stk.
22 Hjørne samlestykke
4 stk.
23 Kromstang 2 stk. 24 Stopring 4 stk.
Delliste

DK
25 Gummi bumper 16 stk. 26 Boldindførsel 2 stk. 27 Scorerliste 2 stk. 28 Stilleskrue 4 stk.
29 Fodbold 2 stk. 30 Håndtag 8 stk. 31 Endekappe 8 stk. 32 Boldboks 2 stk.
33 Sekskantnøgle 1 stk.
Delliste
ADVARSEL: Legetøjet indeholder små dele, bolde m.m.
Ikke til børn under 6 år.
Samlevejledning.
Vi anbefaler at 2 voksne hjælpes ad med at samle spillebordet.
1) Åben kartonet i nærheden af dets endelige placering. Vælg en placering, hvor gulvet er lige.
2) Tag alle dele ud af kartonet og kontroller, at alle dele er med ifølge dellisten. Vi foreslår at I
anvender bunden af kartonet som arbejd / samleade, dette for at beskytte spillet mod slag og
ridser under samlings processen.

DK
Fig. 1.
3) Saml endepanel (2) med de to sidepaneler (1) med to bolte (10) og to spændeskiver (11)
per side som vist på FIG 1 .
BEMÆRK: stram ikke skruerne for meget, dette skal først gøres senere.
4) Skub fodboldbanen (4) på plads med billedet nedad som vist på FIG.1. Hvis du ikke kan få
skubbet fodboldbanen (4) på plads, så har du måske fået strammet skruerne for meget eller
fodboldbanen er ikke korrekt placeret i slidsen..
ADVARSEL: Hold ikke
fodboldbanen (4)
i hjørnerne da disse
risikere at kække
Fig. 2.
5) Gentag proceduren og saml det andet endepanel (2) med de to side paneler (1)
som vist på FIG 2.
BEMÆRK: kontroller at endepaneler (2) og sidepaneler (1) er i vinkel.
6) Fastgør fodboldbanen (4) til endepanelerne (2) med pladeskruerne (12) som vist på FIG.2.

DK
Fig. 3.
7) Placer de to endepaneler (3) på enderne af spillet og skub de re hjørner (22) ind i slidsen
mellem sidepaneler (1) og endepaneler (3) som vist på FIG. 3A and 3B. Hjørnerne fastgøres med
2 skruer (13) FIG. 3C.
8) Monter de to målbokse (32) på endepanelerne ved hjælp af re pladeskruer (15) per målboks
FIG.3.

DK
Fig. 4.
9) Placer afstivere for bund (5) på fodboldbanen (4) som vist på FIG.4. Fastgør stiverne med to
pladeskruer (12) per side. se FIG.4.
FIG.5.
10) Monter venstre ben (6) og højre ben (7) med en kromstang (23) imellem, til fodboldspillet.
Hertil anvendes re bolte (8) og re spændeskiver (9) per ben, som vist på FIG 5 og 5A.
BEMÆRK: Hvis du har problemer med, at isætte boltene (8), kan du være nød til at gå tilbage til
FIG 2 og løsne boltene (10) en lille smule.

DK
Fig. 6.
11) Påsæt de re stilleskruer (28) en på hvert sit ben. se FIG 6.
FIG.7.
12) To voksne løfter spillebordet fra gulvet, vender og placerer det, hvor det skal anvendes.
BEMÆRK: Løft ikke i benene! Løft i rammen. Se FIG 7.
Løft bordet Rammen Løft ikke
i benene
Læn ikke bordet
på benene!
ADVARSEL: To voksne anbefales til at løfte og vende bordet.
1. Tag fat i bordets ramme og løft.
2. Vend bordet.
3. Placer det samtidigt på gulvet på alle re ben.

DK
Fig. 8.
13)Tag en kromstang (16/17/18)
Skub en spiller (19 eller 20)
ind på midten, en stop ring (24
kun målmænd) og en gummi
bumper (25) på hver side af
spilleren. Se.FIG. 8A. følg FIG
8 som viser placering af spillere
og stænger. HUSK at vende alle
spillerne i en farve med front
mod modstanderen. Giv dig god
tid til at sikre korrekt placering
af spillere på de enkelte krom
stænger før disse fastgøres.
Fig. 9.
14) Alle spillere (19/20) og
stopringe (24) fastgøres
til kromstængerne med to
skruer (21) som vist på
FIG 9 og 9A.

DK
Fig. 10.
15) Monter de to boldindførelses huller (26) på sidepanelerne. Anvend adhoved skrue (13)
Se. FIG.10 og 10A.

DK
Fig. 12.
17) Tryk håndtagene(30) og ende
knapper (31) på kromstængerne.
TIPS: For at få håndtagene til at glide
lettere på kromstængerne kan der
anvendes lidt vindues pudse middel.
Se. FIG.12 og 12A.
Fig. 11.
16) Monter de to scorelister (27)
Som vist på tegningen. Hertil
anvendes 2 adhoved skruer (14)
per scoreliste. Se FIG.11.
Sidan laddas...
Sidan laddas...
Sidan laddas...
Sidan laddas...
Sidan laddas...
Sidan laddas...
Sidan laddas...
Sidan laddas...
Sidan laddas...
Sidan laddas...
Sidan laddas...
Sidan laddas...
Sidan laddas...
Sidan laddas...
Sidan laddas...
Sidan laddas...
Sidan laddas...
Sidan laddas...
Sidan laddas...
Sidan laddas...
Sidan laddas...
Sidan laddas...
-
 1
1
-
 2
2
-
 3
3
-
 4
4
-
 5
5
-
 6
6
-
 7
7
-
 8
8
-
 9
9
-
 10
10
-
 11
11
-
 12
12
-
 13
13
-
 14
14
-
 15
15
-
 16
16
-
 17
17
-
 18
18
-
 19
19
-
 20
20
-
 21
21
-
 22
22
-
 23
23
-
 24
24
-
 25
25
-
 26
26
-
 27
27
-
 28
28
-
 29
29
-
 30
30
-
 31
31
-
 32
32
-
 33
33
-
 34
34
-
 35
35
-
 36
36
-
 37
37
-
 38
38
-
 39
39
-
 40
40
-
 41
41
-
 42
42


