
XT503600S
GB Compressor
The original instruction manual
SE Kompressor
Översättning av original-bruksanvisning
FI Kompressori
Käännös alkuperäisestä käyttöohjeesta
Art.Nr.
5906103924
AusgabeNr.
5906103851
Rev.Nr.
16/04/2015
Art.Nr.
XT503600S
AusgabeNr.
3906124850
Rev.Nr.
06/12/2016

DE
Nur für EU-Länder.
Werfen Sie Elektrowerkzeuge nicht in den Hausmüll!
Gemäß europäischer Richtlinie 2012/19/EU über Elektro- und Elektronik-
Altgeräte und Umsetzung in nationales Recht müssen verbrauchte Elektro-
werkzeuge getrennt gesammelt und einer umweltgerechten Wiederverwer-
tung zugeführt werden.
GB
Only for EU countries.
Do not dispose of electric tools together with household waste material!
In observance of European directive 2012/19/EU on wasted electrical and
electronic equipment and its implementation in accordance with national
law, electric tools that have reached the end of their life must be collected
separately and returned to an environmentally compatible recycling facility.
FR
Pour les pays européens uniquement
Ne pas jeter les appareils électriques dans les ordures ménagères!
Conformément à la directive européenne 2012/19/EU relative aux déchets
d’équipements électriques ou électroniques (DEEE), et à sa transposition
dans la législation nationale, les appareils électriques doivent être collec-
tés à part et être soumis à un recyclage respectueux de l’environnement.
IT
Solo per Paesi EU.
Non gettare le apparecchiature elettriche tra i rifi uti domestici!
Secondo la Direttiva Europea 2012/19/EU sui rifi uti di apparrecchiature
elettriche ed elettroniche e la sua attuazione in conformità alle norme
nazionali, le apparecchiature elettriche esauste devono essere raccolte
separatamente, al fi ne di essere reimpiegate in modo eco-compatibile.
NL
Allen voor EU-landen.
Geef elektrisch gereedschap niet met het huisvuil mee!
Volgens de europese richtlijn 2012/19/EU inzake oude elektrische en
elektronische apparaten en de toepassing daarvan binnen de nationale
wetgeving, dient gebruikt elektrisch gereedschap gescheiden te worden
ingezameld en te worden afgevoerd naar en recycle bedrijf dat voldoet aan
de geldende milieu-eisen.
ES
Sólo para países de la EU
¡No deseche los aparatos eléctricos junto con los residuos domésticos!
De conformidad con la Directiva Europea 2012/19/EU sobre residuos
de aparatos eléctricos y electrónicos y su aplicación de acuerdo con la
legislación nacional, las herramientas electricas cuya vida útil haya llegado
a su fi n se deberán recoger por separado y trasladar a una planta de
reciclaje que cumpla con las exigencias ecológicas.
PT
Apenas para países da UE.
Não deite ferramentas eléctricas no lixo doméstico!
De acordo cum a directiva europeia 2012/19/EU sobre ferramentas
eléctricas e electrónicas usadas e a transposição para as leis nacionais,
as ferramentas eléctricas usadas devem ser recolhidas em separado e
encaminhadas a uma instalação de reciclagem dos materiais ecológica.
SE
Gåller endast EU-länder.
Elektriska verktyg får inte kastas i hushållssoporna!
Enligt direktivet 2012/19/EU som avser äldre elektrisk och elektronisk
utrustning och dess tillämpning enligt nationell lagstiftning ska uttjänta
eletriska verktyg sorteras separat och lämnas till miljövänlig återvinning.
FI
Koskee vain EU-maita.
Älä hävitä sähkötyökalua tavallisen kotitalousjätteen mukana!
Vanhoja sähkö- ja elektroniikkalaitteita koskevan EU-direktiivin 2012/19/
EU ja sen maakohtaisten sovellusten mukaisesti käytetyt sähkötyökalut on
toimitettava ongelmajätteen keräyspisteeseen ja ohjattava ympäristöystä-
välliseen kierrätykseen.
NO
Kun for EU-land.
Kast aldri elektroverktøy i husholdningsavfallet!
I henhold til EU-direktiv 2012/19/EU om kasserte elektriske og elektroniske
produkter og direktivets iverksettning i nasjonal rett, må elektroverktøy som
ikke lenger skal brukes, samles separat og returneres til et miljøvennlig
gjenvinningsanlegg.
DK
Kun for EU-lande.
Elværktøj må ikke bortskaffes som allmindeligt affald!
I henhold til det europæiske direktiv 2012/19/EU em bortskaffelse af
elektriske og elektroniske produkter og gældende national lovgivning skal
brugt elværktoj indsamles separat og bortskaffes på en måde, der skåner
miljøet mest muligt.
SK
Kun for EU-lande.
Elværktøj må ikke bortskaffes som allmindeligt affald!
I henhold til det europæiske direktiv 2012/19/EU em bortskaffelse af
elektriske og elektroniske produkter og gældende national lovgivning skal
brugt elværktoj indsamles separat og bortskaffes på en måde, der skåner
miljøet mest muligt.
SI
Samo za države EU.
Električnega orodja ne odstranjujte s hišnimi odpadki!
V skladu z Evropsko direktivo 2012/19/EU o odpani električni in elektronski
opremi in z njenim izvajanjem v nacionalni zakonodaji je treba električna
orodja ob koncu nijihove življenjske dobe ločeno zbirati in jih predati v
postopek okolju prijaznega recikliranja.
HU
Csak EU-országok számára.
Az elektromos kéziszerszámokat ne dobja a háztartási szemétbe!
A használt villamos és elektronikai készülékekról szóló 2012/19/EU
irányelv és annak a nemzeti jogba való átültetése szerint az elhasznált
elektromos kéziszerszámokat külön kell gyüjteni, és környezetbarát módon
újra kell hasznositani.
HR
Samo za EU-države.
Električne alate ne odlažite u kućne otpatke!
Prema Europskoj direktivi 2012/19/EU o starim električnim i elektroničkim
strojevima i usklađivanju s hrvatskim pravom istrošeni električni alati
moraju se sakupljati odvojeno i odvesti u pogon za reciklažu.
CZ
Jen pro státy EU.
Elektrické náradi nevyhazujte do komunálniho odpadu!
Podle evropské smêrnice 2012/19/EU o nakládání s použitými elecktrický-
mi a elektronickými zarizeními a odpovídajícich ustanoveni právnich pred-
pisú jednotlivých zemí se použitá elektrická náradí musí sbírat oddêlenê
od ostatniho odpadu a podrobit ekologicky šetrnému
recyklování.
PL
Tylko dla państw UE.
Proszę nie wyrzucać elektronarzędzi wraz z odpadami domowymi!
Zgodnie z europejską Dyrektywą 2012/19/EU dot. zużytego sprzętu elek-
trycznego i elektronicznego oraz odpowiednikiem w prawie narodowym
zużyte elektronarzędzia muszą być oddzielnie zbierane i wprowadzane do
ponownego użytku w sposób nieszkodliwy dla środowiska.
RO
Numai pentru ţările din UE.
Nu aruncaţi echipamentele electrice la fel ca reziduurile menajere!
Conform Directivei Europene 2012/19/EU privitoare la echipamente
electrice şi electronice scoase din uz şi în conformitate cu legile naţionale,
echipamentele electrice care au ajuns la fi nalul duratei de viaţă trebuie să
fi e colectate separat şi trebuie să fi e predate unei unităţi de reciclare.
EE
Kehtib vaid EL maade suhtes.
Ärge kasutage elektritööriistu koos majapidamisjäätmetega!
Vastavalt EÜ direktiivile 2012/19/EU elektri- ja elektroonikaseadmete jäät-
mete osas ja kooskõlas igas riigis kehtivate seadustega, kehtib kohustus
koguda kasutatud elektritööriistad eraldi kokku ja suunata need keskkon-
nasõbralikku taasringlusesse.
LV
Tikai attiecībā uz ES valstīm.
Neutilizējiet elektriskas ierīces kopā ar sadzīves atkritumiem!
Ievērojot Eiropas Direktīvu 2012/19/EU par elektrisko un elektronisko
iekārtu atkritumiem un tās ieviešanu saskaņā ar nacionālo likumdošanu,
elektriskas ierīces, kas nokalpojušas savu mūžu, ir jāsavāc dalīti un
jāatgriež videi draudzīgās pārstrādes vietās.
LT
Tik ES šalims.
Nemesti elektros prietaisų kartu su kitomis namų ūkio atliekomis!
Pagal Europos Sąjungos direktyvą 2012/19/EU dėl elektros ir elektroninės
įrangos atliekų ir jos vykdymo pagal nacionalinius įstatymus elektros
įrankius, kurių tinkamumo naudoti laikas pasibaigė, reikia surinkti atskirai ir
perduoti aplinkai nekenksmingo pakartotinio perdirbimo įmonei.
IS
Aðeins fyrir lönd ESB:
Ekki henda rafmagnstækjum með heimilisúrgangi!
Í fylgni við evrópsku tilskipunina 2012/19/EU um fargaðan rafbúnað og
rafrænan búnað og framkvæmd þess í samræmi við innlend lög, verða
rafmagnstæki sem úr sér gengin.

3
GB Compressor
10-17
SE Kompressor 18-25
FI Kompressori 26-33

4
215
ON
16
OFF
3
3 7
17
14 14
5
1
1
2
8
10
11
9
3
4
5 7
6
18
12
16
13
14
5
212123
11
20
22
4
21
15 14
20 22 23 9
21 24 25 25 26
11
11

5
6
9
7
A
814 9
B
10 15
19
13 C
D
E
F
14
18
11
min
max
12
12 C
D
E
G

6
DE Vor Inbetriebnahme Bedienungsanleitung und Sicherheitshinweise lesen und beachten!
FR Avant la mise en service, lisez le mode d’emploi et les consignes de sécurité et respectez-
les!
IT Prima della messa in esercizio leggete e osservate le istruzioni per l‘uso e le avvertenze
di sicurezza!
GB
Read and follow the operating and safety instructions before you start working with this
power tool.
PL
Przed uruchomieniem należy przeczytać niniejszą instrukcję obsługi i przestrzegać wskazó-
wek bezpieczeństwa!
LT
Prieš eksploatacijos pradžią perskaitykite naudojimo instrukciją ir saugos nurodymus bei jų
laikykitės!
CZ
Před uvedením do provozu si přečtěte a dodržujte návod k obsluze a bezpečnostní pokyny.
SK
Pred uvedením do prevádzky si prečítajte návod na obsluhu a bezpečnostné upozornenia
a dodržiavajte ich.
EE Lugege enne käikuvõtmist kasutusjuhend ja ohutusjuhised läbi ning pidage neist kinni!
LV Pirms lietošanas sākšanas izlasiet un ievērojiet lietošanas instrukciju un drošības
norādījumus!
SE Läs och beakta bruksanvisningen och säkerhetsupplysningarna före idrifttagande!
FI Ennen käyttöönottoa lue käyttöohje ja turvallisuusohjeet ja noudata niitä!
DK
Læs betjeningsvejledningen før du tager dette elektriske værktøj i brug.
NL Vóór in gebruikneming de handleiding en de veiligheidsvoorschriften lezen en in acht
nemen!
DE Gehörschutz tragen!
FR Porter une protection auditive!
IT Portare cufe antirumore!
GB Wear ear protection!
PL Nosić słuchawki ochronne!
LT Jālieto dzirdes aizsardzības līdzekļi!
CZ Nosit ochranu sluchu!
SK Používajte ochranu sluchu!
EE Kandke kõrvakaitsevahendeid!
LV Lietojiet ausu aizsargus!
SE
Använd hörselskydd!
FI
Käytä kuulosuojaimia
DK Brug høreværn. Støjudviklingen fra maskinen kan forårsage høretab.
NL Draag een gehoorbeschermer. Lawaai kan aanleiding geven tot gehoorverlies.

DE Warnung vor heißen Teilen!
(G Fig.12)
FR Attention aux pièces brûlantes!
IT Fate attenzione alle parti molto calde!
GB Beware of hot parts!
PL Uwaga! Gorące części urządzenia!
LT Saugokitės karšto paviršiaus!
CZ Varování před horkými díly!
SK Výstraha pred horúcimi dielmi!
EE Hoiduge kuuma pinnaga!
LV Piesargāties no karstas virsmas!
SE Varning för varma delar!
FI Varoitus! Kuuma pinta!
DK Advarsel mod varme dele!
NL Waarschuwing voor warme onderdelen!
DE Warnung vor elektrischer Spannung!
FR Attention à la tension électrique!
IT Fate attenzione alla tensione elettrica!
GB Beware of electrical voltage!
PL Nosić słuchawki ochronne!
LT Naudojimo instrukcijos!
CZ Varování před elektrickým napětím!
SK Výstraha pred elektrickým napätím!
EE Kasutusjuhised!
LV Lietošanas instrukcijas!
SE Varning för elektrisk spänning!
FI Varo jännite!
DK Advarsel mod elektrisk spænding!
NL Waarschuwing voor elektrische spanning!

8
DE Warnung! Die Einheit ist ferngesteuert und darf ohne Warnung anlaufen.
FR Avertissement ! L’unité est télécommandée et peut démarrer sans avertissement préa-
lable.
IT Avvertimento! L’unità è telecomandata e può mettersi in moto senza avvertimento.
GB Warning! The equipment is remote-controlled and may start-up without warning.
PL Ostrzeżenie! Urządzenie jest zdalnie sterowane i może się uruchomić bez ostrzeżenia.
LT Įspėjimas ! Įsijungia automatiškai.
CZ Varování! Jednotka je řízena dálkově a může se spustit bez varování.
SK Výstraha! Jednotka je riadená diaľkovo a môže sa rozbehnúť bez predchádzajúceho
varovania.
EE
Hoiatus! Moodul on kaugjuhitav ja võib hoiatuseta käivituda.
LV Brīdinājums! Ierīce ir aprīkota ar automātisku palaišanas vadību. Nelaidiet trešās personas
ierīces darba zonā!
SE
Varning! Utrustningen är fjärrstyrda och kan starta utan förvarning.
FI
Varoitus! Yksikkö on kauko-ohjattu ja saattaa käynnistyä ilman varoitusta.
DK Advarsel! Enheden er fjernstyret og kan gå i gang uden varsel.
NL Waarschuwing! De unit wordt op afstand bestuurd en mag zonder waarschuwing starten.
DE Achtung! Vor Erstinbetriebnahme Ölstand überprüfen und Ölverschlussstopfen austau-
schen!
FR Attention ! Avant la première mise en service, vériez le niveau d‘huile et remplacez le
bouchon d‘huile !
IT Attenzione! Prima della prima messa in esercizio controllate il livello dell‘olio e sostituite il
relativo tappo a vite!
GB Caution! Before using for the rst time, check the oil level and replace the oil sealing plug!
PL Uwaga! Przed pierwszym uruchomieniem sprawdzić poziom oleju i wymienić korek zbior-
nika oleju!
LT Dėmesio! Prieš naudodami pirmą kartą patikrinkite alyvos lygį ir pakeisti naftos bako
dangtelį!
CZ Pozor! Před prvním uvedením do provozu zkontrolovat stav oleje a vyměnit uzavírací
zátku oleje!
SK Pozor! Pred uvedením do prevádzky skontrolovať stav oleja a vymeniť olejovú zátku!
EE
Tähelepanu! Kontrollige enne esmakordset käikuvõtmist õlitaset ja vahetage õlisulgurkork
välja!
LV
Levērībai! Pirms lietošanas uzsākšanas pārbaudiet eļļas līmeni un nomainiet eļļas vītņoto
aizbāzni!
SE
Observera! Kontrollera oljenivån före driftsättningen och byt oljeförslutningspluggen!
FI
Huomio! Tarkasta öljyntaso ja vaihda öljyn sulkutulpat ennen ensimmäistä käyttöönottoa!
DK Vigtigt! Kontroller oliestanden, og skift olieproppen ud inden ibrugtagning første gang!
NL LET OP! Voor de eerste in gebruikneming oliepeil controleren en oliesluitdop vervangen!


10 GB
Table of contents: Page:
1. Introduction 11
2. Device description 11
3. Scope of delivery 11
4. Intended use 12
5. Safety information 12
6. Technical data 13
7. Before starting the equipment 14
8. Attachment and operation 14
9. Electrical connection 14
10. Cleaning, maintenance and storage 15
11. Disposal and recycling 16
12. Troubleshooting 16
13. Declaration of conformity 35
14. Warranty certicate 36

11GB
1. Introduction
MANUFACTURER:
Isojoen Konehalli Oy
Keskustie 26
61850 Kauhajoki As
Finland
DEAR CUSTOMER,
we hope your new tool brings you much enjoyment and
success.
NOTE:
According to the applicable product liability laws, the
manufacturer of the device does not assume liability
for damages to the product or damages caused by the
product that occurs due to:
• Improper handling,
• Non-compliance of the operating instructions,
• Repairs by third parties, not by authorized service
technicians,
• Installation and replacement of non-original spare
parts,
• Application other than specied,
• A breakdown of the electrical system that occurs due
to the non-compliance of the electric regulations and
local regulations.
We recommend:
Read through the complete text in the operating instruc-
tions before installing and commissioning the device.
The operating instructions are intended to help the user
to become familiar with the machine and take advantage
of its application possibilities in accordance with the
recommendations. The operating instructions contain
important information on how to operate the machine
safely, professionally and economically, how to avoid
danger, costly repairs, reduce downtimes and how to in-
crease reliability and service life of the machine.
In addition to the safety regulations in the operating
instructions, you have to meet the applicable regula-
tions that apply for the operation of the machine in your
country. Keep the operating instructions package with
the machine at all times and store it in a plastic cover
to protect it from dirt and moisture. Read the instruction
manual each time before operating the machine and
carefully follow its information. The machine can only
be operated by persons who were instructed concern-
ing the operation of the machine and who are informed
about the associated dangers. The minimum age re-
quirement must be complied with.
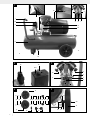
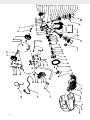
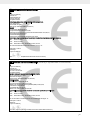
2. Device description (Fig. 1-14)
1. Transport handle
2. Pressure switch
3. Quick-lock coupling (regulated compressed air)
4. Pressure gauge (for reading the preset vessel
pressure)
5. Pressure regulator
6. Pressure gauge (for reading the vessel pressure)
7. Quick-lock coupling (unregulated compressed air)
8. Pressure vessel
9. Supporting foot (2x)
10. Drain plug for condensation water
11. Wheel (2x)
12. Oil drain plug/ Oil– level window
13. Compressor pump
14. Air lter
15. Oil sealing plug
16. ON/OFF switch
17. Safety valve
18. Overload switch
19. Oil ller opening
20. Screw (Wheel)
21. Washer (Wheel)
22. Spring washer (Wheel)
23. Nut (Wheel)
24. Screw (Supporting foot)
25. Washer (Supporting foot)
26. Nut (Supporting foot)
3. Scope of delivery
2x Air lter
2x Supporting foot
2x Wheel
1x Mounting material
1x Oil sealing plug
1x Translation of Original Operating Manual
• Open the packaging and remove the device carefully.
• Remove the packaging material as well as the pack-
aging and transport bracing (if available).
• Check that the delivery is complete.
• Check the device and accessory parts for transport
damage.
• If possible, store the packaging until the warranty pe-
riod has expired.
m ATTENTION
The device and packaging materials are not toys! Chil-
dren must not be allowed to play with plastic bags, lm
and small parts! There is a risk of swallowing and suf-
focation!

12 GB
4. Intended use
The compressor is designed to generate compressed
air for compressed-air driven tools which can be driven
with an air volume of up to approx. 272 l/min (e.g. tire
inator, blow-out pistol and paint spray gun). Due to the
limited air output it is not possible to use the compressor
to drive tools with very high air consumption (for exam-
ple orbital sanders, die grinders and hammer screwdriv-
ers).
The equipment is to be used only for its prescribed pur-
pose. Any other use is deemed to be a case of misuse.
The user / operator and not the manufacturer will be li-
able for any damage or injuries of any kind caused as a
result of this.
Please note that our equipment has not been designed
for use in commercial, trade or industrial applications.
Our warranty will be voided if the equipment is used in
commercial, trade or industrial businesses or for equiv-
alent purposes.
5. Safety information
m Attention! The following basic safety measures
must be observed when using electric tools for protec-
tion against electric shock, and the risk of injury and re.
Read all these notices before using the electric tool and
keep the safety instructions for later reference.
m Attention! The following basic safety actions must
be taken when using this compressor in order to protect
the user from electric shocks and the risk of injury and
re. Read and follow these instructions before using the
equipment.
Safe work
1 Keep the work area orderly
–Disorder in the work area can lead to accidents.
2 Take environmental inuences into account
–Do not expose electric tools to rain.
–Do not use electric tools in a damp or wet envi-
ronment. There is a risk of electric shock!
–Make sure that the work area is well-illuminated.
–Do not use electric tools where there is a risk of
re or explosion.
3 Protect yourself from electric shock
–Avoid physical contact with earthed parts (e.g.
pipes, radiators, electric ranges, cooling units).
4 Keep children away
–Do not allow other persons to touch the equip-
ment or cable, keep them away from your work
area.
5 Securely store unused electric tools
–Unused electric tools should be stored in a dry,
elevated or closed location out of the reach of
children.
6 Do not overload your electric tool
–They work better and more safely in the speci-
ed output range.
7 Wear suitable clothing
–Do not wear wide clothing or jewellery, which can
become entangled in moving parts.
–Rubber gloves and non-slip shoes are recom-
mended when working outdoors.
–Tie long hair back in a hair net.
8 Do not use the cable for purposes for which it is
not intended
–Do not use the cable to pull the plug out of the
outlet. Protect the cable from heat, oil and sharp
edges.
9 Take care of your tools
–Keep your compressor clean in order to work
well and safely.
–Follow the maintenance instructions.
–Check the connection cable of the electric tool
regularly and have it replaced by a recognised
specialist when damaged.
–Check extension cables regularly and replace
them when damaged.
10 Pull the plug out of the outlet
–During non-use of the electric tool or prior to
maintenance and when replacing tools such as
saw blades, bits, milling heads.
11 Avoid inadvertent starting
–Make sure that the switch is switched off when
plugging the plug into an outlet.
12 Use extension cables for outdoors
–Only use approved and appropriately identied
extension cables for use outdoors.
–Only use cable reels in the unrolled state.
13 Remain attentive
–Pay attention to what you are doing. Remain
sensible when working. Do not use the electric
tool when you are distracted.
14 Check the electric tool for potential damage
–Protective devices and other parts must be care-
fully inspected to ensure that they are fault-free
and function as intended prior to continued use
of the electric tool.
–Check whether the moving parts function fault-
lessly and do not jam or whether parts are dam-
aged. All parts must be correctly mounted and all
conditions must be fullled to ensure fault-free
operation of the electric tool.
–Damaged protective devices and parts must be
properly repaired or replaced by a recognised
workshop, insofar as nothing different is speci-
ed in the operating manual.
–Damaged switches must be replaced at a cus-
tomer service workshop.
–Do not use any faulty or damaged connection
cables.
–Do not use any electric tool on which the switch
cannot be switched on and off.
15 Have your electric tool repaired by a qualied elec-
trician
–This electric tool conforms to the applicable
safety regulations. Repairs may only be per-
formed by an electrician using original spare
parts. Otherwise accidents can occur.

13GB
16 Important!
–For your own safety you must only use the ac-
cessories and additional units listed in the oper-
ating instructions or recommended or specied
by the manufacturer. The use of mounted tools
or accessories other than those recommended
in the operating instructions or catalogue may
place your personal safety at risk.
17 Noise
–Wear ear muffs when you use the compressor.
18 Replacing the power cable
–To prevent hazards, leave the replacement of
damaged power cables strictly to the manufac-
turer or a qualied electrician. There is a risk of
electric shock!
19 Inating tires
–Directly after inating tires, check the pressure
with a suitable pressure gauge, for example at
your lling station.
20 Roadworthy compressors for building site opera-
tions
–Make sure that all lines and ttings are suitable
for the maximum permissible operating pressure
of the compressor.
21 Place of installation
–Set up the compressor on an even surface.
22 Supply hoses at pressures above 7 bar should be
equipped with a safety cable (e.g. a wire rope).
ADDITIONAL SAFETY INSTRUCTIONS
Safety instructions for working with compressed
air and blasting guns
• The compressor pump and lines can become very hot
during operation. Touching these parts will burn you.
• The air which is sucked in by the compressor must be
kept free of impurities that could cause res or explo-
sions in the compressor pump.
• When releasing the hose coupling, hold the hose cou-
pling piece with your hand. This way, you can protect
yourself against injury from the rebounding hose.
• Wear safety goggles when working with the blow-out
pistol. Foreign bodies or blown off parts can easily
cause injuries.
• Do not blow at people with the blow-out pistol and
do not clean clothes while being worn. Risk of injury!
Safety information for paint spraying
• Do not process any paints or solvents with a ash
point below 55° C. There is a risk of explosion!
• Do not heat up paints or solvents. There is a risk of
explosion!
• If hazardous liquids are processed, wear protective
lter units (face guards). Also, adhere to the safety
information provided by the manufacturers of such
liquids.
• The details and designations of the Ordi-
nance on Hazardous Substances, which
are displayed on the outer packaging of
the processed material, must be observed.
• Additional protective measures are to be undertak-
en if necessary, particularly the wearing of suitable
clothing and masks.
• Do not smoke during the spraying process and/or in
the work area. There is a risk of explosion! Paint va-
pors are easily combustible.
• Never set up or operate the equipment in the vicin-
ity of a re place, open lights or sparking machines.
• Do not store or eat food and drink in the work area.
Paint vapors are harmful to your health.
• The work area must exceed 30 m3 and sufcient ven-
tilation must be ensured during spraying and drying.
Do not spray against the wind. Always adhere to the
regulations of the local police authority when spray-
ing combustible or hazardous materials.
• Do not process media such as white spirit, butyl al-
cohol and methylene chloride with the PVC pressure
hose. These media will destroy the pressure hose.
Operating pressure vessels
• You must keep your pressure vessel in good work-
ing order, operate the vessel correctly, monitor the
vessel, carry out necessary maintenance and repair
work immediately and meet the relevant safety pre-
cautions.
• The supervisory authority may enforce essential con-
trol measures in individual cases.
• A pressure vessel is not allowed to be used if it has
faults or deciencies that can endanger workers or
third parties.
• Check the pressure vessel for signs of rust and dam-
age each time before using. Do not use the compres-
sor with a damaged or rusty pressure vessel. If you
discover any damage, then please contact the cus-
tomer service workshop.
Do not lose these safety instructions
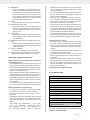
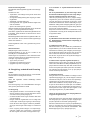
6. Technical data
Mains connection 230 V ~ 50 Hz
Motor rating W 2200
Operating mode S1
Compressor speed 2850 min-1
Pressure vessel capacity (in liters) 50
Operating pressure approx. 8 bar
Theoretical intake capacity (l/min) approx. 412
sound power level LWA 97 dB(A)
uncertainty KWA 2.03 dB
Protection type IP20
Weight of the unit in kg approx. 52.7
Oil (15W 40) l approx. 0,25
Max. altitude
(above mean sea level) 1000 m
The noise emission values were measured in ac-
cordance with EN ISO 3744.

14 GB
Wear hearing protection.
The effects of noise can cause a loss of hearing.
7. Before starting the equipment
Before you connect the equipment to the mains supply
make sure that the data on the rating plate are identical
to the mains data.
• Check the equipment for damage which may have
occurred in transit. Report any damage immediately
to the transport company which was used to deliver
the compressor.
• Install the compressor near the point of consumption.
• Avoid long air lines and supply lines (extension ca-
bles).
• Make sure that the intake air is dry and dustfree.
• Do not install the compressor in a damp or wet room.
• The compressor may only be used in suitable rooms
(with good ventilation and an ambient temperature
from +5 °C to 40 °C). There must be no dust, acids,
vapors, explosive gases or inammable gases in the
room.
• The compressor is designed to be used in dry rooms.
It is prohibited to use the compressor in areas where
work is conducted with sprayed water.
• The oil level in the compressor pump has to be
checked before putting the equipment into operation.
8. Attachment and operation
m Important!
You must fully assemble the appliance before using it
for the rst time!
You will require the following tools for assembly and in-
stallation: 2 x open-ended wrench size 19 mm (not in-
cluded)
You will require the following tools for assembly and in-
stallation: 2 x open-ended wrench size 14 mm (not in-
cluded)
8.1 Fitting the wheels (Fig. 5)
• Fit the supplied wheels (11) as shown.
8.2 Fitting the supporting foot (2x)(Fig. 6)
• Fit the supplied supporting foot (2x) as shown.
8.3 Fitting the air lter (2x)(Fig. 7,8)
• Remove the transportation stop (A) and screw the air
lter (14) to the equipment.
8.4 Changing the transportation cover (B) (Fig. 9,10)
• Remove the transportation cover from the oil lter
opening (19) and insert the supplied oil sealing plug
(15) into the oil ller opening.
8.5 Mains connection
• The compressor is equipped with a mains cable with
shock-proof plug. This can be connected to any 230-
240V ~ 50 Hz shock-proof socket.
• Before you use the machine, make sure that the
mains voltage is the same as the operating voltage
(see the rating plate).
• Long supply cables, extensions, cable reels etc.
cause a drop in voltage and can impede motor start-
up.
• At low temperatures below +5°C, sluggishness may
make starting difcult or impossible.
8.6 ON/OFF switch (Fig. 2)
• Pull the ON/OFF switch (16) upwards to switch on the
compressor. To switch off the compressor, press the
ON/OFF switch down.
8.7 Setting the pressure (Fig. 1,3)
• Use the pressure regulator (5) to set the pressure on
the pressure gauge (4).
• The set pressure can be drawn from the quick lock
coupling (3).
• The vessel pressure can be read off the pressure
gauge (6).
• The vessel pressure is drawn from the quick lock cou-
pling (7).
8.8 Setting the pressure switch (Fig. 1)
• The pressure switch (2) is set at the factory. Cut-in
pressure approx. 6 bar Cut-out pressure approx. 8
bar.
8.9 Overload switch (Fig. 14)
The motor is tted with an overload switch (18). If the
compressor overloads, the overload switch switches off
the equipment automatically to protect the compressor
from overheating. If the overload switch triggers, switch
off the compressor using the ON/ OFF switch (16) and
wait until the compressor cools down. Then press the
overload switch (18) and restart the compressor.
9. Electrical connection
The electrical motor installed is connected and ready for
operation. The connection complies with the applicable
VDE and DIN provisions.
The customer‘s mains connection as well as the exten-
sion cable used must also comply with these regula-
tions.
• The product meets the requirements of EN 61000-
3-11 and is subject to special connection condi-
tions. This means that use of the product at any
freely selectable connection point is not allowed.
• Given unfavourable conditions in the power supply
the product can cause the voltage to uctuate tem-
porarily.
• The product is intended solely for use at connection
points that
a) do not exceed a maximum permitted supply im-
pedance “Z” (Zmax = 0.382 Ω), or
b) have a continuous current-carrying capacity of
the mains of at least 100 A per phase.

15GB
• As the user, you are required to ensure, in consulta-
tion with your electric power company if necessary,
that the connection point at which you wish to oper-
ate the product meets one of the two requirements,
a) or b), named above.
Important information
In the event of an overloading the motor will switch itself
off. After a cool-down period (time varies) the motor can
be switched back on again.
Damaged electrical connection cable
The insulation on electrical connection cables is often
damaged.
This may have the following causes:
• Passage points, where connection cables are passed
through windows or doors.
• Kinks where the connection cable has been improp-
erly fastened or routed.
• Places where the connection cables have been cut
due to being driven over.
• Insulation damage due to being ripped out of the wall
outlet.
• Cracks due to the insulation ageing.
Such damaged electrical connection cables must not be
used and are life-threatening due to the insulation dam-
age.
Check the electrical connection cables for damage
regularly. Make sure that the connection cable does not
hang on the power network during the inspection.
Electrical connection cables must comply with the ap-
plicable VDE and DIN provisions. Only use connection
cables with the marking „H05VV-F“.
The printing of the type designation on the connection
cable is mandatory.
AC motor
• The mains voltage must be 230 V~
• Extension cables up to 25 m long must have a cross-
section of 1.5 mm2.
Connections and repairs of electrical equipment may
only be carried out by an electrician.
Please provide the following information in the event of
any enquiries:
• Type of current for the motor
• Machine data - type plate
• Machine data - type plate
10. Cleaning, maintenance, and storage
m Important!
Pull out the power plug before doing any cleaning and
maintenance work on the equipment. Risk of injury from
electric shock!
m Important!
Wait until the equipment has cooled down completely!
Risk of burns!
m Important!
Always depressurize the equipment before carrying out
any cleaning and maintenance work! Risk of injury!
10.1 Cleaning
• Keep the equipment free of dirt and dust as far as
possible. Wipe the equipment with a clean cloth or
blow it down with compressed air at low pressure.
• We recommend that you clean the equipment imme-
diately after you use it.
• Clean the equipment regularly with a damp cloth and
some soft soap. Do not use cleaningagents or sol-
vents; these may be aggressive to the plastic parts
in the equipment. Ensure that no water can get into
the interior of the equipment.
• You must disconnect the hose and any spraying tools
from the compressor before cleaning. Do not clean
the compressor with water, solvents or the like.
10.2 Maintenance work on the pressure vessel (Fig.
1)
m Important! To ensure a long service life of the pres-
sure vessel (8), drain off the condensed water by open-
ing the drain valve (10) each time after using. Release
the vessel pressure rst (see 10.7.1). Open the drain
screw by turning counter-clockwise (looking at the
screw from the bottom of the compressor) so that all
the condensed water can run out of the pressure ves-
sel. Then close the drain screw again (turn it clockwise).
Check the pressure vessel for signs of rust and damage
each time before using. Do not use the compressor with
a damaged or rusty pressure vessel. If you discover
any damage, then please contact the customer service
workshop.
m Important!
The condensed water from the pressure vessel will con-
tain residual oil. Dispose of the condensed water in an
environmentally compatible manner at a suitable collec-
tion point.
10.3 Safety valve (Fig. 3)
The safety valve (17) has been set for the highest per-
mitted pressure of the pressure vessel. It is prohibited
to adjust the safety valve or remove its seal. Actuate
the safety valve from time to time to ensure that it works
when required. Pull the ring with sufcient force until
you can hear the compressed air being released. Then
release the ring again.
10.4 Checking the oil level at regular intervals (Fig.
11)
Place the compressor on a level and straight surface.
The oil level must be between the MAX and MIN marks
on the oil level window (12).
Oil change: we recommend SAE 15W 40 or equivalent.
The original oil lling must be changed after 100 hours
in operation; thereafter the oil must be drained and re-
placed with new oil after every 500 hours in operation.
10.5 Changing the oil (Fig. 1,10,11)
Switch off the engine and pull the mains plug out of the
socket. Remove the oil sealing plug (15). After releasing
any air pressure you can unscrew the oil drain plug (12)
from the compressor pump (13).

16 GB
To prevent the oil from running out in an uncontrolled
manner, hold a small metal chute under the opening and
collect the oil in a vessel. If the oil does not drain out com-
pletely, we recommend tilting the compressor slightly.
When the oil has drained out, re-t the oil drain plug
(12).
Dispose of the old oil at a drop-off point for old oil.
To ll in the correct quantity of oil, make sure that the
compressor stands on an even surface. Fill new oil
through the oil ller opening (19) until it comes up to the
maximum level. This is marked with a red dot on the oil
level window (12) (Fig. 11). Do not exceed the maximum
lling quantity. Overlling the equipment may result in
damage. Reinsert the oil sealing plug (15) into the oil
ller opening (19).
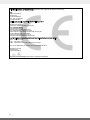
10.6 Cleaning the intake lter (Fig. 3, 12, 13)
The intake lter prevents dust and dirt being drawn in.
It is essential to clean this lter after at least every 300
hours in service. A clogged intake lter will decrease
the compressor’s performance dramatically. Open the
screw (E) to remove the intake lter(2x).
Then pull off the lter cover (D). Now you can remove
the air lter (F). Carefully tap out the air lter, lter cover
and lter housing. Then blow out these parts with com-
pressed air (approx. 3 bar) and reinstall in reverse order.
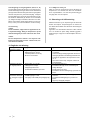
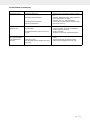
12. Troubleshooting
Fault Possible cause Remedy
The compressor does
not start. • No supply voltage.
• Insufcient supply voltage.
• Outside temperature is too low.
• Motor is overheated.
• Check the supply voltage, the power plug and the
socket-outlet.
• Make sure that the extension cable is not too
long. Use an extension cable with large enough
wires.
• Never operate with an outside temperature of
below +5° C.
• Allow the motor to cool down. If necessary, rem-
edy the cause of the overheating.
The compressor starts
but there is no pres-
sure.
• The safety valve (17) leaks.
• The seals are damaged.
• The drain plug for condensation water (10)
leaks.
• Have a service center replace the safety valve
(17).
• Check the seals and have any damaged seals
replaced by a service center.
• Tighten the screw by hand. Check the seal on
the screw and replace if necessary.
The compressor starts,
pressure is shown on
the pressure gauge, but
the tools do not start.
• The hose connections have a leak.
• A quick-lock coupling has a leak.
• Insufcient pressure set on the pressure
regulator (5).
• Check the compressed air hose and tools and
replace if necessary.
• Check the quick-lock coupling and replace if
necessary.
• Increase the set pressure with the pressure
regulator.
10.7 Storage
m Important!
Pull out the mains plug and ventilate the equipment and
all connected pneumatic tools. Switch off the compres-
sor and make sure that it is secured in such a way that it
cannot be started up again by any unauthorized person.
m Important!
Store the compressor only in a dry location which is not
accessible to unauthorized persons. Always store up-
right, never tilted! Oil may leak out!
10.7.1 Releasing excess pressure
Release the excess pressure by switching off the com-
pressor and using the compressed air which is still left
in the pressure vessel, e.g. with a compressed air tool
running in idle mode or with a blow-out pistol.
11. Disposal and recycling
The equipment is supplied in packaging to prevent it
from being damaged in transit. The raw materials in this
packaging can be reused or recycled. The equipment
and its accessories are made of various types of mate-
rial, such as metal and plastic. Defective components
must be disposed of as special waste. Ask your
dealer or your local council.

17

18 SE
Innehåll: Sida:
1. Inledning 19
2. Maskinbeskrivning 19
3. Leverans 19
4. Avsedd användning 20
5. Säkerhetsanvisningar 20
6. Tekniska uppgifter 21
7. Innan maskinen tas i drift 22
8. Montering och manövrering 22
9. Elanslutning 22
10. Rengöring, underhåll och förvaring 23
11. Skrotning och källsortering 24
12. Störningsåtgärder 24
13. Konformitetsdeklaration 35
14. Garantibevis 36

19SE
1. Indledning
PRODUCENT:
Isojoen Konehalli Oy
Keskustie 26
61850 Kauhajoki As
Finland
ÄRADE KUND,
Vi önskar dig mycket glädje och framgång vid arbetet
med din nya apparat.
UPPLYSNING:
Tillverkaren av apparaten ansvarar, enligt gällande pro-
duktansvarslag, inte för skador, som uppstår på denna
apparat eller genom apparaten vid:
• felaktig användning,
• ignorering av bruksanvisningen
• reparationer genom tredje person, icke auktoriserad
specialister,
• montering och byte av icke originalreservdelar,
• icke bestämmelseenlig användning,
• stopp i den elektriska anläggningen vid ignorering av
de elektriska föreskrifterna och VDE-bestämmelser-
na (förbundet för tyska elektrotekniker) 0100, DIN
57113/VDE0113.
Beakta:
Läs igenom hela texten i bruksanvisningen före mon-
teringen och idrifttagandet:
Denna bruksanvisning ska underlätta det för dig att
lära känna ditt el-verktyg och att nyttja dess bestäm-
melseenliga användningsmöjligheter.
Bruksanvisningen innehåller viktiga upplysningar, om
hur du arbetare säkert, fackmässigt och ekonomiskt
med el-verktyget och hur du undviker faror, sparar
reparationskostnader, minskar ståtider och ökar el-
verktygets tillförlitlighet och livslängd.
Jämte säkerhetsbestämmelserna i denna bruksanvis-
ning måste du ovillkorligen beakta ditt lands gällande
föreskrifter för driften av el-verktyg.
Förvara bruksanvisningen, skyddad mot smuts och
fukt i ett plastfodral, jämte el-verktyget. Den måste
läsas och beaktas av all driftspersonal innan arbete
påbörjas. Endast personer, som är insatta i använd-
ningen av el-verktyget och är informerade om farorna,
som är förbundna med detta, får arbeta med el-verk-
tyget. Den krävda lägsta åldern måste iakttas.
Jämte säkerhetsupplysningarna i denna bruksan-
visning och ditt lands särskilda föreskrifter, ska man
även beakta de allmänna erkända reglerna för träbe-
arbetningsmaskiner.
Vi tar inget ansvar för olyckor eller skador som orsakats
av underlåtenhet att följa bruksanvisningen och säker-
hetsinstruktionerna .
2. Maskinbeskrivning (bild 1-14)
1. Transportgrepp
2. Tryckvakt
3. Snabbkoppling (reglerad tryckluft)
4. Manometer (inställt tryck kan avläsas)
5. Tryckreglage
6. Manometer (panntrycket kan avläsas)
7. Snabbkoppling (oreglerad tryckluft)
8. Tryckbehållare
9. Stativ(2x)
10. Avtappningsskruv för kondensation
11. Navbult (2x)
12. Oljeavtappningsplugg / Olje-synglas
13. Kompressorpump
14. Luftlter
15. Oljepluggen
16. På-/Av-reglage
17. Säkerhetsventil
18. Överlast-/ skyddsreglage
19. Olje-påfyllningsöppning
20. Skruv (hjul)
21. Bricka (hjul)
22. Fjäderring (hjul)
23. Mutter (hjul)
24. Skruv (Stativ)
25. Bricka (Stativ)
26. Mutter (Stativ)
3. Leverans
2x luftlter
2x Stativ
2x Navbult
1x Monteringsmaterial
1x Olje-förslutningsplugg
1x Bruksanvisning
• Öppna förpackningen och lyft försiktigt ut apparaten.
• Avlägsna förpackningsmaterialet samt förpacknings-/
och transportsäkringar (om de nns).
• Kontrollera att leveransen är fullständig.
• Kontrollera att apparaten och tillbehören inte skadats
vid transport.
• Spara om möjligt förpackningen tills garantin gått ut.
m OBS!
Apparaten och förpackningsmaterialet är inga
leksaker! Barn får inte leka med plastpåsar, folie
och smådelar! Risk för sväljskador och kvävning!

20 SE
4. Avsedd användning
Kompressorn är avsedd att producera tryckluft åt tryck-
luftsdrivna verktyg, vilka kan drivas med en luftmängd
på upp till ca 272 l/min (t ex ringtryckmätare, luftpistoler
och lackpistoler). På grund av det begränsade luftödet
är det inte möjligt att driva verktyg som kräver ett my-
cket stort luftöde (t ex slipmaskiner, stavslipmaskiner
och mutterdragare).
Maskinen får endast användas för de ändamål den är
avsedd för. Varje ytterligare användning anses som icke
avsedd användning. För alla material- och personska-
dor som uppstår därav ansvarar användaren/operatören
och inte tillverkaren.
Observera att våra apparater inte är konstruerade i av-
sikt att användas för kommersiellt, hantverks- eller in-
dustribruk. Vi övertar inget ansvar om apparaten an-
vänds för kommersiellt, hantverks- eller industribruk
samt liknande bruk.
5. Säkerhetsanvisningar
m Observa! Vid användning av elektriska verktyg ska
följande säkerhets åtgärder iakttas som skydd mot el-
chock, skade- och brandrisk. Läs alla dessa anvisningar
innan du använder det elektriska verktyget, och spara
säkerhetsanvisningarna.
m Observera! Vid användning av denna kompressor
ska följande principiella försiktighetsåtgärder beaktas
som skydd mot elektrisk stöt, skaderisk och brandfara.
Läs och beakta dessa anvisningar innan du använder
apparaten.
Arbeta säkert
1 Håll ordning på arbetsområdet
–Ett stökigt arbetsområde kan ha olyckor som följd.
2 Ta hänsyn till omgivningens inytande
–Utsätt inte det elektriska verktyget för regn,
–Använd inte elektriska verktyg i fuktig eller blöt
miljö. Risk för elchock!
–Sörj för god belysning av arbetsområdet.
–Använd inte elektriska verktyg om brand-eller ex-
plosionsrisk består.
3 Skydda dig mot elchock
–Undvik kroppskontakt med jordade delar (t ex rör,
element, elektriska spisar, kylapparater).
4 Håll barn borta!
–Låt inte andra personer röra vid verktyget och ka-
beln, håll dem borta från arbetsområdet.
5 Förvara elektriska verktyg på ett säkert ställe när de
inte används.
–När elektriska verktyg inte är i bruk bör de förvaras
på ett torrt, högt beläget eller avstängt utrymme,
utom räckhåll för barn.
6 Överlasta inte det elektriska verktyget.
–De fungerar bättre och säkrare inom det angivna
prestandaområdet.
7 Bär lämplig klädsel
–Bär ingen vid klädsel eller smycken, de kan fastna
i rörliga delar.
–Vid arbete i det fria rekommenderas gummihands-
kar och halkfria skor.
–Bär hårnät om du har långt hår.
8 Använd inte kabeln för ändamål som den inte är
avsedd för.
–Använd inte kabeln för att dra stickkontakten ur
eluttaget. Skydda kabeln mot värme,olja och skar-
pa kanter.
9 Vårda dina verktyg omsorgsfullt
–Håll kompressorn ren för ett gott och säkert arbete.
–Följ underhållsföreskrifterna.
–Kontrollera regelbundet det elektriska verktygets
anslutningsledning och låt teknisk personal ersät-
ta den om den är skadad.
–Kontrolloera förlängningsledningar regelbundet
och ersätt dessa om de är skadade.
10 Dra stickkontakten ur eluttaget
–när det elektriska verktyget inte används, innan
underhåll och vid byte av verktyg.
11 Undvik att maskinen startar oavsiktligt
–Försäkra dig om att reglaget är avstängt när du
sätter kontakten i eluttaget.
12 Använd förlängningskablar utomhus
–Använd enbart tillåtna förlängningskablar med
motsvarande beteckning för arbete utomhus.
–Använd kabeltrummor enbart i utrullat tillstånd.
13 Var alltid uppmärksam
–Var uppmärksam på vad du gör. Arbeta förstån-
digt. Använd inte det elektriska verktyget om du
är okoncentrerad.
14 Kontrollera att det elektriska verktyget inte har några
eventuella skador
–Innan ytterligare användning av det elektriska verk-
tyget måste noggrant undersökas om skyddsan-
ordningar eller lätt skadade delar fungerar korrekt
och ändamålsenligt.
–Kontrollera att de rörliga delarna fungerar korrekt
och inte fastnar samt att delar inte är skadade.
Samtliga delar måste monteras korrekt och upp-
fylla alla krav för att garantera felfri drift av det
elektriska verktyget.
–Skadade skyddsanordningar och delar måste re-
pareras eller bytas ut enligt bestämmelserna av
en erkänd verkstad om inte annat anges i bruk-
sanvisningen.
–Skadade reglage måste ersättas i en kundtjänst-
verkstad.
–Använd inga defekta eller skadade anslutnings-
kablar.
–Använd inga elektriska verktyg om reglaget inte
kan slås av och på.
15 Reparationer ska utföras av elektroteknisk personal
–Detta elektriska verktyg följer gällande säkerhets-
bestämmelser. Reparationer får enbart utföras av
elektroteknisk personal och med användning av
originalreservdelar; annars kan olyckor uppstå för
användaren.
Sidan laddas...
Sidan laddas...
Sidan laddas...
Sidan laddas...
Sidan laddas...
Sidan laddas...
Sidan laddas...
Sidan laddas...
Sidan laddas...
Sidan laddas...
Sidan laddas...
Sidan laddas...
Sidan laddas...
Sidan laddas...
Sidan laddas...
Sidan laddas...
-
 1
1
-
 2
2
-
 3
3
-
 4
4
-
 5
5
-
 6
6
-
 7
7
-
 8
8
-
 9
9
-
 10
10
-
 11
11
-
 12
12
-
 13
13
-
 14
14
-
 15
15
-
 16
16
-
 17
17
-
 18
18
-
 19
19
-
 20
20
-
 21
21
-
 22
22
-
 23
23
-
 24
24
-
 25
25
-
 26
26
-
 27
27
-
 28
28
-
 29
29
-
 30
30
-
 31
31
-
 32
32
-
 33
33
-
 34
34
-
 35
35
-
 36
36


på andra språk
- eesti: Strongline XT503600S Kasutusjuhend
- English: Strongline XT503600S User manual
Andra dokument
-
Scheppach HC550TC-400V Användarmanual
-
Scheppach HC52dc Användarmanual
-
Scheppach HC 53dc Original Instruction Manual
-
-
Scheppach HC08 Användarmanual
-
Scheppach HC550TC-230V Translation Of Original Instruction Manual
-
Parkside PKO 400 A1 Operation And Safety Notes Original Operating Instructions
-
Parkside PKO 270 A1 Operation and Safety Notes
-
-
Scheppach HC06 Translation Of Original Instruction Manual