
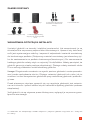
Bedienungsanleitung
celexon Aktiv Lautsprecher-Set
2-Wege 525
Vielen Dank für den Kauf dieses Produkts.
Für eine optimale Leistung und Sicherheit lesen Sie diese Anweisungen bitte sorgfältig
durch, bevor Sie dieses Produkt anschließen oder betreiben. Bitte bewahren Sie diese
Anleitung für eine spätere Verwendung auf.
Version: 32422_081

1
Diese Bedienungsanleitung dient dazu, Sie mit der Funktionsweise dieses Produktes
vertraut zu machen. Bewahren Sie diese Anleitung daher gut auf, damit Sie jederzeit
darauf zugreifen können.
• Beginnen Sie nicht mit der Montage, bevor Sie die komplette Bedienungsanleitung
gelesen und diese verstanden haben.
• Führen Sie die Installation mit einer weiteren Person durch um eine sichere Montage
zu gewährleisten.
• Entnehmen Sie das Produkt der Verpackung und entfernen alle Verpackungsmateri-
alien. Achten Sie darauf, dass sich kein Verpackungsmaterial am oder im Produkt be-
ndet Sollten Sie Verpackungsbeschädigungen feststellen, prüfen Sie zusätzlich ob
Beschädigungen am Produkt zu nden sind. Sollten Sie äußerliche Beschädigungen
an dem Gerät oder unerwartete oder unübliche Funktionsweisen feststellen, darf
das Produkt nicht weiter genutzt werden. Kontaktieren Sie umgehend den Händler,
bei dem Sie das Produkt gekauft haben oder celexon direkt (Web: www.celexon.de,
Mail: info@celexon.de) für weitere Informationen.
• Um einen störungsfreien Betrieb sicherzustellen, darf das Produkt ausschließlich in
Innenbereichen eingesetzt werden, es ist NICHT zur Nutzung im Freien geeignet.
• Die Nutzung des Geräts und Zubehörteile ist Kindern unter 12 Jahren verboten.
• Sorgen Sie dafür, dass keine Kinder mit den Geräten spielen oder sich ohne Aufsicht
in der Nähe aufhalten.
• Ein Umbauen oder Verändern des Produktes beeinträchtigt die Produktsicherheit.
• Achtung Verletzungsgefahr! Öffnen Sie das Produkt niemals eigenmächtig. Führen
Sie Reparaturen nie selbst aus!
• Verwenden Sie das Produkt nicht in der Nähe von Gas- oder Wassergerätschaften,
in staubiger Umgebung oder auf/ in der Nähe von metallischen Flächen (Empfangs-
beeinussung).
• Behandeln Sie das Produkt sorgfältig. Es kann durch Stöße, Schläge oder Fall aus
bereits geringer Höhe beschädigt werden.
• Halten Sie das Produkt fern von Feuchtigkeit und Hitze.
• Tauchen Sie das Produkt niemals in Wasser oder andere Flüssigkeiten.
• Verwenden Sie das Produkt nur in seiner bestimmungsgemäßen Art und Weise. Eine
anderweitige Verwendung kann zu Beschädigungen am Produkt oder in dessen Um-
gebung führen.
• Ziehen Sie die Schrauben fest, aber überdrehen diese nicht. Ein zu festes Anziehen
(z.B. Durch Verwendung eines Akkuschraubendrehers) kann Schäden verursachen
WARNHINWEISE

2
und den sicheren Halt des Produkts beeinträchtigen.
• Beschaffen Sie sich ggf. passendes Montagematerial für Ihren Montageuntergrund.
Achten Sie darauf, dass der Untergrund ausreichen Tragkraft aufweist um das Pro-
dukt inkl. weiterer Komponenten sicher und dauerhaft zu halten.
• Nach der Montage des Produkts und weiterer Komponenten sind diese auf ausrei-
chende Festigkeit und Betriebssicherheit zu überprüfen.
• Hängende Lasten müssen mindestens zweimal jährlich auf Festigkeit und Tragfähig-
keit geprüft werden.
• Alle Zuleitungen und Kabel dürfen nicht belastet werden und müssen so verlegt
werden, dass diese nicht beschädigt, gequetscht oder auf Spannung liegen.
• Schalten Sie das Gerät spannungsfrei, bevor Sie jegliche Verkabelung durchführen.
• Bei Nichtbeachtung obiger Anweisungen kann es zu Personenschäden und
Beschädigungen des Produktes oder Geräten die daran angeschlossen
sind kommen. Auch kann bei fehlerhafter Installation oder Verwendung die
Garantie erlöschen.
• Achten Sie auf eine angemessene Lautstärke, um Hörschäden zu vermeiden.
• Wenn Sie beim Verwenden des Produktes unsicher sind, kontaktieren Sie
Fachpersonal, Ihren Händler oder celexon direkt (Web: www.celexon.de,
Mail: info@celexon.de).
• Technische Änderungen und Irrtümer vorbehalten.
Der Hersteller übernimmt keine Verantwortung für Sachschäden oder Personenschäden,
wenn die Halterung außerhalb der empfohlenen Spezikationen verwendet wird, oder
bei unsachgemäßer Installation.
HAFTUNGSAUSSCHLUSS
Die Angaben in diesem Dokument können ohne vorherige Ankündigung durch
den Hersteller geändert werden. Änderungen werden jeweils in den folgenden
Versionen dieses Handbuchs ergänzt. Der Hersteller übernimmt keine Garantie
oder Gewährleistung auf die Richtigkeit der Angaben in diesem Dokument.

3
TECHNISCHE DATEN
• Spannung: AC 110-220 V, 50/60 Hz
• Verbrauch: Betrieb: 1,2 - 45 W (MAX)
Aus-Zustand: 0 W
• Leistung: 2 x 30 W (RMS), Peak 50 W
• Frequenzbereich: 40 Hz - 20 kHz
• T.H.D. @ 1kHz: < 1%
• Signal-Rausch-Verhältnis: >90 dB
• Abmessungen: 245 x 180 x 162 mm (BxHxT)
• Impedanz: 8 Ohm
• Audio Kanal: 2.0 (links und rechts)
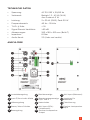
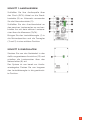
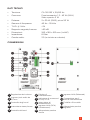
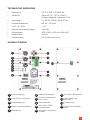
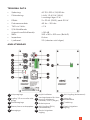
ANSCHLÜSSE
Lautstärkeregelung
Input 3,5mm Audio Klinke
Höhenregelung
Stereo/ Mono Schalter
Bassregelung
6
7
8
9
10
1
2
3
4
5
11
12
13
14
AUX Input (Balanced)
Anschluss für
Netzkabel
Feinsicherung
Passiver Lautsprecher
Input
Betriebsanzeige
Übersteuerungsanzeige
Clip L und R
Netzschalter
AUX Input (RCA)
(Unbalanced)
Passiver Lautsprecher
Output

4
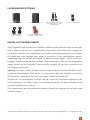
LIEFERUMFANG
INSTALLATIONSHINWEIS
Stellen Sie die Lautsprecher auf einen festen und tragfähigen Untergrund, oder
montieren Sie diese mithilfe der Montagebügel an eine Wand/ Decke. Ach-
ten Sie auf eine ausreichend tragfähige Wand-/ Deckenbeschaffenheit und
beschaffen Sie sich geeignetes Montagematerial für Ihren spezischen Unter-
grund. (Das beiliegende Montagematerial ist ausschließlich für Beton/ Voll-
stein-Untergrund zulässig.) Pro Lautsprecher müssen mindestens 2 Schrau-
ben/ Dübel zur Aufnahme verwendet werden. Bitte beachten Sie, dass die
Lautsprecher im Betrieb Wärme erzeugen. Lassen Sie daher um das Gehäuse
der Lautsprecher umlaufend ca. 10 cm Platz frei.
Achtung: Eine längere Beschallung mit hoher Lautstärke kann zu dauerhaften
Hörschäden führen. Stellen Sie die Lautstärke deshalb möglichst niedrig ein,
und vermeiden Sie eine längere Verwendung der Lautsprecher mit übermäßi-
ger Lautstärke.
Stellen Sie vor der ersten Inbetriebnahme sicher, dass die Lautstärkeregler auf
das Minimum eingestellt sind und nähern Sie sich der gewünschten Lautstärke
im Betrieb langsam an.
Bei längerem Nichtgebraucht, schalten Sie die Lautsprecher über den Netz-
schalter aus.
1 x aktiv Lautsprecher* 2 x Wandmontagebügel
und Montagematerial
1 x passiv Lautsprecher* 1 x 1,8m RCA Kabel
2 x Netzkabel (EU & UK) 1 x Anschlusskabel Aktiv zu
Passiv Kabel 4,8m
*je nach erworbenem Modell sind die Aktiv- und Passivlautsprecher W = Weiß oder B = Schwarz

5
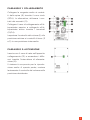
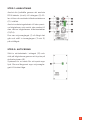
SCHRITT 1: ANSCHLIESSEN
Schließen Sie Ihre Audioquelle über
das Cinch (RCA) Kabel an die Steck-
kontakte (9) an. Alternativ verwenden
Sie die Klemmkontakte (11).
Schließen Sie das Anschlusskabel an
den passiven Lautsprecher an und ver-
binden ihn mit dem aktiven Lautspre-
cher über die Klemmen (10/14).
Bringen Sie den Lautstärkeregler (1) in
die Minimalposition und die Tonregler
(3 und 5) in eine mittlere Position.
SCHRITT 2: EINSCHALTEN
Stecken Sie nun das Netzkabel in den
dafür vorgesehenen Anschluss (12) und
schalten die Lautsprecher über den
Netzschalter (8) ein.
Das System ist nun bereit zur Audio-
wiedergabe. Drehen Sie nun langsam
den Lautstärkeregler in die gewünsch-
te Position.

6
Hersteller: celexon Europe GmbH
Adresse: Gutenbergstraße 2, 48282 Emsdetten, DE
Produktname: celexon Aktiv Lautsprecher-Set 2-Wege 525
Produkte, die mit dem CE-Zeichen gekennzeichnet sind, entsprechen allen
Anforderungen der entsprechenden EU-Direktiven. Die EU-Konformitäts-
erklärung kann unter folgender Adresse heruntergeladen werden:
www.celexon.de/zertikate
INFORMATION ZUR EU-KONFORMITÄT
Das Symbol weist auf die getrennte Rücknahme elektrischer und
elektronischer Geräte in EU-Ländern hin. Bitte werfen Sie das Gerät
nicht in den Hausmüll. Informieren Sie sich über das in Ihrem Land
gültige Rücknahmesystem und wenden Sie sich bei Fragen zum
Entsorgungsprozess an Ihre Kommune oder Ihre örtliche Wert-und
Schadstoffsammelstelle.

Operating instructions
celexon active loudspeaker set
2-way 525
Thank you for purchasing this product.
For optimum performance and safety, please read these instructions carefully
before connecting or operating this product. Please retain these instructions for future
reference.
Version: 32422_081

1
These operating instructions are intended to familiarise you with the operation of this
product. Keep this manual in a safe place so that you can refer to it at any time.
• Do not start assembly until you have read and understood the complete operating
instructions.
• Carry out the installation with another person to ensure safe installation.
• Remove the product from the packaging and remove all packaging material. Make
sure that there is no packaging material on or in the product. If you notice any da-
mage to the packaging, also check whether there is any damage to the product. If
you notice any external damage to the unit or any unexpected or unusual functio-
ning, the product must not be used any longer. Contact the dealer immediately from
whom you purchased the product or celexon directly (Web: www.celexon.co.uk,
Mail: info@celexon.co.uk) for further information.
• To ensure trouble-free operation, the product must only be used indoors and is NOT
suitable for outdoor use.
• The use of the appliance and accessories is forbidden to children under 12 years of
age.
• Ensure that no children play with the appliance or are in the vicinity without super-
vision.
• Modifying or altering the product will compromise product safety.
• Caution: Risk of injury! Never open the product without authorisation. Never carry
out repairs yourself!
• Do not use the product near gas or water appliances, in a dusty environment or on/
near metallic surfaces (reception interference).
• Handle the product with care. It can be damaged by knocks, blows or falling from
even a small height.
• Keep the product away from moisture and heat.
• Never immerse the product in water or other liquids.
• Only use the product in its intended manner. Any other use may result in damage to
the product or its surroundings.
• Tighten the screws, but do not overtighten them. Overtightening (e.g. by using a
cordless screwdriver) may cause damage and affect the secure t of the product.
• If necessary, procure suitable mounting material for your mounting surface. Make
sure that the surface has sufcient load-bearing capacity to hold the product incl.
other components securely and permanently.
WARNINGS

2
• After mounting the product and other components, check that they are sufciently
strong and safe to operate.
• Suspended loads must be checked for strength and load-bearing capacity at least
twice a year.
• All supply lines and cables must not be loaded and must be laid in such a way that
they are not damaged or crushed.
• Disconnect the unit from the power supply before carrying out any wiring.
• Failure to follow the above instructions may result in personal injury and damage
to the product or equipment connected to it. Incorrect installation or use may also
invalidate the warranty.
• Be sure to listen at an appropriate volume to avoid hearing damage.
• If you are unsure about the use of the product, contact your specialist personnel,
your dealer or celexon directly (Web: www.celexon.co.uk, Mail: info@celexon.co.uke).
• Technical changes and errors excepted.
The manufacturer accepts no responsibility for damage to property or personal injury if
the product is used outside the recommended specications, or in the event of improper
installation.
DISCLAIMER
The information in this document is subject to change without notice by the
manufacturer. Changes will be added to subsequent versions of this manual.
The manufacturer does not guarantee or warranty for the correctness of the
information in this document.

3
TECHNICAL DATA
• Voltage: AC 110-220 V, 50/60 Hz
• Consumption: Operation: 1,2 - 45 W (MAX)
Off mode: 0 W
• Power: 2 x 30 W (RMS), peak 50 W
• Frequency range: 40 Hz - 20 kHz
• T.H.D. @ 1kHz: < 1%
• Signal-to-noise ratio: >90 dB
• Dimensions: 245 x 180 x 162 mm (WxHxD)
• Impedance: 8 Ohm
• Audio channel: 2.0 (left and right)
CONNECTIONS
Volume control
3.5 mm audio jack Input
Treble control
Stereo / Mono switch
Bass control
6
7
8
9
10
1
2
3
4
5
11
12
13
14
AUX Input (Balanced)
Connection for mains cable
Fine-wire fuse
Passive loudspeaker input
Power indicator
Overload indicator
L and R
Power switch
AUX Input (RCA)
(Unbalanced)
Passive loudspeaker output

4
IN THE BOX
INSTALLATION NOTE
Place the speakers on a solid and stable surface or mount them on a wall/
ceiling using the mounting brackets. Make sure that the wall/ceiling has suf-
cient load-bearing capacity, and obtain suitable mounting materials for your
specic surface. (The enclosed mounting material is only suitable for concrete/
solid stone substrates). At least 2 screws/dowels must be used per speaker.
Please note that the speakers generate heat during operation. Therefore, leave
approx. 10 cm of space all the way around.
Caution: Prolonged exposure to sound at high volumes can cause permanent
hearing damage. Therefore, set the volume as low as possible and avoid pro-
longed use of the speakers at excessive volume.
Before using the speakers for the rst time, make sure that the volume controls
are set to the minimum and slowly approach the desired volume during opera-
tion. If the speakers will not be used for a long time, switch them off using the
mains switch.
1 x active loudspeaker* 2 x wall mounting brackets
and mounting material
1 x passive speaker* 1 x 1.8m RCA cable
2 x Mains cable (EU & UK) 1 x Active to Passive
Connection cable 4.8m
*depending on the model purchased, the active and passive loudspeakers are W = White or B = Black.

5
STEP 1: CONNECT
Connect your audio source via the
Cinch (RCA) cable to the plug cont-
acts (9). Alternatively, use the terminal
contacts (11). Connect the connection
cable to the passive loudspeaker and
connect it to the active loudspeaker via
the terminals (10/14).
Set the volume control (1) to the mini-
mum position and the tone controls (3
and 5) to a middle position.
STEP 2: SWITCH ON
Now plug the mains cable into the de-
signated connection (12) and switch
on the speakers with the mains switch
(8). The system is now ready for audio
playback. Now slowly turn the volume
control to the desired position.

6
Manufacturer: celexon Europe GmbH
Address: Gutenbergstraße 2, 48282 Emsdetten, DE
Product name: celexon active loudspeaker set 2-way 525
Products that are marked with the CE mark meet all requirements of the relevant
EU directives. The EU declaration of conformity can be downloaded from the
following address: www.celexon.de/zertikate
INFORMATION ON EU-CONFORMITY
The symbol indicates the separate collection of electrical and electronic
devices in EU countries. Please do not throw the device into household
waste. Find out about the return system applicable in your country and
contact your local authority or your local waste and pollutant collection
point if you have any questions about the disposal process.

7
Manufacturer: celexon Europe GmbH
Address: Gutenbergstraße 2, 48282 Emsdetten, DE
Product name: celexon active loudspeaker set 2-way 525
Products that are marked with the UKCA mark meet all requirements of the
relevant UK directives. The UK declaration of conformity can be downloaded
from the following address: www.celexon.de/zertikate
INFORMATION ON UK-CONFORMITY
The symbol indicates the separate collection of electrical and electronic
devices in EU countries. Please do not throw the device into household
waste. Find out about the return system applicable in your country and
contact your local authority or your local waste and pollutant collection
point if you have any questions about the disposal process.

Notice d’utilisation
Set d’enceintes actives celexon 2
voies 525
Merci d’avoir choisi ce produit.
Pour une performance et une sécurité optimales, veuillez lire attentivement les présentes
instructions avant de connecter ou d’utiliser ce produit. Veuillez conserver la présente
notice pour une utilisation ultérieure.
Version : 32422_081

1
La présente notice d’utilisation est destinée à vous familiariser avec le mode de fonction-
nement de ce produit. Conservez donc précieusement ces instructions an de pouvoir y
accéder à tout moment.
• Ne commencez pas le montage avant d’avoir lu entièrement et compris la notice
d’utilisation.
• Effectuez l’installation avec une autre personne an de garantir un montage sûr.
• Retirez le produit de l’emballage et enlevez tous les matériaux d’emballage. Veillez
à ce qu’aucun matériau d’emballage ne se trouve sur et dans le produit Si vous
constatez des dommages sur l’emballage, vériez également que le produit n’est
pas endommagé. Si vous constatez des dommages extérieurs sur l’appareil ou
des fonctionnements inattendus ou inhabituels, le produit ne doit plus être utilisé.
Contactez immédiatement le revendeur auprès duquel vous avez acheté le produit
ou directement celexon (web : www.celexon.fr, mail : info@celexon.fr) pour de plus
amples informations.
• Pour garantir un fonctionnement parfait, le produit doit être utilisé exclusivement en
intérieur, il N’est PAS adapté à une utilisation en extérieur.
• L’utilisation de l’appareil et de ses accessoires est interdite aux enfants de moins de
12 ans.
• Veillez à ce qu’aucun enfant ne joue avec les appareils ou ne se trouve à proximité
sans surveillance.
• Toute transformation ou modication du produit porte atteinte à sa sécurité.
• Attention risque de blessure ! N’ouvrez jamais le produit de votre propre initiative.
N’exécutez jamais vous-même les réparations !
• N’utilisez pas le produit à proximité d’appareils à gaz ou à eau, dans un environne-
ment exposé à la poussière ou sur/à proximité de surfaces métalliques (inuence
sur la réception).
• Traitez le produit avec soin. Il peut être endommagé par des chocs, des coups ou
des chutes, même de faible hauteur.
• Maintenez le produit à l’abri de l’humidité et de la chaleur.
• N’immergez jamais le produit dans l’eau ou d’autres liquides.
• N’utilisez le produit que de façon conforme. Toute autre utilisation peut entraîner
des dommages sur le produit ou dans son environnement.
• Serrez les vis, toutefois pas trop. Un serrage excessif (par exemple à l’aide d'un
tournevis sans l) peut entraîner des dommages et compromettre la bonne tenue
du produit.
AVERTISSEMENTS

2
• Procurez-vous, le cas échéant, le matériel de montage adapté à votre support de
montage. Veillez à ce que le support présente une capacité de charge sufsante
pour maintenir le produit et les autres composants de manière sûre et durable.
• Après le montage du produit et des autres composants, il convient de vérier que
leur résistance et leur sécurité de fonctionnement sont sufsantes.
• La résistance et la capacité admissible des charges suspendues doivent être contrô-
lées au moins deux fois par an.
• Tous les ls et câbles d’alimentation ne doivent pas être soumis à des contraintes et
doivent être posés de manière à ne pas être endommagés, écrasés ou sous tension.
• Mettez l’appareil hors tension avant d’effectuer tout câblage.
• Le non-respect des instructions énoncées ci-dessus peut entraîner des dom-
mages corporels et endommager le produit ou les appareils qui y sont raccor-
dés. Une installation ou une utilisation incorrecte peut entraîner l’annulation de
la garantie.
• Veillez à ce que le volume sonore soit raisonnable an d’éviter toute décience
auditive.
• Si vous n’êtes pas sûr lors de l’utilisation du produit, contactez le person-
nel spécialisé, votre revendeur ou directement celexon (Web : www.celexon.fr,
Mail : info@celexon.fr).
• Sous réserve de modications techniques et d’erreurs.
Le fabricant décline toute responsabilité en cas de dommages matériels ou corporels si
le support est utilisé en dehors des spécications recommandées ou s’il n’est pas installé
correctement.
EXCLUSION DE RESPONSABILITÉ
Les informations contenues dans le présent document peuvent être modiées
sans préavis par le fabricant. Les modications seront ajoutées dans les ver-
sions suivantes de ce manuel. Le fabricant n’offre aucune garantie ou assurance
quant à l’exactitude des informations contenues dans le présent document.

3
DONNÉES TECHNIQUES
• Tension : AC 110-220 V, 50/60 Hz
• Consommation : Fonctionnement : 1,2 - 45 W (MAX)
État arrêt : 0 W
• Puissance : 2 x 30 W (RMS), pic 50 W
• Plage de fréquences : 40 Hz - 20 kHz
• T.H.D. @ 1 kHz : < 1 %
• Rapport signal/bruit : >90 dB
• Dimensions : 245 x 180 x 162 mm (l x H x P)
• Impédance : 8 Ohms
• Canal audio : 2.0 (à gauche et à droite)
RACCORDS
Réglage du volume sonore
Entrée audio jack 3,5 mm
Réglage de la hauteur
Interrupteur stéréo/mono
Réglage des basses
6
7
8
9
10
1
2
3
4
5
11
12
13
14
Entrée AUX
(équilibré)
Raccord pour
câble d’alimentation
Fusible n
Enceinte passive
Entrée
Indicateur de fonctionnement
Indication de surcharge
Clip L et R
Interrupteur d’alimentation
Entrée AUX (RCA)
(non équilibré)
Enceinte passive
Sortie

4
CONTENU DE LA LIVRAISON
CONSIGNE D’INSTALLATION
Placez les enceintes sur une surface solide et stable ou montez-les sur un mur/
plafond à l’aide des supports de montage. Veillez à ce que la nature du mur/pla-
fond soit sufsamment solide et procurez-vous le matériel de montage adapté
à votre support spécique. (Le matériel de montage fourni est exclusivement
autorisé pour les supports en béton/pierre pleine). Il faut utiliser au moins 2
vis/chevilles par enceinte pour le montage. Veuillez noter que les enceintes
produisent de la chaleur lorsqu’elles sont en train de fonctionner. Laissez donc
un espace d’environ 10 cm autour du boîtier des enceintes.
Attention : Une exposition prolongée à un volume sonore élevé peut entraîner
des lésions auditives permanentes. Par conséquent, réglez le volume le plus
bas possible et évitez d’utiliser les enceintes à un volume excessif pendant une
période prolongée.
Avant la première utilisation, assurez-vous que les boutons de volume sont
réglés au minimum et rapprochez-vous progressivement du volume souhaité
pendant le fonctionnement.
En cas de non-utilisation prolongée, éteignez-les à l’aide de l’interrupteur d’ali-
mentation.
1 x enceinte active* 2 x étriers de montage mu-
ral et matériel de montage
1 x enceinte passive* 1 câble RCA de 1,8 m
2 x câbles d’alimentation
(UE & RU)
1 x câble de raccordement,
câble actif à passif 4,8 m
*selon le modèle acheté, les enceintes actives et passives sont W = blanc ou B = noir
Sidan laddas...
Sidan laddas...
Sidan laddas...
Sidan laddas...
Sidan laddas...
Sidan laddas...
Sidan laddas...
Sidan laddas...
Sidan laddas...
Sidan laddas...
Sidan laddas...
Sidan laddas...
Sidan laddas...
Sidan laddas...
Sidan laddas...
Sidan laddas...
Sidan laddas...
Sidan laddas...
Sidan laddas...
Sidan laddas...
Sidan laddas...
Sidan laddas...
Sidan laddas...
Sidan laddas...
Sidan laddas...
Sidan laddas...
Sidan laddas...
Sidan laddas...
Sidan laddas...
Sidan laddas...
Sidan laddas...
Sidan laddas...
Sidan laddas...
Sidan laddas...
Sidan laddas...
Sidan laddas...
Sidan laddas...
-
 1
1
-
 2
2
-
 3
3
-
 4
4
-
 5
5
-
 6
6
-
 7
7
-
 8
8
-
 9
9
-
 10
10
-
 11
11
-
 12
12
-
 13
13
-
 14
14
-
 15
15
-
 16
16
-
 17
17
-
 18
18
-
 19
19
-
 20
20
-
 21
21
-
 22
22
-
 23
23
-
 24
24
-
 25
25
-
 26
26
-
 27
27
-
 28
28
-
 29
29
-
 30
30
-
 31
31
-
 32
32
-
 33
33
-
 34
34
-
 35
35
-
 36
36
-
 37
37
-
 38
38
-
 39
39
-
 40
40
-
 41
41
-
 42
42
-
 43
43
-
 44
44
-
 45
45
-
 46
46
-
 47
47
-
 48
48
-
 49
49
-
 50
50
-
 51
51
-
 52
52
-
 53
53
-
 54
54
-
 55
55
-
 56
56
-
 57
57


Celexon 525-W aktywne głośniki 2-drożne Bruksanvisning
- Typ
- Bruksanvisning
- Denna manual är också lämplig för
på andra språk
- italiano: Celexon 525-W aktywne głośniki 2-drożne Manuale del proprietario
- español: Celexon 525-W aktywne głośniki 2-drożne El manual del propietario
- Deutsch: Celexon 525-W aktywne głośniki 2-drożne Bedienungsanleitung
- polski: Celexon 525-W aktywne głośniki 2-drożne Instrukcja obsługi
- français: Celexon 525-W aktywne głośniki 2-drożne Le manuel du propriétaire
- Nederlands: Celexon 525-W aktywne głośniki 2-drożne de handleiding
Relaterade papper
-
Celexon Professional Table Top 102 x 76 cm stołowy ekran projekcyjny 4:3 Bruksanvisning
-
-
-
-
-
-
-