
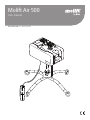
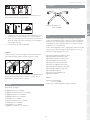
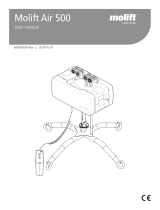
Molift Air 500
User manual
BM16099 Rev. D 2021-01-29

2
Molift Air / www.etac.com

3
Molift Air / www.etac.com
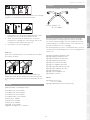
Contents
User manual - English - 1
Gebrauchsanweisung - Deutsch - 11
Brukermanual - Norsk - 21
Bruksanvisning - Svenska - 31
Käyttöohje - Suomi - 41
Manual utente - Italiano - 51
Manual d`utilisation - Francais - 61
Manual de usuarioo - Español - 71
Handleiding - Nederlands - 81
Brugsvejledning - Dansk - 91

1
Molift Air / www.etac.com
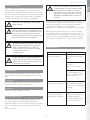
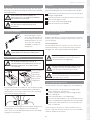
Important
This User Manual contains important safety instructions and
information regarding the use of the sling and accessories.
In this manual the client is the person being lifted.
The caregiver is the person operating the lifter.
This symbol indicates important information
related to safety. Follow these instructions
carefully.
Read User Manual before use!
It is important to fully understand the con-
tent of the user manual before attempting to
use the equipment.
Visit www.etac.com for download of documentation to ensure
you have the latest version.
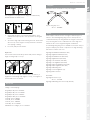
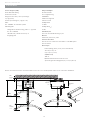
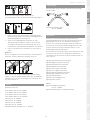
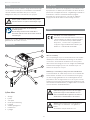
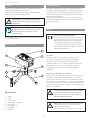
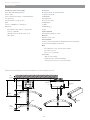
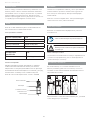
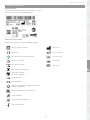
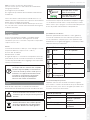
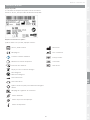
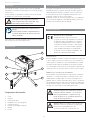
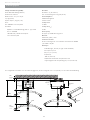
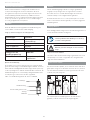
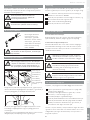
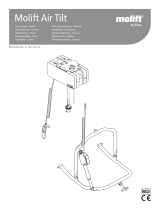
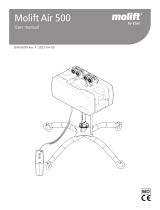
Molift Air 500
1
2
3
7
8
6
5
4
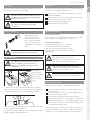
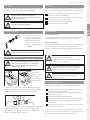
Hoist components:
1. Trolley
2. Hoist
3. Side covers
4. Emergency stop/ Emergency
lowering
5. Lifting belt
6. Quick release pin
7. Hand control
8. Sling bar
About Molift Air
Molift AIR is a strong and smooth ceiling lift that enables patients
and residences to be transferred in a comfortable and safe way.
Suitable for sitting and lateral transfers as well as standing and
gait training situations together with the comprehensive acces-
sory program from Molift.
Molift AIR is a very light motor which in combination with the
quick release coupling system gives an easy handling when
mounting and servicing
General
Declaration of conformity:
The Molift Air and related accessories described
in this operator manual are CE marked in
accordance with EU Council Directive 93/42/EEC
concerning medical devices, class 1, and has been
tested and approved by a third party according to
standards IEC 60601-1, IEC 60601-1-2 and NS-EN
ISO 10535:2006.
Conditions for Use
Lift and transfer of a client will always pose a certain risk and
only trained personnel are allowed to use the equipment and
accessories covered by this user manual. The rail system must
be installed by certified personnel in accordance with applicable
installation instructions. The lifter is not intended to be operated
by the client being lifted.
Modifications and use of components made by other manufacturers.
We recommend only using Molift components and spare parts.
Declaration of conformity is not valid and Etac is not responsible
for warranty if any modifications are made to the product. Etac
shall not be liable for faults or accidents that can occur when
using components made by other manufacturers. It can be
unsafe to use accessories, detachable parts and materials that is
not listed in this user manual.
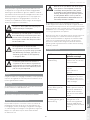
Only certified personnel are allowed to open
hoist or accessories to perform service or
repair. Risk of injury from rotating parts and
electric shock.
Warranty: 2-year warranty against defects in
workmanship and materials of our products. 1
year warranty for battery.
For Terms and conditions, see www.etac.com

2
Molift Air / www.etac.com
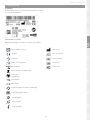
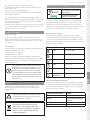
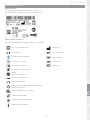
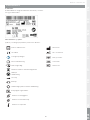
Product identification
Product label
The Product labels barcode contain article number, serial number
and production date:
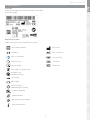
Warning labels and Symbols
Symbols used on the product, explained in more detail:
ENNO DEFR ITES FI SVNLDA
Class II double insulated
Manufacturer
CE marked
YYYY-MM-DD
Date of manufacture
Refer to user manual
Catalogue number
Indoor Use only
Serial number
255
560
Max user weight
Medical Device
Do not dispose in general waste
Emergency stop/
Emergency lowering
Service Light
Battery Light
Hex tool symbol for
Manual Emergency lowering
60601-1
Certification Body mark
Humidity limitation
Atmospheric pressure limitation
Temperature limitation

3
Molift Air / www.etac.com
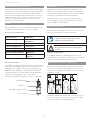
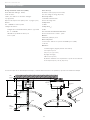
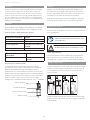
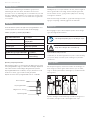
CSP
A 3000mm
118,11”
W 246mm
9.68”
L 360mm
14,17”
Min. 760mm
29.92”
H 195mm
7,67”
B Min.
327mm
12,87”
Min.
62mm
2,44”
F Min.
475mm
18,7”
Min.
190mm
7.48”
D 275mm
10.83”
C 29,5mm
1,16” /
72,5mm
2,85”
E 10mm
0,39”
Safe Working Load (SWL)
Molift AIR 500: 500 kg (1102 lbs)
Weight of unit:
Chassis incl. battery, Excl. sling bar:
14.1 kg (31 lbs)
4-point Sling bar: 5,3 kg (11.7 lbs)
Battery:
Art: 2920007 12 V SLA 2.9 Ah
Battery charger:
Charger for handcontrol, Mascot - type 3743
Art. no.: 2540100
100-240 V AC, 50-60 Hz max 0.5A
Output 0.9A
Technical data
Lifting speed
60mm/second (2,36 inches/second)
with 75kg (165,35 lbs) load
Protection class
Hand control IP24
Lift motor IP24
Sound pressure
52 dBA
Sound power (L
WA
)
63 dB
Operating forces button
Buttons on handset: 3.4 N
Material:
Aluminum, Plastic, Steel
Expected Lifetime:
The hoist has an expected lifetime of 30 000 cycles SWL
or 10 years.
Dimensions:
L x W x H (Length, Width, Height without trolley)
36 x 24,6 x 19,5 cm
(14,2 x 9,7 x 7,7 inches)
A (Hoisting Range)
300 cm (118 Inches)
B (Minimum d ist ance from ceiling to Sling bar
coupling point) 32,7 cm (12.7⁄8 Inches)
For extended information about technical data, how to preform service and repair, see technical manual.

4
Molift Air / www.etac.com
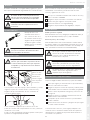
Installation
The hoist is marked with Safe Working Load (SWL), this should
not exceed rail systems max load capacity.
The rail system can only be installed by certi-
fied personnel in accordance with applicable
installation instructions.
Do not start using hoist before complet-
ing control according to checklist after
installation.
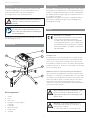
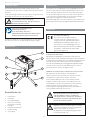
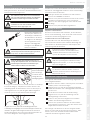
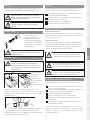
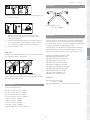
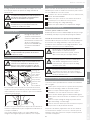
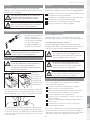
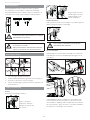
Trolley installation
Mounting trolley in rail
system. Remove End stop
and insert Trolley into rail.
Mount end stop, and make
sure it is securely fastened.
See BM4401 for installation
details.
Make sure end stops are mounted in all ends
of the Rail system before using the hoist!
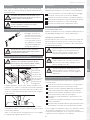
Lifter installation
Mounting of
Lifter on trolley.
No tools required.
The lifter has
two connection
points.
Connect one point first. Push button all the way in, and place
lifter in connection point on trolley. Release button and make sure
it is clearly showing green before connecting the next point.
Make sure both connection point buttons completely return and
clearly show green after installation.
Emergency lowering cord and tube can be adjusted to the correct
length (height) by cutting tube and cord.
Installation
Use this checklist to verify that the hoist is properly installed and
can operate correctly and safely before use.
End stops on rail are installed after mounting of trolley as
described in BM4401
Make sure that the hoist is properly fastened to the rail and
that the lift does not have any loose parts.
Perform one lift with load (60-80 kg)
Make sure battery is fully charged.
How to use Molift Air
General Safety Precautions
Only use accessories and slings that are adjusted to fit the client,
type of disability, size, weight and type of transfer.
Working pause ratio/Duty Cycle.
Molift Air 500 should not be run constantly
for more than 2 minutes (with maximum
load), and rest for minimum 18 minutes. Duty
Cycle 10%. (Intermittence according to standard
ISO-EN 10535)
If maximum load (SWL) differs between hoist
sling bar and body support unit, then the lowest
maximum load shall always be used
Molift lifters shall only be used to lift clients. Never
use the lifter to lift or move objects of any kind.
Before use / Daily check
Inspection to be performed by caregiver daily or before use:
Inspect lifter and rail system has no visible damage, defects
or deformations
Make sure sling bar connection and all detachable parts are
properly connected and secured
Test emergency stop button and emergency lowering
Make sure battery indicator or service light is not illuminated
Make sure lifting strap does not have visible damage or frays.
Test run lifters operation functions and make sure lifter does
not make any abnormal sounds
If there are any faults or defects, the lift needs to be taken out of
operation and marked ”out of order”. No parts on the Molift Air
should be serviced or maintained while in use with a patient.
Do not position hoist in a way
that makes it difficult to disconnect
mains cable. To isolate the system, pull out the
main cable from the elektrical wall socket.
Be carefull during elevated work situations.
We recomend two or more installers, to
prevent loosing balance and injury during
installation!
ENNO DEFR ITES FI SVNLDA

5
Molift Air / www.etac.com
Hand control
The Hand control has 2 buttons for lifting and lowering, or 4 but-
tons if the hoist is equipped with propulsion. The Hand control
has an indicator light that will illuminate when battery level is low
and the lifter requires charging
Do not pull Hand control to move the hoist
along the rail
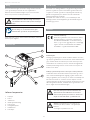
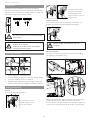
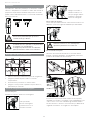
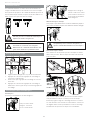
Mounting sling bar
1. Align sling bar in connection point.
2. Push button on locking pin and insert all the way through.
3. Make sure locking pin is properly fastened
4. Push and hold down the button on the locking pin, and pull
to remove locking pin.
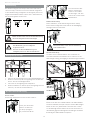
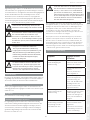
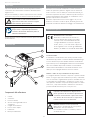
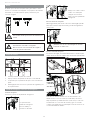
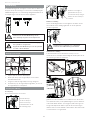
Emergency stop / emergency lowering
Emergency Stop
Activation and reset of emergency stop:
Electrical Emergency Lowering
Pull and hold to start lowering. Hold until client is
lowered and can be released from sling bar.
Only for emergency use when hand control
does not work!
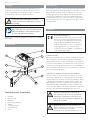
Manual Emergency lowering
Allen key or bit for power drill can be found inside the lifter.
Remove covers on both sides of the hoist to locate.
To open side covers use a screwdriver or power drill on all 8
screws (4 on each side). Turn the red “Brake Release” handle
up. Locate the tools on the other side of the hoist and rotate
counterclockwise to lower lifting belt. Using a power drill is
recommended.
Service is NOT required if:
1) the Air manual emergency down is used for a known reason,
and
2) the belt is undamaged, and
3) the unit is operating normally after the manual emergency
lowering procedure.
The new brake override will contribute to this by making emer-
gency manual lowering less stressful to lift components.
If the unit have had a malfunction with unknown reason, and
manual emergency lowering system has been used, Service is
required.
Pull to activate emer-
gency stop. The button
will come out, and hoist
will stop.
Push with finger or use tube
on cord to push button
back in to reset emergency
stop.
1
2
3 4
The lift will not work if hand control is
connected to a charger.
Disconnect hand control from charger before
operating the lift.

6
Molift Air / www.etac.com
Electronics
Transport and Storage
For long time storage it is recommended that the emergency
stop button is activated (pulled out). The lifter can be stored and
transported under temperatures between -25 - 70 °C.
Operating
The lifter is designed for use at standard room temperatures (+5
to +40°C).
Air Pressure: 70 - 106 kPa
Relative Humidity: 15 - 90 %
Following storage or transport at other temperatures leave the
lifter in a room with a suitable temperature until it reaches a safe
operating temperature.
Molift Air 500 is available with a 24V SLA battery.
The SLA battery has a life expectancy of approx. 500 charge
cycles.
Medical electrical equipment requires special
precautions regarding electromagnetic
compatibility (EMC). Portable or mobile radio
communication equipment may affect the
medical electrical equipment, and should
be kept minimum 25 cm (10 inches) from the
lifters electronics.
Batteries
Battery and service indicator on lifter
Wrench symbol /
Service indicator
Battery symbol /
Battery indicator
The electrical system has a power-save function
which will turn off the electrical system five
minutes after last operation. All indicators will turn off.The system
is activated when pushing one of the operating buttons on the
hand control.
Service indicator / Periodic inspection
The lifters electronics record the weight lifted and number of
lifts. After a certain period of operation a signal is given to
indicate that service is required.
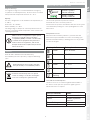
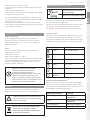
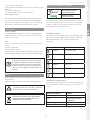
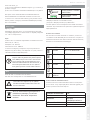
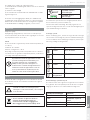
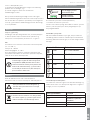
Battery indicator Battery level
Green 80% or more
Green 80 - 60%
Green 60 - 40%
Green 40 - 20%
Yellow 20% - 0%
Yellow
flashing
0%
Battery indicator on hoist
When the multi level battery indicator is yellow the lifter will
have sufficient power available for at least one full lifting cycle
with max load. When battery is flashing yellow it is only possible
to lower the sling bar.
Service indicator Mode
No light No service needed
Yellow Periodic inspection
required
Green flashing Order service
Red Perform service
Batteries must be disposed of as special
waste according to local rules and regula-
tions. Do not dispose in general waste.
ENNO DEFR ITES FI SVNLDA
Recharge battery upon receipt, and then
every six months, to avoid battery failure.

7
Molift Air / www.etac.com
Transfer
Plan the lifting operation in advance to ensure that it is as safe
and smooth as possible. Remember to work ergonomically. Assess
the risks and take notes. The assistant is responsible for the safety
of the user.
Molift Air can be used with both 2-point and 4-point sling bar for
different types of transfers; sitting, recumbent or ambulating.
Using slings
It is important that the sling has been tested with the individual
user and for the intended lifting situation.
Read User Manual for the sling prior to use.
Do not to use damaged or badly worn slings.
Slings made by other manufacturers
We recommend only using Molift slings. Etac shall not be liable
for faults or accidents that can occur when using slings made by
other manufacturers.
Lifting and lowering
When moving the client, stand to the side of the client you are
lifting. Make sure that arms and legs do not obstruct the seat,
bed, etc. Keep eye contact with the client to help them feel safe.
The 4-point sling bar must always be positioned across the client,
to prevent the client from unintentionally sliding out of the sling.
Service scope
Service involves replacing the lifting belt and inspection/
replacement of worn parts. This must be carried out by author-
ized personnel. Service is needed when the service light is red
(calculated 5.000 lifts in weight class 2). Contact Etac your local
dealer, or see etac.com for a recommendation of an approved
service partner.
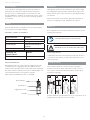
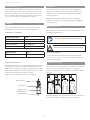
Charging
Hand control charging
The battery charger is plugged into a power outlet. Wall-mounted
docking for hand control is available. Make shure not to damage
the cable. The charger can be connected to the power outlet
at all times. Use only Molift chargers. The Hand control has an
indicator light that will illuminate when battery level is low and
the lifter requires charging.
Charger for Molift Air hand control: Art. no.: 2540100
Hand Control
Battery indicator
Wall Mounted Docking
Charging cable
Molift Air 500 can be charged through the hand control with a
battery charger, or through the rail with In Rail Charging.
Charger indicator Mode
Green flash Not connected to hoist
Yellow Charging
Yellow flash Top of charge
Green Fully charged
Indicator on charger and power supply indicator
Power supply indicator Mode
Blue Connected to power
outlet

8
Molift Air / www.etac.com
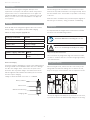
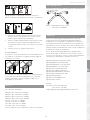
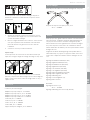
1
32
The sling bar hook design prevents sling to be inadvertently
detached when mounted correct.
1. Check that the sling is correctly fitted around the client
and that the strap loops are correctly fitted to the sling bar
hooks.
2. Stretch the sling straps without lifting the client. Ensure that
all four loops of the sling are securely fastened to avoid the
user slipping or falling.
3. Lift client, and perform transfer.
Angle sensor
The hoist has a directional safety feature that prevents lifting if
angle on lifting strap is to steep.
>30˚
If the hoist doesn’t respond to Hand control “up” button, it
might be because lifting strap angle is to steep, or lifting belt is
twisted and sensor is activated.
ENNO DEFR ITES FI SVNLDA
Sling bars
Molift Air can be used with a 4 or 8 point sling bar.
4-point sling bar, steel
Art. no.: 2140003
Slings
Molift supplies a wide selection of slings for different types of
transfers. The Molift RgoSling sling series is developed to be
combined with a 4-point sling bar but the sling also works with
a 2-point sling bar. See the combination list in the slings user
manual for the correct sling and sling bar combination.
The Molift RgoSling sling series is available in sizes XXS – XXL, in
polyester and polyester mesh. Complete list of slings and sling
bars can be found on etac.com.
Rgosling Mediumback Padded (XS-XXL)
Rgosling Highback Padded (XS-XXL)
Rgosling Mediumback Net (XXS-XXL)
Rgosling Highback Net (XXS-XXL)
Rgosling Toilet Lowback (XXS-XXL)
Rgosling Toilet Highback (XXS-XXL)
Rgosling Ampu Mediumback (XXS-XXL)
Rgosling Ampu Highback (XXS-XXL)
Rgosling Ambulating Vest
Rgosling Comfort Highback (S-L)
RgoSling Fabric Stretcher
Accessories:
Rgosling Extension Loops
Art. no.: 1721600
Rgosling Ambulating Vest Groin strap (XXS-XL)
Accessories
Plug adapter EU, art.no 2510365
Plug adapter UK, art.no 2510366
Plug adapter US, art.no 2510367
Plug adapter AUS, art.no 2510368
Cord EU, art.no 1140105
Cord UK, art.no 1140106
Cord US, art.no 1140104
Cord AUS, art.no 1140107
Wall bracket for charger, art. no. 2610123
Charger cords and plugs.

9
Molift Air / www.etac.com

10
Molift Air / www.etac.com
Cleaning / Disinfection
Clean on a regular basis. Clean surfaces with a damp cloth using
an appropriate pH-neutral detergent. Do not use solvents or
strong liquids, this may damage surfaces on the lifter. For disinfec-
tion when needed; use isopropyl alcohol. Avoid abrasive cleaning
products. Check emergency stop and emergency lowering after
cleaning. The lift should not be exposed to running water.
Make sure not to damage or remove labels
when cleaning.
Reconditioning
Recycling
Spare parts
A list of spare parts is available on request.
Refer to “Recycling instructions” for how to properly dispose of
product. This can be found on www.etac.com.
Follow cleaning and installation procedure, complete periodic
inspection and use checklist after installation to recondition the
lifter.
Periodic inspection scope
If there is any problems with the lifter that
could jeopardize someones safety, the lifter
shall immediately be taken out of service
and marked “out of order”. Do not use the
lifter untill it is repaired. Contact you local
Molift/Etac dealer/distributer to report any
problems.
Periodic inspection is a visual examination (particularly of the
lifter’s load bearing structure and lifting mechanism with
attachments, brakes, controls, safety devices and person-support
devices) according to Periodic Inspection Report for Molift Air
500.
See www.etac.com.
Periodic Inspection shall be performed at least once a year or
more frequently if required by local requirements. The inspection
must be performed by service personnel authorized by Etac.
Contact Etac at molif[email protected] for training and
authorization or recommendation of an approved service partner.
When performing a periodic inspection, the inspector shall fill
out the inspection report for Molift Air. The reports should be
retained by the person(s) responsible for servicing the lifter. If the
inspection reveals defects and damages, the lifter shall be taken
out of operation and marked “out of order” until it is repaired.
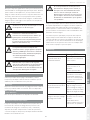
Symptom Possible Cause/Action
The lifter does not respond
to Hand control action
Emergency Stop is activated.
Deactivate by pushing button
back in.
The lifters electronics is
overheated.
Wait for it to cool down.
Hand control is not plugged
in properly. Hand control or
plug or cord can be broken an
should be replaced.
The lifter does not respond
to Hand control up button
Lifting strap angle sensor is
activated. Adjust lifting strap
or move hoist to reduce lifting
strap angle.
When using Electrical
Emergency lowering the
lifting band goes upwards
Lifting band has gone
completely out, and has been
winded the wrong way.
Use manual emergency lower-
ing. Send lifter to service.
Troubleshooting
Caregiver and client is exposed to the follow-
ing materials: Polypropilene and polyester
(slings*), PC/ABS (hand control and hoist
cover), powder coated aluminium, powder
coated zink (sling bars).
* = Applied part
The hoist and hand control have IPX4 protec-
tion class which indicates: >12.5mm protection
against access to hazardous parts, and that
water splashed against the enclosure from any
direction shall have no harmful effects.
In rare cases client or caregiver exposed to
polypropilene and polyester may suffer from
allergic reactions such as skin irritation, mild
itching and skin tenderness.
ENNO DEFR ITES FI SVNLDA

11
Molift Air / www.etac.com
Wichtiger Hinweis
Diese Bedienungsanleitung enthält wichtige Hinweise und
Informationen für den sicheren Gebrauch des Hebetuchs und des
Zubehörs.
In dieser Anleitung ist der Benutzer die Person, die gehoben wird.
Der Pfleger ist die Person, die den Lifter bedient.
Dieses Symbol weist auf wichtige
Sicherheitshinweise hin. Befolgen Sie diese
Anweisungen bitte genau.
Lesen Sie vor dem Gebrauch die
Bedienungsanleitung!
Es ist sehr wichtig, dass Sie vor
Inbetriebnahme des Geräts mit dem Inhalt der
Bedienungsanleitung genau vertraut sind.
Besuchen Sie www.etac.com und vergewissern Sie sich, dass Sie
über die neueste Version der Bedienungsanleitung verfügen.
Molift Air 500
1
2
3
7
8
6
5
4
Bestandteile des Lifts:
1. Laufschlitten
2. Hubeinheit
3. Seitenabdeckungen
4. Notstoppvorrichtung/
Notabsenkvorrichtung
5. Hebegurt
6. Schnellverschlussbolzen
7. Handsteuerung
8. Spreizstange
Über Molift Air
Molift AIR ist ein leistungsfähiger und leichtgängiger Deckenlift,
mit dessen Hilfe Patienten und pflegebedürftige Personen sicher
und komfortabel umgesetzt werden können. Das Gerät eignet
sich für Veränderungen der Sitzposition und seitliches Umsetzen
sowie für Stand- und Gehübungen und ist mit dem umfangre-
ichen Zubehörprogramm von Molift kombinierbar.
Molift AIR verfügt über einen sehr leichten Motor, der zusammen mit
dem Schnellverschlusssystem Montage und Wartung einfach macht
Allgemeines
Konformitätserklärung:
Der in dieser Bedienungsanleitung bes-
chriebene Molift Air samt Zubehörteilen ist
CE-gekennzeichnet gemäß EU-Ratsrichtlinie
93/42/EWG über Medizinprodukte, Klasse 1,
und wurde von einer unabhängigen Stelle in
Übereinstimmung mit den Normen IEC 60601-1,
IEC 60601-1-2 und NS-EN ISO 10535:2006
geprüft und zugelassen.
Bedingungen für die Benutzung
Das Anheben und Umlagern eines Benutzers geht immer mit
gewissen Risiken einher, und die Benutzung des in diesem Handbuch
behandelten Geräts und Zubehörs ist ausschließlich dafür geschultem
Personal gestattet. Das Schienensystem muss von zertifiziertem
Personal unter Einhaltung der einschlägigen Montageanweisungen
montiert werden. Der Lifter ist nicht dafür konzipiert, von dem
Benutzer bedient zu werden, der gehoben wird.
Modifikationen und Verwendung von Komponenten anderer Hersteller.
Wir empfehlen die ausschließliche Verwendung von
Molift-Komponenten und -Ersatzteilen. Wenn am Produkt
Modifikationen vorgenommen werden, erlischt die
Konformitätserklärung und die von Etac auf das Produkt
gegebene Garantie. Für Probleme oder Unfälle, die bei der
Verwendung von Komponenten anderer Hersteller auftreten,
haftet Etac nicht. Die Verwendung von nicht in dieser
Bedienungsanleitung aufgeführtem Zubehör, abnehmbaren
Teilen und Materialien kann unsicher sein.
Nur zertifiziertes Personal darf den Lift
oder das Zubehör öffnen, um Wartung
oder Reparaturen vorzunehmen. Aufgrund
beweglicher und spannungsführender Teile
besteht ein Verletzungsrisiko.
Garantie: Für unsere Produkte gilt eine zweijäh-
rige Garantie auf Material- und Fertigungsfehler.
Es gilt 1 Jahr Garantie für den Akku.
Die Allgemeinen Geschäftsbedingungen finden
Sie unter www.etac.com

12
Molift Air / www.etac.com
Produktkennzeichnung
Produktetikett
Das Produktetikett enthält einen Barcode mit Artikelnummer,
Seriennummer und Herstellungsdatum:
Warnetiketten und Symbole
Die auf dem Produkt verwendeten Symbole haben folgende
Bedeutung:
ENNO DEFR ITES FI SVNLDA
Schutzklasse 2 (schutzisoliert)
Manufacturer
CE-konform
YYYY-MM-DD
Date of manufacture
Lesen Sie die Bedienungsanleitung
Catalogue number
Nur für den Gebrauch in Innenräumen
Serial number
255
560
Maximales Patientengewicht
Medical Device
Nicht im Hausmüll entsorgen
Not-Aus-Schalter/Notabsenkung
Wartungsanzeige
Ladeanzeige
Sechskantschlüsselsymbol für manuelle Notabsenkung
60601-1
Zeichen der Zertifizierungsstelle
Luftfeuchtigkeitsbegrenzung
Luftdruckbegrenzung
Temperaturbegrenzung

13
Molift Air / www.etac.com
CSP
A 3000mm
118,11”
W 246mm
9.68”
L 360mm
14,17”
Min. 760mm
29.92”
H 195mm
7,67”
B Min.
327mm
12,87”
Min.
62mm
2,44”
F Min.
475mm
18,7”
Min.
190mm
7.48”
D 275mm
10.83”
C 29,5mm
1,16” /
72,5mm
2,85”
E 10mm
0,39”
Sichere Traglast (SWL)
Molift AIR 500: 500 kg
Gewicht des Geräts:
Fahrgestell inkl. Akku, ohne Spreizstange:
14,1 kg (31 lbs)
4-Punkt-Spreizstangen 5,3 kg (11.7 lbs)
Akku:
Art.: 2920007 12V Bleiakku 2,9Ah
Akkuladegerät:
Ladegerät für Handsteuerung, Mascot – Typ 3743
Art.-Nr.: 2540100
100-240 V AC, 50-60 Hz max. 0,5 A
Ausgang 0,9 A
Technische Daten
Hubgeschwindigkeit
60 mm/Sekunde
bei 75 kg Belastung
Schutzklasse
Handsteuerung IP24
Hubmotor IP24
Sound pressure
52 dBA
Sound power (L
WA
)
63 dB
Bedienkraft, Taste
Tasten an der Handbedienung: 3,4 N
Material:
Aluminium, Kunststoff, Stahl
Erwartete Lebensdauer:
Der Lift hat eine erwartete Lebensdauer von 30 000 Zyklen
bzw. 10 Jahren.
Abmessungen:
L x B x H (Länge, Breite, Höhe, ohne Laufschlitten)
36 x 24,6 x 19,5 cm
(14,2 x 9,7 x 7,7 Zoll)
A (Hebebereich)
300 cm
B(Mindestabstand zwischen Decke und
Spreizstangenverbindungspunkt) 32,7 cm (12,7/8 Zoll)
Weitere Informationen zu den technischen Daten sowie zu Service und Reparatur finden Sie im technischen Handbuch.

14
Molift Air / www.etac.com
Installation
Der Deckenlifter ist mit dem zulässigen Benutzungsgewicht
(SWL) gekennzeichnet, das nicht die maximale Belastbarkeit des
Schienensystems übersteigen sollte.
Das Schienensystem darf nur von zertifiziertem
Personal und im Einklang mit den einschlägigen
Installationsanweisungen installiert werden.
Nehmen Sie den Lifter erst in Gebrauch,
nachdem Sie nach der Installation die
Checkliste durchgegangen sind.
Installation des Laufschlittens
Einsetzen des Laufschlittens im
Schienensystem. Entfernen Sie
den Endstopper und führen Sie
den Laufschlitten in die Schiene
ein. Bringen Sie den Endstopper
an und vergewissern Sie sich,
dass dieser ordnungsgemäß
befestigt ist. Siehe BM4401 für
Details zur Installation.
Stellen Sie sicher, dass alle Enden des
Schienensystems durch Endstopper gesichert
sind, bevor Sie den Lifter benutzen!
Lifterinstallation
Befestigung des Lifts
auf dem Laufschlitten.
Keine Werkzeuge
erforderlich. Der Lift
verfügt über zwei
Aufhängungspunkte.
Befestigen Sie zunächst den ersten Punkt. Drücken Sie den Knopf
bis zum Anschlag ein, und platzieren Sie dann den Lift in den
Verbindungspunkt des Laufschlittens. Lassen Sie den Knopf los
und vergewissern Sie sich, dass die grüne Markierung klar zu
erkennen ist, bevor Sie den nächsten Punkt befestigen.
Vergewissern Sie sich, dass beide Verbindungspunktknöpfe
vollständig in die Ausgangsposition zurückschnappen und nach der
Installation die grüne Markierung bei beiden klar zu erkennen ist.
Notabsenkungsschnur und -rohr können durch Zuschneiden an
die korrekte Länge bzw. Höhe angepasst werden.
Installation
Verifizieren Sie vor der Inbetriebnahme mit Hilfe dieser Checkliste,
dass der Lift ordnungsgemäß installiert ist und vorschriftsmäßig
und sicher benutzt werden kann.
Endstopper werden nach Installation des Hebeschlittens
montiert wie in BM4401 beschrieben
Stellen Sie sicher, dass die Hubeinheit korrekt mit der Schiene
verbunden ist und der Lift keine losen Teile aufweist.
Führen Sie einen Hebevorgang mit einem Gewicht durch
(60–80 kg)
Stellen Sie sicher, dass der Akku voll geladen ist.
Bedienung des Molift Air
Allgemeine Sicherheitshinweise
Benutzen Sie nur Zubehör und Hebetücher, die dem Benutzer,
der Art seiner Behinderung, seiner Größe und seinem Gewicht
und der Art der Umsetzung angepasst sind.
Verhältnis Betriebszeit zu Pausen/Arbeitszyklus.
Molift Air 500 sollte nicht dauerhaft länger als 2 Minuten
am Stück betrieben werden (unter maximaler Belastung) und
dann mindestens 18 Minuten pausieren. Arbeitszyklus 10 %.
(Pausenzeit gemäß ISO-EN 10535)
Falls sich die zulässige maximale Arbeitsbelastung
(SWL) der Spreizstange der Hubeinheit und des
Trageteils unterscheidet, so ist stets der niedrigere
Wert ausschlaggebend
Lifter von Molift dürfen ausschließlich zum Heben
von Benutzern verwendet werden. Setzen Sie
den Lifter niemals zum Heben oder Bewegen von
Objekten aller Art ein.
Vor Gebrauch / Tägliche Prüfung
Die folgenden Prüfmaßnahmen sind vom Pfleger täglich bzw. vor
Benutzung durchzuführen:
Inspektion des Lifters und des Schienensystems auf sichtbare
Schäden, Defekte oder Verformungen
Vergewissern Sie sich, dass die Spreizstangenverbindung
und alle abnehmbaren Teile ordnungsgemäß verbunden und
gesichert sind
Test des Not-Aus-Schalters und der Notabsenkung
Vergewissern Sie sich, dass die Ladeanzeige oder die
Wartungsanzeige nicht leuchtet
Stellen Sie sicher, dass die Hebegurte keine sichtbaren
Schäden oder Ausfransungen aufweisen.
Testen Sie die operativen Funktionen des Lifters mithilfe
eines Probelaufs und stellen Sie sicher, dass der Lifter keine
ungewöhnlichen Geräusche macht
Bei Störungen oder Defekten ist der Lifter umgehend außer
Betrieb zu setzen und entsprechend zu kennzeichnen („außer
Betrieb“). Keine Teile des Molift Air dürfen während des
Gebrauchs am Patienten gewartet werden.
Positionieren Sie die Hubeinheit nicht so,
dass das Herausziehen des Netzkabelsteckers
erschwert wird. Ziehen Sie zum Isolieren des
Systems das Hauptkabel aus der Steckdose.
Seien Sie bei erhöhten Arbeitssituationen vor-
sichtig. Wir empfehlen zwei oder mehr Monteure,
um Gleichgewichtsverlust und Verletzungen
während der Installation zu vermeiden!
ENNO DEFR ITES FI SVNLDA

15
Molift Air / www.etac.com
Handsteuerung
Die Handsteuerung hat zwei Knöpfe zum Heben und Senken,
oder vier Knöpfe, wenn der Lift mit einem Antrieb ausgestattet
ist. Die Handsteuerung verfügt über ein Anzeigelicht, das bei nie-
drigem Ladezustand des Akkus leuchtet und so darauf hinweist,
dass der Akku geladen werden muss
Ziehen Sie den Lifter nicht an der Handsteuerung,
um ihn entlang der Schiene zu bewegen
Montage der Spreizstange
1. Führen Sie die Spreizstange korrekt in den Verbindungspunkt ein.
2. Drücken Sie den Knopf des Verriegelungsstifts ein und schie-
ben Sie den Stift vollständig hindurch.
3. Festen Sitz des Verriegelungsstifts überprüfen
4. Drücken und halten Sie den Knopf am Verriegelungsstift und
ziehen Sie, um den Stift herauszunehmen.
Not-Aus-Schalter/Notabsenkung
Not-Aus-Schalter
Aktivierung und Zurücksetzen des Not-Aus-Schalters:
Ziehen, um die Not-Aus-
Funktion zu aktivieren.
Der Knopf springt her-
aus, und der Lift hält an.
Sie können die Not-Aus-
Funktion zurücksetzen,
indem Sie den Schalter
mit dem Finger oder dem
Rohr auf der Schnur wieder
zurückdrücken.
Elektrische Notabsenkung
Ziehen und halten, um die Absenkung einzuleiten. Halten,
bis der Benutzer abgesenkt wurde und aus der Aufhängung
herausgenommen werden kann.
Nur für Notfälle, wenn die Handsteuerung
nicht funktioniert!
Manuelle Notabsenkung
Sie finden einen Sechskantschlüssel oder ein Bitstück für
einen Akkuschrauber innerhalb des Lifters. Entfernen Sie die
Abdeckung beidseitig, um Zugang zu den Werkzeugen zu haben.
Öffnen Sie mit Hilfe eines Schraubendrehers oder Akkuschraubers
an allen 8 Schrauben (4 auf jeder Seite) die seitlichen Abdeckungen.
Drehen Sie den roten „Brake Release“-Griff nach oben. Suchen
Sie die Werkzeuge auf der anderen Seite des Lifts und senken Sie
durch Drehen gegen den Uhrzeigersinn den Hebegurt. Es wird die
Benutzung eines Akkuschraubers empfohlen.
1
2
3 4
Der Lifter funktioniert nicht, wenn die
Handbedienung an ein Ladegerät
angeschlossen ist.
Trennen Sie die Handbedienung vom
Ladegerät, bevor Sie den Lifter bedienen.

16
Molift Air / www.etac.com
Steuerelektronik
Transport und Lagerung
Für die langfristige Lagerung wird empfohlen, den Not-
Aus-Knopf zu aktivieren (herausziehen). Der Lifter kann bei
Umgebungstemperaturen von - 25 bis + 70 °C gelagert und
transportiert werden.
Betrieb
Der Lifter ist auf die Benutzung bei Zimmertemperaturen
ausgelegt (+ 5 bis + 40 °C).
Luftdruck: 70 - 106 kPa
Relative Luftfeuchtigkeit: 15 - 90 %
Nach einer Lagerung oder einem Transport unter abweichenden
Temperaturbedingungen muss der Lifter in einem Raum mit
geeigneter Temperatur gelagert werden, bis er eine sichere
Betriebstemperatur erreicht hat.
Der Molift Air 500 ist mit einem 24-V-Bleiakku erhältlich.
Der Bleiakku hat eine Lebensdauer von ca. 500Ladezyklen.
Medizinische Elektrogeräte bedürfen
spezieller Sicherheitsmaßnahmen
in Bezug auf elektromagnetische
Kompatibilität (EMK). Tragbare oder mobile
Funkkommunikationsgeräte können die
Funktion medizinischer Elektrogeräte beein-
trächtigen und sollten stets mindestens 25 cm
Abstand zur Lifter-Elektronik haben.
Batterien
Lade- und Wartungsanzeige am Lifter
Schraubenschlüsselsymbol/
Serviceanzeige
Batteriesymbol/Ladeanzeige
Das elektrische System verfügt über eine Stromsparfunktion,
durch die das elektrische System fünf
Minuten nach dem letzten Betrieb abschaltet. Dann erlöschen
alle Anzeigen. Das System kann reaktiviert werden durch
Betätigung einer der Betriebstasten auf der Handsteuerung.
Wartungsanzeige/Regelmäßige Wartung
Die Elektronik des Lifters registriert, wie viele Hebevorgänge
mit welcher Gewichtsbelastung durchgeführt wurden. Nach
einer bestimmten Gebrauchsdauer leuchtet die LED auf, um die
Notwendigkeit einer Wartung anzuzeigen.
Ladeanzeige Akkuladestand
Grün 80% oder mehr
Grün 80 - 60 %
Grün 60 - 40 %
Grün 40 - 20 %
Gelb 20 - 0 %
Gelbes
Blinken
0 %
Ladeanzeige am Lifter
Wenn die mehrstufige Akkuanzeige gelb aufleuchtet, hat der
Lifter nochausreichend Energie für mindestens einen vollen
Hebezyklus mit maximaler Last. Wenn die Batterieanzeige gelb
aufblinkt, kann die Spreizstange nur noch abgesenkt werden.
Wartungsanzeige Zustand
Kein Licht Keine Wartung
erforderlich
Gelb Regelmäßige Inspektion
erforderlich
Grün blinkend Wartung anfordern
Rot Wartung durchführen
Akkus müssen als Sondermüll entspre-
chend den einschlägigen lokalen
Bestimmungen entsorgt werden. Nicht
im Hausmüll entsorgen.
ENNO DEFR ITES FI SVNLDA
Laden Sie den Akku nach Erhalt und danach
alle sechs Monate auf, um einen Ausfall des
Akkus zu vermeiden.
Wartung ist NICHT erforderlich, wenn:
1) der Grund für die manuelle Notfallabsenkung des Molift Air
bekannt ist,
2) der Gurt unbeschädigt ist, und
3) das Gerät nach der manuellen Notabsenkung normal funktion-
iert und betrieben werden kann.
Die neue Bremsüberbrückung trägt dazu bei, indem sie die mit
der manuellen Notabsenkung einhergehende Beanspruchung der
Lifterkomponenten reduziert.
Wenn die Einheit eine Fehlfunktion mit unbekannter Ursache
hatte und das manuelle Notabsenkungssystem verwendet wurde,
ist eine Wartung erforderlich.

17
Molift Air / www.etac.com
Transfer
Planen Sie den Hebetransfer im Voraus, um sicherzustellen, dass
alles so sicher und störungsfrei wie nur möglich abläuft. Denken
Sie an eine ergonomische Arbeitsweise. Bewerten Sie die Risiken
und machen Sie entsprechende Notizen. Der Helfer ist für die
Sicherheit des Benutzers verantwortlich.
Molift Air kann sowohl mit einer 2-Punkt- als auch mit einer
4-Punkt-Spreizstange für verschiedene Arten des Umsetzens
benutzt werden; sitzend, liegend oder gehend.
Benutzung von Hebetüchern
Es ist wichtig, dass das Hebetuch mit jedem einzelnen Benutzer
und für jede Hebesituation individuell getestet wird.
Vor dem Gebrauch des Hebetuchs die
Bedienungsanleitung lesen.
Keine beschädigten oder stark abgenutzten
Hebetücher verwenden.
Hebetücher anderer Hersteller
Benutzen Sie nach Möglichkeit nur Hebetücher von Molift. Für
Probleme oder Unfälle, die bei Verwendung der Hebetücher
anderer Hersteller auftreten, haftet Etac nicht.
Heben und Senken
Wenn Sie den Benutzer bewegen, stellen Sie sich beim Anheben
neben die Person. Sorgen Sie dafür, dass Arme und Beine
nicht eingeklemmt werden (Bett, Stuhl usw.). Versuchen Sie,
Augenkontakt zu halten, denn dadurch fühlt sich der Benutzer
gut aufgehoben.
Die 4-Punkt-Spreizstange muss immer horizontal zum Benutzer
ausgerichtet sein, um zu verhindern, dass dieser aus dem
Hebetuch rutscht.
Wartungsumfang
Bei der Wartung wird der Hebegurt ausgetauscht und abge-
nutzte Teile werden inspiziert bzw. ersetzt. Dies darf nur durch
befugtes Personal erfolgen. Die Wartung ist vorgeschrieben,
wenn die Wartungsanzeige rot leuchtet (5 000 Hebevorgänge in
Gewichtsklasse 2). Kontaktieren Sie Ihren lokalen Etac-Händler
oder besuchen Sie etac.com, um einen autorisierten Service-
Partner zu erfragen.
Laden
Laden mit der Handsteuerung
Das Akkuladegerät wird mit einer Steckdose verbunden.
Wandmontiertes Andocken ist für die Handsteuerung verfügbar.
Seien Sie vorsichtig, damit Sie das Kabel nicht beschädigen. Das
Ladegerät kann dauerhaft an eine Steckdose angeschlossen sein.
Verwenden Sie nur Molift-Ladegeräte. Die Handsteuerung verfügt
über ein Anzeigelicht, das bei niedrigem Ladezustand des Akkus
leuchtet und so darauf hinweist,dass der Akku geladen werden muss.
Ladegerät für Handsteuerung Molift Air: Art.-Nr.: 2540100
Handsteuerung
Ladeanzeige
Wandmontiertes
Dockingsystem
Ladekabel
Molift Air 500 kann über die Handsteuerung mit einem
Akku-Ladegerät aufgeladen werden oder über die Schiene per
Schienenladung (IRC).
Ladeanzeige Zustand
Grün blinkend Nicht an Hubeinheit
angeschlossen
Gelb Laden
Gelb blinkend Erhaltungsladung
Grün Vollständig geladen
Anzeige am Ladegerät und Anzeige der Stromversorgung
Stromversorgungsanzeige Zustand
Blau An Steckdose
angeschlosen
Sidan laddas...
Sidan laddas...
Sidan laddas...
Sidan laddas...
Sidan laddas...
Sidan laddas...
Sidan laddas...
Sidan laddas...
Sidan laddas...
Sidan laddas...
Sidan laddas...
Sidan laddas...
Sidan laddas...
Sidan laddas...
Sidan laddas...
Sidan laddas...
Sidan laddas...
Sidan laddas...
Sidan laddas...
Sidan laddas...
Sidan laddas...
Sidan laddas...
Sidan laddas...
Sidan laddas...
Sidan laddas...
Sidan laddas...
Sidan laddas...
Sidan laddas...
Sidan laddas...
Sidan laddas...
Sidan laddas...
Sidan laddas...
Sidan laddas...
Sidan laddas...
Sidan laddas...
Sidan laddas...
Sidan laddas...
Sidan laddas...
Sidan laddas...
Sidan laddas...
Sidan laddas...
Sidan laddas...
Sidan laddas...
Sidan laddas...
Sidan laddas...
Sidan laddas...
Sidan laddas...
Sidan laddas...
Sidan laddas...
Sidan laddas...
Sidan laddas...
Sidan laddas...
Sidan laddas...
Sidan laddas...
Sidan laddas...
Sidan laddas...
Sidan laddas...
Sidan laddas...
Sidan laddas...
Sidan laddas...
Sidan laddas...
Sidan laddas...
Sidan laddas...
Sidan laddas...
Sidan laddas...
Sidan laddas...
Sidan laddas...
Sidan laddas...
Sidan laddas...
Sidan laddas...
Sidan laddas...
Sidan laddas...
Sidan laddas...
Sidan laddas...
Sidan laddas...
Sidan laddas...
Sidan laddas...
Sidan laddas...
Sidan laddas...
Sidan laddas...
Sidan laddas...
Sidan laddas...
Sidan laddas...
Sidan laddas...
-
 1
1
-
 2
2
-
 3
3
-
 4
4
-
 5
5
-
 6
6
-
 7
7
-
 8
8
-
 9
9
-
 10
10
-
 11
11
-
 12
12
-
 13
13
-
 14
14
-
 15
15
-
 16
16
-
 17
17
-
 18
18
-
 19
19
-
 20
20
-
 21
21
-
 22
22
-
 23
23
-
 24
24
-
 25
25
-
 26
26
-
 27
27
-
 28
28
-
 29
29
-
 30
30
-
 31
31
-
 32
32
-
 33
33
-
 34
34
-
 35
35
-
 36
36
-
 37
37
-
 38
38
-
 39
39
-
 40
40
-
 41
41
-
 42
42
-
 43
43
-
 44
44
-
 45
45
-
 46
46
-
 47
47
-
 48
48
-
 49
49
-
 50
50
-
 51
51
-
 52
52
-
 53
53
-
 54
54
-
 55
55
-
 56
56
-
 57
57
-
 58
58
-
 59
59
-
 60
60
-
 61
61
-
 62
62
-
 63
63
-
 64
64
-
 65
65
-
 66
66
-
 67
67
-
 68
68
-
 69
69
-
 70
70
-
 71
71
-
 72
72
-
 73
73
-
 74
74
-
 75
75
-
 76
76
-
 77
77
-
 78
78
-
 79
79
-
 80
80
-
 81
81
-
 82
82
-
 83
83
-
 84
84
-
 85
85
-
 86
86
-
 87
87
-
 88
88
-
 89
89
-
 90
90
-
 91
91
-
 92
92
-
 93
93
-
 94
94
-
 95
95
-
 96
96
-
 97
97
-
 98
98
-
 99
99
-
 100
100
-
 101
101
-
 102
102
-
 103
103
-
 104
104


på andra språk
- italiano: Molift Air 500 Manuale utente
- español: Molift Air 500 Manual de usuario
- Deutsch: Molift Air 500 Benutzerhandbuch
- français: Molift Air 500 Manuel utilisateur
- English: Molift Air 500 User manual
- dansk: Molift Air 500 Brugermanual
- suomi: Molift Air 500 Ohjekirja
- Nederlands: Molift Air 500 Handleiding
Relaterade papper
-
 Molift Air 350 Användarmanual
-
 Molift Air 500 Användarmanual
-
 Molift Mover 180 Användarmanual
-
 Molift Mover 300 Användarmanual
-
Molift Smart 150 Användarmanual
-
 Molift RgoSling Active Användarmanual
-
 Molift Air Tilt Användarmanual
-
 Molift RgoSling Groin Straps Användarmanual
-
 Molift EvoSling LowBack Net Padded Användarmanual
-
Molift EvoSling Shadow HighBack Användarmanual


Andra dokument
-
 Etac Air 500 Användarmanual
-
 Etac Molift Q13234 Bruksanvisningar
-
Invacare Robin Användarmanual
-
-
-
-
Human Care 25064 Comfort Sling Soft Användarmanual
-
-
Ferm LHM1008 - KT750 Bruksanvisning
-
 Meganex MEG135 Användarmanual


