Philips 5000 SERIE QC5580/32 Bruksanvisning
- Kategori
- Hårtrimmare
- Typ
- Bruksanvisning

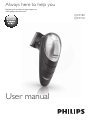
Always here to help you
User manual
Register your product and get support at
www.philips.com/welcome
QC5580
QC5570


1


6
Introduction
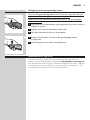
Congratulations on your purchase and welcome to Philips! To fully
benet from the support that Philips offers, register your product at
www.philips.com/welcome.
Your new Philips hair clipper with new ergonomic design and 180°
adjustable cutting element allows you to clip your own hair easily. You can
move the clipper over all areas of your head as easily as running your
ngers through your hair. To enjoy using the hair clipper, we advise you to
read the following information.
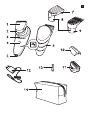
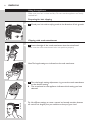
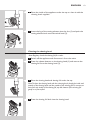
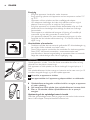
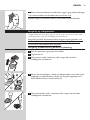
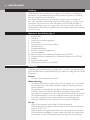
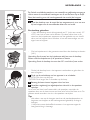
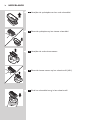
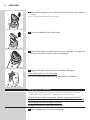
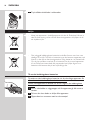
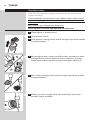
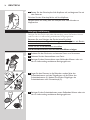
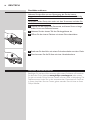
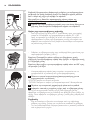
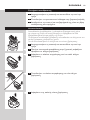
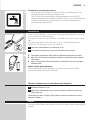
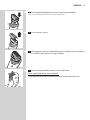
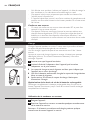
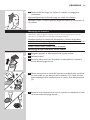
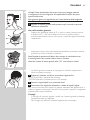
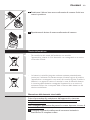
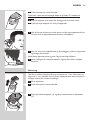
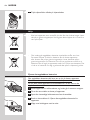
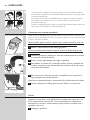
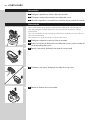
General description (Fig. 1)
1 Cutting element
2 Swivel head
3 Length setting adjustment ring
4 On/off button
5 Socket for small plug
6 Charging lights
7 Regular comb attachment
8 Length setting indicator
9 Precision comb attachment
10 Protection cap of shaving head (only QC5580)
11 Shaving head with retaining frame and shaving foil (only QC5580)
12 Adapter
13 Cleaning brush
14 Storage pouch (only QC5580)
Important
Read this user manual carefully before you use the appliance and save it for
future reference.
Danger
- Make sure the adapter does not get wet.
Warning
- The adapter contains a transformer. Do not cut off the adapter to
replace it with another plug, as this causes a hazardous situation.
- This appliance is not intended for use by persons (including children)
with reduced physical, sensory or mental capabilities, or lack of
experience and knowledge, unless they have been given supervision or
instruction concerning use of the appliance by a person responsible for
their safety.
- Keep the appliance and its cord out of the reach of children.
Caution
- Do not use the appliance in the bath or in the shower.
- Use, charge and store the appliance at a temperature between 5°C
and 35°C.
- Only use the adapter supplied to charge the appliance.
- If the adapter is damaged, always have it replaced with one of the
original type in order to avoid a hazard.
- Do not use the appliance when the shaving head, the cutting element
or one of the comb attachments is damaged or broken, as this may
cause injury.
ENGLISH

- This appliance is only intended for clipping human scalp hair. Do not
use it for any other purpose.
- If the appliance is subjected to a major change in temperature, pressure
or humidity, let the appliance acclimatise for 30 minutes before you use
it.
Compliance with standards
- The appliance complies with the internationally approved IEC safety
regulations and can be safely cleaned under the tap.
- This Philips appliance complies with all standards regarding
electromagnetic elds (EMF). If handled properly and according to the
instructions in this user manual, the appliance is safe to use based on
scientic evidence available today.
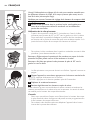
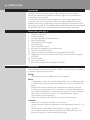
Charging
Charge the appliance for at least 1 hour before you use it for the rst time
or after a long period of non-use.
When the appliance is fully charged, it has a cordless clipping time of up to
1 hour.
When the charging light ashes orange, the battery is running low (approx.
10 minutes of operating time left) and you need to charge the appliance.
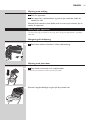
1 Make sure the appliance is switched off.
2 Insert the appliance plug into the appliance and insert the adapter
into the wall socket.
, The charging light starts to ash white to indicate that the appliance
is charging.
, When the battery is fully charged, the charging light lights up white
continuously.
, After approx. 30 minutes the charging light goes out to save energy.
Optimising the lifetime of the rechargeable battery
Discharge the rechargeable battery completely twice a year by letting the
motor run until it stops. Then fully recharge the battery.
Corded clipping
1 Switch off the appliance.
2 Connect the appliance to the mains and wait a few seconds before
you switch it on.
Note: If the battery is completely empty, wait a few minutes before you switch
on the appliance.
ENGLISH 7

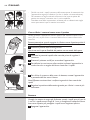
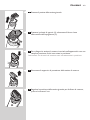
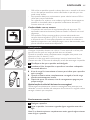
Using the appliance
Make sure your hair is clean and dry. Do not use the appliance on freshly
washed hair.
Preparing for hair clipping
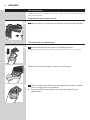
1 Comb your hair with a styling comb in the direction of hair growth.
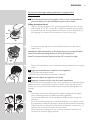
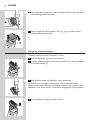
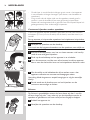
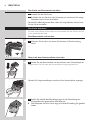
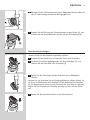
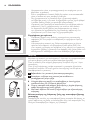
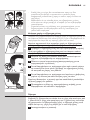
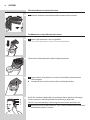
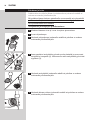
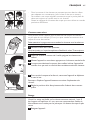
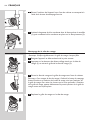
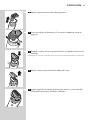
Clipping with comb attachment
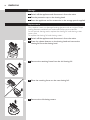
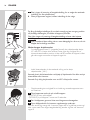
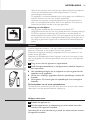
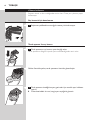
1 Insert the edge of the comb attachment into the swivel head.
Make sure the comb attachment locks into position properly
Note: The length settings are indicated on the comb attachment.
2 Turn the length setting adjustment ring to set the comb attachment
to the desired setting.
, The arrowhead on the appliance indicates which setting you have
selected.
Tip: Use different settings to create a natural and smooth transition between
the various hair lengths from your neckline to the top of your head.
–
3 m
m
–
5
–
7
–
9
–
11
– 15
– 5
– 7
– 9
– 11
– 15
ENGLISH8

Do not turn the length setting adjustment ring beyond the
highest setting.
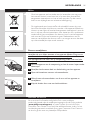
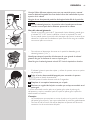
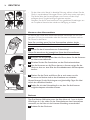
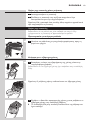
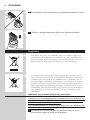
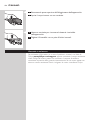
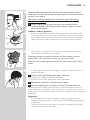
3 Turn the swivel head to the position that is most comfortable for
your arm when you clip the different parts of your head.
Using the swivel head
- From its starting position of 0° (pointing forwards), you can turn the
swivel head 45° or 90° to the left or right. This enables you to adjust
the position of the cutting element to the part of your head that you
are clipping. This makes it much easier to clip your own hair.
- To set the cutting element to the desired position, turn the swivel
head (‘click’).
Note: Always adjust the position of the cutting element by turning the swivel
head. Do not turn the cutting element or the comb attachment.
Note: Do not turn the swivel head more than 90° to the left or right.
- The swivel head allows you to hold and use the appliance like a styling
comb.
4 Press the on/off button to switch on the appliance.
QC5570: Press the button briey.
QC5580: Press the button more than 2 seconds.
5 Move the clipper through the hair slowly.
6 Regularly remove cut hair from the comb attachment.
If a lot of hair has accumulated in the comb attachment, remove the comb
attachment from the appliance and blow and/or shake the hair out of it.
When you remove the comb attachment, the selected setting does not
change.
Tips
- We advise you to start clipping at the highest setting of the regular
comb attachment and to reduce the setting gradually.
- To clip most effectively, move the appliance against the hair growth
direction.
- Since all hair does not grow in the same direction, you need to move
the appliance in different directions (upwards, downwards and across).
- Make sure that the at part of the comb attachment is always fully in
contact with the scalp to obtain an even result
- Write down the settings you use to create a certain hairstyle as a
reminder for future clipping sessions.
–
3 m
m
–
5
–
7
ENGLISH 9

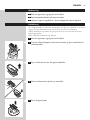
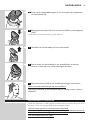
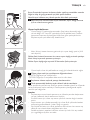
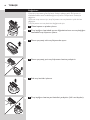
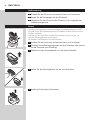
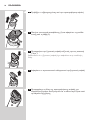
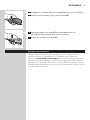
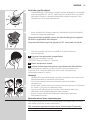
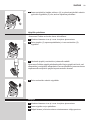
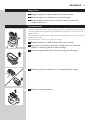
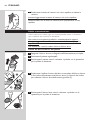
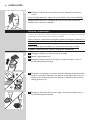
Contouring without comb attachment
You can use the appliance without comb attachment to clip your hair very
close to the skin (0,5mm) or to contour the neckline and the area around
the ears.
Be careful when you clip without comb attachment because the cutting
element removes every hair it touches.
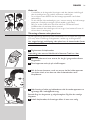
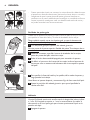
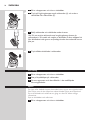
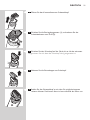
1 Pull the comb attachment off the swivel head.
Never pull at the exible top of the comb attachment. Always pull at the
bottom part.
2 Comb the hair ends over the ears before you start to contour the
hairline.
3 Press the on/off button to switch on the appliance.
4 When you shape the contours around the ears, tilt the appliance in
such a way that only one edge of the cutting element touches the
hair ends.
5 To contour the neckline and the sideburns, turn the appliance and
make downward strokes.
Note: Move the appliance slowly and smoothly. Just follow the natural hairline.
6 Adjust the position of the swivel head to make contouring easier.
– 5
– 7
– 9
– 11
– 15
ENGLISH10

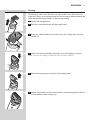
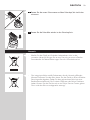
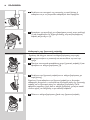
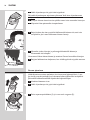
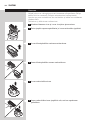
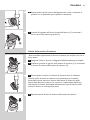
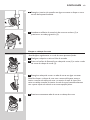
Shaving
Tip: Shaving is easier when the hairs are shorter than 1mm. If the hairs are
longer than 1mm, we recommend that you use the cutting element without the
comb attachment to pre-cut hairs to the shortest setting.
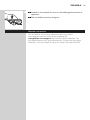
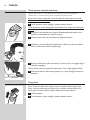
1 Switch off the appliance.
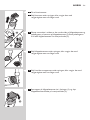
2 Pull the comb attachment off the swivel head.
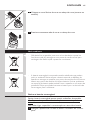
3 Press the release buttons (1) and remove the cutting unit from the
handle (2).
4 Attach the shaving head by pressing it onto the appliance (‘click’).
Make sure that the shaving head locks into position properly.
5 Remove the protection cap from the shaving head.
6 Adjust the position of the swivel head to make shaving easier. You can
do this before and/or during use.
–
3 m
m
–
5
–
7
–
9
–
11
– 15
ENGLISH 11

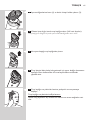
7 Place the shaving head on your scalp and start shaving.
Press the shaving head onto your scalp lightly.
Note: Make sure that the shaving foil is always in full contact with your scalp.
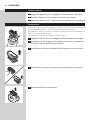
Cleaning and maintenance
Clean the appliance every time you have used it by rinsing it under the tap
or with the cleaning brush supplied.
Never use compressed air, scouring pads, abrasive cleaning agents or
aggressive liquids such as petrol, acetone or ethereal oils to clean the
appliance.
Be careful that the cutting element does not fall on the oor.
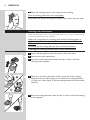
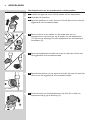
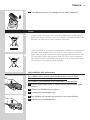
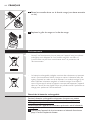
Cleaning the cutting element and comb attachments
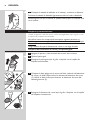
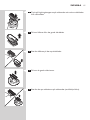
1 Switch off the appliance and disconnect it from the mains.
2 Remove the comb attachment.
3 Rinse the comb attachment under the tap or clean it with the
cleaning brush supplied.
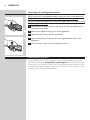
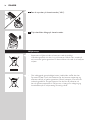
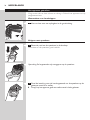
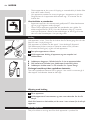
4 Place your thumb in the center of the round side of the cutting
element and your index nger on the teeth of the cutting element
(1). Use your index nger to lift the cutting element from the swivel
head (2).
5 Rinse the cutting element under the tap or clean it with the cleaning
brush supplied.
–
3 m
m
–
5
–
7
–
9
–
11
– 15
ENGLISH12

6 Rinse the inside of the appliance under the tap or clean it with the
cleaning brush supplied.
7 Insert the lug of the cutting element into the slot (1) and push the
cutting element back onto the swivel head (2).
Cleaning the shaving head
Note: Regulary check the shaving foil for cracks.
1 Switch off the appliance and disconnect it from the mains.
2 Press the release buttons on the shaving head (1) and remove the
shaving foil from the shaving head (2).
3 Rinse the shaving head and shaving foil under the tap.
Note: To clean the shaving head with the cleaning brush, brush the inside and
outside of the shaving head and the outside of the shaving foil. To remove cut
hairs from the inside of the shaving foil, tap the bottom of the shaving foil
gently on a at surface.
4 Press the shaving foil back into the shaving head.
ENGLISH 13

Storage
1 Switch off the appliance and disconnect it from the mains.
2 Put the protection cap on the shaving head.
3 Store the appliance and its accessories in the storage pouch supplied.
Replacement
Only replace a worn or damaged cutting element with an original Philips
cutting element, available from authorised Philips service centres.
For an optimal shaving result, replace the shaving foil and shaving cutter
once a year.
To replace the shaving foil and shaving cutter:
1 Switch off the appliance and disconnect it from the mains.
2 Press the release buttons on the shaving head and remove the
shaving foil from the shaving head.
3 Remove the retaining frame from the old shaving foil.
4 Place the retaining frame on the new shaving foil.
5 Remove the old shaving cutters.
ENGLISH14

6 Place the new cutters on the shaving head (‘click’).
7 Press the shaving foil back into the shaving head.
Environment
- Do not throw away the appliance with the normal household waste
at the end of its life, but hand it in at an ofcial collection point for
recycling. By doing this, you help to preserve the environment.
- The built-in rechargeable battery contains substances that may pollute
the environment. Always remove the battery before you discard and
hand in the appliance at an ofcial collection point. Dispose of the
battery at an ofcial collection point for batteries. If you have trouble
removing the battery, you can also take the appliance to a Philips
service centre. The staff of this centre will remove the battery for you
and will dispose of them in an environmentally safe way.
ENGLISH 15

Removing the rechargeable battery
Only remove the rechargeable battery when you discard the appliance.
Make sure the battery is completely empty when you remove it.
Do not connect the appliance to the mains again after you have removed
the rechargeable battery.
1 Disconnect the appliance from the mains and let the appliance run
until the motor stops.
2 Remove the upper housing part of the appliance.
3 Open the inner body with a screwdriver.
4 Use a screwdriver to remove the rechargeable battery from the
appliance.
5 Cut the wires with a pair of household scissors.
Guarantee and service
If you need service or information or if you have a problem, please visit
the Philips website at www.philips.com/support or contact the Philips
Consumer Care Centre in your country. You nd its phone number in the
worldwide guarantee leaet. If there is no Consumer Care Centre in your
country, go to your local Philips dealer.
ENGLISH16

17
Introduktion
Tillykke med dit køb og velkommen til Philips! For at få fuldt udbytte
af den support, Philips tilbyder, skal du registrere dit produkt på
www.philips.com/welcome.
Med din nye Philips hårklipper i nyt ergonomisk design og med en 180°
justérbar skærenhed kan du nemt klippe dit eget hår. Hårklipperen er lige
så nem at føre gennem håret som ngrene. For at få det fulde udbytte af
hårklipperen anbefaler vi, at du læser følgende oplysninger.
1 Skærenhed
2 Drejehoved
3 Ring til justering af længdeindstilling
4 On/off-knap
5 Lille strømstik
6 Opladeindikatorer
7 Almindelig kam til påsætning
8 Indikator for længdeindstilling
9 Præcisionskam til påsætning
10 Beskyttelsesdæksel til shaverhoved (kun QC5580)
11 Shaverhoved med samleramme og skærfolie (kun QC5580)
12 Adapter
13 Rensebørste
14 Opbevaringsetui (kun QC5580)
Vigtigt
Læs denne brugsvejledning omhyggeligt igennem, inden apparatet tages i
brug, og gem den til eventuelt senere brug.
Fare
- Sørg for, at adapteren ikke bliver våd.
Advarsel
- Adapteren indeholder en transformer. Adapteren må ikke klippes af og
udskiftes med et andet stik, da dette vil forårsage en farlig situation.
- Dette apparat er ikke beregnet til at blive brugt af personer (herunder
børn) med nedsatte fysiske og mentale evner, nedsat følesans eller
manglende erfaring og viden, medmindre de er blevet vejledt eller
instrueret i apparatets anvendelse af en person, der er ansvarlig for
deres sikkerhed.
- Hold apparatet og ledningen uden for børns rækkevidde.
DANSK

Forsigtig
- Brug ikke apparatet i badet eller under bruseren.
- Brug, oplad og opbevar altid apparatet ved en temperatur mellem 5°C
og 35°C.
- Apparatet må kun oplades med den medfølgende adapter.
- Hvis adapteren beskadiges, skal den altid udskiftes med en original
adapter af samme type for at undgå en farlig situation.
- Brug ikke apparatet, hvis shaverhovedet, skærenheden eller en af de
påsatte kamme er beskadiget eller ødelagt, da dette kan forårsage
personskade.
- Dette apparat er udelukkende beregnet til klipning af hovedhår på
mennesker og bør aldrig anvendes til andre formål.
- Hvis apparatet udsættes for store temperatursvingninger, tryk eller
fugtighed, skal du lade det akklimatisere sig i 30 minutter, inden det
tages i brug.
Overholdelse af standarder
- Produktet opfylder de internationalt godkendte IEC-sikkerhedsregler og
kan skylles under rindende vand uden risiko.
- Dette Philips-apparat overholder alle standarder for elektromagnetiske
felter (EMF). Ved korrekt anvendelse i overensstemmelse med
instruktionerne i denne brugsvejleding, er apparatet sikkert at anvende,
ifølge den videnskabelige viden, der er tilgængelig i dag.
Opladning
Oplad apparatet i mindst 1 time før første anvendelse eller efter en lang
periode, hvor det ikke er blevet brugt.
Når apparatet er fuldt opladet, har det en ledningsfri brugstid på op til 1
time.
Når opladeindikatoren blinker orange, er batteriet ved at være tomt (ca. 10
minutters brugstid tilbage), og du skal oplade apparatet.
1 Kontroller, at apparatet er slukket.
2 Sæt apparatstikket ind i apparatet og adapterstikket i en stikkontakt.
, Opladeindikatoren begynder at blinke hvidt for at angive, at apparatet
er under opladning.
, Når batteriet er fuldt opladet, lyser opladeindikatoren konstant hvidt.
, Efter ca. 30 sekunder slukker opladeindikatoren for at spare på
energien.
Optimering af det opladelige batteris levetid
Aad det genopladelige batteri helt to gange om året ved at lade motoren
køre, til den stopper. Genoplad herefter batteriet helt.
DANSK18

Klipning med ledning
1 Sluk for apparatet.
2 Sæt apparatet i stikkontakten, og vent et par sekunder, inden du
tænder for det.
Bemærk: Hvis batteriet er helt aadet, skal du vente et par minutter, før du
tænder for apparatet.
Sådan bruges apparatet
Du skal sikre dig, at håret er rent og tørt. Brug ikke apparatet i nyvasket,
vådt hår.
Klargøring til hårklipning
1 Red håret med en frisørkam i hårets vækstretning.
Klipning med påsat kam
1 Sæt kanten af kammen ind i drejehovedet.
Kontroller, at kammen låser korrekt på plads
Bemærk: Længdeindstillingen angives på den påsatte kam.
–
3
m
m
–
5
–
7
–
9
–
11
– 15
DANSK 19

2 Drej ringen til justering af længdeindstilling for at vælge den ønskede
indstilling for den påsatte kam.
, Pilen på apparatet angiver, hvilken indstilling du har valgt.
Tip: Brug forskellige indstillinger for at skabe naturlig og jævn overgang mellem
de forskellige hårlængder fra nakken til toppen af hovedet.
Drej ikke ringen til justering af længdeindstilling ud over den højeste
indstilling.
3 Drej hovedet til den stilling, der er mest behagelig for din arm, når du
klipper de forskellige områder.
Sådan bruges drejehovedet
- Fra udgangspositionen 0° (pegende fremad) kan drejehovedet drejes
45° eller 90° til højre eller venstre. Dette giver dig mulighed for at
tilpasse skærenhedens position til den del af hovedet, du klipper, hvilket
gør det meget nemmere at klippe dit eget hår.
- Indstil skærenheden til den ønskede stilling ved at dreje
drejehovedet (“klik”).
Bemærk: Justér altid skærenheden ved hjælp af drejehovedet. Prøv ikke at dreje
skærenheden eller kammen.
Bemærk: Drej aldrig drejehovedet mere end 90° til højre eller venstre.
- Drejehovedet giver mulighed for at holde og anvende apparatet som
en frisørkam.
4 Tænd apparatet ved tryk på on/off-knappen.
QC5570: Tryk kort på knappen.
QC5580: Tryk på knappen i mere end 2 sekunder.
5 Før hårklipperen gennem håret med langsomme bevægelser.
6 Fjern afklippede hår fra kammen regelmæssigt undervejs.
Har der samlet sig mange hår i kammen, tages den af og hårene pustes og/
eller rystes væk. Den valgte længdeindstilling ændrer sig ikke, når kammen
tages af.
– 5
– 7
– 9
– 11
– 15
–
3 m
m
–
5
–
7
DANSK20
Sidan laddas ...
Sidan laddas ...
Sidan laddas ...
Sidan laddas ...
Sidan laddas ...
Sidan laddas ...
Sidan laddas ...
Sidan laddas ...
Sidan laddas ...
Sidan laddas ...
Sidan laddas ...
Sidan laddas ...
Sidan laddas ...
Sidan laddas ...
Sidan laddas ...
Sidan laddas ...
Sidan laddas ...
Sidan laddas ...
Sidan laddas ...
Sidan laddas ...
Sidan laddas ...
Sidan laddas ...
Sidan laddas ...
Sidan laddas ...
Sidan laddas ...
Sidan laddas ...
Sidan laddas ...
Sidan laddas ...
Sidan laddas ...
Sidan laddas ...
Sidan laddas ...
Sidan laddas ...
Sidan laddas ...
Sidan laddas ...
Sidan laddas ...
Sidan laddas ...
Sidan laddas ...
Sidan laddas ...
Sidan laddas ...
Sidan laddas ...
Sidan laddas ...
Sidan laddas ...
Sidan laddas ...
Sidan laddas ...
Sidan laddas ...
Sidan laddas ...
Sidan laddas ...
Sidan laddas ...
Sidan laddas ...
Sidan laddas ...
Sidan laddas ...
Sidan laddas ...
Sidan laddas ...
Sidan laddas ...
Sidan laddas ...
Sidan laddas ...
Sidan laddas ...
Sidan laddas ...
Sidan laddas ...
Sidan laddas ...
Sidan laddas ...
Sidan laddas ...
Sidan laddas ...
Sidan laddas ...
Sidan laddas ...
Sidan laddas ...
Sidan laddas ...
Sidan laddas ...
Sidan laddas ...
Sidan laddas ...
Sidan laddas ...
Sidan laddas ...
Sidan laddas ...
Sidan laddas ...
Sidan laddas ...
Sidan laddas ...
Sidan laddas ...
Sidan laddas ...
Sidan laddas ...
Sidan laddas ...
Sidan laddas ...
Sidan laddas ...
Sidan laddas ...
Sidan laddas ...
Sidan laddas ...
Sidan laddas ...
Sidan laddas ...
Sidan laddas ...
Sidan laddas ...
Sidan laddas ...
Sidan laddas ...
Sidan laddas ...
Sidan laddas ...
Sidan laddas ...
Sidan laddas ...
Sidan laddas ...
Sidan laddas ...
Sidan laddas ...
Sidan laddas ...
Sidan laddas ...
Sidan laddas ...
Sidan laddas ...
Sidan laddas ...
Sidan laddas ...
Sidan laddas ...
Sidan laddas ...
Sidan laddas ...
Sidan laddas ...
Sidan laddas ...
Sidan laddas ...
Sidan laddas ...
Sidan laddas ...
Sidan laddas ...
Sidan laddas ...
Sidan laddas ...
Sidan laddas ...
Sidan laddas ...
Sidan laddas ...
Sidan laddas ...
Sidan laddas ...
Sidan laddas ...
Sidan laddas ...
Sidan laddas ...
Sidan laddas ...
Sidan laddas ...
Sidan laddas ...
Sidan laddas ...
Sidan laddas ...
Sidan laddas ...
Sidan laddas ...
-
 1
1
-
 2
2
-
 3
3
-
 4
4
-
 5
5
-
 6
6
-
 7
7
-
 8
8
-
 9
9
-
 10
10
-
 11
11
-
 12
12
-
 13
13
-
 14
14
-
 15
15
-
 16
16
-
 17
17
-
 18
18
-
 19
19
-
 20
20
-
 21
21
-
 22
22
-
 23
23
-
 24
24
-
 25
25
-
 26
26
-
 27
27
-
 28
28
-
 29
29
-
 30
30
-
 31
31
-
 32
32
-
 33
33
-
 34
34
-
 35
35
-
 36
36
-
 37
37
-
 38
38
-
 39
39
-
 40
40
-
 41
41
-
 42
42
-
 43
43
-
 44
44
-
 45
45
-
 46
46
-
 47
47
-
 48
48
-
 49
49
-
 50
50
-
 51
51
-
 52
52
-
 53
53
-
 54
54
-
 55
55
-
 56
56
-
 57
57
-
 58
58
-
 59
59
-
 60
60
-
 61
61
-
 62
62
-
 63
63
-
 64
64
-
 65
65
-
 66
66
-
 67
67
-
 68
68
-
 69
69
-
 70
70
-
 71
71
-
 72
72
-
 73
73
-
 74
74
-
 75
75
-
 76
76
-
 77
77
-
 78
78
-
 79
79
-
 80
80
-
 81
81
-
 82
82
-
 83
83
-
 84
84
-
 85
85
-
 86
86
-
 87
87
-
 88
88
-
 89
89
-
 90
90
-
 91
91
-
 92
92
-
 93
93
-
 94
94
-
 95
95
-
 96
96
-
 97
97
-
 98
98
-
 99
99
-
 100
100
-
 101
101
-
 102
102
-
 103
103
-
 104
104
-
 105
105
-
 106
106
-
 107
107
-
 108
108
-
 109
109
-
 110
110
-
 111
111
-
 112
112
-
 113
113
-
 114
114
-
 115
115
-
 116
116
-
 117
117
-
 118
118
-
 119
119
-
 120
120
-
 121
121
-
 122
122
-
 123
123
-
 124
124
-
 125
125
-
 126
126
-
 127
127
-
 128
128
-
 129
129
-
 130
130
-
 131
131
-
 132
132
-
 133
133
-
 134
134
-
 135
135
-
 136
136
-
 137
137
-
 138
138
-
 139
139
-
 140
140
-
 141
141
-
 142
142
-
 143
143
-
 144
144
-
 145
145
-
 146
146
-
 147
147
-
 148
148
-
 149
149
-
 150
150


Philips 5000 SERIE QC5580/32 Bruksanvisning
- Kategori
- Hårtrimmare
- Typ
- Bruksanvisning
på andra språk
- italiano: Philips 5000 SERIE QC5580/32 Manuale del proprietario
- español: Philips 5000 SERIE QC5580/32 El manual del propietario
- Deutsch: Philips 5000 SERIE QC5580/32 Bedienungsanleitung
- português: Philips 5000 SERIE QC5580/32 Manual do proprietário
- français: Philips 5000 SERIE QC5580/32 Le manuel du propriétaire
- Türkçe: Philips 5000 SERIE QC5580/32 El kitabı
- dansk: Philips 5000 SERIE QC5580/32 Brugervejledning
- Nederlands: Philips 5000 SERIE QC5580/32 de handleiding
Relaterade papper
-
Philips QC5570 DIY HAIR CLIPPER Användarmanual
-
Philips QC5560/15 Användarmanual
-
Philips QC5099/00 Användarmanual
-
Philips QC5170/02 Användarmanual
-
Philips QC5005/10 Användarmanual
-
-
-
-
Philips BRE635/00 Användarmanual
-
Philips BRE630/00 Användarmanual