
CMR 26/CMR 45
Installatörshandbok
SE
Installer manual
GB
Installateurhandbuch
DE
IHB 1147-2
031980


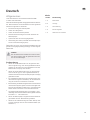
Allmänt
CMR 26/CMR 45 är en utbyteskylmodul för NIBE
F1126/1145/1226/1245.
Alla kompressorstorlekar är inte utbytbara mot varandra.
Vid byte från en mindre storlek till en större ska följande
beaktas:
႑
borrhålets/kollektorslingans dimensionering
႑
värmesystemets storlek
႑
varmvattenberedarens storlek
႑
husets och/eller värmepumpens avsäkring
႑
matningskabeln area
႑
rörens dimension (internt i värmepumpen samt klimat-
systemet)
Kontrollera även att utbyteskylmodulen har samma mat-
ningsspänning som originalkylmodulen.
OBS!
Elektrisk installation och ledningsdragning ska
utföras enligt gällande bestämmelser.
Tänk på
႑
Om den nya kylmodulen är av samma märke och
modell som originalkylmodulen behöver du inte upp-
datera programvaran eller ändra kylmodulen i display-
en.
႑
Om den nya kylmodulen inte är av samma märke
och/eller modell som originalkylmodulen kan även
cirkulationspumparna behöva ändras i displayen.
႑
Medlevererat USB-minne med program måste anslutas
för att hantera uppdateringen av programvaran.
႑
Se respektive värmepumps installationshandbok för
beskrivning och hantering av menyer och menysystem.
Dokumenten finns att ladda hem på www.nibe.se.
႑
För att motverka framtida driftstörningar är det viktigt
att rätt kylmodul är vald i meny 7.4 - "serienummer".
႑
Alla de inställningar du har gjort i värmepumpen finns
kvar efter uppdateringen.
႑
Om något går fel vid uppdateringen kan du alltid
återgå till den tidigare installerade programvaran (se
sida 5).
Innehåll
BeskrivningAntal
Kylmodul1st
O-ringar8st
Planpackning1st
Dräneringspip1st
USB-minne med programvara1st
3
Svenska
SE

Programvara
Om utbyteskyldelen inte är av samma storlek som origi-
nalkylmodulen behöver värmepumpens programvara
uppdateras.
Kontrollera aktuell kompressorstorlek
Gå in i meny 3.1 - "serviceinfo" för att kontrollera aktuell
storlek på kompressorn.
serviceinfo 3.1
.RPSUHVVRUVWRUOHN
Kontrollera aktuell cirkulationspump
Gå in i meny 3.1 - "serviceinfo" för att kontrollera aktuell
modell av cirkulationspump.
VHUYLFHLQIR
.¸OGE¦UDUSXPS
9¦UPHE¦UDUSXPS
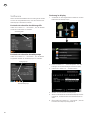
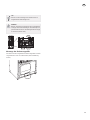
Ändra i displayen
1.
Anslut det medlevererade USB-minnet i värmepum-
pens displayenhet.
,120+86./,0$7
950(3803 ,1)2
9$509$77(1
86%
XSSGDWHUD SURJUDPYDUDQ
86%
ORJJQLQJ
KDQWHUD LQVW¦OOQLQJDU
VHULHQXPPHU
2.
Gå in i meny 7.1 - "uppdatera programvaran" och
följ anvisningarna i displayen.
3.
Gå in i meny 7.4 - "serienummer".
EHNU¦IWD §WHUVW¦OO
VHULHQXPPHU
4.
Välj aktuell cirkulationspump.
5.
När du bekräftat valet av ny cirkulationspump tillkom-
mer en stjärna efter serienumret.
6.
Kontrollera i meny 3.1 - "serviceinfo" att rätt cirkula-
tionspump är vald.
4
SE

Återställning av tidigare programvaruversion
Om uppdateringen skulle avbrytas innan den är klar (t.ex.
vid strömavbrott) kan programvaran återställas till tidigare
version. Därefter kan du återigen påbörja installationen
av den nya programvaran.
Minnet i värmepumpen innehåller alltid två versioner av
programvaran: den som används just nu samt föregående
installerad programvara.
För att växla mellan dessa versioner:
1.
Ställ strömställaren i läge ( ).
2.
Håll inne OK-knappen på displayenheten och ställ
samtidigt strömställaren i läge (
).
3.
Släpp OK-knappen när den gröna lampan tänds (tar
ca. 10 sekunder). Nu har den föregående programva-
ran blivit aktiverad.
5
SE

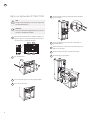
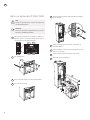
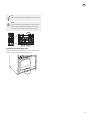
Byte av kylmodul F1126/1145
OBS!
Stäng av värmepumpen och vrid av strömmen
på säkerhetsbrytaren.
TÄNK PÅ!
Ta bort frontluckan enligt beskrivning i värme-
pumpens installatörshandbok.
Stäng avstängningsventilerna (QM32), (QM33) och
(QM34). Tappa ur kylmodulen enligt anvisningarna
i värmepumpens installatörshandbok.
1
40:3
4040
Dra av låsblecken.
2
L
EK
:3
Lossa röranslutningen vid rörkopplingen (WP4).
3
Lossa de två skruvarna.
4
LEK
Lossa kontakterna från grundkortet (AA2) med hjälp
av skruvmejsel.
5
LEK
Lossa kontakterna (A) och (B) från undersidan av
grundkortslådan.
6
Lossa kontakten (C) från elpatronskortet (AA1) med
hjälp av skruvmejsel.
7
Lossa kontakten (D) från skarvkortet (AA100).
8
Dra försiktigt ut kylmodulen.
9
L
EK
$
%
&
'
6
SE

TIPS!
Kylmodulen monteras i omvänd ordning.
OBS!
Vid återmonteringen ska medlevererade O-ringar
samt planpackning ersätta befintliga vid anslut-
ningarna till värmepumpen (se bild).
40
4040
Montering av dräneringspip
Montera den medlevererade dräneringspipen i det avsed-
da hålet på kylmodulen (se bild nedan).
LEK
7
SE

Byte av kylmodul F1226/1245
OBS!
Stäng av värmepumpen och vrid av strömmen
på säkerhetsbrytaren.
TÄNK PÅ!
Ta bort frontluckan enligt beskrivning i värme-
pumpens installatörshandbok.
Stäng avstängningsventilerna (QM32), (QM33) och
(QM34). Tappa ur kylmodulen enligt anvisningarna
i värmepumpens installatörshandbok.
1
40:3
4040
Dra av låsblecken.
2
L
EK
:3
Lossa röranslutningen vid rörkopplingen (WP4).
3
Lossa de två skruvarna.
4
LEK
Lossa kontakterna från grundkortet (AA2) med hjälp
av skruvmejsel.
5
L
EK
Lossa kontakterna (A) och (B) från undersidan av
grundkortslådan.
6
Lossa kontakten (C) från elpatronskortet (AA1) med
hjälp av skruvmejsel.
7
Lossa kontakten (D) från skarvkortet (AA100).
8
Dra försiktigt ut kylmodulen.
9
L
EK
$
%
&
'
8
SE

TIPS!
Kylmodulen monteras i omvänd ordning.
OBS!
Vid återmonteringen ska medlevererade O-ringar
samt planpackning ersätta befintliga vid anslut-
ningarna till värmepumpen (se bild).
40
4040
Montering av dräneringspip
Montera den medlevererade dräneringspipen i det avsed-
da hålet på kylmodulen (se bild nedan).
LEK
9
SE

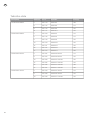
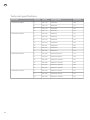
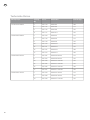
Tekniska data
Vikt (kg)KylmodulArt nrEffekt (w)Värmepump
108CMR 26-5067 1145F1126/F1226 3x400 V
112CMR 26-6067 1156
120CMR 26-8067 1168
130CMR 26-11067 11711
110CMR 45-5067 1545F1145/F1245 3x400 V
115CMR 45-6067 1186
125CMR 45-8067 1198
130CMR 45-10067 12010
135CMR 45-12067 12112
148CMR 45-15067 12215
156CMR 45-17067 12317
115CMR 45-6 3x230V067 1826F1145/F1245 3x230 V
125CMR 45-8 3x230V067 1838
130CMR 45-10 3x230V067 18410
135CMR 45-12 3x230V067 18512
148CMR 45-15 3x230V067 18615
156CMR 45-17 3x230V067 18717
110CMR 45-5 1x230V067 1545F1145/F1245 1x230 V
125CMR 45-8 1x230V067 1898
130CMR 45-12 1x230V067 19010
10
SE

General
CMR 26/CMR 45 is a replacement cooling module for
NIBE F1126/1145/1226/1245.
All compressor sizes are not interchangeable. When re-
placing from a smaller size to a larger size, observe the
following:
႑
the bore hole's/collector coil's dimensioning
႑
the size of the heating system
႑
size of the water heater
႑
the fuse rating of the house and /or heat pump
႑
area of the supply cable
႑
dimension of the pipes (inside the heat pump and
climate system)
Also check that the replacement cooling module has the
same supply voltage as the original cooling module.
NOTE
Electrical installation and wiring must be carried
out in accordance with the stipulations in force.
Remember
႑
If the new cooling module is the same make and
model as the original cooling module, you do not
need to update the software or change the cooling
module in the display.
႑
If the new cooling module is not the same make
and/or model as the original cooling module, the cir-
culation pumps may also need to be changed in the
display.
႑
The supplied USB memory with program must be
connected to manage the software update.
႑
See the relevant heat pump's installation manual for
descriptions and how to navigate menus and the
menu system. Documentation can be downloaded
from www.nibe.se.
႑
To prevent future malfunctions it is important that
the correct cooling module is selected in menu 7.4 -
"serial number".
႑
All the settings that you have made in the heat pump
remain after the update.
႑
If anything goes wrong during the update you can
always return to the previously installed software (see
page 13).
Contents
DescriptionQuantity
Cooling module1x
O-rings8x
Flat gasket1x
Drainage pipe1x
USB memory with software1x
11
English
GB

Software
If the replacement cooling section is not the same size as
the original cooling module, the heat pump software
needs updating.
Check the current compressor size
Enter menu 3.1 - "service info" to check current com-
pressor size.
service info 3.1
&RPSUHVVRU VL]H
Check the current circulation pump
Enter menu 3.1 - "service info" to check current circula-
tion pump model.
VHUYLFH LQIR
%ULQH SXPS
&LUFXODWLRQ SXPS
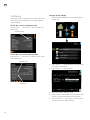
Change in the display
1.
Insert the supplied USB memory into the heat pump's
display unit.
,1'225 &/,0$7(
+($7 3803 ,1)2
+27 :$7(5
86%
XSGDWH ILUPZDUH
86%
ORJJLQJ
PDQDJH VHWWLQJV
VHULDO QXPEHU
2.
Enter menu 7.1 - "update firmware" and follow the
instructions in the display.
3.
Enter menu 7.4 - "serial number".
FRQILUP UHVHW
VHULDO QXPEHU
4.
Check the current circulation pump.
5.
Once you have confirmed the new circulation pump
selection a star appears after the serial number.
6.
Check in menu 3.1 - "service info" that the correct
circulation pump has been selected.
12
GB

Resetting previous software version
If the update is interrupted before it is complete (for ex-
ample power cut etc.) the software can be reset to the
previous version. You can then restart the installation of
the new software.
The memory in heat pump always contains two versions
of the software: one that is used at present and the pre-
viously installed software.
To shift between these versions:
1.
Set the switch to mode ( ).
2.
Keep the OK button held in on the display unit and
at the same time set the switch to (
).
3.
Release the OK button when the green lamp illumin-
ates (takes approx 10 seconds). The previous software
has now been activated.
13
GB

Replacing cooling module
F1126/1145
NOTE
Shut off the heat pump and turn off the current
on the safety breaker.
Caution
Remove the front door according to the descrip-
tion in the heat pump's installer's manual.
Close the shut-off valves (QM32), (QM33) and
(QM34). Drain the cooling module according to the
instructions in the heat pump's installer's manual.
1
40:3
4040
Pull off the lock catches.
2
L
E
K
:3
Disconnect the pipe connection at the pipe coupling
(WP4).
3
Remove the two screws.
4
LE
K
Remove the connections from the base card (AA2)
using a screwdriver.
5
LEK
Disconnect the connectors (A) and (B) from the un-
derside of the base card cabinet.
6
Disconnect the connector (C) from the immersion
heater circuit board (AA1) using a screwdriver.
7
Disconnect the connector (D) from the joint circuit
board (AA100).
8
Carefully pull out the cooling module.
9
L
EK
$
%
&
'
14
GB

TIP
The cooling module is installed in reverse order.
NOTE
At reinstallation, the supplied O-rings and flat
gasket must replace the existing ones at the
connections to the heat pump (see image).
40
4040
Installing the drainage pipe
Install the supplied drainage pipe in the intended hole
on the cooling module (see image below).
LEK
15
GB

Replacing cooling module
F1226/1245
NOTE
Shut off the heat pump and turn off the current
on the safety breaker.
Caution
Remove the front door according to the descrip-
tion in the heat pump's installer's manual.
Close the shut-off valves (QM32), (QM33) and
(QM34). Drain the cooling module according to the
instructions in the heat pump's installer's manual.
1
40:3
4040
Pull off the lock catches.
2
L
E
K
:3
Disconnect the pipe connection at the pipe coupling
(WP4).
3
Remove the two screws.
4
LE
K
Remove the connections from the base card (AA2)
using a screwdriver.
5
L
EK
Disconnect the connectors (A) and (B) from the un-
derside of the base card cabinet.
6
Disconnect the connector (C) from the immersion
heater circuit board (AA1) using a screwdriver.
7
Disconnect the connector (D) from the joint circuit
board (AA100).
8
Carefully pull out the cooling module.
9
L
EK
$
%
&
'
16
GB

TIP
The cooling module is installed in reverse order.
NOTE
At reinstallation, the supplied O-rings and flat
gasket must replace the existing ones at the
connections to the heat pump (see image).
40
4040
Installing the drainage pipe
Install the supplied drainage pipe in the intended hole
on the cooling module (see image below).
LEK
17
GB

Technical specifications
Weight (kg)Cooling modulePart No.Power (w)Heat pump
108CMR 26-5067 1145F1126/F1226 3x400 V
112CMR 26-6067 1156
120CMR 26-8067 1168
130CMR 26-11067 11711
110CMR 45-5067 1545F1145/F1245 3x400 V
115CMR 45-6067 1186
125CMR 45-8067 1198
130CMR 45-10067 12010
135CMR 45-12067 12112
148CMR 45-15067 12215
156CMR 45-17067 12317
115CMR 45-6 3x230V067 1826F1145/F1245 3x230 V
125CMR 45-8 3x230V067 1838
130CMR 45-10 3x230V067 18410
135CMR 45-12 3x230V067 18512
148CMR 45-15 3x230V067 18615
156CMR 45-17 3x230V067 18717
110CMR 45-5 1x230V067 1545F1145/F1245 1x230 V
125CMR 45-8 1x230V067 1898
130CMR 45-12 1x230V067 19010
18
GB

Allgemeines
CMR 26/CMR 45 ist ein Austauschartikel für NIBE
F1126/1145/1226/1245.
Nicht alle Verdichtergrößen sind gegeneinander austausch-
bar. Beim Austausch von einer kleineren zu einer größeren
Einheit ist Folgendes zu beachten:
႑
Dimensionierung der Wärmequelle
႑
Größe des Heizsystems
႑
Größe des Brauchwasserspeichers
႑
Elektrische Absicherung des Hauses und/oder der
Wärmepumpe
႑
Querschnitt des Stromversorgungskabels
႑
Abmessung der Rohre (innerhalb der Wärmepumpe
sowie im Klimatisierungssystem)
Überprüfen Sie auch, dass das Austauschkältemodul die
gleiche Versorgungsspannung benötigt, wie das Original-
kältemodul.
HINWEIS!
Bei der elektrischen Installation und beim Verle-
gen der Leitungen sind die geltenden Vorschrif-
ten zu berücksichtigen.
Zur Beachtung
႑
Wenn das neue Kältemodul von der gleichen Serie
und vom gleichen Typ wie das Originalkältemodul ist,
müssen Sie die Software nicht aktualisieren und das
Kältemodul im Display nicht ändern.
႑
Wenn das neue Kältemodul nicht von der gleichen
Serie und/oder Typ wie das Originalkältemodul ist,
müssen eventuell auch die Umwälzpumpen im Display
geändert werden.
႑
Der mitgelieferte USB-Stick muss angeschlossen wer-
den und das Programm enthalten, um die Aktualisie-
rung der Software vornehmen zu können.
႑
Beschreibung und Bedienungshinweise für die Menüs
und das Menüsystem gehen aus dem Montagehand-
buch für das jeweilige Produkt hervor. Die Dokumente
stehen unter www.nibe.se zum Download bereit.
႑
Um spätere Betriebsstörungen zu vermeiden, muss
unbedingt das korrekte Kältemodul eingestellt werden
im Menü 7.4 - "Seriennummer".
႑
Alle in der Wärmepumpe vorgenommenen Einstellun-
gen bleiben bei der Aktualisierung erhalten.
႑
Wenn bei der Aktualisierung ein Fehler auftritt, lässt
sich die vorherige Version stets wiederherstellen (sie-
heSeite 21).
Inhalt
BeschreibungAnzahl
Kältemodul1 St.
O-Ringe8 St.
Flachdichtung1 St.
Entleerungstülle1 St.
USB-Stick mit Software1 St.
19
Deutsch
DE

Software
Wenn das Austauschkältemodul nicht die gleiche Größe
hat wie das Originalkältemodul, muss die Software der
Wärmepumpe aktualisiert werden.
Ermitteln der aktuellen Verdichtergröße
Gehen Sie in Menü 3.1 - "Serviceinfo", um die aktuelle
Größe des Verdichters zu ermitteln.
Serviceinfo 3.1
9HUGLFKWHUJU¸¡H
Ermitteln der aktuellen Umwälzpumpe
Gehen Sie in Menü 3.1 - "Serviceinfo", um das aktuell
eingestellte Modell der Umwälzpumpe zu ermitteln.
6HUYLFHLQIR
:¦UPHTXHOOHQSXPSH
+HL]NUHLVSXPSH
Änderung im Display
1.
Verbinden Sie den mitgelieferten USB-Stick mit dem
Bedienfeld der Wärmpumpe.
5$80./,0$
:50(3803( ,1)2
%5$8&+:$66(5
86%
6RIWZDUHXSGDWH
86%
3URWRNROOLHUXQJ
(LQVWHOOXQJHQ YHUZDOWHQ
6HULHQQXPPHU
2.
Rufen Sie Menü 7.1 - "Softwareupdate" auf und
befolgen Sie die Anweisungen auf dem Display.
3.
Gehen Sie in Menü 7.4 - "Seriennummer".
EHVW¦WLJHQ ]XU¾FNVHW]HQ
6HULHQQXPPHU
4.
Wählen Sie die aktuelle Umwälzpumpe.
5.
Wenn Sie die Wahl der neuen Umwälzpumpe bestä-
tigt haben, erscheint hinter der Seriennummer ein
Stern.
6.
Überprüfen Sie im Menü 3.1 -"Serviceinfo", dass die
korrekte Umwälzpumpe eingestellt ist.
20
DE
Sidan laddas...
Sidan laddas...
Sidan laddas...
Sidan laddas...
Sidan laddas...
Sidan laddas...
Sidan laddas...
Sidan laddas...
-
 1
1
-
 2
2
-
 3
3
-
 4
4
-
 5
5
-
 6
6
-
 7
7
-
 8
8
-
 9
9
-
 10
10
-
 11
11
-
 12
12
-
 13
13
-
 14
14
-
 15
15
-
 16
16
-
 17
17
-
 18
18
-
 19
19
-
 20
20
-
 21
21
-
 22
22
-
 23
23
-
 24
24
-
 25
25
-
 26
26
-
 27
27
-
 28
28


Nibe CMR26 Installer Manual
- Typ
- Installer Manual
- Denna manual är också lämplig för
på andra språk
- Deutsch: Nibe CMR26
- English: Nibe CMR26
Relaterade papper
-
Nibe EL-150 Water Heater EL Användarmanual
-
Nibe VVM 225 Installer Manual
-
-
-
Nibe EME 20 Användarmanual
-
-
-
-
